
Word for Microsoft 365 Word for Microsoft 365 for Mac Word 2021 Word 2021 for Mac Word 2019 Word 2019 for Mac Word 2016 Word 2016 for Mac Word 2013 Word 2010 Word for Mac 2011 More…Less
To create a form in Word that others can fill out, start with a template or document and add content controls. Content controls include things like check boxes, text boxes, date pickers, and drop-down lists. If you’re familiar with databases, these content controls can even be linked to data.
Show the Developer tab
If the developer tab isn’t displayed in the ribbon, see Show the Developer tab.
Open a template or a blank document on which to base the form
To save time, start with a form template or start from scratch with a blank template.
-
Go to File > New.
-
In Search online templates, type Forms or the type of form you want and press ENTER.
-
Choose a form template, and then select Create or Download.
-
Go to File > New.
-
Select Blank document.
Add content to the form
Go to Developer, and then choose the controls that you want to add to the document or form. To remove a content control, select the control and press Delete. You can set properties on controls once inserted.
Note: You can print a form that was created using content controls, but the boxes around the content controls will not print.
In a rich text content control, users can format text as bold or italic, and they can type multiple paragraphs. If you want to limit what users add, insert the plain text content control.
-
Click or tap where you want to insert the control.
-
Select Developer > Rich Text Content Control
 or Plain Text Content Control .
 or Plain Text Content Control
  .
.To set specific properties on the control, see Set or change properties for content controls.
A picture control is often used for templates, but you can also add a picture control to a form.
-
Click or tap where you want to insert the control.
-
Select Developer > Picture Content Control
.
 .
.To set specific properties on the control, see Set or change properties for content controls.
Use building block controls when you want people to choose a specific block of text. For example, building block controls are helpful when you need to add different boilerplate text depending on the contract’s specific requirements. You can create rich text content controls for each version of the boilerplate text, and then you can use a building block control as the container for the rich text content controls.
-
Click or tap where you want to insert the control.
-
Go to DeveloperBuilding Block Gallery Content Control
(or Building Block Content Control). -
Select Developer and content controls for the building block.
 (or Building Block Content Control).
-
Click or tap where you want to insert the control.
To set specific properties on the control, see Set or change properties for content controls.
In a combo box, users can select from a list of choices that you provide or they can type in their own information. In a drop-down list, users can only select from the list of choices.
-
Go to Developer > Combo Box Content Control
or Drop-Down List Content Control . -
Select the content control, and then select Properties.
-
To create a list of choices, select Add under Drop-Down List Properties.
-
Type a choice in Display Name, such as Yes, No, or Maybe.
Repeat this step until all of the choices are in the drop-down list.
-
Fill in any other properties that you want.
Note: If you select the Contents cannot be edited check box, users won’t be able to click a choice.
 or Drop-Down List Content Control
  .
.-
Click or tap where you want to insert the date picker control.
-
Select Developer > Date Picker Content Control
.
 .
.To set specific properties on the control, see Set or change properties for content controls.
-
Click or tap where you want to insert the check box control.
-
Select Developer > Check Box Content Control
.
 .
.To set specific properties on the control, see Set or change properties for content controls.
Legacy form controls are for compatibility with older versions of Word and consist of legacy form and Active X controls.
-
Click or tap where you want to insert a legacy control.
-
Go to Developer > Legacy Forms
drop-down. -
Select the Legacy Form control or Active X Control that you want to include.
 drop-down.
Set or change properties for content controls
Each content control has properties that you can set or change. For example, the Date Picker control offers options for the format you want to use to display the date.
-
Select the content control that you want to change.
-
Go to Developer > Properties.
-
Change the properties that you want.

Add protection to a form
If you want to limit how much others can edit or format a form, use the Restrict Editing command:
-
Open the form that you want to lock or protect.
-
Select Developer > Restrict Editing.
-
After selecting restrictions, select Yes, Start Enforcing Protection.


Advanced Tip:
If you want to protect only parts of the document, separate the document into sections and only protect the sections you want.
To do this, choose Select Sections in the Restrict Editing panel. For more info on sections, see Insert a section break.

Show the Developer tab
If the developer tab isn’t displayed in the ribbon, see Show the Developer tab.
Open a template or use a blank document
To create a form in Word that others can fill out, start with a template or document and add content controls. Content controls include things like check boxes, text boxes, and drop-down lists. If you’re familiar with databases, these content controls can even be linked to data.
-
Go to File > New from Template.
-
In Search, type form.
-
Double-click the template you want to use.
-
Select File > Save As, and pick a location to save the form.
-
In Save As, type a file name and then select Save.

-
Go to File > New Document.
-
Go to File > Save As.
-
In Save As, type a file name and then select Save.

Add content to the form
Go to Developer, and then choose the controls that you want to add to the document or form. To remove a content control, select the control and press Delete. You can set Options on controls once inserted. From Options, you can add entry and exit macros to run when users interact with the controls, as well as list items for combo boxes, .
-
In the document, click or tap where you want to add a content control.
-
On Developer, select Text Box, Check Box, or Combo Box.
-
To set specific properties for the control, select Options, and set .
-
Repeat steps 1 through 3 for each control that you want to add.

Options let you set common settings, as well as control specific settings. Select a control and then select Options to set up or make changes.
-
Set common properties.
-
Select Macro to Run on lets you choose a recorded or custom macro to run on Entry or Exit from the field.
-
Bookmark Set a unique name or bookmark for each control.
-
Calculate on exit This forces Word to run or refresh any calculations, such as total price when the user exits the field.
-
Add Help Text Give hints or instructions for each field.
-
OK Saves settings and exits the panel.
-
Cancel Forgets changes and exits the panel.
-
-
Set specific properties for a Text box
-
Type Select form Regular text, Number, Date, Current Date, Current Time, or Calculation.
-
Default text sets optional instructional text that’s displayed in the text box before the user types in the field. Set Text box enabled to allow the user to enter text into the field.
-
Maximum length sets the length of text that a user can enter. The default is Unlimited.
-
Text format can set whether text automatically formats to Uppercase, Lowercase, First capital, or Title case.
-
Text box enabled Lets the user enter text into a field. If there is default text, user text replaces it.
-
-
Set specific properties for a Check box.
-
Default Value Choose between Not checked or checked as default.
-
Checkbox size Set a size Exactly or Auto to change size as needed.
-
Check box enabled Lets the user check or clear the text box.
-
-
Set specific properties for a Combo box
-
Drop-down item Type in strings for the list box items. Press + or Enter to add an item to the list.
-
Items in drop-down list Shows your current list. Select an item and use the up or down arrows to change the order, Press — to remove a selected item.
-
Drop-down enabled Lets the user open the combo box and make selections.
-
-
Go to Developer > Protect Form.
Note: To unprotect the form and continue editing, select Protect Form again.
-
Save and close the form.

If you want, you can test the form before you distribute it.
-
Protect the form.
-
Reopen the form, fill it out as the user would, and then save a copy.
Show the Developer tab
-
On the right side of the ribbon, select
, and then select Ribbon Preferences. -
Under Customize, select Developer .
 , and then select Ribbon Preferences.
Open a template or a document on which to base the form
You can start with a blank document and create your own form. Or, to save time, you can start with a form template.
-
Go to File > New from Template.
-
In the left pane, expand Online Templates, and then select Forms.
-
Double-click the form template that you want to use.
Add content controls to the form
-
In the document, click where you want to add the control.
-
On the Developer tab, under Form Controls, select Text Box, Check Box, or Combo Box.
-
To set specific properties for the control, select Options, and then configure the properties that you want.
Note: To create a list of drop-down items in a combo box, select the combo box placeholder, click Options, and then add the items that you want to appear in the drop-down list.
-
Repeat steps 1 through 3 for each control that you want to add.
Add instructional text (optional)
Instructional text (for example, «Type First Name») in a text box can make your form easier to use. By default, no text appears in a text box, but you can add it.
-
Select the text box control that you want to add instructional text to.
-
On the Developer tab, under Form Controls, select Options.
-
In Default Text, type the instructional text.
-
Make sure that Fill-in enabled is selected, and then select OK.
Protect the form
-
On the Developer tab, under Form Controls, select Protect Form.
Note: To unprotect the form and continue editing, click Protect Form again.
-
Save and close the form.
Test the form (optional)
If you want, you can test the form before you distribute it.
-
Protect the form.
-
Reopen the form, fill it out as the user would, and then save a copy.
Creating fillable forms isn’t available in Word for the web.
You can create the form with the desktop version of Word with the instructions in Create a fillable form.
When you save the document and reopen it in Word for the web, you’ll see the changes you made.
Need more help?
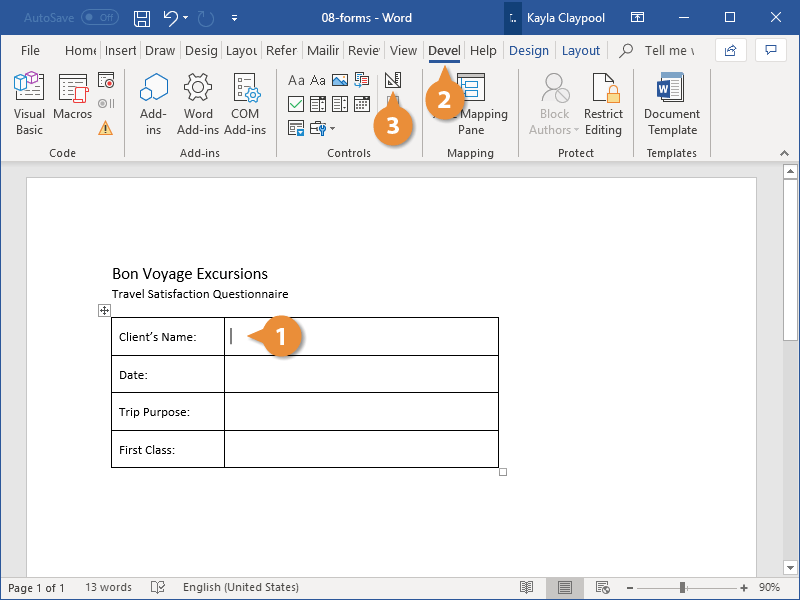
You can use Word to create interactive digital forms that other people can fill out on their computers before printing or sending them back to you. It takes a little preparation but keeps you from having to decipher messy handwriting! Some of the tools you will use when creating a form include:
- Templates: Forms are normally saved as templates so that they can be used again and again.
- Content controls: The areas where users input information in a form.
- Tables: Tables are often used in forms to align text and form fields, and to create borders and boxes.
- Protection: Users can complete the form fields without being able to change the form’s text and/or design.
Show the Developer Tab
Before you can create a form, you’ll need to turn on the Developer tab to get access to the advanced tools.
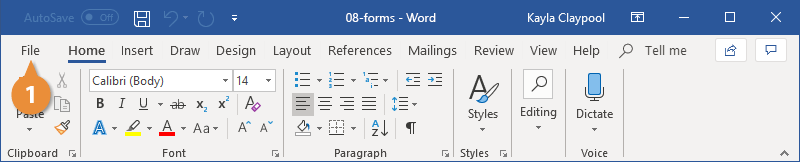
- Click the File tab.

- Select Options.

The Word Options window opens.
- Click the Customize Ribbon tab on the left.
The column on the right controls which ribbon tabs are enabled.
- Check the Developer check box.
- Click OK.
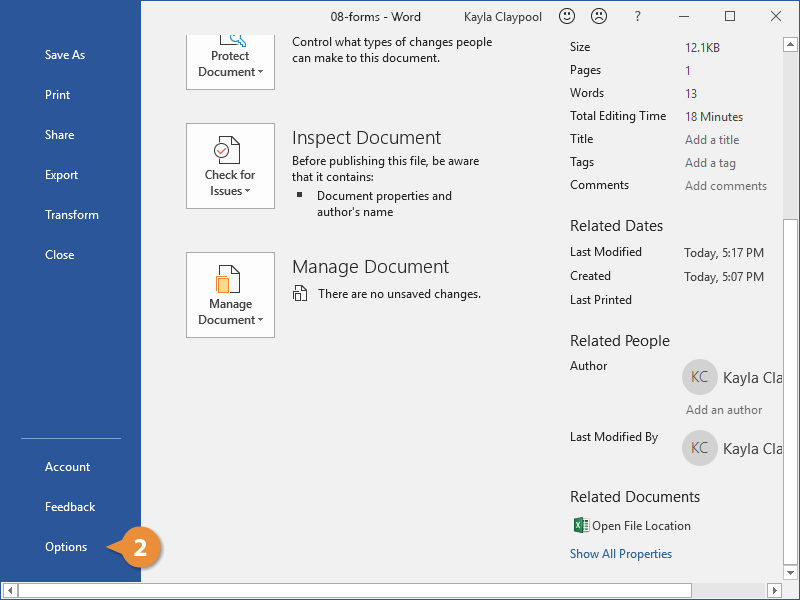
The Developer tab now appears on the ribbon. In addition to advanced tools for macro recording, add-ins, and document protection, we now have access to form controls.
Create a Form
Once you’ve enabled the Developer tab, and created the layout and structure of the form, you can start adding form fields to your document with Content Controls.
- Place the text cursor where you want to insert the form field.
- Click the Developer tab on the ribbon.
The Controls group contains the different kinds of content controls you can add to a form, as well as the toggle button for Design Mode.
- Click the Design Mode button in the controls group.
While Design Mode is active, controls you insert won’t be active, so clicking a check box to move it around won’t also check it. You can also customize placeholder text for some controls.
- Click a Content Control buttons to insert the selected type of control.
The content control is inserted.
Select a form field and click the Properties button on the ribbon to edit a control’s options. Depending on the type of control you’ve inserted, you can change its appearance, set up the options in a list, or lock the control once edited.
- When you’re done, click the Design Mode button again to exit Design Mode.
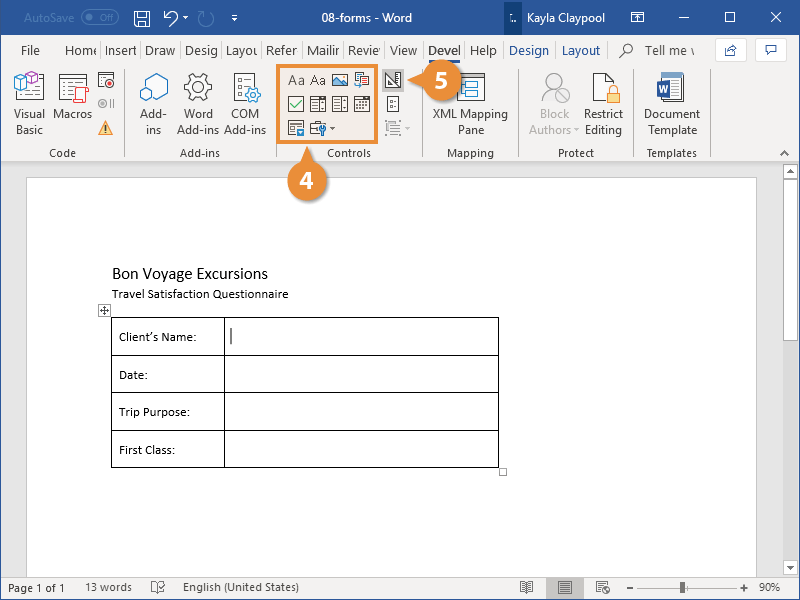
You leave Design Mode, and the content controls that you’ve inserted can now be used.
Types of Form Controls
There are many different types of form controls you can add to a form that will allow people to add different types of responses.
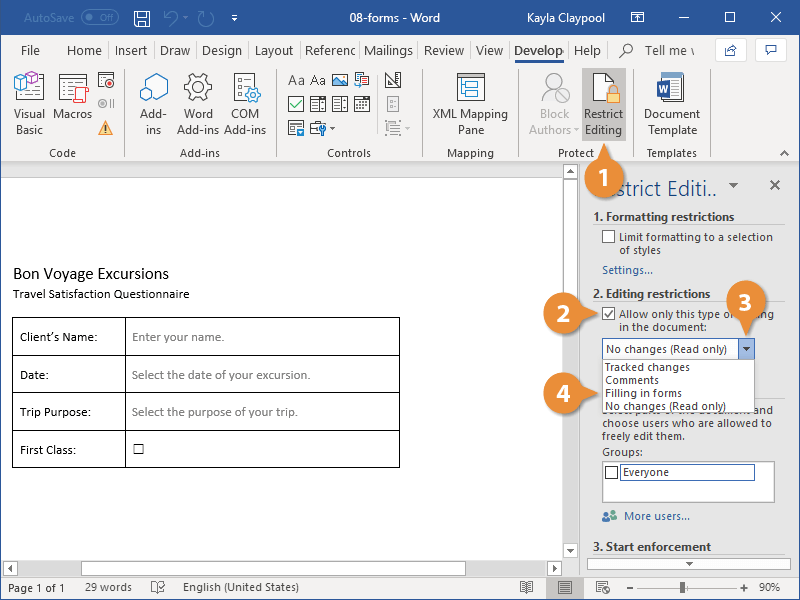
Finalize a Form
When you’re ready to distribute a form so others can fill it out, you can restrict the form so that content controls cannot be removed or changed by those filling it out.
- Click the Restrict Editing button on the Developer tab.
The Restrict Editing pane appears on the right.
- Check the Editing restrictions check box.
- Click the Editing restriction list arrow.
- Select Filling in forms.
When this option is enabled, the only change that anyone else can make to this document is the filling in of form fields. They won’t be able to move, delete, or edit the fields themselves until protection is turned off.
- Click the Yes, Start Enforcing Protection button.
A password is not required to start enforcing protection, but you can add one if you’d like to prevent just anyone from turning this protection off.
- Enter a password (optional), then click OK.
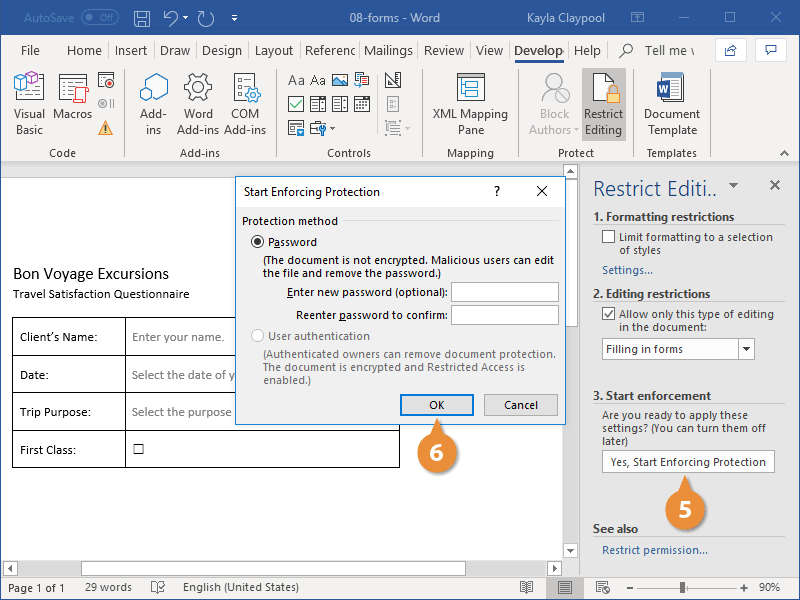
The document is now restricted, and anyone you send it to will only be able to fill in the forms.

FREE Quick Reference
Click to Download
Free to distribute with our compliments; we hope you will consider our paid training.
If you use forms at work, you’ll love the convenience of interactive or fillable forms in Microsoft Word. Forms that you can fill out make gathering information easy.


With a fillable form, all you’ve got to do is create a form in Word. Then you can use it over and over again. There’s nothing to print, so interactive forms are good for both your budget and the environment.
If you want a fillable form that also looks good, then begin with a template in Word. Form templates for Microsoft Word are available in Envato Elements and GraphicRiver.
In this tutorial, you’ll learn how to create a fillable form in Word, so you can reap all the benefits of an interactive form.
Find Great Form Templates on Elements
Fillable forms in Word have a variety of uses. Human resources use forms to capture employee and consultant information. Organizations use forms to register members, students, or clients. You also use forms to take orders for your products and services. Those are only a few examples of how useful fillable forms are.
Ideally, you want your Microsoft Word forms to be consistent with your branding. Well-designed forms reflect your credibility and professionalism. That’s why you want to avoid generic-looking forms. Want to know how to make a fillable form in Word that’s aligned with your visual brand?


The easiest way is by using templates for Word with pre-built tables or forms. One awesome source for Word templates is Envato Elements. Elements has an irresistible offer: for one low monthly fee, you get unlimited downloads of the millions of creative assets in its library. These include:
- Word templates
- fonts
- graphics
- photos
- and more
Whatever you need to make your forms look as good as possible, you can find in Elements.
If you need to create only one form, then a better source for Word templates is GraphicRiver. It’s got the same massive library of creative assets but on a pay-per-use basis. For the one-off project in Word, GraphicRiver is a terrific and budget-friendly option.
How to Create Fillable Forms in Word
You may be wondering, «How do I make a fillable form in Word?» Let me take you step-by-step through how to create a fillable form in Word.
Note: In the following tutorial, I’m using Microsoft Word for Mac version 16.48. If you’re using a different version, then the steps and interface may be different. But these steps should still be helpful for you.
1. Show the Developer Tab
As a first step, make sure that the Developer tab is showing up for you. This may be hidden by default. If you don’t see the Developer tab, follow these steps:
Go to Word > Preferences.


The Word Preferences menu opens. Click on the Ribbon & Toolbar button.


The Ribbon & Toolbar menu pops up. Under Main Tabs, scroll down and check Developer. Click Save.


The Developer tab should now be visible.


2. Determine the Layout and Structure of the Form
The next step is to determine the layout and structure of the fillable form. This will depend on what information you want to capture. You may want to sketch this on a sheet of paper first.
When you know what the form will look like, create a table in Word. By creating your form as a table in Word, it’ll be easier for you to keep things aligned and organized. The cells of the table are the form fields. Keep this in mind as you create your interactive form. This tutorial shows you the steps for how to make a table in Word:
Another option is to use a Word template with a pre-built table as a form. This way, the form has already been professionally designed. All you’ve got to do is to customize the form in Word according to your needs. Remember that the form template must have been built as a table so that you can make the form interactive in Word.
In the steps that follow, I’m going to create a form from scratch by first creating a table in Word:


Now, it’s time to make this a fillable form in Word.
3. Add Form Fields With Content Controls
You create a fillable form in Word by adding form fields. There are different types of form fields with content controls, depending on the types of responses you’re looking for.
Under the Developer tab, you’ll see buttons for creating a Text Box, Check Box, and Combo Box (or drop-down form field).


Let me show you how to create each type of form field:
How to Add a Word Fillable Form Text Box
Place the cursor where you would like to create a text field. Click on the Developer tab, then the Text Box button.


A text box is created. To change the text box settings, click on Options. The Text Form Field Options menu opens.


Here, choose various settings. For example, you’ve got several Text Types to choose from:
- Regular Text
- Number
- Date
- Current Date
- Current Time
- Calculation
Add a Default Text for the form field to guide respondents in filling out the form. You can also specify the Maximum Length and Text or Number Format.


When you’re happy with the settings, click OK. Repeat for each text box you want to create.


How to Add a Check Box to a Fillable Form in Word
Next, let’s make check boxes. First type the text for the check box items. Then, place your cursor in front of the first item. Go to Developer > Check Box.


A check box appears where your cursor was. Again, change the check box settings by clicking on the Options button.


The Check Box Form Field Options menu opens. Here you can determine whether the Default Value for the check box is Not Checked or Checked. Specify the Check Box Size and other options. When you’re done setting up the check box options, click OK.
Repeat these steps for the other check boxes.


How to Create a Drop-down Field in a Fillable Form in Word
Finally, let’s add a drop-down field in our form. Place the cursor where you want the drop-down menu to be, then go to Developer > Combo Box.


To add the drop-down menu items, click on the Options button. The Drop-Down Form Field Options menu opens.


Type a drop-down item, then click the + sign.


Repeat for each drop-down item you want to include in your fillable form. When you’re done, click OK.


Only the first drop-down item will appear. You’ll see the rest when you test the form.
4. Finalize the Form
Before using the fillable form in Word, it’s a good idea to first test it. To do this, click the Protect Form button on the Developer ribbon.


Now that the form is protected, fill the form fields like your respondents would. You’ll notice that the drop-down menu items appear when you click on the field or the arrow beside it.


When you’re happy with how the fillable form works, finalize the document by formatting the page. Click Protect Form again to un-protect it, so you can edit the document. Now’s the time to change fonts, colors, add logos, and format the form as you wish.
This is what my final fillable form looks like:


You may also decide to remove the shading for each form field. To do so, go to Developer > Shading.


I’m going to keep the Shading on, to make it clear to my respondents where they’re supposed to type in their answers. That’s because I deleted the borders of my table to give my form a cleaner appearance. If you keep the table borders, then it makes sense to switch off the form field Shading.
5. Use and Distribute Fillable Forms in Word
Once the fillable form in Word is completed, share it with your users or respondents. Do this by sharing the fillable form as an email attachment.
First, make sure that the form is protected. This ensures that other users won’t be able to edit the form when you share it with them.
Next, click on Share > Share a Copy.


In the menu that opens, click Email as Attachment.


This launches your default email application with the fillable form attached.


3 Top Form Templates for Word (Unlimited Downloads from Elements)
If you want a form with an impressive design, it’s best to start with a form template for Word. Templates with built-in forms are designed by professional graphic designers. This means the biggest—and hardest—design decisions have already been made for you. By customizing the colors and fonts and adding your logo, you can make the template truly your own.
Below are a few form templates for Word that look great:
1. Clean Business Registration Form Template


The Clean Business Registration Form template for Word allows you to gather basic personal information and contact details. It’s useful for registering employees, clients, members, vendors, and more. This form template comes in A4 size. You’ve got the option of customizing it with your branding colors. The template comes in Microsoft Word files, as well as files for InDesign, Adobe Illustrator, and Photoshop.
2. Order Form


Receive orders for your products or services with this Order Form for Word. This A4-sized template uses paragraph styles, making it easy to edit in Microsoft Word. It also comes in Adobe InDesign files, if you’re more comfortable editing in that application. A file guide is included to help you customize this template.
3. Client Questionnaire


Impress your clients with this Client Questionnaire template that looks anything but generic. Editable in both Microsoft Word and Adobe InDesign, this form template comes in A4 size. A 34-page guide walks you through how to edit and use the template files.
More of the Best Word Templates for Your Business or Organization
Now you know how to create a fillable Word document. But aside from fillable forms, your business or organization needs other types of documents. Using templates for MS Word helps you create professional-looking documents quickly. Premium Word templates are designed to be easy to customize, so you end up with materials that are coherent with your brand.
Here are more Word templates you can customize to easily create impressive documents for your business or organization:
Learn More About Using Microsoft Word for Your Business and Personal Needs
Whether for personal or business use, MS Word lets you create various kinds of documents. But with power comes complexity, so it can take time to learn how to use its robust features.
The best place to start is with our ultimate guide, Learn How to Use Microsoft Word (Beginner Tutorial Guide). It takes you from the basics of opening and creating Word files, to more advanced skills like comparing and merging two Word documents.
These Word tutorials will also help:
Enhance Your Workflow With Fillable Forms in Word
You’ve seen how convenient it is to use an interactive, fillable form. And now, you know how to create your own fillable form in Word.
Take it up a notch by starting with a Word template, such as those from Elements or GraphicRiver. These professionally-designed templates for Word are sure to impress your clients, employees, or members.
For unlimited downloads of Word templates, take your pick of the vast options in Envato Elements. For one small monthly subscription, you get unlimited downloads of anything you want in its massive library. These include photos, fonts, graphics, as well as sound effects, music, and stock video. If you create many marketing and communication materials, Elements gives you massive value.
For one-off projects, GraphicRiver is another massive library of Word templates and other creative elements. But with GraphicRiver, you pay only for each single use of each item. It’s an affordable way of getting the same professional results.
Microsoft Word is the one of the important apps most of us use on daily basis for creating documents. However, do you know that it is easy to create editable forms in Microsoft Word? You can use the forms for various purposes like applications or information collection purposes. In this article, we will explain how to create fillable forms in Microsoft Word with Microsoft 365 version.
Usage of Word Forms
There are numerous ways you can make use of the forms in Word. The best example includes an application form that you receive in emails to fill and send back. In this case, the form controls are applied to control what the receiver can edit or select in the form. It is also important the user should not delete the content of the fillable form or change the formatting.
On other hand, there are pre-printed forms like the applications you can see in banks. These forms are first created in Word and pre-printed with necessary details. Users can fill other personal details manually and submit for processing. It is just matter of few minutes to reprint the form when required. It is also easy to modify some fields in the form to create a variation before printing.
Creating Forms in Microsoft Word
There are two straightforward ways to create a form in Word.
- Download the form template from Office library and modify the content as per your need.
- Create a custom form from scratch.
1. Creating Form from Template Library
This is the easy option to save your time. However, it may not always work as the pre-defined templates may not match your requirements.
- Open Word app and when you are in the backstage view, you will see default templates next to “Blank document” template.
- Click “More templates” link to explore all free templates available for you to download from Microsoft.
- Use the search box to enter the keywords like form or volunteer form to filter the relevant templates.
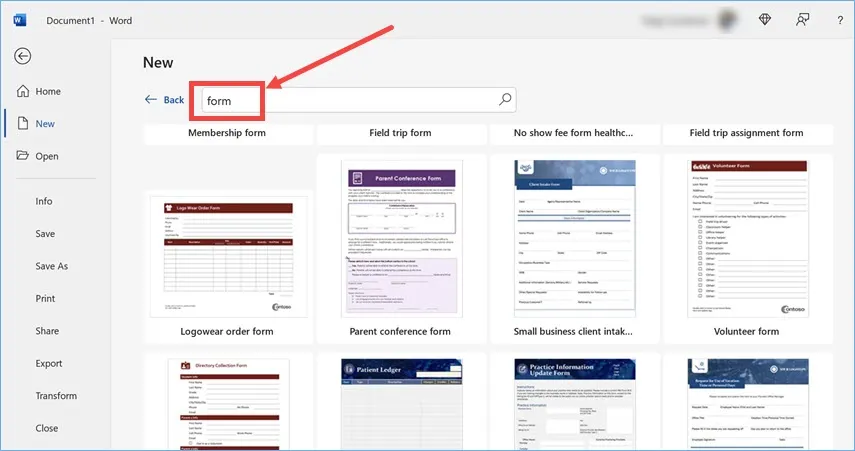
- When you find the template, click on it and then click “Create” button to start downloading the template.

- After downloading the template will be applied in your document. You can start modifying the content and print after finishing the work.

This method has lot of problems that most of the templates do not actually use the form controls. For example, all the checkboxes you see in the above “Volunteer Form” are simply square symbols. This means you cannot check or uncheck the items Word. The primary usage in this case will be to print out the form physically and the users need to manually fill out the details like the bank applications.
2. Creating Editable Forms in Word from Scratch
This is the correct approach when you want to have an editable form in Word. However, you will not see any form elements like checkbox or list in the default Word menu. you have to enable “Developer” menu to make them visible. When you are in Word app, go to “Files > Options”. Navigate to “Customize Ribbon” section and enable “Developer” option under “Main Tabs”. Now you will see a “Developer” menu in the ribbon showing form control icons.

The “Design Mode” will show additional instructional text which you can use if needed. Otherwise, you can simply click on the required form elements and start creating your form. After adding an element, you can click on the “Properties” to set needed controls. For example, after adding a list or combo box, you can setup the options in the properties section. You can also lock the filed, apply colors and protect it from deletion in the properties section.
Form Controls
Here are the form controls you can use with Word:
- Text controls – there are two text controls available – rich text and plain text. While both controls allow you to add text boxes, you can format the text like bold and italic with rich text option.
- Picture control – though there are not much use of pictures in the form, you can insert your logo and lock the item from deletion.
- Building block gallery content control – you can use this control to insert any building blocks from Quick Parts and other gallery of blocks.
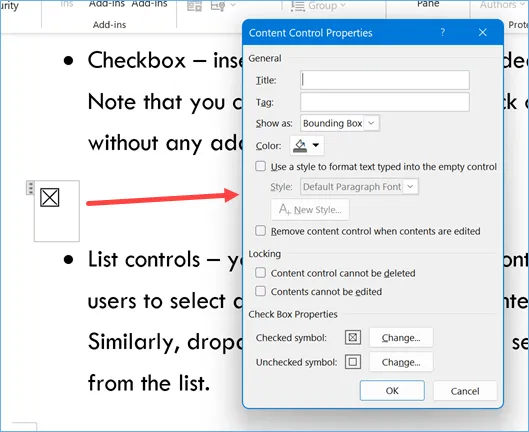
- Checkbox – insert a checkbox where needed on your form. Note that you can click on the box to check or uncheck without any additional formatting.
- List controls – you can insert combo box control allowing users to select an option from the list or enter own value. Similarly, dropdown list will force users to select a value from the list.

- Date picker – insert a date picker for selecting a date.
- Repeating control – clicking on this icon will add a + icon to the selected control. You can click the + icon to duplicate the control easily.
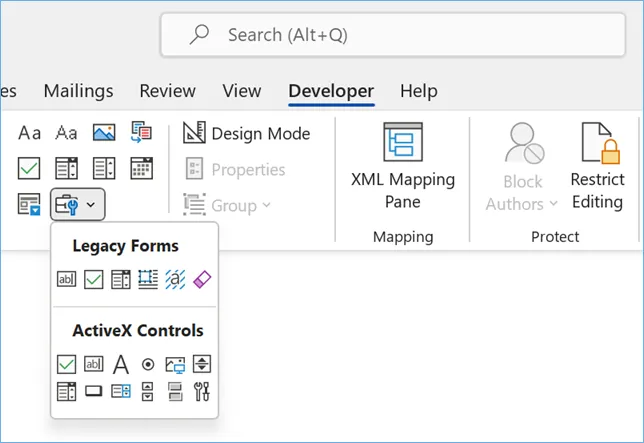
- Legacy tools – it contains legacy form controls and ActiveX controls. These controls are useful to insert radio button or apply shading on form elements.
Note that the legacy and other controls will work differently on the form. For example, you can insert a “Check box content control” and enable the checked option by simply clicking on the icon. However, if you insert the “Check Box Form Field” from legacy tools, you need to double click on the icon and select “Checked” as your default value.
Let Us Create a Simple Form
To make the appearance of the form looks beautiful, first go to “Insert” menu and add a text box. You can also choose one of the built-in text box templates. This will help you to easily add background to your form and move all form fields easily.

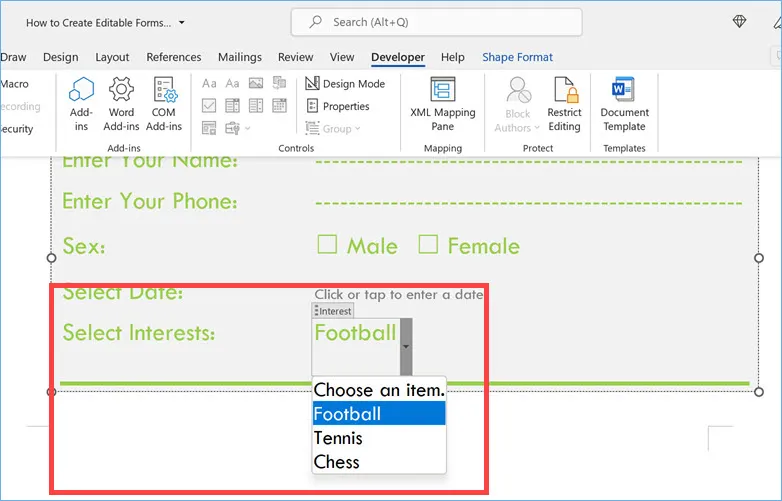
After adding a text box, go to developer menu and start adding your fields inside the text box. Let us add the name and phone number which are plain text controls. Then a “Sex” field with Male and Female as two checkboxes both unchecked. A date picker for selecting the date and finally a combo box for selecting multiple interests. The form will look like below on your document:
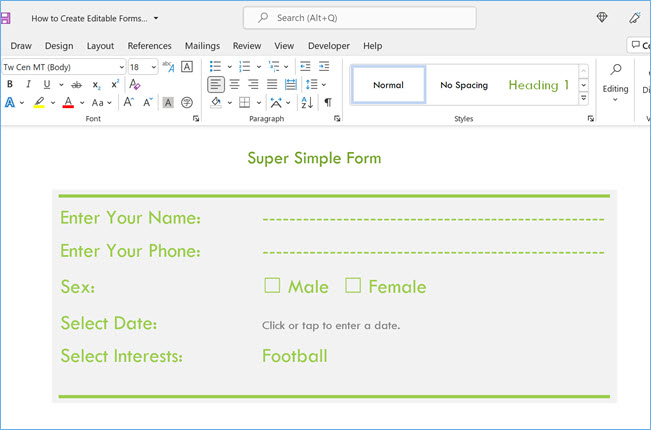
As you can see, we have applied background and some text formatting to the text box to make the form looks appealing. When clicking on the interests field, it will show options for users to select as shown below. Since it is a combo field, users can also enter values on their own.
Protecting Your Form in Word
It is necessary to protect your form or fields so that users will not edit or modify the content. In addition, the formatting also needs to be protected to keep the form readable. Word offers multiple options to protect your form. As you can see in the properties screenshot above, you can choose the following options for each field.
- Content control cannot be deleted
- Contents cannot be edited
To protect the entire form, click on the “Restrict Editing” option. You have the possibilities to set two types of restrictions:
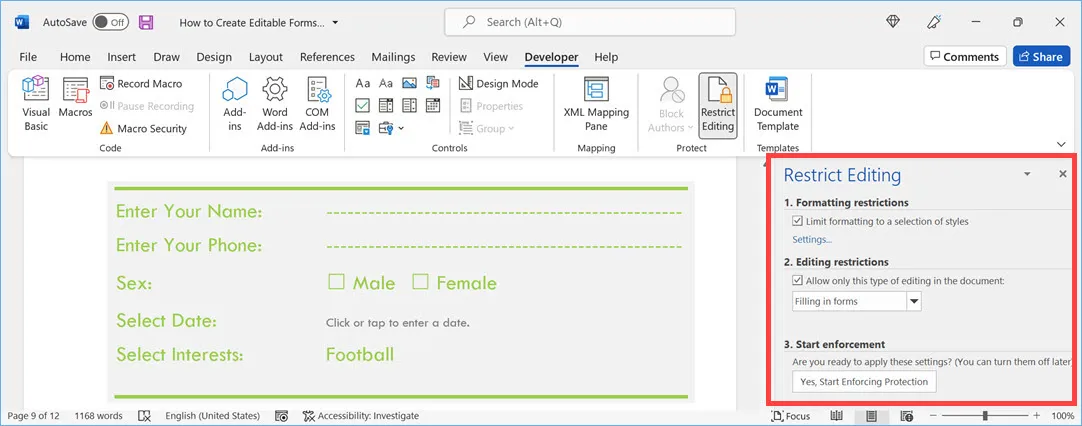
- Formatting restrictions – enable “Limit formatting to a selection of styles” option and click on “Settings…” link just below that. On the pop-up that appears you can select the styles that you want to apply the restrictions.

- Editing Restrictions – first select “Allow only this type of editing in the document” option. Then select the option to allow from the list. You can allow commenting, tracking changes, filling in forms or do not allow any changes by making the document as read only.
After selecting the restrictions, click on “Yes, Start Enforcing Protection” button and apply the password to protect your document. Remember, setting restrictions will apply throughout the document and is useful if you only have a form in the document. In case, if your form is part of a long document then you can create sections and apply protection for the section that contains the form.
В случае, если вам необходимо создать документ Word для заполнения другими людьми, например, создать анкету участника конференции, чтобы упростить процесс, вы можете создать форму для заполнения в Microsoft Word. Форма в ворде позволяет создавать заполнители для различных типов информации, таких как текст, дата, да-нет вопросы и т. д.
Включение вкладки «Разработчик»
Прежде чем перейти к созданию формы в ворде, вам нужно активировать вкладку «Разработчик» на ленте. Для этого нажмите «Файл» —> «Параметры», чтобы открыть диалоговое окно «Параметры Word». Выберите «Настроить ленту», затем установите флажок для вкладки «Разработчик».

Создание формы в Word – Параметры Word
Теперь на ленте появится вкладка «Разработчик».

Создание формы в Word – Вкладка Разработчик
Добавление полей формы в ворде
Теперь мы готовы перейти к созданию формы в ворде. Для этого мы будем использовать разнообразные поля, которые будут являться составляющими нашей будущей формы для заполнения в ворде.
Чтобы добавить поле формы для заполнения, поместите курсор в нужное место, затем выберите необходимый элемент из группы «Элементы управления» на вкладке «Разработчик». Вы можете навести указатель мыши на поля, чтобы увидеть различные параметры. В этом примере мы добавляем текстовое поле, чтобы пользователи могли вводить свои имена.

Создание формы в Word – Элементы управления для создания формы в ворде
В документе появится тестовое поле:

Создание формы в Word – Текстовое поле
Вы можете добавить несколько типов полей для создания формы в ворде. Например, вы можете добавить флажок для выбора:

Создание формы в Word – Поле «флажок»
Или даже поле выбора даты:

Создание формы в Word – Поле для выбора даты
После того, как вы добавили все поля в документ, ваша форма в ворде готова, и вы можете отправлять ее другим пользователям!
Настройка полей формы в ворде
Если вы хотите еще больше контролировать способ отображения полей своей формы в ворде, вы можете включить «Режим конструктора» в группе «Элементы управления» на вкладке «Разработчик».

Создание формы в Word – Режим конструктора
Затем вы можете изменить свойства для каждого поля вашей формы в ворде, включая текст, который будет отображаться в каждом поле. Если вы готовы потратить немного времени на настройку каждого поля, вы можете создать довольно прочную форму. Например, вы можете создать в своей форме заполнения собственный выпадающий список, как в приведенном ниже примере:

Создание формы в Word – Использование выпадающего списка в форме
В итоге в нашем примере, мы получили следующую форму для заполнения в ворде:

Создание формы в Word – Пример формы для заполнения в ворде
В этой статье мы рассмотрели основы создания формы в ворде. Теперь вы можете с легкостью создать собственную форму для заполнения в Microsoft Word.
Содержание
- 1 Вставка полей в форму Текстовые поля
- 2 Создание бланка в Word
- 3 Создаем настраиваемую форму в MS Word
- 4 Защищаем форма от изменений
- 5 Общие правила оформления
- 5.1 Сведения об адресате и заявителе
- 5.1.1 Информация об адресате
- 5.1.2 Информация о заявителе
- 5.1.3 1. Со строчной буквы в начале строки и с точкой после слова
- 5.1.4 2. С прописной буквы без точки в конце
- 5.1.5 3. Прописными буквами без точки в конце
- 5.2 Формулировка просьбы, жалобы или предложения
- 5.3 Дата подачи заявления
- 5.1 Сведения об адресате и заявителе
- 6 Как сделать и распечатать бейджик
- 6.1 Шаг 1
- 6.2 Шаг 2
- 6.3 Шаг 3
- 6.4 Шаг 4
- 6.5 Шаг 5
- 6.6 Шаг 5. Как распечатать бейджик?
- 7 Добавление элементов управления содержимым к шаблону
- 7.1 Добавление элементов управления содержанием
- 7.2 Добавление пояснительного текста к шаблону
- 7.3 Помогла ли вам эта статья?
- 8 Как сохранить текст
- 9 Как найти нужную программу на компьютере
- 10 Макеты слайдов PowerPoint
- 11 Текстовые блоки
- 12 Работаем над шаблоном
- 12.1 Подгоняем размеры блоков макета
- 12.2 Сохраняем результат работы
- 13 Разработкаэлектронной формы
-
- 13.0.1
Подготовка
шаблона - 13.0.2
Вставка
полей формы- 13.0.2.1 АНКЕТА
- 13.0.3
Создание
документа на основе шаблона формы
- 13.0.1
-
- 14 Быть или не быть Шаблону
Вставка полей в форму Текстовые поля
Текстовые поля предназначены для ввода
данных в форму с использованием клавиатуры
или вставкой из буфера обмена.
Установите курсор в месте вставки.
Во вкладке Разработчик
в группеЭлементы управления
нажмите кнопкуИнструменты из предыдущих версий
и выберите элементПоле
(рис.
1.76
).

увеличить
изображение
Рис. 1.76.
Добавление поля
Поле отобразится как серый прямоугольник
(рис.
1.77
).

увеличить
изображение
Рис. 1.77.
Поле в документе
Для настройки параметров поля нажмите
кнопку Свойства
во вкладкеРазработчик
в группеЭлементы управления
(см.рис.
1.77
) или дважды щелкните по нему
мышью. В окнеПараметры текстового
поля
(рис.
1.78
) установите требуемые
параметры.

Рис. 1.78.
Настройка параметров
текстового поля
В раскрывающемся списке Тип
выберите
тип данных, которые будут вводиться в
поле. Текстовое поле может содержать
разные типы данных. Выбор правильного
типа данных, с одной стороны, облегчит
последующее заполнение формы, а с другой
стороны, воспрепятствует неправильному
заполнению.
Тип Обычный текст
предназначен для
полей, в которые может вводиться различная
информация: текст, числа, даты и т.д.
В поле Текст по умолчанию
можно
ввести текст, который первоначально
будет отображен в поле формы. Например,
если в поле надо указать название города
и в большинстве случаев это будетМосква
,
то этот текст можно назначить используемым
по умолчанию
В счетчике Максимальная длина
можно
установить ограничение на количество
вводимых символов от1
добез
ограничений
(фактически максимальное
количество символов 32676).
В раскрывающемся списке Формат текста
можно выбрать принудительную установку
регистра вводимого текста (Прописные
буквы
,Строчные буквы
,Первая
прописная
,Первые прописные
).
Тип Число
предназначен для полей,
в которые допускается вводить только
числовые данные. При заполнении формы
в поле можно ввести и текст, но при
переходе к следующему полю введенный
текст автоматически уничтожается. Если
в поле ввести число и текст, то останется
только введенное число. Если ввести
только текст, то вместо текста в поле
будет отображен 0 (ноль) или число,
установленное по умолчанию.
В поле Число по умолчанию
можно
ввести число, которое первоначально
будет отображено в поле формы. Например,
если в поле надо указать количество
дней проживания и в большинстве случаев
это будет5
, то это число можно
назначить используемым по умолчанию
В счетчике Максимальная длина
можно
установить ограничение на количество
вводимых цифр от1
добез ограничений
(фактически максимальное количество
цифр 32676).
В раскрывающемся списке Формат числа
можно выбрать числовой формат отображаемого
числа. Например, при установке форматачисло в поле будет отображена
только целая часть числа, независимо
от введенного количества знаков после
запятой. При формате0,00
в поле будет
отображено число с двумя знаками после
запятой, независимо от введенного
количества цифр десятичных разрядов;
при отсутствии дробной части будут
отображены нули.
Тип Дата
предназначен для полей, в
которые допускается вводить только
даты и/или время.
В поле Дата по умолчанию
можно ввести
дату, которая первоначально будет
отображена в поле формы.
В счетчике Максимальная длина
можно
установить ограничение на количество
вводимых знаков от1
добез
ограничений
(фактически максимальное
количество цифр 32676).
В раскрывающемся списке Формат даты
можно выбрать числовой формат отображаемой
даты/времени, который будет использован
независимо от введенных значений (при
условии правильности вводимой
инфоромации). Например, если для поля
установить форматdddd, d MMMM yyyy «г.»
, то
при вводе даты в кратком формате1.12.08
она будет отображена каксуббота, 1
декабря 2008 г.
Тип Текущая дата
предназначен для
полей, в которых должна быть отображена
текущая дата. Ввод данных в это поле
невозможен, Но можно установить числовой
формат отображаемой даты, в том числе
с отображением текущего времени.
Тип Текущее время
предназначен для
полей, в которых должно быть отображено
текущее время. Ввод данных в это поле
невозможен, Но можно установить числовой
формат отображаемой времени, в том числе
с отображением текущей даты.
Тип Вычисление
использует поле=
(Формула)
и предназначен для вычислений.
Заполнение или изменение этого поля
невозможно.
Создание бланка в Word
Прежде, чем создавать шаблон бланка, необходимо научиться создавать разделительные линии, уметь выравнивать текст, изменять межстрочный интервал, настроить программу на авто проверку орфографии, устанавливать необходимые шрифты, и создавать колонтитулы.
Для того чтобы создать бланк нам необходимо сначала выбрать его из списка готовых шаблонов. Это намного ускорит и облегчит нашу задачу.
Щелкните по кнопке «Office».

Создаем форму
- Опять жмем на кнопке «Office».
- В открывшемся меню выберите запись Создать.
- В следующем окне выберете форму.

Для примера выберем форму Заявления.

В формах программы Word возможны три вида полей:
- Текстовые поля для ввода строк текста,
- Флажки указывают на положительный или отрицательный ответ на вопрос. Для этого надо просто щелкнуть по флажку мышкой и в параметрах флажка выбрать Состояние по умолчанию – Установлен.
 3. Раскрывающиеся списки позволяют выбрать один или несколько вариантов.
Можно просто создать бланки для заполнения их вручную, а можно заполнять их прямо на компьютере со слов и документов посетителей. Это уже , как вам удобнее.
Формы Анкет и Тестов очень хороши для преподавателей школ.
Примечание
При загрузке бланков и форм, необходимо подключиться к Интернету.
Надеюсь, что создание бланка в word вам очень пригодиться в работе.
Попробуем разобраться с такой ситуацией: «Я получила письмо. В приложении был бланк анкеты. Принтера у меня нет и заполнить текст вручную я не могла. Скопировала в ворд и дальше долго боролась с текстом.»
Анкета в Word – это документ (файл) в формате текстового редактора Word, что можно определить по имени файла, точнее, по тому, какое расширение имеет имя файла.
Если файл (документ) имеет имя, например, «Анкета соискателя.docx», то по тому, что идет в имени файла после точки (у нас это .docx, еще бывает .doc) можно однозначно определить, что файл создан в Word, а значит, редактировать его можно также в редакторе Word.
Создаем настраиваемую форму в MS Word
Усложнять мы не будем, и в нашей первой «анкете» будет всего одно поле: имя. В группе «Элементы управления» на вкладке «Разработчик» найдите инструмент «Обычный текст» и щелкните на него. Тотчас на листе появится текстовое поле заполненное заготовкой «место для ввода текста».

Создаем простую форму в MS word
Прекрасно, теперь начинается волшебство
Щелкните по инструменту «Ограничить редактирование» и обратите внимание на появившуюся справа панель. Мы хотим добиться простого результата: пользователь заполняющий документ может ввести текст в поле формы (в данном случае, свои имя), но не может изменить само поле, а также изменить форматирование или вставить в документ какой-то дополнительный текст

Поле формы вставленное в лист текстового редактора
Защищаем форма от изменений
Теперь сделайте следующее:
- В пункте «Ограничения на форматирование» поставьте галочку «Ограничить набор разрешенных стилей»
- В пункте «Ограничения на редактирование» выберите из выпадающего списка значение «Ввод данных в поля формы».
- В пункте «Включение защиты» нажмите единственную кнопку «Да, включить защиту»

Запрещаем изменение документа
На экран будет выведено окно с предложением ввести пароль — можете ничего не вводить и сразу нажать «Ок», или ввести простой пароль, который не забудете. Вот и всё.

Защищаем страницу от изменений с помощью пароля
Попробуйте ввести имя в созданное нами ранее поле. Получается? А теперь попробуйте ввести текст куда-бы то ни было помимо этого поля. Ага! Страница защищена от редактирования. Можете смело сохранять её и будьте уверены — сохранятся только данные введенные в соответствующее поле.
Что если вам потребуется внести в форму изменения, например, добавив новые поля? Обратите внимание на нижнюю часть панели «Ограничить редактирование» и нажмите кнопку «Отключить защиту». По её нажатию, документ снова будет доступен для редактирования

Если вы хотите отредактировать страницу, ограничения можно отменить
Общие правила оформления
Общие требования к письменным обращениям изложены в Федеральном законе № 59 «О порядке рассмотрения обращений граждан Российской Федерации». Исходя из него, а также из общепринятой деловой практики, заявление состоит из пяти реквизитов:
- Сведения об адресате и заявителе.
- Формулировка просьбы или предложения.
- Подпись.
Сведения об адресате и заявителе
В правом верхнем углу надо указать, кому это заявление предназначается и, собственно, от кого оно.
Информация об адресате
Так как заявление — это официальный документ, то и пишем мы его не просто человеку с улицы, а официальному лицу. Поэтому обязательно указываем:
- Должность адресата.
- Название организации.
- Его имя, отчество и фамилию.
Имя и должность адресата нужно писать в дательном падеже (задаём себе вопрос «кому?»). Например, директору Петрову или ректору Ивановой.
Информация о заявителе
В сведениях о заявителе чаще всего достаточно просто указать свою фамилию и имя. Когда это необходимо, можете дополнить указанием должности или статуса. Эти данные указываем в родительном падеже (задаём себе вопрос «от кого?»).
Часто возникают споры о том, нужно ли ставить в строке о заявителе предлог «от». То есть как правильно: «Ивановой Марии» или «от Ивановой Марии»? Оба варианта допустимы.
Традиционной формой считается написание без предлога. Но попробуйте прочитать предложение целиком — ряд из имён и фамилий звучит довольно запутанно. С предлогом такой проблемы не возникает: сразу понятно, кому и от кого.
Казалось бы, что сложного в том, чтобы просто написать «заявление». Однако и тут есть свои нюансы. Самый частый вопрос: с большой или маленькой буквы писать это слово? Здесь есть три допустимых варианта написания.
1. Со строчной буквы в начале строки и с точкой после слова

Традиционный способ оформления. В этом случае сведения об адресате и заявителе и наименование документа считаются одним предложением.
2. С прописной буквы без точки в конце

Когда вы пишете слово «заявление» в центре листа, оно становится заголовком всего документа. И к нему применяется то же правило, что и к остальным заголовкам: первая буква — прописная, а в конце нет точки.
3. Прописными буквами без точки в конце

Здесь применяется то же правило, что и в предыдущем пункте. По центру — заголовок документа, значит, точка в конце не нужна. Такой вариант написания обычно встречается, если текст набран на компьютере, а не написан от руки.
Формулировка просьбы, жалобы или предложения
Эта часть начинается с красной строки. Заявление вы пишете с конкретной целью и должны здесь объяснить, чего именно хотите от адресата. Опишите причину обращения, свою просьбу, аргументы.
Формулировка не ограничивается никакими правилами, но просторечия здесь будут смотреться неуместно.
Чтобы обосновать справедливость своей просьбы, можно приложить к заявлению дополнительные документы и сослаться на них в этой части.
Дата подачи заявления
Обычно дата подачи указывается сразу после формулировки сути заявления и выравнивается по левому краю.

Также дату можно указать сразу после наименования документа.

Подпись на заявлении всегда ставится вручную, даже если всё остальное вы оформили на компьютере. Она выравнивается по правому краю.
Как сделать и распечатать бейджик
Предлагаю инструкцию, как сделать бейджи любого размера.
Шаг 1
Перед началом работы измерьте или бейдж-образец, или имеющиеся у вас бейджедержатели, вертикальные или горизонтальные — делаются они одинаково.
Шаг 2
Откройте новый документ Word и выберите ориентацию листа. Для стандартного бейджа лучше всего сделать альбомную ориентацию, для вертикального — оставить по умолчанию.
На вкладке Разметка страницы выберите Альбомная.


Далее сделаем отступы от границ страницы поменьше: Разметка страницы — Поля — Узкие.

Шаг 3
На этом шаге создадим таблицу с фиксированным размером ширины и высоты ячейки. На главной панели выбираем Вставка — Таблица — 3х3 (или другое количество строк, если нужно сделать много бейджиков сразу).

Получится вот такая таблица

Далее выделим таблицу. Для этого наведем курсор на левый верхний угол таблицы, пока не появится крестик.

Далее нажнем правой кнопки мыши на крестик. Появится контекстное меню, в котором выберем пункт Свойства таблицы.
В свойств таблицы на вкладке Строка:
- задаем высоту строки — 5,5 (см);
- размер — точно;
- убираем галочку Разрешить перенос строк на новую страницу.

На вкладке Столбец ставим ширину столбца — 9 (см).

Получается таблица, по ячейкам которой нужно будет нарезать бейджики.

Шаг 4
Когда таблица для нарезки бейджиков создана, можно приступить к оформлению первого бейджа — настраивать место ввода текста, шрифты, наличие картинок. Все это делается обычным образом.
Ставим курсор мыши в первую ячейку и начинаем работать.
Целесообразно вставить логотип школы или компании как Вставка — Рисунок и далее выбрать место хранения файла на компьютере. Таким же образом можно вставить и фотографию человека.

Чтобы уменьшить размер рисунка, его нужно выделить, щелкнув по нему, подвести курсор мыши к углу и, когда курсор изменится, «схватить» левой кнопкой мыши и потянуть внутрь. Более подробно о работе с рисунками смотрите в соответствующей статье или в нашем дистанционном курсе по Word.
Отступить от верхнего края ячейки можно поставив новый пустой абзац клавишей ENTER. Если сдвигается вся таблица вниз, то можно сначала поставить пробел, а потом нажать ENTER.
Полностью форматируем содержимое первой ячейки — первого бейджа.
Шаг 5
Далее полностью выделяем содержимое первой ячейки, копируем и вставляем во вторую и третью ячейку. Далее выделяем первую строку и копируем ее во вторую, третью и другие строки.

Шаг 5. Как распечатать бейджик?
Для распечатки бейджика нажимаем CTRL + P и в открывшемся окне нажимаем Печать.
Таким образом мы рассмотрели создание бейджика в Word, и вы сможете создать свои бейджи под любой нестандартный размер — нужно только создать таблицу с ячейками нужного размера
Обратите внимание, что нужно один раз отформатировать бейджик и далее уже просто копировать текст и менять ФИО и надписи, а не делать оформление в каждой ячейке отдельно

Добавление элементов управления содержимым к шаблону
В некоторых ситуациях требуется придать шаблону вместе со всем его содержимым некоторую гибкость. Например, шаблон может содержать раскрывающийся список, созданный автором. По тем или иным причинам этот список может не устроить другого пользователя, которому доведется с ним работать.
Если в таком шаблоне будут присутствовать элементы управления содержимым, второй пользователь сможет подкорректировать список под себя, оставив его неизменным в самом шаблоне. Чтобы добавить в шаблон элементы управления содержимым, необходимо включить вкладку “Разработчик” в MS Word.
1. Откройте меню “Файл” (или “MS Office” в более ранних версиях программы).
2. Откройте раздел “Параметры” и выберите там пункт “Настройка ленты”.
3. В разделе “Основные вкладки” установите галочку напротив пункта “Разработчик”. Для закрытия окна нажмите “ОК”.
4. Вкладка “Разработчик” появится на панели управления Ворд.
Добавление элементов управления содержанием
1. Во вкладке “Разработчик” нажмите на кнопку “Режим конструктора”, расположенную в группе “Элементы управления”.
Вставьте в документ необходимые элементы управления, выбрав их из представленных в одноименной группе:
- Форматированный текст;
- Обычный текст;
- Рисунок;
- Коллекция стандартных блоков;
- Поле со списком;
- Раскрывающийся список;
- Выбор даты;
- Флажок;
- Повторяющийся раздел.
Добавление пояснительного текста к шаблону
Сделать шаблон более удобным в использовании можно с помощью пояснительного текста, добавленного в документ. Если это необходимо, стандартный пояснительный текст всегда можно изменить в элементе управления содержимым. Для настройки пояснительного текста по умолчанию для пользователей, которые будут использовать шаблон, необходимо выполнить следующие действия.
1. Включите “Режим конструктора” (вкладка “Разработчик”, группа “Элементы управления”).
2. Кликните по тому элементу управления содержимым, в котором необходимо добавить или изменить пояснительный текст.
3. Измените, отформатируйте замещающий текст.
4. Отключите “Режим конструктора” повторным нажатием на эту кнопку на панели управления.
5. Пояснительный текст будет сохранен для текущего шаблона.
На этом мы закончим, из этой статьи вы узнали о том, что представляют собой шаблоны в Microsoft Word, как их создавать и изменять, а также обо всем том, что с ними можно делать. Это действительно полезная функция программы, во многом упрощающая работу с ней, особенно, если над документами работает не один, а сразу несколько пользователей, не говоря уже о крупных компаниях.
Мы рады, что смогли помочь Вам в решении проблемы.
Помогла ли вам эта статья?
Да Нет
16:02
Людмила
Просмотров: 9550
Создание бланка в word. В любой организации всегда нужны формы бланков — заявлений, анкет, карточек учета, и тому подобны документов. Только многие делопроизводители и кадровики даже не подозревают, что они могут сами легко создать и практически любую форму, анкету или карточку учета. И ничего кроме текстового редактора Ворд и принтера им не нужно. Многие организации заказывают эти бланки в типографиях и платят за это не малые деньги. А необходимо просто загрузить бланк или форму, и создать шаблон многоразового использования, который всегда можно подкорректировать под нужды организации. Как это сделать , мы сейчас рассмотрим на примере.
Как сохранить текст
После того, как вы создали свой документ, вы можете его сохранить. Для этого найдите в левом верхнем углу кнопку, которая вызывает меню, и в этом меню выберите Сохранить как
и любой подходящий формат, например Документ Word
:

Появится окно, в котором можно выбрать:
- куда сохранить файл (я обычно выбираю Рабочий стол,
- как назвать файл (вводите любое подходящее название),
- и формат файла (я его не меняю, оставляю по умолчанию).

Готово! Теперь этот файл появится на рабочем столе вашего компьютера.

Вот с этим документом вы можете делать все что угодно. Например, скинуть на флешку, отправить по электронной почте, открыть для дальнейшего редактирования или удалить.
К слову, если вы работаете над большим документом, я рекомендую вам делать промежуточные сохранения. И чем чаще, тем лучше.
Как найти нужную программу на компьютере
Я по своим родным знаю, что самое сложное для новичка на первом этапе — это найти и открыть эти программы.
Чтобы справиться с этой задачей, вы должны представлять, как выглядят значки программ. Чаще всего это значок документа с буквой W
, или как в последнем случае — с буквой А
(так обозначается программа WordPad):
Посмотрите внимательно на рабочий стол и панель инструментов внизу, программы могут быть вынесены на видное место, как на моем рабочем столе (кстати, вот он, не пугайтесь):

Если вы ничего такого не нашли, тогда попробуйте второй способ:
1 — запустите панель Пуск
или просто нажмите на круглый значок в левом нижнем углу, откроется меню.
В нем вам нужно найти поле для поиска файлов, у меня оно называется Найти программы и файлы
:

Именно в это поле введите название программы, которую вы ищете. Например, я ввожу слово Word и получаю программы Microsoft Office Word:

Если я введу слово WordPad, то он найдет для меня и эту программу:

После этого вы просто нажимаете на найденную программу, и перед вами открывается рабочее окно, в котором можно создавать документ: печатать текст, редактировать его и сохранять.
Макеты слайдов PowerPoint
Макеты слайдов можно изменять и управлять ими в режиме образца слайдов. Чтобы перейти в режим образца слайдов, на вкладке Вид нажмите кнопку Образец слайдов. Макеты расположены под образцом слайдов в области эскизов в левой части экрана.

Для каждой темы доступно различное количество макетов. Выбирайте те макеты, которые лучше всего подходят для содержимого ваших слайдов.

Все макеты слайдов настроены по-разному — они различаются как типом заполнителей, так и их расположением.
У каждого образца слайдов есть связанный макет слайдов под названием Макет титульного слайда, и в каждой теме для этого макета текст и заполнители для других объектов расположены немного по-разному, с разным цветом, шрифтами и эффектами.
Вы можете изменять макет в соответствии со своими потребностями. После внесения изменений в макет и перехода в обычный режим каждый добавляемый слайд будет использовать этот макет и отображать его в измененном виде. Но если в вашей презентации уже имеются готовые слайды на основе старой версии этого макета, вам потребуется повторно применить его к ним.
Приветствую, друзья! Я продолжаю цикл статей по созданию презентаций. В этой заметке разберём, как создать шаблон презентации для powerpoint. Зачем нужен свой, когда есть готовые, уже в самой программе, да и на сайте Microsoft? Да есть, но посмотрите, несколько презентаций и, вероятно, встретите одинаковое оформление. Я для своих презентаций практически никогда не использую готовые шаблоны, всегда стараюсь сделать что-то своё.
Текстовые блоки
Для любых вопросов, требующих ответа в форме текста, можно вставить текстовые блоки. Это делается при помощи:
- Rich Text Content Control (Элемент управления содержимым «форматированный текст») — пользователь может настраивать форматирование
- Plain Text Content Control (Элемент управления содержимым «обычный текст») — допускается только обычный текст без форматирования.
Давайте создадим поле для ответа форматированным текстом на вопрос 9, а затем поле для ответа обычным текстом на вопросы 1, 5, 6 и 10.
Не забывайте, что можно изменять текст в поле элемента управления содержимым, чтобы он соответствовал вопросу. Для этого кликните по полю и введите текст. Результат показан на изображении выше.
Работаем над шаблоном
Итак, перейдём от слов к делу. В предыдущей статье я описал процесс создания простой презентации без использования шаблонов и тем оформления. Так что затруднений быть не должно. В открытом редакторе презентаций перейдём на вкладку Вид.

Здесь в группе Режимы образцов нужно кликнуть кнопку Образец слайдов, для того чтобы перейти в режим правки макетов разметки слайда. Активируется соответствующая вкладка со всеми необходимыми инструментами. В левой части экрана будут видны различные варианты макетов нового шаблона, которые можно удалять и добавлять новые по вашему усмотрению.

Самый большой эскиз вверху — это главный макет. То есть, выбрав его, все изменения по форматированию будут отражены на макетах нижнего (дочернего уровня). Если выбрать эскиз дочернего уровня, то произведённые изменения можно зафиксировать только на нем, не затрагивая форматирование других. Конечно, если не нажимать кнопку Применить ко всем.
На этом шаге необходимо указать оформление заголовков и текста: размер, цвет, начертание, гарнитуру шрифта. Все это проделываем на главном слайде. Постарайтесь придерживаться общих правил оформления. Здесь задаём фон слайдов. Можно сделать сплошной заливкой или градиентной, или узором, или использовать в качестве фона картинку из файла. Ваша фантазия не ограничена, главное — не переусердствовать. На этом же слайде добавляются повторяющиеся элементы: логотипы, виньетки, рисунки и т. п. Посмотрите, ниже на рисунке пример главного эскиза моего шаблона.

На нем задан серый фон, и в шапке макета (выделено красной рамкой) я разместил графические элементы, которые будут присутствовать на всех остальных макетах в качестве фона. Белый прямоугольник — это текстовая зона слайда с образцами написания текста в режиме списка на различных уровнях. Каждый уровень текста можно настроить в соответствии вашим запросам (размер, цвет, шрифт).
Подгоняем размеры блоков макета
Среди вариантов разметок (маленькие эскизы на рисунке выше) посмотрите расположение блоков, лишние удалите. При необходимости, поправьте шрифты.
Если среди разметок нет подходящей, то сделайте её самостоятельно. Нажимаем Вставить макет и получаем новый слайд с заголовком и с оформлением главного эскиза. Сразу отредактируйте заполнитель для заголовка. Расположите его в нужном месте слайда и отформатируйте. в моем шаблоне заполнитель заголовка имеет белый цвет символов и расположен над синим прямоугольником.
Теперь кликаем кнопку Вставить заполнитель и выбираем необходимый блок. Я вставил блоки с рисунками и с текстом, подогнал их до нужного размера.Таким образом, размещаем необходимое количество элементов в макет. Вот такую дополнительную разметку получил я для своего шаблона.

Сохраняем результат работы
Сохраним как тему для использования на своём компьютере. В группе инструментов Изменить тему кликаем кнопку Темы и в выпадающем списке в самом низу будет строка Сохранить текущую тему. Выбираем эту команду и в открывшемся окне даем имя, и кликаем Сохранить. Теперь в вашем редакторе она будет доступна на вкладке Дизайн.
Для выхода и режима редактирование шаблона в правой части вкладки образец слайдов кликните кнопку Закрыть режим образца. А чтобы это оформление можно было использовать и на других компьютерах для создания презентаций на основе шаблона, то сохраняем её как шаблон PowerPoint. Это указывается в типе файла при сохранении.

На данную тему я подготовил видеоурок. Посмотрите его.
Надеюсь, что я доходчиво объяснил, как делать шаблоны презентаций. И теперь, вы без особого труда сможете сделать уникальное оформление для представления своего доклада или реферата. И ваше выступление, оставит яркое впечатление в памяти ваших слушателей. Удачи, друзья!
Разработкаэлектронной формы
Для
создания электронной формы необходимо
подготовить и сохранить в файле новый
шаблон, в котором будут заполняться
поля с переменной информацией.
Создайте
шаблон
электронной
формы
для заполнения анкет
и заполните с его помощью одну анкету.
Пример анкеты приведен ниже.
Подготовка
шаблона
-
Чтобы
создать новый шаблон выполните команду
Кнопка Office– Создать.
В открывшемся диалоговом окне выберите
в разделе Пустые
и последние
шаблон Новый
документ (Normal.dotx)
и нажмите кнопку Создать. -
Внесите
необходимые изменения в размеры полей
документа, например, установите все
поля по 2,5 см., определите ориентацию
страниц — Книжная. -
Чтобы
создать форму, начните с ввода и
оформления текста и рисунка (см. ниже),
которые должны повторяться во всех
новых документах формы, основанных на
этом шаблоне.
Вставка
полей формы
-
Для
вставки полей в форму
— текстовых полей, раскрывающихся
списков и др. – перейдите на вкладку
РАЗРАБОТЧИК.
Примечание.
Если вкладки РАЗРАБОТЧИК
нет на Инструментальной
ленте,
выведите ее командой Кнопка
Office
— Параметры Word
– раздел Основные – Показывать вкладку
Разработчик на ленте.
Выберите
команду РАЗРАБОТЧИК
– группа Элементы управления.
-
Вставьте
поля формы
в нужные места шаблона, используя кнопки
Текст,
Поле со
списком,
Выбор даты.

Примечание.
Для удобства форматирования (красивого
расположения полей в документе) перед
вставкой каждого поля нажмите клавишу
ТАВ.
«Место
для ввода текста» – Поля
Текст.
«Место
для ввода даты» – Поля
Выбор даты.
«Выберите
элемент»
— Поле со
списком.
В
конце анкеты:
Дата заполнения
– вставьте информационное поле
Дата/Время командой
ВСТАВКА – группа Текст – Дата и время.
-
Для
настройки свойств полей,
выделив поле, выберите команду РАЗРАБОТЧИК
– группа Элементы управления – Свойства.
В появившемся окне Свойства элемента
управления содержимым в поле Название
введите, например, для первого поля
Введите
фамилию.
Это будет подсказкой, что вводить в
данное поле. Для других текстовых полей
тоже введите соответствующие подсказки.


-
В
свойствах Полей
со списком
через кнопку Добавить
введите списки элементов для выбора.

Для
поля Вакансии:
Юрист, Менеджер, Секретарь.
Для
поля Желаемый
уровень зарплаты:
Не менее 10000 руб, Не менее 20000 руб, Не
менее 30000 руб.
В
поле Выбор
даты вставьте
предполагаемую дату, когда вы можете
приступить к работе.
В
поле Дата/Время
вставьте информационное поле даты и
времени заполнения анкеты командой
ВСТАВКА –
группа Текст – Дата и время.
АНКЕТА
1. Поля
Фамилия Место
Имя Место
Отчество Место
Год
Домашний
Телефон Место Семейное положение: Поля Возраст
2. Укажите, Вакансии:
Желаемый
3. Поле
Когда
Дата . Поле |

-
Вставьте
рисунок для
украшения формы иp
библиотеки ClipArt. -
Отформатируйте
документ по образцу,
выровняйте все поля, используя табуляторы. -
Введите
ограничение на доступ к будущему шаблону
командой
РАЗРАБОТЧИК
– группа Защитить – Защитить документ.
В появившейся Области
задач — Ограничить форматирование
в группе Ограничение
на редактирование
выбрать из списка Ввод
данных в поля форм. Далее
укажите Да,
включить защиту (пароль
не вводите).

-
Сохраните
документ как шаблон
Для этого в диалоговом окне Сохранение
документа
сначала раздел укажите Надежные
шаблоны,
затем типф файла Шаблон
Word и в
открывшейсяпапке
Шаблоны сохраните
файл под именем Анкета.
Создание
документа на основе шаблона формы
-
Чтобы
создать новый документ на основе
электронной формы, выполните команду
Кнопка Office
— Создать.
Выберите раздел Мои
шаблоны и
подготовленный для формы шаблон —
Анкета,
выберите значение Документ,
а затем нажмите кнопку ОК.

-
После
заполнения формы Анкета
выберите команду Кнопка
Office — Сохранить
как и в поле
Имяфайла
введите имя для нового документа
(например, Анкета
Сидорова).
Сохраните документ на рабочем диске.
Быть или не быть Шаблону
Есть два варианта, с которых можно начать создавать формы. Первый проще, при условии, что Вы подберёте подходящий шаблон. Чтобы найти шаблоны, откройте меню File
(Файл) и нажмите New
(Создать). Вы увидите множество шаблонов, готовых для скачивания. Остаётся лишь кликнуть по Forms
(Формы) и отыскать нужный шаблон среди предложенных.

Когда найдёте подходящий шаблон, загрузите его и редактируйте форму, как пожелаете.
Это самый простой путь, но может случиться так, что Вы не найдёте подходящий шаблон среди предложенных. В этом случае можно создать форму из черновика. Сперва откройте настройки шаблонов, но вместо уже готовой формы выберите My Templates
(Мои шаблоны).

Выберите Template
(Шаблон) и кликните по ОК
, чтобы создать чистый шаблон. В завершение нажмите Ctrl+S
, чтобы сохранить документ. Назовём его Form Template 1
.

Although Word is most commonly used for creating documents, it can also be used for capturing data like a form. Word Forms do not require any programming knowledge. These are easy to create and will work across ALL versions of Word.

The Need for Word Forms
This is very useful for conducting quick surveys or quizzes where you want to control the responses. Of course, there are more sophisticated methods and tools available for bother these scenarios, Word is familiar to everyone and almost guaranteed to be available on every desktop. Hence it is a compelling option even today (2017).
How to create Word Forms?
Two steps. Create the survey by inserting editable items (form fields) and then lock the document so that only the form can be filled.
Adding fields to Word Forms
There are three types of fields.
- The new type of fields which are better looking and more interactive.
These do not work with older versions of Word. - The solution is to use the built-in form fields.
These are available with any version of Word. So compatibility is never an issue. - ActiveX controls
These are more sophisticated but not guaranteed to be available on every PC. ActiveX controls are being phased out globally. These are used by programmers who want to extend Word and add business functionality to it.
In short, we will use the built-in Word Forms and related fields. To use these, we have to enable the developer tab.
Enable developer tab in Office 2007
File – Word Options – Popular – activate the Show developer tab option.
Enable developer tab in Office 2010 onwards
Open Word. File – Options. Click Customize Ribbon. In the list on the right side, scroll and identify the Developer item. This item is not selected by default. Select it and close the dialog.
Using Form Fields
Open the briefcase icon dropdown under Developer Tab – Controls group.
We will use only the upper part called Legacy forms. We have various types of fields available. Simple text, checkbox and box.
Create a document and choose a field. Let us add a text field for capturing the name.
The word Name is typed manually. Now select Text form field from the legacy tools area. Notice that the field is added with gray background. The width of this field looks small but it expands automatically.
Let us add another textbox for duration. To keep things simple, we will use another text field.

Let us add the leave type. Choose the Drop-down form field. Once added, double click inside the field to add various leave options.

Now let us add a Check box form field. We will ask whether it is Paid or unpaid leave. Double click on the field to change the default to Checked (means Paid leave).

Now the form looks like this.

Restricting form filling in Word Forms
Right now the form is in edit mode. The captions and structure can be changed. We cannot type inside the fields properly. Checkbox cannot be unchecked and the dropdown does not appear.
Here is how you can make it a fillable form. With Office 2007, Choose Protect Document from the Review tab. Choose Restrict Formatting and Editing option. For newer versions of Office, the Restrict editing option is directly available in the Review tab.

Now a new window (pane) opens. Choose the Allow only this type of editing checkbox and choose the Filling in Forms option from the dropdown.

Now click the Yes, Start enforcing protection button. Specify a password and type it again to confirm it.
Now it is a real form.
How to fill Word Forms?
Click on any field to fill it. You cannot click and edit any other area in the Word file.
Dropdowns can be selected and checkboxes can be enabled or disabled.
How to save the data from filled Word Forms?
You will send this form as attachment to multiple people. They will fill it and then send it back to you. Unfortunately, you cannot extract data from multiple filled forms. You have to do it one-by-one. Here is a filled form.

In order to save only the data from the form, follow these steps:
- Go to File – Options – Advanced
- Scroll down and choose the checkbox as shown below. Left side is Office 2007 and right side is newer versions of Word.

Now the saved file will be just a TXT file containing the comma delimited data. A preview is also shown before saving.

Practical Usage
This method works ever since Word was created. Although newer methods are available now, this method may still come in handy for quick and easy data capture.
***