Word for Microsoft 365 Word for Microsoft 365 for Mac Word 2021 Word 2021 for Mac Word 2019 Word 2019 for Mac Word 2016 Word 2016 for Mac Word 2013 Word 2010 Word for Mac 2011 More…Less
A text box is an object you can add to your document that lets you put and type text anywhere in your file. Text boxes can be useful for drawing attention to specific text and can also be helpful when you need to move text around in your document.
Add a text box
-
Place cursor where you want the text box to appear.
-
Go to Insert and in Illustrations select Drawing.
-
Select Text Box and use your cursor to create the text box.
-
Insert text in box and apply any styling needed.
-
Select Save andClose.
If you aren’t using a mouse
-
Press Alt + Period (.) and then press N.
-
Then press D to select drawings.
-
Press Alt + Period (.) and then press N.
-
Type the text that you want.
-
Press the Esc key 3 times.
-
Press Enter to save textbox.
Notes:
-
To format the text in the text box, select the text, and then use the formatting options in the Font group on the Home tab.
-
To format the text box itself, use the commands on the Shape Format contextual tab that appears when you select a text box.
-
To position the text box, select it, and then when the pointer becomes a
four-headed arrow, drag the text box to a new location.
-
You can also change or remove a border from a text box or shape.
-
If you have multiple text boxes, you can link them together so that text will flow from one box to another. Select one of the text boxes and on the Shape Format tab, select Create Link.
-
Editing in a text box
-
Double click the textbox.
-
In Drawing (Preview), select the textbox to place your cursor and edit text.
-
When finished select Save and Close to view updated text box.
Copy a text box
-
Select the border of the text box that you want to copy.
-
Press Ctrl+C.
Note: Make sure the pointer is on the border of the text box, not inside it. If the pointer is inside, pressing Ctrl+C will copy the text, not the text box.
-
Select a location and press Ctrl+V to paste the text box.
Delete a text box
-
Select the border of the text box that you want to delete, and then press Delete.
Note: Make sure the pointer is on the border of the text box and not inside it. If the pointer is inside the box, pressing Delete will delete the text inside the text box, not the box.
Add a text box
-
Go to Insert > Text Box, and then select Draw Text Box.
-
Click or tap in the document, and drag to draw the text box the size that you want.
-
To add text to a text box, select inside the text box, and then type or paste text.
Notes:
-
To format the text in the text box, select the text, and then use the formatting options in the Font group on the Home tab.
-
To format the text box itself, use the commands on the Format contextual tab, which appears under Drawing Tools when you select a text box.
-
To position the text box, select it, and then when the pointer becomes a
, drag the text box to a new location.
-
You can also change or remove a border from a text box or shape.
-
If you have multiple text boxes, you can link them together so that text will flow from one box to another. Select one of the text boxes and on the Format tab, under Drawing Tools, and then select Create Link.
-
Copy a text box
-
Select the border of the text box that you want to copy.
-
Go to Home > Copy
.
Make sure that the pointer is not inside the text box, but rather on the border of the text box. If the pointer is not on the border, pressing Copy will copy the text inside the text box and not the text box.
-
Go to Home and select Paste.
Delete a text box
-
Select the border of the text box and then press DELETE.
Make sure that the pointer is not inside the text box, but rather on the border of the text box. If the pointer is not on the border, pressing DELETE will delete the text inside the text box instead.
Add a text box
-
Go to Insert > Text Box and then select either Draw Text Box (where the text aligns horizontally on the page) or Vertical Text Box (where the text aligns vertically on the page).
-
Select in the document, and then drag to draw the text box the size that you want.
-
To add text to a text box, click or tap inside the text box, and then type or paste text.
-
To format the text in the text box, select it, and then Control + Click the text and select Font.
-
To add different effects to the text box, select the text box, and use the options on the Shape Format tab (such as changing the text direction or aligning the text at the top, middle or bottom of the text box).
-
To position the text box, select and hold it, and then when the pointer becomes a
, drag the text box to a new location.
-
Note: If you have drawn multiple text boxes, you can link them together so that text will flow from one box to another. You can only link an empty text box to the one that you’ve selected. To do this, select the text box that you want to link to another text box, and then go to Shape Format > Create Link.
Copy a text box
-
Select the text box you want to copy.
Make sure that the pointer is on the border of the text box and not inside the text box. If the pointer is not on the border, the text inside the text box is copied.
-
Press Control + Click, and then select Copy. Or, press
+ C.
-
Select the location in your document where you want to paste the text box, press Control + Click, and then select Paste. Or, press
+ V.
Remove a text box
-
Select the border of the text box that you want to delete, and then press DELETE.
Make sure that the pointer is on the border of the text box and not inside the text box. If the pointer is not on the border, pressing DELETE will delete the text inside the text box.
Add a text box
-
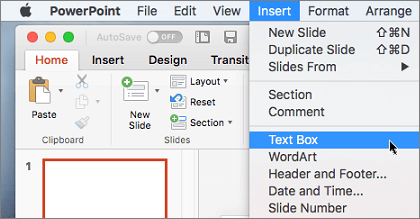
Go to Insert > Text Box.
-
Click in your file where you’d like to insert the text box, hold your mouse button down, then drag to draw the text box the size that you want.
-
After you’ve drawn the text box click inside it to add text.
Copy a text box
-
Select the text box you want to copy.
Make sure that the pointer is on the border of the text box and not inside the text box. If the pointer is not on the border, the text inside the text box is copied.
-
Press Control + Click, and then select Copy. Or, press
+ C.
-
Select the location in your document where you want to paste the text box, press Control + Click, and then select Paste. Or, press
+ V.
Remove a text box
-
Select the border of the text box that you want to delete, and then press DELETE.
Make sure that the pointer is on the border of the text box and not inside the text box. If the pointer is not on the border, pressing DELETE will delete the text inside the text box.
Need more help?
Want more options?
Explore subscription benefits, browse training courses, learn how to secure your device, and more.
Communities help you ask and answer questions, give feedback, and hear from experts with rich knowledge.
Even though Microsoft Word gives you plenty of ways to format, align, and manipulate text, there may be a time when it’s not enough. By using text boxes in Word, you have the flexibility to place text where you want, put it inside a shape, or customize it to make it pop.
Content
- How to Insert a Text Box in Word
- How to Resize, Rotate, or Move a Text Box
- How to Customize the Text Box Appearance
- How to Connect Text Boxes in Word
- Frequently Asked Questions
You can insert a premade text box that includes formatting and a style or start from scratch by drawing your own.
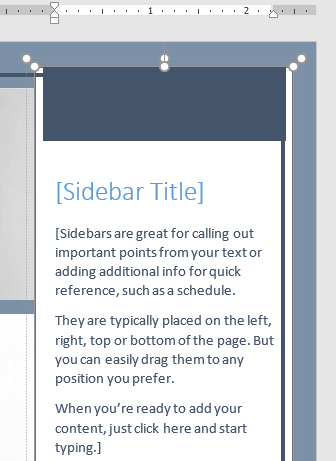
Insert a Built-In Text Box
Using a premade text box, you can get a jump start on the formatting or apply a bit of flare without any extra work. Currently, this feature is only available in Word on Windows, not Mac.
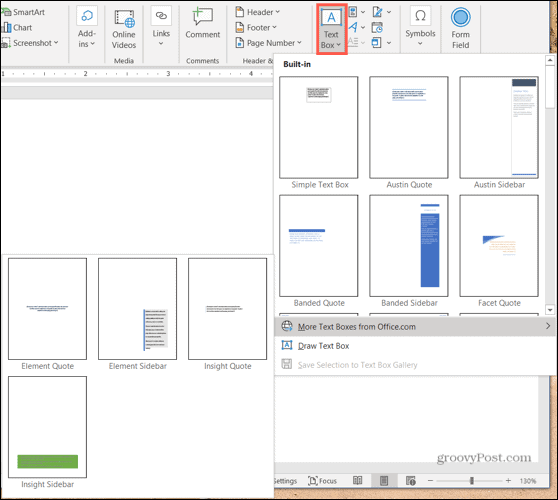
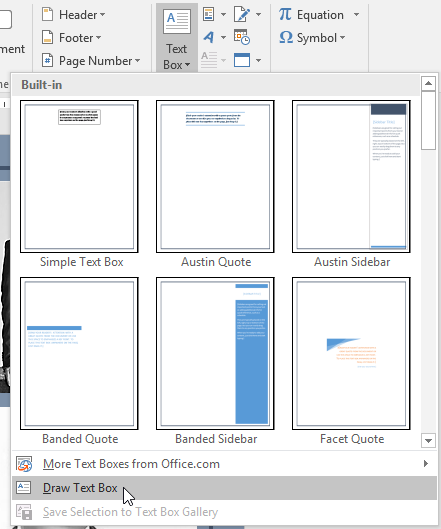
- Head to the “Insert” tab and open the “Text Box” drop-down box. You’ll see options below “Built-in” at the top. If you hover your cursor over one, you can see a brief description.

- Choose the premade text box you want to use, and you’ll see it pop onto the page.

- Click inside the box, which selects the sample text, then type your own.

You can customize the built-in text box, just like one you draw yourself, which is described below.
Draw a Text Box
If you want a complete blank canvas for your text box, you can draw one the size you need and insert your text. Additionally, this is the only option for inserting a text box in Word on Mac at this time.
- Go to the “Insert” tab and open the “Text Box” drop-down box. On Windows, select “Draw Text Box.”

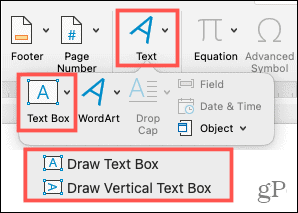
- On Mac, select either “Draw Text Box” or “Draw Vertical Text Box.” The latter places the text sideways in the box as shown below.

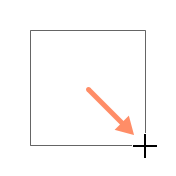
- When your cursor changes to a crosshair symbol, drag to draw the text box the size you want. You can still resize the text box later if needed.

- Once you have your box, just type your text inside of it.

Note: you can also add text boxes in Google Docs.
How to Resize, Rotate, or Move a Text Box
You aren’t stuck with the size, angle, or location of your new text box. You can easily resize, rotate, or move a text box in Word a few different ways.
Resize a Text Box
- To quickly resize a text box, drag a corner or edge.

- You can also go to the “Shape Format” tab to change the size. Use the Size section of the ribbon to enter the dimensions in the “Height” and “Width” boxes.

- If you want to size your box according to the text within it, right-click the text box and pick “Format Shape.” When the sidebar opens, go to the “Layout & Properties” tab and check the box for “Resize shape to fit text.”

Rotate a Text Box
- To freely rotate the box, drag the circular arrow at the top to the right or left.

- To rotate it right or left 90 degrees, go to the “Shape Format” tab. Pick an option from the “Rotate” drop-down menu in the “Arrange” section of the ribbon.

- For an exact angle, right-click and choose “More Layout Options.” Open the Size tab, enter the angle in the “Rotation” box, and click “OK.”

Move a Text Box
To move a text box, drag it to your desired location.
Because a text box works like an object, any other text in your document won’t move out of the way for a text box. However, you can use the Wrap Text and Position features to adjust this if needed.

- Go to the “Shape Format” tab, then use the “Wrap Text” drop-down box in the “Arrange” section of the ribbon to choose a wrapping option. For instance, you can place the box in line with the text.

- You can also use the “Position” drop-down box to the left of “Wrap Text” to place the box in a specific spot within the text. For example, you can place it on the top left with text wrapping around it.

Tip: learn how you can create and customize tables in Word.
How to Customize the Text Box Appearance
Along with resizing, rotating, or moving a text box, you may want to change its appearance. You can customize the shape of the text box, apply a background color, or give it a border.
- Select the text box and head to the “Shape Format” tab, then use the following sections of the ribbon to customize the box and text:
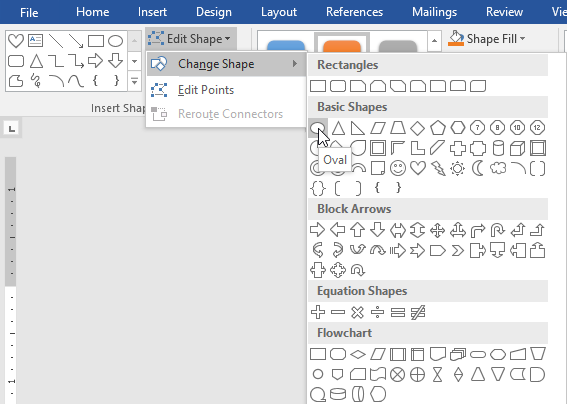
- Insert Shapes: open the “Edit Shape” drop-down menu, move to “Change Shape,” and select a new shape in the pop-out menu.

- Shape Styles: pick a preformatted design in the Shapes Styles box or choose a fill, apply a border, or add a shadow.

- WordArt Styles and Text: use these two sections to adjust the appearance of the text. Apply a design, fill, outline, or effect. You can also change the direction or align the text. For the font style and size, use the options in the “Font” section of the “Home” tab.

- For additional options, right-click the text box and select “Format Shape,” then you can adjust both the box and text settings in the sidebar. Some options match those in the ribbon while others are different. For instance, you can adjust the transparency of the box or text.

Try this: create an organized document with a table of contents and add page numbers in Word.
How to Connect Text Boxes in Word
One super-handy feature of text boxes in Word is that you can link them together. This allows you to start typing in one box and have the text carry over to the next box. It’s ideal for a list of tips, brief instructions, or short stories you want to include with your content.
To link text boxes, the box you want to connect to the previous one must be empty. If you already have your boxes filled with text, you can either remove the text from the subsequent boxes or add new boxes and remove the existing ones.
- Insert a text box as described earlier, then add a second text box, but be sure to leave it empty.

- Select the first text box, go to the “Shape Format” tab, and pick “Create Link” in the Text section of the ribbon.

- When your cursor changes to a paint can icon, click inside the second text box. This creates a link between the two. If you want a third or fourth text box linked, follow the same process by linking the second box to the third, third to the fourth, and so on.
- As you add text to the first box, the text that won’t fit then fills the second text box. If you have more text boxes, they will continue to fall into them.

- If you resize the text boxes, the amount of text in each one adjusts to accommodate it. When you resize one text box, you’ll see the linked box automatically resize as well.

- Should you decide later you don’t want the boxes linked, you can break the link. Select the first text box, go to the “Shape Format” tab, and click “Break Link.” Follow the same process to remove any additional text box connections.

Frequently Asked Questions
Can I add a hyperlink to a text box in Word?
You can add a link to a text box or specific text within it, just like any other object or text in a Word document.
To link the box, select it. To link specific text within the box, select it instead. Right-click, pick “Link” or “Hyperlink,” then choose an existing file or web page, place in the document, new document, or email address. On the right, select the item or add the URL and click “OK.”
How do I stop text from wrapping inside of a text box?
By default, the text inside of a text box wraps to the next line when it reaches the edge of the shape. But you can change this if you would like.
Right-click the text box and pick “Format Shape.” When the sidebar opens, select the “Layout & Properties” tab and uncheck the box for “Wrap text in shape.”
Can I temporarily hide text boxes in Word?
As you work on the other content in your document, you may want to hide a text box or two to focus on other things.
Select a text box, go to the “Shape Format” tab, and click “Selection Pane” in the “Arrange” section. When the sidebar opens, click the eye icon to the right of a text box to hide it. For all text boxes, click “Hide All” at the top. To unhide the text boxes, select the eye with a line through it to the right or pick “Show All” at the top.
Image credit: Pixabay. All screenshots by Sandy Writtenhouse.
Sandy Writtenhouse
With her BS in Information Technology, Sandy worked for many years in the IT industry as a Project Manager, Department Manager, and PMO Lead. She wanted to help others learn how technology can enrich business and personal lives and has shared her suggestions and how-tos across thousands of articles.
Subscribe to our newsletter!
Our latest tutorials delivered straight to your inbox
If you want to get creative with your text or simply have more flexibility, consider adding a customizing a text box in Word.
If you want more flexibility with certain text in your Word document, why not use a text box? Since a text box is considered an object, you can move it wherever you like in your document. This is handy for placing text in areas you normally wouldn’t.
You can use a text box to call attention to something in your document, rotate snippets of text, or create a unique appearance. Microsoft Word also provides formatting options for text boxes that give them their own nifty style or useful function.
Here, we’ll show you how to add or draw a text box and then format it to your liking in Microsoft Word.
With Word on Windows, you can either insert a preformatted text box or draw one of your own. Either way, you can customize it afterward, so choose the best option for you.
Go to the spot in your document where you want the text box and select the Insert tab. Click the Text Box drop-down arrow and pick a Built-In style or Draw a Text Box.
If you’re using Word on Mac, go to the Insert tab, click the Text drop-down arrow, and then the Text Box arrow. You can then choose to draw a simple text box or one where the text inside is vertical.
To draw your text box on either platform, drag the crosshairs to create the size you want. You can resize the text box any time after you draw it too.
When your text box appears, click inside to add your own words.
Format and Customize a Text Box in Word
Once you insert or draw your text box, select it and go to the Shape Format tab to view all of your formatting options. You’ll find the following features in Word on Windows, which may differ slightly in Word on Mac.
Shape Styles
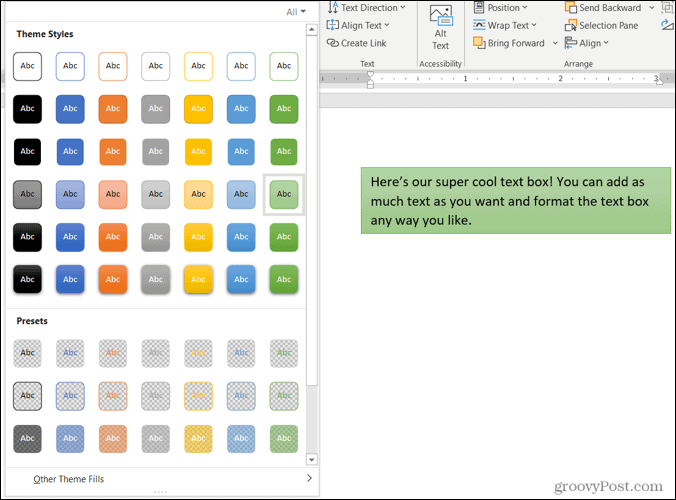
Choose a theme or preset style for your text box. These options include filling colors and various effects.
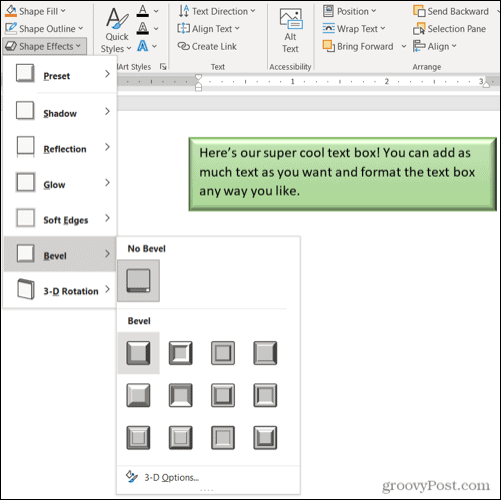
Or you can use the Shape Fill, Outline, and Effects options to create your own distinctive style. From gradients and patterns to dashed lines and scribbles, you have many terrific options for customizing the appearance of your text box.
Note: Some options in the Shape Styles section may not be available if you select a preset text box.
WordArt Styles
Along with making the text box itself look snazzy, you can do the same with the text inside of it. Check out the Quick Styles in the WordArt Styles for premade options.
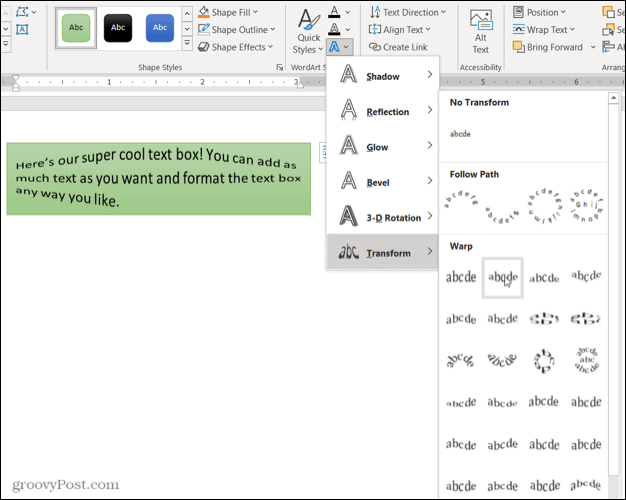
Or use the Text Fill, Outline, and Effects to make the text really pop. You can do things like add a shadow and glow or warp the text, so it’s curvy and cool.
Text, Accessibility, Arrange, and Size
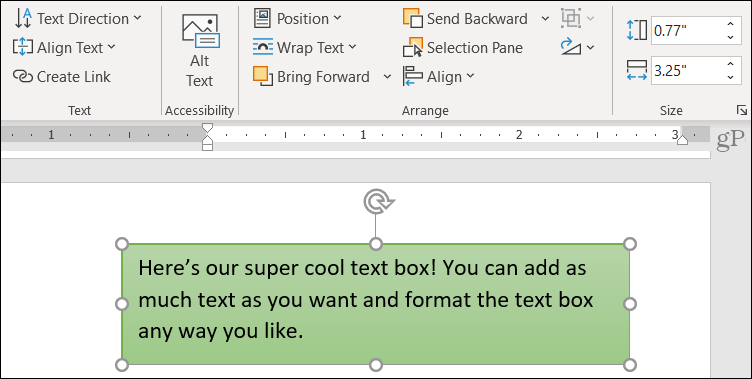
The remaining sections of the ribbon allow you to change the direction of the text inside the box, use text wrapping with other elements in your document, rotate the text box, and adjust its exact size. You can also use the Alt Text Accessibility option to describe the text box.
Edit Your Text Box
After you customize your text box, you can still edit it anytime. Just note that when you select the text box to make changes, it may appear without some of the elements or effects you’ve applied. This is to make text editing simpler.
Once you complete your edits and deselect the text box, it will return to normal with your customizations.
Add Text Anywhere, Any Way in Word
Text boxes in Microsoft Word let you place text anywhere in your document without worries of margins or other normal text limitations. And because you can completely format the text box almost any way you want, it can be both a fun and useful addition to your document.
If you use Google Docs and Microsoft Word, take a look at how to work with text boxes in Docs too!
Lesson 21: Text Boxes
/en/word2016/shapes/content/
Introduction
Text boxes can be useful for drawing attention to specific text. They can also be helpful when you need to move text around in your document. Word allows you to format text boxes and the text within them with a variety of styles and effects.
Optional: Download our practice document.
Watch the video below to learn more about text boxes in Word.
To insert a text box:
- Select the Insert tab, then click the Text Box command in the Text group.
- A drop-down menu will appear. Select Draw Text Box.
- Click and drag anywhere on the document to create the text box.
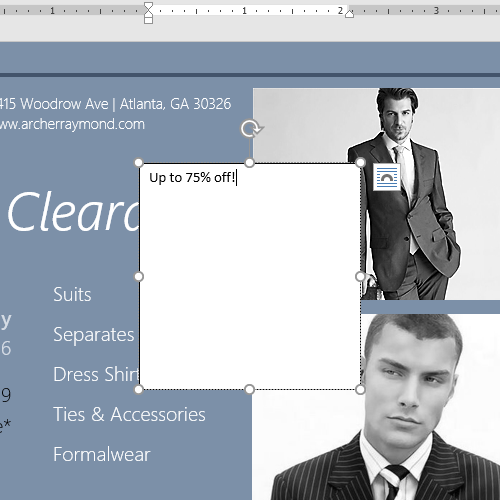
- The insertion point will appear inside the text box. You can now type to create text inside the text box.
- If you want, you can select the text and then change the font, color, and size by using the commands on the Format and Home tabs. To learn more about using these formatting commands, see our Formatting Text lesson.
- Click anywhere outside the text box to return to your document.
You can also select one of the built-in text boxes that have predefined colors, fonts, positions, and sizes. If you choose this option, the text box will appear automatically, so you will not need to draw it.
To move a text box:
- Click the text box you want to move.
- Hover the mouse over one of the edges of the text box. The mouse will change into a cross with arrows.
- Click and drag the text box to the desired location.
To resize a text box:
- Click the text box you want to resize.
- Click and drag any of the sizing handles on the corners or sides of the text box until it is the desired size.
Modifying text boxes
Word offers several options for changing the way text boxes appear in your document. You can change the shape, style, and color of text boxes or add various effects.
To change the shape style:
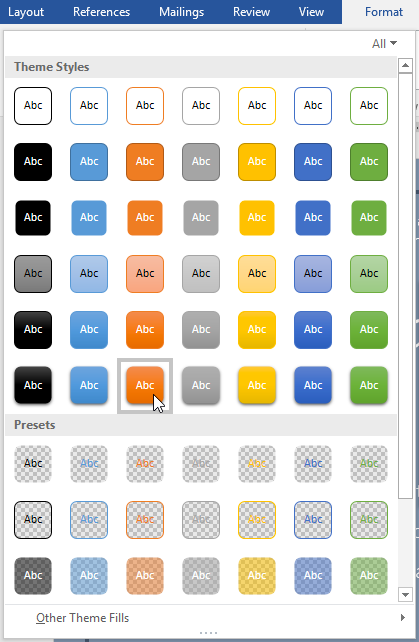
Choosing a shape style allows you to apply preset colors and effects to quickly change the appearance of your text box.
- Select the text box you want to change.
- On the Format tab, click the More drop-down arrow in the Shape Styles group.
- A drop-down menu of styles will appear. Select the style you want to use.
- The text box will appear in the selected style.
If you want to have more control over text box formatting, you can use any of the shape formatting options such as Shape Fill and Shape Outline. To learn more, see our Shapes lesson.
To change the text box shape:
Changing the shape of a text box can be a useful option for creating an interesting look in your document.
- Select the text box you want to change. The Format tab will appear.
- From the Format tab, click the Edit Shape command.
- Hover the mouse over Change Shape, then select the desired shape from the menu that appears.
- The text box will appear formatted as the shape.
Challenge!
- Open our practice document.
- Insert a Simple Text Box.
- In the text box, type Get an additional 25% off when you mention this ad!
- Change the font to Gadugi, 20 pt, Center Align.
- Change the shape of the text box to Double Wave from the Stars and Banners group.
- Change the text box style by selecting any style in the Intense Effect row.
- Drag the text box to the space below Buy 1, Get 1 Free* and Formalwear.
- When you’re finished, your document should look something like this:
/en/word2016/aligning-ordering-and-grouping-objects/content/
Why not utilize a text box if you need greater freedom with certain content in your Word document? A text box may be moved anywhere on your page since it is regarded as an object. This is useful for adding text to places you wouldn’t ordinarily.
A text box may be used to highlight a specific area of your document, rotate text, or give it a distinctive look. Text boxes in Microsoft Word may also be formatted to give them a unique look or helpful feature.
Here, we’ll demonstrate how to add or create a text box in Microsoft Word, then format it as you see fit.
Insert or Draw a Text Box in Word
You may either enter a preformatted text box or create your own using Word on Windows. Choose the one that best suits you since you may tweak it either way afterward.
Select the Insert tab and go to the location in your document where you want the text box to appear. Choose a Built-In style or Draw a Text Box by clicking the drop-down arrow next to the text box.
When using Word on a Mac, choose the Insert tab, then click the Text drop-down and Text Box arrows. Then, you may decide whether to construct a plain text box or one with vertical text within.
On either platform, move the crosshairs to achieve the desired size before drawing your text box. After drawing the text box, you may always change its size.
Click within your text box when it displays to enter your own words.
Format and Customize a Text Box in Word
To access all of your formatting choices after inserting or drawing your text box, pick it and go to the Shape Format tab. The capabilities listed below are available in Word for Windows, albeit they could be somewhat different in Word for Mac.
Shape Styles
For your text box, choose a theme or pre-made design. These choices include different effects and filling colors.
Alternately, you may develop your own design by using the Shape Fill, Outline, and Effects tools. You have a tonne of fantastic choices for personalizing the look of your text box, from gradients and patterns to dashed lines and scribbles.
Note: Some of the choices in the Shape Styles section may not be accessible if you choose a preset text box.
WordArt Styles
You may style the text within the text box just as you do the text box itself. For ready-made choices, go through the WordArt Styles’ Quick Styles.
Or, to truly make the text stand out, use the Text Fill, Outline, and Effects. You may alter the text to make it curvy and cool by adding a shadow and shine or warping it.
Text, Accessibility, Arrange, and Size
You may rotate the text box, utilize text wrapping with other components in your document, alter the orientation of the text within the box, and modify the precise size of the text box using the remaining ribbon parts. To explain the text box, you may alternatively utilize the Alt Text Accessibility setting.
Edit Your Text Box
You can always update your text box even after you’ve customized it. Please be aware that some of the components or effects you’ve applied may not display when you choose the text box to make changes. This will simplify text editing.
The text box will revert to its original state with your adjustments after you’ve finished editing and deselected it.
Add Text Anywhere, Anyway in Word
With Microsoft Word’s text boxes, you may insert text wherever in a document without worrying about margins or other typical text restrictions. Additionally, the text box may be totally formatted whatever you choose, making it a valuable and entertaining addition to your work.

 four-headed arrow, drag the text box to a new location.
 .
.

 + C.
+ C.