
Преобразуйте Excel в PDF онлайн
бесплатно в любом месте
Преобразование Excel в PDF
Преобразуйте таблицу Excel в документ формата PDF онлайн. Это быстро, удобно и абсолютно бесплатно.
Просто загрузите файл (с устройства или из облака), а мы сделаем всё остальное. PDF2Go быстро преобразует файл в формат PDF (время ожидания зависит от размера документа).
Преобразование PDF-файлов онлайн
Не надо ничего скачивать или устанавливать! Онлайн-сервис PDF2Go работает прямо в браузере. Вам не грозят проблемы с вирусами или нехваткой свободного места на жёстком диске и телефоне.
Чтобы преобразовать Excel-файл в формат PDF, нужен только Интернет — и всё.
Зачем нужен формат PDF?
По сравнению с таблицами Excel у файлов формата PDF есть ряд преимуществ: это и неизменное форматирование, и возможность открыть на компьютере, на котором нет программы Excel. К тому же PDF-файлы больше подходят для печати, и ими проще делиться в интернете.
Используйте эти и другие преимущества: преобразуйте таблицу Excel в формат PDF.
Файлы в безопасности — всегда
Регулярное удаление файлов, защищённые сервера, автоматическая обработка и конфиденциальность — вот за счёт чего PDF2Go обеспечивает безопасность файлов.
Все права сохраняются за вами; PDF2Go не претендует на исходный Excel или полученный PDF-файл.
Преобразование любых таблиц
Формат PDF универсален и иногда лучше подходит для поставленной задачи. Мы предлагаем вам бесплатный инструмент для преобразования файлов Microsoft Excel. Вы можете конвертировать в PDF следующие типы файлов.
Электронные таблицы:
Microsoft Excel XLS и XLSX
Преобразовать файл в формат PDF онлайн
Зачем загромождать память устройства, если можно работать онлайн?
Название PDF2Go говорит само за себя: конвертируйте PDF-файлы в пути, дома, на работе — в удобном для вас месте. Онлайн-конвертер работает на любом устройстве, будь то планшет, компьютер или смартфон.
Конвертируйте любые Excel-таблицы (xls, xlsx) в формат PDF.
Google Drive
Dropbox
Ссылка
Перетащите файлы сюда
Связаться с нами
Воспользуйтесь этой формой, чтобы связаться с нами, сообщить об ошибке или предложить функцию.
Спасибо
Сообщение отправлено
Премиум доступ к 50 приложениям
Размер файла до 10 ГБ
Неограниченное количество файлов
Без рекламы
Премиум
Премиум доступ к 50 приложениям
Размер файла до 10 ГБ
Неограниченное количество файлов
Без рекламы
Хотите сэкономить 20%?
Вы можете сэкономить 20% при оплате за год. Хотите оплатить 3570₽ за годовой доступ? Это 298₽ в месяц.
Перейти на премиум
Единая подписка на все наши приложения
Восстановление пароля
Мы отправим вам ссылку для восстановления пароля
Установите новый пароль
Здесь вы можете установить новый пароль для входа в учетную запись 123apps. Обязательно запомните его и храните в надежном месте.
Пароль обновлен
Ваш пароль был успешно изменен
Войти
Единый аккаунт для всех наших приложений
Войти через Google
Войти через Facebook
или
Создать аккаунт
Единый аккаунт для всех наших приложений
Войти через Google
Войти через Facebook
или
Создавая учетную запись, вы соглашаетесь с Условиями использования
Уже зарегистрированы? Войти
Обновить способ оплаты
Нам не удалось продлить вашу подписку. Пожалуйста, обновите платежную информацию.
Разрешите этому приложению работать с вашим Google Диском
![]()
Download Article
Easy ways to convert Excel to PDF
![]()
Download Article
Converting an Excel file to a PDF makes it easier for people to open the and view the file on various platforms—even if they don’t have Microsoft Office. PDFs are also easier to print and distribute than Excel spreadsheets. If you have Microsoft Excel, you can easily convert your spreadsheet to a PDF by saving or exporting it within the app. If you don’t have Excel, you can use Google Sheets, a tool on Google Drive, to make the conversion for free.
-

1
Select the part of the Excel spreadsheet you want to convert to PDF (optional). If there’s only a certain part of the Excel file that you want to turn into PDF format, select it now. Otherwise, move on to the next step.
- Note that PDF conversions cannot be easily reverted back into an Excel sheet, but this method will preserve your original copy.
-
2
Click the File menu. It’s at the top-left corner.
Advertisement
-
3
Click Export on the menu. This opens the Export panel.
-
4
Click Create PDF/XPS. Look for the icon that looks like a sheet of paper wearing a belt.
-
5
Click the Options… button. This will allow you to adjust the settings for the PDF file you are about to create.
-
6
Choose your PDF options and click OK.
- If you selected an area of your spreadsheet to save as a PDF, choose Selection under «Publish what.» This ensures that only that selected area is saved as a PDF.
- If you’d rather save the entire visible worksheet as a PDF, choose Active sheet(s) instead.
- If you want to choose specific pages from the workbook to save as a PDF, use the «Page(s)» drop-down menus to define the first and last pages.
- Click OK to continue.
-
7
Choose your optimization (optional). Above the «Options» button, you can select how you want to optimize the PDF. Most people can stick with «Standard» unless the spreadsheet is very large. «Minimum size» will reduce the size of a larger file to something more manageable.
- If you want to change the location to which you’re saving the file, you can navigate to that folder in the window now.
-
8
Name the file and click Publish. This exports the selected information to a new PDF file with the name you’ve entered.
-
9
Review the PDF. By default, the PDF file will open automatically for your review. If it doesn’t open by automatically, just double-click the name of the file in the folder to which you saved it..
- It’s not really possible to edit the PDF now, so if you need to make changes you’ll want to make them in the Excel document and then create a new PDF.


Advertisement
-
1
Go to https://drive.google.com. If you need to convert an Excel spreadsheet to PDF but don’t have Excel, don’t fret—you can use tools built in to your Google account to do the conversion for free.
- If you’re not already signed in to your Google account, sign in when prompted.
-
2
Click +New. It’s at the top-left corner of your Google Drive.
-
3
Click File upload. This opens your computer’s file browser.
-
4
Select your Excel spreadsheet and click Open. This uploads the spreadsheet to your Google Drive.
-
5
Click the Excel spreadsheet in your Google Drive. This opens the spreadsheet in Google Sheets, Google’s free spreadsheet editor.
-
6
Click the File menu and select Download. A list of download options will expand.
-
7
Click PDF document (.pdf). This displays a preview of your PDF in the Google Sheets printing window.
-
8
Adjust the layout of your PDF. If the print preview doesn’t look the way you want, use the right panel to make any changes you need before you continue.
- The PDF will save in the same orientation as the spreadsheet (usually landscape mode). If you’d rather it be in portrait (vertical) mode, select Portrait under «Page orientation.»
- Change the scale (the size/fit on the page) and margin size if necessary.
- Click Formatting to choose whether to display gridlines and/or notes, adjust the page order, and change the alignment.
- To add headers and footers to the tops and bottoms of pages, click Headers & footers, and then check the boxes to choose which information to display.
- If your spreadsheet contains a lot of data and cuts off in odd places, click SET CUSTOM PAGE BREAKS in the right panel. Here, you can drag the blue lines to adjust where each page begins and ends. Click CONFIRM BREAKS at the top-right to save your changes.
-
9
Click EXPORT. It’s the blue button at the top-right. This prompts you to save your new PDF to your computer.
- If the download doesn’t begin automatically, choose a location to which you’ll save the PDF, and then click Save to download it.


Advertisement
-
1
Ensure that the headers and footers on all of your sheets are the same (optional). If you’re using Excel 2011 and want to save multiple worksheets in a single PDF, each worksheet will need to have identical headers and footers. If they aren’t, each sheet will be created as a separate PDF document, but you can also easily merge these afterwards.
- Select all of the worksheets in your entire workbook. To do this, click the tab for the first sheet at the bottom of excel, hold down the Shift key, and then click the last sheet’s tab to select all.
- Click the Layout tab and then click Header & Footer.
- Click the Customize Header… and Customize Footer… buttons to edit the headers and footers for all of the sheets.
-
2
Select the part of the Excel spreadsheet you want to convert to PDF (optional). If there’s only a certain part of the spreadsheet that you want to turn into a PDF, select it now. Otherwise, go to the next step.
- PDF conversions cannot be easily converted back into an Excel sheet, but this method will preserve your original copy.
-
3
Click the File menu and select Save As. You could also press Command + Shift + S to open the Save As option.[1]
- If you want to save the PDF to a new folder, you can select that folder now. # Type a different name for the file. The name of the current Excel file appears in the «Save As» field. You will need to enter a different name (even if it’s just slightly different) to avoid accidentally overwriting the spreadsheet file.[2]
- If you want to save the PDF to a new folder, you can select that folder now. # Type a different name for the file. The name of the current Excel file appears in the «Save As» field. You will need to enter a different name (even if it’s just slightly different) to avoid accidentally overwriting the spreadsheet file.[2]
-
4
Click the «Format» or «File Format» menu and select PDF. This menu may have a slightly different name depending on your version of Excel.
-
5
Select what gets included in the PDF. At the bottom of the window, you can select Workbook (to convert the entire workbook), Sheet (to save only the active sheet as a PDF), or Selection (to save just the selected area as a PDF).
-
6
Click Save or Export. You’ll see a different option depending on your version of Excel.
- If the headers don’t match on a multi-sheet file, a separate file will be created for each sheet.
-
7
Join the separate PDF files (if necessary). If saving the Excel file as a PDF resulted in multiple PDF files, you can quickly join them together using Preview. Here’s how:
- Open the first PDF file by double-clicking its name in its folder.
- Click the View menu and select Thumbnails.[3]
- Click the last thumbnail to select it. This tells Preview to add the next PDF to the end of the current document.
- Click the Edit menu and select Insert > Page from File.
- Select the next PDF in the range and click Open.
- Repeat this process until you’ve added all PDFs.
- Click File and select Export as PDF.


Advertisement
Add New Question
-
Question
How can I send a large Excel spreadsheet if I don’t want to convert it to a PDF?

Luigi Oppido is the Owner and Operator of Pleasure Point Computers in Santa Cruz, California. Luigi has over 25 years of experience in general computer repair, data recovery, virus removal, and upgrades. He is also the host of the Computer Man Show! broadcasted on KSQD covering central California for over two years.
Computer & Tech Specialist
Expert Answer
If you’re sending a large Excel sheet, or if you want to send multiple files at once, you can compress the files as a zip folder. Then, the other person can unzip the folder and see all of the original files.
-
Question
How do I get a one-page worksheet as a one-page PDF? It keeps trying to save as several pages.
In Excel go to Page Layout. In the Scale to Fit section, make sure Width and Height are both set to one page, then save the Excel document as a PDF.
-
Question
How can I get full xlsx worksheets to convert to PDF?
In Microsoft Office Suite 2016. There’s an option to export under File. From there, you can choose the Export to PDF option.

See more answers
Ask a Question
200 characters left
Include your email address to get a message when this question is answered.
Submit
Advertisement
-
If you’re sending a large Excel sheet to someone who also has Microsoft Excel, or if you need to send multiple files, try compressing the files instead of converting them to a PDF.
Advertisement
About This Article
Article SummaryX
1. Click the File menu and select Export.
2. Click Create PDF/XPS.
3. Click Options.
4. Choose your options and select OK.
5. Select an optimization level.
6. Name the file and click Publish.
Did this summary help you?
Thanks to all authors for creating a page that has been read 1,553,124 times.
Is this article up to date?
Excel for Microsoft 365 Word for Microsoft 365 Access for Microsoft 365 Project Online Desktop Client Publisher for Microsoft 365 Word for the web OneNote for the web PowerPoint for the web Excel 2021 Word 2021 Access 2021 Project Professional 2021 Project Standard 2021 Publisher 2021 OneNote 2021 Excel 2019 Word 2019 Access 2019 Project Professional 2019 Project Standard 2019 Publisher 2019 Excel 2016 Word 2016 Access 2016 OneNote 2016 Project Professional 2016 Project Standard 2016 Publisher 2016 Office 2016 for Mac Excel 2013 Word 2013 Access 2013 OneNote 2013 Project Professional 2013 Project Standard 2013 Publisher 2013 Project Online Excel 2010 Word 2010 Access 2010 OneNote 2010 Project 2010 Project Standard 2010 Publisher 2010 Office 2010 Excel Starter 2010 More…Less
You can use the Office programs to save or convert your files to PDFs so that you can share them or print them using commercial printers. And you won’t need any other software or add-ins.
Use PDF format when you want a file that:
-
Looks the same on most computers.
-
Has a smaller file size.
-
Complies with an industry format.
Examples include resumes, legal documents, newsletters, files that are intended to be read (not edited) and printed, and files that are intended for professional printing.
Important: Many programs, including Microsoft Word, have the ability to open and edit PDF files. Simply sharing something as a PDF is not sufficient to guarantee the recipient can’t edit the file.
To see step-by-step instructions, select an Office program from the drop-down list.
-
Open the table or report you want to publish as a PDF.
-
On the External Data tab, in the Export group, select PDF or XPS.
-
In the File Name field, type or select a name for the document.
-
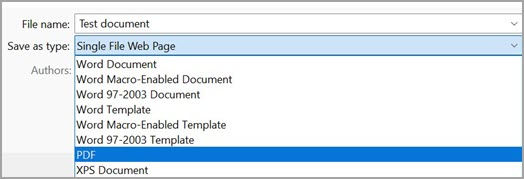
In the Save as type list, select PDF (*.pdf) .
-
If the document requires high print quality, select Standard (publishing online and printing) .
-
If file size is more important than print quality, select Minimum size (publishing online).
-
-
Select Options to set the page to be printed, to choose whether markup should be printed, and to select output options. Select OK .
-
Select Publish.

Note: You can’t save Power View sheets as PDF files.
-
Select the File tab.
-
Select Save As .
To see the Save As dialog box in Excel 2013 or Excel 2016, you have to choose a location and folder. -
In the File Name box, enter a name for the file, if you haven’t already.
-
In the Save as type list, select PDF (*.pdf) .
-
If you want the file to open in the selected format after saving, select the Open file after publishing check box .
-
If the document requires high print quality, select Standard (publishing online and printing) .
-
If file size is more important than print quality, select Minimum size (publishing online) .
-
-
Select Options to set the page to be printed, to choose whether markup should be printed, and to select output options. For more information on the Options dialog box in Excel, see More about PDF options . Select OK when finished.
-
Select Save .
-
Select the File tab.
-
Select Export .
-
Under Export Current , select what part of the notebook you want to save as PDF.
-
Under Select Format , select PDF (*.pdf) , and then select Export .
-
In the Save As dialog box, in the File Name field, enter a name for the notebook.
-
Select Save .
-
Select the File tab.
-
Select Save As .
To see the Save As dialog box in PowerPoint 2013 or PowerPoint 2016 , you have to choose a location and folder. -
In the File Name box, enter a name for the file, if you haven’t already.
-
In the Save as type list, select PDF (*.pdf) .
-
If you want the file to open in the selected format after saving, select the Open file after publishing check box.
-
If the document requires high print quality, select Standard (publishing online and printing) .
-
If the file size is more important than print quality, select Minimum size (publishing online) .
-
-
Select Options to set the page to be printed, to choose whether markup should be printed, and to select output options. Select OK when finished.
-
Select Save .
-
On the File tab, choose Save As .
To see the Save As dialog box in Project 2013 or Project 2016, you have to choose a location and folder. -
In the File Name box, enter a name for the file, if you haven’t already.
-
In the Save as type list, select PDF Files (*.pdf) or XPS Files (*.xps) , and then choose Save .
-
In the Document Export Options dialog box, select a Publish Range , whether to Include Non-printing Information , and ISO 19500-1 compliance (PDF only).
Formatting tips
Project doesn’t support every PDF or XPS formatting feature, but you can still use some print options to change the look of the final doc.
Choose File > Print , and then change any of these options:
-
Dates
-
Orientation
-
Paper Size
-
Page Setup
In the Page Setup dialog box, you can change options on these tabs:
-
Margins
-
Legend
-
View
-
Select the File tab.
-
Select Save As .
To see the Save As dialog box in Publisher 2013 or Publisher 2016, you have to choose a location and folder. -
In the File Name box, enter a name for the file, if you haven’t already.
-
In the Save as type list, select PDF (*.pdf) .
-
If you want to change how the document is optimized, select Change . (Select Options in Publisher 2013 or Publisher 2016.)
-
Make any changes you want to the picture resolution and non-printing information.
-
Select Print Options to make changes to the printing options for the document.
-
Select OK when finished.
-
-
If you want the file to open in the selected format after saving, select the Open file after publishing check box.
-
Select Save .
-
Select the File tab.
-
Select Save As .
To see the Save As dialog box in Visio 2013 or Visio 2016, you have to choose a location and folder. -
In the File Name box, enter a name for the file, if you haven’t already.
-
In the Save as type list, select PDF (*.pdf) .
-
If you want the file to open in the selected format after saving, select the Automatically view file after saving check box.
-
If the document requires high print quality, select Standard (publishing online and printing) .
-
If file size is more important than print quality, select Minimum size (publishing online) .
-
-
Select Options to set the page to be printed, to choose whether markup should be printed, and to select output options. Select OK .
-
Select Save .
-
If the file was previously saved, select File > Save a Copy.
If the file is unsaved, select File > Save As. -
Select Browse to choose the location on your computer where you want to save the file.
-
In the drop-down list, select PDF.
-
Select Save.
Select More Options > Options to customize your PDF.
-
To make a PDF file from only some of the pages in your document, choose an option under Page range.
-
To include tracked changes in the PDF, under Publish what, select Document showing markup. Otherwise, make sure Document is selected.
-
To create a set of bookmarks in the PDF file, select Create bookmarks using. Then, choose Headings or, if you added bookmarks to your document, Word Bookmarks.
-
If you want to include document properties in the PDF, make sure Document properties is selected.
-
To make the document easier for screen-reading software to read, select Document structure tags for accessibility.
-
ISO 19005-1 compliant (PDF/A) This option outputs the PDF document as version 1.7 PDF, which is an archiving standard. PDF/A helps to insure that a document will look the same when it’s opened later on a different computer.
-
Bitmap text when fonts may not be embedded If fonts can’t be embedded into the document, the PDF uses bitmap images of the text so that the PDF looks the same as the original document. If this option isn’t selected and the file uses a font that can’t be embedded, then the PDF reader might substitute another font.
-
Encrypt the document with a password To restrict access so only people with the password can open the PDF, select this option. When you select OK, Word opens the Encrypt PDF Document box, where you can type and re-enter a password.
Open and copy content from a PDF with Word
You can copy any content you want from a PDF by opening it in Word.
Go to File > Open and browse to the PDF file. Word opens the PDF content in a new file. You can copy any content you want from it, including images and diagrams.
To save your file as a PDF in Office for Mac, follow these easy steps:
-
Select File.
-
Choose Save As.
-
Select File Format at the bottom of the window.
-
Choose PDF from the list of available file formats.
-
Give your file a name, if it doesn’t already have one, then select Export.
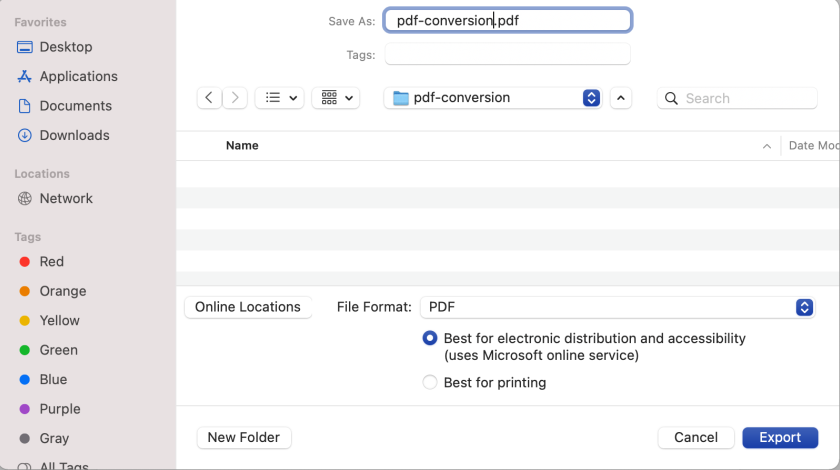
Note: When using Best for printing, the hyperlinks may not convert correctly. This is a known issue in Word for Mac.
Important:
-
When using Online Service , only font that Microsoft has the legal rights to can be used. If the documentation contains custom font, it will be substituted and may cause problems. This can be avoided by embedding the fonts into the document.
-
Learn more about embedding fonts by visiting:
-
Benefits of embedding custom fonts
-
Some of your fonts can’t be saved with the presentation
You can use Word, PowerPoint, and OneNote for the Web to convert your doc into a PDF.
-
Select File > Print > Print (in PowerPoint you will select one of three formats).
-
In the dropdown menu under Printer , select Save as PDF and then select Save.
-
Then in the Explorer menu that opens you can name the PDF and choose where to save it and then select Save.
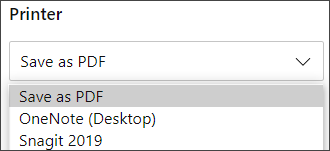
This will generate a basic PDF that preserves the layout and format of your original document.
If you need more control over the options for your PDF, such as adding bookmarks, use the desktop app to convert your doc to a PDF. Select Open in Desktop App in the toolbar of PowerPoint and OneNote to start using the desktop app, and in Word select the Editing dropdown first and then select Open in Desktop App .

If you don’t own the desktop app, you can try or buy Microsoft 365.
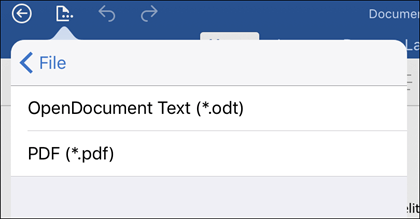
To export your Word document or Excel workbook to PDF format on iOS tap the File button at the top left, choose Export and then PDF.
Portable Document Format (PDF) preserves document formatting and enables file sharing. When the PDF format file is viewed online or printed, it retains the format that you intended. The PDF format is also useful for documents that will be reproduced using commercial printing methods. PDF is accepted as a valid format by many agencies and organizations, and viewers are available on a wider variety of platforms than XPS.
XML Paper Specification (XPS) is an electronic file format that preserves document formatting and enables file sharing. The XPS format ensures that when the file is viewed online or printed, it retains exactly the format that you intended, and that data in the file cannot be easily changed.
Important: Most modern web browsers can open and display a PDF file. If you have an older operating system, however, you may need a PDF reader installed on your device such as the Acrobat Reader, available from Adobe Systems.
See also
-
Edit or make changes to a PDF file
-
Create accessible PDFs
Need more help?
Содержание
- Конвертация в программе Excel
- Использование надстроек
- Сторонние программы
- Конвертация с помощью онлайн-сервисов
- Вопросы и ответы
Формат PDF является одним из самых популярных форматов документов для чтения и печати. Также, его можно использовать, как источник информации без возможности редактирования. Поэтому, актуальным является вопрос конвертации файлов других форматов в ПДФ. Давайте разберемся, как перевести известный табличный формат Excel в PDF.
Конвертация в программе Excel
Если раньше для того, чтобы конвертировать Excel в PDF, нужно было повозиться, используя для этого сторонние программы, сервисы и дополнения, то с версии 2010 года процесс конвертации можно выполнить прямо в программе Microsoft Excel.
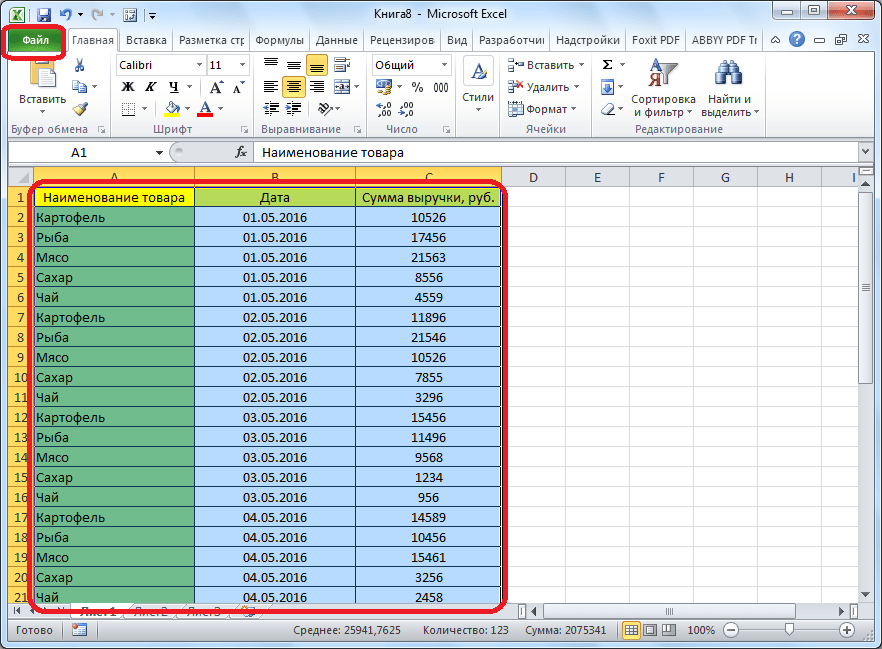
Прежде всего, выделяем область ячеек на листе, которую собираемся конвертировать. Затем, переходим во вкладку «Файл».
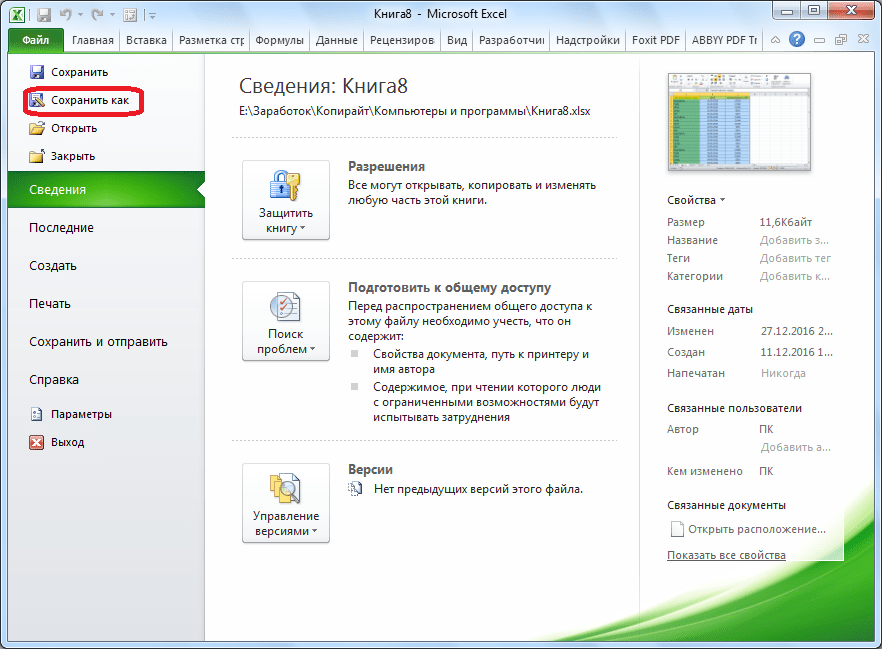
Кликаем по пункту «Сохранить как».
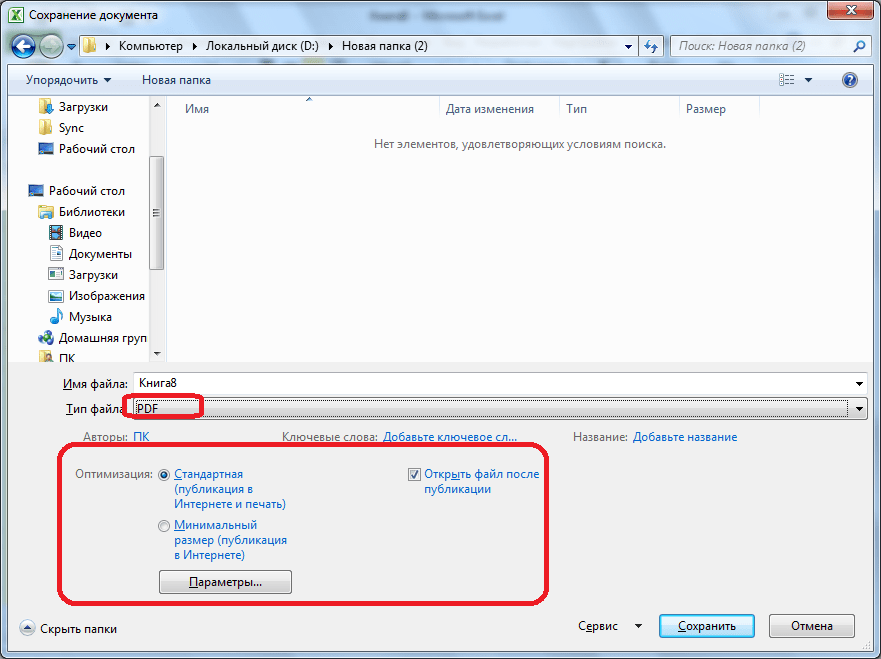
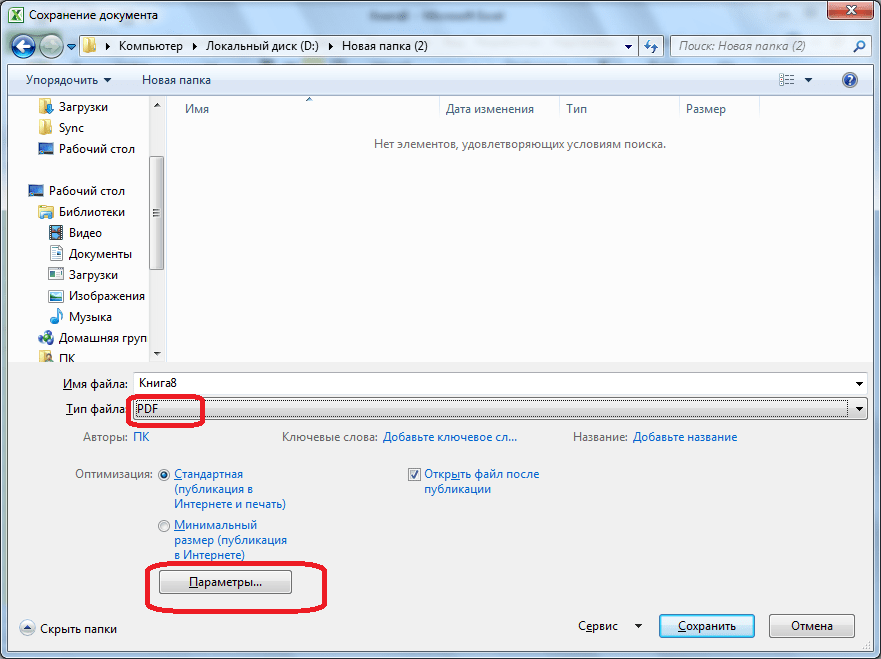
Открывается окно сохранения файла. В нём следует указать папку на жестком диске или съемном носителе, куда файл будет сохранен. При желании, можно переименовать файл. Затем, раскрываем параметр «Тип файла», и из огромного списка форматов выбираем PDF.

После этого, открываются дополнительные параметры оптимизации. Путем установки переключателя в нужную позицию, можно выбрать один из двух вариантов: «Стандартный размер» или «Минимальный». Кроме того, установив галочку напротив надписи «Открыть файл после публикации», вы сделаете так, что сразу после процесса конвертации, файл запустится автоматически.
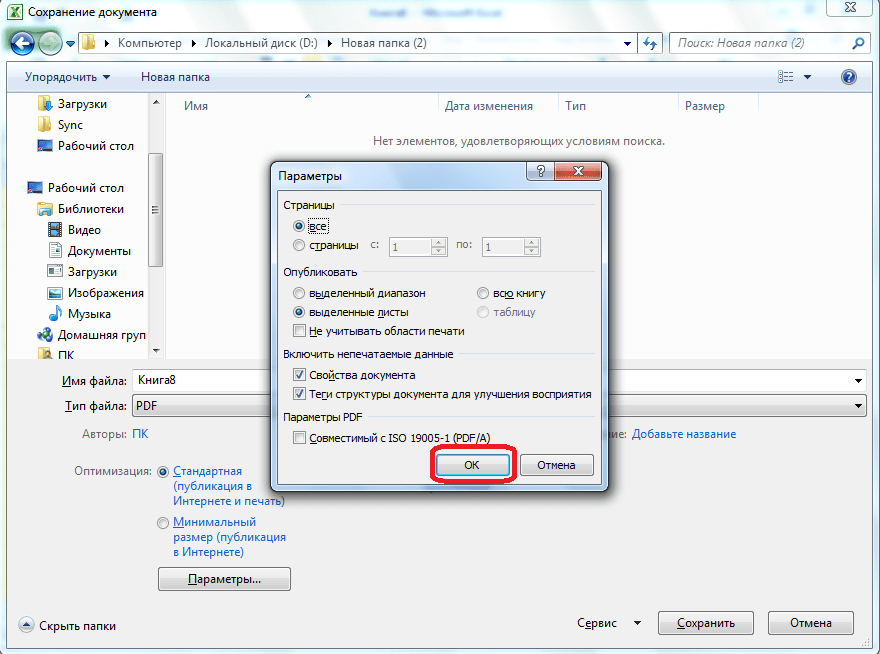
Для установки некоторых других настроек, нужно нажать на кнопку «Параметры».
После этого, открывается окно параметров. В нём можно установить конкретно, какую часть файла вы собираетесь конвертировать, подключить свойства документов и тэги. Но, в большинстве случаев, изменять данные настройки не нужно.

Когда все настройки сохранения выполнены, жмем на кнопку «Сохранить».
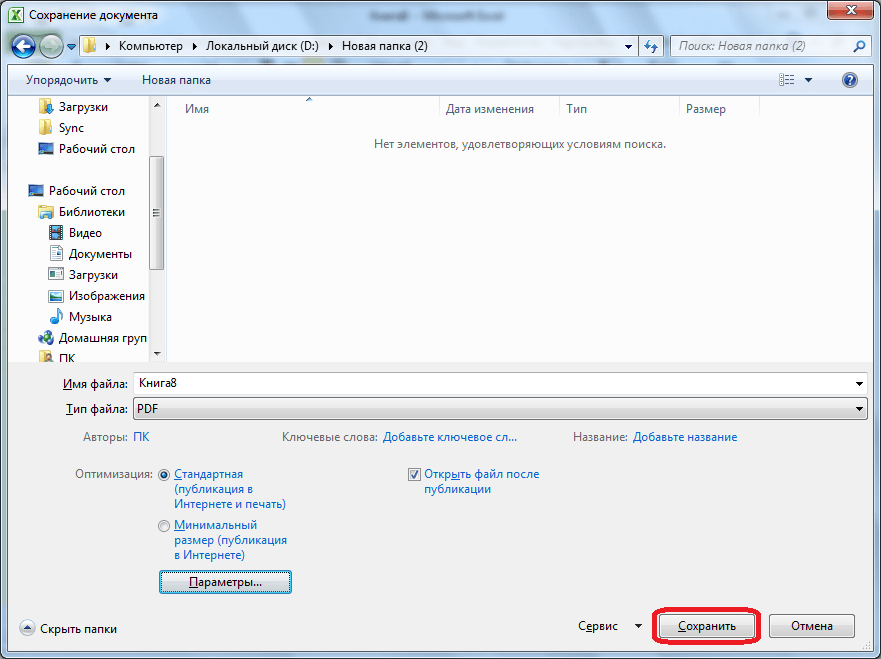
Происходит конвертация файла в формат PDF. На профессиональном языке процесс конвертации в этот формат называется публикацией.
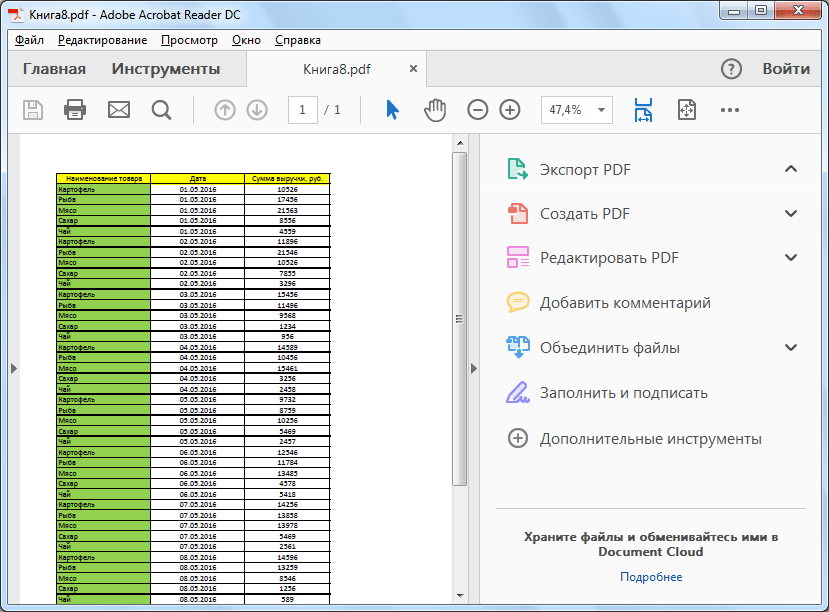
По завершению конвертации, вы можете делать с готовым файлом все то же самое, что и с любым другим документом PDF. Если в настройках сохранения вы указали необходимость открыть файл после публикации, то он запустится в автоматическом режиме в программе для просмотра файлов PDF, которая установлена по умолчанию.
Использование надстроек
Но, к сожалению, в версиях Microsoft Excel до 2010 года не предусмотрен встроенный инструмент конвертации Excel в PDF. Что же делать пользователям, у которых старые версии программы?
Для этого, в Excel можно установить специальную надстройку для конвертации, которая действует по типу плагинов в браузерах. Многие программы для работы с PDF предлагают установку собственных надстроек в приложениях пакета Microsoft Office. Одной из таких программ является Foxit PDF.
После установки этой программы, в меню Microsoft Excel появляется вкладка под названием «Foxit PDF». Для того, чтобы конвертировать файл нужно открыть документ и перейти в эту вкладку.
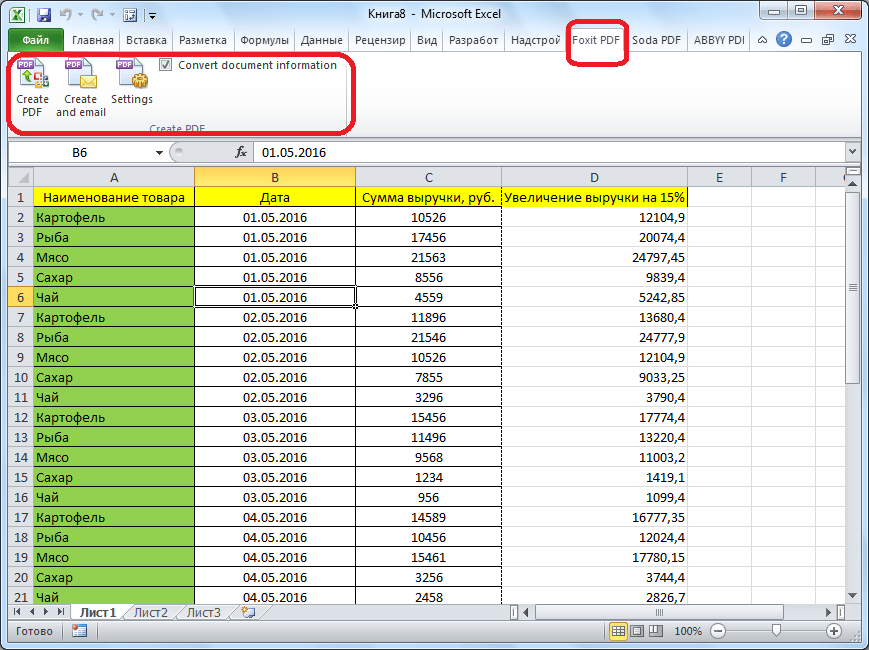
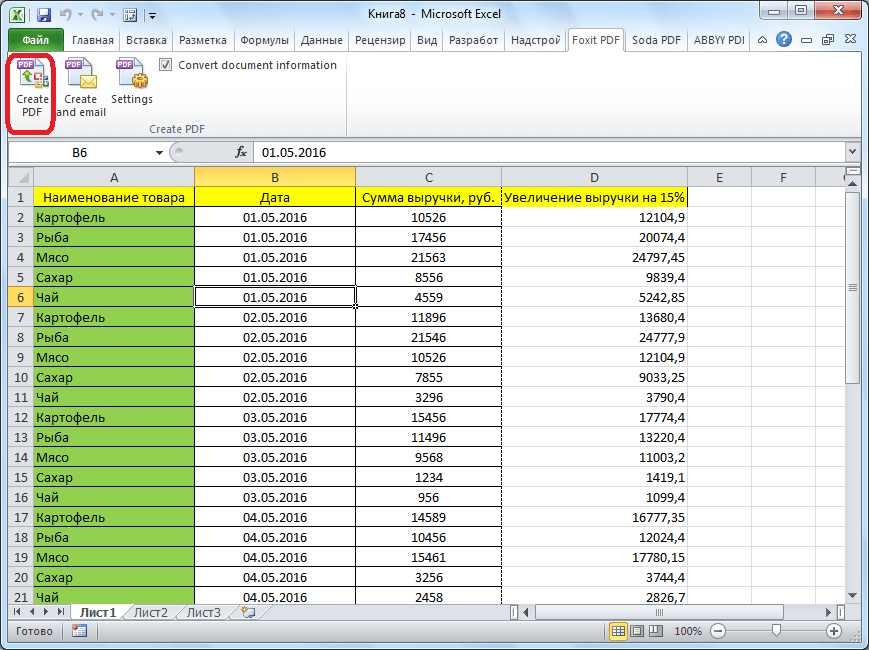
Далее, следует нажать на кнопку «Create PDF», которая расположена на ленте.
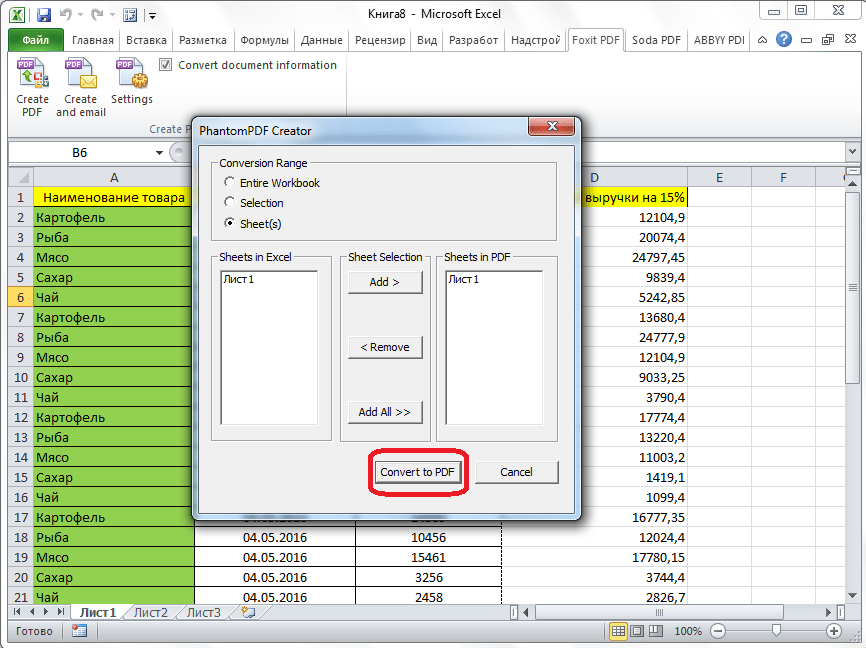
Открывается окно, в котором, с помощью переключателя, нужно выбрать один из трёх режимов конвертирования:
- Entire Workbook (конвертация всей книги полностью);
- Selection (конвертация выделенного диапазона ячеек);
- Sheet(s) (конвертация выбранных листов).
После того, как выбор режима конвертации сделан, жмем на кнопку «Convert to PDF» («Конвертировать в PDF»).
Открывается окно, в котором нужно выбрать директорию жесткого диска, или съемного носителя, где будет размещаться готовый файл PDF. После этого, жмем на кнопку «Сохранить».
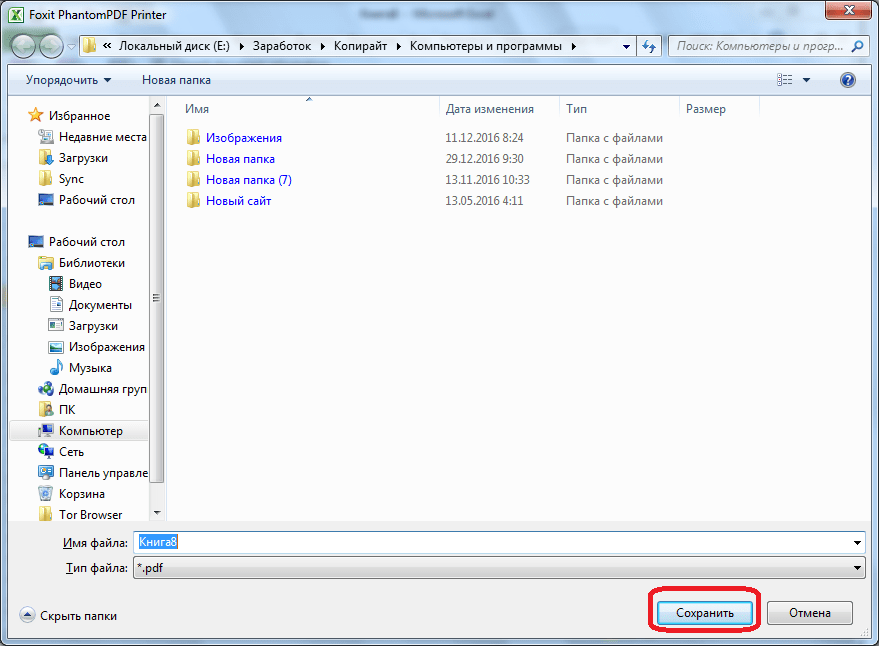
Выполняется конвертация документа Excel в формат PDF.
Сторонние программы
Теперь давайте выясним, существует ли способ конвертации файла Excel в PDF, если на компьютере вообще не установлен пакет Microsoft Office? В этом случае, на помощь могут прийти сторонние приложения. Большинство из них работают по принципу виртуального принтера, то есть посылают на печать файл Excel не на физический принтер, а в документ PDF.
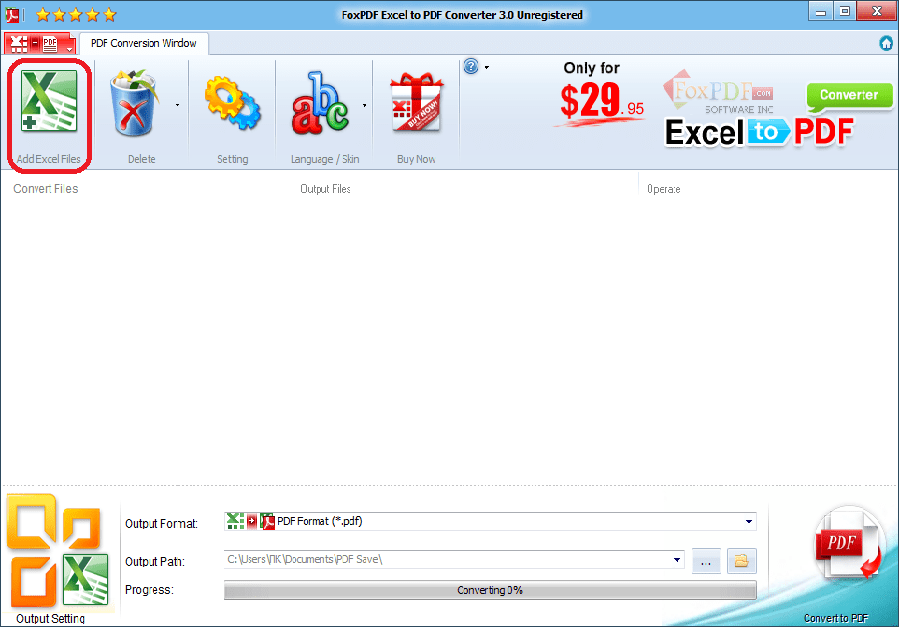
Одной из наиболее удобных и простых программ для процесса конвертирования файлов в данном направлении, является приложение FoxPDF Excel to PDF Converter. Несмотря на то, что интерфейс данной программы на английском языке, все действия в ней очень просты и интуитивно понятны. Инструкция, которая приводится ниже, поможет сделать работу в приложении ещё проще.
После того, как FoxPDF Excel to PDF Converter установлен, запускаем эту программу. Жмем на крайнюю левую кнопку на панели инструментов «Add Excel Files» («Добавить файлы Excel»).
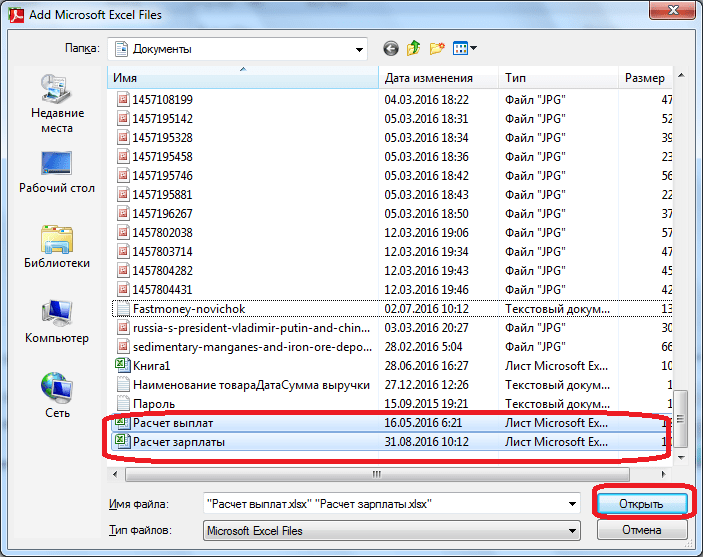
После этого, открывается окно, где вы должны найти на жестком диске, или съемном носителе, файлы Excel, которые желаете конвертировать. В отличие от предыдущих способов конвертации, этот вариант хорош тем, что одновременно позволяет добавить несколько файлов, и таким образом, произвести пакетную конвертацию. Итак, выделяем файлы и жмем на кнопку «Открыть».
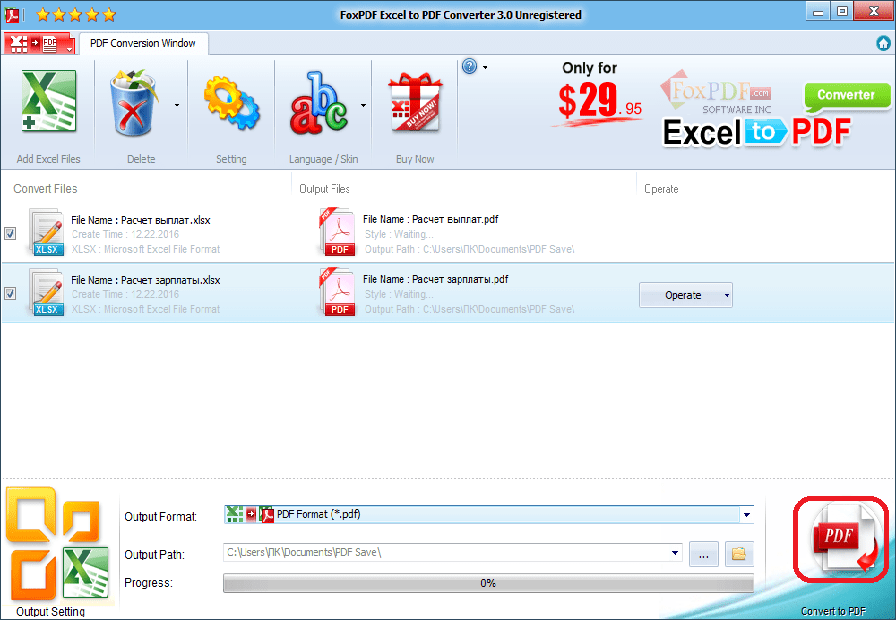
Как видим, после этого, наименование этих файлов появляется в главном окне программы FoxPDF Excel to PDF Converter. Обратите внимание, чтобы около наименований файлов, подготовленных к конвертации, стояли галочки. Если галочка не установлена, то после запуска процедуры преобразования, файл со снятой галочкой конвертирован не будет.

По умолчанию, конвертированные файлы сохраняются в специальной папке. Если вы хотите сохранять их в другом месте, то нажмите на кнопку справа от поля с адресом сохранения, и выберите нужную директорию.

Когда все настройки выполнены, можно запускать процесс конвертирования. Для этого, нажмите на большую кнопку с эмблемой PDF в нижнем правом углу окна программы.
После этого, будет выполнена конвертация, и вы сможете использовать готовые файлы по своему усмотрению.
Конвертация с помощью онлайн-сервисов
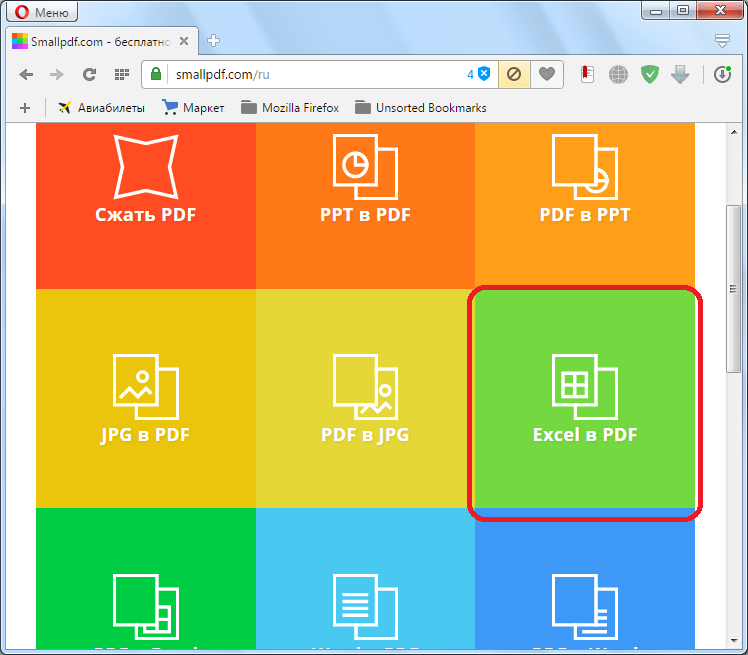
Если вы конвертируете файлы Excel в PDF не очень часто, и для этой процедуры не хотите устанавливать у себя на компьютере дополнительное программное обеспечение, то можно использовать услуги специализированных онлайн-сервисов. Рассмотрим, как произвести конвертацию Excel в PDF на примере популярного сервиса SmallPDF.
После перехода на главную страницу данного сайта, жмем на пункт меню «Excel в PDF».
После того, как мы попали в нужный раздел, просто перетягиваем файл Excel из открытого окна Проводника Windows в окно браузера, в соответствующее поле.
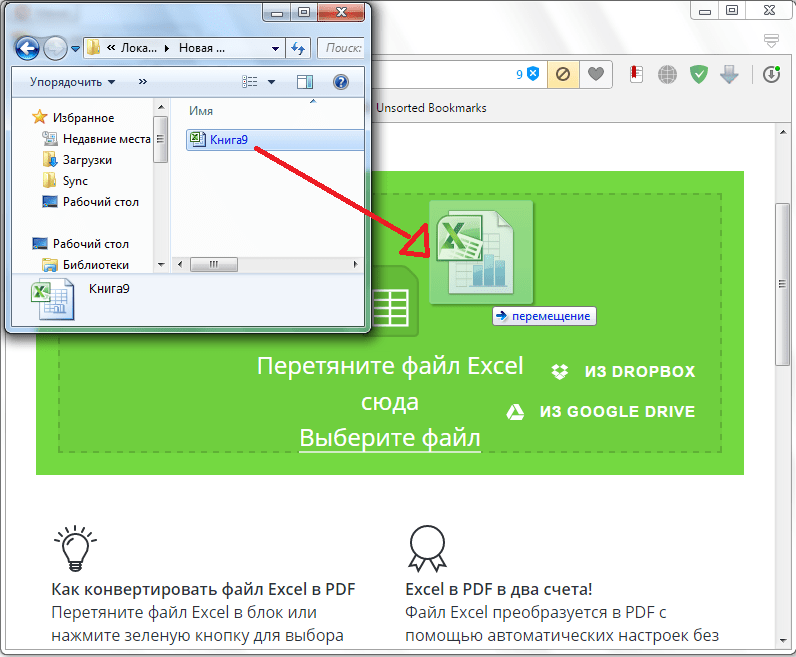
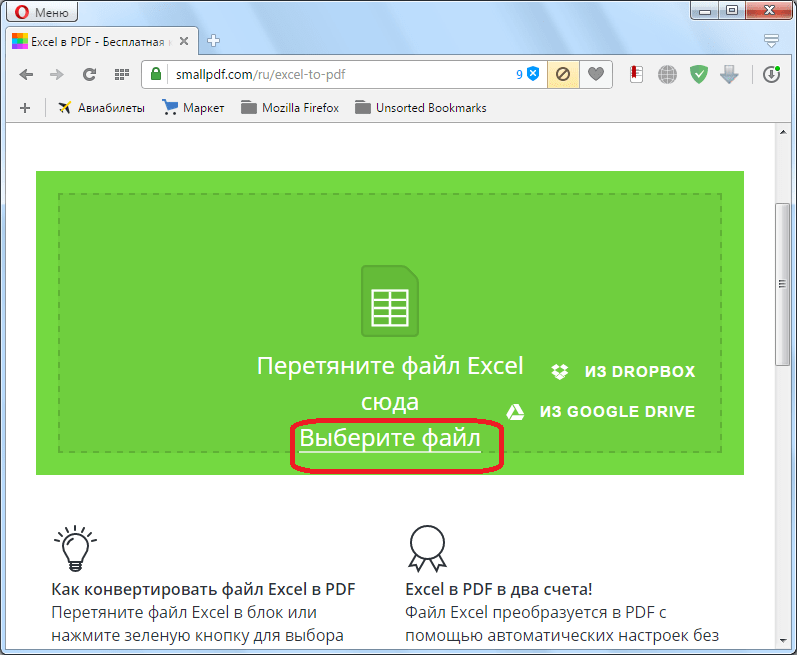
Можно добавить файл и другим способом. Жмем на кнопку «Выберите файл» на сервисе, и в открывшемся окне выбираем файл, или группу файлов, которые желаем конвертировать.
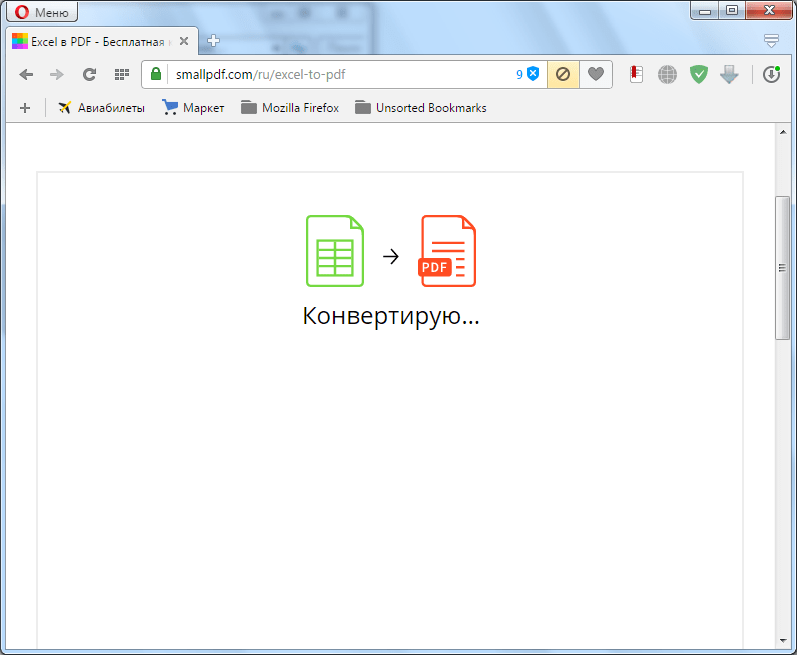
После этого, начинается процесс конвертации. В большинстве случаев, он не занимает много времени.
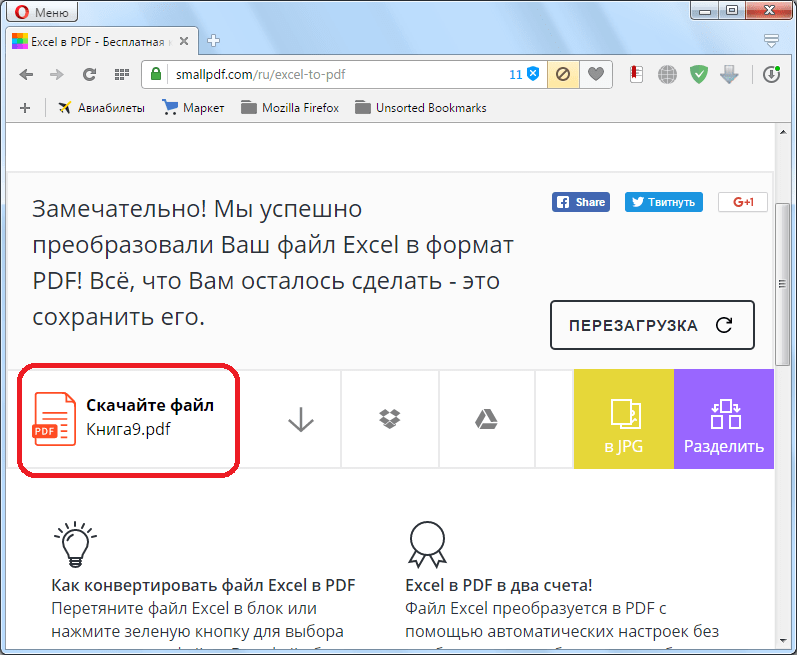
После того, как конвертация завершена, вам остается только загрузить готовый файл PDF на компьютер, нажав на кнопку «Скачайте файл».
В подавляющем большинстве онлайн-сервисов конвертация проходит по точно такому же алгоритму:
Как видим, существуют четыре варианта конвертации файла Excel в PDF. Каждый из них имеет свои преимущества и недостатки. Например, с помощью специализированных утилит можно производить пакетную конвертацию файлов, но для этого нужно устанавливать дополнительное программное обеспечение, а для конвертации онлайн, обязательно требуется подключение к интернету. Поэтому, каждый пользователь решает для себя сам, каким способом воспользоваться, учитывая свои возможности и потребности.