
|
This post discusses extensively what character formatting entails. You will learn how to perform character formatting tasks such as changing the font, font style, size, color, and other effects and animations, using the Format menu, formatting toolbar or shortcut keys. Characters are letters, numerals, spaces, punctuation marks and symbols entered from the keyboard/onscreen keyboard (such as @, #, %, & and *) or symbols inserted into the document from the Symbol dialog box or the Character Map (such as ®, ™, φ. ♥, ♫, », Ø, Σ, ∫, ∏, Φ, ☺, ≤, ∞, Ω, №, ß, etc). Character formatting in Word has to do with applying formatting properties to enhance the appearance of individual text characters. Character formats can be applied to a single character, word, sentence or a line of text, without such formatting affecting the entire current paragraph. Examples of character formats that can be applied to text characters in Word include those you find in the Font dialog box (such as bold, italic, underline, font, size, color, superscript, subscript, scaling, animation effects, etc), highlight, change case, etc. To apply a character format to a character or a set of characters, you need to specifically select the desired amount of characters and then apply the formatting you want. The following sections provide you extensive instructions on how to format text characters in Word. Change Font Font is referred to as the typeface for typed text. In a lame man’s language, it can be called ‘handwriting’. In real life, people scribble in unique handwritings characterized with different looks, sizes, intensity and spaces. Font is the electronic version of such handwritings. |
To change the font in which text is displayed in a Word 2002 document, use any of the following:
- Format Menu
- Formatting Toolbar
- Keyboard Shortcut
Change Font Using the Format Menu
- Select the text.
- On the Menu bar, click Format to display the Format menu.
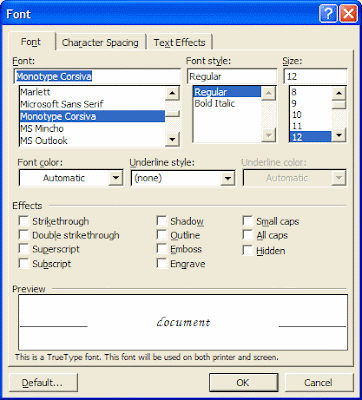
- From the Format menu, click Font. The Font dialog box appears.
- If the Font tab page is not already displayed, click the Font tab to activate it.
- Select a font name in the Font box. The Preview box shows how text will be displayed in the selected font.
- Click OK button.
Change Font Using the Formatting Toolbar
- Select the text.
- On the Formatting toolbar, click the drop-down arrow in front of the Font box and click a font name from the font list.
Change Font Using Keyboard Shortcut
- Select the text.
- Press Ctrl + Shift + F. Word selects the current font name in the Font box on the Formatting toolbar.
- Type, or use the arrow keys to select a font name.
- Press ENTER.
Change Font Size
You can change the font size of text via
- The Font dialog box
- The Formatting toolbar
- Shortcut keys
Change Font Size Using the Font Dialog Box
- Select the text.
- From the Format menu, click Font. Font dialog box appears.
- Type or select a font size in the Size box.
- Click OK.
Change Font Size Using the Formatting Toolbar
- Select the desired text.
- On the Formatting toolbar, type a desired number in Font Size box, or click the drop-down arrow in the Font Size box and select a desired font size from the Font Size drop-down list.
Change Font Size Using Shortcut Keys
- To decrease font size by one point (e.g. 12 to 11), press Ctrl + [ .
- To increase font size by one point (e.g. from 12 to 13), press Ctrl + ] .
- To decrease font size to the next smaller size (e.g. from 12 to 10), press Ctrl + Shift + <.
- To increase font size to the next larger size (e.g. from 12 to 14), press Ctrl + Shift + >.
OR
- Select the desired text.
- Press Ctrl + Shift + P. The current font size becomes selected in the Font Size box on the Formatting toolbar.
- Type, or use the arrow keys to select a font size in the Font Size box.
- Press ENTER.
Changing Font Style
The font style in which text is displayed in Word 2002 can be changed using
- The Font command.
- The Formatting toolbar.
- Shortcut keys.
Change Font Style Using the Font Command
- Select the text.
- From the Format menu, click Font.
- In the Style box, select a font style (e.g. Bold, Italic, or Bold Italic)
- Click the OK button.
Change Font Style Using the Formatting Toolbar
Select the text whose font style you want to change, and do one or more of the following:
- On the Formatting toolbar, click Bold (button) to apply bold formatting to the selected text.
- On the Formatting toolbar, click Italic (button) to italicize the selected text.
Change Font Style Using Shortcut Keys
Select the required text, and do one or combination of the following:
- Press Ctrl + B, to apply bold formatting.
- Press Ctrl + I, to italicize text.
Underline Text
One way to emphasize a portion of text in a document is to underline it. You can underline text using any of Font dialog box, Formatting toolbar, or keyboard shortcut. To underline text with a line style and/or color other than the default setting in your document, use the Font dialog box. In the dialog box, you can specify the underline style as well as the underline color.
To underline text quickly using the default underline style, use the Formatting toolbar, or keyboard shortcuts.
Underline Text Using the Font Command
- Select the text to be underlined.
- On the Format menu, click Font. Font dialog box is displayed.
- Click Underline style box, and then click a desired style e.g. Words only.
- To make the underline appear in a color different from letter color, select a desired color from the Underline color box.
- Click the OK button.
NOTE:
If/since your computer is connected to the internet, the decorative line styles may appear dimmed in the list, and when selected, Word may display a message box stating that the line style you have selected has been disabled because it is not supported by target browsers such as Internet Explorer 4.0 or later or Netscape Navigator 4.0 or later.
When this happens, you can do one of two things:
A). If you intend to display the content of the document in a browser on the intranet/internet, simply stick to the default underline style which is supported and available on all browsers.
B). If you do not intend to display the document on a browser but simply want to use the desired underline style for decorative purpose, you can suppress the message box and make the underline styles available for use by doing the following:
- On the Tools menu, click Options and then click the General tab in the Options dialog box that appears.
- Click Web Options button, and then click Browsers tab in the Web Options dialog box that is displayed.
- Uncheck the Disable features not supported by these browsers check box.
- In the People who view this Web page will be using box, select choose your browser.
- Click OK to close the Web Options dialog box.
- Click OK to accept your settings and close the Options dialog box.
Underline Text Quickly Using the Formatting Toolbar
- Select the text to be underlined.
- On the Formatting toolbar, the Underline button.
- To remove the Underline formatting from text, select the text and Click the Underline button on the Formatting toolbar again, or use alternative methods.
Underline Text Quickly Using Shortcut Keys
- Select the desired text.
- Do one of the following:
- Press Ctrl + U to underline both text and spaces.
- Press Ctrl + Shift + W to underline words only.
- Press Ctrl + Shift + D to apply double underline style.
Apply Other Effects
Using the Font dialog box, you can apply or remove character formats, such as Hidden Text, Superscript, Subscript, shadows, etc. These formatting options appear under the Effects section of the Font tab page in the Font dialog box. They have check boxes beside them which can be checked (populated/marked, by clicking it using the mouse or by pressing the SPACEBAR on the keyboard when focus is on it) or unchecked (cleared/unmarked, by clicking it or pressing the SPACEBAR on the keyboard when it receives focus) to deselect or remove the effect from the selected text. You can select more than one of such effects and apply them to selected text at once by clicking the OK button. For example, you can check the boxes beside each of Superscript, Strikethrough and Small Caps to select them and then click the OK button to apply them at once to the selected text.
Note however, that some of these effects are mutually exclusive, in that selecting one of such mutually exclusive options makes selecting the other impossible, because both effects cannot be applied to the selected text at the same time. As a result, once you check the box next to one of such mutually exclusive options, Word automatically clears the checkmark from the other option.
Examples of pairs of mutually exclusive formatting effects in Word are:
- Strikethrough and Double Strikethrough.
- Superscript and Subscript.
- Emboss and Engrave.
- Shadow and Emboss.
- Shadow and Engrave.
- Outline and Emboss.
- Outline and Engrave.
- All Caps and Small Caps.
To apply one or more formatting effects to selected text,
- Select the required text.
- On the Format menu, click Font and then click the Font tab in the Font dialog box that appears.
- In the Effects section of the Font tab page, click the boxes next to the options you want.
- Click the OK button.
Tips:
You can also apply or remove effects using shortcut keys. Examples:
Press These Keys To Do This CTRL + SHIFT + A Apply All Caps formatting to letters. CTRL + SHIFT + K Apply SMALL CAPS formatting to letters. CTRL + SHIFT + W Underline words but not spaces. CTRL + SHIFT + D Format text with Double-underline. CTRL + SHIFT + H Apply Hidden Text formatting. CTRL + EQUAL SIGN Apply Subscript formatting. CTRL + SHIFT + PLUS SIGN Apply Superscript formatting. CTRL + SPACEBAR Remove manual character formatting.
Change Default Character Formatting
Normally, when you type in Word, text appears in a particular font (Times New Roman); style (Regular); size (12); color (Automatic, i.e. Black); and anytime you underline text, a single tiny line with color same as letter color is placed under the selected text. The aforementioned are some of the default character formatting for the Normal Style (the default text style) in Word and it is used in all new documents you create from the current document template.
Sometimes, however, you choose a different font, style, size, etc, for text, if the preset style is not adequately desirable for your creativity. It you always create documents that use a (character) formatting different in some respects from the Default style, it will be preferable you change the Default (for the Normal Style) to make the new setting available for all new documents you create from the current document template. This will save you some hair, (believe me) in terms of time and effort!
To change the default character formatting
- On the Format menu, click Font. Font dialog box appears.
- Do one of the following:
- To set a new default font, type or select a font name in the Font box.
- To set a new default font style, select an option from the Font Style list box.
- To set a new default size, type or select the new size from the Size box.
- To set a new default text color, underline style, and other effects, select them in the appropriate boxes available.
- If necessary, click the Character Spacing tab or the Text Effects tab and make appropriate selections.
- Click the Default button. ‘Surprised or wondering whether you simply clicked the button unknowingly‘ Word (or the Office Assistant) will display a dialog box asking you to confirm that you really want to change the default font to… for the NORMAL (current) template.
- Click YES.
- Save the the document.
Character Spacing
Characters are letters, numerals, symbols (such as #, $, ^, &, @, etc ), punctuation marks, and spaces. To enter text in Word, you hit the lettered keys on the keyboard and these input the labeled letters in the document. The letters so entered are closely placed horizontally next to each other to form words, with little spaces after each character (letter) forming the words. This is the normal (default) character spacing.
Characters are combined to form words, with little spaces between them. Each character you enter has a little space after it. These after-a-character spaces are the spaces seen in-between the characters that form the words in a document. If you like, however, you can adjust the spacing between the characters forming words. This is called character spacing.
Character spacing can either increase or reduce the amount of space after a selected character by the amount you specify. Note that the adjustment depends on the font design and the specific letter pairs.
In Word, character spacing can take any of the following forms:

- Condensed e.g character spacing.
- Normal e.g character spacing.
- Expanded e.g character spacing.
- You can also specify automatic kerning to have Word reduce the spacing between certain letter pairs to improve the overall appearance of the selected text. Note that automatic kerning can be used only with proportionally spaced TrueType fonts (i.e. fonts having varying width for each character e.g. ‘i’
and ‘w’ differ in widths) or Adobe Type Manager fonts. In other words, kerning occurs immediately for scaleable fonts larger than the minimum size you specify.
To adjust character spacing
- On the Format menu, click Font. Font dialog box is displayed.
- Click the Character Spacing tab.
- In the Character spacing tab page, do one or more of the following:
| TO | DO THIS |
|
|
|
|
|
|
|
|
|
|
|
|
- Click the OK button.
Text Animation
Word also includes a bunch of effects you can use to dazzle up or animate a document onscreen. You should note the following about text effects:
- Animation options in Word are mutually exclusive, in that you can apply only one animation effect at a time.
- Animation effects are for on-screen display only: they cannot be printed with document.
- Animation effects can be applied to both text and graphics.
To apply animation effects to selected document content
- Select the document content (text and/objects) to be animated.
- On the Format menu, click Font and then click the Text Effects tab on the Font dialog box.
- In the Animations box, select the animation effect you want.
- Click the OK button.
Highlighting Documents
Sometimes when you read, you use a marker or other appropriate tools to mark points you want to find easily next time. This kind of operation is called highlighting in Word. In Word, you use the Highlight tool on the Formatting toolbar to mark and find important text or ponts in your document. The following sections provide you the steps needed to apply or remove highlighting from part or all of a document.
| Apply Highlighting | |
|
|
|
|
|
|


Remove Highlighting from Part or All of A Document
- Select the text you want to remove highlighting from, or press CTRL+A to select all of the text in the document.
- On the Formatting toolbar, click the arrow next to Highlight, and then click None.
Copying Character Formatting
You can quickly and easily format text by copying character formats from selected text to other text you want in a document. Suppose you have formatted a line as 10-point Arial, bold italic, Pink colored and justified, you can easily copy these settings to other text or all text in the entire document by using either the Format Painter tool or shortcut keys.
Copy Character Formats Using the Format Painter
- Select the text whose format you want to copy.
- Do one of the following:
- To copy the formats to only one location, on the Standard toolbar, click the Format Painter button once.
- To copy the formats to several locations, on the Standard toolbar, double-click the Format Painter button.

- When the mouse pointer changes to a paintbrush with an I-beam pointer, select the text to be formatted.
- If you double-clicked the Format Painter button, select the text you want to format, release the mouse button, and then select additional text anywhere in the document.
- When formatting is over, click the Format Painter button again, or simply press the ESC key.
Copy Character Formats Using the Keyboard
- Select the text whose format you want to copy.
- Press Ctrl + Shift + C.
- Select the text to be formatted.
- Press Ctrl + Shift + V.
Removing Character Formatting
Sometimes it may be necessary to strip certain text of the character formats that you specifically applied to it using the Font dialog box, Formatting toolbar, or key combinations. The operation will then leave the text in its raw or default character formatting settings. Note though, that you cannot remove from text character formats that are part of the paragraph style of the text.
To remove character formatting from text
- Select the text that has the character formats that youi want to remove.
- Press Ctrl + Spacebar keys.
Change Case
You can change the capitalization of text quickly in Word using either the keyboard or the Change Case command on the Format menu. This saves you the stress of deleting and re-tying text in a different capitalization.
Change Case Using the Keyboard
- Select the text whose case (capitalization) you want to change.
- Press Shift + F3 keys repeatedly until the text shows in the case (capitalization) you want.
Change Chase Using the Change Case Command
- Select the text whose capitalization you want to change.
- On the Format menu, choose the Change Case command. Change Case dialog box appears.
- Click the capitalization option you want in the Change case dialog box, and then click OK.
The following are the uses of the options in the Change Case dialog box.
- Sentence case: capitalizes only the first letter in the selected sentences.
- lowercase: converts all selected text to lowercase letters («small letters»).
- UPPERCASE: converts all selected text to uppercase letters («capital letters»).
- Title Case: capitalizes the first letter of each word of the selected text.
- tOGGLE cASE: changes uppercase letters to lowercase letters and lowercase letters to uppercase letters for all the selected text.

Thank you for taking your time to read this tutorial. Please continue to drop in again for future updates and helpful tips. Your visits will surely be worth it. I sincerely appreciate your visits and presence here. If you are finding these tutorials and tips informative and helpful, please kindly recommend this blog to your friends. If, on the other hand, there is any area you feel improvement is needed, please kindly forward a piece of advice. These will be highly welcomed and appreciated. Feel free to drop comments or ask questions using the comment box below. Your comments will be promptly reviewed and published and your questions speedily looked into and answered in the best possible manner. Thanks.
Accurate Font Sizes
Want to get your typeface exactly the right size? Here’s how you can specify just the size you want Word to use.
Adding a Font Menu
You can customize Word so it includes a Fonts menu.
Adding a Little Color
The normal way to change the color of selected text is through the use of the Font Color tool. If you have to use the same color over and over again, there is a different way—you can create your own color tool as described in this tip.
Adjusting Small Caps Text
If you use small caps text in a document, you know that there are several steps involved in properly formatting the text. These steps can be combined into a single macro that makes adjusting the text easier than ever before.
Adjusting the Width of Characters
Need to adjust how your characters look horizontally? Word provides an easy way you can scale the horizontal appearance of your text without affecting the height. Here’s how to do it.
Animating Your Text
Want to make your text shimmer and dance on the screen? Depending on your version of Word you can easily add snazzy animations to your text.
Applying Bold Italics
Applying bold and italics formatting to text is easy in Word. If you want to apply bold and italics simultaneously, you can create a tool to handle this formatting easily.
Applying Formatting to Words
You don’t have to select whole words before applying direct character formatting. With the proper Word options set, simply putting the insertion point in a word is enough for Word to apply character formatting to a whole word.
Applying the All Caps Format
Want your text to always appear in upper-case, regardless of how you type it? Word allows you to add formatting to your text that enforces this desire. Discover, in this tip, how to set the All Caps format for a selection of text.
Automatically Using Smart Quotes
As a way to make your documents look more professional, Word can utilize «smart quotes» for both quote marks and apostrophes. Here’s what that term actually means and how to control the capability in Word.
Changing Character Color
Need to easily change the color of some selected text? A quick way to do it is with a custom macro that sets just the hue that you want. This tip describes such a macro and explains how to modify it for any color desired.
Changing Font Size Using a Shortcut Key
When you need to change the font size of a text selection, using the shortcut described in this tip is a great technique. However, what the shortcut does depends on what you have displayed on your screen.
Changing Kerning
When you need to adjust the space Word uses between characters, you need to adjust what is called «kerning.» This tip explains how you can make the adjustment you need.
Changing Strikethrough Lines
Want to change the way a strikethrough line appears? It’s not as easy as you think, as you find out in this tip.
Changing Text Case
Word provides a built-in shortcut to change the case of a text selection. Understanding how that shortcut works (and the other options available to you) can make some editing tasks easier.
Changing the Formatting of All Instances of a Word
Need to find all the instances of a particular word and change the formatting of those instances? It’s easy to do using the regular Find and Replace capabilities of the program.
Changing the Height of a Font
Scaling the width of a font is easy to do with Word’s formatting capabilities. Scaling the height of the fonts is not so easy, but can be accomplished. Here’s how.
Complex Compound Formatting
Sometimes it can seem that the formatting needs of your document can easily outstrip the capabilities of Word. This is not always the case, however. Sometimes you just need to take a step back and figure out how to best get the look you need.
Controlling the Bold Text Attribute
When processing a document in a macro, you may need to make some of your text bold. It’s easy to do using the Bold attribute, as described in this tip.
Controlling the Hidden Text Attribute
Want your macro to change the Hidden attribute for some text in your document? It’s easier to change than you might think.
Copying Character Formatting
If you are applying character formatting directly to text rather than using a character style you can copy it from one place to the next rather than going through all of the steps required to apply it.
Creating a Drop Cap
Drop caps can be a nice finishing touch for some types of documents. Word allows you to create three types of drop caps, and to adjust how those drop caps appear.
Creating Custom Underlines
Word provides a wide assortment of underlines that you can apply to your text. If the assortment isn’t wide enough for your needs, however, you’ll want to consider the options described in this tip.
Creating Thin Spaces
Thin spaces are a typographic device that allows you add a bit of space between elements of a document. There are no thin spaces available in Word (as separate characters), but you can create the same effect produced by thin spaces by using the ideas presented in this tip.
Discovering the RGB Value of a Custom Text Color
Word allows you to easily change the color of the text in your document. If you get a document from someone else, you may want to know what color was applied to a particular selection of text. Here’s how to find out that information an make changes to that color throughout a document.
Embossing Text
Word can make your text look as if it has been embossed on the page.
Engraving Text
Word allows you to format your text in a number of different ways. One rather esoteric way to format your text is by «engraving» it, as described in this tip.
Fonts Don’t Work in Word on New System
When you upgrade from a system with an older version of Word to a system that has a newer version, your fonts may not work in the same way as they did on your old system. The solution may lie not within Word, but in the operating system. This tip examines some ways you can deal with the problem.
Fonts in the Font Drop-Down List
Ever wonder how to customize which fonts appear in the Font drop-down list? Making changes to this list is not easy. This tip explains why.
Formatted Merging
When you use the mail-merge capabilities of Word, the information merged takes on the formatting of your source document, not your data source. If you want to apply different formatting to some of the information you merge, you’ll need to use the technique illustrated in this tip.
Intelligent Title Case
A common editorial need is to change the capitalization used on different words in a selection of text. Word provides a rudimentary way to adjust the case of the text, but you may want a more intelligent way of changing it.
Letters Turn into Squares
Imagine that you are typing away, and all of a sudden your beautiful prose turns into a series of small rectangles that are worthless. If you run into this problem, there are a few things you should check out.
Making Text Bold
Want a cool shortcut to make your text bold? Here’s a method that fits in wonderfully with how things are done in the online world.
Missing Fonts in a Letterhead
When you create a document (such as a letterhead) that you want multiple people to use, you need to be concerned with whether the users have access to the fonts used in the document. Here’s a couple of ways you can approach the problem of making sure that your document looks the same on different systems.
Overlining Characters
Want to add an overline above a character or two in your document? There are several ways you can try, as described in this tip.
Placing Numbers Over Other Numbers
Sometimes you need to create text that isn’t as «linear» as you might expect. For instance, you may need to put some text over the top of other text, almost like a fraction (but without the fraction line). This tip examines a few ways that you can position text in this over-and-under manner.
Printing Hidden Text
One of the formatting attributes you can add to text is to make it «hidden,» which means you can control whether it is displayed or printed. This tip explains how you can control the printing of hidden text, independent of whether it is displayed or not.
Printing without Headings
The writer uses headline styles to create a story outline. He does not want to see the headlines when he prints the story. This tip describes a couple of ways to do this.
Protecting Hidden Text
Formatting some of your text as hidden can be a great help when you need to keep some things from being viewed or printed. The hidden text can be easily unhidden by anyone, however. Here’s how to get rid of it so that it can’t be uncovered.
Quickly Decreasing Point Size
A shortcut for decreasing the point size of a font.
Quickly Displaying the Font Dialog Box
Want to quickly format some text in your document? Select, right-click, and make a selection, and you can get to the heart of character formatting. This tip shows how easy it is!
Quickly Increasing Point Size
Want to adjust the size of a text selection? Here’s a quick shortcut to increase the size.
Replacing Quoted Text with Italics
If you have text surrounded by quotes in a document, you may want to remove the quote marks and make the text that was within them italic. Here’s an easy way to make the conversion.
Resetting Default Character Formatting
If you need to remove any explicit character formatting from some text, you’ll want to commit the shortcut in this tip to memory. It may end up being one of the more common shortcuts you use.
Retaining Explicit Formatting after Applying Styles
The formatting in a document is often a mix of styles and explicit formatting, applied over time. You may want to apply style-based formatting to various paragraphs and still retain some of the explicit formatting with the paragraph. Here’s one approach you can use.
Searching for Character Formatting
Need to look for a piece of text possessing a particular formatting attribute? Here’s the skinny on how this is accomplished.
Smushing Text Together
Word gives you control over how your text appears on the page. This includes adjusting how close letters are to each other horizontally. Here’s how to make the adjustment.
Strikethrough Shortcut Key
One common type of formatting is strikethrough, which is normally applied from the Font dialog box. There is no built-in keyboard shortcut for the format, but you can make your own following the advice in this tip.
Superscript and Subscript at the Same Place
Do you want a superscript and subscript character to appear directly above each other without using the Equation Editor? There are multiple ways you can accomplish this task, and this tip examines all of those ways.
Text Prints as Bold, but Displays as Regular
What to do when text looks one way on the screen but prints a different way? This tip provides several different approaches you can use to correct the disparity.
Underlining Quoted Text
Do you have a document in which you need to convert all the quoted text (text surrounded by quotes) to underlined text? If so, then the macro presented in this tip will be a huge timesaver for you.
Underlining Section References Automatically
If you have a document that has some sort of keyword within it (such as «Section») you may want to automatically format that keyword in some way. This tip addresses just such a situation, and shows how you can apply the formatting you need.
Underlining Tabs In Numbered Lists
When Word creates an automatically numbered list, it removes some of your formatting flexibility. One thing you can’t seem to format is the space after the number and the period and before the start of your text. There are ways around this dilemma, however.
Understanding Font Styles
Fonts, by default, come with one or more styles that define variations of how that font is displayed in your document. Understanding font styles enhances the way in which you can format your text.
Understanding Monospace Fonts
Monospace fonts allow you to easily achieve a specific «look» with your text or to line up information in a certain way. This tip explains what makes monospace fonts, well, «mono.»
Understanding Underlines
Part of the formatting you can add to your text is underlining. That simple word (underlining) represents quite a few different types of formats in Word, however. This tip discusses all the different types of underlines you can use.
Unwanted Numbering on Pasted Tables
When pasting text from another document or from the Web you can have unexpected characters sometimes show up. Many of them may be eliminated during paste by using Paste Special capabilities of Word.
Using Non-Printing Notes
Adding notes to your document in Word is a handy tool. But what if you don’t want those notes to be seen on the screen or printed? Turning the notes on and off is simple.
Using Very Large Font Sizes
You can format your text to use some very, very large font sizes. The results you see from formatting with large fonts depend on the typeface used. This tip discusses some of the considerations to keep in mind.
The Font group in the Home tab enables you to format your document’s text with a mouse click. This group has about sixteen formatting commands (as mentioned in the figure). To know the purpose of a command, hover the mouse pointer over it. For example, when you hover the mouse pointer over the Bold command button, a small description and the keyboard shortcuts are shown in the ScreenTip. See figure:

Save Time with Live Preview
Some Font group commands show the live preview to help you to choose the best option. In the following figure, the Live Preview shows how the Text Effect would look when applied:
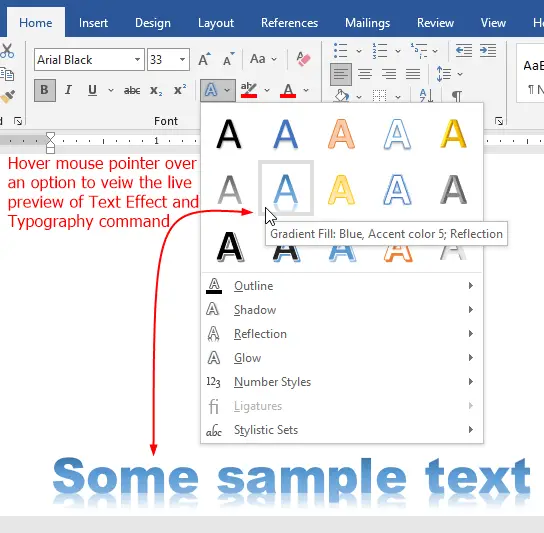
As shown in the above figure, Live Preview shows the preview of the hovered (but not yet applied) option.
The following commands support the live preview in the Font group:
- Font
- Font Size
- Text Effects and Typography
- Text Highlight Color
- Font color
Font
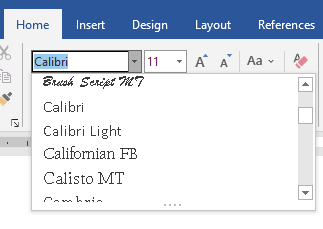
A font defines the appearance of your text. Your operating system includes many built-in fonts you can apply to your documents. To change the font of your text, first, select the text and then click the Font drop-down menu and select the desired font.
Embedding Fonts
When you use a unique font in a document, the text formatted with that font may not display or print correctly on other users’ computers. To solve this problem, you can embed the fonts used in a document when saving. See, how to embed fonts in a document?
Font Size

- Keyboard shortcut to increase the font size:
Ctrl+Shift+> - Keyboard shortcut to decrease the font size:
Ctrl+Shift+<
Use the Font Size drop-down menu to choose a size for the selected text. To apply a size not included in the drop-down list, type a new size, and press Enter. You can also either decrease or increase your font size by clicking on the alphabet A that is situated just beside the Font Size menu. To increase the font size click the bigger A (or press Ctrl+Shift+>) and to decrease the font size click the smaller A (or press Ctrl+Shift+<).
Change Case
Keyboard shortcut: Shift + F3
The Change Case menu is represented with the capital letter ‘A’ and a small letter ‘a’ Aa in Font group. It enables you to transform text from small letters to capital letters or a mixture of both with other preferred options.
To change the case type:
- Select text that you want to change to another case type
- Click
Hometab - Click
Change Casebutton from theFontgroup - Select your desired case type from the menu (or press the
Shiftkey on your keyboard and hold it down while you press theF3function key).

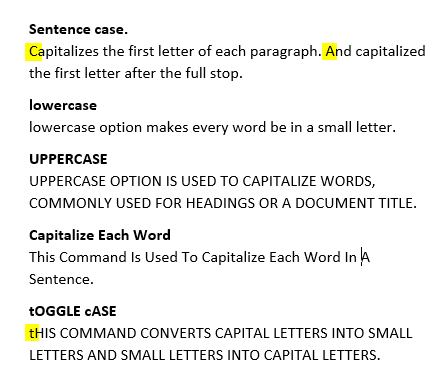
The Change Case command offers the following cases:
- Sentence case.
Capitalizes the first letter of each paragraph and capitalized the first letter after the full stop. - Lowercase
lowercase option makes every word be in a small letter. - Uppercase
UPPERCASE option is used to capitalize words, commonly used for headings or a document title. - Capitalize Each Word
This command is used to capitalize each word in a sentence. - Toggle Case
This command converts capital letters into small letters and small letters into capital letters. Useful when you accidently pressed the caps lock button while writing a document.
Clear All Formatting
![]()
- Keyboard shortcut to remove
Fontgroup formatting:
Select text and pressCtrl+Space. - Keyboard shortcut to remove
Paragraphgroup formatting:
Select paragraphs and pressCtrl+Q
Click Clear Formatting command in the Font group to remove all formats (which you applied through the Font group, such as font size, bold, italic or underline) from the selected text. Follow these steps to remove all text formatting:
- Select text
- Click
Hometab - Click the
Clear Formattingbutton from theFontgroup
Troubleshooting
I’ve selected the text and clicked the Clear Formatting command but some formats have not been removed.
The Clear Formatting command clears all character formats (available through Font group) except the following commands:
Change Case
Clear Formatting command doesn’t change the text case.Text Highlight Color
Clear Formatting command doesn’t remove text highlighting.
Bold, Italic, Underline
Keyboard shortcuts:
- Bold:
Ctrl+B - Underline:
Ctrl+U - Double underline:
Ctrl+Shift+D - Italic:
Ctrl+I
To apply either bold, italics, or underline format, or a combination of any of them, first select the text, then navigate to the Font group under Home tab and select your desired command:
- Click
Bicon (or pressCtrl+B) to apply the bold format. - Click
Iicon (or pressCtrl+I) to apply the italic format. - Click
Uicon (or pressCtrl+U) to apply the underline format.

For the underline option, you can choose to use single or double underline format. To choose either of these, click the drop-down icon by the underline icon to show the drop-down menu for the selection of various choices.
Strikethrough
The Strikethrough command draws a line through the text. It is often used to identify text for reviewer proposes to delete. To use this command, first, select the text, then navigate to the Font group under Home tab and click the abc
Subscript and Superscript
Keyboard Shortcuts:
- For Subscript command use
Ctrl+= - For Superscript command use
Ctrl+Shift+=
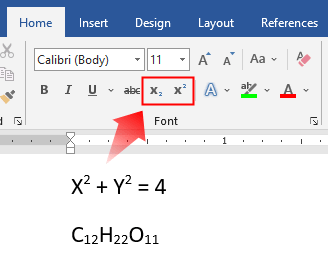
The superscript notation makes text above the text line, while the subscript notation makes text below the text line. These commands are commonly used in the mathematical expression and chemical formulas.
- Select the text.
- Click the
Hometab. - Click the
X2icon (or pressCtrl+Shift+=) to Superscript the text, - Or click the
X2icon (or pressCtrl+=) to Subscript the text.
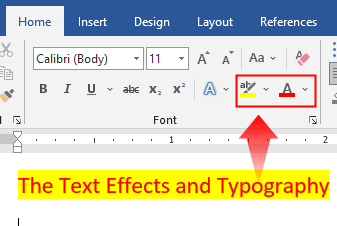
Text Effects and Typography
You can use the Text Effects and Typography menu to beautify the text by choosing one of the following options: Outline, Shadow, Reflection, Glow, Number Styles, Ligatures, or Stylistic Sets.
.
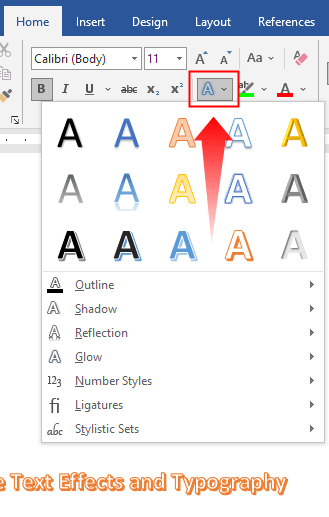
- Select the text to apply an effect.
- Click the
Hometab. - Click the
Text Effects and Typographybutton in theFontgroup. - Point the mouse at any preformatted effect to see its live preview and apply it.
- Or click the name of effect in menu, such as,
Reflection. - Then make selections on the submenus to apply and modify those effects.
Text Highlight Color and Font Color
Font Color
You can select to use a different color for the selected text. To change your text color, click the Font Color icon in Font group under the Home tab. This will show a menu of color options, which you can choose from as per your choice.
To highlight text
Select the text and then click the Text Highlight Color icon in the Font group on the Home tab to apply the default highlight color or click the arrow (on the right side of the icon) for more colors, and then click a color swatch to apply the selected highlight color.
Font Dialog Box
Keyboard Shortcut: Ctrl+D
The Font dialog box lists all font (or character) related formatting. To open the Font dialog box, click the Dialog Box Launcher button in the lower-right corner of the Font group (or press the Ctrl+D).

The Set As Default button is used to change the font formatting that Word uses for a new document. For example, if you want to use a specific font, font size, font color or any other attribute for all your new documents, choose all that formatting and then click the Set As Default button. A new dialog box will appear
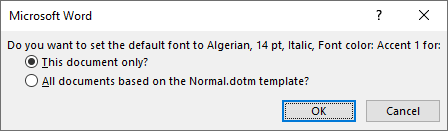
In the confirmation dialog box, choose the option “All Documents Based on the Normal Template”. Now all documents start with the font formatting you selected.
Font dialog box – Advanced tab
Character Spacing
To set the character spacing (including character scale, spacing between characters, character vertical position ), use the Advanced tab in the Font dialog box:
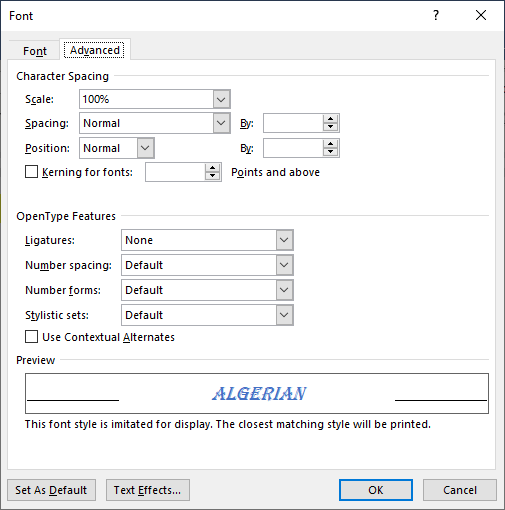
The Character Spacing section has the following options:
- Scale
Character scale stretches or shrinks the width of characters and this option does not change the height of the character. - Spacing
Character spacing or letterspacing changes just the horizontal space between characters. The drop-down menu shows Condensed when you decrease the space between characters and shows Expanded when you increase the space between characters. - Position
Character position, or baseline shift, allows raising or lowering the baseline of selected text without making any change to its size or appearance. - Kerning for fonts
Kerning refers to adjusting the space of some specific pairs of characters so they can occupy less space, for example: VA, Va, WA, Wa, etc.
OpenType Features
OpenType is a scalable font format developed by Microsoft. OpenType adds additional features that allow you to manipulate some of the more intricate aspects of fonts and number spacing. The Calibri font is one of the most popular OpenType fonts. We’ll discuss later in detail about the OpenType Features.
Ribbon: Access keys
To use Backstage view, open the File page
Alt + F
Ribbon: Access keys
To use themes, colors, and effects, such as page borders, open the Design tab
Alt + G
Ribbon: Access keys
To use common formatting commands, paragraph styles, or to use the Find tool, open Home tab
Alt + H
Ribbon: Access keys
To manage Mail Merge tasks, or to work with envelopes and labels, open Mailings tab
Alt + M
Ribbon: Access keys
To insert tables, pictures and shapes, headers, or text boxes, open Insert tab
Alt + N
Ribbon: Access keys
To work with page margins, page orientation, indentation, and spacing, open Layout tab.
Alt + P
Insert or mark table of contents, footnotes and citations
Go to «Tell me what you want to do» and Smart Lookup (in Word 2016)
Alt + Q
Ribbon: Access keys
To use Spell Check, set proofing languages, or to track and review changes to your document, open the Review tab
Alt + R
Ribbon: Access keys
To add a table of contents, footnotes, or a table of citations, open the References tab
Alt + S
Ribbon: Access keys
To choose a document view or mode, such as Read Mode or Outline view, open the View tab You can also set Zoom magnification and manage multiple windows of documents
Alt + W
Insert characters by using character codes
while holding, type character code (on the numeric keypad): Insert the ANSI character for the specified ANSI (decimal) character code. For example, to insert the euro currency symbol, hold down Alt and press 0128 on the numeric keypad
Alt
Function key reference
Show KeyTips
F10
Move within a table
To the next cell in a row
⭾ Tab
Move within a table
To the previous cell in a row
↑ Shift + ⭾ Tab
Print and preview documents
Move around the preview page when zoomed in
← ↑ → ↓
Ctrl + Function keys
Expand or collapse the ribbon
Ctrl + F1
Shift + Function keys
Display a shortcut menu
↑ Shift + F10
Function key reference
Go to the next pane or frame
F6
Ribbon: Change focus by using the keyboard
Open a selected menu or gallery on the ribbon
Space
Insert special characters
(after you type the first few characters of the AutoText entry name and when the ScreenTip appears) An AutoText entry
⤶ Enter
Ribbon: Change focus by using the keyboard
Cycle through floating shapes, such as text boxes or images (press Tab repeatedly)
Ctrl + Alt + 5 then ⭾ Tab
Extending selection
Turn extend mode off.
Esc
Create and edit documents
Create a new document
Ctrl + N
Create and edit documents
Open a document
Ctrl + O
Create and edit documents
Close a document
Ctrl + W
Create and edit documents
Remove the document window split
Alt + Ctrl + S
Check spelling and review changes in a document
Close the Reviewing Pane if it is open.
Alt + ↑ Shift + C
Create and edit documents
Save a document
Ctrl + S
Work with web content
Insert a hyperlink
Ctrl + K
Work with web content
Go back one page
Alt + ←
Work with web content
Go forward one page
Alt + →
Function key reference
Update the selected fields
F9
Print and preview documents
Print a document
Ctrl + P
Print and preview documents
Switch to print preview
Alt + Ctrl + I
Move around in a document
Up one screen (scrolling)
Page Up
Move around in a document
Down one screen (scrolling)
Page Down
Move around in a document
To the beginning of a document
Ctrl + Home
Move around in a document
To the end of a document
Ctrl + End
Check spelling and review changes in a document
Insert a comment (in the Revision task pane)
Alt + R then C
Check spelling and review changes in a document
Turn change tracking on or off
Ctrl + ↑ Shift + E
Check spelling and review changes in a document
Select Review tab on ribbon
Alt + R then ↓
Check spelling and review changes in a document
Select Spelling & Grammar
Alt + R then S
Find, replace, and go to specific items
Open the search box in the Navigation task pane
Ctrl + F
Find, replace, and go to specific items
Replace text, specific formatting, and special item.
Ctrl + H
Find, replace, and go to specific items
Go to a page, bookmark, footnote, table, comment, graphic, or other location
Ctrl + G
Find, replace, and go to specific items
Switch between the last four places that you have edited
Alt + Ctrl + Z
Move around in a document
One character to the left
←
Language bar: Turn on East Asian Input Method Editors
Alt Turn Korean Input Method Editor (IME) on 101 keyboard on or off
→
Move around in a document
One word to the left
Ctrl + ←
Move around in a document
One word to the right
Ctrl + →
Move around in a document
One paragraph up
Ctrl + ↑
Move around in a document
One paragraph down
Ctrl + ↓
Move within a table
To the previous row
↑
Language bar: Set proofing language
Review list of proofing languages
↓
Move through document in Read View mode
Go to end of document.
End
Move through document in Read View mode
Go to beginning of document
Home
Move around in a document
To the top of the window
Alt + Ctrl + Page Up
Move around in a document
To the end of the window
Alt + Ctrl + Page Down
Move around in a document
To the top of the next page
Ctrl + Page Down
Move around in a document
To the top of the previous page
Ctrl + Page Up
Shift + Function keys
Move to the last change
↑ Shift + F5
Insert or mark table of contents, footnotes and citations
Mark a table of contents entry
Alt + ↑ Shift + O
Insert or mark table of contents, footnotes and citations
Mark a table of authorities entry (citation).
Alt + ↑ Shift + I
Insert or mark table of contents, footnotes and citations
Mark an index entry
Alt + ↑ Shift + X
Insert or mark table of contents, footnotes and citations
Insert a footnote
Alt + Ctrl + F
Insert or mark table of contents, footnotes and citations
Insert an endnote
Alt + Ctrl + D
Insert or mark table of contents, footnotes and citations
Go to next footnote (in Word 2016)
Alt + ↑ Shift + >
Insert or mark table of contents, footnotes and citations
Go to previous footnote (in Word 2016)
Alt + ↑ Shift + <
Switch to another view of the document
Switch to Read Mode view
Alt + W then F
Switch to another view of the document
Switch to Print Layout view
Alt + Ctrl + P
Switch to another view of the document
Switch to Outline view
Alt + Ctrl + O
Switch to another view of the document
Switch to Draft view
Alt + Ctrl + N
Working with headings in Outline view
Promote a paragraph
Alt + ↑ Shift + ←
Working with headings in Outline view
Demote a paragraph.
Alt + ↑ Shift + →
Apply styles to paragraphs
Apply the Normal style
Ctrl + ↑ Shift + N
Move within a table
Row up
Alt + ↑ Shift + ↑
Move within a table
Row down
Alt + ↑ Shift + ↓
Working with headings in Outline view
Expand text under a heading
Alt + ↑ Shift + +
Working with headings in Outline view
Collapse text under a heading
Alt + ↑ Shift + -
Working with headings in Outline view
Expand or collapse all text or headings
Alt + ↑ Shift + A
Working with headings in Outline view
Hide or display character formatting
/
Working with headings in Outline view
Show the first line of text or all text
Alt + ↑ Shift + L
Working with headings in Outline view
Show all headings with the Heading 1 style
Alt + ↑ Shift + 1
Working with headings in Outline view
Show all headings up to Heading 1-9.
Alt + ↑ Shift + Num 1 — Num 9
Insert paragraphs and tab characters in a table
Tab characters in a cell
Ctrl + ⭾ Tab
Move through document in Read View mode
Go to page 1-9
1 — 9
Function key reference
Extend a selection
F8
Extending selection
Select the nearest character
F8 then ← →
Shift + Function keys
Reduce the size of a selection
↑ Shift + F8
Extending selection
Extend a selection one character to the right
↑ Shift + →
Extending selection
Extend a selection one character to the left
↑ Shift + ←
Extending selection
Extend a selection to the end of a word
Ctrl + ↑ Shift + →
Extending selection
Extend a selection to the beginning of a word
Ctrl + ↑ Shift + ←
Extending selection
Extend a selection to the end of a line
↑ Shift + End
Extending selection
Extend a selection to the beginning of a line
↑ Shift + Home
Extending selection
Extend a selection one line down
↑ Shift + ↓
Extending selection
Extend a selection one line up
↑ Shift + ↑
Extending selection
Extend a selection to the end of a paragraph
Ctrl + ↑ Shift + ↓
Extending selection
Extend a selection to the beginning of a paragraph
Ctrl + ↑ Shift + ↑
Extending selection
Extend a selection one screen down
Shift + Page Down
Extending selection
Extend a selection one screen up
Shift + Page Up
Extending selection
Extend a selection to the beginning of a document
Ctrl + ↑ Shift + Home
Extending selection
Extend a selection to the end of a document
Ctrl + ↑ Shift + End
Extending selection
Extend a selection to the end of a window
Alt + Ctrl + Shift + Page Down
Extending selection
Extend a selection to include the entire document
Ctrl + A
Ctrl + Shift + Function keys
Extend a selection or block
Ctrl + ↑ Shift + F8 then ← ↑ → ↓
Extending selection
Extend a selection to a specific location in a document
F8 + ← ↑ → ↓
Delete text and graphics
Delete one character to the left
⬅ Backspace
Delete text and graphics
Delete one word to the left
Ctrl + ⬅ Backspace
Delete text and graphics
Delete one character to the right
Del
Delete text and graphics
Delete one word to the right
Ctrl + Del
Copy and move text and graphics
Cut selected text or graphics to the Office Clipboard.
Ctrl + X
Delete text and graphics
Undo the last action
Ctrl + Z
Ctrl + Function keys
Cut to the Spike
Ctrl + F3
Copy and move text and graphics
Open the Office Clipboard
Alt + H then F then O
Copy and move text and graphics
Copy selected text or graphics to the Office Clipboard.
Ctrl + C
Copy and move text and graphics
Paste the most recent addition or pasted item from the Office Clipboard.
Ctrl + V
Copy and move text and graphics
Move text or graphics once.
F2 then Mouse movement then ⤶ Enter
Copy and move text and graphics
Copy text or graphics once.
↑ Shift + F2 then Mouse movement then ⤶ Enter
Alt + Function keys
Create a new Building Block
Alt + F3
Ctrl + Shift + Function keys
Insert the contents of the Spike
Ctrl + ↑ Shift + F3
Copy and move text and graphics
Copy the header or footer used in the previous section of the document.
Alt + ↑ Shift + R
Select text and graphics in a table
(press arrow keys repeatedly) Extend a selection to adjacent cells
↑ Shift + ← ↑ → ↓
Select text and graphics in a table
Select the column from top to bottom
Shift + Alt + Page Down
Select text and graphics in a table
Select the column from bottom to top
Shift + Alt + Page Up
Select text and graphics in a table
(with Num Lock off) Select an entire table
Alt + Num 5
Move within a table
To the first cell in a row
Alt + Home
Move within a table
To the last cell in a row
Alt + End
Move within a table
To the first cell in a column
Alt + Page Up
Move within a table
To the last cell in a column
Alt + Page Down
Format characters
Open the Font dialog box to change the formatting of characters.
Ctrl + D
Shift + Function keys
Change the case of letters
↑ Shift + F3
Format characters
Format all letters as capitals
Ctrl + ↑ Shift + A
Format characters
Apply bold formatting
Ctrl + B
Format characters
Apply an underline
Ctrl + U
Format characters
Underline words but not spaces
Ctrl + ↑ Shift + W
Format characters
Double-underline text
Ctrl + ↑ Shift + D
Format characters
Apply hidden text formatting
Ctrl + ↑ Shift + H
Format characters
Apply italic formatting
Ctrl + I
Format characters
Format letters as small capitals
Ctrl + ↑ Shift + K
Format characters
Apply subscript formatting (automatic spacing)
Ctrl + =
Format characters
Apply superscript formatting (automatic spacing)
Ctrl + ↑ Shift + +
Language bar: Turn on East Asian Input Method Editors
Turn Chinese Input Method Editor (IME) on 101 keyboard on or off
Ctrl + Space
Format characters
Change the selection to the Symbol font
Ctrl + ↑ Shift + Q
Change or resize font
Open the Font dialog box to change the font.
Ctrl + ↑ Shift + F
Change or resize font
Increase the font size
Ctrl + ↑ Shift + >
Change or resize font
Decrease the font size
Ctrl + ↑ Shift + <
Change or resize font
Increase the font size by 1 point
Ctrl + ]
Change or resize font
Decrease the font size by 1 point
Ctrl + [
Copy and review text formats
Copy formats.
Ctrl + ↑ Shift + C
Copy and review text formats
Paste formats.
Ctrl + ↑ Shift + V
Change paragraph alignment
Switch a paragraph between centered and left-aligned.
Ctrl + E
Change paragraph alignment
Switch a paragraph between justified and left-aligned
Ctrl + J
Change paragraph alignment
Switch a paragraph between right-aligned and left-aligned
Ctrl + R
Change paragraph alignment
Left align a paragraph
Ctrl + L
Change paragraph alignment
Indent a paragraph from the left
Ctrl + M
Change paragraph alignment
Remove a paragraph indent from the left
Ctrl + ↑ Shift + M
Change paragraph alignment
Create a hanging indent
Ctrl + T
Change paragraph alignment
Reduce a hanging indent
Ctrl + ↑ Shift + T
Change paragraph alignment
Remove paragraph formatting
Ctrl + Q
Copy and review text formats
(asterisk on numeric keypad does not work) Display nonprinting characters
Ctrl + ↑ Shift + *
Shift + Function keys
Start context-sensitive Help or reveal formatting
↑ Shift + F1
Set line spacing
Single-space lines.
Ctrl + 1
Set line spacing
Double-space lines.
Ctrl + 2
Set line spacing
Set 1.5-line spacing.
Ctrl + 5
Set line spacing
Add or remove one line space preceding a paragraph
Ctrl + 0
Apply styles to paragraphs
Open Apply Styles task pane.
Ctrl + ↑ Shift + S
Apply styles to paragraphs
Open Styles task pane.
Alt + Ctrl + ↑ Shift + S
Apply styles to paragraphs
Start AutoFormat.
Alt + Ctrl + K
Apply styles to paragraphs
Apply the Heading 1 style
Alt + Ctrl + 1
Apply styles to paragraphs
Apply the Heading 2 style
Alt + Ctrl + 2
Apply styles to paragraphs
Apply the Heading 3 style
Alt + Ctrl + 3
Ctrl + Function keys
Insert an empty field
Ctrl + F9
Insert special characters
A line break
↑ Shift + ⤶ Enter
Insert special characters
A page break
Ctrl + ⤶ Enter
Insert special characters
A column break
Ctrl + ↑ Shift + ⤶ Enter
Insert special characters
An em dash
Alt + Ctrl + Num -
Insert special characters
An en dash
Ctrl + Num -
Insert special characters
An optional hyphen
Ctrl + -
Insert special characters
A nonbreaking hyphen
Ctrl + ↑ Shift + -
Insert special characters
A nonbreaking space
Ctrl + ↑ Shift + Space
Insert special characters
The copyright symbol
Alt + Ctrl + C
Insert special characters
The registered trademark symbol
Alt + Ctrl + R
Insert special characters
The trademark symbol
Alt + Ctrl + T
Insert special characters
An ellipsis
Alt + Ctrl + .
Insert special characters
A single opening quotation mark
Ctrl + ` then `
Insert special characters
A single closing quotation mark
Ctrl + ' then '
Insert special characters
Double opening quotation marks
Ctrl + ` then ↑ Shift + '
Insert special characters
Double closing quotation marks
Ctrl + ' then ↑ Shift + '
Insert characters by using character codes
Find out the Unicode character code for the selected character
Alt + X
Adding objects
Open object dialog box. Then Press down arrow to select an object type and press Enter to create an object
Alt then N then J then J
Mail merge and fields
Preview a mail merge
Alt + ↑ Shift + K
Mail merge and fields
Merge a document
Alt + ↑ Shift + N
Mail merge and fields
Print the merged document
Alt + ↑ Shift + M
Mail merge and fields
Edit a mail-merge data document
Alt + ↑ Shift + E
Mail merge and fields
Insert a merge field
Alt + ↑ Shift + F
Mail merge: Working with fields
Insert a DATE field
Alt + ↑ Shift + D
Mail merge: Working with fields
Insert a LISTNUM field
Alt + Ctrl + L
Mail merge: Working with fields
Insert a Page field
Alt + ↑ Shift + P
Mail merge: Working with fields
Insert a TIME field
Alt + ↑ Shift + T
Ctrl + Shift + Function keys
Update linked information in a Word source document
Ctrl + ↑ Shift + F7
Ctrl + Shift + Function keys
Unlink a field
Ctrl + ↑ Shift + F9
Shift + Function keys
Switch between a field code and its result
↑ Shift + F9
Alt + Function keys
Switch between all field codes and their results
Alt + F9
Alt + Shift + Function keys
Run GOTOBUTTON or MACROBUTTON from the field that displays the field results
Alt + ↑ Shift + F9
Function key reference
Go to the next field
F11
Shift + Function keys
Go to the previous field
↑ Shift + F11
Ctrl + Function keys
Lock a field
Ctrl + F11
Ctrl + Shift + Function keys
Unlock a field
Ctrl + ↑ Shift + F11
Language bar: Set proofing language
Open the Set Proofing Language dialog box
Alt + R then U then L
Language bar: Set proofing language
Set default languages
Alt + R then L
Language bar: Turn on East Asian Input Method Editors
Turn Japanese Input Method Editor (IME) on 101 keyboard on or off
Alt + ~
Function key reference
Get Help or visit Office.com.
F1
Function key reference
Move text or graphics
F2
Function key reference
Repeat the last action
F4
Function key reference
Choose the Go To command (Home tab).
F5
Function key reference
Choose the Spelling command (Review tab)
F7
Function key reference
Choose the Save As command
F12
Shift + Function keys
Copy text.
↑ Shift + F2
Shift + Function keys
Repeat a Find or Go To action
↑ Shift + F4
Shift + Function keys
Go to the previous pane or frame (after pressing F6)
↑ Shift + F6
Shift + Function keys
Choose the Thesaurus command (Review tab, Proofing group)
↑ Shift + F7
Shift + Function keys
Choose the Save command
↑ Shift + F12
Ctrl + Function keys
Choose the Print Preview command.
Ctrl + F2
Ctrl + Function keys
Close the window
Ctrl + F4
Ctrl + Function keys
Go to the next window
Ctrl + F6
Ctrl + Function keys
Maximize the document window
Ctrl + F10
Ctrl + Function keys
Choose the Open command
Ctrl + F12
Ctrl + Shift + Function keys
Edit a bookmark
Ctrl + ↑ Shift + F5
Ctrl + Shift + Function keys
Go to the previous window
Ctrl + ↑ Shift + F6
Ctrl + Shift + Function keys
Choose the Print command
Ctrl + ↑ Shift + F12
Alt + Function keys
Go to the next field
Alt + F1
Alt + Function keys
Exit Word
Alt + F4
Alt + Function keys
Restore the program window size
Alt + F5
Alt + Function keys
Move from an open dialog box back to the document, for dialog boxes that support this behavior
Alt + F6
Alt + Function keys
Find the next misspelling or grammatical error
Alt + F7
Alt + Function keys
Run a macro
Alt + F8
Alt + Function keys
Display the Selection task pane
Alt + F10
Alt + Function keys
Display Microsoft Visual Basic code
Alt + F11
Alt + Shift + Function keys
Go to the previous field
Alt + ↑ Shift + F1
Alt + Shift + Function keys
Choose the Save command
Alt + ↑ Shift + F2
Alt + Shift + Function keys
Display a menu or message for an available action
Alt + ↑ Shift + F10
Alt + Shift + Function keys
Choose Table of Contents button in the Table of Contents container when the container is active.
Alt + ↑ Shift + F12
Ctrl + Alt + Function keys
Display Microsoft System Information
Ctrl + Alt + F1
Ctrl + Alt + Function keys
Choose the Open command
Ctrl + Alt + F2
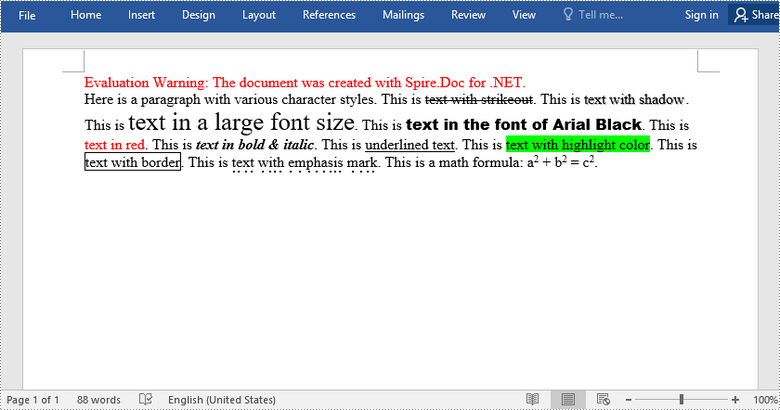
Character formatting is used to change the appearance of individual words or phrases. Formatted text can direct the reader’s attention to select sections of a document and highlight key information. There are quite a lot of forms of characters formatting that you can use in Word. In this article, you will learn how to apply various types of formatting to characters in Word in C# and VB.NET using Spire.Doc for .NET.
- Font Name
- Font Size
- Font Color
- Highlight Color
- Bold
- Italic
- Underline
- Strikethrough
- Border
- Shadow Effect
- Emphasis Mark
- Subscript and Superscript
Install Spire.Doc for .NET
To begin with, you need to add the DLL files included in the Spire.Doc for .NET package as references in your .NET project. The DLL files can be either downloaded from this link or installed via NuGet.
PM> Install-Package Spire.Doc
Apply Formatting to Characters in Word in C# and VB.NET
In order to apply formatting to a piece of text, you need to get the text in a TextRange and then format the characters within the TextRange through the CharacterFormat property. The following are the detailed steps.
- Create a Document object.
- Add a section to the document using Document.AddSection() method.
- Add a paragraph to the section using Section.AddParagraph() method.
- Append text to the paragraph using Paragraph.AppendText() method and return a TextRange object.
- Apply formatting such as font name, font size, border and highlight color to the characters within the text range through TextRange.CharacterFormat property.
- Save the document to a Word file using Document.SaveToFile() method.
- C#
- VB.NET
using Spire.Doc;
using Spire.Doc.Documents;
using Spire.Doc.Fields;
using System.Drawing;

namespace ApplyFormattingToCharacters
{
    class Program
    {
        static void Main(string[] args)
        {
            //Create a Document object
            Document document = new Document();

            //Add a section
            Section sec = document.AddSection();

            //Add a paragraph
            Paragraph paragraph = sec.AddParagraph();
            paragraph.AppendText("Here is a paragraph with various character styles. This is ");

            //Append text to the paragraph and return a TextRange object
            TextRange tr = paragraph.AppendText("text with strikeout");

            //Set the character format to strikeout via TextRange object
            tr.CharacterFormat.IsStrikeout = true;

            //Apply shadow effect to text
            paragraph.AppendText(". This is ");
            tr = paragraph.AppendText("text with shadow");
            tr.CharacterFormat.IsShadow = true;

            //Set font size
            paragraph.AppendText(". This is ");
            tr = paragraph.AppendText("text in a large font size");
            tr.CharacterFormat.FontSize = 20;

            //Set font name
            paragraph.AppendText(". This is ");
            tr = paragraph.AppendText("text in the font of Arial Black");
            tr.CharacterFormat.FontName = "Arial Black";

            //Set font color
            paragraph.AppendText(". This is ");
            tr = paragraph.AppendText("text in red");
            tr.CharacterFormat.TextColor = Color.Red;

            //Apply bold & italic to text
            paragraph.AppendText(". This is ");
            tr = paragraph.AppendText("text in bold & italic");
            tr.CharacterFormat.Bold = true;
            tr.CharacterFormat.Italic = true;

            //Apply underline to text
            paragraph.AppendText(". This is ");
            tr = paragraph.AppendText("underlined text");
            tr.CharacterFormat.UnderlineStyle = UnderlineStyle.Single;

            //Apply background color to text
            paragraph.AppendText(". This is ");
            tr = paragraph.AppendText("text with highlight color");
            tr.CharacterFormat.HighlightColor = Color.Green;

            //Apply border to text
            paragraph.AppendText(". This is ");
            tr = paragraph.AppendText("text with border");
            tr.CharacterFormat.Border.BorderType = Spire.Doc.Documents.BorderStyle.Single;
            tr.CharacterFormat.Border.Color = Color.Black;

            //Apply emphasis mark to text
            paragraph.AppendText(". This is ");
            tr = paragraph.AppendText("text with emphasis mark");
            tr.CharacterFormat.EmphasisMark = Emphasis.DotBelow;

            //Apply superscript to text
            paragraph.AppendText(". This is a math formula: a");
            tr = paragraph.AppendText("2");
            tr.CharacterFormat.SubSuperScript = SubSuperScript.SuperScript;
            paragraph.AppendText(" + b");
            tr = paragraph.AppendText("2");
            tr.CharacterFormat.SubSuperScript = SubSuperScript.SuperScript;
            paragraph.AppendText(" = c");
            tr = paragraph.AppendText("2");
            tr.CharacterFormat.SubSuperScript = SubSuperScript.SuperScript;
            paragraph.AppendText(".");

            //Save to file
            document.SaveToFile("SetCharacterFormat.docx", FileFormat.Docx);
        }
    }
}
Apply for a Temporary License
If you’d like to remove the evaluation message from the generated documents, or to get rid of the function limitations, please request a 30-day trial license for yourself.