
After you create a table, Microsoft Office Word 2007 offers you many ways to format that table. If you decide to use Table Styles, you can format your table all at once, and even see a preview of what your table will look like formatted in a particular style before you actually apply the style.
You can create a custom look for tables by splitting or merging cells, adding or deleting columns or rows, or adding borders. If you’re working with a long table, you can repeat the table headings on each page on which the table appears. To prevent awkward page breaks that disrupt the flow of your table, you can also specify just how and where the table should break across pages.
What do you want to do?
-
Use Table Styles to format an entire table
-
Add or remove borders
-
Display or hide gridlines
-
Add a cell, row, or column
-
Delete a cell, row, or column
-
Merge or split cells
-
Repeat a table heading on subsequent pages
-
Control where a table is divided
Use Table Styles to format an entire table
After you create a table, you can format the entire table by using Table Styles. By resting your pointer over each of the preformatted table styles, you can preview what the table will look like.
-
Click in the table that you want to format.
-
Under Table Tools, click the Design tab.
-
In the Table Styles group, rest the pointer over each table style until you find a style that you want to use.
Note: To see more styles, click the More arrow
 .
. -
Click the style to apply it to the table.
-
In the Table Style Options group, select or clear the check box next to each the table element to apply or remove the selected style.
 .
.Top of Page
Add or remove borders
You can add or remove borders to format a table the way that you want.
Add table borders
-
Under Table Tools, click the Layout tab.
-
In the Table group, click Select, and then click Select Table.
-
Under Table Tools, click the Design tab.
-
In the Table Styles group, click Borders, and then do one of
the following:-
Click one of the predefined border sets.
-
Click Borders and Shading, click the Borders tab, and then choose the options that you want.
-
Remove table borders from the whole table
-
Under Table Tools, click the Layout tab.
-
In the Table group, click Select, and then click Select Table.
-
Under Table Tools, click the Design tab.
-
In the Table Styles group, click Borders, and then click No Border.
Add table borders to specified cells only
-
On the Home tab, in the Paragraph group, click Show/Hide.
-
Select the cells that you want, including their end-of-cell marks.
-
Under Table Tools, click the Design tab.
-
In the Table Styles group, click Borders, and then click the border that you want to add.


Remove table borders from specified cells only
-
On the Home tab, in the Paragraph group, click Show/Hide.
-
Select the cells that you want, including their end-of-cell marks.
-
Under Table Tools, click the Design tab.
-
In the Table Styles group, click Borders, and then click No Border.
Top of Page
Display or hide gridlines
Gridlines show the cell boundaries of a table on the screen wherever the table doesn’t have borders applied. If you hide the gridlines in a table that has borders, you won’t see the change because the gridlines are behind the borders. To view the gridlines, remove the borders.
Unlike borders, gridlines appear only on the screen; they are never printed. If you turn off gridlines, the table is displayed as it will be printed.
Note: Gridlines are not visible when you view a document in a Web browser or in Print Preview.
Display or hide table gridlines in a document
-
Under Table Tools, on the Layout tab, in the Table group, click View Gridlines.
Top of Page
Add a cell, row, or column
Add a cell
-
Click in a cell that is located just to the right of or above where you
want to insert a cell. -
Under Table Tools, on the Layout tab, click the Rows & Columns Dialog Box Launcher.
-
Click one of the following options:
|
Click this |
To do this |
|
Shift cells right |
Insert a cell and move all other cells in that row to the right. Note: This option may result in a row that has more cells than the other rows. |
|
Shift cells down |
Insert a cell and move remaining existing cells in that column down one row each. A new row will be added at the bottom of the table to contain the last existing cell. |
|
Insert entire row |
Insert a row just above the cell that you clicked in. |
|
Insert entire column |
Insert a column just to the right of the cell that you clicked in. |
Add a row
-
Click in a cell that is located just below or above where you want to add a row.
-
Under Table Tools, click the Layout tab.
-
Do one of the following:
-
To add a row just above the cell that you clicked in, in the Rows and Columns group, click Insert Above.
-
To add a row just below the cell that you clicked in, in the Rows and Columns group, click Insert Below.
-
Add a column
-
Click in a cell that is located just to the right or left of where you want to add a column.
-
Under Table Tools, click the Layout tab.
-
Do one of the following:
-
To add a column just to the left of the cell that you clicked in, in the Rows and Columns group, click Insert Left.
-
To add a column just to the right of the cell that you clicked in, in the Rows and Columns group, click Insert Right.
-
Top of Page
Delete a cell, row, or column
-
Do one of the following:
To select
Do this
A cell
Click the left edge of the cell.
.A row
Click to the left of the row.
A column
Click the column’s top gridline or top border.
-
Under Table Tools, click the Layout tab.
-
In the Rows & Columns group, click Delete, and then click Delete Cells, Delete Rows, or Delete Columns, as appropriate.


Top of Page
Merge or split cells
Merge cells
You can combine two or more cells in the same row or column into a single cell. For example, you can merge several cells horizontally to create a table heading that spans several columns.
-
Select the cells that you want to merge by clicking the left edge of a cell and then dragging across the other cells that you want.
-
Under Table Tools, on the Layout tab, in the Merge group, click Merge Cells.
Split cells
-
Click in a cell, or select multiple cells that you want to split.
-
Under Table Tools, on the Layout tab, in the Merge group, click Split Cells.
-
Enter the number of columns or rows that you want to split the selected cells into.
Top of Page
Repeat a table heading on subsequent pages
When you work with a very long table, it will be divided wherever a page break occurs. You can make adjustments to the table so that the table headings are repeated on each page.
Repeated table headings are visible only in Print Layout view and when you print the document.
-
Select the heading row or rows. The selection must include the first row of the table.
-
Under Table Tools, on the Layout tab, in the Data group, click Repeat Header Rows.
Note: Word automatically repeats the table headings on each new page that results from an automatic page break. Word does not repeat a heading if you insert a manual page break within a table.
Top of Page
Control where a table is divided
When you work with a very long table, it must be divided wherever a page break occurs. By default, if a page break occurs within a large row, Microsoft Word allows a page break to divide the row between the two pages.
You can make adjustments to the table to make sure that the information appears as you want it to when the table spans multiple pages.
Prevent a
table row from breaking across pages
-
Click in the table.
-
Under Table Tools, click the Layout tab.
-
In the Table group, click Properties, and then click the Row tab.
-
Clear the Allow row to break across pages check box.
Force a table to break across pages at a particular row
-
Click in the row that you want to appear on the next page.
-
Press CTRL+ENTER.
Top of Page
Select the table
- Using the mouse: Move the mouse over the table until you see the table selection icons in the upper-left corner of the table and click it:

Note: You can also click on the table selection icon in the bottom-right corner (resizing handle) for the same effect.
- Using the keyboard: To select table elements, on the Table Layout tab, on the Table group, click the Select button, then select the option you prefer:

- Select Cell
- Select Column
- Select Row
- Select Table
Format the table
After positioning the cursor anywhere in a table or selecting a table element, Word shows two tabs: Table Design and Layout. E.g.:

See also Select and format table elements in Word.
Apply a predefined Table style
There are several predefined styles you can use for the table. Styles include a variety of borders, colors, and other attributes that give a table a very professional appearance.
To choose any of the predefined styles, do the following:
1. Select the table.
2. On the Table Design tab, in the Table Styles group, in the Styles Gallery, click the More arrow to see the complete list of styles:

3. Select the table style you want:

The Table Styles gallery includes three categories of styles:
- Plain Tables have minimal formatting.
- Grid Tables include vertical separators between columns.
- List Tables do not include vertical column separators:

Note: The selected style overrides any previously added style changes for the table.
Modify the table style options
To change the table or selected style, on the Table Design tab, in the Table Style group, click Modify Table Style…:

In the Modify Style dialog box, make changes you want:

Note: Click the Format button at the bottom of the dialog box to change other options such as Font or Paragraph. See also how to clear formatting.
Customize the table formatting
After applying a table style, you can turn various options on or off to change their appearance. On the Table Design tab, in the Table Style Options group, there are six options:

- Header Row is the first row of the table that contains Headers that helps identify the contents of a particular column. Usually, the Header Row is formatted differently and should be repeated at the beginning of each new page for tables that extend beyond one page.
Note: According to most requirements, data tables should have a header row to provide a contextual structure that aids navigation.
- Total Row is the last row of the table. If this option is selected, the last row will be formatted differently from the body rows, designed to summarize the rows above it (see how to insert formulas).
- First Column used special formatting to the column. Usually, the First Column contains the row headings.
- Last Column applies special formatting to the column to summarize the earlier columns (see how to insert formulas).
- Banded Rows and Banded Columns alternate the background color of rows and columns (see how to change the background color for the selected cells below).
Note: Certain Table Style Options may have a different effect depending on the Table Style you’ve chosen. You might need to experiment to get the look you want.
Apply the border styles
To apply and remove cell borders, do the following:
1. Select the cells or entire table to which you want to add a border.
2. On the Table Design tab, in the Borders group, choose the desired Border Styles, Line Style, Line Weight, and Pen Color:

- Select the predefined Line Style, Line Weight, and Line Color from the Border Styles dropdown list:

- Select the Line Style:

- Select a border thickness from the Line Weight dropdown list:

- Select the border color from the Pen Color dropdown list:

- Select the borders from the Borders dropdown list:

Note: Select No Borders from the Borders dropdown list to remove borders from the selected cells.
- Draw the border where you want:
- After selecting border style or color, the Border Painter button is automatically checked, or
- If all that you want is selected already, just click the Border Painter button by yourself:

After any of these actions, your cursor changes to the brush. Now, draw the border where you need it:

Note: Use the Eraser button in the Draw group on the Table Layout tab to remove the unnecessary border:


Apply background colors and shading
To change the background color for some table elements, select them, then on the Table Design tab, in the Table Styles group, click the Shading button, then select the background color you prefer:

Note: To use a pattern instead of a solid color, on the Table Design tab, in the Borders group, click the dialog box launcher:

In the Borders and Shading dialog box, on the Shading tab, select a pattern in the Style list:

Layout of the table
The Table Layout tab includes commands for changing the entire table format, as well as commands for changing the appearance of individual table components such as cells, columns, rows:

See Select and format table elements in Word for more details.
Resize a table
- Using the mouse: To resize a table in a Word document, move the mouse over the table until you see the table resizing icons (handle) in the bottom-right corner of the table and click it:

Drag the table to the size you need, and then release the handle.
- Using the keyboard: Select a table (see also how to resize individual cells, specific rows, or columns); the do one of the following:
- On the Layout tab, in the Cell Size group, change the values in the Height and Width fields:

- Open the Table Properties dialog box by doing one of the following:
- On the Table Layout tab, in the Table group, click the Properties button:

- Right-click the table and select Table Properties… in the popup menu:

In the Table Properties dialog box, on the Table tab, in the Size section, select the Preferred width check box, then:
- In the Preferred width field, type or select the value you need,
- In the Measure in dropdown list, select one of the items:
- Percent to specify the percentage of the table width,
- Inches to fix the column width:

- On the Table Layout tab, in the Table group, click the Properties button:
- On the Layout tab, in the Cell Size group, change the values in the Height and Width fields:


See how to resize table elements for more details.
Freeze the table
Some Word tables change the width of their columns according to the data. To stop changing the table size when new data is inserted, do the following:
1. Select the table.
2. Open the Table Properties dialog box.
3. In the Table Properties dialog box, on the Table tab, click the Options… button:

4. In the Table Options dialog box, deselect the Automatically resize to fit contents check box:

See also how to fix the height of table rows.
Move a table
To move a table to a new page or a new document, select it, then use the Cut and Paste commands. You can also use the Copy command to leave a copy of the table in the original location.
If you are working with tables, we recommend that you enable gridlines. Frames that are a format are printed. Grids are not printed. These tips are not enough to cover the scope of table formatting in Word. I didn`t talk about the role of the Design tab in creating eye-catching boards. That is a problem in itself. But this is one of the smallest areas to get lost thanks to the visual help of this tab. If you`re working with documents with multiple tables, formatting with table styles can ensure that your tables are formatted consistently and save you a lot of time. If you are copying tables from another document, you may need to apply the same style to those tables.
It is long and tedious to select all the tables one by one to change the style. This tutorial shows you two simple ways to change the style of all tables in Word. Microsoft Word tables change their dimension to include new data. There may be times when you don`t want to resize the table at all, even if new data is inserted. That is, “freeze” the size of the cells. You can select document themes, color themes, and font themes from the Themes, Colors, or Fonts drop-down menus on the Theme tab of the ribbon: After inserting a table into a document, place the cursor in the table to trigger the Table Tools tab. Then click Design and select a table style from the Table Styles library. You can apply table styles to your Word tables to format them quickly and consistently. Word comes with several built-in table styles, or you can create your own. You can change table styles by changing borders, shading, character formatting, paragraph formatting, and table properties. If your document contains multiple tables, table styles can save a lot of time.
Each Word document uses a document theme that includes a font theme and a color theme. The colors used in table styles are based on the color theme. Working with tables in Word can be extremely rewarding. While tables are a common space between Microsoft Word and Excel, Microsoft Excel is more for managing tabular data. Nevertheless, learning how to properly format tables in both applications is an essential skill of Microsoft Office. Take advantage of it at every opportunity. You will find a use for this simple workaround. By default, Gmail doesn`t keep the table format when pasted from Microsoft Excel. To send tabular data by e-mail without sending it as a separate attachment, use Microsoft Word as a bridge.
NOTE: If you want to use the Select Tables feature to select all tables in the Word document, first place the cursor outside all tables. Word automatically applies the style to every new table you create in your document. If you want to format the table template in a more unique way, see this article: 2 Ways to Alternate Row or Column Colors in Your Word Table Is there a way to select all tables to apply this change? Or do I have to select them manually (`select all` doesn`t work because it also highlights the normal text that disables the table`s properties)? You can also set a default table style for new tables in the active document or for all new documents. In Method 2, we have a macro that allows you to select all existing tables in an active document. Once the tables are selected, you can apply any style to them in batches. You can edit a table style in a Word document, and all tables that use that table style are modified. Using tables and even spontaneously editing them based on the data has become much easier in new versions of Word like Microsoft Word 2019 and Office 365. The intuitive formatting features of Microsoft Word tables allow you to control more finely (and faster) the appearance of a table.
But first, go to the ribbon > > Insert Table > Table to create your first table. After you select a table style, you can select different table style options (which are affected by the formats in the table format). Loss of critical data can be a curse on people`s digital lives. What is sarcastic is that we only feel regret when what has been done has been done. Since there is no point in mourning the loss, we recommend that you get a tool to recover Word docx document error as soon as possible. In addition, this utility also allows you to select all tables to change the borders, swatches, and properties of all tables at once. For example, suppose you are writing a 20-page Microsoft Word document and you want the 10 tables in your document to look the same. Once you`ve found a style you like, use the Table AutoFormat feature to apply it to your first table.
With Word 2000, you must do the same for the 10 tables. However, with Word XP or Word 2003, you can save yourself a few mouse clicks by setting the default style for all new tables in your document. To do this, follow these steps: Tabular data specifies information in its structure. It would have been frustrating if Word didn`t have something to handle non-tabular data. You can use the Insert Table command to immediately convert data to tables. 2. After selecting all the tables, click Design on the ribbon, and then click We didn`t cover the tables as often as we would have liked. It`s time to fix this because the number of people asking questions about the correct formatting of tables is piling up. Maybe these eight table tips can be an aperitif.
You simply can`t create beautiful Microsoft Word documents by truncating tables – learn how to format tables in Word. You can also create your own custom color themes so that your boards can be formatted with your organization`s colors. However, if you want a new style for your tables, you can make a new style customization by following these steps. If you change a table style and tables that use that style are not changed, it is likely that direct or manual formatting has been applied to the table, which then replaces the table style. You may need to remove formatting from the table by selecting the table and clicking Remove Formatting in the Font group on the Home tab. Position the painting according to the text around it for a visually aesthetic look. Wrap the text around the tables by dragging it onto the handle. Text wrapping automatically changes from None to Next. Use the Table Position dialog box to specify the distance to the surrounding text for each page in the table. Now, all tables should already be selected.
You can apply a built-in or newly created style to all tables in the active document. You can specify how Microsoft Word should divide data into rows and columns. Paragraph, tabs, commas, or other delimiters. This allows you to easily import non-tabular data from CSV files or simple TXT files and convert them into formatted tables. Remember that you can also import data from Microsoft Word into an Excel spreadsheet. If your Word document contains multiple tables that you want to format consistently, we recommend that you use table styles instead of formatting each table manually or directly. In Microsoft Word, tables are important formatting tools. Microsoft Office has simplified the process of creating and formatting basic tables in Microsoft Word for Office 365, Word 2019, Word 2016, and Word 2013. Select Move with text if the text is directly linked to the data in the table. The table aligns vertically with the corresponding paragraph that surrounds it. If the tabular data applies to the entire document, you can leave the option unchecked.
You can also control tables by using Microsoft Word keyboard shortcuts. 3. Press the F5 key to run this code and all tables have been modified in the specified style. If your tables overlap in Word, or if you want to prevent them from overlaying your text, you must learn how to position your tables on the page by using the Table Properties feature. If you don`t want to use the VBA, you can also do it quickly with Kutools for Word. After installing Kutool for Word, you can quickly change the style of all tables. Do this: just use the cursor as if you were selecting the entire line, where you go to the far left of the page, to the edge section, until the cursor tilts to the right side, say 45 degrees, and then select/highlight others by also holding down the Control button after the first selection. This is basically the selection of multiple rows across the entire page and I just found out after so many (inconvenient) VB script forum recommendations that it works for tables as well. I am in the process of editing a 21-page MSDS full of tables. If you often work on long Microsoft Word documents that contain tables in the same format, do you usually complain when you need to reset the format? Learn how to alleviate your frustrations by setting the default format for all tables.
You can save a lot of time by reusing spreadsheets in your professional Microsoft Word documents. Save empty table formats and insert new data if necessary. With this quick backup, you don`t need to create the layout for new data from scratch. Select the Microsoft Excel worksheet and paste it into a Microsoft Word document with the source formatting, and then paste it into a Microsoft Word document. Now, copy from Microsoft Word to Gmail. As you can see from the screenshot, the problem is solved. You may need to tweak the most heavily formatted tables a bit, but most of the formatting is preserved. From time to time, we need to create tables in our Word document to place and organize different data. And if there are a number of tables, it would be better to apply the same style to them to make the file more professional. For this reason, we would like to introduce you to 2 methods in the upcoming texts. Use the Building Block Organizer to preview the table you created. You can also edit the properties and delete the tables from here.
.
Create, Modify and Apply Table Styles in Word Documents
by Avantix Learning Team | Updated August 21, 2022
Applies to: Microsoft® Word® 2013, 2016, 2019, 2021 or 365 (Windows)
You can apply table styles to your Word tables to format them quickly and consistently. Word is shipped with several built-in table styles or you can create your own. You can edit table styles by modifying borders, shading, character formatting, paragraph formatting and table properties. If your document includes multiple tables, table styles can save a lot of time.
Note: Buttons and Ribbon tabs may display in a different way (with or without text) depending on your version of Word, the size of your screen and your Control Panel settings. For newer versionns of Word, Ribbon tabs may appear with different names. For example, the Table Tools Design tab may appear as Table Design.
Recommended article: How to Keep a Microsoft Word Table Together on One Page
Do you want to learn more about Microsoft Word? Check out our virtual classroom or live classroom Word courses >
Table styles and themes
Every Word document uses a document theme which includes a font theme and color theme. The colors used in table styles are based on the color theme.
You can select document themes, color themes and font themes using the Themes, Colors or Fonts drop-down menus on the Design tab in the Ribbon:

You can also create your own custom color themes so your tables can be formatted using your organization’s colors.
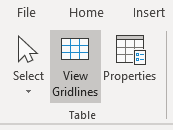
Display gridlines
When you are working with tables, it’s a good idea to turn gridlines on. Borders, which are a format, will print. Gridlines do not print.
To display gridlines:
- Click in a table.
- Click the Table Tools Layout or Table Layout tab.
- Click View Gridlines. Gridlines will stay on for all Word documents.
View Gridlines appears on the Table Tools Layout or Table Layout tab when you click in a table:
Apply a table style
If your Word document contains multiple tables that you want to format in a consistent way, it’s best to use table styles rather than applying manual or direct formatting to each table.
To apply a table style to a table:
- Click in the table.
- Click the Table Tools Design or Table Design tab in the Ribbon.
- Click the More down arrow on the bottom right in the Table Styles gallery. A drop-down menu appears.
- Hover over the various table styles. The table formatting will change as you move over different table styles in the gallery.
- Click the table style you want to apply.
Below is the Table Styles gallery (the current theme is the Office theme):
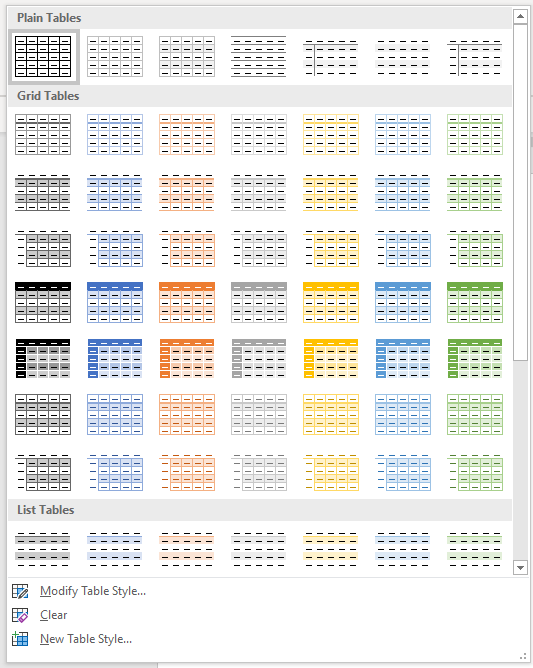
Note: Table styles do not include row height, column width or custom cell formatting for individual cells. If a user applies manual or direct formatting to a table (such as fills and borders) on the Table Tools Design or Table Design tab, this formatting will override the table style.
Apply Table Style Options
Once you have selected a table style, you can select or check different Table Style Options (which are affected by the formats in the selected table style).
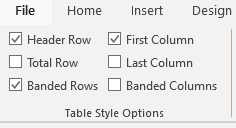
The six Table Style Options that you can apply are: Header Row, Total Row, Banded Rows, First Column, Last Column and Banded Columns. If you have selected a plain table style, you may not notice any changes in the table formatting if you select different Table Style Options.
Table Style Options appear on the Table Tools Design or Table Design tab as follows when you click in a table:
To select Table Style Options:
- Click in the table.
- Click the Table Tools Design or Table Design tab in the Ribbon.
- In Table Style Options, check or uncheck Header Row. If this option is checked, the header row will be formatted differently from the body rows.
- In Table Style Options, check or uncheck Total Row. If this option is checked, the last row will be formatted differently from the body rows.
- In Table Style Options, check or uncheck Banded Rows or Banded Columns for alternate row or column shading.
- In Table Style Options, check First Column or Last Column if you want the first or last column formatted differently from the other columns.
In the following table, Header Row and Banded Rows are checked in Table Style Options:

Modify a table style
You can modify a table style in a Word document and all tables using that table style will change.
To modify a table style:
- Click in the table.
- Click the Table Tools Design or Table Design tab in the Ribbon.
- Click the More down arrow on the bottom right in the Table Styles gallery. A drop-down menu appears.
- Click Modify Table Style. A dialog box appears. You can also right-click a table style and select Modify.
- From the Apply Formatting to drop-down menu, select the element that you want to modify (such as Header row).
- Select the desired formatting such as font, font size, font color, fill and border.
- From the Apply Formatting to drop-down menu, select the next element that you want to modify.
- Select the desired formatting such as font, font size, font color, fill and border.
- Repeat for other elements.
- Select Only in this document or New documents based on this template. If you select Only in this document, the modified style will only be available for the current document. If you select New documents based on this template, then the table style will be modified for future documents based on the current template (usually the Normal template).
- Click OK.
Below is the Modify Style dialog box:
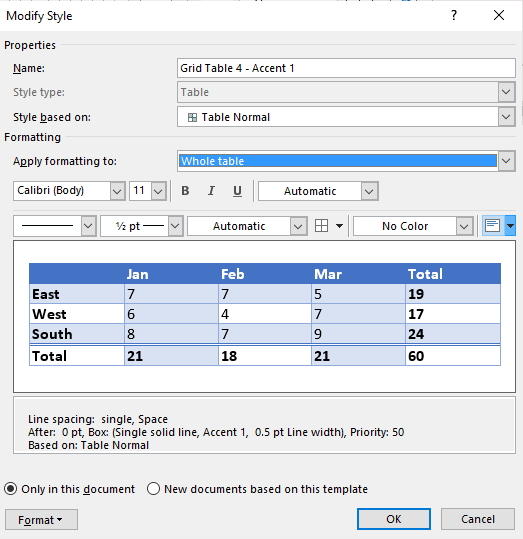
You can also click Format at the bottom of the dialog box and choose other options such as Font or Paragraph.
If you modify a table style and the tables using that style do not change, it’s likely that direct or manual formatting has been applied to the table which then overrides the table style. You may need to clear formatting in the table by selecting the table and clicking Clear Formatting on the Home tab in the Font group.
You can also modify Table Properties in a table style. Table properties include table alignment, row settings and cell margins.
To modify Table Properties in a table style:
- Click in the table.
- Click the Table Tools Design or Table Design tab in the Ribbon.
- Click the More down arrow on the bottom right in the Table Styles gallery. A drop-down menu appears.
- Click Modify Table Style. A dialog box appears. You can also right-click a table style and select Modify.
- Click Format on the bottom left of the dialog box. A drop-down menu appears.
- Click Table Properties. A dialog box appears.
- Click the Table tab and select an Alignment.
- Click the Row tab and select the desired options. For example, turn off Allow row to break across pages.
- Select any other formatting options you want to apply to the entire table.
- Click OK.
- Select Only in this document or New documents based on this template.
- Click OK.
Below is the Table Properties dialog box with the Table tab selected:

Create a new table style
You can also create a new or custom table style.
To create a custom table style:
- Click in the table.
- Click the Table Tools Design or Table Design tab in the Ribbon.
- Click the More down arrow on the bottom right in the Table Styles gallery. A drop-down menu appears.
- Click a table style to apply it as a base style.
- Click the More down arrow on the bottom right in the Table Styles gallery. A drop-down menu appears.
- Click New Table Style. A dialog box appears.
- Enter a name for the new table style in the Name box.
- Select the desired formatting.
- Select Only in this document or New documents based on this template.
- Click OK.
New Table Style appears at the bottom of the Table Styles gallery:
The new table style will appear in the Table Styles gallery under Custom (at the top of the gallery). If you want to delete it, right-click it in the gallery and select Delete Table Style.
Clear a table style
To clear a table style and remove formatting:
- Click in the table.
- Click the Table Tools Design or Table Design tab in the Ribbon.
- Click the More down arrow on the bottom right in the Table Styles gallery. A drop-down menu appears.
- Click Clear.
Clear appears at the bottom of the Table Styles gallery:
Set a default table style
You can also set a default table style for new tables in the current document or all new documents.
To set a default table style:
- Click in the table.
- Click the Table Tools Design or Table Design tab in the Ribbon.
- Click the More down arrow on the bottom right in the Table Styles gallery. A drop-down menu appears.
- Right-click the table style you want to use as the default style and select Set as Default from the drop-down menu. A dialog box appears.
- Select This document only or All documents based on the Normal.dotm template (the default template in Word is the Normal template).
- Click OK.
If you are working with documents with multiple tables, formatting with table styles can ensure that your tables are formatted consistently and save a lot of time.
Subscribe to get more articles like this one
Did you find this article helpful? If you would like to receive new articles, JOIN our email list.
More resources
4 Ways to Create a Table in Word
14 Shortcuts to Quickly Select Text in Microsoft Word
How to Create Headings in Word (Using Heading Styles)
How to Quickly Remove Hard Returns in Word Documents
10 Microsoft Word Tips, Tricks and Shortcuts for Selecting in Tables
Related courses
Microsoft Word: Intermediate / Advanced
Microsoft Excel: Intermediate / Advanced
Microsoft PowerPoint: Intermediate / Advanced
Microsoft Word: Long Documents Master Class
Microsoft Word: Styles, Templates and Tables of Contents
Microsoft Word: Designing Dynamic Word Documents Using Fields
VIEW MORE COURSES >
Our instructor-led courses are delivered in virtual classroom format or at our downtown Toronto location at 18 King Street East, Suite 1400, Toronto, Ontario, Canada (some in-person classroom courses may also be delivered at an alternate downtown Toronto location). Contact us at info@avantixlearning.ca if you’d like to arrange custom instructor-led virtual classroom or onsite training on a date that’s convenient for you.
Copyright 2023 Avantix® Learning
Microsoft, the Microsoft logo, Microsoft Office and related Microsoft applications and logos are registered trademarks of Microsoft Corporation in Canada, US and other countries. All other trademarks are the property of the registered owners.
Avantix Learning |18 King Street East, Suite 1400, Toronto, Ontario, Canada M5C 1C4 | Contact us at info@avantixlearning.ca
In this post, we will look at 2 useful ways to apply the same style to all tables in your Word document.
Every so often, we need to create tables in our Word document to place and arrange various data. And if there are a number of tables, it would be better to apply the same style to them so as to make the file appear more professional. For this reason, we’d like to exhibit you 2 methods in the coming texts.
Method 1: Apply the Same Style to a Table Individually
Once you insert a table in document, put cursor inside the table to trigger the “Table Tools” tab. Then click “Design” and choose a table style in the “Table Styles” library.
However, in case you may want a novel style for your tables, you are fine to customize a new one by following the succeeding steps.
- Firstly, click the “More” button in “Table Styles” group.
- Then choose “New Table Style”.

- Now in the “Create New Style from Formatting” dialog box, name the new style first.
- Next set such formatting as font, font size, borders, Fill Color, etc.
- And select the “New documents based on this template” option.
- Lastly, click “OK”.


If you want to format the table template in a more unique way, take a glance at this article: 2 Methods to Alternate Row or Column Colors in Your Word Table
Method 2: Manipulate Tables in Batches
In method 2, we have a macro for you to select all existing tables in an active document. Once tables are selected, you can apply whatever style for them in batches.
- First off, click “Developer” tab in the Ribbon.
- Then click “Visual Basic” to trigger the VBA editor.

- Next insert a new module by click “Normal” and then “Insert”.
- On the drop-down menu, choose “Module”.

- Double click new module to open coding area and paste the codes:


'Select all tables in a Word document.
Sub SelectAllTables()
  Dim objDoc As Document
  Dim objTable As Table

  Application.ScreenUpdating = False

  'Initialization
  Set objDoc = ActiveDocument

  'Set each table in document as a range editable to everyone.
  With objDoc
  For Each objTable In .Tables
    objTable.Range.Editors.Add wdEditorEveryone
  Next
  objDoc.SelectAllEditableRanges wdEditorEveryone
  objDoc.DeleteAllEditableRanges wdEditorEveryone
  Application.ScreenUpdating = True
  End With
End Sub
- Finally, hit “Run” button.


Now all tables shall be selected already. You can apply a built-in or newly created style to all tables in the current document.
Cope with Word Data Loss
Loss of critical data can be a bane of people’s digital life. What’s sarcastic is we feel regret only after what’s done has been done. Since there is no use of mourning for the loss, we suggest you to get a tool to recover Word docx document error as soon as possible.
Author Introduction:
Vera Chen is a data recovery expert in DataNumen, Inc., which is the world leader in data recovery technologies, including Excel xls recovery product and pdf repair software products. For more information visit www.datanumen.com