
To do so, hold down the Ctrl key and click each picture. Remember, if you can’t create a multi-picture selection, check the text wrapping options–they should all be With Text Wrapping. With all of the pictures selected, click the contextual Format tab.
Contents
- 1 Can you format all pictures in Word at once?
- 2 How do you arrange pictures in Word?
- 3 Why can’t I select multiple pictures in Word?
- 4 What does F4 do in Word?
- 5 How do you select multiple pictures?
- 6 How do I resize multiple pictures at once in Windows 10?
- 7 Can I group pictures in Word?
- 8 Why can’t I Group A picture and a shape in Word?
- 9 How do I copy multiple images in Word?
- 10 What does Alt F9 do in Windows?
- 11 What does Alt F9 do in Word?
- 12 What is Alt F10?
- 13 How do I select a group of pictures in Windows?
- 14 How do I select multiple photos in Windows?
- 15 How do I select all photos in photos?
- 16 Can you crop multiple images at once?
- 17 How do I crop a group of pictures?
- 18 How do I resize multiple images at once on a Mac?
- 19 How do I compress photos in bulk?
- 20 How do I print 4 pictures on one page in Word?
Can you format all pictures in Word at once?
Step 1: Open the Word document that contains your images. Step 2: Right-click on the first image and select Size and Position. Step 3: In the Layout box that opens, click on the Size tab. Then, uncheck the box next to Lock aspect ratio.
How do you arrange pictures in Word?
Hold down Shift and use the mouse or touchpad to select the objects that you want to align. Select Shape Format or Picture Format. Select Align. If you don’t see Align on the Shape Format tab, select Arrange, and then choose Align.
Why can’t I select multiple pictures in Word?
By default, Word inserts pictures In Line with Text in the document.Therefore, Word will not allow selecting multiple pictures in your document when they are In Line with Text. Therefore, you must change the layout of the pictures to With Text Wrapping. This will allow you to select multiple pictures at the same time.
What does F4 do in Word?
F4: Repeat your last action. Shift+F4: Repeat the last “Find” action. This one’s handy because you can use it to browse search results without having the Find and Replace window or Navigation pane open. Ctrl+F4: Close the current document.
How do you select multiple pictures?
On a computer:
Click the white circle with check mark at the top-left corner of the photo. Hold the Shift key and hover with the mouse over a thumbnail. When the thumbnails turn blue you can click. Now all pictures from the first to the last selected picture are selected.
How do I resize multiple pictures at once in Windows 10?
Select a group of images with your mouse, then right-click them. In the menu that pops up, select “Resize pictures.” An Image Resizer window will open. Choose the image size that you want from the list (or enter a custom size), select the options that you want, and then click “Resize.”
Can I group pictures in Word?
Press and hold CTRL and select shapes, pictures, or other objects to group.Go to Picture Format or Picture Tools Format > Group > Group.
Why can’t I Group A picture and a shape in Word?
Group shapes, pictures, or other objects
Press and hold CTRL while you click the shapes, pictures, or other objects to group. You will need to select more than one shape, picture or object in order to enable the Group button. Tip: For help selecting a shape or picture, see Select a shape or other object.
How do I copy multiple images in Word?
- Select the pictures you want to put into Word Document, Copy them (Ctrl+C)
- Then open the word document, you want to paste them into.
- Then paste (Ctrl + V) the pictures you copied.
- Then arrange them as required.
- You can also change the format, height, width and other settings of the image.
What does Alt F9 do in Windows?
When working on a merge document in Word, pressing Alt-F9 brings up the Windows search panel instead of toggling the field code. Ctrl-F9 also brings up the Window search instead of adding a blank field code.
What does Alt F9 do in Word?
Pressing Alt + F9 toggles between fields and their results, and it doesn’t matter where the cursor is. But when you update an individual field (by pressing F9), the cursor must be inside the field you’re updating. If a field doesn’t update as you expect, make sure the cursor is inside the field and try again.
What is Alt F10?
“Alt + F10” is a set of shortcut keys to help users of Acer computer to quickly enter into recovery environment of Acer eRecovery Management.
How do I select a group of pictures in Windows?
To select multiple files on Windows 10 from a folder, use the Shift key and select the first and last file at the ends of the entire range you want to select. To select multiple files on Windows 10 from your desktop, hold down the Ctrl key as you click on each file until all are selected.
How do I select multiple photos in Windows?
Click the first file or folder you want to select. Hold down the Shift key, select the last file or folder, and then let go of the Shift key. Hold down the Ctrl key and click any other file(s) or folder(s) you would like to add to those already selected.
How do I select all photos in photos?
The Photos app has a “Select” command on every screen and in every folder, so you can use it anywhere. You can also select all the photos in a folder or all the photos on your iPhone by tapping and dragging your finger around. You’ll select all the photos in the current location as the iPhone scrolls through photos.
Can you crop multiple images at once?
If you want to process a batch of multiple photos in one go, you can apply one crop size to all of them, or adjust the cropping area on each image separately.
How do I crop a group of pictures?
How To Crop Multiple Images in Photoshop
- Create Two Folders.
- Copy your Source Images Into the “SOURCE” Folder.
- Create an Action to Resize and Crop Images.
- Perform the Operations to Resize the Image.
- Perform the Operations to Crop the Image.
- Save Your Image.
- Stop Recording.
- Start Cropping Multiple Images.
How do I resize multiple images at once on a Mac?
From the resulting dropdown menu, select “Image Files.” In the sidebar, click on “Files and Folders.” Press and hold on “Get Specified Finder Items” and then drag this to the workflow pane. In the sidebar, click on “Photos” and then drag “Scale Images” to the workflow pane.
How do I compress photos in bulk?
How to Compress Images in Bulk (with Mass Image Compressor)
- Download and install Mass Image Compressor (Windows) from the corresponding page on Sourceforge.net.
- Select the source folder with the images you want to compress.
- Adjust the Compression Parameters (Quality and Dimensions) for the compression.
How do I print 4 pictures on one page in Word?
To print four pages to a sheet, follow these steps:
- Go to File | Print.
- In the Zoom section, select 4 Pages from the Pages Per Sheet drop-down list.
- Make any other print selections, and click OK.
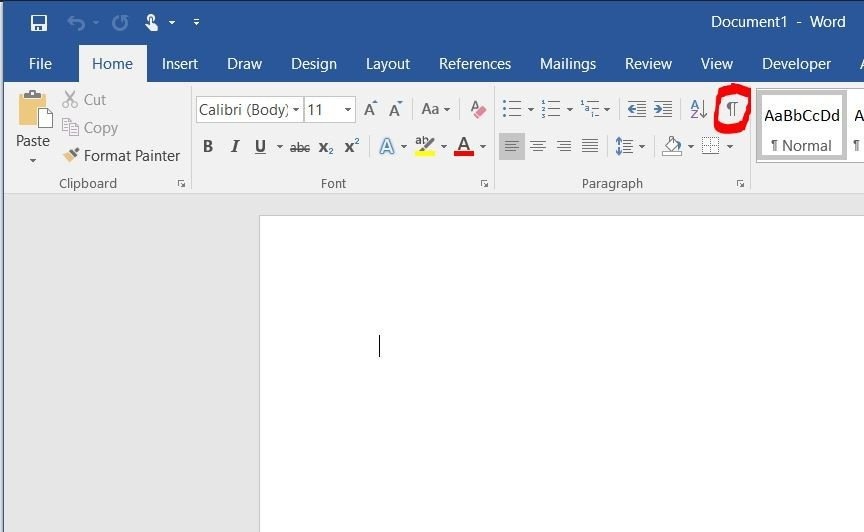
How to select and format all pictures to
Brightness 20%, Contrast -40% and Sharpness 100%
and select
Wrapping Behind Text
in Word 2013 with few clicks?
- microsoft-word
asked Apr 11, 2015 at 20:48
![]()
user320187user320187
1612 gold badges4 silver badges9 bronze badges
1 Answer
The re-do option can speed things up but is limited to one action at a time.
You could go and set the brightness to 20%. Click then on the next picture and use CTRL + Y. The second picture will now have 20% brightness too. And so on. It isn’t perfect but saves clicks aplenty.
answered Apr 12, 2015 at 2:45
![]()
1
-
I can save one click more. Set brightness to 20% and click on the next picture and use F4. Searching for better solution. Thanks.
Apr 13, 2015 at 7:20
Представьте себе — вы хотите вставить несколько изображений в документ Word. Изначально картинки имеют разный размер, но вы хотите, чтобы в документе они были одинакового размера. Хотя можно воспользоваться помощью подходящих инструментов для редактирования фотографий, иногда у вас нет к ним доступа. В таких ситуациях вы можете использовать сам Microsoft Word, чтобы изменить размер всех картинок.

Нельзя отрицать тот факт, что Microsoft Word великолепен, когда дело доходит до текста. Но если вы углубитесь в него, вы обнаружите его скрытые функции, связанные и с другими вещами, такими как редактирование фотографий. Например, знаете ли вы, что прямо в Word можно придать изображению идеально круглую форму?
Точно так же вы можете делать картинки одинакового размера в Word. Давайте посмотрим, как это сделать, используя два метода, упомянутых ниже.
Способ 1: использование макросов
Иногда нам хотелось бы, чтобы у нас была единственная кнопка, нажатие на которую автоматически выполняло сложную задачу. Это то что макросы делать в ворде.
Макросы автоматизируют определенную задачу, которая в противном случае потребовала бы многократного выполнения. Вы можете создать макрос, либо записав шаги, которые вы хотите выполнить, либо написав набор инструкций.
Поскольку нам нужно изменить размер всех изображений в MS Word, мы воспользуемся помощью макросов. Мы бы создали его, написав код для изменения размера фотографий. Не запутайтесь. Вот шаги в деталях:
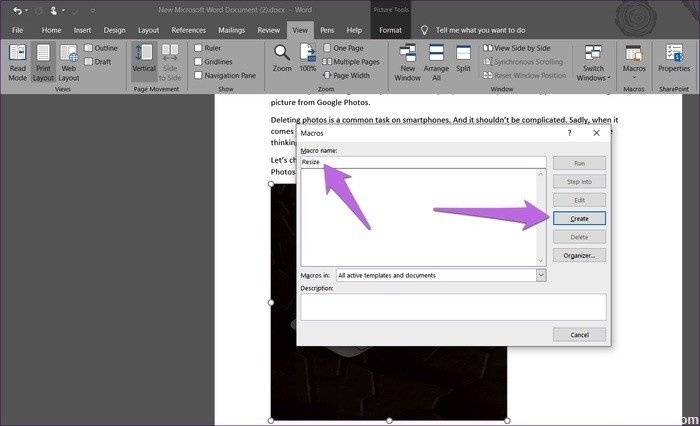
Шаг 1: Откройте файл Word, в котором вы хотите сделать все картинки одинакового размера.
Шаг 2: Нажмите на первую фотографию в файле, чтобы выбрать ее. Затем нажмите на вкладку «Вид» вверху.

Шаг 3: Нажмите «Макросы».

Шаг 4: Откроется всплывающее окно. Введите имя в поле под именем макроса. Вы можете назвать это как угодно. Ради понимания мы бы назвали это Resize.
Затем нажмите «Создать».

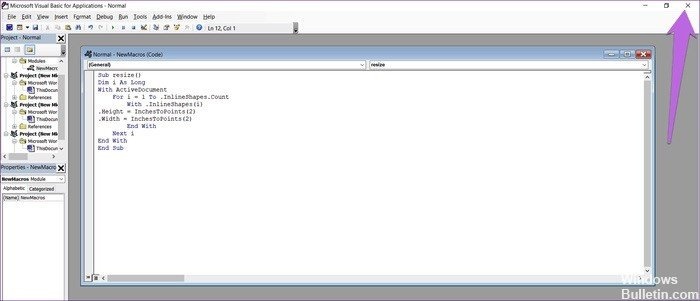
Шаг 5: Откроется новое окно Microsoft Visual Basic для приложений. Выберите существующий код и удалите его.

Шаг 6: Затем скопируйте и вставьте один из следующих кодов в окно.
Тип A: используйте следующий код, если вы хотите изменить высоту и ширину в пикселях. Замените 500 и 600 своими значениями.
Sub resize() Dim i As Long с ActiveDocument For i = 1 To .InlineShapes.Count с .InlineShapes(i) .Height = 500 .Width = 600 End With Next i End With End Sub
Тип B: Используйте это, если вы хотите изменить размер в дюймах. Замените 2 на ваше значение.
Sub resize() Dim i As Long с ActiveDocument For i = 1 To .InlineShapes.Count с .InlineShapes(i) .Height = InchesToPoints(2) .Width = InchesToPoints(2) End With Next i End With End Sub
Тип C: Если вы хотите масштабировать изображения, вам поможет следующий код. Замените 30 и 40 вашими предпочтительными значениями.
Sub resize() Dim i As Long с ActiveDocument For i = 1 To .InlineShapes.Count с .InlineShapes(i) .ScaleHeight = 30 .ScaleWidth = 40 End With Next i End With End Sub
Шаг 7: После копирования закройте окно Microsoft Visual Basic для приложений, щелкнув значок крестика.

Шаг 8: Выбрав изображение, снова нажмите «Макросы» на вкладке «Вид».

Шаг 9: Откроется окно макросов. Нажмите «Выполнить» с выбранным макросом.

Как только вы нажмете кнопку «Выполнить», вы заметите, что размер изменится для всех изображений.

Способ 2: использование волшебного ключа
Знаете ли вы, что можете повторить последнее выполненное действие в приложениях Microsoft Office, просто нажав кнопку на клавиатуре? Это клавиша F4 в Windows и клавиша Y на Mac.
Совет:
Вот шаги для этого метода:
Шаг 1: Откройте документ Word, содержащий ваши изображения.
Шаг 2: Щелкните правой кнопкой мыши первое изображение и выберите «Размер и положение».

Шаг 3: В открывшемся окне «Макет» щелкните вкладку «Размер». Затем снимите флажок «Блокировать соотношение сторон». Введите требуемые значения высоты и ширины изображений в данные поля. Нажмите «ОК».

Шаг 4: Вы заметите, что размер выбранного изображения изменится. Теперь щелкните другие изображения одно за другим и нажмите клавишу F4 (или fn + F4 в Windows) или клавишу Y (в macOS) для каждого из них. Это повторит действие, выполненное в шаге 3 — изменение высоты и ширины изображения.
Примечание
Размер важен
Хорошо организованный документ с изображениями подходящего размера выглядит лучше, чем неорганизованный. Хотя приведенные выше методы позволят вам выполнить намеченную задачу по изменению размера всех изображений, мы бы хотели, чтобы был простой способ. Пока мы не получим это, вам придется полагаться на два метода, упомянутых выше. Если вы знаете другой способ, мы всегда слушаем в комментариях ниже.
Далее: Хотите изменить тему для продуктов Microsoft Office? Узнайте, как изменить тему и отключить темный режим в Word, Excel и PowerPoint по данной ссылке.
Post Views: 10 039
More than ever, pictures are critical to the effectiveness of your communication materials. With the image formatting and layout tools in Microsoft Word, it’s possible to add and manipulate pictures in your document—even if you’re a beginner.


Starting with a Microsoft Word template makes it even easier. With a well-designed Word template, the positioning and formatting of pictures have already been done for you. All you’ve got to do is to drag your pictures into the image placeholders.
Even if you’re using a template for Word, it’s good to know how to format pictures so you can make your document look exactly the way you want it to.
In this article, you’re going to see, step-by-step, how to work with pictures in Microsoft Word.
(Note: The screenshots below show Microsoft Word for Mac. The screens and steps may be slightly different if you’re using a different version of Word.)
How to Insert a Picture in Word
To add a picture to a Word document, click Insert > Pictures. From here, you’ve got three options:
1. Photo Browser
If you choose this option, you’ll be able to select an image from the existing photo sets on your computer. On a Mac, that includes photos in iPhoto and Photo Booth. When you find the picture you want to use, click on it, then drag it into the document.


2. Picture From File
This option lets you insert an image from another location on your computer. Find the image file, select it, then click Insert.


3. Online Pictures
Insert pictures in Word from the web by selecting Online Pictures…. This opens a Bing image search right inside your document. Type a keyword or phrase in the search bar.


By default, the Creative Commons only filter is checked. Keep this selected to make sure you don’t violate any copyright laws. Click on the filter icon to filter the image results by other parameters.


Select an image by clicking on it, then click Insert. You can select several images before clicking the Insert button.


Microsoft Word automatically includes the image attribution and license details as a caption.


Note: While you can import many image formats into Word, the ones that work best are JPG and PNG.
How to Format Pictures in Word
After importing pictures into Word, you can apply different formatting settings to each Microsoft Word picture and control its appearance. Below are some of the most basic image formatting you can apply in Word:
1. Resize an Image
Resize a picture in two ways:
Resizing Method 1
Click on the picture. Press and hold the Shift key, then click and drag one of the sizing handles either towards or away from the center.


Holding the Shift key ensures that the proportion of the picture is retained. Otherwise, it would become distorted and your entire document will look amateurish.
Resizing Method 2
This method allows you to resize the picture to a specific length or width. Click on the picture, then click on the Picture Format tab. Type the length or width you wish the image to have.


By default, the original proportion of the image is retained even when you change either the length or width of the image. Keep this checked to avoid distorting the image.
2. Rotate or Flip Images
To rotate an image, do so either manually or by a specific amount.
Manual Image Rotation
To rotate an image manually, click on the image to select it. Click on the rotation handle and drag it in the direction you want.


Flip or Rotate an Image By a Specific Amount
Rotate a picture by a specific amount. Click on the picture, then go to Picture Format > Rotate. From here, you’ve got the option to:
- Rotate Right 90°
- Rotate Left 90°
- Flip Vertical
- Flip Horizontal
- Select More Rotation Options
To rotate a picture to an exact angle, choose Select More Rotation Options.


Type in the amount you wish to rotate the object, then click OK.


How to Crop Photos in Word
If you’re wondering how to crop a picture in Microsoft Word, it’s not difficult. Follow the steps below to not only crop an image, but also to dress it up by cropping it to a shape or adding decorative borders:
1. Basic Image Cropping
To crop a picture, select the picture, then go to Picture Format > Crop > Crop.
Black cropping handles appear on the sides of the picture. From here:
- Crop one side. Drag one side handle inward.
- Crop two adjacent sides at the same time. Drag one corner inward.
Click outside the image to apply the crop.
2. Crop Image to a Shape
To crop the picture to a specific shape, select the picture. Go to Picture Format > Crop > Crop to Shape. Select a shape from the selection that appears.


Click away from the picture to apply the new shape.


3. Frames and Borders
Borders are an easy way to dress up a picture in Microsoft Word. To add a border, select the picture, go to Picture Format. Click on the Picture Border button on the ribbon to reveal the border options.


From here, choose the color, weight, and dash style you wish to use for the border.


To add a frame, click on the picture, then go to Picture Format. Click on the Picture Quick Styles button on the ribbon. Select the border you want to use.


How to Use Image Editing Tools
There are many Word image editing tools. Learn how to format pictures in Word by removing the background or adjusting the brightness. Here’s how:
1. Remove Background
Microsoft Word allows you to remove the background from your pictures. This feature works best if the color of the background is distinct from the colors on the main subject of the picture.
To remove the background, select the image. Go to Picture Format > Remove Background.


Use the tools provided to select which parts of the image you wish to keep and which parts you want to remove.


The parts that’ll be removed are colored pink.
When you’re happy with the selection, click Keep Changes.


2. Sharpness and Brightness Corrections
Improve the sharpness and brightness of your pictures in Microsoft Word. To adjust these, select the picture. Go to Picture Format > Corrections. Select the sharpness and brightness/contrast settings you wish to use.


To more finely control these settings, go to Picture Format > Corrections > Picture Corrections Options. The Format Picture sidebar appears. It allows you to provide specific settings for sharpness, brightness, and contrast.


3. Picture Color
Microsoft Word also allows you to control the color saturation and tone of your picture. And you can recolor the entire picture for special effects. Select the picture, go to Picture Format > Color. Select any of the options that appear.


From here choose:
- More Variations. Recolors the image with a different color from the options provided.
- Set Transparent Color. Makes certain colors transparent so that the color of the background shows through.
- Picture Color Options. Opens the Format Picture sidebar, where you can fine-tune the settings for color saturation, tone, and recolor.
How to Use Layout Options
Microsoft Word’s layout options for images lets you control how photos are displayed alongside text.
By default, a picture is set to be «In line with text.» This means the picture is treated as an object that moves with the text. This means whatever formatting is applied to the text applies to the picture as well, which may not be how you want it to appear. When a picture is in line with text, you won’t be able to drag and drop it to a different part of the document.
To set up a picture’s layout options, select the image, then go to Picture Format > Position. Select one of the pre-configured layout options to position your picture on the page.


Gain more control by going to Picture Format > Wrap Text.


Select one of the text wrapping options:
- Square — wraps text around the picture in a square shape


- Tight — wraps text following the shape of the picture


- Through — shows text through all the “open” parts of the picture (may only be visible with certain picture shapes)


- Top and Bottom — wraps text only above and below the picture


These text wrapping options allow you to overlay pictures in Word or merge them together into a collage-type layout.
You’ve got other options:
- Behind text. Overlays the text in front of the picture
- In Front of Text. Places text behind the picture, covering it
- Edit Wrap Boundary. Lets you fine-tune how text wraps around the picture, which is especially useful if it’s irregularly shaped
- Move with text. Keeps the picture anchored to the text
- Fix position on page. Keeps the picture on the same position relative to the page, even if the text moves
- More Layout Options …. Gives you precise control over the picture layout
How to Move Pictures in Word and Arrange them on the Page
You may be wondering how to move a picture in Microsoft Word. The easiest way to move a picture is by clicking and dragging it. If this doesn’t work, the picture is probably set to be inline with text. Follow the instructions above to select a different text wrapping option.
To move multiple images, hold the shift key down as you click on each picture. Then, drag and drop them into place.
You can also move images using precise measurements. Select the image, go to Picture Format > Position > More Layout Options …. Specify the horizontal and vertical position of the picture relative to an element of the page.


Get Creative With Pictures in Word
Use the skills you learned above to add pictures in your Word documents and display them exactly the way you envision. As you’ve seen, it’s easy to control the appearance and placement of images on the page. By following the steps above, you can produce professional-looking documents all by yourself. However, we’ve only scratched the surface of the many ways you can work with pictures in Word!
Of course, if you prefer to have these design choices made for you, you’ve got the option to start with a Microsoft Word template. If you make a lot of Word documents, then you’ll like the cost-effectiveness of Envato Elements. You get unlimited downloads of templates as well as fonts, stock photos, and more for one low subscription price. On the other hand, GraphicRiver may be a better option if you only need the one-off template.
This gives you the ultimate convenience because professionally-designed Word templates have image placeholders. All you’ve got to do is to drag and drop your own pictures into the placeholders. The picture formatting steps in this article will help you fine-tune the image settings as you wish.
Now you, too, can get more creative—and effective—with pictures in Microsoft Word. But first, get your head start by downloading your favorite MS Word Template from Envato Elements or GraphicRiver.
Вы хотите вставить несколько изображений в документ Word, но они имеют разный размер. Однако вы хотите, чтобы они были одинакового размера в вашем документе. Вы можете использовать правильные инструменты для редактирования изображений, но иногда у вас нет к ним доступа. В таких ситуациях вы можете использовать Microsoft Word для изменения размера всех изображений.
Изменение размера всех изображений до одинаковой высоты и ширины с помощью клавиши клавиатуры
а. Щелкните правой кнопкой мыши на первом изображении, откройте поле «Размер и положение» (или откройте поле из «Изображение» -> «Формат» -> «Размер». Вам нужно поле размера, а не только параметры высоты и ширины на вкладке, чтобы заблокировать соотношение сторон, иначе не получится)
б. Снимите флажок «Блокировать соотношение сторон».
с участием. Измените высоту и ширину на желаемый размер
и закрыть коробку
e.Нажмите на следующее изображение и нажмите F4. Продолжайте кликать по последовательным изображениям и нажимать F4 (для MAC используйте «команда — Y»).
и. Для больших документов используйте вертикальную полосу прокрутки справа для перехода от одного изображения к другому.
Использование макросов
Иногда нам хотелось бы, чтобы у нас была единственная кнопка, которую мы могли бы нажать, чтобы автоматически выполнить сложную задачу. Это то, что делают макросы в Word.
Макросы автоматизируют конкретную задачу, которая в противном случае потребовала бы ее повторения. Вы можете создать макрос, записав шаги, которым вы хотите следовать, или написав серию инструкций.
Так как нам нужно изменить размер всех изображений в MS Word, мы будем использовать макросы. Мы создаем его, написав код для изменения размера изображений. Не запутайтесь. Вот подробные шаги:
Обновление за январь 2022 года:
Теперь вы можете предотвратить проблемы с ПК с помощью этого инструмента, например, защититься от потери файлов и вредоносных программ. Кроме того, это отличный способ оптимизировать работу ПК для достижения максимальной производительности. Программа легко исправляет распространенные ошибки, которые могут возникать в системах Windows; Нет необходимости часами искать и решать проблемы, если у вас есть идеальное решение под рукой:
- Шаг 1. Загрузите средство восстановления и оптимизации ПК (Windows 10, 8, 7, XP, Vista — Microsoft Gold Certified).
- Шаг 2. Нажмите «Начать сканирование», чтобы найти проблемы реестра Windows, которые могут вызывать проблемы с вашим ПК.
- Шаг 3 — Нажмите «Исправить все», чтобы исправить все проблемы.
Шаг 1. Откройте файл Word, в котором вы хотите, чтобы все изображения были одинакового размера.
Шаг 2: Нажмите на первую фотографию в файле, чтобы выбрать ее. Затем нажмите на вкладку «Просмотр» вверху.
Шаг 3: Нажмите «Макросы.
Шаг 4: Откроется всплывающее окно. Введите имя в поле под именем макроса. Вы можете дать ему имя по вашему выбору. Для лучшего понимания мы будем называть это изменением размера.
Затем нажмите Создать.
Шаг 5: Откроется новое окно Microsoft Visual Basic для приложений. Выберите существующий код и удалите его.
Шаг 6 — Затем скопируйте один из следующих кодов и вставьте его в окно.
Тип A: используйте следующий код, если вы хотите изменить высоту и ширину в пикселях. Замените 500 и 600 своими значениями.
Sub resize() Dim i всегда с ActiveDocument For i = 1 For .InlineShapes.Count С .InlineShapes(i) .Height = 500 .Width = 600 End With Next i End With Sub End
Тип B: используйте этот параметр, если хотите изменить размер в дюймах. Замените 2 своим значением.
Sub resize() Dim i всегда с ActiveDocument For i = 1 To .InlineShapes.Count С .InlineShapes (i) .Height = дюймы в точках (2) .Width = дюймы в точках (2) End with Next i End with End Sub
Введите C: если вы хотите масштабировать изображения, следующий код поможет вам заменить 30 и 40 на ваши предпочтительные значения.
Sub resize() Dim i As Long с ActiveDocument для i = 1 до .InlineShapes.Count с .InlineShapes(i) .ScaleHeight = 30 .ScaleWidth = 40 End next i End with End Sub
Шаг 7. После копирования закройте окно Microsoft Visual Basic для приложений, щелкнув значок крестика.
Шаг 8. Выбрав изображение, снова нажмите «Макросы» на вкладке «Вид».
Шаг 9: Откроется окно макросов. Щелкните Запустить с выбранным макросом.
Как только вы нажмете кнопку «Выполнить», вы заметите, что размер изменится для всех изображений.
СОВЕТ СОТРУДНИКОВ: Если у вас возникли проблемы с компьютером, нажмите здесь, чтобы исправить ошибки Windows и оптимизировать производительность системы.