
Авторизация в Excel на VBA: создание формы, написание программного кода, особенности реализации.
В этой статье я расскажу вам о создании формы авторизации в Excel с помощью VBA.
Что же представляет из себя авторизация в Excel? Это форма, то есть окно, с запросом ввода логина и пароля, при успешном вводе которых, пользователю будут открываться различные листы документа, в зависимости от группы доступа пользователя. Точно также, помимо открытия листов, можно будет выставить ограничения на действия в Excel: запрет форматирования ячеек, удаление строк, столбцов, использование фильтров, объектов, сценариев и так далее. Но обо всем по порядку.
Авторизация в Excel: основной алгоритм работы
Для начала, необходимо разработать алгоритм, по которому мы будем работать, и выглядеть он будет примерно так:
 Итак, поехали!
Авторизация в Excel: макет документа
Наш рабочий документ будет состоять из четырех листов:
- Лист с приветствием — единственный лист, который будет отображаться всем пользователям до авторизации
- Лист с дашбордом (визуализированным отчетом) — графики, диаграммы/гистограммы — изначально со свойством VeryHidden*
- Лист с данными — источник расчетов для дашборда — изначально со свойством VeryHidden
- Служебный/технический лист — для хранения логинов, паролей и служебной и вспомогательной информации — также, со свойством VeryHidden
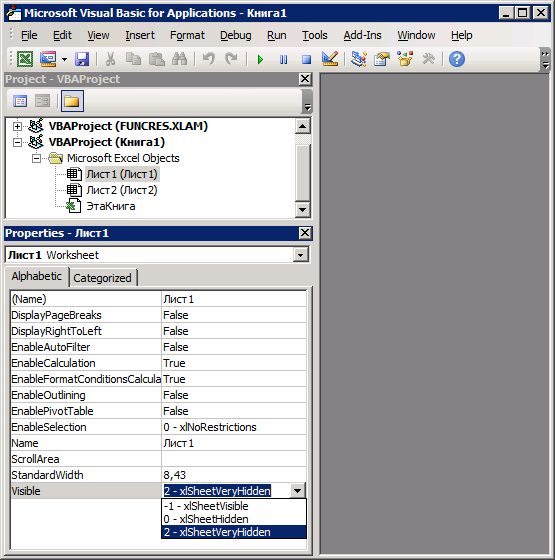
*VeryHidden— свойство листа, при котором сам лист скрыт и включить его отображение можно только через использование режима разработчика. Для выбора данного свойства, необходимо в Excel зайти в меню «Разработчик» — «Visual Basic». Далее, необходимо выбрать нужный нам лист и в его свойствах («Properties») найти свойство Visible и установить в «2 — xlSheetVeryHidden».
 После этого лист станет «очень скрытым». Отменить свойство VeryHidden можно точно так же через режим разработчика, либо используя необходимый нам макрос, о котором я напишу чуть дальше.
Авторизация в Excel: группы доступа
После создания макета документа, нам необходимо разработать несколько групп доступа и распределить и ограничить для них права. Предположим, что таких групп будет три:
- Администраторы (Admin): доступны все листы , в том числе служебный, а также отсутствуют какие-либо ограничения.
- Руководители и ответственные за данные (Head): доступны 2 рабочих листа + стоит пароль на изменение структуры книги.
- Рядовые сотрудники компании (Worker): доступен только 1 рабочий лист с дашбордом + стоит пароль на изменение структуры книги.
Авторизация в Excel: разработка макета формы
С этим пунктом не должно возникнуть никаких проблем. Элементов на форме авторизации должно быть не так уж и много:
- Поле ввода для логина
- Поле ввода для пароля
- Кнопка «Авторизация» (проверка логина и пароля)
- Различные подписи на форме
- По желанию: кнопка закрытия формы, кнопка восстановления пароля, логотипы, справка и все, что душе угодно
Для тех, кто не знает, как создавать формы в VBA: нужно зайти в меню «Разработчик» — «Visual Basic», нажать правой кнопкой по нашему проекту (VBAProject Название_Файла.xlsx), затем Insert — UserForm. Создается форма с названием UserForm1, на которой мы и будем размещать все наши объекты с помощью меню «ToolBox».
Если быстро набросать элементы, которые мы перечислили, должно получиться что-то вроде этого:

После добавления элементов, поменял их стандартные названия:
«UserForm1» переименовал в «Authorization».
«TextBox1» переименовал в «TextBox_Login».
«TextBox2» переименовал в «TextBox_Pass».
Также, в свойствах «TextBox_Pass», мы находим свойство «PasswordChar» и вводим любой символ, который мы хотим видеть вместо вводимых символов пароля — чаще всего используется символ «*».
Ничего лишнего, пока что все просто. Переходим далее.
Подготовка служебного листа
В моем примере, служебный лист будет содержать список логинов, паролей, а также соответствующую логину группу доступа. Чтобы немного «усложнить» потенциальный взлом (хотя надо понимать, что взломать Excel продвинутому пользователю не составит никакого труда), пароли на листе мы будем хранить в захешированном виде. Подробнее о хешировании можно прочитать на Википедии, но в вкратце — это преобразование данных в строку фиксированной длины, состоящей из цифр и букв с помощью определенных математических алгоритмов. О том, как мы будем хешировать пароли в Excel, я расскажу далее.
Итак, для начала, содержимое служебного листа будет выглядеть вот так:

Авторизация в Excel: особенности и написание программного кода на VBA
Данные пункты тесно взаимосвязаны между собой, поэтому я их объединил в один большой. Здесь мы будем писать программный код для всего нашего файла: как для формы, так и для некоторых событий.
Для начала, мы напишем код, который будет отображать различные листы в зависимости от роли пользователя после авторизации. Макрос user_group мы делаем приватным и вписывать его будем не в отдельный модуль, а в нашу готовую форму Authorization. Аргументом для макроса является переменная X, которая будет содержать название группы доступа в виде текстовой строки String:
Private Sub user_group(ByVal X As String)
Dim Sht As Worksheet 'создаем переменную типа Рабочий Лист

ActiveWorkbook.Unprotect "112" 'Снимаем защиту структуры книги паролем

For Each Sht In ThisWorkbook.Sheets 'перебираем все листы книги
    If (X = "Admin") Then Sht.Visible = -xlSheetVisible 'если роль Admin - каждый лист будет видимый
    If (X = "Head") And (Sht.Name <> "Settings") Then Sht.Visible = -xlSheetVisible 'если роль Head - видны все, кроме Settings
    If (X = "Worker") And (Sht.Name = "Dashboard") Then Sht.Visible = -xlSheetVisible 'если роль Worker - виден только Dashboard
Next Sht

'если роль либо Head, либо Worker - ставим защиту на структуру книги с паролем "112"
If (X = "Head") Or (X = "Worker") Then ActiveWorkbook.Protect Password:="112", Structure:=True, Windows:=False

End Sub
Хочу обратить внимание на то, что у нашего файла будет стоять «защита структуры книги» с паролем «112», т.е. пользователь не сможет создавать, удалять и переименовывать листы нашего документа. И, чтобы изменить видимость листов, необходимо сначала снять эту защиту программно, а затем, в зависимости от роли пользователя, поставить обратно, что мы и делаем в нашем коде.
Далее, код для кнопки «Авторизация». При нажатии на данную кнопку, запускается несколько проверок:
- Проверка полей логина и пароля заполнение: если одно из них не заполнено — выводится уведомление, выполнение макроса прекращается.
- Проверка переменной Check: данная переменная хранит значение «некорректных» попыток входа. Ее необходимо объявить в основном модуле книги: Public check As Integer. Если данная переменная больше 3х — доступ к авторизации в текущей сессии блокируется.
- Поиск и проверка логина на наличие на листе «Settings». Если логин найден — введенный пароль хешируется и сравнивается с хранимым хешем на соответствующей строке логина:
- Если все корректно — запускается макрос User_Group, который открывает доступ к листам в зависимости от группы доступа, соответствующей логину.
- Если данные некорректные — пользователь предупреждается об этом, а также наращивается счетчик некорректных попыток авторизации.
- В оставшемся случае (все введено, но пользователь с таким логином не найден), пользователь также уведомляется.
Private Sub CommandButton1_Click()
If (TextBox_Login = "") Or (TextBox_Pass = "") Then 'предупреждение на заполнение полей логина/пароля
    MsgBox "Не введен логин или пароль!", vbInformation + vbOKOnly, "Внимание!"
    Exit Sub
End If

If (check > 3) Then 'проверка на количество паролей, введенных некорректно
    MsgBox "Вы ввели неверный пароль больше трех раз. Доступ к файлу заблокирован!", vbCritical + vbOKOnly, "Внимание"
    Exit Sub
End If

LastRow = Sheets("Settings").Cells(Rows.Count, 1).End(xlUp).Row 'проверка списка логинов
For i = 2 To LastRow
    If TextBox_Login = Sheets("Settings").Cells(i, 1) Then 'если логин найден
        If Sheets("Settings").Cells(i, 2) = GetHash(TextBox_Pass.Value) Then 'пароль хешируется и сравнивается с хранимым хешем
            user_group Sheets("Settings").Cells(i, 3).Value 'и если все ок - запускается макрос разграничения групп доступа
            Unload Authorization
            Exit Sub
        Else 'в противном случае - уведомление о неправильном пароле
            MsgBox "Неверный пароль", vbCritical + vbOKOnly, "Внимание!"
            check = check + 1 'также наращивается счетчик неправильных паролей
            Exit Sub
        End If
    End If
Next i

'в оставшемся случае - уведомления о несуществующем логине.
MsgBox "Пользователя с данным логином не существует.", vbInformation + vbOKOnly, "Внимание!"

End Sub
В макросе CommandButton1_Click используется функция GetHash (строка 15), которая преобразует входящие данные в хеш. Данная функция взята с сайта ExcelVba.ru, за что выражаю им огромную благодарность. Код необходимо вставить в главный модуль книги:
Function GetHash(ByVal txt$) As String
    Dim oUTF8, oMD5, abyt, i&, k&, hi&, lo&, chHi$, chLo$
    Set oUTF8 = CreateObject("System.Text.UTF8Encoding")
    Set oMD5 = CreateObject("System.Security.Cryptography.MD5CryptoServiceProvider")
    abyt = oMD5.ComputeHash_2(oUTF8.GetBytes_4(txt$))
    For i = 1 To LenB(abyt)
        k = AscB(MidB(abyt, i, 1))
        lo = k Mod 16: hi = (k - lo) / 16
        If hi > 9 Then chHi = Chr(Asc("a") + hi - 10) Else chHi = Chr(Asc("0") + hi)
        If lo > 9 Then chLo = Chr(Asc("a") + lo - 10) Else chLo = Chr(Asc("0") + lo)
        GetHash = GetHash & chHi & chLo
    Next
    Set oUTF8 = Nothing: Set oMD5 = Nothing
End Function
Основной код написан, теперь переходим к более мелким.
Макрос, который запускает форму авторизации (можно установить на кнопку на главном листе «Main»):
Sub Authorization_Start()
    Authorization.Show
End Sub
Также, макрос можно использовать при событии «Open» — при открытии книги:
Private Sub Workbook_Open()
    Authorization_Start
End Sub
Стоит отметить, что у большинства пользователей запуск макросов по умолчанию отключен, именно поэтому на главном листе Main необходимо сделать что-то вроде «памятки» со справочной информацией о том, как активировать работу макросов.
Макрос для закрытия книги.
При закрытии книги, нам нужно снять защиту со структуры книги, затем скрыть все листы (кроме листа «Main»), а затем снова вернуть защиту структуры книги с паролем «112» (можно установить на какую-либо кнопку):
Sub close_book()
Dim Sht As Worksheet
ActiveWorkbook.Unprotect "112"
For Each Sht In ThisWorkbook.Sheets
    If Sht.Name <> "Main" Then Sht.Visible = xlSheetVeryHidden
Next Sht
ActiveWorkbook.Protect Password:="112", Structure:=True, Windows:=False
End Sub
Да, данный макрос можно использовать при событии «BeforeClose» — перед закрытием книги. Однако, может возникнуть несколько проблем:
- Если пользователь сохраняется вручную до закрытия документа, закрывает документ, а затем при автоматическом запросе о сохранении нажимает «не сохранять». В таком случае, при новом запуске документа, скрытые листы будут видны всем. Да, вероятность такого события крайне мала, но она все-таки есть.
Private Sub Workbook_BeforeClose(Cancel As Boolean) close_book End Sub - Если добавим принудительное сохранение после скрытия всех листов, перед окончательным закрытием файла (как на примере ниже). В таком случае, если пользователь очень сильно ошибется с данными в файле и нажмет на крестик, чтобы начать все с нуля — файл все равно сохранится и восстановить исходные данные не получится.
Private Sub Workbook_BeforeClose(Cancel As Boolean)
    Application.ScreenUpdating = False
    close_book
    ThisWorkbook.Save
End Sub
Поэтому, чтобы избежать такой ситуации, я хочу предложить более радикальный, менее удобный вариант, который, однако, сведет вышеперечисленные потенциальные проблемы к минимуму: помимо выполнения макроса close_book перед каждым закрытием книги с помощью события «BeforeClose» (как на первом проблемном варианте), мы будем выполнять его и перед каждым ручным сохранением файла с помощью события BeforeSave:
Private Sub Workbook_BeforeSave(ByVal SaveAsUI As Boolean, Cancel As Boolean)
    close_book
End Sub
Осталось только сделать памятку по включению макросов на главном листе документа, а также выполнить важный шаг, без которого все наши проделанные действия не имеют смысла — поставить пароль на проект VBA: Меню «Разработчик» — «Visual Basic» — «Tools» — «VBAProject — Project Properties» — Вкладка «Protection» — поставить галочку «Lock project for viewing» и ввести пароль и нажать «Ок».

Сохраняем файл в формате «.xlsb» или «.xlsm» и все, наша «Авторизация на VBA» готова. Помимо этого, можно защитить проект еще сильнее — о способах защиты написано моей отдельной статье.
Также, по желанию, мы можем сделать отдельную форму для администраторов, для добавления новых пользователей на лист «Settings», либо форму для восстановления пароля по какому-либо ключевому слову, но в данном примере такие функции мы реализовывать не будем.
Назначение формы авторизации


Форма авторизации предназначена для разграничения прав пользователей при работе с документами Office, содержащими макросы.
При помощи данного инструмента вы можете реализовать различные пользовательские интерфейсы для сотрудников различных групп доступа, а также разграничить права отдельных пользователей программы.
Программа допускает создание неограниченного числа пользователей, каждый из которых принадлежит к одной из следующих групп:
пользователь, уверенный пользователь, администратор, разработчик.
(количество групп при желании можно легко увеличить до 9999)
При первом запуске формы (или после того, как вы залогинитесь под правами администратора) становится доступной кнопка добавления и редактирования списка учётных записей.
Для вызова формы авторизации используется функция GetNewAL, которая возвращает выбранный пользователем уровень доступа.
Текущий уровень доступа хранится в глобальной переменной AL, таким образом, в любом месте кода вы можете использовать соответствующие проверки:
Sub Main()
    If AL = AL_DEVELOPER Then Exit Sub    ' этот макрос не надо запускать под учёткой разработчика

    If AL < AL_ADMINISTRATOR Then    ' пользователь, или уверенный пользователь

        MsgBox "У вас недостаточно прав для выполнения этого действия", vbExclamation, "Недостаточно прав"

        ' предоставляем пользователю возможность ввести учётные данные администратора
        If GetNewAL >= AL_ADMINISTRATOR Then
            ' ваш код (пользователь залогинился как "администратор")
        End If

    End If
End Sub
Пароль на проект VBA: 1 (единица)

Excel VBA Login Form
VBA Login is a unique way to protect excel workbook and worksheets. Although we have options of Protect Sheet and protect workbook which is available in Review menu option, which we have the fix patterns of locking the worksheet and workbook. With the help of the VBA login, we have created a customize login box by which we can create dialog box or login form in which we can authorize the login id and password to access the complete excel workbook and any specific worksheets. For better understanding, suppose we have an Excel file that has multiple sheets and each sheet has some confidential data to be protected. And each data is meant for everyone, so we can create a login form by giving every user their login id and password and user will only be able to open and access the data which is meant for him. This could be done only by VBA Login.
How to Generate Login User Form in VBA?
We will learn how to generate logic user form in Excel by using the VBA Code.
You can download this VBA Login Excel Template here – VBA Login Excel Template
Example #1
In this example, we will learn how to create login box using User form. For this, follow the below steps:
Step 1: For this open VBA and from the Insert menu tab select UserForm.

Step 2: Now once we get the UserForm opened, from the toolbox select the Label option and create a label box in Userform.

Step 3: At the left hand side we have a Properties of the Label which we have created. We can change the name, font, size, and color of created label.

Step 4: As you can see in below screenshot, we have change the name user form as Label1, Font as Arial Narrow, Fore Color as Blue and Caption as Enter User Name. We can further customize it.

Step 5: Now we will create a text box here to enter the user name for login as shown below.

Step 6: Now we would insert a label for entering the password.

Step 7: Again we would change the name of Label, color, font, size, and name as required below.

Step 8: Insert a text box for entering the password against the Password label.

Step 9: And last, create a login button with the help of the Command button to click on it.

Step 10: Now edit the properties of created Command Button from the Properties window at left.

Step 11: We are done with part of creating a login form in VBA. Now we will write a small VBA code to make this login work. For this, double click anywhere on created UserForm and in that write the sub-procedure as shown below.
Code:
Private Sub Login_Click()

End Sub

Step 12: Open an IF – End IF loop and write the condition as if the Login flag is FALSE then activate the worksheet and then show login.
Code:
Private Sub Login_Click()

If LoginFlag = False Then
Worksheets("Sheet1").Activate
LogIn.Show
End If

End Sub

Step 13: Now we will compile the code by pressing the F8 key and And run the code by pressing the Play button located below the menu bar, we would get the Login box.

Example #2
Although there are various ways to create a VBA Login. But we will be seeing another code where we will be using IF – End IF loop to list the login. For this, again follow the same process to create a UserForm which we have seen in example-1. Include 2 labels and 2 text boxes, each for entering User Name and Password.
Step 1: We can use the same User Form which we have seen in example-1 as there is no change in the pattern of login box or create a new one. Now double click on User form and write the sub procedure. Now in the open the IF – End IF loop for the condition, if Username box is blank then give me the message as “Enter Login Credentials”, else message “Enter Username”.
Code:
Private Sub Login_Click()

If UsernameBox.Value = "" Then
If PasswordBox.Value = "" Then
MsgBox "Enter Login Credentials!"
Else
MsgBox "Enter Username"
End If

End Sub

Step 2: Now define the Else If condition again, if username value is USER1 and password is Blank then give me the message as “Enter Password” and if the password is “abcd” then hide the application or else give the message as “Re-Enter Login Credentials.”
Code:
Private Sub Login_Click()

If UsernameBox.Value = "" Then
If PasswordBox.Value = "" Then
MsgBox "Enter Login Credentials!"
Else
MsgBox "Enter Username"
End If
ElseIf UsernameBox.Value = "USER1" Then
If PasswordBox.Value = "" Then
MsgBox "Enter Password"
ElseIf PasswordBox.Value = "abcd" Then
Me.Hide: Application.Visible = True
Else
MsgBox "Please Re-Enter Login Credentials."
End If

End Sub

Step 3: At last list the final IF condition for if the login password is incorrect or blank, then return the message “Enter Correct Credentials”.
Code:
Private Sub Login_Click()

If UsernameBox.Value = "" Then
If PasswordBox.Value = "" Then
MsgBox "Enter Login Credentials!"
Else
MsgBox "Enter Username"
End If
ElseIf UsernameBox.Value = "USER1" Then
If PasswordBox.Value = "" Then
MsgBox "Enter Password"
ElseIf PasswordBox.Value = "abcd" Then
Me.Hide: Application.Visible = True
Else
MsgBox "Please Re-Enter Login Credentials."
End If
Else
If PasswordBox.Value = "" Then
MsgBox "Enter Password"
Else
MsgBox "Please Enter Correct Credentials."
End If
End If

End Sub

Step 4: Open a new sub procedure for Command Button which we created for Login, and write the below line for quitting the application.
Code:
Private Sub CommandButton2_Click()

ThisWorkbook.Application.Quit

End Sub

Step 5: And at last, write the final sub procedure for Created UserForm name to close the application.
Code:
Private Sub LoginArena_QueryClose(Cancel As Integer, CloseMode As Integer)

ThisWorkbook.Application.Quit

End Sub

Step 6: Final would look like this below.

Step 7: Now compile the each and every step of the code and run it then. In the popped up login form, Enter the user name as USER1 and the password as “abcd” in designated section as per code. If we press ENTER or click on LOGIN, then the code will be exited and we will be returned to the VBA window.

Pros & Cons of VBA Login
- VBA Login allows different users to login in a different way in a single Excel worksheet.
- We restrict the user to the data which is meant for him/ her.
- With the help of VBA Login, we can customize the excel workbook and give the different login user id and password to different users to access the data.
- Because of lengthy lines of code, the process of creating VBA Login is quite complicated.
Things to Remember
- We can use Protect Worksheet and Protect Workbook which also consider the password for login and accessing the data. But the password would be the same for each login. Whereas VBA Login allows use to create multiple user id and password.
- Always create a simple user form first, because when we customize the data the size and attributes of created shapes and boxes, we may end of complicating the coding part.
- We can create VBA login to direct the user to his login area after login.
- Once coding is done, save the Excel in macro-enabled excel format.
Recommended Articles
This is a guide to the VBA Login. Here we discuss how to Generate Login User Form in Excel VBA along with practical examples and downloadable excel template. You can also go through our other suggested articles –
- VBA Name Worksheet
- VBA Input
- VBA Solver
- VBA Selecting Range
Excel VBA Login Form
It is possible to create a login-based user form in Excel VBA with all the login ID drop-down lists, and it will share the password separately. However, at some point, you must have an idea of creating a password-based login user form, which requires the user to pick their user ID and enter the password to access the required worksheet.
Table of contents
- Excel VBA Login Form
- How to Create a Login User Form?
- Step 1: Insert User Form
- Step 2: Design Userform
- Step 3: Code
- Things to Remember
- Recommended Articles
- How to Create a Login User Form?
This article will show you how to create a login UserForm using Excel VBA.

You are free to use this image on your website, templates, etc, Please provide us with an attribution linkArticle Link to be Hyperlinked
For eg:
Source: VBA Login Form (wallstreetmojo.com)
How to Create a Login User Form?
For example, assume you have region-wise sales numbers in different worksheets. We have four different zone names, and each zone worksheet has its related data only. Now, the idea is to create a login form where the “East” zone sales head should see only “East” zone data. Not any other zones, but as an admin, you should see all the zones’ worksheets.
You can download this VBA Login Excel Template here – VBA Login Excel Template
First, we need to insert a sheet name called “Admin.” Then, in this admin sheet, we need to create “Login ID” and “Password” credentials.

We have named the zone and password the same. You can change this later. We have created the name rangeName range in Excel is a name given to a range for the future reference. To name a range, first select the range of data and then insert a table to the range, then put a name to the range from the name box on the left-hand side of the window.read more for zone names as “ZoneList.” This “Name Manager” will be used later on this login UserForm.

When the user opens the file, they should see one dummy sheet in the background, so create a new sheet and name it the “Dummy” sheet.

Using these worksheets, we will create a login UserForm.
Step 1: Insert User Form
Press ALT + F11 key to open the VBA EditorThe Visual Basic for Applications Editor is a scripting interface. These scripts are primarily responsible for the creation and execution of macros in Microsoft software.read more window.

- From the “Insert” tab, insert “UserForm.”

- It will create a new UserForm like the below one.

- Press the F4 key to see the “Properties” window. From this window, change the name of the UserForm to “LogInUF.”

- Similarly, using this properties window, we can play with the properties of the UserForm. We have made some of the property changes. We can refer to the below properties window to apply changes to the properties of the UserForm.

- Now, my UserForm looks like this.

Step 2: Design Userform
- From the toolbox of the UserForm, insert two label boxes and enter the text, as shown below.

- From the toolbox, insert “Combo Box.”

- For this ComboBox excelCombo Box in Excel is a type of data validation tool that can create a dropdown list for the user to select from the pre-determined list. It is a form control which is available in the insert tab of the developer’s tab.read more, we need to get the zone names from the worksheet “Admin Sheet,” so from the properties window of the “Combo Box,” first give a name to this combo box as “Zone_List_ComboBox” under the “Name” property.

- From the “RowSource” property of the combo box, enter the name given to the zone list in the “Admin Sheet.”

- Now, our ComboBox should show zone names in its dropdown list in excelA drop-down list in excel is a pre-defined list of inputs that allows users to select an option.read more.

- For “Enter Your Password,” we need to insert a “Text Box” from the toolbox.

- For this “Text Box,” we need to change the “Name” property and change it as “Password_TB.”

Now in the coding for the VBAVBA code refers to a set of instructions written by the user in the Visual Basic Applications programming language on a Visual Basic Editor (VBE) to perform a specific task.read more login form, “Combo Box” will be referred to by the name “Zone_List_ComboBox,” and “Text Box” will be referred to by the name “Password_TB.”
- Insert two “CommandButton” and enter the text as “Log In” and “Log Out.”

For the “Log In” command button, change the name property to “Login_CommandButton,” and for the “Log Out” command button, change the name property to “LogOut_CommandButton.”
Step 3: Code
We completed the VBA login UserForm design part. Next, it is time to write the code to create a login-based UserForm in Excel VBA.
- Double click on the “Log In” Command Button. It will open a blank sub procedure like the below one.

Inside this procedure, we need to write the code about what should happen if we press the “Log In” button.
We have already written the code. We can copy and paste the code from below inside the above procedure.
Code:
Private Sub Login_CommandButton_Click()

If Zone_List_ComboBox.Value = "" Then
MsgBox "Zone Cannot be Blank!!!", vbInformation, "Zone Name"
Exit Sub
End If

If Password_TB.Value = "" Then
MsgBox "Password Cannot be Blank!!!", vbInformation, "Password"
Exit Sub
End If

If Zone_List_ComboBox.Value = "Admin" And Password_TB.Value = "Admin" Then
Unload Me

Dim Ws As Worksheet

For Each Ws In ActiveWorkbook.Worksheets
Ws.Visible = xlSheetVisible
Next Ws
Sheets("Admin").Select
Else

Dim ZoneName As String
Dim Password As Variant

ZoneName = Zone_List_ComboBox.Value
Password = Application.WorksheetFunction.VLookup(ZoneName, Sheets("Admin").Range("A:B"), 2, 0)

If Password <> Password_TB.Value Then
MsgBox "Password is not matching", vbInformation, "Wrong Password"
Exit Sub
End If

If Password = Password_TB.Value Then
Unload Me
Sheets(ZoneName).Visible = True
Sheets(ZoneName).Select
ActiveSheet.Range("A1").Select
End If
End If

End Sub
Similarly, double click on the “Log Out” command button and enter the below code.
Code:
Private Sub LogOut_CommandButton_Click()

        ThisWorkbook.Save
        ThisWorkbook.Close

End Sub

Now, double click on “UserForm” (not on any of the buttons inserted) and add the below code.
Code:
Private Sub UserForm_QueryClose(Cancel As Integer, CloseMode As Integer)
' Prevents use of the Close button
     If CloseMode = vbFormControlMenu Then
          MsgBox "Clicking the Close button does not work."
          Cancel = True
     End If
End Sub

- Now, double-click on the “ThisWorkbookVBA ThisWorkbook refers to the workbook on which the users currently write the code to execute all of the tasks in the current workbook. In this, it doesn’t matter which workbook is active and only requires the reference to the workbook, where the users write the code.read more” icon. It will open up below the blank code field.

Now add the below code in this blank field.
Code:
Private Sub Workbook_Open()

     Dim Ws As Worksheet

     Application.DisplayAlerts = False
     Application.ScreenUpdating = False

     For Each Ws In ActiveWorkbook.Worksheets

     If Ws.Name <> "Dummy" Then
     Ws.Visible = xlSheetVeryHidden
     End If
     Next Ws

     LogInUF.Show

End Sub

- We have completed the coding part of the form. Next, save the workbook as a “Macro-Enabled” workbook and reopen the workbook. Upon reopening the workbook, we should see the below window.
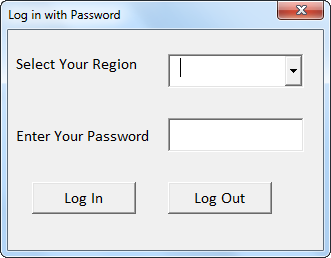
- We must choose the respective zone name from this UserForm and enter the associated password. For example, we will choose the “East” zone from the dropdown and enter the password.

- If we click “Log In,” we can see only the “East” zone worksheet.

Similarly, if we log in with “Admin,” we can access all the worksheets.

Like this, we can create login-based password-protected worksheet access.
Things to Remember
- It would help if we used the same names given to the UserForm, text box, command button, and combo box in the coding.
- We can change the zone name and password according to your wish.
Recommended Articles
This article has been a guide to VBA Login. Here, we discuss how to create a login form in Excel VBA with the help of an example and a downloadable Excel sheet. You can learn more about VBA from the following articles: –
- VBA Object Required
- ENVIRON Function in VBA
- VBA Close UserForm
- Excel Forms for Data Entry
В ЭТОЙ ЗАДАЧЕ
-
АННОТАЦИЯ
-
Создание диалогового окна
-
Образец кода для использования диалогового окна
-
Аннотация
В Microsoft Excel можно создать пользовательское диалоговое окно предлагает пользователю сведения с помощью текстовых полей, кнопок или других элементов окна. Как правило при вводе текста в текстовом поле появляется текст при вводе. Тем не менее можно использовать свойство Visual Basic для приложений Майкрософт в форме выпуска (VBA) для создания эффекта скрытые или «маскируемый» текстового поля. Это может быть полезно для создания диалогового окна пароль, где вы не хотите текста, введенного в текстовом поле «visible». Следующая информация описывает, как для создания этого эффекта. В начало статьи
Создание диалогового окна
-
Запустите Excel.
-
Нажмите клавиши Alt + F11, чтобы запустить редактор Microsoft Visual Basic.
-
В Меню Вставкавыберите команду Формы пользователя.
-
С помощью панели Инструментов элементы управления, добавьте текстовое поле и кнопку в форму пользователем.
-
В окне свойств в списке объектвыберите TextBox1.
-
На вкладке по алфавиту выберитеPasswordChar.
-
Введите звездочку (*).
-
В окне свойств в списке объектвыберите UserForm1.
-
В меню запуска нажмите кнопку Запустить форму.
При вводе буквы, вместо этого отображается звездочка. В начало статьи
Образец кода для использования диалогового окна
Для получения текстовой строки, написанные на текстовое поле, можно использовать следующий образец кода:
-
Дважды щелкните форму пользователя CommandButton1 .
-
Введите следующий код:
Private Sub CommandButton1_Click() MsgBox Me.TextBox1End Sub
-
Нажмите кнопку Сохранить для сохранения проекта.
-
В меню запуска нажмите кнопку Запустить Sub/пользователя формы.
Введите слово в текстовом поле и нажмите кнопку . Введенный текст отображается в окне сообщения. В начало статьи