
В случае, если вам необходимо создать документ Word для заполнения другими людьми, например, создать анкету участника конференции, чтобы упростить процесс, вы можете создать форму для заполнения в Microsoft Word. Форма в ворде позволяет создавать заполнители для различных типов информации, таких как текст, дата, да-нет вопросы и т. д.
Включение вкладки «Разработчик»
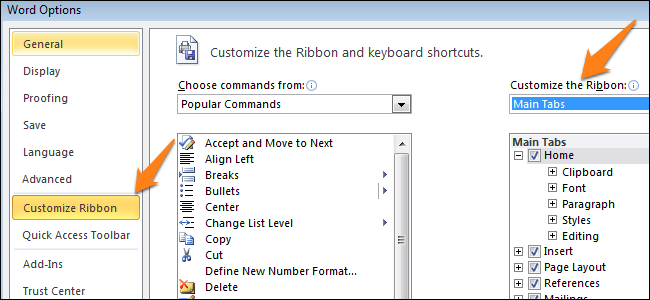
Прежде чем перейти к созданию формы в ворде, вам нужно активировать вкладку «Разработчик» на ленте. Для этого нажмите «Файл» —> «Параметры», чтобы открыть диалоговое окно «Параметры Word». Выберите «Настроить ленту», затем установите флажок для вкладки «Разработчик».

Создание формы в Word – Параметры Word
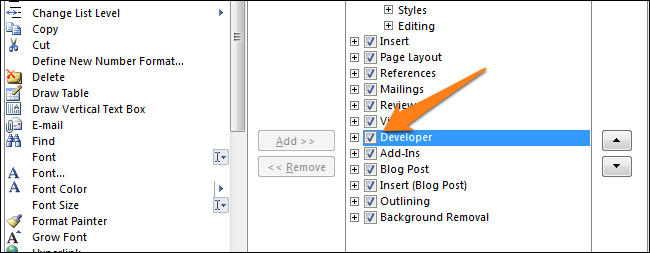
Теперь на ленте появится вкладка «Разработчик».

Создание формы в Word – Вкладка Разработчик
Добавление полей формы в ворде
Теперь мы готовы перейти к созданию формы в ворде. Для этого мы будем использовать разнообразные поля, которые будут являться составляющими нашей будущей формы для заполнения в ворде.
Чтобы добавить поле формы для заполнения, поместите курсор в нужное место, затем выберите необходимый элемент из группы «Элементы управления» на вкладке «Разработчик». Вы можете навести указатель мыши на поля, чтобы увидеть различные параметры. В этом примере мы добавляем текстовое поле, чтобы пользователи могли вводить свои имена.

Создание формы в Word – Элементы управления для создания формы в ворде
В документе появится тестовое поле:

Создание формы в Word – Текстовое поле
Вы можете добавить несколько типов полей для создания формы в ворде. Например, вы можете добавить флажок для выбора:

Создание формы в Word – Поле «флажок»
Или даже поле выбора даты:

Создание формы в Word – Поле для выбора даты
После того, как вы добавили все поля в документ, ваша форма в ворде готова, и вы можете отправлять ее другим пользователям!
Настройка полей формы в ворде
Если вы хотите еще больше контролировать способ отображения полей своей формы в ворде, вы можете включить «Режим конструктора» в группе «Элементы управления» на вкладке «Разработчик».

Создание формы в Word – Режим конструктора
Затем вы можете изменить свойства для каждого поля вашей формы в ворде, включая текст, который будет отображаться в каждом поле. Если вы готовы потратить немного времени на настройку каждого поля, вы можете создать довольно прочную форму. Например, вы можете создать в своей форме заполнения собственный выпадающий список, как в приведенном ниже примере:

Создание формы в Word – Использование выпадающего списка в форме
В итоге в нашем примере, мы получили следующую форму для заполнения в ворде:

Создание формы в Word – Пример формы для заполнения в ворде
В этой статье мы рассмотрели основы создания формы в ворде. Теперь вы можете с легкостью создать собственную форму для заполнения в Microsoft Word.
You can use Word to create interactive digital forms that other people can fill out on their computers before printing or sending them back to you. It takes a little preparation but keeps you from having to decipher messy handwriting! Some of the tools you will use when creating a form include:
- Templates: Forms are normally saved as templates so that they can be used again and again.
- Content controls: The areas where users input information in a form.
- Tables: Tables are often used in forms to align text and form fields, and to create borders and boxes.
- Protection: Users can complete the form fields without being able to change the form’s text and/or design.
Show the Developer Tab
Before you can create a form, you’ll need to turn on the Developer tab to get access to the advanced tools.
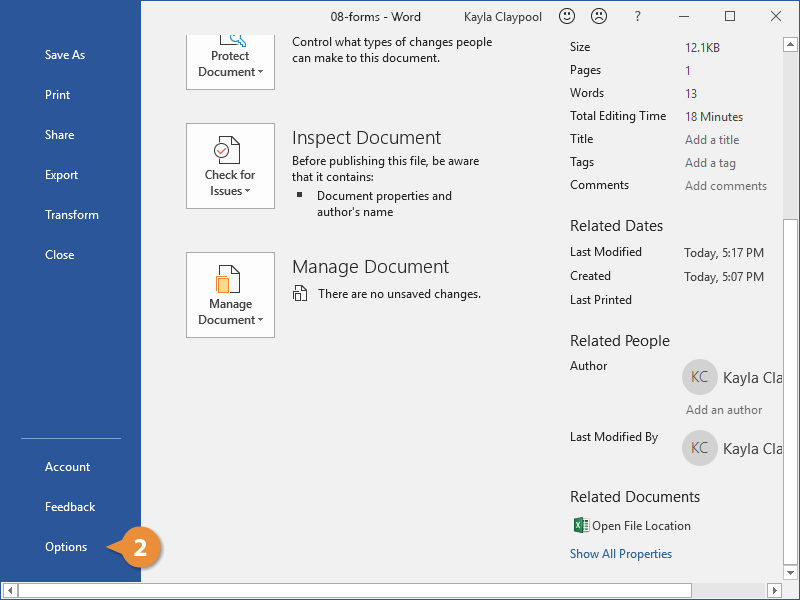
- Click the File tab.

- Select Options.

The Word Options window opens.
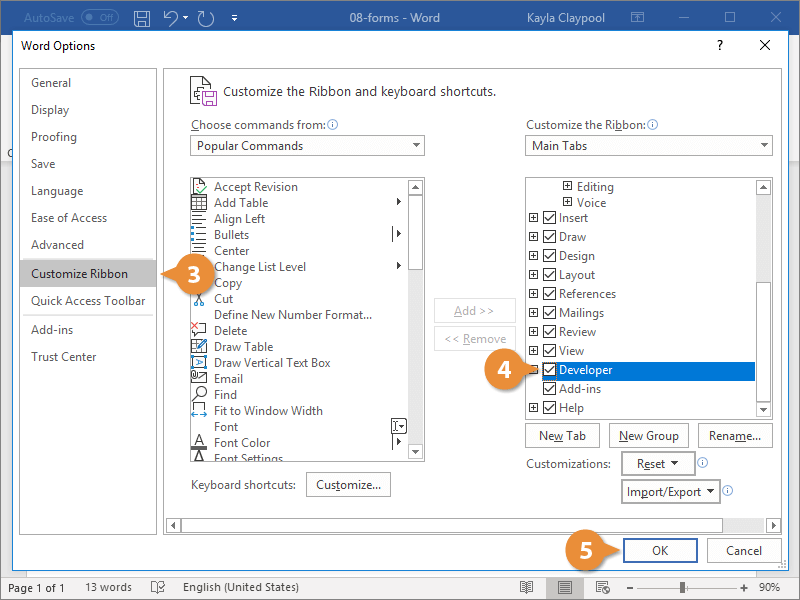
- Click the Customize Ribbon tab on the left.
The column on the right controls which ribbon tabs are enabled.
- Check the Developer check box.
- Click OK.
The Developer tab now appears on the ribbon. In addition to advanced tools for macro recording, add-ins, and document protection, we now have access to form controls.
Create a Form
Once you’ve enabled the Developer tab, and created the layout and structure of the form, you can start adding form fields to your document with Content Controls.
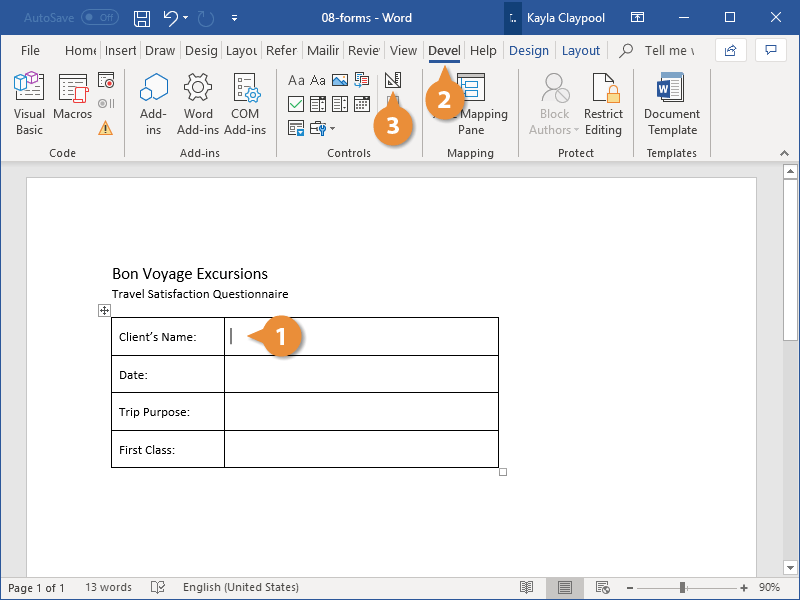
- Place the text cursor where you want to insert the form field.
- Click the Developer tab on the ribbon.
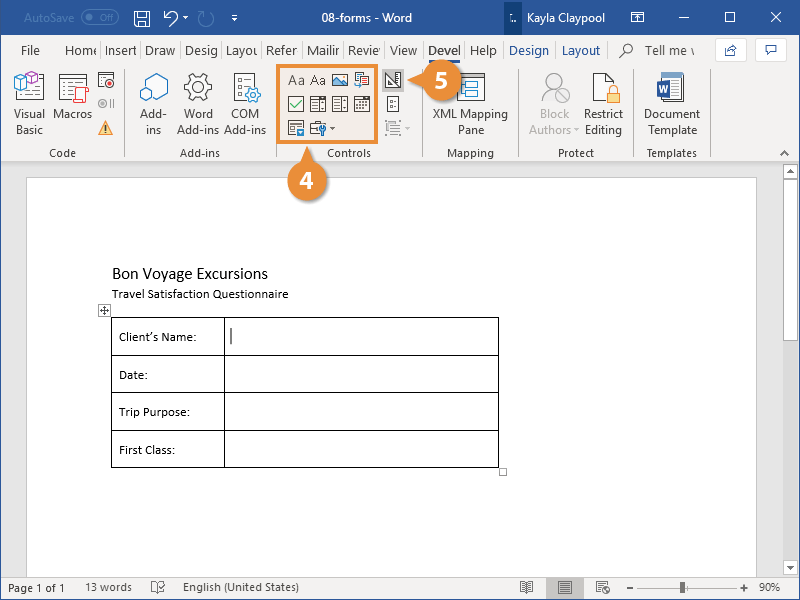
The Controls group contains the different kinds of content controls you can add to a form, as well as the toggle button for Design Mode.
- Click the Design Mode button in the controls group.
While Design Mode is active, controls you insert won’t be active, so clicking a check box to move it around won’t also check it. You can also customize placeholder text for some controls.
- Click a Content Control buttons to insert the selected type of control.
The content control is inserted.
Select a form field and click the Properties button on the ribbon to edit a control’s options. Depending on the type of control you’ve inserted, you can change its appearance, set up the options in a list, or lock the control once edited.
- When you’re done, click the Design Mode button again to exit Design Mode.
You leave Design Mode, and the content controls that you’ve inserted can now be used.
Types of Form Controls
There are many different types of form controls you can add to a form that will allow people to add different types of responses.
Finalize a Form
When you’re ready to distribute a form so others can fill it out, you can restrict the form so that content controls cannot be removed or changed by those filling it out.
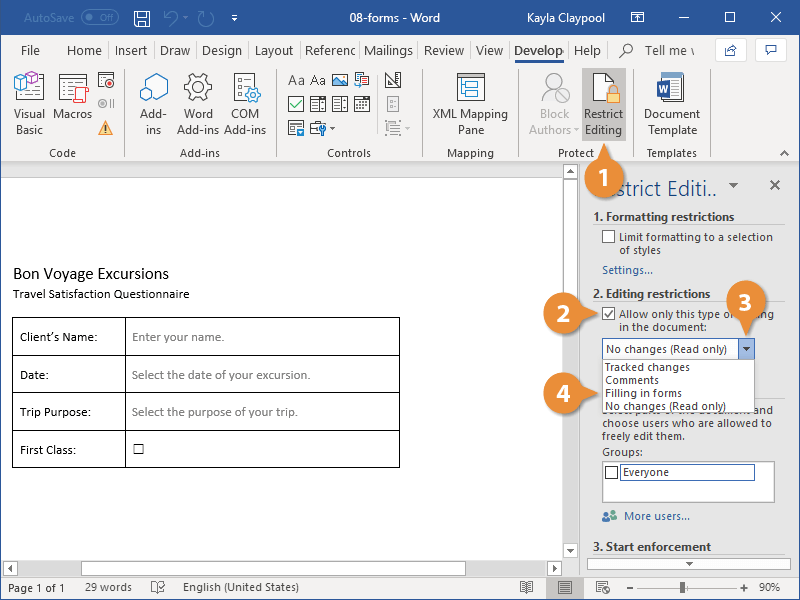
- Click the Restrict Editing button on the Developer tab.
The Restrict Editing pane appears on the right.
- Check the Editing restrictions check box.
- Click the Editing restriction list arrow.
- Select Filling in forms.
When this option is enabled, the only change that anyone else can make to this document is the filling in of form fields. They won’t be able to move, delete, or edit the fields themselves until protection is turned off.
- Click the Yes, Start Enforcing Protection button.
A password is not required to start enforcing protection, but you can add one if you’d like to prevent just anyone from turning this protection off.
- Enter a password (optional), then click OK.
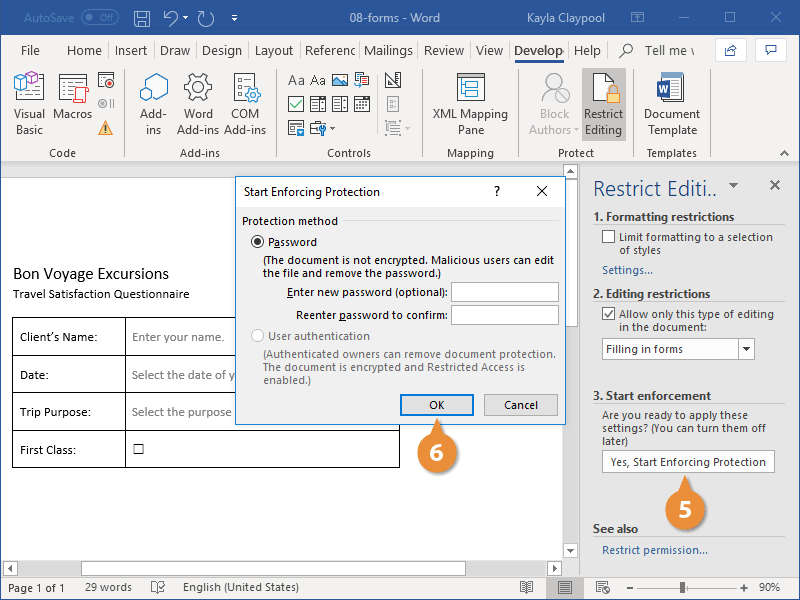
The document is now restricted, and anyone you send it to will only be able to fill in the forms.

FREE Quick Reference
Click to Download
Free to distribute with our compliments; we hope you will consider our paid training.
If you use forms at work, you’ll love the convenience of interactive or fillable forms in Microsoft Word. Forms that you can fill out make gathering information easy.


With a fillable form, all you’ve got to do is create a form in Word. Then you can use it over and over again. There’s nothing to print, so interactive forms are good for both your budget and the environment.
If you want a fillable form that also looks good, then begin with a template in Word. Form templates for Microsoft Word are available in Envato Elements and GraphicRiver.
In this tutorial, you’ll learn how to create a fillable form in Word, so you can reap all the benefits of an interactive form.
Find Great Form Templates on Elements
Fillable forms in Word have a variety of uses. Human resources use forms to capture employee and consultant information. Organizations use forms to register members, students, or clients. You also use forms to take orders for your products and services. Those are only a few examples of how useful fillable forms are.
Ideally, you want your Microsoft Word forms to be consistent with your branding. Well-designed forms reflect your credibility and professionalism. That’s why you want to avoid generic-looking forms. Want to know how to make a fillable form in Word that’s aligned with your visual brand?


The easiest way is by using templates for Word with pre-built tables or forms. One awesome source for Word templates is Envato Elements. Elements has an irresistible offer: for one low monthly fee, you get unlimited downloads of the millions of creative assets in its library. These include:
- Word templates
- fonts
- graphics
- photos
- and more
Whatever you need to make your forms look as good as possible, you can find in Elements.
If you need to create only one form, then a better source for Word templates is GraphicRiver. It’s got the same massive library of creative assets but on a pay-per-use basis. For the one-off project in Word, GraphicRiver is a terrific and budget-friendly option.
How to Create Fillable Forms in Word
You may be wondering, «How do I make a fillable form in Word?» Let me take you step-by-step through how to create a fillable form in Word.
Note: In the following tutorial, I’m using Microsoft Word for Mac version 16.48. If you’re using a different version, then the steps and interface may be different. But these steps should still be helpful for you.
1. Show the Developer Tab
As a first step, make sure that the Developer tab is showing up for you. This may be hidden by default. If you don’t see the Developer tab, follow these steps:
Go to Word > Preferences.


The Word Preferences menu opens. Click on the Ribbon & Toolbar button.


The Ribbon & Toolbar menu pops up. Under Main Tabs, scroll down and check Developer. Click Save.


The Developer tab should now be visible.


2. Determine the Layout and Structure of the Form
The next step is to determine the layout and structure of the fillable form. This will depend on what information you want to capture. You may want to sketch this on a sheet of paper first.
When you know what the form will look like, create a table in Word. By creating your form as a table in Word, it’ll be easier for you to keep things aligned and organized. The cells of the table are the form fields. Keep this in mind as you create your interactive form. This tutorial shows you the steps for how to make a table in Word:
Another option is to use a Word template with a pre-built table as a form. This way, the form has already been professionally designed. All you’ve got to do is to customize the form in Word according to your needs. Remember that the form template must have been built as a table so that you can make the form interactive in Word.
In the steps that follow, I’m going to create a form from scratch by first creating a table in Word:


Now, it’s time to make this a fillable form in Word.
3. Add Form Fields With Content Controls
You create a fillable form in Word by adding form fields. There are different types of form fields with content controls, depending on the types of responses you’re looking for.
Under the Developer tab, you’ll see buttons for creating a Text Box, Check Box, and Combo Box (or drop-down form field).


Let me show you how to create each type of form field:
How to Add a Word Fillable Form Text Box
Place the cursor where you would like to create a text field. Click on the Developer tab, then the Text Box button.


A text box is created. To change the text box settings, click on Options. The Text Form Field Options menu opens.


Here, choose various settings. For example, you’ve got several Text Types to choose from:
- Regular Text
- Number
- Date
- Current Date
- Current Time
- Calculation
Add a Default Text for the form field to guide respondents in filling out the form. You can also specify the Maximum Length and Text or Number Format.


When you’re happy with the settings, click OK. Repeat for each text box you want to create.


How to Add a Check Box to a Fillable Form in Word
Next, let’s make check boxes. First type the text for the check box items. Then, place your cursor in front of the first item. Go to Developer > Check Box.


A check box appears where your cursor was. Again, change the check box settings by clicking on the Options button.


The Check Box Form Field Options menu opens. Here you can determine whether the Default Value for the check box is Not Checked or Checked. Specify the Check Box Size and other options. When you’re done setting up the check box options, click OK.
Repeat these steps for the other check boxes.


How to Create a Drop-down Field in a Fillable Form in Word
Finally, let’s add a drop-down field in our form. Place the cursor where you want the drop-down menu to be, then go to Developer > Combo Box.


To add the drop-down menu items, click on the Options button. The Drop-Down Form Field Options menu opens.


Type a drop-down item, then click the + sign.


Repeat for each drop-down item you want to include in your fillable form. When you’re done, click OK.


Only the first drop-down item will appear. You’ll see the rest when you test the form.
4. Finalize the Form
Before using the fillable form in Word, it’s a good idea to first test it. To do this, click the Protect Form button on the Developer ribbon.


Now that the form is protected, fill the form fields like your respondents would. You’ll notice that the drop-down menu items appear when you click on the field or the arrow beside it.


When you’re happy with how the fillable form works, finalize the document by formatting the page. Click Protect Form again to un-protect it, so you can edit the document. Now’s the time to change fonts, colors, add logos, and format the form as you wish.
This is what my final fillable form looks like:


You may also decide to remove the shading for each form field. To do so, go to Developer > Shading.


I’m going to keep the Shading on, to make it clear to my respondents where they’re supposed to type in their answers. That’s because I deleted the borders of my table to give my form a cleaner appearance. If you keep the table borders, then it makes sense to switch off the form field Shading.
5. Use and Distribute Fillable Forms in Word
Once the fillable form in Word is completed, share it with your users or respondents. Do this by sharing the fillable form as an email attachment.
First, make sure that the form is protected. This ensures that other users won’t be able to edit the form when you share it with them.
Next, click on Share > Share a Copy.


In the menu that opens, click Email as Attachment.


This launches your default email application with the fillable form attached.


3 Top Form Templates for Word (Unlimited Downloads from Elements)
If you want a form with an impressive design, it’s best to start with a form template for Word. Templates with built-in forms are designed by professional graphic designers. This means the biggest—and hardest—design decisions have already been made for you. By customizing the colors and fonts and adding your logo, you can make the template truly your own.
Below are a few form templates for Word that look great:
1. Clean Business Registration Form Template


The Clean Business Registration Form template for Word allows you to gather basic personal information and contact details. It’s useful for registering employees, clients, members, vendors, and more. This form template comes in A4 size. You’ve got the option of customizing it with your branding colors. The template comes in Microsoft Word files, as well as files for InDesign, Adobe Illustrator, and Photoshop.
2. Order Form


Receive orders for your products or services with this Order Form for Word. This A4-sized template uses paragraph styles, making it easy to edit in Microsoft Word. It also comes in Adobe InDesign files, if you’re more comfortable editing in that application. A file guide is included to help you customize this template.
3. Client Questionnaire


Impress your clients with this Client Questionnaire template that looks anything but generic. Editable in both Microsoft Word and Adobe InDesign, this form template comes in A4 size. A 34-page guide walks you through how to edit and use the template files.
More of the Best Word Templates for Your Business or Organization
Now you know how to create a fillable Word document. But aside from fillable forms, your business or organization needs other types of documents. Using templates for MS Word helps you create professional-looking documents quickly. Premium Word templates are designed to be easy to customize, so you end up with materials that are coherent with your brand.
Here are more Word templates you can customize to easily create impressive documents for your business or organization:
Learn More About Using Microsoft Word for Your Business and Personal Needs
Whether for personal or business use, MS Word lets you create various kinds of documents. But with power comes complexity, so it can take time to learn how to use its robust features.
The best place to start is with our ultimate guide, Learn How to Use Microsoft Word (Beginner Tutorial Guide). It takes you from the basics of opening and creating Word files, to more advanced skills like comparing and merging two Word documents.
These Word tutorials will also help:
Enhance Your Workflow With Fillable Forms in Word
You’ve seen how convenient it is to use an interactive, fillable form. And now, you know how to create your own fillable form in Word.
Take it up a notch by starting with a Word template, such as those from Elements or GraphicRiver. These professionally-designed templates for Word are sure to impress your clients, employees, or members.
For unlimited downloads of Word templates, take your pick of the vast options in Envato Elements. For one small monthly subscription, you get unlimited downloads of anything you want in its massive library. These include photos, fonts, graphics, as well as sound effects, music, and stock video. If you create many marketing and communication materials, Elements gives you massive value.
For one-off projects, GraphicRiver is another massive library of Word templates and other creative elements. But with GraphicRiver, you pay only for each single use of each item. It’s an affordable way of getting the same professional results.

Создавать формы в Microsoft Word легко. Трудности начинаются, когда Вы решаете создать заполняемые формы, которые можно будет разослать людям, чтобы они их заполнили. В этом случае MS Word поможет решить вашу задачу: будь то форма для сбора информации о людях или опрос для получения обратной связи от пользователей о программном обеспечении или о новом товаре.
Содержание
- Включаем вкладку «Разработчик»
- Быть или не быть Шаблону?
- Наполняем форму элементами
- Текстовые блоки
- Добавляем выбор даты
- Вставляем раскрывающийся список
- Вставляем чек-боксы
- В заключение
Включаем вкладку «Разработчик»
Чтобы создавать заполняемые формы, сначала нужно активировать вкладку Developer (Разработчик). Для этого откройте меню File (Файл) и кликните по команде Options (Параметры). В появившемся диалоговом окне откройте вкладку Customize Ribbon (Настроить ленту) и выберите Main Tabs (Основные вкладки) из выпадающего списка.
Поставьте галочку в строке Developer (Разработчик) и нажмите ОК.
Теперь на ленте появилась новая вкладка.

Быть или не быть Шаблону?
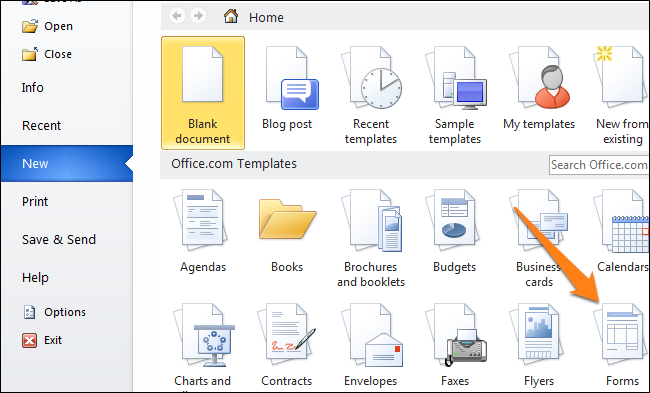
Есть два варианта, с которых можно начать создавать формы. Первый проще, при условии, что Вы подберёте подходящий шаблон. Чтобы найти шаблоны, откройте меню File (Файл) и нажмите New (Создать). Вы увидите множество шаблонов, готовых для скачивания. Остаётся лишь кликнуть по Forms (Формы) и отыскать нужный шаблон среди предложенных.
Когда найдёте подходящий шаблон, загрузите его и редактируйте форму, как пожелаете.
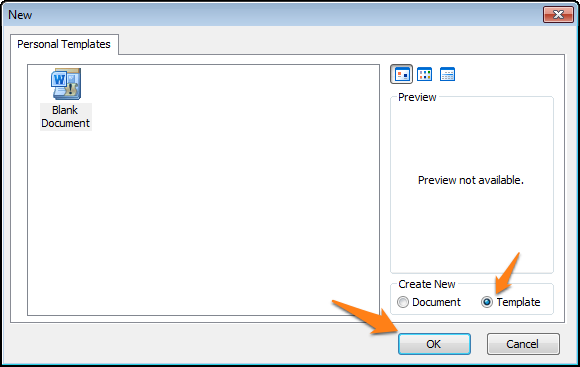
Это самый простой путь, но может случиться так, что Вы не найдёте подходящий шаблон среди предложенных. В этом случае можно создать форму из черновика. Сперва откройте настройки шаблонов, но вместо уже готовой формы выберите My Templates (Мои шаблоны).
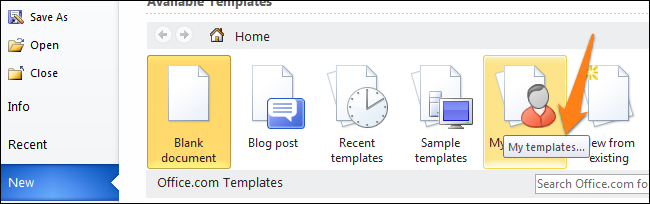
Выберите Template (Шаблон) и кликните по ОК, чтобы создать чистый шаблон. В завершение нажмите Ctrl+S, чтобы сохранить документ. Назовём его Form Template 1.
Наполняем форму элементами
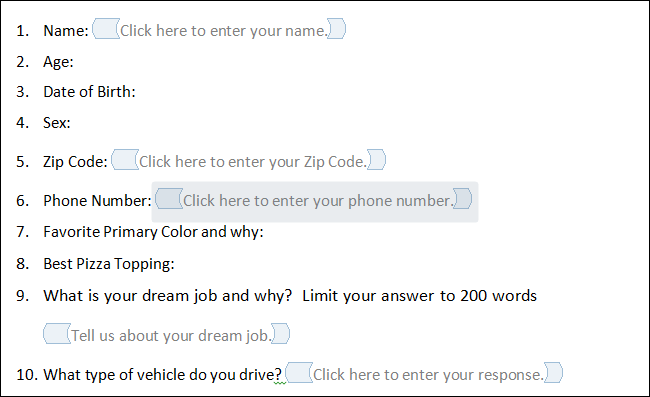
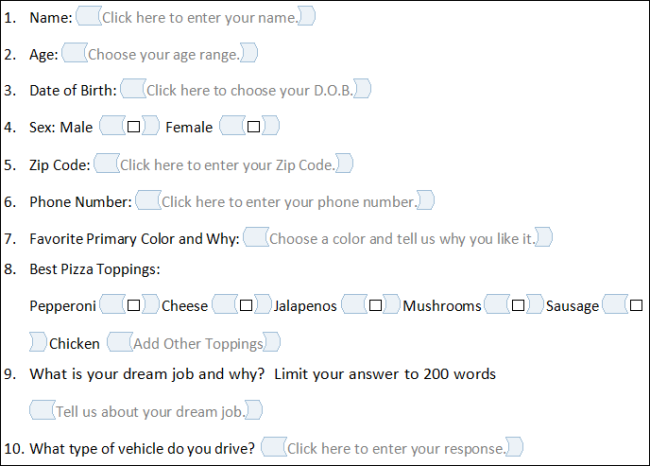
Теперь у Вас есть пустой шаблон, значит уже можно добавлять информацию в форму. Форма, которую мы создадим в этом примере, – это простой опросник для сбора информации о людях, которые будут его заполнять. Первым делом вставьте основные вопросы. В нашем случае мы будем узнавать следующую информацию:
- Name (Имя) – обычный текст
- Age (Возраст) – раскрывающийся список
- D.O.B. (День Рождения) – выбор даты
- Sex (Пол) – чек-бокс
- Zip Code (Почтовый индекс) – обычный текст
- Phone Number (Номер телефона) – обычный текст
- Favorite Primary Color and why (Какой любимый цвет и почему) – поле со списком
- Best Pizza Toppings (Любимая начинка пиццы) – чек-бокс и обычный текст
- What is your dream job and why? Limit your answer to 200 words (О какой работе Вы мечтаете и почему) – форматированный текст
- What type of vehicle do you drive? (Какой у Вас автомобиль) – обычный текст
Чтобы приступить к созданию различных вариантов элементов управления, откройте вкладку Developer (Разработчик), которую Вы добавили ранее, и в разделе Controls (Элементы управления) выберите Design Mode (Режим конструктора).
Текстовые блоки
Для любых вопросов, требующих ответа в форме текста, можно вставить текстовые блоки. Это делается при помощи:
- Rich Text Content Control (Элемент управления содержимым «форматированный текст») — пользователь может настраивать форматирование
- Plain Text Content Control (Элемент управления содержимым «обычный текст») — допускается только обычный текст без форматирования.
Давайте создадим поле для ответа форматированным текстом на вопрос 9, а затем поле для ответа обычным текстом на вопросы 1, 5, 6 и 10.
Не забывайте, что можно изменять текст в поле элемента управления содержимым, чтобы он соответствовал вопросу. Для этого кликните по полю и введите текст. Результат показан на изображении выше.
Добавляем выбор даты
Если Вам нужно добавить дату, можно вставить Date Picker Content Control (Элемент управления содержимым «выбор даты»). Используем этот элемент для вопроса 3.

Вставляем раскрывающийся список
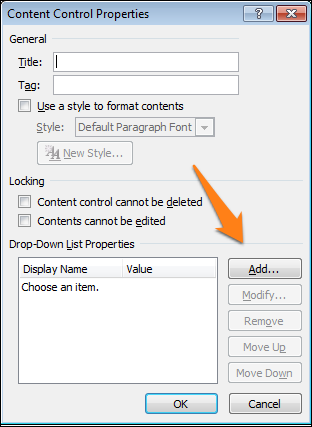
Для вопросов, подразумевающих единственный ответ (например, вопрос 2), удобно использовать раскрывающийся список. Вставим простой список и заполним его возрастными диапазонами. Разместите поле элемента управления содержимым, кликните по нему правой кнопкой мыши и выберите пункт Properties (Свойства). В появившемся диалоговом окне Content Control Properties (Свойства элемента управления содержимым) нажмите Add (Добавить), чтобы добавить в список возрастные диапазоны.
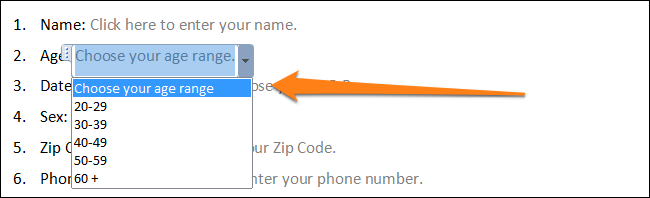
Когда закончите, у Вас должно получиться примерно то, что изображено на рисунке ниже. При этом режим конструктора нужно отключить!
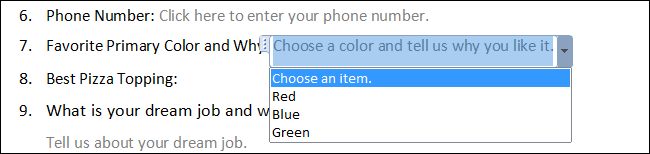
Ещё можно использовать Combo Box (Поле со списком), в котором легко составить список из любых нужных элементов. При необходимости пользователь сможет ввести дополнительный текст. Давайте вставим поле со списком для вопроса 7. Так как мы будем использовать этот элемент, пользователи смогут выбрать один из предложенных вариантов и ввести ответ, почему им нравится выбранный цвет.
Вставляем чек-боксы
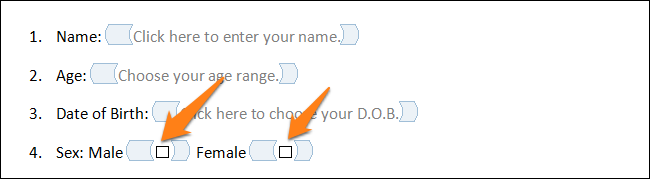
Для ответа на четвёртый вопрос вставим чек-боксы. Для начала нужно ввести варианты ответов (male – мужчина; female – женщина). Затем добавить элемент управления содержимым Check box (Флажок) рядом с каждым вариантом ответа:
Повторите это действие для любого вопроса, который подразумевает один или несколько вариантов ответа. Мы добавим чек-бокс к ответу на вопрос 8. Кроме того, чтобы пользователь мог указать вариант начинки пиццы, которого нет в списке, мы добавим элемент управления содержимым Plain Text (Обычный текст).

В заключение
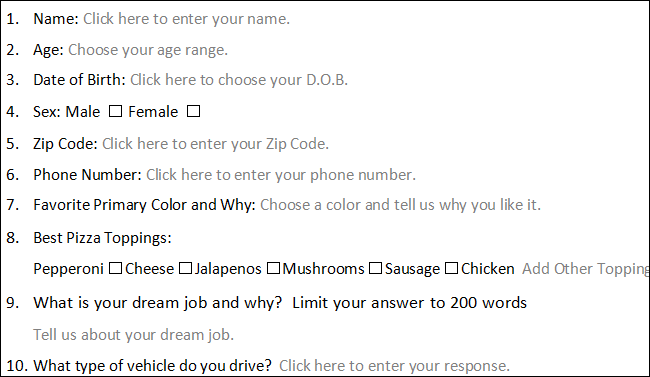
Готовая пустая форма с включённым и с выключенным режимом конструктора должна выглядеть, как на рисунках ниже.
Режим конструктора включен:
Режим конструктора выключен:
Поздравляем! Вы только что освоили основные приёмы создания интерактивных форм. Вы можете отправить файл DOTX людям, и когда они его запустят, он автоматически откроется как обычный документ Word, который можно заполнить и отправить обратно.
Оцените качество статьи. Нам важно ваше мнение:
Although Word is most commonly used for creating documents, it can also be used for capturing data like a form. Word Forms do not require any programming knowledge. These are easy to create and will work across ALL versions of Word.

The Need for Word Forms
This is very useful for conducting quick surveys or quizzes where you want to control the responses. Of course, there are more sophisticated methods and tools available for bother these scenarios, Word is familiar to everyone and almost guaranteed to be available on every desktop. Hence it is a compelling option even today (2017).
How to create Word Forms?
Two steps. Create the survey by inserting editable items (form fields) and then lock the document so that only the form can be filled.
Adding fields to Word Forms
There are three types of fields.
- The new type of fields which are better looking and more interactive.
These do not work with older versions of Word. - The solution is to use the built-in form fields.
These are available with any version of Word. So compatibility is never an issue. - ActiveX controls
These are more sophisticated but not guaranteed to be available on every PC. ActiveX controls are being phased out globally. These are used by programmers who want to extend Word and add business functionality to it.
In short, we will use the built-in Word Forms and related fields. To use these, we have to enable the developer tab.
Enable developer tab in Office 2007
File – Word Options – Popular – activate the Show developer tab option.
Enable developer tab in Office 2010 onwards
Open Word. File – Options. Click Customize Ribbon. In the list on the right side, scroll and identify the Developer item. This item is not selected by default. Select it and close the dialog.
Using Form Fields
Open the briefcase icon dropdown under Developer Tab – Controls group.
We will use only the upper part called Legacy forms. We have various types of fields available. Simple text, checkbox and box.
Create a document and choose a field. Let us add a text field for capturing the name.
The word Name is typed manually. Now select Text form field from the legacy tools area. Notice that the field is added with gray background. The width of this field looks small but it expands automatically.
Let us add another textbox for duration. To keep things simple, we will use another text field.

Let us add the leave type. Choose the Drop-down form field. Once added, double click inside the field to add various leave options.

Now let us add a Check box form field. We will ask whether it is Paid or unpaid leave. Double click on the field to change the default to Checked (means Paid leave).

Now the form looks like this.

Restricting form filling in Word Forms
Right now the form is in edit mode. The captions and structure can be changed. We cannot type inside the fields properly. Checkbox cannot be unchecked and the dropdown does not appear.
Here is how you can make it a fillable form. With Office 2007, Choose Protect Document from the Review tab. Choose Restrict Formatting and Editing option. For newer versions of Office, the Restrict editing option is directly available in the Review tab.

Now a new window (pane) opens. Choose the Allow only this type of editing checkbox and choose the Filling in Forms option from the dropdown.

Now click the Yes, Start enforcing protection button. Specify a password and type it again to confirm it.
Now it is a real form.
How to fill Word Forms?
Click on any field to fill it. You cannot click and edit any other area in the Word file.
Dropdowns can be selected and checkboxes can be enabled or disabled.
How to save the data from filled Word Forms?
You will send this form as attachment to multiple people. They will fill it and then send it back to you. Unfortunately, you cannot extract data from multiple filled forms. You have to do it one-by-one. Here is a filled form.

In order to save only the data from the form, follow these steps:
- Go to File – Options – Advanced
- Scroll down and choose the checkbox as shown below. Left side is Office 2007 and right side is newer versions of Word.

Now the saved file will be just a TXT file containing the comma delimited data. A preview is also shown before saving.

Practical Usage
This method works ever since Word was created. Although newer methods are available now, this method may still come in handy for quick and easy data capture.
***