
Циклы в VBA Excel предназначены для повторения одного и того же блока операторов. Количество итераций может быть задано явно, зависеть от условия или количества элементов, содержащихся в обрабатываемом объекте.
Цикл For… Next
Цикл For… Next в VBA Excel предназначен для выполнения группы операторов необходимое количество раз, заданное счетчиком — специальной переменной цикла. После выполнения каждой итерации значение счетчика увеличивается или уменьшается на единицу или на число, указанное с помощью оператора Step. Предусмотрен принудительный выход из цикла с помощью оператора Exit For. Перейти к подробному описанию …
Цикл Do While… Loop
Цикл Do While… Loop в VBA Excel предназначен для повторения блока операторов до тех пор, пока выполняется заданное условие (возвращается значение True). Этот цикл позволяет проверять условие как до, так и после выполнения операторов. Предусмотрен принудительный выход из цикла с помощью оператора Exit Do. Перейти к подробному описанию …
Цикл While… Wend
Цикл While… Wend в VBA Excel предназначен для выполнения блока операторов до тех пор, пока выполняется заданное условие (возвращается значение True). Этот цикл позволяет проверять условие только до выполнения операторов. Принудительный выход из цикла с помощью оператора Exit Do не предусмотрен. Перейти к подробному описанию …
Цикл Do Until… Loop
Цикл Do Until… Loop в VBA Excel предназначен для повторения блока операторов пока не выполняется заданное условие (возвращается значение False). Этот цикл позволяет проверять условие как до, так и после выполнения операторов. Предусмотрен принудительный выход из цикла с помощью оператора Exit Do. Перейти к подробному описанию …
Цикл For Each… Next
Цикл For Each… Next в VBA Excel предназначен для выполнения блока операторов по отношению к каждому элементу из группы элементов (диапазон, массив, коллекция). Предусмотрен принудительный выход из цикла с помощью оператора Exit For. Перейти к подробному описанию …
На чтение 13 мин. Просмотров 26.4k.

Рамакришна, Источники индийской мудрости
Сейчас … мы идем по кругу
Эта статья содержит полное руководство по VBA Do While и VBA While Loops. (Если вы ищете информацию о циклах VBA For и For Each, перейдите сюда)
Цикл VBA While существует, чтобы сделать его совместимым со старым кодом. Однако Microsoft рекомендует использовать цикл Do Loop, поскольку он более «структурирован и гибок». Оба этих цикла рассматриваются в этом посте.
Для быстрого ознакомления с этими циклами перейдите к таблице быстрого руководства ниже.
Если вы ищете что-то конкретное, вы можете посмотреть содержание ниже.
Содержание
- Краткое руководство по VBA While Loops
- Введение
- Цикл For против цикла Do While
- Условия
- Формат цикла Do
- Цикл Exit Do
- While Wend
- Бесконечный цикл
- Использование функций Worksheet вместо циклов
- Резюме
Краткое руководство по VBA While Loops
| Формат цикла | Описание | Пример |
| Do While … Loop | Запускается 0 или более раз, пока условие выполняется | Do While result = «Верно» Loop |
| Do … Loop While | Запускается 1 или более раз, пока условие выполняется | Do Loop While result = «Верно» |
| Do Until … Loop | Запускается 0 или более раз, пока условие не будет выполнено | Do Until result <> «Верно» Loop |
| Do … Until Loop | Запускается 1 или более раз, пока условие не будет выполнено | Do Loop Until result <> «Верно» |
| While … Wend R |
Запускается 0 или более раз, пока условие истинно. Примечание: этот цикл считается устаревшим. |
While result = «Верно» Wend |
| Exit the Do Loop | Завершает Do | Do While i < 10 i = GetTotal If i < 0 Then Exit Do End If Loop |
Введение
Если вы никогда ранее не использовали циклы, тогда вы можете прочитать «Что такое циклы и зачем они вам нужны» из моего поста в журнале For Loop.
Я собираюсь сосредоточиться в основном на Do Loop в этой статье. Как я упоминал выше, мы видели, что цикл While Wend считается устаревшим. Для полноты информации я все равно его включил в эту статью.
Итак, во-первых, зачем нам нужны циклы Do While, когда у нас уже есть циклы For?
Цикл For против цикла Do While
Когда мы используем цикл For Loop, мы заранее знаем, сколько раз мы хотим его запустить. Например, мы можем захотеть запустить цикл один раз для каждого элемента в коллекции, массиве или словаре.
В следующем примере кода мы видим в начале каждого цикла, сколько раз он будет выполняться.
' запускается 5 раз
For i = 1 To 5

' запускается один раз для каждого элемента коллекции
For i = 1 To coll.Count

' запускается один раз для каждого элемента в arr
For i = LBound(arr) To coll.lbound(arr)

' запускается один раз для каждого значения от 1 до значения в lastRow
For i = 1 To lastRow

' запускается один раз для каждого элемента в коллекции
For Each s In coll
Цикл Do другой. Он работает:
- В то время как условие верно
- Пока условие не будет выполнено
Другими словами, количество циклов в большинстве случаев не имеет значения.
Итак, что такое условие и как мы их используем?
Условия
Условие — это утверждение, которое оценивается как истинное или ложное. Они в основном используются с операторами Loops и If. При создании условия вы используете такие знаки, как >, <, <>,> =, =.
Ниже приведены примеры условий
| Условие | Истина, когда… |
| x < 5 | x меньше 5 |
| x <= 5 | x меньше либо равен 5 |
| x > 5 | x больше 5 |
| x >= 5 | x больше либо равен 5 |
| x = 5 | x равен 5 |
| x <> 5 | x не равен 5 |
| x > 5 And x < 10 | x больше 5 И меньше 10 |
| x = 2 Or x >10 | x равен 2 ИЛИ больше 10 |
| Range(«A1») = «Иван» | Ячейка A1 содержит текст «Иван» |
| Range(«A1») <> «Иван» | Ячейка A1 не содержит текст «Иван» |
Вы могли заметить x = 5 как условие. Его следует путать с х = 5, при использовании в качестве назначения.
Например
' означает: значение 6 будет храниться в х
x = 6

' означает: х равен 6?
If x = 6

' означает: х равен 6?
Do While x = 6
В следующей таблице показано, как «=» используется в условиях и назначениях.
| Использование «=» | Тип | Имеется в виду |
| Loop Until x = 5 | Условие | x равен 5? |
| Do While x = 5 | Условие | x равен 5? |
| If x = 5 Then | Условие | x равен 5? |
| For x = 1 To 5 | Присваивание | Установите значение x = 1, затем = 2 и т.д. |
| x = 5 | Присваивание | Установите значение x=5 |
| b = 6 = 5 | Присваивание и условие |
Присвойте b результату условия 6 = 5 |
| x = MyFunc(5,6) | Присваивание | Присвойте х значение, возвращаемое функцией |
Формат цикла Do
Цикл Do можно использовать четырьмя способами, и это часто вызывает путаницу. Однако в каждом из этих четырех способов есть только небольшая разница.
Do всегда в начале первой строки, а Loop всегда в конце последней строки.
Мы можем добавить условие после любой строки.
Do [условие]
Loop

Do
Loop [условие]
Условию предшествует While или Until, которое дает нам эти четыре возможности
Do While [условие]
Loop

Do Until [условие]
Loop

Do
Loop While [условие]

Do
Loop Until [условие]
Давайте посмотрим на некоторые примеры, чтобы прояснить это.
Примеры цикла Do
Представьте, что вы хотите, чтобы пользователь ввел список элементов. Каждый раз, когда пользователь вводит элемент, вы печатаете его в «Immediate Window». Когда пользователь вводит пустую строку, вы хотите, чтобы приложение закрывалось.
В этом случае цикл For не подойдет, поскольку вы не знаете, сколько элементов будет вводить пользователь. Пользователь может ввести пустую строку первым или с сотой попытки. Для этого типа сценария вы бы использовали цикл Do.
Следующий код показывает это
 Dim sCommand As String

    Do
        ' Получить пользовательский ввод
        sCommand = InputBox("Пожалуйста, введите элемент")

        ' Печать в Immediate Window (Ctrl + G для просмотра)
        Debug.Print sCommand

    Loop While sCommand <> ""
Код входит в цикл и продолжается до тех пор, пока не достигнет строки «Loop While». На этом этапе он проверяет, оценивается ли условие как истинное или ложное.
Если условие оценивается как ложное, то код выходит из цикла и продолжается.
Если условие оценивается как истинное, то код возвращается к строке Do и снова проходит через цикл.
Разница между наличием условия на линии Do и на линии Loop очень проста.
Когда условие находится в строке Do, цикл может вообще не работать. Так что он будет работать ноль или более раз.
Когда условие находится на линии Loop, цикл всегда будет запущен хотя бы один раз. Так что он будет запущен один или несколько раз.
В нашем последнем примере условие находится в строке Loop, потому что мы всегда хотим получить хотя бы одно значение от пользователя. В следующем примере мы используем обе версии цикла. Цикл будет выполняться, пока пользователь не введет букву «н».
Sub GetInput()

    Dim sCommand As String

    ' Условие в начале
    Do While sCommand <> "н"
        sCommand = InputBox("Пожалуйста, введите элемент для цикла 1")
    Loop

    ' Условие в конце
    Do
        sCommand = InputBox("Пожалуйста, введите элемент для цикла 2")
    Loop While sCommand <> "н"

End Sub
В приведенном выше примере оба цикла будут вести себя одинаково.
Однако, если мы установим для sCommand значение «н» до запуска цикла «Do While», код не войдет в цикл.
Sub GetInput2()

    Dim sCommand As String
    sCommand = "н"

    ' Цикл не будет работать, поскольку команда "н"
    Do Whilel sCommand <> "н"
        sCommand = InputBox("Пожалуйста, введите элемент для цикла 1")
    Loop

    ' Цикл все равно будет запущен хотя бы один раз
    Do
        sCommand = InputBox("Пожалуйста, введите элемент для цикла 2")
    Loop While sCommand <> "н"

End Sub
Второй цикл в вышеприведенном примере (то есть Loop While) всегда будет запускаться хотя бы один раз.
While против Until
При использовании Do Loop условию должно предшествовать Until или While.
Until и While, по сути, противоположны друг другу. Они используются в VBA аналогично тому, как они используются в английском языке.
Например:
- Оставьте одежду, пока не пойдет дождь
- Оставь одежду, пока не идет дождь
Другой пример:
- Оставайся в постели, пока не станет светло
- Оставайся в постели, пока темно
Еще один пример:
- повторять, пока число не станет больше или равно десяти
- повторить пока счет меньше десяти
Как видите, использование Until и While — это просто противоположный способ написания одного и того же условия.
Примеры Until и While
Следующий код показывает циклы «While» и «Until» рядом. Как видите, единственная разница в том, что условие полностью изменено.
Примечание: знаки <> означают «не равно».
Sub GetInput()

    Dim sCommand As String

    ' Условие в начале
    Do Until sCommand = "н"
        sCommand = InputBox("Пожалуйста, введите элемент для цикла 1")
    Loop

    Do While sCommand <> "н"
        sCommand = InputBox("Пожалуйста, введите элемент для цикла 1")
    Loop

    ' Условие в конце
    Do
        sCommand = InputBox("Пожалуйста, введите элемент для цикла 2")
    Loop Until sCommand = "н"

    Do
        sCommand = InputBox("Пожалуйста, введите элемент для цикла 2")
    Loop While sCommand <> "н"

End Sub
- Первый цикл: запускается только в том случае, если sCommand не равен ‘н’.
- Второй цикл: запускается только в том случае, если sCommand не равен ‘н’.
- Третий цикл: будет запущен хотя бы один раз перед проверкой sCommand.
- Четвертый цикл: будет запущен хотя бы один раз перед проверкой sCommand.
Пример: проверка объектов
Примером использования Until и While является проверка объектов. Когда объект не был назначен, он имеет значение Nothing.
Поэтому, когда мы объявляем переменную книги в следующем примере, она имеет значение Nothing, пока мы не назначим ее Workbook.
Противоположностью Nothing не является Nothing, что может сбить с толку.
Представьте, что у нас есть две функции: GetFirstWorkbook и GetNextWorkbook, которые возвращают некоторые объекты книги. Код будет печатать имя рабочей книги до тех пор, пока функции больше не вернут действительную рабочую книгу.
Вы можете увидеть пример кода здесь:
Dim wrk As Workbook
    Set wrk = GetFirstWorkbook()

    Do Until wrk Is Nothing
        Debug.Print wrk.Name
        Set wrk = GetNextWorkbook()
    Loop
Написание этого кода с использованием Do While было бы более запутанным, так как условие Not Is Nothing
Dim wrk As Workbook
    Set wrk = GetFirstWorkbook()

    Do While Not wrk Is Nothing
        Debug.Print wrk.Name
        Set wrk = GetNextWorkbook()
    Loop
Это делает код более понятным, и наличие четких условий — всегда хорошо. Честно говоря, разница маленькая, и выбор между «While» и «Until» действительно сводится к личному выбору.
Цикл Exit Do
Мы можем выйти из любого цикла Do с помощью оператора Exit Do.
Следующий код показывает пример использования Exit Do
Do While i < 1000
     If Cells(i,1) = "Найдено" Then
         Exit Do
     End If
     i = i + 1
Loop
В этом случае мы выходим из цикла Do Loop, если ячейка содержит текст «Найдено».
While Wend
Этот цикл в VBA, чтобы сделать его совместимым со старым кодом. Microsoft рекомендует использовать циклы Do, поскольку они более структурированы.
Из MSDN: «Оператор Do… Loop обеспечивает более структурированный и гибкий способ выполнения циклов».
Формат цикла VBA While Wend
Цикл VBA While имеет следующий формат:
While <Условие>
Wend
While Wend против Do
Разница между циклами VBA While и VBA Do заключается в следующем:
- While может иметь условие только в начале цикла.
- While не имеет версии Until.
- Не существует оператора для выхода из цикла While, как Exit For или Exit Do.
Условие для цикла VBA While такое же, как и для цикла VBA Do While. Два цикла в приведенном ниже коде работают точно так же.
Sub GetInput()

    Dim sCommand As String

    Do While sCommand <> "н"
        sCommand = InputBox("Пожалуйста, введите элемент для цикла 1")
    Loop

    While sCommand <> "н"
        sCommand = InputBox("Пожалуйста, введите элемент для цикла 2")
    Wend

End Sub
Бесконечный цикл
Даже если вы никогда не писали код в своей жизни, я уверен, что вы слышали фразу «Бесконечный цикл». Это цикл, в котором условие никогда не будет выполнено. Обычно это происходит, когда вы забыли обновить счетчик.
Следующий код показывает бесконечный цикл
Dim cnt As Long
    cnt = 1

    'это бесконечный цикл
    Do While cnt <> 5

    Loop
В этом примере cnt установлен в 1, но он никогда не обновляется. Поэтому условие никогда не будет выполнено — cnt всегда будет меньше 5.
В следующем коде cnt обновляется каждый раз, поэтому условие будет выполнено.
Dim cnt As Long
    cnt = 1

    Do While cnt <> 5
        cnt = cnt + 1
    Loop
Как вы можете видеть, использование For Loop безопаснее для подсчета, поскольку оно автоматически обновляет счет в цикле. Ниже приведен тот же цикл с использованием For.
Dim i As Long
    For i = 1 To 4

    Next i
Это явно лучший способ сделать это. Цикл For устанавливает начальное значение, условие и счет в одну строку.
Конечно, можно использовать бесконечный цикл, используя For — это потребует немного больше усилий 🙂
 Dim i As Long
    ' Бесконечный цикл
    For i = 1 To 4
        ' i никогда не достигнет 4
        i = 1
    Next i
Работа с бесконечным циклом
Когда у вас бесконечный цикл — VBA не выдаст ошибку. Ваш код будет продолжать работать, а редактор Visual Basic не будет отвечать.
Раньше вы могли выйти из цикла, просто нажав Ctrl и Break. В настоящее время разные ноутбуки используют разные комбинации клавиш. Полезно знать, как это настроено в вашем ноутбуке, чтобы в случае возникновения бесконечного цикла вы могли легко остановить код.
Вы также можете выйти из цикла, убив процесс. Нажмите Ctrl + Shift + Esc. На вкладке Процессы найдите Excel / Microsoft Excel. Щелкните правой кнопкой мыши по этому и выберите «Завершить процесс». Это закроет Excel, и вы можете потерять часть работы — так что гораздо лучше использовать Ctrl + Break или его эквивалент.
Использование функций Worksheet вместо циклов
Иногда вы можете использовать функцию листа вместо цикла.
Например, представьте, что вы хотите добавить значения в список ячеек. Вы можете сделать это с помощью цикла, но было бы более эффективно использовать функцию таблицы Sum. Это быстрее и экономит много кода.
Использовать функции рабочего листа очень просто. Ниже приведен пример использования Sum и Count.
Sub WorksheetFunctions()

    Debug.Print WorksheetFunction.Sum(Range("A1:A10"))

    Debug.Print WorksheetFunction.Count(Range("A1:A10"))

End Sub
В следующем примере используется цикл для выполнения того же действия. Как видите, это гораздо более длинный способ достижения той же цели.
Sub SumWithLoop()

    Dim total As Long, count As Long
    Dim rg As Range
    For Each rg In Range("A1:A10")
        ' Total
        total = total + rg
        ' Count
        If rg <> "" Then
            count = count + 1
        End If
    Next rg

    Debug.Print total
    Debug.Print count

End Sub
Резюме
Цикл Do While
- Цикл Do можно использовать 4 способами.
- Его можно использовать в начале или в конце, Do While .. Loop, Do … Loop While
- Может использоваться с Until в начале или в конце, Do Until .. Loop, Do … Loop Until
- While и Until используют противоположные условия друг к другу.
- Бесконечный цикл происходит, если ваше условие выхода никогда не будет выполнено.
- Иногда использование функции рабочего листа более эффективно, чем использование цикла.
Цикл While Wend
- Цикл Wend Wend устарел, и вы можете вместо этого использовать цикл Do.
In this Article
- VBA Loop Quick Examples
- For Each Loops
- For Next Loops
- Do While Loops
- Do Until Loops
- VBA Loop Builder
- VBA For Next Loop
- For Loop Syntax
- For Loop Step
- For Loop Step – Inverse
- Nested For Loop
- Exit For
- Continue For
- VBA For Each Loop
- For Each Cell in Range
- For Each Worksheet in Workbook
- For Each Open Workbook
- For Each Shape in Worksheet
- For Each Shape in Each Worksheet in Workbook
- For Each – IF Loop
- VBA Do While Loop
- Do While
- Loop While
- VBA Do Until Loop
- Do Until
- Loop Until
- Exit Do Loop
- End or Break Loop
- More Loop Examples
- Loop Through Rows
- Loop Through Columns
- Loop Through Files in a Folder
- Loop Through Array
- Loops in Access VBA
To work effectively in VBA, you must understand Loops.
Loops allow you to repeat a code block a set number of times or repeat a code block on a each object in a set of objects.
First we will show you a few examples to show you what loops are capable of. Then we will teach you everything about loops.
VBA Loop Quick Examples
For Each Loops
For Each Loops loop through every object in a collection, such as every worksheet in workbook or every cell in a range.
Loop Through all Worksheets in Workbook
This code will loop through all worksheets in the workbook, unhiding each sheet:
Sub LoopThroughSheets()
Dim ws As Worksheet

    For Each ws In Worksheets
        ws.Visible = True
    Next

End Sub
Loop Through All Cells in Range
This code will loop through a range of cells, testing if the cell value is negative, positive, or zero:
Sub If_Loop()
Dim Cell as Range

  For Each Cell In Range("A2:A6")
    If Cell.Value > 0 Then
      Cell.Offset(0, 1).Value = "Positive"
    ElseIf Cell.Value < 0 Then
      Cell.Offset(0, 1).Value = "Negative"
    Else
      Cell.Offset(0, 1).Value = "Zero"
     End If
  Next Cell

End Sub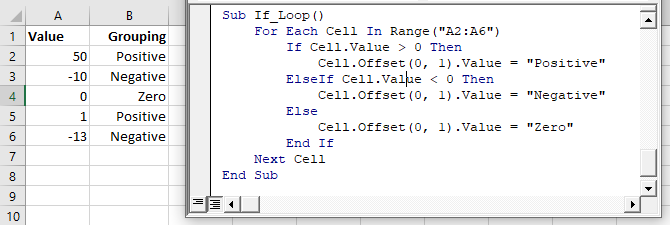
For Next Loops
Another type of “For” Loop is the For Next Loop. The For Next Loop allows you to loop through integers.
This code will loop through integers 1 through 10, displaying each with a message box:
Sub ForLoop()
    Dim i As Integer
    For i = 1 To 10
        MsgBox i
    Next i
End Sub
Do While Loops
Do While Loops will loop while a condition is met. This code will also loop through integers 1 through 10, displaying each with a message box.
Sub DoWhileLoop()
    Dim n As Integer
    n = 1
    Do While n < 11
        MsgBox n
        n = n + 1
    Loop
End Sub
Do Until Loops
Conversely, Do Until Loops will loop until a condition is met. This code does the same thing as the previous two examples.
Sub DoUntilLoop()
    Dim n As Integer
    n = 1
    Do Until n >= 10
        MsgBox n
        n = n + 1
    Loop
End Sub
We will discuss this below, but you need to be extremely careful when creating Do While or Do Until loops so that you don’t create a never ending loop.
VBA Loop Builder
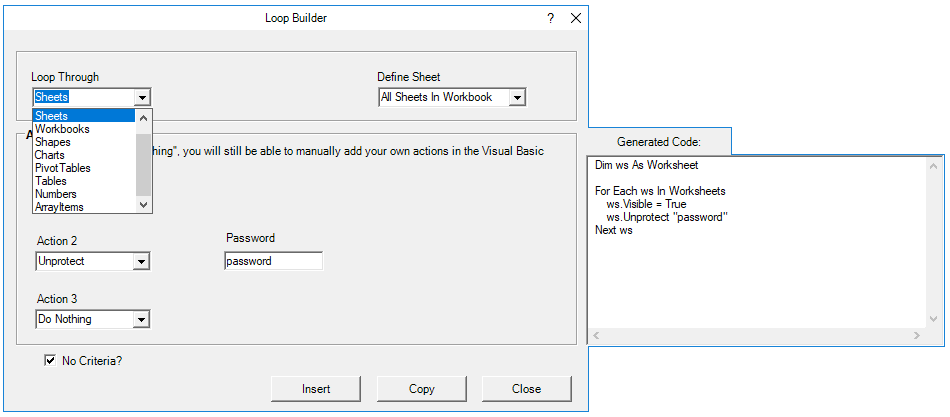
This is a screenshot of the “Loop Builder” from our Premium VBA Add-in: AutoMacro. The Loop Builder allows you to quickly and easily build loops to loop through different objects, or numbers. You can perform actions on each object and/or select only objects that meet certain criteria.
The add-in also contains many other code builders, an extensive VBA code library, and an assortment of coding tools. It’s a must have for any VBA developer.
Now we will cover the different types of loops in depth.
VBA Coding Made Easy
Stop searching for VBA code online. Learn more about AutoMacro — A VBA Code Builder that allows beginners to code procedures from scratch with minimal coding knowledge and with many time-saving features for all users!

Learn More
VBA For Next Loop
For Loop Syntax
The For Next Loop allows you to repeat a block of code a specified number of times. The syntax is:
[Dim Counter as Integer]

For Counter = Start to End [Step Value]
    [Do Something]
Next [Counter]
Where the items in brackets are optional.
- [Dim Counter as Long] – Declares the counter variable. Required if Option Explicit is declared at the top of your module.
- Counter – An integer variable used to count
- Start – The start value (Ex. 1)
- End – The end value (Ex. 10)
- [Step Value] – Allows you to count every n integers instead of every 1 integer. You can also go in reverse with a negative value (ex. Step -1)
- [Do Something] – The code that will repeat
- Next [Counter] – Closing statement to the For Next Loop. You can include the Counter or not. However, I strongly recommend including the counter as it makes your code easier to read.
If that’s confusing, don’t worry. We will review some examples:
Count to 10
This code will count to 10 using a For-Next Loop:
Sub ForEach_CountTo10()

Dim n As Integer
For n = 1 To 10
    MsgBox n
Next n

End Sub
For Loop Step
Count to 10 – Only Even Numbers
This code will count to 10 only counting even numbers:
Sub ForEach_CountTo10_Even()

Dim n As Integer
For n = 2 To 10 Step 2
    MsgBox n
Next n

End Sub
Notice we added “Step 2”. This tells the For Loop to “step” through the counter by 2. We can also use a negative step value to step in reverse:
VBA Programming | Code Generator does work for you!
For Loop Step – Inverse
Countdown from 10
This code will countdown from 10:
Sub ForEach_Countdown_Inverse()

Dim n As Integer
For n = 10 To 1 Step -1
    MsgBox n
Next n
MsgBox "Lift Off"

End Sub
Delete Rows if Cell is Blank
I’ve most frequently used a negative step For-Loop to loop through ranges of cells, deleting rows that meet certain criteria. If you loop from the top rows to the bottom rows, as you delete rows you will mess up your counter.
This example will delete rows with blank cells (starting from the bottom row):
Sub ForEach_DeleteRows_BlankCells()

Dim n As Integer
For n = 10 To 1 Step -1
    If Range("a" & n).Value = "" Then
        Range("a" & n).EntireRow.Delete
    End If
Next n

End Sub
Nested For Loop
You can “nest” one For Loop inside another For Loop. We will use Nested For Loops to create a multiplication table:
Sub Nested_ForEach_MultiplicationTable()

Dim row As Integer, col As Integer

For row = 1 To 9
    For col = 1 To 9
        Cells(row + 1, col + 1).Value = row * col
    Next col
Next row

End Sub
Exit For
The Exit For statement allows you to exit a For Next loop immediately.
You would usually use Exit For along with an If Statement, exiting the For Next Loop if a certain condition is met.
For example, you might use a For Loop to find a cell. Once that cell is found, you can exit the loop to speed up your code.
This code will loop through rows 1 to 1000, looking for “error” in column A. If it’s found, the code will select the cell, alert you to the found error, and exit the loop:
Sub ExitFor_Loop()

Dim i As Integer

For i = 1 To 1000
    If Range("A" & i).Value = "error" Then
        Range("A" & i).Select
        MsgBox "Error Found"
        Exit For
    End If
Next i

End Sub
Important: In the case of Nested For Loops, Exit For only exits the current For Loop, not all active Loops.
Continue For
VBA does not have the “Continue” command that’s found in Visual Basic. Instead, you will need to use “Exit”.
AutoMacro | Ultimate VBA Add-in | Click for Free Trial!
VBA For Each Loop
The VBA For Each Loop will loop through all objects in a collection:
- All cells in a range
- All worksheets in a workbook
- All shapes in a worksheet
- All open workbooks
You can also use Nested For Each Loops to:
- All cells in a range on all worksheets
- All shapes on all worksheets
- All sheets in all open workbooks
- and so on…
The syntax is:
For Each Object in Collection
[Do Something]
Next [Object]
Where:
- Object – Variable representing a Range, Worksheet, Workbook, Shape, etc. (ex. rng)
- Collection – Collection of objects (ex. Range(“a1:a10”)
- [Do Something] – Code block to run on each object
- Next [Object] – Closing statement. [Object] is optional, however strongly recommended.
For Each Cell in Range
This code will loop through each cell in a range:
Sub ForEachCell_inRange()

Dim cell As Range

For Each cell In Range("a1:a10")
    cell.Value = cell.Offset(0,1).Value
Next cell

End Sub
For Each Worksheet in Workbook
This code will loop through all worksheets in a workbook, unprotecting each sheet:
Sub ForEachSheet_inWorkbook()

Dim ws As Worksheet

For Each ws In Worksheets
    ws.Unprotect "password"
Next ws

End Sub
For Each Open Workbook
This code will save and close all open workbooks:
Sub ForEachWB_inWorkbooks()

Dim wb As Workbook

For Each wb In Workbooks
    wb.Close SaveChanges:=True
Next wb

End Sub
AutoMacro | Ultimate VBA Add-in | Click for Free Trial!
For Each Shape in Worksheet
This code will delete all shapes in the active sheet.
Sub ForEachShape()

Dim shp As Shape

For Each shp In ActiveSheet.Shapes
    shp.Delete
Next shp

End Sub
For Each Shape in Each Worksheet in Workbook
You can also nest For Each Loops. Here we will loop through all shapes in all worksheets in the active workbook:
Sub ForEachShape_inAllWorksheets()

Dim shp As Shape, ws As Worksheet

For Each ws In Worksheets
    For Each shp In ws.Shapes
        shp.Delete
    Next shp
Next ws

End Sub
For Each – IF Loop
As we’ve mentioned before, you can use an If statement within a loop, performing actions only if certain criteria is met.
This code will hide all blank rows in a range:
Sub ForEachCell_inRange()

Dim cell As Range

For Each cell In Range("a1:a10")
    If cell.Value = "" Then _
       cell.EntireRow.Hidden = True
Next cell

End Sub
VBA Do While Loop
The VBA Do While and Do Until (see next section) are very similar. They will repeat a loop while (or until) a condition is met.
The Do While Loop will repeat a loop while a condition is met.
Here is the Do While Syntax:
Do While Condition
[Do Something]
Loop
Where:
- Condition – The condition to test
- [Do Something] – The code block to repeat
You can also set up a Do While loop with the Condition at the end of the loop:
Do
[Do Something]
Loop While Condition
We will demo each one and show how they differ:
AutoMacro | Ultimate VBA Add-in | Click for Free Trial!
Do While
Here is the Do While loop example we demonstrated previously:
Sub DoWhileLoop()
    Dim n As Integer
    n = 1
    Do While n < 11
        MsgBox n
        n = n + 1
    Loop
End Sub
Loop While
Now let’s run the same procedure, except we will move the condition to the end of the loop:
Sub DoLoopWhile()
    Dim n As Integer
    n = 1
    Do
        MsgBox n
        n = n + 1
    Loop While n < 11
End Sub
VBA Do Until Loop
Do Until Loops will repeat a loop until a certain condition is met. The syntax is essentially the same as the Do While loops:
Do Until Condition
[Do Something]
Loop
and similarly the condition can go at the start or the end of the loop:
Do
[Do Something]
Loop Until Condition
Do Until
This do Until loop will count to 10, like our previous examples
Sub DoUntilLoop()
    Dim n As Integer
    n = 1
    Do Until n > 10
        MsgBox n
        n = n + 1
    Loop
End Sub
AutoMacro | Ultimate VBA Add-in | Click for Free Trial!
Loop Until
This Loop Until loop will count to 10:
Sub DoLoopUntil()
    Dim n As Integer
    n = 1
    Do
        MsgBox n
        n = n + 1
    Loop Until n > 10
End Sub
Exit Do Loop
Similar to using Exit For to exit a For Loop, you use the Exit Do command to exit a Do Loop immediately
Exit DoHere is an example of Exit Do:
Sub ExitDo_Loop()

Dim i As Integer
i = 1

Do Until i > 1000
    If Range("A" & i).Value = "error" Then
        Range("A" & i).Select
        MsgBox "Error Found"
        Exit Do
    End If
    i = i + 1
Loop

End Sub
End or Break Loop
As we mentioned above, you can use the Exit For or Exit Do to exit loops:
Exit ForExit DoHowever, these commands must be added to your code before you run your loop.
If you are trying to “break” a loop that’s currently running, you can try pressing ESC or CTRL + Pause Break on the keyboard. However, this may not work. If it doesn’t work, you’ll need to wait for your loop to end or, in the case of an endless loop, use CTRL + ALT + Delete to force close Excel.
This is why I try to avoid Do loops, it’s easier to accidentally create an endless loop forcing you to restart Excel, potentially losing your work.
More Loop Examples
AutoMacro | Ultimate VBA Add-in | Click for Free Trial!
Loop Through Rows
This will loop through all the rows in a column:
Public Sub LoopThroughRows()

Dim cell As Range

For Each cell In Range("A:A")
    If cell.value <> "" Then MsgBox cell.address & ": " & cell.Value
Next cell

End Sub
Loop Through Columns
This will loop through all columns in a row:
Public Sub LoopThroughColumns()

Dim cell As Range

For Each cell In Range("1:1")
    If cell.Value <> "" Then MsgBox cell.Address & ": " & cell.Value
Next cell

End Sub
Loop Through Files in a Folder
This code will loop through all files in a folder, creating a list:
Sub LoopThroughFiles ()

Dim oFSO As Object
Dim oFolder As Object
Dim oFile As Object
Dim i As Integer

Set oFSO = CreateObject("Scripting.FileSystemObject")

Set oFolder = oFSO.GetFolder("C:Demo)

i = 2

For Each oFile In oFolder.Files
    Range("A" & i).value = oFile.Name
    i = i + 1
Next oFile

End Sub
Loop Through Array
This code will loop through the array ‘arrList’:
For i = LBound(arrList) To UBound(arrList)
    MsgBox arrList(i)
Next i
The LBound function gets the “lower bound” of the array and UBound gets the “upper bound”.
Loops in Access VBA
Most of the examples above will also work in Access VBA. However, in Access, we loop through the Recordset Object rather than the Range Object.
Sub LoopThroughRecords()
   On Error Resume Next
   Dim dbs As Database
   Dim rst As Recordset
   Set dbs = CurrentDb
   Set rst = dbs.OpenRecordset("tblClients", dbOpenDynaset)
   With rst
      .MoveLast
      .MoveFirst
      Do Until .EOF = True
         MsgBox (rst.Fields("ClientName"))
        .MoveNext
     Loop
   End With
   rst.Close
   Set rst = Nothing
   Set dbs = Nothing
End SubTo get the most out of Excel and VBA, you need to know how to use loops efficiently.
In VBA, loops allow you to go through a set of objects/values and analyze it one by one. You can also perform specific tasks for each loop.
Here is a simple example of using VBA loops in Excel.
Suppose you have a dataset and you want to highlight all the cells in even rows. You can use a VBA loop to go through the range and analyze each cell row number. If it turns out to be even, you give it a color, else you leave it as is.
Now this, of course, is very simple of looping in Excel VBA (and you can also do this using conditional formatting).
In real life, you can do a lot more with VBA loops in Excel that can help you automate tasks.
Here are some more practical examples where VBA loops can be useful:
- Looping through a range of cells and analyzing each cell (highlight cells with a specific text in it).
- Looping through all the worksheets and do something with each (such as protect/unprotect it).
- Loop through all the open workbooks (and save each workbook or close all except the active workbook).
- Loop through all the characters in a cell (and extract the numeric part from a string).
- Loop through all the values an array.
- Loop through all the charts/objects (and give a border or change the background color).
Now to best use loops in Excel VBA, you need to know about the different kinds that exist and the correct syntax of each.

In this tutorial, I’ll showcase different types of Excel VBA loops and cover a few examples for each loop
Note: This is going to be a huge tutorial, where I will try and cover each VBA loop in some detail. I recommend you bookmark this page for future reference.
If you’re interested in learning VBA the easy way, check out my Online Excel VBA Training.
For Next Loop
The ‘For Next’ loop allows you to go through a block of code for the specified number of times.
For example, if I ask you to add the integers from 1 to 10 manually, you would add the first two numbers, then add the third number to the result, then add the fourth number to the result, as so on..
Isn’t it?
The same logic is used in the For Next loop in VBA.
You specify how many times you want the loop to run and also specify what you want the code to do each time the loop is run.
Below is the syntax of the For Next loop:
For Counter = Start To End [Step Value]
[Code Block to Execute]
Next [counter]
In the For Next loop, you can use a Counter (or any variable) that will be used to run the loop. This counter allows you to run this loop for a required number of times.
For example, if I want to add the first 10 positive integers, then my Counter value would be from 1 to 10.
Let’s have a look at a few examples to better understand how For Next loop works.
Example 1 – Adding the first 10 positive integers
Below is the code that will add the first 10 positive integers using a For Next loop.
It will then display a message box showing the sum of these numbers.
Sub AddNumbers()
Dim Total As Integer
Dim Count As Integer
Total = 0
For Count = 1 To 10
Total = Total + Count
Next Count
MsgBox Total
End Sub
In this code, the value of Total is set to 0 before getting into the For Next loop.
Once it gets into the loop, it holds the total value after every loop. So after the first loop, when Counter is 1, ‘Total’ value becomes 1, and after the second loop it becomes 3 (1+2), and so on.
And finally, when the loop ends, ‘Total’ variable has the sum of the first 10 positive integers.
A MsgBox then simply displays the result in a message box.
Example 2 – Adding the first 5 Even Positive Integers
To sum the first five even positive integers (i.e, 2,4,6,8, and 10), you need a similar code with a condition to only consider the even numbers and ignore the odd numbers.
Here is a code that will do it:
Sub AddEvenNumbers()
Dim Total As Integer
Dim Count As Integer
Total = 0
For Count = 2 To 10 Step 2
Total = Total + Count
Next Count
MsgBox Total
End Sub
Note that we started the Count value from 2 and also used ‘Step 2‘.
When you use ‘Step 2’, it tells the code to increment the ‘Count’ value by 2 every time the loop is run.
So the Count value starts from 2 and then becomes 4, 6, 8 and 10 as the looping occurs.
NOTE: Another way of doing this could be to run the loop from 1 to 10 and within the loop check whether the number is even or odd. However, using Step, in this case, is a more efficient way as it does not require the loop to run 10 times, but only 5 times.
The Step value can also be negative. In such as case, the Counter starts at a higher value and keeps getting decremented by the specified Step value.
Example 3 – Entering Serial Number in the Selected Cells
You can also use the For Next loop to go through a collection of objects (such as cells or worksheets or workbooks),
Here is an example that quickly enters serial numbers in all the selected cells.
Sub EnterSerialNumber()
Dim Rng As Range
Dim Counter As Integer
Dim RowCount As Integer
Set Rng = Selection
RowCount = Rng.Rows.Count
For Counter = 1 To RowCount
ActiveCell.Offset(Counter - 1, 0).Value = Counter
Next Counter
End Sub
The above code first counts the number of selected rows and then assigns this value to the variable RowCount. We then run the loop from ‘1 to RowCount’.
Also note that since selection can be any number of rows, we have Set the variable Rng to Selection (with the line ‘Set Rng = Selection’). Now we can use the ‘Rng’ variable to refer to the selection in our code.
Example 4 – Protect All Worksheets in the Active Workbook
You can use the ‘For Next’ loop to go through all the worksheets in the active workbook, and protect (or unprotect) each of the worksheets.
Below is the code that will do this:
Sub ProtectWorksheets()
Dim i As Integer
For i = 1 To ActiveWorkbook.Worksheets.Count
Worksheets(i).Protect
Next i
End Sub
The above code counts the number of sheets by using ActiveWorkbook.Worksheets.Count. This tells VBA how many times the loop needs to be run.
In each instance, it refers to the Ith workbook (using Worksheets(i)) and protects it.
You can use this same code to Unprotect worksheets too. Just change the line Worksheets(i).Protect to Worksheets(i).UnProtect.
Nested ‘For Next’ Loops
You can use nested ‘For Next’ loops to get more complex automation done in Excel. A nested ‘For Next’ loop would mean that there is a ‘For Next’ loop within a ‘For Next’ loop.
Let me show you how to use this using an example.
Suppose I have 5 workbooks open in my system and I want to protect all the worksheets in all these workbooks.
Below is the code that will do this:
Sub ProtectWorksheets()
Dim i As Integer
Dim j As Integer
For i = 1 To Workbooks.Count
For j = 1 To Workbooks(i).Worksheets.Count
Workbooks(i).Worksheets(j).Protect
Next j
Next i
End Sub
The above is a nested For Next loop as we have used one For Next loop within another.
‘EXIT For’ Statements in For Next Loops
‘Exit For’ statement allows you to exit the ‘For Next’ loop completely.
You can use it in cases where you want the For Next loop to end when a certain condition is met.
Let’s take an example where you have a set of numbers in Column A and you want to highlight all the negative numbers in red font. In this case, we need to analyze each cell for its value and then change the font color accordingly.
But to make the code more efficient, we can first check if there are any negative values in the list or not. If there are no negative values, we can use the Exit For the statement to simply come out of the code.
Below is the code that does this:
Sub HghlightNegative()
Dim Rng As Range
Set Rng = Range("A1", Range("A1").End(xlDown))
Counter = Rng.Count
For i = 1 To Counter
If WorksheetFunction.Min(Rng) >= 0 Then Exit For
If Rng(i).Value < 0 Then Rng(i).Font.Color = vbRed
Next i
End Sub
When you use the ‘Exit For’ statement within a nested ‘For Next’ loop, it will come out of the loop in which it is executed and go on to execute the next line in the code after the For Next loop.
For example, in the below code, the ‘Exit For’ statement will get you out of the inner loop, but the outer loop would continue to work.
Sub SampleCode()
For i = 1 To 10
For j = 1 to 10
Exit For
Next J
Next i
End Sub
Do While Loop
A ‘Do While’ loop allows you to check for a condition and run the loop while that condition is met (or is TRUE).
There are two types of syntax in the Do While Loop.
Do [While condition]
[Code block to Execute]
Loop
and
Do
[Code block to Execute]
Loop [While condition]
The difference between these two is that in the first, the While condition is checked first before any code block is executed, and in the second case, the code block is executed first and then the While condition is checked.
This means that if the While condition is False is both the cases, the code will still run at least once in the second case (as the ‘While’ condition is checked after the code has been executed once).
Now let’s see some examples of using Do While loops in VBA.
Example 1 – Add First 10 Positive Integers using VBA
Suppose you want to add the first ten positive integers using the Do While loop in VBA.
To do this, you can use the Do While loop until the next number is less than or equal to 10. As soon as the number is greater than 1o, your loop would stop.
Here is the VBA code that will run this Do While loop and the show the result in a message box.
Sub AddFirst10PositiveIntegers()
Dim i As Integer
i = 1
Do While i <= 10
Result = Result + i
i = i + 1
Loop
MsgBox Result
End Sub
The above loop continues to work until the value of ‘i’ becomes 11. As soon as it becomes 11, the loop ends (as the While condition becomes False).
Within the loop, we have used a Result variable that holds the final value Once the loop is completed, a message box shows the value of the ‘Result’ variable.
Example 2 – Enter Dates For the Current Month
Let’s say you want to enter all the dates of the current month into a worksheet column.
You can do that by using the following Do While loop code:
Sub EnterCurrentMonthDates()
Dim CMDate As Date
Dim i As Integer
i = 0
CMDate = DateSerial(Year(Date), Month(Date), 1)
Do While Month(CMDate) = Month(Date)
Range("A1").Offset(i, 0) = CMDate
i = i + 1
CMDate = CMDate + 1
Loop
End Sub
The above code would enter all the dates in the first column of the worksheet (starting from A1). The loops continue till the Month value of the variable ‘CMDate’ matches that of the current month.
Exit Do Statement
You can use the Exit Do statement to come out of the loop. As soon as the code executes the ‘Exit Do’ line, it comes out of the Do While loop and passes the control to the next line right after the loop.
For example, if you want to enter the first 10 dates only, then you can exit the loop as soon as the first 10 dates are entered.
The below code will do this:
Sub EnterCurrentMonthDates()
Dim CMDate As Date
Dim i As Integer
i = 0
CMDate = DateSerial(Year(Date), Month(Date), 1)
Do While Month(CMDate) = Month(Date)
Range("A1").Offset(i, 0) = CMDate
i = i + 1
If i >= 10 Then Exit Do
CMDate = CMDate + 1
Loop
End Sub
In the above code, the IF statement is used to check if the value of i is greater than 10 or not. As soon as the value of ‘i’ becomes 10, Exit Do statement is executed and the loop ends.
Do Until Loop
‘Do Until’ loops are very much like the ‘Do While’ loops.
In ‘Do While’, the loop runs till the given condition is met, while in ‘Do Until’, it loops until the specified condition is met.
There are two types of syntax in the Do Until Loop.
Do [Until condition]
[Code block to Execute]
Loop
and
Do
[Code block to Execute]
Loop [Until condition]
The difference between these two is that in the first, the Until condition is checked first before any code block is executed, and in the second case, the code block is executed first and then the Until condition is checked.
This means that if the Until condition is TRUE is both cases, the code will still run at least once in the second case (as the ‘Until’ condition is checked after the code has been executed once).
Now let’s see some examples of using Do Until loops in VBA.
Note: All the examples for Do Until are the same as that of Do While. These have been modified to show you how the Do Until loop works.
Example 1 – Add First 10 Positive Integers using VBA
Suppose you want to add the first ten positive integers using the Do Until loop in VBA.
To do this, you need to run the loop until the next number is less than or equal to 10. As soon as the number is greater than 1o, your loop would stop.
Here is the VBA code that will run this loop and show the result in a message box.
Sub AddFirst10PositiveIntegers()
Dim i As Integer
i = 1
Do Until i > 10
Result = Result + i
i = i + 1
Loop
MsgBox Result
End Sub
The above loop continues to work until the value of ‘i’ becomes 11. As soon as it becomes 11, the loop ends (as the ‘Until’ condition becomes True).
Example 2 – Enter Dates For the Current Month
Let’s say you want to enter all the dates of the current month into a worksheet column.
You can do that by using the following Do Until loop code:
Sub EnterCurrentMonthDates()
Dim CMDate As Date
Dim i As Integer
i = 0
CMDate = DateSerial(Year(Date), Month(Date), 1)
Do Until Month(CMDate) <> Month(Date)
Range("A1").Offset(i, 0) = CMDate
i = i + 1
CMDate = CMDate + 1
Loop
End Sub
The above code would enter all the dates in the first column of the worksheet (starting from A1). The loop continues until the Month of variable CMDate is not equal to that of the current month.
Exit Do Statement
You can use the ‘Exit Do’ statement to come out of the loop.
As soon as the code executes the ‘Exit Do’ line, it comes out of the Do Until loop and passes the control to the next line right after the loop.
For example, if you want to enter the first 10 dates only, then you can exit the loop as soon as the first 10 dates are entered.
The below code will do this:
Sub EnterCurrentMonthDates()
Dim CMDate As Date
Dim i As Integer
i = 0
CMDate = DateSerial(Year(Date), Month(Date), 1)
Do Until Month(CMDate) <> Month(Date)
Range("A1").Offset(i, 0) = CMDate
i = i + 1
If i >= 10 Then Exit Do
CMDate = CMDate + 1
Loop
End Sub
In the above code, as soon as the value of ‘i’ becomes 10, Exit Do statment is executed and the loop ends.
For Each
In VBA, you can loop through a set of collections using the ‘For Each’ loop.
Here are some examples of collections in Excel VBA:
- A collection of all the open Workbooks.
- A collection of all worksheets in a workbook.
- A collection of all the cells in a range of selected cells.
- A collection of all the charts or shapes in the workbook.
Using the ‘For Each’ loop, you can go through each of the objects in a collection and perform some action on it.
For example, you can go through all the worksheets in a workbook and protect these, or you can go through all the cells in the selection and change the formatting.
With the ‘For Each’ loop (also referred to as the ‘For Each-Next’ loop), you don’t need to know how many objects are there in a collection.
‘For Each’ loop would automatically go through each object and perform the specified action. For example, if you want to protect all the worksheets in a workbook, the code would be the same whether you have a workbook with 3 worksheets or 30 worksheets.
Here is the syntax of For Each-Next loop in Excel VBA.
For Each element In collection
[Code Block to Execute]
Next [element]
Now let’s see a couple of examples of using the For Each Loop in Excel.
Example 1 – Go through All the Worksheets in a Workbook (and Protect it)
Suppose you have a workbook where you want to protect all the worksheets.
Below For Each-Next loop can do this easily:
Sub ProtectSheets()
Dim ws As Worksheet
For Each ws In ActiveWorkbook.Worksheets
ws.Protect
Next ws
End Sub
In the above code, we have defined ‘ws’ variable as a Worksheet object. This tells VBA that ‘ws’ should be interpreted as a worksheet object in the code.
Now we use the ‘For Each’ statement to go through each ‘ws’ (which is a worksheet object) in the collection of all the worksheets in the active workbook (given by ActiveWorkbook.Worksheets).
Note that unlike other loops where we have tried to protect all the worksheets in a workbook, here we don’t need to worry about how many worksheets are there in the workbook.
We don’t need to count these to run the loop. For Each loop ensures that all the objects are analyzed one by one.
Example 2 – Go through All the Open Workbooks (and Save All)
If you work with multiple workbooks at the same time, it can come in handy to be able to save all these workbooks at once.
Below VBA code can do this for us:
Sub SaveAllWorkbooks()
Dim wb As Workbook
For Each wb In Workbooks
wb.Save
Next wb
End Sub
Note that in this code, you don’t get a prompt that asks you to save the workbook in a specific location (if saving it for the first time).
It saves it in the default folder (it was the ‘Documents’ folder in my case). This code works best when these files are already saved and you’re making changes and you want to save all the workbooks quickly.
Example 3 – Go through All the Cells in a Selection (Highlight negative values)
Using the ‘For Each’ loop, you can loop through all the cells in a specific range or in the selected range.
This can be helpful when you want to analyze each cell and perform an action based on it.
For example, below is the code that will go through all the cells in the selection and change the cell color of the cells with negative values to red.
Sub HighlightNegativeCells()
Dim Cll As Range
For Each Cll In Selection
If Cll.Value < 0 Then
Cll.Interior.Color = vbRed
End If
Next Cll
End Sub
(Note I’ve used Cll as a short variable name for Cell. It’s advisable not to use object names such as Sheets or Range as variable names)
In the above code, the For Each-Next loop goes through the collection of cells in the selection. IF statement is used to identify if the cell value is negative or not. In case it is, the cell is given a red interior color, else it goes to the next cell.
In case you don’t have a selection, and instead want VBA to select all the filled cells in a column, starting from a specific cell (just like we use Control + Shift + Down arrow key to select all filled cells), you can use the below code:
Sub HighlightNegativeCells()
Dim Cll As Range
Dim Rng As Range
Set Rng = Range("A1", Range("A1").End(xlDown))
For Each Cll In Rng
If Cll.Value < 0 Then
Cll.Interior.Color = vbRed
End If
Next Cll
End Sub
In the above example, it doesn’t matter how many filled cells are there. It will start from cell A1 and analyze all the contiguous filled cells in the column.
You also don’t need to have cell A1 selected. You can have any far-off cell selected and when the code runs, it will still consider all the cells in column A (starting from A1) and color the negative cells.
‘Exit For’ Statment
You can use the ‘Exit For’ statement in the For Each-Next loop to come out of the loop. This is usually done in case a specific condition is met.
For example, in Example 3, as we are going through a set of cells, it can be more efficient to check if there are any negative values or not. In case there are no negative values, we can simply exit the loop and save some VBA processing time.
Below is the VBA code that will do this:
Sub HighlightNegativeCells()
Dim Cll As Range
For Each Cll In Selection
If WorksheetFunction.Min(Selection) >= 0 Then Exit For
If Cll.Value < 0 Then
Cll.Interior.Color = vbRed
End If
Next Cll
End Sub
Where to Put the VBA Code
Wondering where the VBA code goes in your Excel workbook?
Excel has a VBA backend called the VBA editor. You need to copy and paste the code in the VB Editor module code window.
Here are the steps to do this:
- Go to the Developer tab.

- Click on the Visual Basic option. This will open the VB editor in the backend.
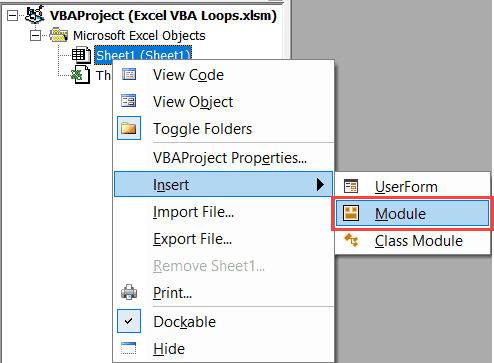
- In the Project Explorer pane in the VB Editor, right-click on any object for the workbook in which you want to insert the code. If you don’t see the Project Explorer go to the View tab and click on Project Explorer.
- Go to Insert and click on Module. This will insert a module object for your workbook.

- Copy and paste the code in the module window.


You May Also Like the Following Excel Tutorials:
- How to record a macro in Excel.
- Creating User-defined functions in Excel.
- Excel VBA Msgbox
- How to Run a Macro in Excel.
- How to Create and Use Add-ins in Excel.
- Excel VBA Events – An Easy (and Complete) Guide.
- How to Sort Data in Excel using VBA (A Step-by-Step Guide).
- 24 Useful Excel Macro Examples for VBA Beginners (Ready-to-use).
- How to Use Excel VBA InStr Function (with practical EXAMPLES).
- Excel Personal Macro Workbook | Save & Use Macros in All Workbooks.
- Using Select Case in Excel VBA.
Loops are used in VBA for repeating a set of statements multiple times. Loops form an essential part of any programming language, and VBA is no exception. There are five different types of loops that can be used in VBA. These are as follows:
- For Loop
- For Each Loop
- Do While Loop
- Do Until Loop
- Wend Loop (obsolete)
In this post, I will explain all these VBA Loops with examples. But before jumping into the topic, let’s understand what a loop is and why it is used.
What is a loop, and what are its uses?
Loop is an instruction that can continually repeat a set of statements until a particular condition is reached.
Loops can serve the following purposes:
- It helps in iterating a set of statements.
- It helps in checking a particular condition multiple times.
- It can also help in developing custom sleep and wait logic in code.

VBA FOR LOOP
For loop is one of the most important and frequently used loop in VBA. For Loop is sometimes also called ‘For Next Loop’.
For Loops allow you to iterate a set of statements for a specified number of times.
Syntax of VBA For Loop
The basic syntax of a VBA For loop or structure of For Loop is as follows:
For loop_ctr = start_num To end_num [step_increment]
'Statements to be executed inside the loop
Next loop_ctr
Here, ‘loop_ctr’ stands for the loop counter. It is the backbone of the ‘For Next Loop,’ and hence it is also called ‘loop timekeeper’. This variable gets incremented after each iteration until the loop ends.
‘start_num’ is the number from which the loop should begin.
‘end_num’ is the number till which the loop should continue.
‘step_increment’ is an optional parameter. It denotes by how much value the ‘loop_ctr’ should be incremented after each iteration. By default, the value of ‘step_increment’ is 1. This means that with each iteration, the ‘loop_ctr’ value is incremented by 1.
How does a VBA For Loop Work?
Let’s say we have a simple For Loop in VBA as shown below:
For loop_ctr = 1 To 100
'Statements to be executed inside the loop
Next loop_ctr
- When the program control reaches the statement ‘For loop_ctr = 1 To 100’, it reserves a space for the variable ‘loop_ctr’ in the memory and initializes it to 1.
- After this, it executes the statements inside the For Loop sequentially.
- Finally, the program control reaches the statement ‘Next loop_ctr’, here it increments the variable ‘loop_ctr’ by 1. And the control again goes to the statement ‘For loop_ctr = 1 To 100’, where it checks if the value of ‘loop_ctr’ has reached 100 or not. If the value is less than 100, then it continues the next iteration; otherwise, the loop stops.
Still not clear with the working of a For Loop? No Worries. Let’s try to understand this with the help of a flow diagram.
VBA For Next Loop Flow Diagram

Let’s try to understand the control flow as depicted in the above flow chart:
- First of all, the FOR statement is executed. This step allows the ‘loop_ctr’ and ‘step_increment’ values to be initialized.
- After this, the condition is evaluated. If the condition is TRUE, all the statements inside the loop ‘Code Block’ are executed. However, If the condition evaluates to FALSE, then the control flow jumps to the next statement outside the For loop.
- When the ‘code block’ inside the For Loop executes, the loop starts to get ready for the next iteration and increments the ‘loop_ctr’ value.
- Finally, the condition is again evaluated with the incremented ‘loop_ctr,’ and the process repeats itself.
Few Simple Examples of For Loop In VBA
Let’s see some simple examples of For Loop in VBA.
Example 1: Use VBA For Loop to print numbers from 1 to 10 in excel.
In this example, we have a range «A1:A10”, and we have to fill this range with numbers from 1-10.
To accomplish this, we can use the below code:
Sub ForLoopPrintNumbers()
Dim loop_ctr As Integer
For loop_ctr = 1 To 10
ActiveSheet.Range("A1").Offset(loop_ctr - 1, 0).Value = loop_ctr
Next loop_ctr
MsgBox "For Loop Completed!"
End Sub
Explanation:
In the above code, first of all, we have declared the loop counter ‘loop_ctr’ for our For loop. Next, along with the For statement, we have initialized the ‘loop_ctr’ to 1 and set the ‘end_num’ as 10.
Inside the For Loop body, we have written the code to write the loop_ctr value on the excel sheet in the A column. After this, there is a statement that increments the ‘loop_ctr’ for the next iteration.
Note that since we have not specified an explicit ‘step_increment’ value, so every iteration, the ‘loop_ctr’ will be incremented by 1. The For loop in the above code iterates 10 times and populates the cells in the range A1:A10 with numbers from 1-10 serially.
Example 2: Use For Loop in VBA to find the sum of all the numbers between 1 to 10.
In this example, we will loop through all the numbers between 1 to 10 and sum them. Finally, we will be displaying the sum of the numbers from 1 to 10 on the screen.
To do this we can use the following code:
Sub ForLoopSumNumbers()
Dim loop_ctr As Integer
Dim result As Integer
result = 0
For loop_ctr = 1 To 10
result = result + loop_ctr
Next loop_ctr
MsgBox "Sum of numbers from 1-10 is : " & result
End Sub
Explanation:
In the above code, first of all, we have declared the loop counter ‘loop_ctr’ for our For loop. Next, we have declared another integer variable as ‘result’ for storing the sum of numbers from 1 to 10.
After this, along with the For statement, we have initialized the ‘loop_ctr’ to 1 and set the ‘end_num’ as 10.
Inside the For Loop body, we have added the value of ‘loop_ctr’ along with the result. This means that in the first iteration, the result will be: 1, and in the second iteration, it will be : (1+2) = 3. Similarly, in the third iteration, the value will be: (3 + 3) = 6 and so on.
After the For loop body, there is a statement that increments the ‘loop_ctr’ for the next iteration.
Note that since we have not specified an explicit ‘step_increment’ value, hence with every iteration, the ‘loop_ctr’ will be incremented by 1.
The For loop in the above code iterates 10 times and sums all the numbers from 1 to 10, and finally displays the sum of these numbers in msgbox.
Example 3: Use VBA For Loop to print numbers, all even numbers from 1 to 10.
In this example, we will fill all the even numbers between 1 and 10 into cells A1 to A5.
To do this, we can use the below code:
Sub ForLoopToPrintEvenNumbers()
Dim loop_ctr As Integer
Dim cell As Integer
cell = 1For loop_ctr = 1 To 10
If loop_ctr Mod 2 = 0 Then
ActiveSheet.Range("A1").Offset(cell - 1, 0).Value = loop_ctr
cell = cell + 1
End If
Next loop_ctrMsgBox "For Loop Completed!"
End Sub
Explanation:
In the above code, first of all, we have declared the loop counter ‘loop_ctr’ for our For loop. After that, we have declared another variable ‘cell’. This variable is initialized with a value of 1.
Next, along with the For statement, we have initialized the ‘loop_ctr’ to 1 and set the ‘end_num’ as 10.
Inside the For Loop body, we have used an IF statement to check if the ‘loop_ctr’ value is even or not.
If the ‘loop_ctr’ value is Even then, we have written a statement to print the value out to the spreadsheet in the A column.
After this, we are incrementing the cell variable by 1. We have used the cell variable in our loop to print the values in the appropriate cell in the A column.
Next, there is a statement that increments the ‘loop_ctr’ for the next iteration.
Note that since we have not specified an explicit ‘step_increment’ value, after every iteration, the ‘loop_ctr’ will be incremented by 1.
The For loop in the above code iterates 10 times and populates the cells in the range A1:A5 with even numbers from 2-10.
Alternate Logic
There is another better way to accomplish the same, let’s see how.
Sub ForLoopToPrintEvenNumbers()
Dim loop_ctr As Integer
Dim cell As Integer
cell = 1For loop_ctr = 2 To 10 Step 2
ActiveSheet.Range("A1").Offset(cell - 1, 0).Value = loop_ctr
cell = cell + 1
Next loop_ctrMsgBox "For Loop Completed!"
End Sub
Explanation:
In the above code, we have looped through all the numbers between 2 to 10. Instead of the default ‘step_increment’ of 1, we are using an explicit ‘step_increment’ of 2.
In the first iteration of the for loop, the ‘loop_ctr’ value is 2, which is what gets printed in cell A1. In the second iteration, the ‘loop_ctr’ value becomes 4 (earlier value : 2 + step_increment : 2) and this number gets printed on cell A2.
Similarly, in the third iteration, the ‘loop_ctr’ value is 6 (earlier value: 4 + step_increment: 2) and it gets printed on the cell A3 and so on.
Writing a Nested For Loop
There are times when you might need to use a for loop within another for loop; this is called nesting of for loops.
VBA For loops can be nested within one another to perform complex tasks in excel. Let’s understand a nested loop with an example:
Example 4: Print numbers from 1 to 10 in all the worksheets in an excel spreadsheet using a For Loop.
In this example, we need to print numbers from 1 to 10 in all the worksheets in an excel workbook.
To do this, we can make use of the following code:
Sub ForLoopPrintNumbers()
Dim loop_ctr As Integer
Dim sheet As IntegerFor sheet = 1 To Worksheets.Count
For loop_ctr = 1 To 10
Worksheets(sheet).Range("A1").Offset(loop_ctr - 1, 0).Value = loop_ctr
Next loop_ctr
Next sheetMsgBox "For Loop Completed!"
End Sub
Explanation:
In this example, there are two For Loops, one inside another. The Outer For Loop iterates over the variable ‘sheet’, and the Inner For Loop iterates over ‘loop_ctr’ that determines the cell position.
Inside the body of the Inner For loop, we have a statement that prints the numbers between 1 to 10 in each worksheet (as per the outer loop).
The outer loop iterates over all the available sheets in the spreadsheet, whereas the inner loop iterates over the A1 to A10 for the current sheet. This makes it possible to print numbers from 1 – 10 in all the available worksheets.
Reverse For Loop in VBA
In all our previous examples, we have only seen those For loops in which the loop counter variable gets incremented from a lower value to a higher value (with each iteration).
But this is not necessary, you can also have a For Loop where the loop counter moves from a higher value to a lower value (with each iteration).
Example 5: Use a Reverse For Loop to print numbers from 1 to 10 in descending order.
Sub ReverseForLoop()
Dim loop_ctr As Integer
Dim cell As Integer
cell = 1For loop_ctr = 10 To 1 Step -1
ActiveSheet.Range("A1").Offset(cell - 1, 0).Value = loop_ctr
cell = cell + 1
Next loop_ctrMsgBox "For Loop Completed!"
End Sub
Explanation:
In this example, the loop starts with the value of ‘loop_ctr’ as 10. And then, with each iteration, the value of the loop counter is decremented by 1 (since the ‘step_increment’ is -1).
Inside the For Loop body, we print the value of the loop counter variable in the active sheet from A1:A10.
Infinite Loop Using a For Loop
An infinite loop is also sometimes called an Endless Loop. An Infinite Loop is a loop whose ending condition (often due to a logic error by the programmer) never becomes true. The loop iterates an infinite number of times or until halted by programmer/user action.
Although in the case of FOR loop, generally due to the clear start and end conditions, it is not easy to make an endless loop by logical mistake. However, there can be cases where you can by mistake reset the loop counter variable inside the loop, thereby making the loop infinite.
Below is an example of an endless for loop:
'Do not run this code
Sub InfiniteForLoop()
Dim loop_ctr As Integer
Dim cell As IntegerFor loop_ctr = 1 To 10
ActiveSheet.Range("A1").Offset(loop_ctr - 1, 0).Value = loop_ctr
loop_ctr = loop_ctr - 1
Next loop_ctrMsgBox "For Loop Completed!"
End Sub
The statement ‘loop_ctr = loop_ctr – 1’ makes the above VBA loop infinite since it resets the value of the loop_ctr with every iteration, and hence the end condition is never reached.
Tip: It is always good to not make any changes to the loop counter variable value inside the loop body.
How to Break Out or Exit of a For Loop
I believe many of you will wonder, «Why do we need to break a loop during execution»? The answer is simple: Breaking or exiting a loop can sometimes optimize the code and reduce the resource overhead.
To break a For Loop we can use the ‘Exit For’ statement.
Let’s try to see this in action with an example:
Example 6: Use a FOR loop in VBA to find the sum of the first 20 odd numbers between 1 to 100.
In this example, we have to find the first 20 odd numbers from 1 to 100 and then calculate their sum. Below is the code to do this:
Sub SumFirst20OddNumbers()
Dim loop_ctr As Integer
Dim odd_number_counter As Integer
Dim sum As IntegerFor loop_ctr = 1 To 100
If (loop_ctr Mod 2 <> 0) Then
sum = sum + loop_ctr
odd_number_counter = odd_number_counter + 1
End IfIf (odd_number_counter = 20) Then
Exit For
End If
Next loop_ctrMsgBox "Sum of top 20 odd numbers is : " & sum
End Sub
Explanation:
In this example, we have three variables – ‘loop_ctr’, ‘odd_number_counter’, and ‘sum’. The variable ‘loop_ctr’ is used as a loop counter, the ‘odd_number_counter’ variable holds the count of odd numbers that have been summed (because we only need to sum the first 20 odd numbers), and the ‘sum’ variable holds the sum of the first 20 odd numbers.
Inside the loop, we iterate all the numbers from 1 to 100, one by one (step_increment is 1 as default), and check if the number is odd. If the number is odd, we sum it and increment the ‘odd_number_counter’ by 1.
After the first IF block, another IF condition checks if the ‘odd_number_counter’ variable value is 20. If the value of ‘odd_number_counter’ is 20, then using the ‘Exit For’ statement, we are exiting out of the loop as there is no point in continuing the loop further.
Few Practical Examples of VBA For Loop
Now let’s have a look at some of the practical examples where For Loop can be used:
Example 7: Highlight alternate rows on a spreadsheet using the VBA For Loop.
In this example, we need to highlight alternate rows in a spreadsheet. To do this we can use the below code:
Sub HighlightAlternateRows()
Dim loop_ctr As Integer
Dim Max As Integer
Dim clm As Integer
Max = ActiveSheet.UsedRange.Rows.Count
clm = ActiveSheet.UsedRange.Columns.CountFor loop_ctr = 1 To Max
If loop_ctr Mod 2 = 0 Then
ActiveSheet.Range(Cells(loop_ctr, 1), Cells(loop_ctr, clm)).Interior.ColorIndex = 28
End If
Next loop_ctrMsgBox "For Loop Completed!"
End Sub
Explanation:
In the above code, we have started the loop from 1 to the number of rows in our sheet. We are then using the if statement to find the even-numbered rows for highlighting them.
Example 8: Use VBA For Loop Protect all sheets in Workbook.
In this example, we will try to create a VBA macro that loops through all the worksheets in the active workbook and protects all the worksheets.
Below is the code to do this:
Sub ProtectWorksheets()
Dim loop_ctr As Integer
For loop_ctr = 1 To ActiveWorkbook.Worksheets.Count
Worksheets(loop_ctr).Protect
Next loop_ctr
End Sub
Explanation:
In the above code, we are using a VBA for loop and iterating over all the worksheets in the open workbook. Inside the For Loop, we are trying to protect the current instance of the worksheet.
The above code can also be used to unprotect the sheets as well. Just replace the ‘Worksheets(loop_ctr).Protect’ with ‘Worksheets(loop_ctr).UnProtect’.
Example 9: Loop Over an Array of Numbers and Find the Largest and Smallest Numbers from the Array.
In this example, we have an array of numbers, and using a FOR Loop we have to iterate the array and find the smallest and the Largest numbers from the array. Below is the code to do this:
Sub ForLoopWithArrays()
Dim arr() As Variant
arr = Array(10, 12, 8, 19, 21, 5, 16)Dim min_number As Integer
Dim max_number As Integermin_number = arr(0)
max_number = arr(0)Dim loop_ctr As Integer
For loop_ctr = LBound(arr) To UBound(arr)
If arr(loop_ctr) > max_number Then
max_number = arr(loop_ctr)
End IfIf arr(loop_ctr) < min_number Then
min_number = arr(loop_ctr)
End IfNext loop_ctr
MsgBox "Largest Number: " & max_number _
& " Smallest Number: " & min_number
End Sub
Explanation:
In the above code, we have an array of numbers declared as ‘arr’ variable. In addition to that, we have two variables, ‘min_number’ and ‘max_number’, that are used for holding the minimum and maximum numbers from the array.
We initialize both the ‘min_number’ and ‘max_number’ variables to the array’s first element. Next, inside the For loop, we loop through all the array elements and check –
If the current number is greater than the ‘max_number’, then set the ‘max_number’ value equal to the current number. The next condition that we check is – If the current number is less than the ‘min_number’, then set the ‘min_number’ value equal to the current number.
Finally, we are showing the largest and the smallest numbers inside the array with the help of a msgbox.
VBA For Each Loop
For each is a more sophisticated type of For Loop. It can be used for iterating a collection of objects.
Here you don’t have to worry about the loop counter, your job is to simply pass a collection of objects, and the loop itself identifies the objects and iterates them.
Syntax of a VBA For Each Loop
The syntax of For Each Loop resembles closely to For Loop. Below is the syntax:
For Each item In collection_of_items
'Statements to be executed inside the loop
Next item
Here, ‘collection_of_items’ refers to a group of objects that you need to iterate. If you supply a single object to this parameter, it throws a «run-time error 438».
‘item’ specifies the objects inside the ‘collection_of_items’. At any particular instant inside the loop, ‘item’ contains a single object from the ‘collection_of_items’.
How a For Each Loop Works
Let’s say we have a For Each Loop as:
For Each cl In ActiveSheet.Range("A1:A10")
'Statements to be executed inside the loop
Next cl
- When the program control reaches the statement ‘For Each cl In ActiveSheet.Range(«A1:A10»)’ it evaluates the object collection and then initializes the variable ‘cl’ with the first object in the collection, i.e., cell $A$1.
- After this, it executes the statements inside the loop.
- Next, it fetches the second object from the collection and dumps it in the variable ‘cl’. And the process continues till it has fetched all objects from the collection.
Flow Diagram of a For Each Loop In VBA

Let’s try to understand the control flow as depicted in the above flow chart:
- First of all, the FOR EACH statement is executed and checks if there are any elements in the collection.
- If there are any elements present in the collection, the ‘item’ variable is initialized to the first element of the collection, and the statements inside the loop ‘Code Block’ is executed. However, If the condition evaluates to FALSE, then the control flow jumps to the next statement outside the For Each loop.
- When the ‘code block’ inside the For Each Loop executes, the loop starts to get ready for the next iteration. The ‘item’ variable is re-initialized to the next element in the collection, and the loop continues.
Few Simple Examples of VBA For Each Loop
Now let’s move to some simple examples of For Each loop.
Example 1 – Use VBA For Each Loop to display the names of all the Active Worksheets.
In this example, we will use a For Each loop to iterate through all the worksheets in the ActiveWorkbook and display the names of all the sheets using a msg box.
Sub ForEachDisplaySheetNames()
Dim sheetNames As String
For Each sht In ActiveWorkbook.Sheets
sheetNames = sheetNames & vbNewLine & sht.Name
Next shtMsgBox "The Sheet names are : " & vbNewLine & sheetNames
End Sub
Explanation:
In this example, the For Each loop takes the collection of sheets from ‘ActiveWorkbook.Sheets’ it then iterates the sheets one by one and initializes the ‘sht’ variable with the current sheet instance.
Inside the For Each block, the sheet name for each worksheet is appended to a string, and finally, outside the loop, all the sheet names are displayed using a message box.
Example 2: Use VBA For Each Loop to Sum all the Elements of an Array.
In this example, with the help of a VBA For Each loop, we will be iterating an array of numbers and find the sum of all of its elements. Below is the code to do this:
Sub ForEachSumArrayElements()
Dim arr As Variant
Dim sum As Integer
arr = Array(1, 10, 15, 17, 19, 21, 23, 27)For Each element In arr
sum = sum + element
Next elementMsgBox "The Sum is : " & sum
End Sub
Explanation:
In the above code, we have declared two variables, ‘arr’ and ‘sum’. The ‘arr’ variable is used for storing the array of numbers, and the ‘sum’ variable represents the sum of the array elements.
Inside the For Each loop, we are iterating the array elements one by one, summing them up, and storing the total in the ‘sum’ variable.
Finally, outside the For Each loop, we show the sum of the array elements using a message box.
Example 3: Use VBA For Each Loop to display the names of all the Open Workbooks.
In this example, using a For Each loop, we will loop through all the open workbooks and display their name using a message box.
Below is the code to do this:
Sub ForEachDisplayWorkbookNames()
Dim workBookNames As StringFor Each wrkbook In Workbooks
workBookNames = workBookNames & vbNewLine & wrkbook.Name
Next wrkbookMsgBox "The Workbook names are : " & vbNewLine & workBookNames
End Sub
Explanation:
In this example, the For Each loop takes the collection of workbooks, then iterates the workbooks one by one and initializes the ‘wrkbook’ variable with the current workbook instance.
Inside the For Each block, the workbook name for each workbook is appended to a string, and finally, outside the loop, all the workbook names are displayed using a message box.
Nested VBA For Each Loop
Two For Each loops can be nested within one another to perform complex tasks. Let’s understand For Each nested loop with an example:
Example 4: Display the names of all open workbooks along with their corresponding worksheets.
In this example, we will be iterating through all the open workbooks and then iterate through each workbook’s worksheets and finally display them using a message box.
Below is the code to do this:
Sub ForEachLoopNesting()
Dim result As String
For Each wrkbook In Workbooks
For Each sht In wrkbook.Sheets
result = result & vbNewLine & " Workbook : " & wrkbook.Name & " Worksheet : " & sht.Name
Next sht
Next wrkbookMsgBox result
End Sub
Explanation:
In the above code, we have used two For Each loops, one inside another. The outer For Each loop iterates through the workbooks, and the inner For Each loop iterates through the worksheets.
Inside the inner For Each block, a statement concatenates the names of the workbooks and the worksheets and stores them in a variable called ‘result’.
With each iteration, the ‘result’ variable’s new value is appended to the existing value. Finally, the value of the ‘result’ variable is displayed inside a msgbox.
How to Break Out or Exit of a For Each Loop
To break out of a For Each loop, we can use the ‘Exit For’ statement. So, ‘Exit For’ statement can break both a For loop as well as a For Each loop.
Let’s see this with an example:
Example 5: Use VBA For Each Loop to display the names of the first 3 sheets in the active workbook.
In this example, we will loop through the worksheets inside the active workbook and only display the first 3 worksheet names. Below is the code to do this:
Sub ForEachDisplayFirstThreeSheetNames()
Dim sheetNames As String
Dim sheetCounter As IntegerFor Each sht In ActiveWorkbook.Sheets
sheetNames = sheetNames & vbNewLine & sht.Name
sheetCounter = sheetCounter + 1If sheetCounter >= 3 Then
Exit For
End If
Next shtMsgBox "The Sheet names are : " & vbNewLine & sheetNames
End Sub
Explanation:
In the above code, we have a For Each loop that iterates over the worksheets inside the active workbook. Inside the loop, we are appending and storing the sheet names within the ‘sheetNames’ variable. Also, we have a ‘sheetCounter’ variable that gets incremented on each iteration.
After that, inside the loop, we also check if the value of the ‘sheetCounter’ variable has reached 3 (because we only want to display 3 sheet names).
If the ‘sheetCounter’ variable’s value has reached 3, we exit the loop using the ‘Exit For’ statement. Finally, we are displaying the value of the ‘sheetNames’ variable using a msgbox.
VBA Do While Loop
VBA Do While is another type of loop that repeatedly executes a set of statements while a condition continues to be True. The loop ends when the condition becomes false.
Syntax of Do While Loop In VBA
Do while loop has two syntaxes in VBA, these are as follows:
Syntax 1:
Do While condition
'Statements to be executed inside the loop
Loop
Or
Syntax 2:
Do
'Statements to be executed inside the loop
Loop While condition
In both the syntaxes, ‘condition’ is used as the loop backbone. On each iteration ‘While’ statement checks if the ‘condition’ evaluates to True or False. If the ‘condition’ is True, then the loop continues; otherwise, the loop terminates.
Before everything else, let’s try to understand the difference between these two syntaxes.
Difference Between the two Do While Syntaxes
As we can see in the first, do-while loop syntax, the ‘condition’ is checked as the first statement. This means if the condition is false, the do-while loop in syntax 1 will not perform any iterations.
Whereas in the second syntax, the ‘condition’ is checked as the last statement inside the loop. This means that even if the condition is false, the do-while loop in syntax 2 will perform at least 1 iteration. Only after that, the condition will be evaluated, and the next iteration will not happen.
So, syntax 2 guarantees to have at least 1 iteration irrespective of the condition being true or false.
Now, let’s try to understand how a do-while loop works.
How Does a Do While Loop Work
Syntax 1 –
Let’s say we have a Do While loop as follows:
Dim loop_ctr as Integer
loop_ctr = 1
Do While loop_ctr < 10
'Statements to be executed inside the loop
loop_ctr = loop_ctr + 1
Loop
- In the first two statements, the variable ‘loop_ctr’ is declared and initialized as 1.
- When the program control reaches the statement «Do While loop_ctr < 10», it checks if the value of the ‘loop_ctr’ is less than 10.
- If the ‘loop_ctr’ value is less than 10, the statements inside the body of the loop get executed sequentially, and finally, the ‘loop_ctr’ is incremented by 1.
- After this, the control again moves to the loop «Do While loop_ctr < 10», and the loop continues till the value of ‘loop_ctr’ becomes equal to 10.
- When the value of ‘loop_ctr’ becomes equal to 10, then the do while condition fails, and the control moves to the next statement after the do-while loop.
Syntax 2 –
Let’s say we have a Do While loop as follows:
Dim loop_ctr as Integer
loop_ctr = 1
Do
'Statements to be executed inside the loop</em>
loop_ctr = loop_ctr + 1
Loop While loop_ctr < 10
- In the first two statements, the variable ‘loop_ctr’ is declared and initialized as 1.
- When the program control reaches the «Do» statement, as there are no checks (like syntax 1), it just comes inside the loop and starts executing the statements inside the loop one by one and increments the ‘loop_ctr’ by 1.
- After executing the statements inside the loop body, it checks if the ‘loop_ctr’ is less than 10. If the ‘loop_ctr’ value is less than 10, another iteration starts.
- If the value of ‘loop_ctr’ becomes equal to 10, then the do while condition fails, and the control moves to the next statement after the do-while loop.
Note: In the second syntax, the Do-While Loop always iterates at-least-once since the condition to be checked is placed at the end of the loop.
Flow Diagram of a Do While Loop In VBA:

Let’s try to understand the control flow as depicted in the above flow chart:
Syntax 1 –
- In this Do-While syntax, the loop condition is checked along with the Do statement.
- If the condition is true, then the ‘code block’ inside the do-while loop is executed, and the next iteration begins. Each iteration before beginning checks the loop condition, and the ‘code block’ inside the do-while loop is only executed when the condition evaluates to true.
- When the loop condition becomes false, then no more loop iterations occur, and the control flow jumps to the next statement outside the Do While loop.
Syntax 2 –
- In this Do-While syntax, the loop condition is not checked along with the Do statement.
- Since for the first iteration, no condition is checked. Hence the code block inside the do-while body gets executed.
- After the first iteration, each subsequent iteration, before beginning, checks the loop condition, and the ‘code block’ inside the do-while loop is only executed when the condition evaluates to true.
- When the loop condition becomes false, then no more loop iterations occur, and the control flow jumps to the next statement outside the Do While loop.
Few Simple Examples of Do While Loop In VBA
Example 1: Use VBA Do While Loop to print numbers from 1 to 10 in excel.
In this example, we have a range «A1:A10,» and we have to fill this range with numbers from 1-10. To do this we can use the below code:
Sub DoWhileLoopPrintNumbers()
Dim loop_ctr As Integer
loop_ctr = 1Do While loop_ctr <= 10
ActiveSheet.Range("A1").Offset(loop_ctr - 1, 0).Value = loop_ctr
loop_ctr = loop_ctr + 1
LoopMsgBox ("Loop Ends")
End Sub
Explanation:
In the above code, we have declared and initialized the ‘loop_ctr’ variable for our Do While loop. Next, along with the Do while statement, we have a condition to run the loop till the ‘loop_ctr’ value is less than or equal to 10.
Inside the Do While Loop body, we have written the code to write the ‘loop_ctr’ value on the excel sheet in the A column.
After this, there is a statement that increments the ‘loop_ctr’ for the next iteration.
Example 2: Use Do While Loop in VBA to find the sum of all the numbers between 1 to 20.
In this example, we will loop through all the numbers between 1 to 20 and sum them. Finally, we will be displaying the sum of the numbers from 1 to 20 on the screen.
To do this we can use the following code:
Sub WhileLoopSumNumbers()
Dim loop_ctr As Integer
Dim result As Integer
loop_ctr = 1
result = 0Do While loop_ctr <= 20
result = result + loop_ctr
loop_ctr = loop_ctr + 1
LoopMsgBox "Sum of numbers from 1-20 is : " & result
End Sub
Explanation:
In the above code, we have declared the loop counter ‘loop_ctr’ for our Do While loop. Next, we have declared another integer variable as ‘result’ for storing the sum of numbers from 1 to 20.
After this, along with the Do while statement, we have a condition to run the loop till the ‘loop_ctr’ value is less than or equal to 20.
Inside the Do While Loop body, we have added the value of ‘loop_ctr’ along with the result. This means that in the first iteration, the result’s value will be: 1, and in the second iteration, it will be : (1+2) = 3. Similarly, in the third iteration, the value will be: (3 + 3) = 6 and so on.
After this, there is a statement that increments the ‘loop_ctr’ for the next iteration.
The Do While loop in the above code iterates 20 times, sums all the numbers from 1 to 20, and finally displays the sum of these numbers in msgbox.
Example 3: Show the unique behavior of Do While Loop (In Syntax 2) to execute at-least-once even if the condition to be checked is False.
Sub DoWhileLoopTest()
Dim loop_ctr As Integer
loop_ctr = 100Do
MsgBox "Loop Counter : " & loop_ctr
loop_ctr = loop_ctr + 1
Loop While loop_ctr <= 10End Sub
Explanation:
In the above example, we have initialized the ‘loop_ctr’ as 100 and inside the loop condition we are checking ‘loop_ctr < 10’. This means the loop is only designed to iterate when the value of ‘loop_ctr’ is less than 10. But you will notice that despite the condition this do-while loop executes once.
The reason for this is: because according to syntax 2 of the Do While loop, there is no way to check conditions at the beginning of the loop. You can only check conditions at the end of the loop.
Note: We can fix this issue by simply using the Do While loop in Syntax 1 as shown:
Sub DoWhileLoopTest()
Dim loop_ctr As Integer
loop_ctr = 100Do While loop_ctr <= 10
MsgBox "Loop Counter : " & loop_ctr
loop_ctr = loop_ctr + 1
LoopEnd Sub
Writing a Nested Do While Loop
Similar to other loops, nesting is very much possible in Do While Loops. Let’s understand nested Do While loops this with an example.
Example 4: Print numbers from 1 to 10 in all the worksheets in an excel spreadsheet using a Do While Loop.
In this example, we need to print numbers from 1 to 10 in all the worksheets in an excel workbook using a do-while loop. To do this, we can make use of the following code:
Sub NestedDoWhileLoop()
Dim loop_ctr As Integer
Dim sheet As Integer
sheet = 1Do While sheet <= Worksheets.Count
loop_ctr = 1
Do While loop_ctr <= 10
Worksheets(sheet).Range("A1").Offset(loop_ctr - 1, 0).Value = loop_ctr
loop_ctr = loop_ctr + 1
Loop
sheet = sheet + 1
LoopMsgBox "Nested While Loop Completed!"
End Sub
Explanation:
In this example, there are two Do While Loops, one inside another. The Outer Do While Loop iterates over the variable ‘sheet’ and iterates till the value of the ‘sheet’ variable is less than or equal to ‘Worksheets.Count’ (i.e., the total count of worksheets in a workbook).
Inner Do While Loop iterates over the variable ‘loop_ctr’ and iterates till the value of ‘loop_ctr’ is less than or equal to 10. This helps us to print the numbers in a sequence.
Inside the body of the Inner Do While loop, we have a statement that prints the numbers between 1 to 10 in each worksheet (as per the outer loop).
The outer loop iterates over all the available worksheets sheets in the spreadsheet, whereas the inner loop iterates over the numbers from 1 to 10 for the current sheet.
This makes it possible to print numbers from 1 – 10 in all the available worksheets.
Infinite Loop Using a Do While Loop
Unlike a For Loop, a Do While Loop does not have a clear ‘start’, ‘end’ or ‘step_increments’, so it is very easy to make logical errors resulting in an infinite or an endless loop. Below is an example of a Do While endless loop:
'Do not run this code
Sub InfiniteDoWhileLoop()
Dim loop_ctr As Integer
loop_ctr = 1Do While loop_ctr <= 10
ActiveSheet.Range("A1").Offset(loop_ctr - 1, 0).Value = loop_ctr
LoopMsgBox ("Loop Ends")
End Sub
In the above code, we have simply missed the line to increment the loop counter i.e. ‘loop_ctr = loop_ctr + 1’ and this has made the loop infinite because the value of ‘loop_ctr’ will always be 1 (since it is never incremented) and hence the loop condition ‘While loop_ctr <= 10’ will always evaluate to true.
Tip: It is always a good idea to use a For Each or For Next loop over a Do While or Do Until loop (whenever possible).
How to Break Out or Exit of a Do While Loop
To break out of a Do While loop, we can use the ‘Exit Do’ statement. As soon as the VBA engine executes the ‘Exit Do’ statement, it exits the loop and takes the control to the next statement after the Do while loop.
Let’s see this with an example:
Example 5: Use a Do While loop in VBA to find the sum of the first 15 odd numbers between 1 to 100.
In this example, we have to find the first 15 odd numbers from 1 to 100 and then calculate their sum. Below is the code to do this:
Sub SumFirst15OddNumbers()
Dim loop_ctr As Integer
Dim odd_number_counter As Integer
Dim sum As Integerloop_ctr = 1
Do While loop_ctr <= 100
If (loop_ctr Mod 2 <> 0) Then
sum = sum + loop_ctr
odd_number_counter = odd_number_counter + 1
End IfIf (odd_number_counter = 15) Then
Exit Do
End Ifloop_ctr = loop_ctr + 1
LoopMsgBox "Sum of top 15 odd numbers is : " & sum
End Sub
Explanation:
In this example, we have three variables – ‘loop_ctr’, ‘odd_number_counter’, and ‘sum’. ‘loop_ctr’ is the loop counter variable, ‘odd_number_counter’ variable holds the count of odd numbers that have been summed and the ‘sum’ variable holds the sum of the first 15 odd numbers.
Inside the Do While loop, we loop through all the numbers from 1 to 100, one by one, and check if the number is odd. If the number is odd, we sum it and increment the ‘odd_number_counter’ by 1.
After the first IF block, another IF condition checks if the ‘odd_number_counter’ variable value is 15. If the value of ‘odd_number_counter’ is 15, then using the ‘Exit Do’ statement, we are breaking the loop as there is no point in continuing the loop further.
Finally, we are displaying the value of the ‘sum’ variable using a msgbox.
VBA Do Until Loop
Do Until loop is very similar to Do While loop; the only difference between them is that –
- A ‘do-while’ loop iterates as long as a certain condition is true.
- On the other hand, a ‘do-until’ loop iterates until a condition is no longer true.
Let’s try to understand this difference in simple terms:
For Instance: If we want to write a Do Loop that iterates from 1 to 10, with while keyword, the condition would be ‘Do While loop_ctr <= 10’ and with until keyword, the same condition can be written as ‘Do Until loop_ctr > 10’.
Which means:
- Until – repeat Until the count is greater than ten
- While – repeat While the count is less than or equal to ten
With these examples, you can clearly see – using Until and While is just the opposite way of writing the same condition.
Now, let’s have a look at the syntax of Do Until Loop.
Syntax of Do Until Loop In VBA
Similar to Do While loop, Do Until also has two syntaxes:
Syntax 1 –
Do Until condition
'Statements to be executed inside the loop
Loop
Or
Syntax 2 –
Do
'Statements to be executed inside the loop
Loop Until condition
Here, ‘condition’ is used as the loop backbone, the same as in the case of Do While Loop. On each iteration, Until statement checks, if the ‘condition’ evaluates to True or False. If the ‘condition’ is False, then the loop continues. Otherwise, the loop ends.
Now, let’s try to understand the difference between these two syntaxes.
Difference Between the two Do Until Syntaxes
As we can see in the first do until loop syntax, the ‘condition’ is checked as the first statement. This means if the condition is true, the do-until loop in syntax 1 will not perform any iterations.
Whereas in the second syntax, the ‘condition’ is checked as the last statement inside the loop. This means that even if the condition is true, the do-until loop in syntax 2 will perform at least 1 iteration. Only after that, the condition will be evaluated, and the next iteration will not happen.
So, syntax 2 guarantees to have at least 1 iteration irrespective of the condition being true or false.
How a Do Until Loop Works
Syntax 1 –
Let’s say we have a Do Until loop as follows:
Dim loop_ctr As Integer
loop_ctr = 1
Do Until loop_ctr > 10
'Statements to be executed inside the loop
loop_ctr = loop_ctr + 1
Loop
- In the first two statements, a variable ‘loop_ctr’ is declared and initialized as 1.
- When the program control reaches the statement «Do Until loop_ctr > 10», it checks if the value of the ‘loop_ctr’ is greater than 10.
- If the ‘loop_ctr’ value is less than or equal to 10, the statements inside the body of the loop get executed sequentially, and finally, the ‘loop_ctr’ is incremented by 1.
- After this, the control again moves to check the condition «Do Until loop_ctr > 10», and the loop continues till the value of ‘loop_ctr’ is less than or equal to 10.
Syntax 2 –
Dim loop_ctr As Integer
loop_ctr = 1
Do
'Statements to be executed inside the loop
loop_ctr = loop_ctr + 1
Loop Until loop_ctr > 10
- In the first two statements, a variable ‘loop_ctr’ is declared and initialized as 1.
- When the program control reaches the statement Do, it simply moves to the next statement as the Do statement doesn’t force the program to check any condition.
- After this, in the following statement, a variable ‘loop_ctr’ is incremented by 1.
- Next, ‘Loop Until loop_ctr > 10’ statement checks if the value of ‘loop_ctr’ is greater than 10 or not. If it is less than or equal to 10, then the program control again jumps to the Do statement, but if the value of ‘loop_ctr’ is greater than 10, it terminates the loop and the program control moves to the next statement.
Note: Syntax 2 of Do Until Loop always iterates at-least-once since the condition that is to be checked is placed at the end of the loop.
Flow Diagram of a Do Until Loop In VBA

Let’s try to understand the control flow as depicted in the above flow chart:
Syntax 1 –
- In this Do-Until syntax, the loop condition is checked along with the Do statement.
- If the condition is false, then the ‘code block’ inside the do-until loop is executed, and the next iteration begins. Each iteration before beginning checks the loop condition, and the ‘code block’ inside the do-until loop is only executed when the condition evaluates to false.
- When the loop condition becomes true, then no more loop iterations occur, and the control flow jumps to the next statement outside the Do Until loop.
Syntax 2 –
- In this Do-Until syntax, the loop condition is not checked along with the Do statement.
- Since for the first iteration, no condition is checked. Hence the code block inside the do-until body gets executed.
- After the first iteration, each subsequent iteration, before beginning, checks the loop condition, and the ‘code block’ inside the do-until loop is only executed when the condition evaluates to false.
- When the loop condition becomes true, then no more loop iterations occur, and the control flow jumps to the next statement outside the Do Until loop.
Few Simple Examples of Do Until Loop In VBA
Example 1: Print numbers from 1 to 10 in excel using a VBA Do Until Loop.
In this example, we have a range «A1:A10,» and we have to fill this range with numbers from 1-10. To do this we can use the below code:
Sub DoUntilLoopPrintNumbers()
Dim loop_ctr As Integer
loop_ctr = 1Do Until loop_ctr < 10
ActiveSheet.Range("A1").Offset(loop_ctr - 1, 0).Value = loop_ctr
loop_ctr = loop_ctr + 1
LoopMsgBox ("Loop Ends")
End Sub
Explanation:
In the above code, first of all, we have declared and initialized the ‘loop_ctr’ variable for our Do Until loop. Next, along with the Do until statement, we have a condition to run the loop till ‘loop_ctr’ value is greater than 10.
Inside the Do Until Loop body, we have written the code to write the ‘loop_ctr’ value on the excel sheet in the A column.
After this, there is a statement that increments the ‘loop_ctr’ for the next iteration. As soon as the value of the ‘loop_ctr’ variable becomes greater than 10, the loop ends.
Example 2: Use Do Until Loop in VBA to find the sum of all the numbers between 1 to 20.
In this example, using a do until loop, we will iterate all the numbers between 1 to 20 and sum them. Finally, we will be displaying the sum of the numbers from 1 to 20 on the screen. To do this we can use the following code:
Sub DoUntilLoopSumNumbers()
Dim loop_ctr As Integer
Dim result As Integer
loop_ctr = 1
result = 0Do Until loop_ctr > 20
result = result + loop_ctr
loop_ctr = loop_ctr + 1
LoopMsgBox "Sum of numbers from 1-20 is : " & result
End Sub
Explanation:
In the above code, we have declared the loop counter ‘loop_ctr’ for our Do Until loop. Next, we have declared another integer variable as ‘result’ for storing the sum of numbers from 1 to 20.
After this, along with the Do Until statement, we have a condition to run the loop until the ‘loop_ctr’ becomes greater than 20.
Inside the Do Until Loop body, we have added the value of ‘loop_ctr’ along with the result. This means in the first iteration, the value of the result will be: 1, and in the second iteration, it will be : (1+2) = 3; similarly, in the third iteration, the value will be: (3 + 3) = 6 and so on.
After this, there is a statement that increments the ‘loop_ctr’ for the next iteration.
The Do Until loop in the above code iterates 20 times and sums all the numbers from 1 to 20, and finally displays the sum of these numbers in msgbox.
Example 3: Show the unique behavior of Do Until Loop (In Syntax 2) to execute at-least-once even if the condition to be checked is True.
Sub DoUntilLoopTest()
Dim loop_ctr As Integer
loop_ctr = 100Do
MsgBox "Loop Counter : " & loop_ctr
loop_ctr = loop_ctr + 1
Loop Until loop_ctr > 10
End Sub
Explanation:
In the above example, we have initialized the ‘loop_ctr’ as 100 and inside the loop condition we are checking ‘loop_ctr > 10’. This means the loop is only designed to iterate when the value of ‘loop_ctr’ is less than 10. But you will notice that despite the condition this do-until loop executes once.
The reason for this is: because according to syntax 2 of the Do Until loop, there is no way to check conditions at the beginning of the loop. The condition can only be checked at the end of the loop.
Note: We can fix this issue by simply using the Do Until loop in Syntax 1 as shown:
Sub DoUntilLoopTest()
Dim loop_ctr As Integer
loop_ctr = 100Do Until loop_ctr > 10
MsgBox "Loop Counter : " & loop_ctr
loop_ctr = loop_ctr + 1
Loop
End Sub
Writing a Nested Do Until Loop
Similar to other loops nesting is very much possible in Do Until Loop. Let’s see how to write a nested Do Until loop:
Example 4: Print numbers from 1 to 5 in all the worksheets in an excel spreadsheet using a Do Until Loop.
In this example, we need to print numbers from 1 to 5 in all the worksheets in an excel workbook using a do until loop. To do this, we can make use of the following code:
Sub NestedDoUntilLoop()
Dim loop_ctr As Integer
Dim sheet As Integer
sheet = 1Do Until sheet > Worksheets.Count
loop_ctr = 1
Do Until loop_ctr > 5
Worksheets(sheet).Range("A1").Offset(loop_ctr - 1, 0).Value = loop_ctr
loop_ctr = loop_ctr + 1
Loop
sheet = sheet + 1
LoopMsgBox "Nested Do Until Loop Completed!"
End Sub
Explanation:
In this example, there are two Do Until Loops, one inside another. The Outer Do Until Loop iterates over the variable ‘sheet’ and iterates until the value of the ‘sheet’ variable becomes greater than ‘Worksheets.Count’ (i.e., the total count of worksheets in a workbook).
Inner Do Until Loop iterates over the variable ‘loop_ctr’ and iterates until the value of ‘loop_ctr’ becomes greater than 5. This helps us to print the numbers in a sequence.
Inside the body of the Inner Do Until loop, we have a statement that prints the numbers between 1 to 5 in each worksheet (as per the outer loop).
The outer loop iterates over all the available worksheets in the spreadsheet, whereas the inner loop iterates over the numbers from 1 to 5 for the current sheet.
This makes it possible to print numbers from 1 – 5 in all the available worksheets.
Infinite Loop Using a Do Until Loop
Syntactically, Do Until Loop is very different from a For Loop since it does not provide a clear ‘start’, ‘end’ or ‘step_increments’, so it is very easy to make logical errors resulting in an infinite or an endless loop.
Below is an example of a Do Until endless loop:
'Do not run this code
Sub InfiniteDoUntilLoop()
Dim loop_ctr As Integer
loop_ctr = 1Do Until loop_ctr > 10
ActiveSheet.Range("A1").Offset(loop_ctr - 1, 0).Value = loop_ctr
LoopMsgBox ("Loop Ends")
End Sub
In the above code, we have simply missed the line to increment the loop counter i.e. ‘loop_ctr = loop_ctr + 1’ and this has made the loop infinite because the value of ‘loop_ctr’ will always be 1 (since it is never incremented) and hence the loop condition ‘Until loop_ctr > 10’ will always evaluate to false.
Tip: It is always a good idea to use a For Each or For Next loop over a Do While or Do Until loop (whenever possible).
How to Break Out or Exit of a Do Until Loop
Similar to a Do While Loop, a Do Until loop can also be exited using an ‘Exit Do’ statement. As soon as the VBA engine executes the ‘Exit Do’ statement, it exits the loop and takes control to the next statement after the Do Until loop.
Let’s see this with an example:
Example 5: Use a Do Until loop in VBA to find the sum of the first 20 even numbers between 1 to 100.
In this example, we must find the first 20 even numbers from 1 to 100 and then calculate their sum.
Below is the code to do this:
Sub SumFirst20EvenNumbers()
Dim loop_ctr As Integer
Dim even_number_counter As Integer
Dim sum As Integerloop_ctr = 1
Do Until loop_ctr < 100
If (loop_ctr Mod 2 = 0) Then
sum = sum + loop_ctr
even_number_counter = even_number_counter + 1
End IfIf (even_number_counter = 20) Then
Exit Do
End Ifloop_ctr = loop_ctr + 1
LoopMsgBox "Sum of top 20 even numbers is : " & sum
End Sub
Explanation:
In this example, we have three variables – ‘loop_ctr’, ‘even_number_counter’, and ‘sum’. ‘loop_ctr’ is the loop counter variable, ‘even_number_counter’ variable holds the count of even numbers that have been summed (because we only need to sum the first 20 even numbers) and ‘sum’ variable holds the sum of the first 20 even numbers.
Inside the Do Until loop, we loop through all the numbers from 1 to 100, one by one, and check if the number is even. If the number is even, we sum it and increment the ‘even_number_counter’ by 1.
After the first IF block, another IF condition checks if the ‘even_number_counter’ variable value is 20. If the value of ‘even_number_counter’ is 20, then using the ‘Exit Do’ statement, we break the loop as there is no point in running the loop further.
While Wend Loop In VBA (Obsolete)
While Wend loop was added in VBA just to make it backward compatible, Microsoft recommends using Do While Loop in place of While Wend Loop.
While Wend Loop is not as structured and flexible like a Do While Loop, it also doesn’t support the idea of prematurely exiting out of the loop.
Tip: If you are learning loops in VBA, then you can skip this topic. However, if you are dealing with a legacy code with While Wend statements, I would recommend you change them and start using the Do while loops instead.
Syntax of While Wend Loops
The syntax of While Wend Loop is as follows:
While condition
'Statements to be executed inside the loop
Wend
‘condition’ is used as the loop backbone. On each iteration, the While statement checks if the ‘condition’ evaluates to True or False. If the ‘condition’ is True, then the loop continues; otherwise, the loop terminates.
Example: Write a While Wend loop to print numbers from 1 to 10.
To do this, we can write the below code:
Sub WhileWendExample()
Dim loop_ctr As Integer
loop_ctr = 1While loop_ctr <= 10
ActiveSheet.Range("A1").Offset(loop_ctr - 1, 0).Value = loop_ctr
loop_ctr = loop_ctr + 1
WendMsgBox "Loop Ends!"
End Sub
Explanation:
In the above code, first of all, we are declaring and initializing a loop counter variable ‘loop_ctr’ as 1. Next, there is a While statement along with the condition ‘While loop_ctr <= 10’.
This means that we need to iterate until the value of the ‘loop_ctr’ variable is less than or equal to 10. After this, we are printing the value of ‘loop_ctr’ in the active worksheet and then incrementing the loop counter. When the Wend statement is encountered, the next iteration starts.
The loop in the above example iterates 10 times, and after that, the value of ‘loop_ctr’ becomes 11, and hence the loop condition becomes false, and the control moves to the statement after the while when loop.
Finally, a message’ Loop Ends!’ is presented on the screen to notify the user that the loop has ended.
How To Write VBA Code In Excel
VBA code can be added to a spreadsheet using the Visual Basic Editor. To open the Visual Basic Editor in Excel, follow the below steps:
- If you are on Windows, press the keys (ALT + F11). If you are on MAC, press the keys (Opt + F11). This will open the Visual Basic Editor.

- After the Visual Basic Editor is opened. Go to «Insert» and click the «Module» option as shown in the image. This will insert a module object for your workbook.

- Now you can copy-paste the above codes in the module and run them using the execute button as shown.
Debugging Tips
- Use the F5 key to run the code.
- Use the F9 key to insert or remove a breakpoint.
- Use the F8 key to ‘step-into’ or run the code line by line. It can be used to debug the code and execute it line by line.
So, this was all about VBA Loops. Do let us know in case you have any queries related to the topic.