
If you’re looking to automate your Excel spreadsheets, macros are a good way to do so. Macros are automated scripts, typically written using Visual Basic for Applications (VBA), to help you perform certain actions in Excel, such as automate a button press or perform a calculation.
VBA is a useful programming language for new data analysts to learn as it supercharges the functionality of Excel, making it easier to perform certain tasks automatically (and repeatedly) with custom-made macro scripts. For instance, if you want a macro that repeats an action by a certain number of times, you can use a VBA For Loop.
Loops like this aren’t unique to VBA—indeed, they’re a common feature in most programming languages, allowing a program or script to run continuously in a sequence with a start and end point. For Excel data analysts, a VBA For Loop can allow you to loop through cells or perform a set number of actions once the criteria to do so are met.
This could be once a certain calculation is inserted or value reached, or when you perform a certain action in your spreadsheet itself (such as, for instance, pressing a custom-inserted button). Using a VBA For Loop is essential for creating macros that will run continuously as you work through your spreadsheet.
If you’re new to VBA programming and you’re looking to create a basic (or even advanced) macro using a VBA For Loop, this guide should help you. In this article, we’ll explain:
- What are VBA For Loops in Microsoft Excel and what are they used for?
- How do VBA For Loops work in Excel?
- Things to consider before using a VBA For Loop in Excel
- How to add a VBA For Loop in Excel using the Visual Basic Editor
How do VBA For Loops work in Excel? Let’s get familiar with the basics.
1. What are VBA For Loops in Microsoft Excel and what are they used for?
As we’ve mentioned already, loops are a programming concept that allows a program to repeat itself. They help to refract your code, reducing the number of specifically-coded actions that are written to help improve the speed and efficiency of your applications.
Loops are flexible tools, giving you the option to repeat a certain action (such as changing cell values) a set number of times. A loop could also be combined with other statements, such as For and If, that help to determine how often, and for how long, a script should run.
In VBA, a For Loop repeats an action (or set of actions) for a set number of times in a sequence. For instance, if you had a macro (written in VBA) that inserted values into a column, you could use a For Loop to do so, filling each cell sequentially (eg. A1, A2, A3, etc) until an end value is reached.

For instance, the VBA code snippet shown previously demonstrates such an action. In this example, the VBA macro is designed to insert values into cells in column A, from 1 to 10, and increase in single-digit increments. Once 10 is reached, the script stops.
This is a basic example, but For Loops are powerful enough to perform almost any action you desire in Excel repeatedly. While this guide isn’t a full VBA tutorial (and it assumes you have a certain level of basic VBA experience already), it should allow you to create basic VBA loops using For to repeat an action in sequence.
2. How do VBA For Loops work in Excel?
Let’s assume that you already have an idea in mind as to how your VBA macro should work. Introducing a For Loop into the mix allows you to set your code (or part of your code) to repeat itself a certain number of times.
We’ll explain the process using a simple-to-understand example. As VBA For Loops are useful for finite repetitive actions, let’s assume you want a pop-up to appear when you press a button (with the class name Button).

Pressing the button causes a pop-up box to appear a set number of times, in sequence, using the variable varButton as the end number (in this case, 10). This pop-up box displays the current variable, starting with zero. It then repeats this 9 more times until the varButton variable (10) is reached.
The action of pressing the button begins the loop. As the test has a start and end variable, the loop has a finite number of runs before it finishes. By default, the values increase by 1 (starting with 0, 1, 2, etc) but this can be changed by adding a Step value. For instance, changing this to 5 would mean only three pop-ups appear.

Once the end value is reached, the loop exits and the macro stops. You could, however, add additional actions to perform at this point, such as changing another cell’s value or creating a different pop-up message. You could nest the For Loop within other logical tests, such as a Do While or If statement.
This example contains all of the typical criteria needed to complete a For Loop using VBA, however. The code identifies how many times the action will be performed in a sequence (varButton) and the increment value used to iterate through the sequence (Step).
The only optional part of this example is the button used to start the macro. You don’t necessarily need to link your macro code to a button press, as you could easily begin this loop and activate the macro manually by pressing Developer > Macros > Run instead.
3. Things to consider before using a VBA For Loop in Excel
A VBA For Loop is a flexible and wide-ranging method that allows your code to perform an action sequentially and only stopping if (and when) certain criteria are met. To help you create this kind of macro in Excel, there are some pointers you’ll need to consider. These include:
- If you want to create a way for your For Loop to end before the final value is reached, you’ll need to add an Exit For statement to your code. This exits the loop and moves on to the next line of code outside of the loop (if your code continues). For instance, you could stop the loop when you press a button.
- A VBA For Loop can be used to cycle through a set number of numerical values in sequence in a basic way using a For Next Loop, but you can also cycle through more complex objects (such as workbooks in your spreadsheet) in sequence using a more complex VBA For Each Loop.
- VBA For Loops can be nested with other logical statements, such as an If or Do While statement. This allows you to integrate more complex decision-making into your code.
- A VBA For Loop will iterate in a sequence, but by changing the Step value, you can change how much the loop counter increases by during each iteration. For instance, if you want your loop to move ahead in a sequence that increases the value by 2, you’d need to use a Step value of 2. If you don’t provide a Step value, the loop counter will increase in increments of 1.
- If your VBA For Loop can’t be performed, or if your code has errors, VBA will exit into debug mode with an error. You’ll need to troubleshoot your code to fix this problem in Excel’s built-in VBA Editor.
While these examples are important, you should also consider any known VBA limitations that aren’t listed here (such as a lack of an undo function when using VBA) before you write your code.
4. How to add VBA For Loops in Excel using the Visual Basic Editor
You can create, test, and run a VBA For Loop in Excel by using the Visual Basic Editor. This is Excel’s built-in VBA editor that allows you to create your own macros using VBA, or edit existing macros created using the Macro Recorder tool.
To begin creating a VBA macro using a For Loop in the Visual Basic Editor, you can follow these steps:
Step 1: Open the VBA Editor
You’ll need to start by opening the Visual Basic Editor in your Excel workbook.
You can do this by pressing the Alt + F11 keys on your keyboard (or Option + F11 on Mac). If you’ve already enabled the Developer tab on the ribbon bar in your Excel’s settings menu, you can also press Developer > Visual Basic to open the editor instead.

Step 2: Create a new VBA Module
The VBA Editor will open in a new window at this point. The next step is to insert your VBA For Loop (and additional code) as a new VBA module. Modules are used to organize VBA code into groups.
To do this, right-click your workbook listed in the tree menu on the left. From the drop-down menu, select Insert > Module.

Step 3: Insert your VBA For Loop code
A new window for your code will appear on the right. This is where you can type or insert the VBA code containing your For Loop. For instance, the following code will insert sequential values into cells A1 to A20 on any active worksheet:
Sub LoopVal()
Dim i As Integer
For i = 1 To 10
Range(“A” & i).Value = i
Next i
End Sub

Step 4: Rename your module and test your code
Once you’ve inserted your code, you’ll need to rename the module which contains the code in order to make it easy to refer to later. To do this, select the module name in the tree menu on the left, then rename it by typing a new module name into the Properties box underneath.

When you’re ready to test your code, press the Run Sub/User Form button. This will run the code in your active worksheet, allowing you to see the macro in action.

Assuming your VBA code worked as intended, you can then proceed to save your workbook with the macro included. If it doesn’t work, a debug message will appear, and you’ll need to troubleshoot the issue further.
Step 5: Save your workbook
With your VBA macro ready, you’ll need to save your Excel workbook as a Macro-enabled workbook in the XLSM format. To do this, press Ctrl + S on your keyboard, or press File > Save As.

Step 6: Run your VBA code
Your macro (containing a VBA For Loop) is ready to run once you’ve saved your workbook. To do this, press Alt + F8 on your keyboard to open the Macro window (or Option + F8 on Mac).

Select your macro (matching the Module name) from the list provided, then press Run. Alternatively, if your VBA For Loop is scheduled to activate based on another action (such as a cell value being reached, a button being pressed, etc), you’ll need to perform this action to begin the process.
Final thoughts
Once you’ve mastered VBA For Loops, you can take things further by experimenting with Do Until Loops, custom worksheet events, and more. VBA tricks like these allow data analysts to create complex applications inside Excel workbooks that can automate tasks or speed up calculations, but you’ll need to master VBA first.
If you’re new to Excel or you’re interested in a career in data analysis, our five-day short course can help you learn more about the fundamentals. If you’re curious to learn more about Excel, you can check out these articles next:
- How to use conditional formatting in Excel
- How to calculate variance in Excel
- How to convert texts to numbers in Excel
If you are writing a VBA program & you want to execute the same task multiple times then you can do this by using VBA for loops. VBA is a sequential programming language. Each line of code gets executed from top to bottom until there are no more lines of code to read. If you want to go back & perform a task, then you have to force by using macro code. You get results with loop.
The For Loop in VBA is one of the most common types of loop. The For loop has two forms: For Next and For Each In Next. The For loop is typically used to move sequentially through a list of items or numbers. To end the For loop at any given point, we can use the exit statement. For Loop will go round and round until it meets the end condition. Once the end condition is met, the programming flow will continue downward, in its natural direction.
The For … Next loop has the following syntax:

For counter = start_counter To end_counter

'Do something here (your code)

Next counter
We are actually creating a loop that uses variable counter as the ‘time keeper’ of the loop. We set it to a value equal to start_counter at the beginning of the loop and then increment it by 1 during each loop till it meets the end condition. The loop will execute till the time the value of the counter becomes equal to end_counter. The loop executes for the last time when both the above values match and then the loop stops.
All of the above might be confusing for some people, so let’s gear up & start learning For Loop in excel with few examples.
- Create a new excel workbook then save it with the extension .xlsm
- To launch Visual Basic editor screen, use ALT + F11
- Insert New Module
- Copy the below code in the VB standard module

Loop 1 (Displaying number with msgbox)
Sub Loop1()
Dim StartNumber As Integer
Dim EndNumber As Integer
EndNumber = 5

    For StartNumber = 1 To EndNumber
        MsgBox StartNumber & " is " & "Your StartNumber"
    Next StartNumber

End Sub
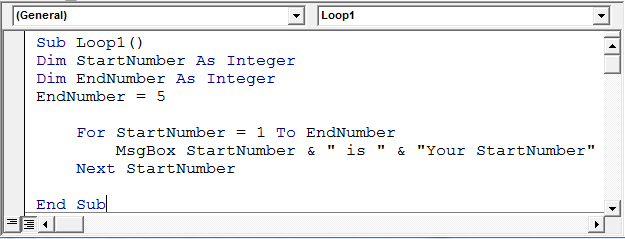
Code Explanation:
- The VBA code needs you to assign value to StartNumber, where EndNumber are variables that are declared as integers as the starting point for your loop
- These values can be any number & we have EndNumber as 5
- StartNumber is started at 1
- For StartNumber = 1 To EndNumber means code will start from 1 (StartNumber) to 5 (EndNumber)
- MsgBox StartNumber & » is » & «Your StartNumber» will display the following message box
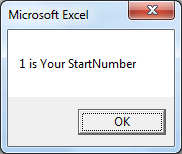
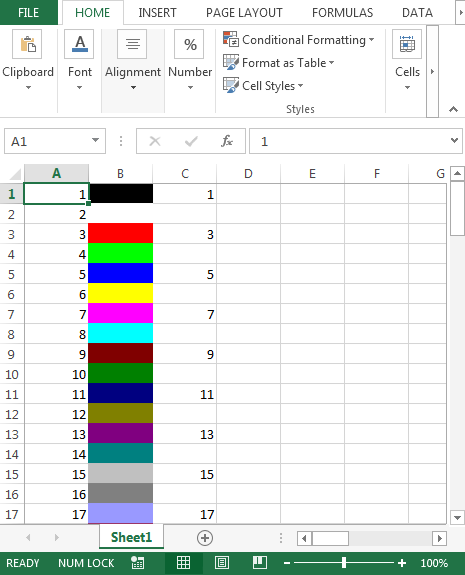
Loop2 (Fill Values)
Sub Loop2()
'Fills cells A1:A56 with values of X by looping' --- Comment
'Increase value of X by 1 in each loop' --- Comment

Dim X As Integer
    For X = 1 To 56
        Range("A" & X).Value = X
    Next X
End Sub

Code Explanation:
- We have assigned X as an integer
- For X = 1 to 56; this will start with 1 and continue till 56 with an increment of 1 each time
- Range(«A» & X).Value = X; this line will store the value of X and will pass to range A1 to A56
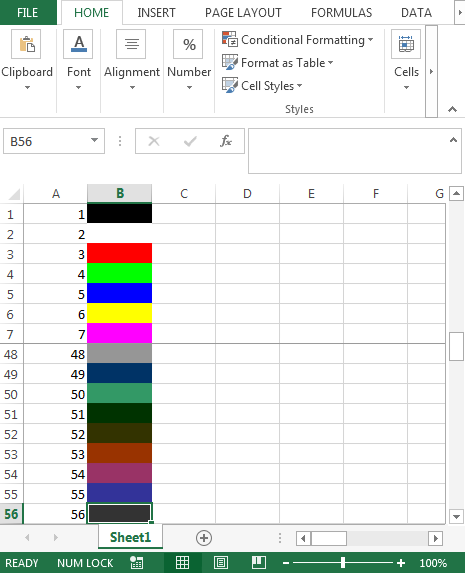
Loop3 (Fill cells with background color)
Sub Loop3()
' Fills cells B1:B56 with the 56 background colours' --- Comment
Dim X As Integer
    For X = 1 To 56
        Range("B" & X).Select
        With Selection.Interior
            .ColorIndex = X
            .Pattern = xlSolid
        End With
    Next X
End Sub
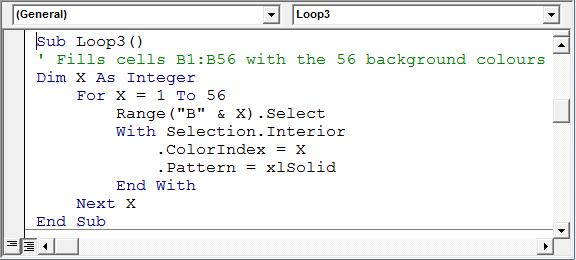
Code Explanation:
- We have assigned X as an integer
- For X = 1 to 56 will start with 1 and continue till 56 with an increment of 1 each time
- Range(«B» & X).Select; this line will store the value of X & select the cell B1 till B56
- The next 4 lines i.e. With Selection.Interior will select interior colorindex & take the value from X of that colorindex such that 1 belongs to color black; 2 belongs to color white; 3 for red & so on
Loop 4 (Fill Values with increment of 2)
By default, the Step value is forward 1, however it can be set to a number more than 1.
Sub Loop4()
' Fills every second cell from C1:C50 with values of X' --- Comment
Dim X As Integer
    For X = 1 To 50 Step 2
        Range("C" & X).Value = X
    Next X
End Sub
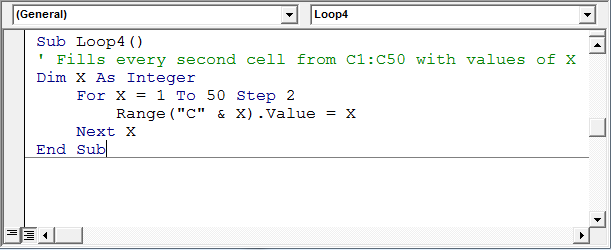
Code Explanation:
- We have assigned X as an integer
- For X = 1 to 50 Step 2; this will start with 1 in X till 50 with an increment of 2 each time
- Range(«C» & X).Value = X; this line will store the value of X and will pass to range C1 to C50
Loop 5 (VBA For Loop in Reverse with STEP Instruction)
It is not necessary that counter in the For loop will only move from low to higher values; instead, For loop can run backwards, too i.e. high to lower values.
Even though the Step value is forward 1 by default, however, it can be set to a number in reverse order.
Sub Loop5()
' Fills cells from D1:D50 with values of X' --- Comment
' In this case X decreases by 1' --- Comment
Dim X As Integer, Row As Integer

Row = 1

    For X = 50 To 0 Step -1
        Range("D" & Row).Value = X
        Row = Row + 1
    Next X

End Sub
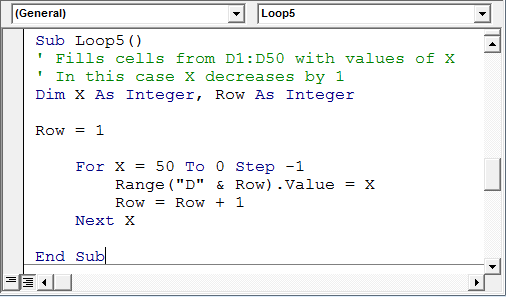
Code Explanation:
- We have assigned X & Row as integer
- Row contains value 1
- For X = 50 to 0 Step -1; this will start from 50 with decrement by 1 in X till 0
- Range(«D» &Row).Value = X; this line will store the value of X and will pass to range D1 to D50
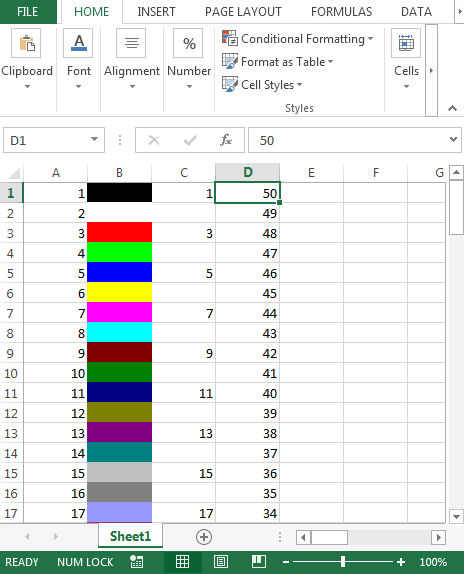
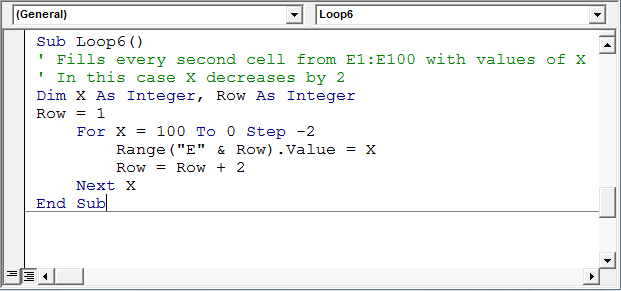
Loop 6 (Fills every second cell in Reverse with STEP-2)
In the above For loop example, we can use the Step and order to see if the For loop works in forward or backward direction.
Sub Loop6()
' Fills every second cell from E1:E100 with values of X' --- Comment
' In this case X decreases by 2' --- Comment
Dim X As Integer, Row As Integer
Row = 1
    For X = 100 To 0 Step -2
        Range("E" & Row).Value = X
        Row = Row + 2
    Next X
End Sub
Code Explanation:
- We have assigned X & Row as integer
- Row contains value 1
- For X = 100 to 0 Step -2; this will start from 100 with decrement by 2 in X till 0
- Range(«E» &Row).Value = X; this line will store the value of X and will pass to range E1 to E100
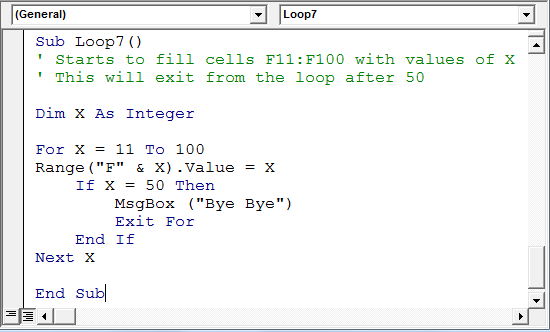
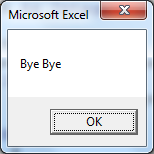
Loop 7 (For Loop with IF condition: Fills cells starting from specific cell)
This will fill the cells from cell F11 with value 11 till X meets the IF condition
Sub Loop7()
' Starts to fill cells F11:F100 with values of X' --- Comment
' This will exit from the loop after 50' --- Comment

Dim X As Integer

    For X = 11 To 100
        Range("F" & X).Value = X
            If X = 50 Then
                MsgBox ("Bye Bye")
                Exit For
            End If
    Next X

End Sub
Code Explanation:
- We have assigned X as an integer
- For X = 11 to 100; will start from 11 with increment by 1 in X till the condition meets
- Range(«F» &X).Value = X; this line will store the value of X and will pass to range F11 till the condition meets
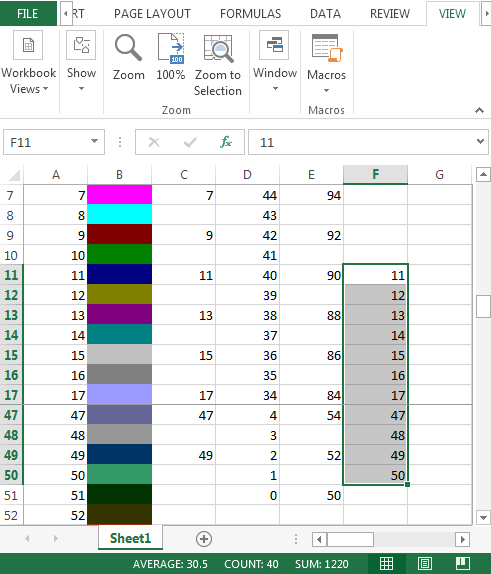
- After entering the value 50 in cell F50, the following message box will be displayed
Conclusion: With the above 7 examples, we can apply For loop in our regular or any automation part.
![]()
If you liked our blogs, share it with your friends on Facebook. And also you can follow us on Twitter and Facebook.
We would love to hear from you, do let us know how we can improve, complement or innovate our work and make it better for you. Write us at info@exceltip.com
08 Jul Breaking Down the Excel VBA For Loop
Posted at 18:43h
in Excel VBA
0 Comments
Howdee! There may be occasions where you need to perform an action a set number of times when writing code. This is generally called “looping”. The Excel VBA for loop is one of the most useful tools an Excel developer can learn. Being able to loop through items and perform actions is at the core of most things you’ll do when developing with Excel. Whether you’re doing an action for every cell in a range, every row/column in a range, or each item in a dictionary, the principle is always the same. Let’s dive in.
For Loop
An Excel VBA for loop will execute a block of code a specified number of times. You can set the number of loops by hardcoding the integer representing the number of loops you want to perform, but it is generally done with variables. Let’s look at the syntax before I explain scenarios.
Sub For_Loop_Example()
Dim NameArr As Variant

NameArr = Array("Bill", "Jane", "Joe", "Piper", "Logan")

For i = 0 To 4 Step 1
    MsgBox NameArr(i)
Next i

End Sub
To start, we declare the variable NameArr as variant. We then populate this variable with an array of five names. In the for loop, we declare that, for each variable I we want to display the corresponding element of the array in a message box. The “Step 1” tells the loop to increment i by one on each run of the loop.
It’s worth noting that this code would run without “Step 1” since that is the default setting. You only need to have the Step declaration there if you want to increment i by something other than one on each loop. However, it’s good practice to declare this on each for loop. I also want to point out that this loop will start with 0 because the first element in a VBA array will always be 0. This is different than if you were looping through a range of cells, which will start with 1.
For Each Loop
A second Excel VBA for loop is the for each loop. This loop will perform an action for each item in a parent item. For example, you might use a for each loop to check the value of each cell in a range and do something if it meets certain criteria. You might have an array of data and need to perform some action for each element of the array. There are a lot of scenarios.
The decision-making process I use when defining whether I want to use a for each loop, or a for loop, is pretty straight forward. If I have a range, array, dictionary, or other data storage object that I’ve already declared and/or populated with data, and I need to do something to every piece of data within that object, I generally use a for each loop. The reason for this is that this ensures that, no matter what size (number of data points) the object, this ensures I’m always performing the action(s) for each item in it. Let’s look at an example:
Sub For_Each_Example()
Dim NameArr As Variant

NameArr = Array("Bill", "Jane", "Joe", "Piper", "Logan")

For Each Item In NameArr
    MsgBox "The current name is " & Item
Next

End Sub
This is a very simple Excel VBA for loop where I’ve created an array with five names. Then the code is looping through each item (element) of the array and popping up a message window displaying the current name of the loop. It’s important to note that the for each loop will start with the first item in the object and loop through each item in that object in order.
Do While Loop
While not explicitly an Excel VBA for loop, I still want to cover do loops here. Do loops were very difficult for me when I first began writing code, I would often find myself in a do loop that would never end and would have to force quit Excel to get it to stop.
A do while loop is a loop that will run as long as a condition is true. Another way to say this would be, the loop will continue until the condition you set is evaluated as false. I generally use this loop when I’m performing an action on a list of objects. Those objects could be cells that are populated with data (do while cell is not blank), files in a folder (do while file name does not equal nothing), or maybe on an API call (do while call returns data).
There are a lot of scenarios to use do while loops. Let’s check out an example of the syntax:
Sub Do_While_Loop_Example()
Dim NameArr As Variant

NameArr = Array("Bill", "Jane", "Joe", "Piper", "Logan")

Do While i < 5
    MsgBox NameArr(i)
    i = i + 1
Loop

End Sub
Sticking with our NameArr array we’ve used previously, we start a do while loop where we instruct it to loop while i is less than five. I don’t have to initially declare i = 0 as the compiler will do that for me, but a big difference between a for loop and a do loop is that I have to increment the variable i during each do loop with a line of code. This code will behave the same as my for loops, but requires one more line of code.
Do Until Loop
Do until loops are great when you need to perform a process until a result is achieved. Another way to think of this is the opposite of a do while loop. A do while loop runs while something is true. A do until loop runs until a specific condition is true.
A very common application of this loop is to perform an action until you return nothing. For example, I use this loop to grab data in batches of 100 records until my data query returns no rows. Using our NameArr example one last time, let’s look at some syntax.
Sub Do_Until_Loop_Example()
Dim NameArr As Variant

NameArr = Array("Bill", "Jane", "Joe", "Piper", "Logan")

Do Until i = 5
    MsgBox NameArr(i)
    i = i + 1
Loop

End Sub
In the do while loop, we performed an action while i < 5 was true. In this example, we performed the action until i = 5 was evaluated as true. Both subroutines return the same exact result but the evaluation is very different. I also want to call out that you can use an alternate syntax for do loops. You can simply start your loop with “Do” and have the while or until statement after the “Loop” keyword. I’ve included additional examples in the example file to show this. If you’re a free member, head over to that page and download the file to check it out!
While all of these examples are very basic and short, the principles of each are what is important to grasp here. Once you understand each Excel VBA for loop, you’ll have a much better understanding of which loop to use when in your code. If you have questions about one of these loops or one of your own, feel free to leave it in the comments!
Cheers,
R