
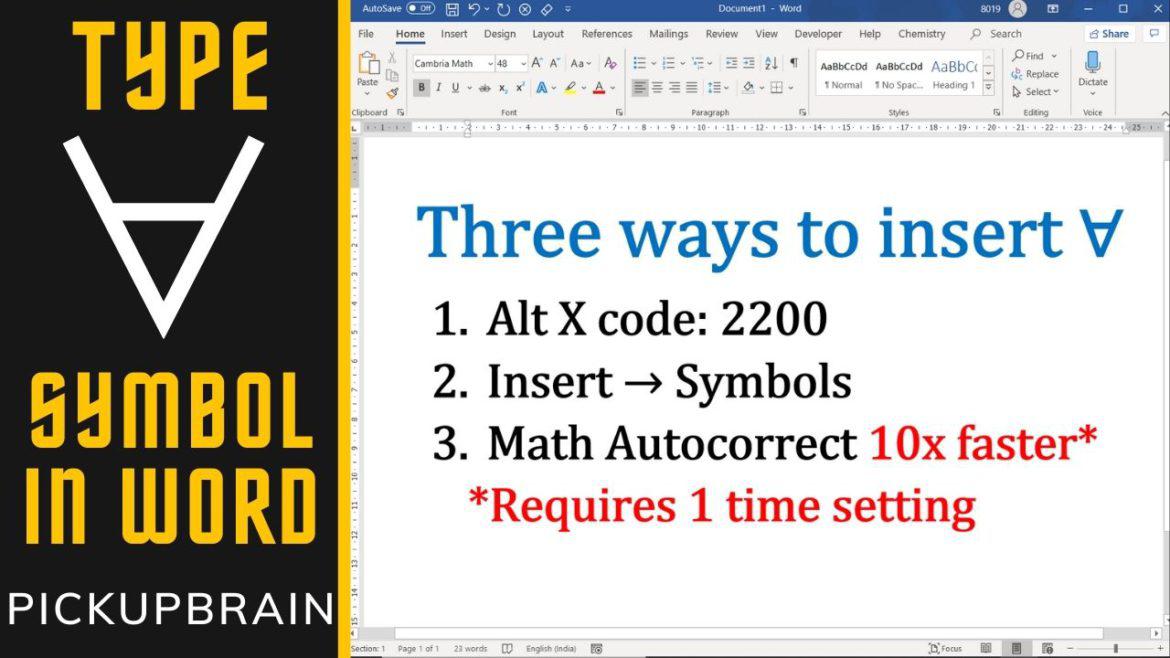
For all (∀) symbol, also known as universal quantification, is used in mathematics to denote “given any” or “for all”. Three different ways viz. insert symbol, alt code, and the fastest math autocorrect are available in Ms Word to type for all symbol.
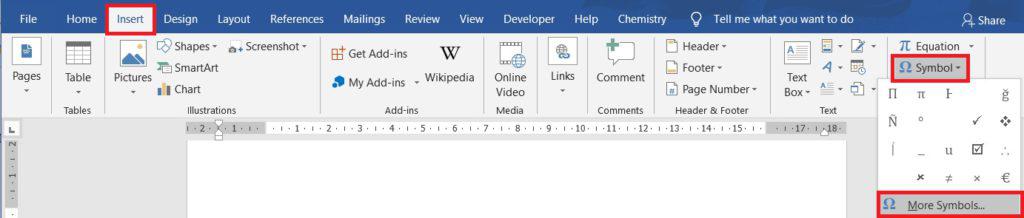
Method 1: Insert > Symbol
1: Navigate Insert Tab > Symbol in symbols group.
2: Select More Symbols.
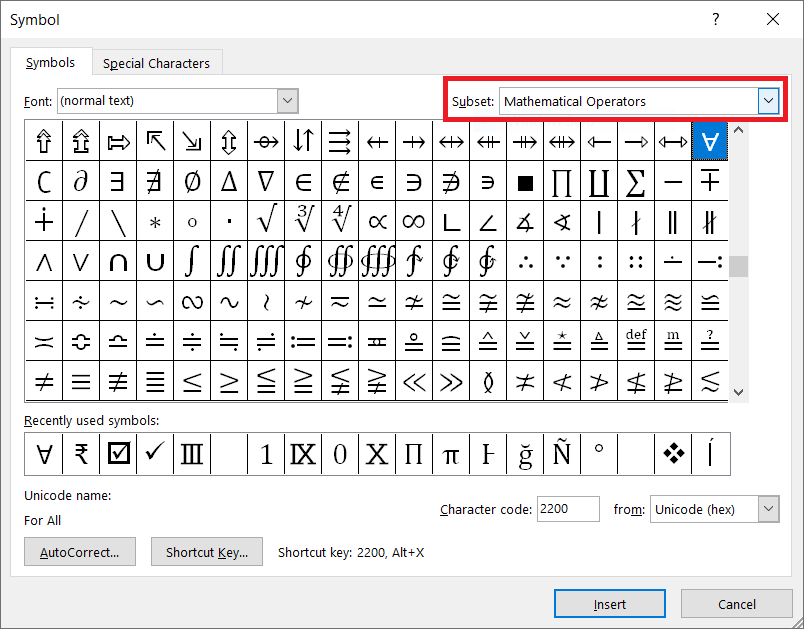
3: Select “normal text” from Font &“Mathematical Operators” from the Subset dropdown.
4: Locate “for all” symbol (∀) and double click it to insert it and click to close dialogue box.
Method 2: Alt X Way
Type 2200 & press “Alt+X” immediately following it to get “for all” symbol (∀).
Method 3: Math Autocorrect – The Smartest Way
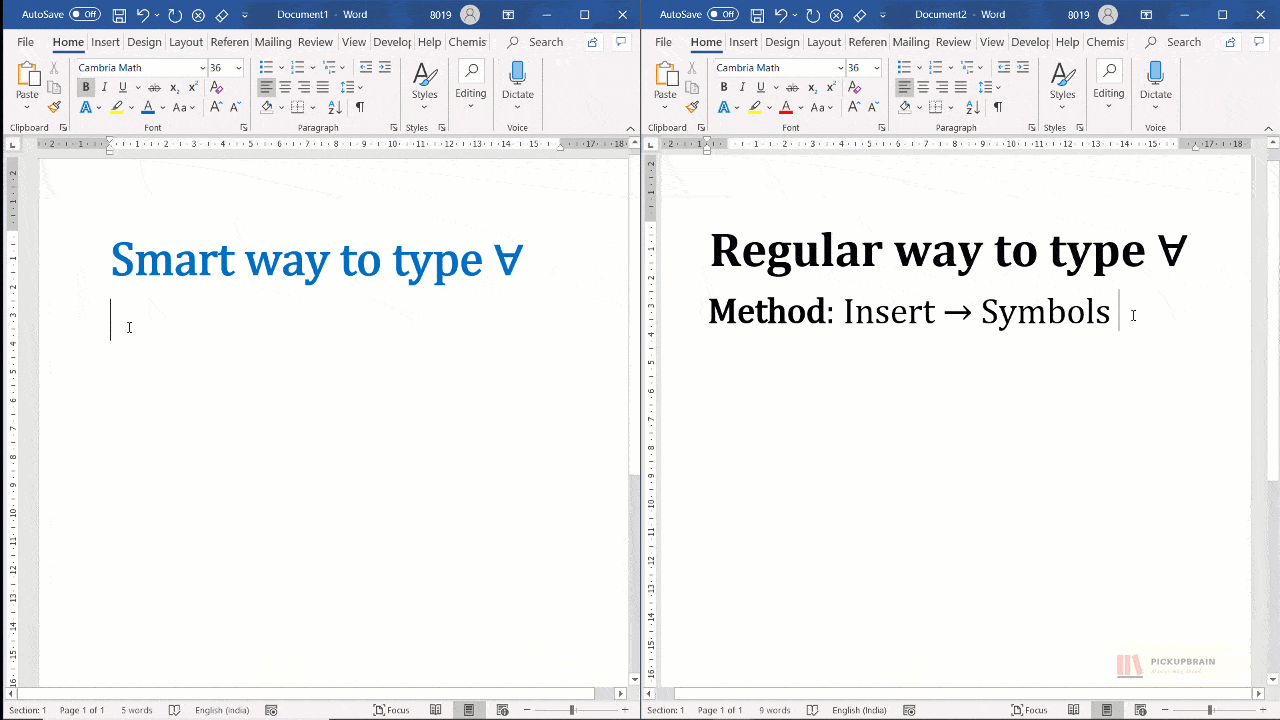
Type forall and press spacebar to get for all symbol (∀).
Enable the following one time setting to make above Math Autocorrect work outside equation editor,.
- Navigate Files → Options to open Word Options
- Navigate to Proofing and click AutoCorrect Options to open Auto Correct window
- Navigate to Math Autocorrect tab
- Check the box against “Use Math Autocorrect options outside Math region“
- Click Ok and close all the dialogue boxed.
Summary
In short, the three methods to type for all (∀) symbol are Alt X Method: type 2200 and press Alt+X immediately after it, Insert Symbol: Navigate Insert -> symbols and click “for all” symbol in Subset: Mathematical Operator and the best method Math Autocorrect Method: type forall and press space.
Return to VBA Code Examples
In this Article
- Loop Through Each Character in a String
- Loop Through Each Character in a String – Alternative
- Read Every Word in a String
- VBA Coding Made Easy
This tutorial will demonstrate how to loop through a string using VBA.
You can perform logic on, or return individual characters from a string in VBA by looping through the string.
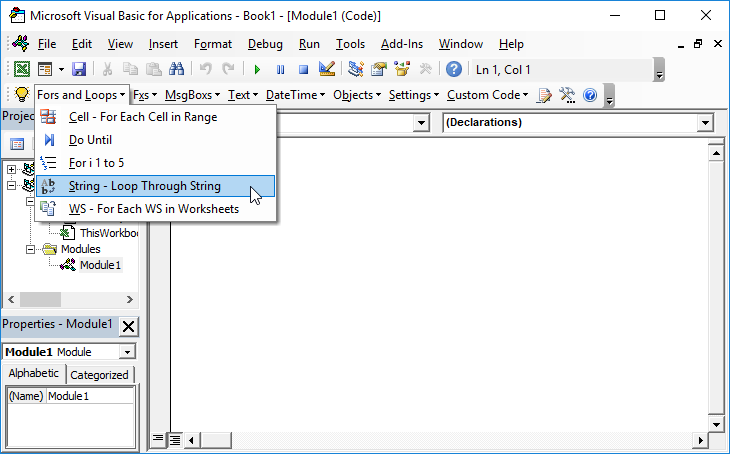
Loop Through Each Character in a String
The following is an example of looping through a string using a For…Next Loop, and returning each character in a msgbox.
Sub LoopThroughString()

Dim Counter As Integer
Dim MyString As String

MyString = "AutomateExcel" 'define string

For Counter = 1 To Len(MyString)
    'do something to each character in string
    'here we'll msgbox each character
    MsgBox Mid(MyString, Counter, 1)
Next

End Sub
The Len Function counts the total number of characters in the string. So the expression
For Counter = 1 to Len(MyStringwill loop through each letter in the string.
Loop Through Each Character in a String – Alternative
Read Every Character in a String
This example reads every character in a string from left to right and returns the result in a message box. It makes use of the Mid Function.
Sub LoopThroughString()

Dim LookInHere As String
Dim Counter As Integer

'Use your own text here
LookInHere = "AutomateExcel.com"

For Counter = 1 To Len(LookInHere)
    MsgBox Mid(LookInHere, Counter, 1)
Next

End Sub
Read Every Word in a String
This example reads every word in a string from left to right and returns the result in a message box. It makes use of the Split Function.
Sub LoopThroughString2()

Dim LookInHere As String
Dim Counter As Integer
Dim SplitCatcher As Variant

'Use your own text here

LookInHere = "I Heart AutomateExcel.com"

SplitCatcher = Split(LookInHere, " ")

For Counter = 0 To UBound(SplitCatcher)
    MsgBox SplitCatcher(Counter)
Next

End Sub
VBA Coding Made Easy
Stop searching for VBA code online. Learn more about AutoMacro – A VBA Code Builder that allows beginners to code procedures from scratch with minimal coding knowledge and with many time-saving features for all users!
Learn More!
<<Return to VBA Examples
Microsoft Word symbols cannot be easily typed in using the keyboard.
However,
the need to include these characters in documents is increasingly common these
days.
Even when writing in English, foreign names of places and people may require some of these special characters.
Scientific writings also include mathematical symbols and Greek letters.
Text may also include characters like the degree symbol and copyright symbol.
There
are character codes you can use to enter a symbol in Word. However, most people
don’t have the time to memorize these character codes.
So, in this guide today, you’ll learn how to insert any symbol in Word either using the mouse pointer or a keyboard shortcut.
NOTE: There are several methods you can use to type symbols in Word. For me, the method I use to type symbols depends on how many and how frequently I need to type them. Keep reading to choose the best method for you
Without
further ado, below are the ways to type symbols in word
1st Method: Using Insert Symbols
This
method involves using the symbols dialog box located in the symbols area at the
right border of the insert tab.
Below are steps to insert symbols in MS Word using Insert Symbols.
NOTE: in the steps below, I’ll illustrate how to insert symbols in MS Word by inserting the greater than or equal to symbol. You can use the same steps to insert any symbol of your choice.

- STEP 1: Click to position the insertion point at where you want to insert the symbol. In this example, we will place the symbol between X and 10 as you can see in the above picture.
- STEP 2: Go to the Insert tab, in the Symbols group and click Symbol, then More Symbols.

NOTE: If the symbol you want to insert is found in the symbols gallery as shown in the picture above, click it to insert it into your document. Any symbol you use will move to the first position in the gallery. Thus, the symbol gallery box gives you access to the 20 most recently used symbols. However, if you can’t find the symbol you are looking for in the symbol gallery, click on More Symbols to display all the symbols.
- STEP 3: Select your desired font from the Font drop down. You can leave it as default (Normal text). You don’t have to explore every font in the list. However, it is worth looking at Wingdings or Symbol if you want a fancy symbol.

- Step 4: Scroll down or up until you find the required symbol, then
click to select it. You can also click the desired symbol in the Recently used
symbols. - Step 5: Click Insert to insert the selected symbol then click
to close the dialog. Alternatively, double-click on the desired symbol to
insert it into your document, then close the dialog.
As soon as you click insert or double-click the symbol, Word will insert it into your document.
2nd
Method: Using the keyboard to insert symbols in Word.
Not all the symbols in Word can be found on the keyboard.
However, all the symbols can be typed using the keyboard.
Typing symbols that are not found on the keyboard can be very tedious. In fact, it is not even necessary in Word because using the first method above is much easier and simple to compare with.
However, it is still useful to know as it becomes handy to obtain certain characters or symbols in software that has no access to Insert Symbol like in Microsoft Word.
Let’s use the following exercise for example:
- Turn on your Num Lock.
- Whilst holding down the [Alt] key, type [065]
on the numeric keypad (on the right). - Then release the [Alt] key. The letter A should
appear. - To type the letter B, repeat steps 2 and 3. But this
time type [Alt 066] on the numeric keypad. - [Alt 067] should give you C, and [Alt 068] should give
you D, and so on.
This
exercise isn’t really necessary because one can easily type in any letter
directly with the keyboard.
However, not all characters and symbols are on the keyboard. Hence let’s try out the following:
- Hold down the [Alt] and type [0176] for a degree sign (°)
- Type [Alt 0189] and [Alt 0190] for fractions (½ and ¾)
- Also try [Alt 0181] for µ
But
how do you remember the number for each symbol?
It’s
almost impossible to remember. It’s not even necessary.
Instead, you should make a note of the symbols or characters you use very often.
In the next section, you’ll learn how to get the shortcut to any symbol into your Word document.
How to find the keyboard shortcut for symbols in word
You
can use the Symbol dialog box to find the character code (or keyboard shortcut)
for any symbol or character.
This way you can insert symbols by typing them on your keyboard instead of using the Symbol dialog box.
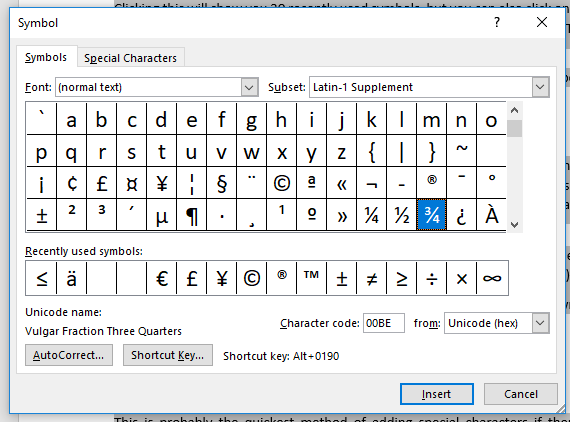
Here’s how to learn the keyboard shortcut code for a particular symbol or character in Word:
- Open the Symbols dialog box.
To
display the Symbols dialog box, go to the Insert tab, in the
Symbols group and click Symbol, then More Symbols.
- Select the symbol you want to take note of, then look near
the bottom of the dialog for the symbol name as well as its code. - To insert any symbol using its character code, press down the
[Alt] key, type the code, then release the [Alt] key.
If you are lucky, you’ll see another shortcut key aside from the character code which is much easier to type than the code.
See
screenshot below:

Assigning
shortcut keys to symbols
In
Microsoft word, you are not limited to the default hotkeys.
You can assign any keyboard shortcut key to any command or symbol to fit your needs.
As
mentioned, each and every character or symbol in Microsoft Word has a character
code that you can use on the keyboard.
Aside from these character codes, Word still gives you the space to assign a shortcut key to any symbol.
Below
are the steps to do so:
- Open the Symbols dialog box.
To
display the Symbols dialog, navigate to the Insert tab, in the
Symbols group and click Symbol, then More Symbols. The Symbols
dialog box should display.
- Click to select the symbol to which you want to assign a shortcut.
- At the bottom area of the dialog, click Shortcut Key… The Customize Keyboard dialog box appears.

- Under Specify keyboard sequence, in the Press new shortcut key field, type the keyboard shortcut you want to assign for the symbol.
If the shortcut key you assign is already assigned for a command, Word will tell you that hey dude, the shortcut key you are assigning to this symbol is already taken by another command. If you ignore and continue to assign, Word will not stop you. However, this shortcut will not work again for the command it was previously assigned to. It will now work for this symbol.

- Click Assign to assign the shortcut.
NOTE: There is another box labeled Current keys. These are the current hotkeys assigned to the selected symbol. You can take note of these hotkeys without assigning another one for the same symbol.
Typing
any symbol in Word doesn’t have to be difficult as you can see.
If you don’t understand anything explained here, let me know in the comments section below for more clarification.
Thank you very much for reading this article.
Your average keyboard has enough letters, numbers, and punctuation marks for all your day-to-day typing needs. But what if you need symbols or special characters that aren’t on your keyboard?
Well, in Microsoft Word, you have three main options:
- Use the Symbol menu.
- Learn some ASCII codes.
- Use Microsoft Word’s special character shortcuts.
In the rest of this post, we’ll look at how to do each of these in your writing. Watch the video or read the post below to get started:
1. Using the Symbol Menu
To see the Symbol menu in Microsoft Word, go to Insert > Symbols on the ribbon and click the Symbol button (or Insert > Advanced Symbol > Symbols in the menu system in Word for Mac).
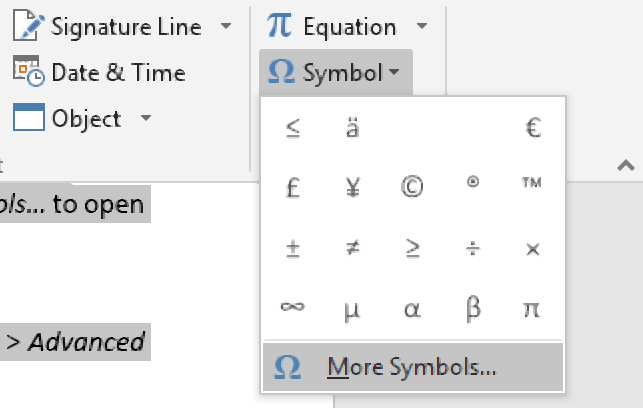
This will open a quick access menu of 20 frequently used symbols to pick from. However, you can also access the full range of special characters in Microsoft Word as follows:
- Go to Insert > Symbols and click Symbol to open the menu.
- Click More Symbols… to open a new window.
- Scroll through until you find the symbol you want to use.
- Click Insert to add the symbol to your document.
The symbol will then appear in your document at your cursor. Microsoft Word will also add it to the quick access menu, saving your time if you need to use the same symbol again.
2. ASCII Codes
ASCII codes each indicate a different symbol, so you can use them to add special characters to a document quickly via the numeric keypad:
- Learn or look up the correct ASCII code for the symbol(s) you need.
- Turn on Num Lock on your keyboard to activate the numeric keypad.
- Hold down the Alt key and type the required code.
The corresponding symbol will then appear at your cursor position.
3. Shortcuts for Special Characters
For some special characters, your simplest option is to let Microsoft Word do the hard work! There are, for example, shortcuts available for the following common symbols:
|
Special Character |
Shortcut |
Autocorrect Option |
|
Trademark symbol (™) |
Ctrl + Alt + T |
Write “TM” in parentheses |
|
Registered trademark symbol (®) |
Ctrl + Alt + R |
“R” in parentheses |
|
Copyright symbol (©) |
Ctrl + Alt + C |
“C” in parentheses |
|
Closed Ellipsis (…) |
Ctrl + Alt + . |
Three periods without spaces |
|
Euro (€) |
Ctrl + Alt + E |
“E” in parentheses |
You’ll notice we’ve included an “autocorrect” version for each symbol above. In these cases, Microsoft Word will automatically correct the specified text to create the symbol.
Find this useful?
Subscribe to our newsletter and get writing tips from our editors straight to your inbox.
For example, to add a trademark symbol to a document, we have two options:
- Hold down Ctrl + Alt + T at the same time.
- Write “(TM)” and let Microsoft Word change this to the symbol.
These shortcuts are very quick and simple, so it is worth memorizing them if you use any of these symbols frequently. Similar shortcuts are also available for accented letters.
Microsoft 365, Microsoft Office, Microsoft Office for Mac, Microsoft Outlook, Microsoft Powerpoint, Microsoft Word, Office 2007, Office 2010, Office 2013, Office 2016, Office 2019, Office 2021 / Office LTSC, Office 365 /
Symbols & Emoji in Microsoft Office, Windows and Mac /
23 February 2023
How to make a bullet list that has different bullet symbol or emoji for each Word or PowerPoint line.
With the wide range of symbols and emoji in Word and PowerPoint there’s scope for creative lists that use symbols that relate to each line.

It’s not possible to do that as a normal bullet list. A Word or PowerPoint bullet list always has the same symbol for each line or item.
Never fear, there are ways to do it. We can think of three options to choose from, each with their own pros and cons.
Symbol next to text
The simplest option is to add the symbol to the start of each line, separated from the text by a space or not. Here’s how it looks with Show All turned on so you can see the hidden characters.

This is simple and obvious – almost so obvious we’re embarrassed to even mention it.
But there are disadvantages. The text doesn’t align vertically because the symbols have different widths … compared the male and female symbols.
The line spacing isn’t as close as you’d normally get on a bulleted list.
Tabbed list
A better choice uses tabs. The tab separates the symbol from text and ensures the text is aligned nicely.

Adjust the tab stop (from the ruler) to put the text as close, or as far, as you like.
Table formatting
Regular Office Watch readers might guess this option because we’ve mentioned it many times over the years. Use a table to solve formatting problems.
Add a table with no borders. The symbols go in one column and text in the other.

The same text showing the table with gridlines (left) and the same table as it appears in the final document or slide (right).
There are many advantages to this approach.
The line spacing can be adjusted by changing the row height. The default in our example puts the lines much closer together than the other choices.
It’s easy to align the symbols and text as two separate elements by column. The column widths can be changed. The text alignment of each column can be quickly altered – for example switch to right or center justify in the first column to put the symbol closer to the text.
Add more interesting bullets in Word and PowerPoint lists
Better Bullets in Word with SVG Icons
Type double circled digits in Word, Excel and more