
Цикл For Each… Next в VBA Excel, его синтаксис и описание отдельных компонентов. Примеры использования цикла For Each… Next.
Цикл For Each… Next в VBA Excel предназначен для выполнения блока операторов по отношению к каждому элементу из группы элементов (диапазон, массив, коллекция). Этот замечательный цикл применяется, когда неизвестно количество элементов в группе и их индексация, в противном случае, более предпочтительным считается использование цикла For…Next.
|
For Each element In group [ statements ] [ Exit For ] [ statements ] Next [ element ] |
В квадратных скобках указаны необязательные атрибуты цикла For Each… Next.
Компоненты цикла For Each… Next
| Компонент | Описание |
|---|---|
| element | Обязательный атрибут в операторе For Each, необязательный атрибут в операторе Next. Представляет из себя переменную, используемую для циклического прохода элементов группы (диапазон, массив, коллекция), которая предварительно должна быть объявлена с соответствующим типом данных*. |
| group | Обязательный атрибут. Группа элементов (диапазон, массив, коллекция), по каждому элементу которой последовательно проходит цикл For Each… Next. |
| statements | Необязательный** атрибут. Операторы вашего кода. |
| Exit For | Необязательный атрибут. Оператор выхода из цикла до его окончания. |
*Если цикл For Each… Next используется в VBA Excel для прохождения элементов коллекции (объект Collection) или массива, тогда переменная element должна быть объявлена с типом данных Variant, иначе цикл работать не будет.
**Если не использовать в цикле свой код, смысл применения цикла теряется.
Примеры циклов For Each… Next
Цикл для диапазона ячеек
На активном листе рабочей книги Excel выделите диапазон ячеек и запустите на выполнение следующую процедуру:
|
Sub test1() Dim element As Range, a As String a = «Данные, полученные с помощью цикла For Each… Next:» For Each element In Selection a = a & vbNewLine & «Ячейка « & element.Address & _ » содержит значение: « & CStr(element.Value) Next MsgBox a End Sub |
Информационное окно MsgBox выведет адреса выделенных ячеек и их содержимое, если оно есть. Если будет выбрано много ячеек, то полностью информация по всем ячейкам выведена не будет, так как максимальная длина параметра Prompt функции MsgBox составляет примерно 1024 знака.
Цикл для коллекции листов
Скопируйте следующую процедуру VBA в стандартный модуль книги Excel:
|
Sub test2() Dim element As Worksheet, a As String a = «Список листов, содержащихся в этой книге:» For Each element In Worksheets a = a & vbNewLine & element.Index _ & «) « & element.Name Next MsgBox a End Sub |
Информационное окно MsgBox выведет список наименований всех листов рабочей книги Excel по порядковому номеру их ярлычков, соответствующих их индексам.
Цикл для массива
Присвоим массиву список наименований животных и в цикле For Each… Next запишем их в переменную a. Информационное окно MsgBox выведет список наименований животных из переменной a.
|
Sub test3() Dim element As Variant, a As String, group As Variant group = Array(«бегемот», «слон», «кенгуру», «тигр», «мышь») ‘или можно присвоить массиву значения диапазона ячеек ‘рабочего листа, например, выбранного: group = Selection a = «Массив содержит следующие значения:» & vbNewLine For Each element In group a = a & vbNewLine & element Next MsgBox a End Sub |
Повторим ту же процедуру VBA, но всем элементам массива в цикле For Each… Next присвоим значение «Попугай». Информационное окно MsgBox выведет список наименований животных, состоящий только из попугаев, что доказывает возможность редактирования значений элементов массива в цикле For Each… Next.
|
Sub test4() Dim element As Variant, a As String, group As Variant group = Array(«бегемот», «слон», «кенгуру», «тигр», «мышь») ‘или можно присвоить массиву значения диапазона ячеек ‘рабочего листа, например, выделенного: group = Selection a = «Массив содержит следующие значения:» & vbNewLine For Each element In group element = «Попугай» a = a & vbNewLine & element Next MsgBox a End Sub |
Этот код, как и все остальные в этой статье, тестировался в Excel 2016.
Цикл для коллекции подкаталогов и выход из цикла
В этом примере мы будем добавлять в переменную a названия подкаталогов на диске C вашего компьютера. Когда цикл дойдет до папки Program Files, он добавит в переменную a ее название и сообщение: «Хватит, дальше читать не буду! С уважением, Ваш цикл For Each… Next.».
|
1 2 3 4 5 6 7 8 9 10 11 12 13 14 15 16 17 18 19 20 21 22 |
Sub test5() Dim FSO As Object, myFolders As Object, myFolder As Object, a As String ‘Создаем новый FileSystemObject и присваиваем его переменной «FSO» Set FSO = CreateObject(«Scripting.FileSystemObject») ‘Извлекаем список подкаталогов на диске «C» и присваиваем ‘его переменной «myFolders» Set myFolders = FSO.GetFolder(«C:») a = «Папки на диске C:» & vbNewLine ‘Проходим циклом по списку подкаталогов и добавляем в переменную «a« ‘их имена, дойдя до папки «Program Files«, выходим из цикла For Each myFolder In myFolders.SubFolders a = a & vbNewLine & myFolder.Name If myFolder.Name = «Program Files» Then a = a & vbNewLine & vbNewLine & «Хватит, дальше читать не буду!» _ & vbNewLine & vbNewLine & «С уважением,» & vbNewLine & _ «Ваш цикл For Each... Next.« Exit For End If Next Set FSO = Nothing MsgBox a End Sub |
Информационное окно MsgBox выведет список наименований подкаталогов на диске C вашего компьютера до папки Program Files включительно и сообщение цикла о прекращении своей работы.
В результате работы программы будут выведены не только наименования подкаталогов, видимых при переходе в проводнике к диску C, но и скрытые и служебные папки. Для просмотра списка всех подкаталогов на диске C, закомментируйте участок кода от If до End If включительно и запустите выполнение процедуры в редакторе VBA Excel.
In this Article
- For Each Loop
- For Each: Basic Examples
- Loop Through Cells
- Loop Through Sheets
- Loop Through Workbooks
- Loop Through Shapes
- Loop Through Charts
- Loop Through PivotTables
- Loop Through Tables
- Loop Through Items in Array
- Loop Through Numbers
- For Each Loop Builder
- For Each – If
- For Each Cell in Range – If
- For Each Common Examples
- Close All Workbooks
- Hide All Sheets
- Unhide All Sheets
- Protect All Sheets
- Unprotect All Sheets
- Delete All Shapes On All Worksheets
- Refresh All PivotTables
- Using For Each in Access VBA
This tutorial will show you examples of using the For Each Loop in VBA. Click here to learn more about loops in general.
For Each Loop
The For Each Loop allows you to loop through each object in a collection:
- All cells in a range
- All worksheets in a workbook
- All open workbooks
- All shapes in a worksheet
- All items in an array
- and more!
For Each: Basic Examples
These examples will demonstrate how to set up For Each loops to loop through different types of objects.
Loop Through Cells
This procedure will loop through each cell in range A1:A10, setting the cell to it’s right equal to itself.
Sub ForEachCell()
    Dim Cell As Range

    For Each Cell In Sheets("Sheet1").Range("A1:A10")
        Cell.Offset(0, 1).value = Cell.value
    Next Cell

End Sub
Loop Through Sheets
This procedure will loop through each sheet in a Workbook, unhiding each sheet.
Sub ForEachSheets()
    Dim ws As Worksheet

    For Each ws In Sheets
        ws.Visible = True
    Next ws

End Sub
Loop Through Workbooks
This procedure will loop through each Workbook, closing each one.
Sub ForEachWorkbooks()
    Dim wb As Workbook

    For Each wb In Workbooks
        wb.Close
    Next wb

End Sub
Loop Through Shapes
This procedure will loop through each shape in Sheet1, deleting each one.
Sub ForEachShape()
    Dim Shp As Shape

    For Each Shp In Sheets("Sheet1").Shapes
        Shp.Delete
    Next Shp

End Sub
VBA Coding Made Easy
Stop searching for VBA code online. Learn more about AutoMacro — A VBA Code Builder that allows beginners to code procedures from scratch with minimal coding knowledge and with many time-saving features for all users!

Learn More
Loop Through Charts
This procedure will loop through each Chart in Sheet1, deleting each one.
Sub ForEachCharts()
    Dim cht As ChartObject

    For Each cht In Sheets("Sheet1").ChartObjects
        cht.Delete
    Next cht

End Sub
Loop Through PivotTables
This procedure will loop through each PivotTable in Sheet1, clearing each one
Sub ForEachPivotTables()
    Dim pvt As PivotTable

    For Each pvt In Sheets("Sheet1").PivotTables
        pvt.ClearTable
    Next pvt

End Sub
Loop Through Tables
This procedure will loop through each Table in Sheet1, deleting each one.
Sub ForEachTables()
    Dim tbl As ListObject

    For Each tbl In Sheets("Sheet1").ListObjects
        tbl.Delete
    Next tbl

End Sub
VBA Programming | Code Generator does work for you!
Loop Through Items in Array
This procedure will loop through each item in an Array, display each value in a msgbox,
Sub ForEachItemInArray()
    Dim arrValue As Variant
    Dim Item As Variant
    arrValue = Array("Item 1", "Item 2", "Item 3")

    For Each Item In arrValue
        MsgBox Item
    Next Item

End Sub
Loop Through Numbers
This procedure will loop through each number in an Array, display each value in a msgbox,
Sub ForEachNumberInNumbers()
    Dim arrNumber(1 To 3) As Integer
    Dim num As Variant

    arrNumber(1) = 10
    arrNumber(2) = 20
    arrNumber(3) = 30

    For Each num In arrNumber
        Msgbox num
    Next num

End Sub
For Each Loop Builder
The examples in this article were built with the Loop Builder in our VBA Add-in: AutoMacro.
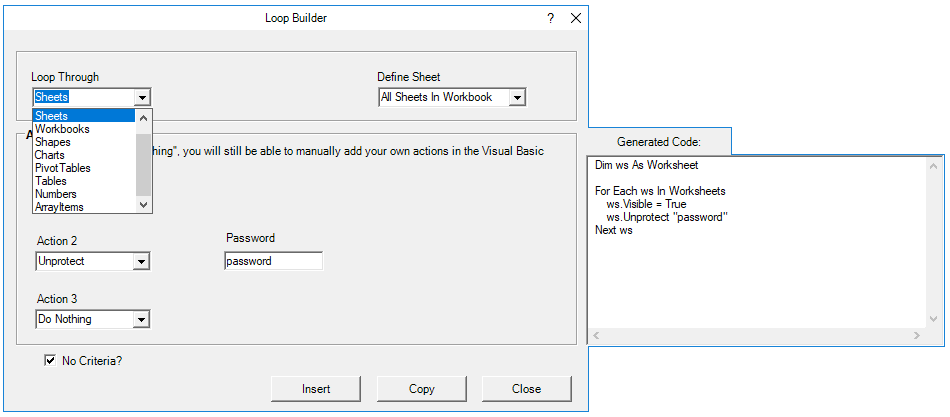
The Loop Builder makes it very easy to generate code to loop through objects. AutoMacro also contains many other Code Generators, an extensive Code Library, and powerful Coding Tools.
For Each – If
You can also use If Statements within Loops to test if objects meet certain criteria, only performing actions on those objects that meet the criteria. Here is an example of looping through each cell in a range:
For Each Cell in Range – If
Sub If_Loop()
Dim Cell as Range

  For Each Cell In Range("A2:A6")
    If Cell.Value > 0 Then
      Cell.Offset(0, 1).Value = "Positive"
    ElseIf Cell.Value < 0 Then
      Cell.Offset(0, 1).Value = "Negative"
    Else
      Cell.Offset(0, 1).Value = "Zero"
    End If
  Next Cell

End Sub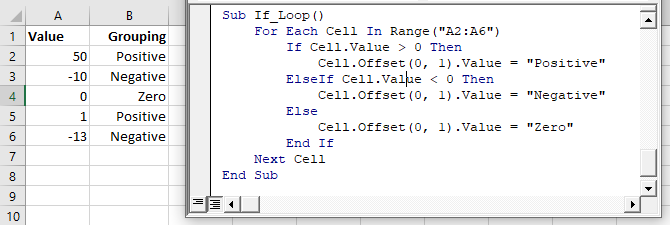
AutoMacro | Ultimate VBA Add-in | Click for Free Trial!
For Each Common Examples
Close All Workbooks
This procedure will close all open workbooks, saving changes.
Sub CloseAllWorkbooks()

    Dim wb As Workbook

    For Each wb In Workbooks
        wb.Close SaveChanges:=True
    Next wb

End Sub
Hide All Sheets
This procedure will hide all worksheets.
Sub HideAllSheets()
    Dim ws As Worksheet

    For Each ws In Sheets
        ws.Visible = xlSheetHidden
    Next ws

End Sub
Unhide All Sheets
This procedure will unhide all worksheets.
Sub UnhideAllSheets()
    Dim ws As Worksheet

    For Each ws In Sheets
        ws.Visible = xlSheetVisible
    Next ws

End Sub
AutoMacro | Ultimate VBA Add-in | Click for Free Trial!
Protect All Sheets
This procedure will protect all worksheets.
Sub ProtectAllSheets()
    Dim ws As Worksheet

    For Each ws In Sheets
        ws.Protect Password:="..."
    Next ws

End Sub
Unprotect All Sheets
This procedure will unprotect all worksheets.
Sub UnprotectAllSheets()
    Dim ws As Worksheet

    For Each ws In Sheets
        ws.Unprotect Password:="..."
    Next ws

End Sub
Delete All Shapes On All Worksheets
This procedure will delete all shapes in a workbook.
Sub DeleteAllShapesOnAllWorksheets()
    Dim Sheet As Worksheet
    Dim Shp As Shape


    For Each Sheet In Sheets
        For Each Shp In Sheet.Shapes
            Shp.Delete
        Next Shp
    Next Sheet

End Sub
Refresh All PivotTables
This procedure will refresh all PivotTables on a sheet.
Sub RefreshAllPivotTables()
    Dim pvt As PivotTable

    For Each pvt In Sheets("Sheet1").PivotTables
        pvt.RefreshTable
    Next pvt

End Sub
Using For Each in Access VBA
The For Each loop works the same way in Access VBA as it does in Excel VBA. The following example will remove all the tables in the current database.
Sub RemoveAllTables()
  Dim tdf As TableDef
  Dim dbs As Database
  Set dbs = CurrentDb
  For Each tdf In dbs.TableDefs
      DoCmd.DeleteObject tdf.Name
  Loop
  Set dbs = Nothing
End SubA For Each loop is used to execute a statement or a set of statements for each element in an array or collection.
Syntax:
For Each element In group
[ statements ]
[ Exit For ]
[ statements ]
Next [ element ]
The For…Each…Next statement syntax has the following three parts:
| Part | Description |
|---|---|
| element | Required (Must be mentioned). Variable is used to iterate through the elements of the collection or array. For collections, the element can only be a Variant variable, a generic object variable, or any specific object variable. For arrays, the element can only be a Variant variable. |
| group | Required(Must be mentioned). Name of an object collection or array (except an array of user-defined types). |
| statement | Optional (May or may not be mentioned). One or more statements are executed on each item in the group. |
There are 4 basic steps to writing a For Each Next Loop in VBA:
- Declare a variable.
- Write the For Each Line with the variable and collection references.
- Add line(s) of code to repeat for each item in the collection.
- Write the Next line to terminate the loop.
The For…Each block is entered if there is at least one element in the group. Upon entering the loop, all the statements in the loop are executed for each element. When there are no more elements in the group, the loop is exited and execution continues with the statement following the Next statement. The next statement line terminates the loop.
Any number of Exit For statements may be placed anywhere in the loop as an alternative way to exit. Exit For is often used after evaluating some condition, for example, If…Then, and transfers control to the statement immediately following Next.
You can also nest For…Each…Next loops by placing one For…Each…Next loop within another. However, each loop element must be unique in its way.
NOTE
- Execution continues as if element is included, if you omit element in a Next statement.
- An error occurs, If a Next statement is encountered before its corresponding For statement,
You can’t use the For…Each…Next statement with an array of user-defined types because a Variant can’t contain a user-defined type.
Example 1
Private Sub Demo_Loop()
students is an array
students = Array(“Akshit”, “Nikita”, “Ritesh”) //Initialising Array-> students
Dim studentnames As Variant // Variable is assigned
‘iterating using For each loop.
For Each Item In students
studentnames =studentnames & Item & Chr(10)
Next
MsgBox studentnames
End Sub
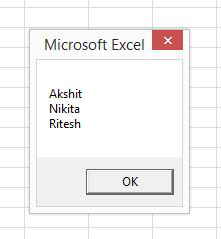
It would look somewhat like below:
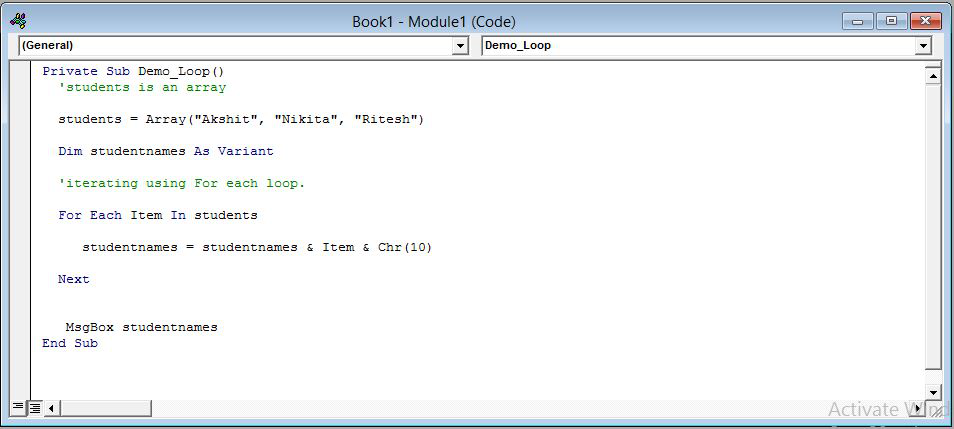
When the above code is executed, it prints all the student names with one item in each line.
This post provides a complete guide to the standard VBA For Loop and the VBA For Each Loop.
If you are looking for information about the VBA While and VBA Do Loop then go here.
If you want some quick info about the For loops then check out the Quick Guide table in the section below.
If you are looking for information on a particular topic then check out the Table of Contents below.
“History is about loops and continuums” – Mike Bidlo.
Related Links for the VBA For Loop
The Complete Guide to Ranges in Excel VBA.
The Complete Guide to Copying Data in Excel VBA.
VBA Do While Loop.
A Quick Guide to the VBA For Loop
| Loop format | Description | Example |
|---|---|---|
| For … Next | Run 10 times | For i = 1 To 10 Next |
| For … Next | Run 5 times. i=2,4, 6 etc. | For i = 2 To 10 Step 2 Next |
| For … Next | Run in reverse order | For i = 10 To 1 Step -1 Debug.Print i Next |
| For … Next | Go through Collection | For i = 1 To coll.Count Debug.Print coll(i) Next |
| For … Next | Go through array | For i = LBound(arr) To UBound(arr) Debug.Print arr(i) Next i |
| For … Next | Go through 2D array | For i = LBound(arr) To UBound(arr) For j = LBound(arr,2) To UBound(arr,2) Debug.Print arr(i, j) Next j Next i |
| For Each … Next | Go through Collection | Dim item As Variant For Each item In coll Debug.Print item Next item |
| For Each … Next | Go through array | Dim item As Variant For Each item In arr Debug.Print item Next item |
| For Each … Next | Go through 2D array | Dim item As Variant For Each item In arr Debug.Print item Next item |
| For Each … Next | Go through Dictionary | Dim key As Variant For Each key In dict.Keys Debug.Print key, dict(key) Next key |
| Both types | Exit Loop | For i = 1 To 10 If Cells(i,1) = «found» Then Exit For End If Next i |
The VBA For Loop Webinar
If you are a member of the website, click on the image below to view the webinar for this post.
(Note: Website members have access to the full webinar archive.)

Introduction to the VBA For Loop
Loops are by far the most powerful component of VBA. They are the rocket fuel of your Macros. They can perform tasks in milliseconds that would take humans hours. They also dramatically reduce the lines of code your applications need.
For Loops have been part of all major programming languages since they were first used with Fortan in 1957.
If you have never used loops before then this post is a great place to start. It provides an in-depth guide to loops, written in plain English without the jargon.
Let’s start with a very important question – what are loops and why do we need them?
What are VBA For Loops?
A loop is simply a way of running the same lines of code a number of times. Obviously running the same code over and over would give the same result.
So what is important to understand is that the lines of code normally contain a variable that changes slightly each time the loop runs.
For example, a loop could write to cell A1, then cell A2, A3 and so on. The slight change each time is the row.
Let’s look at a simple example.
VBA For Loop Example 1
The following code prints the values 1 to 5 in the Immediate Window(Ctrl + G to view).
Debug.Print 1
Debug.Print 2
Debug.Print 3
Debug.Print 4
Debug.Print 5
The Immediate Window
If you have not used the Immediate Window before then this section will get you up to speed quickly.
The function Debug.Print writes values to the Immediate Window. To view this window select View->Immediate Window from the menu( the shortcut is Ctrl + G)


VBA For Loop Example 2
Now imagine we want to print out the numbers 1 to 20. We would need to add 15 more lines to the example above.
However, using a loop we only need to write Debug.Print once.
    For i = 1 To 20
        Debug.Print i
    Next i
The output is:

Output
If we needed print the numbers 1 to 1000 then we only need to change the 20 to 1000.
Normally when we write code we would use a variable instead of a number like 20 or 1000. This gives you greater flexibility. It allows you to decide the number of times you wish to run the loop when the code is running. The following example explains this.
VBA For Loop Example 3
A common task in Excel is read all the rows with with data.
The way you approach this task is as follows
- Find the last row with data
- Store the value in variable
- Use the variable to determine how many times the loop runs
Using a variable in the loop makes your code very flexible. Your will work no matter how many rows there are.
Let’s have a look at an example. Imagine you receive a sheet with a list of fruit types and their daily sales. You want to count the number of Oranges sold and this list will vary in size depending on sales.
The following screenshot shows an example of this list

Sample Data of Fruit Sales
We can use the code to count the oranges
' https://excelmacromastery.com/
Sub CountFruit()

    ' Get the last row with text
    Dim LastRow As Long
    LastRow = Sheet1.Cells(Sheet1.Rows.Count, 1).End(xlUp).Row

    Dim i As Long, Total As Long
    ' Use LastRow in loop
    For i = 2 To LastRow
        ' Check if cell has text "Orange"
        If Sheet1.Cells(i, 1).Value = "Oranges" Then
            ' Add value in column B to total
            Total = Total + Sheet1.Cells(i, 2).Value
        End If
    Next i

    ' Print total
    Debug.Print "Total oranges sold was:"; Total

End Sub
You can try this code for yourself. Change the number of fruit items and you will see that the code still works fine.
If you were to increase the number fruit items to a large value like 10,000 then you will hardly notice the difference in the time it takes to run – almost instantly.
Loops are super fast. This is what makes them so powerful. Imagine performing a manual task on 10,000 cells. It would take a considerable amount of time.
Advantages of the VBA For Loop
4To conclude this section we will list the major advantages of using loops
- They reduce the lines code you need
- They are flexible
- They are fast
In the next sections we will look at the different types of loops and how to use them.
The Standard VBA For Loop
The VBA For loop is the most common loop you will use in Excel VBA. The For Loop is used when you can determine the number of times it will be run. For example, if you want to repeat something twenty times.
YouTube Video For Loop
Check out this YouTube Video of the For Loop:
Get the workbook and code for this video here
Format of the Standard VBA For Loop
The Standard VBA For Loop has the following format:
For <variable> = <start value> to <end value>
Next <variable>
The start and end values can be variables. Also the variable after Next is optional but it is useful and it makes it clear which for loop it belongs to.
How a For Loop Works
Let’s look at a simple for loop that prints the numbers 1 to 3
    Dim i As Long
    For i = 1 To 3
        Debug.Print i
    Next i
How this code works is as follows
i is set to 1
The value of i(now 1) is printed
i is set to 2
The value of i(now 2) is printed
i is set to 3
The value of i(now 3) is printed
If we did not use a loop then the equivalent code would be
    Dim i As Long
    i = i + 1
    Debug.Print i
    i = i + 1
    Debug.Print i
    i = i + 1
    Debug.Print i
The i = i + 1 line is used to add 1 to i and is a common way in programming to update a counter.
Using Step with the VBA For Loop
You can see that i is increased by one each time. This is the default. You can specify this interval using Step keyword.
The next example shows you how to do this:
    ' Prints the even numbers i.e. 2,4,6,8 ... 20
    For i = 2 To 20 Step 2
        Debug.Print i
    Next i
You can use a negative number with Step which will count in reverse
    ' Prints the even numbers in reverse i.e. 20,18,16,14 ... 2
    For i = 20 To 2 Step -2
        Debug.Print i
    Next i
Note: if Step is positive then your starting number must be lower than you ending number. The following loop will not run because the starting number 20 is greater than 10. VBA therefore, thinks it has already reached the target value 10.
    ' Will not run as starting number already greater than 10
    For i = 20 To 10 Step 1
        Debug.Print i
    Next i
If Step is negative then the start number must be greater than the end number.
Exit the For Loop
Sometimes you may want to leave the loop earlier if a certain condition occurs. For example if you read bad data.
You can use Exit For to automatically leave the loop as shown in the following code
    For i = 1 To 1000

        ' If cell is blank then exit for
        If Cells(i, 1) = "" Then
            MsgBox "Blank Cell found - Data error"
            Exit For
        End If

    Next i
Using the VBA For Loop with a Collection
The For loop can also be used to read items in a Collection.
In the following example, we display the name of all the open workbooks
    Dim i As Long
    For i = 1 To Workbooks.Count
        Debug.Print Workbooks(i).FullName
    Next i
Using Nested For Loops
Sometimes you may want to use a loop within a loop. An example of this would be where you want to print the names of the worksheets of each open workbook.
The first loop would go through each workbook. Each time this loop runs it would use a second loop to go through all the worksheets of that workbook. It is actually much easier to do than it sounds.
The following code shows how:
' https://excelmacromastery.com/
Sub ListWorksheets()

    Dim i As Long, j As Long
    ' First Loop goes through all workbooks
    For i = 1 To Workbooks.Count

        ' Second loop goes through all the worksheets of workbook(i)
        For j = 1 To Workbooks(i).Worksheets.Count
            Debug.Print Workbooks(i).Name + ":" + Worksheets(j).Name
        Next j

    Next i

End Sub
This works as follows:
The first loop sets i to 1
The second loop then uses the workbook at 1 to go through the worksheets.
The first loop sets i to 2
The second loop then uses the workbook at 2 to go through the worksheets.
and so on
It the next section we will use a For Each loop to perform the same task. You will find the For Each version much easier to read.
The VBA For Each Loop
The VBA For Each loop is used to read items from a collection or an array. We can use the For Each loop to access all the open workbooks. This is because Application.Workbooks is a collection of open workbooks.
This is a simple example of using the For Each Loop
    Dim wk As Workbook
    For Each wk In Workbooks
        Debug.Print wk.FullName
    Next wk
Format of the VBA For Each Loop
You can see the format of the VBA for each loop here(See Microsoft For Each Next documentation):
For Each <variable> in <collection>
Next <variable>
To create a For Each loop we need a variable of the same type that the collection holds. In the example here we created a variable of type Workbook.
If the collection has different types of items we can declare the variable as a variant.
VBA contains a collection called Sheets. This is a collection of sheets of type Worksheet(normal) and Chart(when you move a chart to be a full sheet). To go through this collection you would declare the variable as a Variant.
The following code uses For Each to print out the name of all the sheets in the current workbook
    Dim sh As Variant
    For Each sh In ThisWorkbook.Sheets
        Debug.Print sh.Name
    Next sh
Order of Items in the For Loop
For Each goes through items in one way only.
For example, if you go through all the worksheets in a workbook it will always go through from left to right. If you go through a range it will start at the lowest cell e.g. Range(“A1:A10”) will return A1,A2,A3 etc.
This means if you want any other order then you need to use the For loop.
Both loops in the following example will read the worksheets from left to right:
    ' Both loops read the worksheets from left to right
    Dim wk As Worksheet
    For Each wk In ThisWorkbook.Worksheets
        Debug.Print wk.Name
    Next

    Dim i As Long
    For i = 1 To ThisWorkbook.Worksheets.Count
        Debug.Print ThisWorkbook.Worksheets(i).Name
    Next
As you can see the For Each loop is neater to write. However if you want to read the sheets in any other order e.g. right to left then you have to use the for loop:
    ' Reading the worksheets from right to left
    Dim i As Long
    For i = ThisWorkbook.Worksheets.Count To 1 Step -1
        Debug.Print ThisWorkbook.Worksheets(i).Name
    Next
Using the VBA For Each Loop With Arrays
One thing to keep in my is that the For Each loop is that it is read-only when you use it with arrays.
The following example demonstrates this:
' https://excelmacromastery.com/
Sub UseForEach()

    ' Create array and add three values
    Dim arr() As Variant
    arr = Array("A", "B", "C")

    Dim s As Variant
    For Each s In arr
        ' Changes what s is referring to - not value of array item
        s = "Z"
    Next

    ' Print items to show the array has remained unchanged
    For Each s In arr
        Debug.Print s
    Next

End Sub
In the first loop we try to assign s to “Z”. When happens is that s is now referring the string “Z” and no longer to the item in the array.
In the second loop we print out the array and you can see that none of the values have changed.
When we use the For Loop we can change the array item. If we change the previous code to use the For Loop you it will change all the array values to “Z”
' https://excelmacromastery.com/
Sub UsingForWithArray()

    ' Create array and add three values
    Dim arr() As Variant
    arr = Array("A", "B", "C")

    Dim i As Long
    For i = LBound(arr) To UBound(arr)
        ' Changes value at position to Z
        arr(i) = "Z"
    Next

    ' Print items to show the array values have change
    For i = LBound(arr) To UBound(arr)
        Debug.Print arr(i)
    Next

End Sub
If your Collection is storing Objects the you can change the items using a For Each loop.
Using Nested For Each Loops
We saw already that you can have a loop inside other loops. Here is the example from above:
' https://excelmacromastery.com/
Sub ListWorksheets()

    Dim i As Long, j As Long
    ' First Loop goes through all workbooks
    For i = 1 To Workbooks.Count

        ' Second loop goes through all the worksheets of workbook(i)
        For j = 1 To Workbooks(i).Worksheets.Count
            Debug.Print Workbooks(i).Name + ":" + Worksheets(j).Name
        Next j

    Next i

End Sub
This time we will use the For Each loop to perform the same task:
' https://excelmacromastery.com/
Sub ReadAllWorksheets()

    Dim wk As Workbook, sh As Worksheet
    ' Read each workbook
    For Each wk In Workbooks

        ' Read each worksheet in the wk workbook
        For Each sh In wk.Worksheets
            ' Print workbook name and worksheet name
            Debug.Print wk.Name + ": " + sh.Name
        Next sh

    Next wk

End Sub
As you can see this is a neater way of performing this task than using the For Loop:
This code run as follows:
- Get the first Workbook from the Workbooks collection
- Go through all the worksheets in this workbook
- Print the workbook/worksheet details
- Get the next workbooks in the collection
- Repeat steps 2 to 3
- Continue until no more workbooks are left in the collection
How to Loop Through a Range
In Excel VBA, the most common use of a For Loop is to read through a range.
Imagine we have the data set in the screenshot below. Our task is to write code that will read through the data and copy the amounts to the column J. We are only going to copy amounts that are greater than 200,000.

The following example shows how we do it:
' Read through an Excel Range using the VBA For Loop
' https://excelmacromastery.com/
Sub ForLoopThroughRange()

    ' Get the worksheet
    Dim sh As Worksheet
    Set sh = ThisWorkbook.Worksheets("Sheet1")

    ' Get the Range
    Dim rg As Range
    Set rg = sh.Range("A1").CurrentRegion

    ' Delete existing output
    sh.Range("J1").CurrentRegion.ClearContents

    ' Set the first output row
    Dim row As Long
    row = 1

    ' Read through all the rows using the For Loop
    Dim i As Long
    For i = 2 To rg.Rows.Count

        ' Check if amount is greater than 200000
        If rg.Cells(i, 4).Value > 200000 Then

            ' Copy amount to column m
            sh.Cells(row, "J").Value = rg.Cells(i, 4).Value

            ' Move to next output row
            row = row + 1

        End If

    Next i

End Sub
This is a very basic example of copying data using Excel VBA. If you want a complete guide to copying data using Excel VBA then check out this post
Summary of the VBA For Loops
The Standard VBA For Loop
- The For loop is slower than the For Each loop.
- The For loop can go through a selection of items e.g. 5 to 10.
- The For loop can read items in reverse e.g. 10 to 1.
- The For loop is not as neat to write as the For Each Loop especially with nested loops.
- To exit a For loop use Exit For.
The VBA For Each Loop
- The For Each loop is faster than the For loop.
- The For Each loop goes through all items in the collectionarray.
- The For Each loop can go through items in one order only.
- The For Each loop is neater to write than a For Loop especially for nested loops.
- To exit a For Each loop use Exit For.
What’s Next?
Free VBA Tutorial If you are new to VBA or you want to sharpen your existing VBA skills then why not try out the The Ultimate VBA Tutorial.
Related Training: Get full access to the Excel VBA training webinars.
(NOTE: Planning to build or manage a VBA Application? Learn how to build 10 Excel VBA applications from scratch.)
Bottom line: The For Next Loops are some of the most powerful VBA macro coding techniques for automating common tasks in Excel. This article explains how the loop works to repeat actions on a collection of items, which saves us a ton of time with our jobs.
Skill level: Intermediate
The Power of VBA Loops
In Excel we spend a lot of time repeating simple tasks. This could be actions like: formatting multiple ranges, unhiding multiple sheets, copying and pasting to several workbooks, apply filters to multiple tables or pivot tables, replacing values, updating formulas, etc.
Can you think of a few tasks where you had to repeat the same process over and over again?
These tasks can be extremely time consuming and BORING!
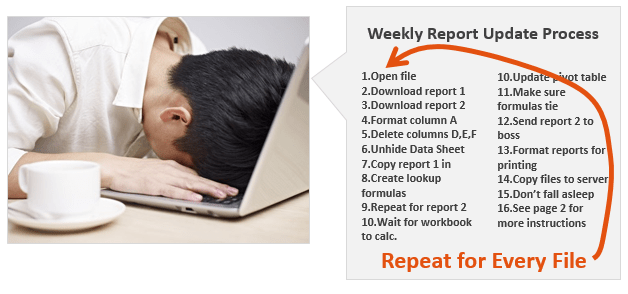
Fortunately, there is a way out. We can use loops in our VBA macros to repeat actions very quickly. Tasks that can take hours to do manually can be completed in a matter of seconds with a loop.
The For Next Loop is the most common type of loop that helps us with these repetitive jobs. In this article we will look at the two types of For Next Loops.
Download the Example File
Download the free Excel file that contains examples of macros with the For Next Loop.
Download a PDF version of the article for printing.
How Does the For Next Loop Work?
The For Next Loop allows us to loop through a collection of items in Excel. The collection can be a collection of objects or a list of numbers.
Examples of collections of objects include:
- Cells in a range.
- Worksheets in a workbook.
- Open workbooks on the computer.
- Pivot tables in a worksheet.
- Pivot fields in a pivot table.
- Shapes on a worksheet.
- And any other object you interact with in Excel.
The job of the For Next Loop is to perform the same actions (lines of code) on each item in the collection.
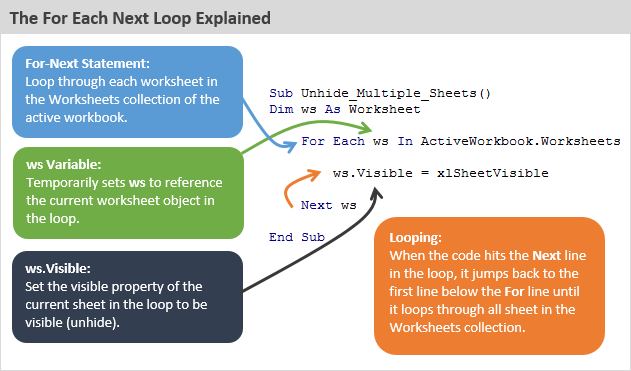
The example below contains a For Next Loop that loops through each worksheet in the workbook and unhides each sheet. The loop starts at the first item in the collection (the first sheet in the workbook), and performs the line(s) of code between the For and Next lines for each item in the collection (every sheet in the workbook).
Sub Unhide_Multiple_Sheets()

Dim ws As Worksheet

    For Each ws In ActiveWorkbook.Worksheets
        ws.Visible = xlSheetVisible
    Next ws

End Sub
Of course we can use logical statements like If statements to test properties and conditions before performing the actions. The following macro only unhides sheets that have the phrase “ABC Global Co.” in cell A1 of each sheet, and hides all other sheets.
Sub Unhide_Report_Sheets()

Dim ws As Worksheet

    For Each ws In ActiveWorkbook.Worksheets
        If ws.Range("A1").Value = "ABC Global Co." Then
            ws.Visible = xlSheetVisible
        Else
            ws.Visible = xlSheetHidden
        End If
    Next ws

End Sub
The Two Types of For Next Loops
There are really two types of For Next Loops.
- For Each Next Loops loop through a collection of items.
- For Next Loops loop through a set of numbers.
Let’s take a look at how each works.
The For Each Next Loop: Loops Through a Collection of Items
As we saw above, the The For Each Next Loop allows us to loop through a collection of items or objects. This is probably the most common loop we use in Excel because we are working with collections of objects. Again, these collections are the cells in a range, worksheets in a workbook, pivot tables in a worksheet, etc.
We will use the example of writing a For Each Next Loop to loop through all the worksheets in a workbook.
There are 4 basic steps to writing a For Each Next Loop in VBA:
- Declare a variable for an object.
- Write the For Each Line with the variable and collection references.
- Add line(s) of code to repeat for each item in the collection.
- Write the Next line to close the loop.
Let’s take a look at each of these steps in detail.
Step 1 – Declare a Variable for an Object
We first need to declare a variable that will temporarily store a reference to the object.
The Dim line at the top of the macro declares a variable as an object. In this case the object is a worksheet. We can create any variable name we want as long as it is not the same as another reference in VBA. “ws” is the most common variable name for a worksheet object, but you can change this.
Dim ws As Worksheet
Step 2 – The For Each Line
Next we will write the For Each statement. This is the first line of code in the loop.
For Each ws In ActiveWorkbook.Worksheets
The first two words are For Each. Then we type the variable name, followed by the word In Finally, we specify where the collection exists. In this case we want to loop through all the worksheets in the ActiveWorkbook. So, we type ActiveWorkbook.Worksheets. That line references all the worksheets in the ActiveWorkbook.
If you want to loop through worksheets of a specific workbook, then you can use the Workbooks property to reference that workbook by name.
For Each ws In Workbooks("Book2.xlsx").Worksheets
Just remember that the workbook you reference has to be open before the For Next line of code runs. Of course, we can use the Workbooks.Open method to open the workbook as well.
Step 3 – Add Code to Repeat for Each Iteration
After the For Each line, we add the line(s) of code that will be performed on each sheet. In this example we just have one line of code that unhides the sheet.
ws.Visible = xlSheetVisible
In this line of code we are using the ws variable to reference the current worksheet in the loop. When the loop runs, it sets a temporary reference to the ws variable for each iteration in the loop.
This would be the same as if we were to set the ws variable to a specific sheet using the following line of code.
Set ws = Worksheets(1)
However, we do NOT need this line with the For Each Next Loop. The loop takes care of setting the variable for us for each iteration in the loop.
For the first iteration in the loop, the ws is set to Worksheets(1). In the next iteration, ws is set to Worksheets(2). This continues as the loop iterates through all sheets in the workbook. This is very powerful because we can reuse the variable to reference the worksheet several times within the the loop.
Step 4 – The Next Line Loops Back
The final line of code in the loop is the Next line.
Next ws
When the macro hits this line of code it does two things:
- First, it changes the variable reference to the next item in the collection. In this example, the ws variable is changed to reference the next sheet in the workbook.
- Second, it loops back up to the run the line of code directly below the For Each line. It then runs all the lines of code between the For Each and Next lines in top to bottom order.
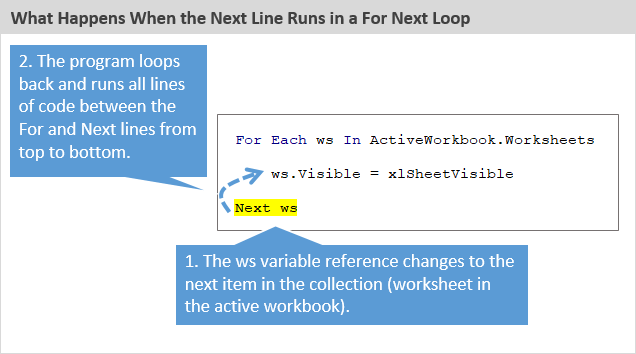
When the last item in the collection (worksheet in the workbook) is reached, the looping stops, and the macro continues on to the next line of code below the Next line.
What Order Does the For Each Loop Run In?
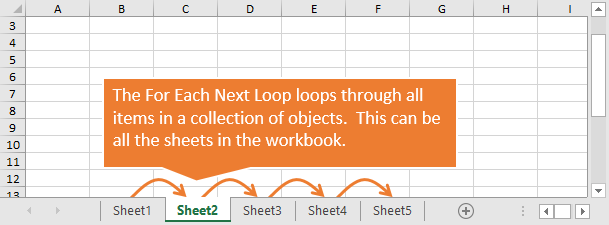
The For Each Loop always starts at the first item in the collection and loops through to the last item in the order they appear in Excel. This is based on the index number of the items in the collection. Here are some examples of the order the loop runs in for common objects.
- Worksheets: Starts at the first sheet tab in the workbook and loops to the last in the order the tabs are displayed in the workbook.
- Workbooks: Starts at the first workbook that was opened and loops in the order that workbooks were opened. Workbooks are assigned an index number as they are opened.
- Cells: Loops left-to-right, then down. Starts in the first cell in the range and loops to the next column in the same row, then goes to the next row.
- Tables & Pivot Tables: Starts with the first object that was create in the sheet and loops in the order the objects were created. This same principle is true for other objects you create in sheets like shapes, charts, slicers, etc.
Items/Objects Are NOT Selected in the Loop
It’s important to note that when we loop through a collection of objects, each object is NOT selected in Excel.
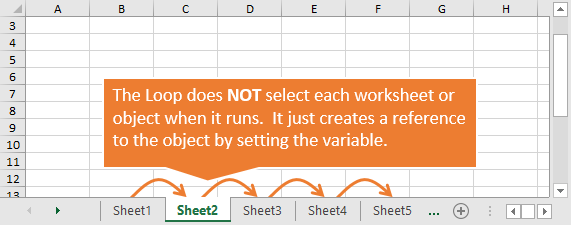
The loop creates a reference to the item/object with the variable. The variable is temporarily set to a reference of the object. The object is NOT selected and does NOT necessarily become the active object. To select the object we can use the Select or Activate methods. You would also have to make sure the objects parent object(s) are selected first. Checkout my article on the Excel Object Model and Object Hierarchy in VBA for more on this.
The Next Loop: Loops Through a Set of Numbers
We can also use the For Next Loop to loop through a set of numbers. This can be useful when we are looping through userform controls, arrays, or if we want to loop through a collection backwards.
The basic operation of the For Next Loop is the same as the For Each Loop. The difference is the format of the For line.
Step 1 – Declare a Variable for a Number
To loop through a set of numbers we first need to declare a variable to a whole number data type. We can use Integer or Long integer.
Dim i As Long
The variable is referred to as the Counter because it increments or counts up/down for each iteration in the loop.
A side note on Long: The Long (integer) data type holds a bigger number than Integer. It takes up more memory, but today’s computer have so much memory that it’s no longer a problem. We can use Long variables all the time. The letter L looks like the number 1 in VBA, so I’m now using i as the variable name even though I use Long as the data type. This is all a matter of personal preference and you can name the variable whatever you want.
Step 2 – Write the For Statement
Next we write the For statement. The basic construct is the keyword For, followed by the variable name (counter), then equals sign, start value To end value.
For i = 1 To 10
The start and end values can be referenced as numbers, or we can use integer/long variables in their place.
For i = iStart To iEnd
We can also use properties of objects that return a number.
For i = 1 To ActiveWorkbook.Worksheets.Count
That line of code would return the number of sheets in the active workbook. However, it is NOT looping through each worksheet. The loop is just looping through a set of numbers. We have to create a reference to a worksheet with the counter variable (i) as the index number of the Worksheets property. Step 3 shows this reference.
Step 3 – Add Code that Repeats for Each Iteration
The rest of the loop functions the same as the For Each loop. We can add lines between the For and Next lines that will run for each iteration of the loop. The counter variable can be used multiple times in these lines of code.
Worksheets(i).Visible = True
Step 4 – The Next Line Increments the Number & Loops Back
Finally, we add the Next line at the bottom.
Next i
When the macro runs it will set the variable equal to the first number in the For line. When the macro hits the Next line, it will add 1 to the value of the variable, or count up. So, i = 2 in the second iteration of the loop. It continues to loop until the last number in the loop is reached.
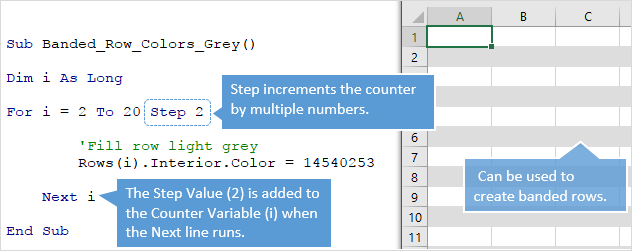
By default, 1 is added to the variable counter for each iteration in the loop. This is called the Step Value, and we can control the value of each step in the counter. The Step value is added to the end of the For line. The following line will add 2 to the counter for each iteration in the loop.
For i = 2 To 20 Step 2
If you wanted to shade every other row in a sheet, you might use a loop like this.
Looping Backwards
We can also use the Step Value to loop backwards by specifying a negative number.
For i = 100 To 1 Step -1
Notice that the Start Value is now the larger number and the End Value is the smaller number. The loops starts at 100 (Start Value) and subtracts 1 from the counter variable (Step -1) for each iteration in the loop until it gets to 1 (End Value).
The Step keyword is optional. If you do not specify it then VBA assumes a Step value of 1.
Looping backwards is great if you are deleting items. I will write a separate post on this, but the general idea is that when we are looping through a collection and deleting items, the size of the collection gets smaller as items are deleted. The loop will typically hit an error once it gets to the 10th item, when there are now only 9 items in the collection. Looping backwards prevents this potential error.
Exiting the Loop Early
Typically the loop will iterate through all items in the collection, then continue on to the next line of code below the Next line. However, we can stop the loop early with an Exit For statement.
Exit For
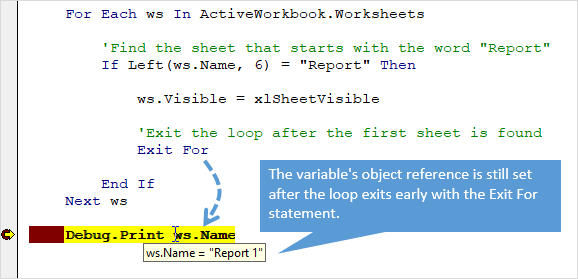
The following macro uses the Exit For statement to exit the loop after the first sheet that starts with the word “Report” is found an unhidden.
Sub Unhide_First_Sheet_Exit_For()
'Unhides the first sheet that contain a specific phrase
'in the sheet name, then exits the loop.

Dim ws As Worksheet

    For Each ws In ActiveWorkbook.Worksheets

        'Find the sheet that starts with the word "Report"
        If Left(ws.Name, 6) = "Report" Then

            ws.Visible = xlSheetVisible

            'Exit the loop after the first sheet is found
            Exit For

        End If
    Next ws

End Sub
The ws variable retains the reference to the worksheet after the loop is exited early, and can be used again in the code below the loop.
Variable Not Required After Next Keyword
You might have noticed that I added the variable after the Next keyword at the bottom of the loop in the examples above.
Next ws
Next i
This is NOT required, and you might not see it in other examples you find on the web. However, I like to include the variable after Next for two reasons.
- We can use it when debugging code to see the value of the variable by hovering the mouse over the variable when the code is stopped.
- It makes it easier to understand which For line the Next line is connected to. This is especially true when you have multiple loops or nested loops in your macros.
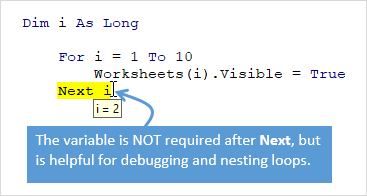
Therefore, I recommend adding the variable after the Next keyword as a best practice. A little extra work up front will save time & headache in the future. Trust me! 😉
Macro Code Examples of VBA For Loops
Here are additional articles with macros that use at least one For Next Loop.
3 Ways to Unhide Multiple Sheets in Excel + VBA Tutorial
Automatic Default Number Formatting in Excel Pivot Tables
3 Tips to Save and Close All Open Excel Workbook Files + Macro
The SUBTOTAL Metrics Macro – Create a Summary Table of All Function Types
How to Add a Table of Contents Image Gallery Sheet to Your Excel Files
Hide & Unhide (Filter) Columns with a Slicer or Filter Drop-down Menu
Filter a Pivot Table or Slicer for the Most Recent Date or Period
How to Make Your Excel Dashboards Resize for Different Screen Sizes
Convert Pivot Table to SUMIFS Formulas + Free VBA Macro
VBA Macro to Hide All Columns That Contain a Value in a Cell
How to Repeat Tasks with VBA Code – Looping – Great article with lots of examples from my friend Chris Newman at The Spreadsheet Guru.
What Task Do You Want To Loop?
I hope that article helps get you started with loops. Don’t forget to download the free Excel file that contains the code samples.
Loops are definitely an intermediate coding technique that force us to go beyond the macro recorder. Unfortunately, the macro recorded cannot create loops. However, this is a skill that you will be able to use over and over again throughout your career to automate simple and complex tasks. Understanding how to use loops will give you magical powers with Excel.
Please leave a comment below with a task that you want to automate with a loop. Thank you! 🙂