
Цикл For… Next в VBA Excel, его синтаксис и описание отдельных компонентов. Примеры использования цикла For… Next.
Цикл For… Next в VBA Excel предназначен для выполнения группы операторов необходимое количество раз, заданное управляющей переменной цикла — счетчиком. При выполнении цикла значение счетчика после каждой итерации увеличивается или уменьшается на число, указанное выражением оператора Step, или, по умолчанию, на единицу. Когда необходимо применить цикл к элементам, количество которых и индексация в группе (диапазон, массив, коллекция) неизвестны, следует использовать цикл For Each… Next.
|
For counter = start To end [ Step step ] [ statements ] [ Exit For ] [ statements ] Next [ counter ] |
|
For счетчик = начало To конец [ Step шаг ] [ операторы ] [ Exit For ] [ операторы ] Next [ счетчик ] |
В квадратных скобках указаны необязательные атрибуты цикла For… Next.
Компоненты цикла For… Next
| Компонент | Описание |
|---|---|
| counter | Обязательный атрибут. Числовая переменная, выполняющая роль счетчика, которую еще называют управляющей переменной цикла. |
| start | Обязательный атрибут. Числовое выражение, задающее начальное значение счетчика. |
| end | Обязательный атрибут. Числовое выражение, задающее конечное значение счетчика. |
| Step* | Необязательный атрибут. Оператор, указывающий, что будет задан шаг цикла. |
| step | Необязательный атрибут. Числовое выражение, задающее шаг цикла. Может быть как положительным, так и отрицательным. |
| statements | Необязательный** атрибут. Операторы вашего кода. |
| Exit For | Необязательный атрибут. Оператор выхода из цикла до его окончания. |
| Next [ counter ] | Здесь counter — необязательный атрибут. Это то же самое имя управляющей переменной цикла, которое можно здесь не указывать. |
*Если атрибут Step отсутствует, цикл For… Next выполняется с шагом по умолчанию, равному 1.
**Если не использовать в цикле свой код, смысл применения цикла теряется.
Примеры циклов For… Next
Вы можете скопировать примеры циклов в свой модуль VBA, последовательно запускать их на выполнение и смотреть результаты.
Простейший цикл
Заполняем десять первых ячеек первого столбца активного листа Excel цифрами от 1 до 10:
|
Sub test1() Dim i As Long For i = 1 To 10 Cells(i, 1) = i Next End Sub |
Простейший цикл с шагом
В предыдущий цикл добавлен оператор Step со значением 3, а результаты записываем во второй столбец:
|
Sub test2() Dim i As Long For i = 1 To 10 Step 3 Cells(i, 2) = i Next End Sub |
Цикл с отрицательными аргументами
Этот цикл заполняет десять первых ячеек третьего столбца в обратной последовательности:
|
Sub test3() Dim i As Long For i = 0 To —9 Step —1 Cells(i + 10, 3) = i + 10 Next End Sub |
Увеличиваем размер шага до -3 и записываем результаты в четвертый столбец активного листа Excel:
|
Sub test4() Dim i As Long For i = 0 To —9 Step —3 Cells(i + 10, 4) = i + 10 Next End Sub |
Вложенный цикл
Внешний цикл последовательно задает индексы первых десяти строк активного листа, а вложенный цикл складывает числа в первых четырех ячейках строки с текущем индексом и записывает сумму в ячейку пятого столбца. Перед запуском вложенного цикла с накопительным сложением, пятую ячейку соответствующей строки обнуляем, чтобы в случае нахождения в ней какого-либо числа, оно не прибавилось к итоговой сумме.
|
Sub test5() Dim i1 As Long, i2 As Long For i1 = 1 To 10 ‘Пятой ячейке в строке i1 присваиваем 0 Cells(i1, 5) = 0 For i2 = 1 To 4 Cells(i1, 5) = Cells(i1, 5) + Cells(i1, i2) Next Next End Sub |
Выход из цикла
В шестой столбец активного листа запишем названия десяти животных, конечно же, с помощью цикла For… Next:
|
Sub test6() Dim i As Long For i = 1 To 10 Cells(i, 6) = Choose(i, «Медведь», «Слон», «Жираф», «Антилопа», _ «Крокодил», «Зебра», «Тигр», «Ящерица», «Лев», «Бегемот») Next End Sub |
Следующий цикл будет искать в шестом столбце крокодила, который съел галоши. В ячейку седьмого столбца цикл, пока не встретит крокодила, будет записывать строку «Здесь был цикл», а когда обнаружит крокодила, запишет «Он съел галоши» и прекратит работу, выполнив команду Exit For. Это будет видно по ячейкам рядом с названиями животных ниже крокодила, в которых не будет текста «Здесь был цикл».
|
Sub test7() Dim i As Long For i = 1 To 10 If Cells(i, 6) = «Крокодил» Then Cells(i, 7) = «Он съел галоши» Exit For Else Cells(i, 7) = «Здесь был цикл» End If Next End Sub |
Результат работы циклов For… Next из примеров:

Результат работы циклов For… Next
Такие данные на активном листе Excel вы получите, если последовательно запустите на выполнение в редакторе VBA все семь подпрограмм из примеров, демонстрирующих работу циклов For… Next.
Цикл с дробными аргументами
Атрибуты start, end и step могут быть представлены числом, переменной или числовым выражением:
|
For i = 1 To 20 Step 2 For i = a To b Step c For i = a — 3 To 2b + 1 Step c/2 |
В результате вычисления значения переменной вне цикла или выражения внутри его может получиться дробный результат. VBA Excel округлит его до целого числа, используя бухгалтерское округление:
|
‘Значения атрибутов до округления For i = 1.5 To 10.5 Step 2.51 ‘Округленные значения атрибутов For i = 2 To 10 Step 3 |
Старайтесь не допускать попадания в тело цикла For… Next неокругленных значений аргументов, чтобы не получить непредсказуемые результаты его выполнения. Если без дробных чисел не обойтись, а необходимо использовать обычное округление, применяйте в коде VBA функцию рабочего листа WorksheetFunction.Round для округления числа перед использованием его в цикле For… Next.
In this Article
- VBA Loop Quick Examples
- For Each Loops
- For Next Loops
- Do While Loops
- Do Until Loops
- VBA Loop Builder
- VBA For Next Loop
- For Loop Syntax
- For Loop Step
- For Loop Step – Inverse
- Nested For Loop
- Exit For
- Continue For
- VBA For Each Loop
- For Each Cell in Range
- For Each Worksheet in Workbook
- For Each Open Workbook
- For Each Shape in Worksheet
- For Each Shape in Each Worksheet in Workbook
- For Each – IF Loop
- VBA Do While Loop
- Do While
- Loop While
- VBA Do Until Loop
- Do Until
- Loop Until
- Exit Do Loop
- End or Break Loop
- More Loop Examples
- Loop Through Rows
- Loop Through Columns
- Loop Through Files in a Folder
- Loop Through Array
- Loops in Access VBA
To work effectively in VBA, you must understand Loops.
Loops allow you to repeat a code block a set number of times or repeat a code block on a each object in a set of objects.
First we will show you a few examples to show you what loops are capable of. Then we will teach you everything about loops.
VBA Loop Quick Examples
For Each Loops
For Each Loops loop through every object in a collection, such as every worksheet in workbook or every cell in a range.
Loop Through all Worksheets in Workbook
This code will loop through all worksheets in the workbook, unhiding each sheet:
Sub LoopThroughSheets()
Dim ws As Worksheet

    For Each ws In Worksheets
        ws.Visible = True
    Next

End Sub
Loop Through All Cells in Range
This code will loop through a range of cells, testing if the cell value is negative, positive, or zero:
Sub If_Loop()
Dim Cell as Range

  For Each Cell In Range("A2:A6")
    If Cell.Value > 0 Then
      Cell.Offset(0, 1).Value = "Positive"
    ElseIf Cell.Value < 0 Then
      Cell.Offset(0, 1).Value = "Negative"
    Else
      Cell.Offset(0, 1).Value = "Zero"
     End If
  Next Cell

End Sub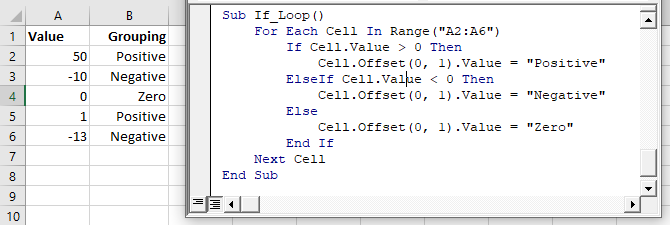
For Next Loops
Another type of “For” Loop is the For Next Loop. The For Next Loop allows you to loop through integers.
This code will loop through integers 1 through 10, displaying each with a message box:
Sub ForLoop()
    Dim i As Integer
    For i = 1 To 10
        MsgBox i
    Next i
End Sub
Do While Loops
Do While Loops will loop while a condition is met. This code will also loop through integers 1 through 10, displaying each with a message box.
Sub DoWhileLoop()
    Dim n As Integer
    n = 1
    Do While n < 11
        MsgBox n
        n = n + 1
    Loop
End Sub
Do Until Loops
Conversely, Do Until Loops will loop until a condition is met. This code does the same thing as the previous two examples.
Sub DoUntilLoop()
    Dim n As Integer
    n = 1
    Do Until n >= 10
        MsgBox n
        n = n + 1
    Loop
End Sub
We will discuss this below, but you need to be extremely careful when creating Do While or Do Until loops so that you don’t create a never ending loop.
VBA Loop Builder
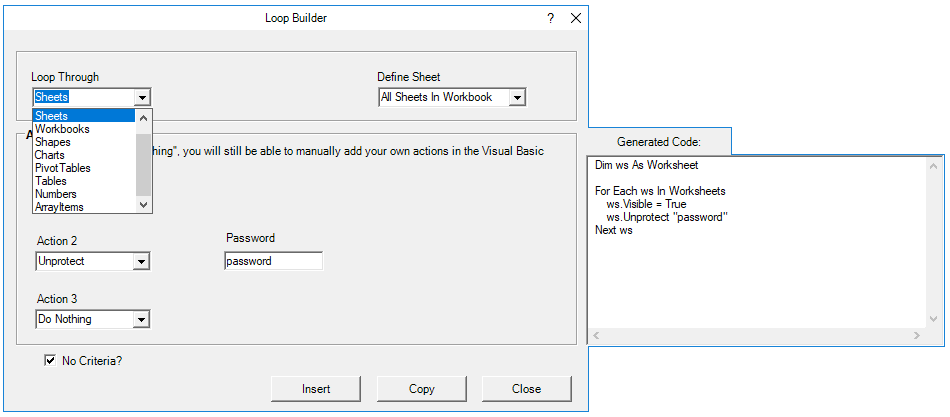
This is a screenshot of the “Loop Builder” from our Premium VBA Add-in: AutoMacro. The Loop Builder allows you to quickly and easily build loops to loop through different objects, or numbers. You can perform actions on each object and/or select only objects that meet certain criteria.
The add-in also contains many other code builders, an extensive VBA code library, and an assortment of coding tools. It’s a must have for any VBA developer.
Now we will cover the different types of loops in depth.
VBA Coding Made Easy
Stop searching for VBA code online. Learn more about AutoMacro — A VBA Code Builder that allows beginners to code procedures from scratch with minimal coding knowledge and with many time-saving features for all users!

Learn More
VBA For Next Loop
For Loop Syntax
The For Next Loop allows you to repeat a block of code a specified number of times. The syntax is:
[Dim Counter as Integer]

For Counter = Start to End [Step Value]
    [Do Something]
Next [Counter]
Where the items in brackets are optional.
- [Dim Counter as Long] – Declares the counter variable. Required if Option Explicit is declared at the top of your module.
- Counter – An integer variable used to count
- Start – The start value (Ex. 1)
- End – The end value (Ex. 10)
- [Step Value] – Allows you to count every n integers instead of every 1 integer. You can also go in reverse with a negative value (ex. Step -1)
- [Do Something] – The code that will repeat
- Next [Counter] – Closing statement to the For Next Loop. You can include the Counter or not. However, I strongly recommend including the counter as it makes your code easier to read.
If that’s confusing, don’t worry. We will review some examples:
Count to 10
This code will count to 10 using a For-Next Loop:
Sub ForEach_CountTo10()

Dim n As Integer
For n = 1 To 10
    MsgBox n
Next n

End Sub
For Loop Step
Count to 10 – Only Even Numbers
This code will count to 10 only counting even numbers:
Sub ForEach_CountTo10_Even()

Dim n As Integer
For n = 2 To 10 Step 2
    MsgBox n
Next n

End Sub
Notice we added “Step 2”. This tells the For Loop to “step” through the counter by 2. We can also use a negative step value to step in reverse:
VBA Programming | Code Generator does work for you!
For Loop Step – Inverse
Countdown from 10
This code will countdown from 10:
Sub ForEach_Countdown_Inverse()

Dim n As Integer
For n = 10 To 1 Step -1
    MsgBox n
Next n
MsgBox "Lift Off"

End Sub
Delete Rows if Cell is Blank
I’ve most frequently used a negative step For-Loop to loop through ranges of cells, deleting rows that meet certain criteria. If you loop from the top rows to the bottom rows, as you delete rows you will mess up your counter.
This example will delete rows with blank cells (starting from the bottom row):
Sub ForEach_DeleteRows_BlankCells()

Dim n As Integer
For n = 10 To 1 Step -1
    If Range("a" & n).Value = "" Then
        Range("a" & n).EntireRow.Delete
    End If
Next n

End Sub
Nested For Loop
You can “nest” one For Loop inside another For Loop. We will use Nested For Loops to create a multiplication table:
Sub Nested_ForEach_MultiplicationTable()

Dim row As Integer, col As Integer

For row = 1 To 9
    For col = 1 To 9
        Cells(row + 1, col + 1).Value = row * col
    Next col
Next row

End Sub
Exit For
The Exit For statement allows you to exit a For Next loop immediately.
You would usually use Exit For along with an If Statement, exiting the For Next Loop if a certain condition is met.
For example, you might use a For Loop to find a cell. Once that cell is found, you can exit the loop to speed up your code.
This code will loop through rows 1 to 1000, looking for “error” in column A. If it’s found, the code will select the cell, alert you to the found error, and exit the loop:
Sub ExitFor_Loop()

Dim i As Integer

For i = 1 To 1000
    If Range("A" & i).Value = "error" Then
        Range("A" & i).Select
        MsgBox "Error Found"
        Exit For
    End If
Next i

End Sub
Important: In the case of Nested For Loops, Exit For only exits the current For Loop, not all active Loops.
Continue For
VBA does not have the “Continue” command that’s found in Visual Basic. Instead, you will need to use “Exit”.
AutoMacro | Ultimate VBA Add-in | Click for Free Trial!
VBA For Each Loop
The VBA For Each Loop will loop through all objects in a collection:
- All cells in a range
- All worksheets in a workbook
- All shapes in a worksheet
- All open workbooks
You can also use Nested For Each Loops to:
- All cells in a range on all worksheets
- All shapes on all worksheets
- All sheets in all open workbooks
- and so on…
The syntax is:
For Each Object in Collection
[Do Something]
Next [Object]
Where:
- Object – Variable representing a Range, Worksheet, Workbook, Shape, etc. (ex. rng)
- Collection – Collection of objects (ex. Range(“a1:a10”)
- [Do Something] – Code block to run on each object
- Next [Object] – Closing statement. [Object] is optional, however strongly recommended.
For Each Cell in Range
This code will loop through each cell in a range:
Sub ForEachCell_inRange()

Dim cell As Range

For Each cell In Range("a1:a10")
    cell.Value = cell.Offset(0,1).Value
Next cell

End Sub
For Each Worksheet in Workbook
This code will loop through all worksheets in a workbook, unprotecting each sheet:
Sub ForEachSheet_inWorkbook()

Dim ws As Worksheet

For Each ws In Worksheets
    ws.Unprotect "password"
Next ws

End Sub
For Each Open Workbook
This code will save and close all open workbooks:
Sub ForEachWB_inWorkbooks()

Dim wb As Workbook

For Each wb In Workbooks
    wb.Close SaveChanges:=True
Next wb

End Sub
AutoMacro | Ultimate VBA Add-in | Click for Free Trial!
For Each Shape in Worksheet
This code will delete all shapes in the active sheet.
Sub ForEachShape()

Dim shp As Shape

For Each shp In ActiveSheet.Shapes
    shp.Delete
Next shp

End Sub
For Each Shape in Each Worksheet in Workbook
You can also nest For Each Loops. Here we will loop through all shapes in all worksheets in the active workbook:
Sub ForEachShape_inAllWorksheets()

Dim shp As Shape, ws As Worksheet

For Each ws In Worksheets
    For Each shp In ws.Shapes
        shp.Delete
    Next shp
Next ws

End Sub
For Each – IF Loop
As we’ve mentioned before, you can use an If statement within a loop, performing actions only if certain criteria is met.
This code will hide all blank rows in a range:
Sub ForEachCell_inRange()

Dim cell As Range

For Each cell In Range("a1:a10")
    If cell.Value = "" Then _
       cell.EntireRow.Hidden = True
Next cell

End Sub
VBA Do While Loop
The VBA Do While and Do Until (see next section) are very similar. They will repeat a loop while (or until) a condition is met.
The Do While Loop will repeat a loop while a condition is met.
Here is the Do While Syntax:
Do While Condition
[Do Something]
Loop
Where:
- Condition – The condition to test
- [Do Something] – The code block to repeat
You can also set up a Do While loop with the Condition at the end of the loop:
Do
[Do Something]
Loop While Condition
We will demo each one and show how they differ:
AutoMacro | Ultimate VBA Add-in | Click for Free Trial!
Do While
Here is the Do While loop example we demonstrated previously:
Sub DoWhileLoop()
    Dim n As Integer
    n = 1
    Do While n < 11
        MsgBox n
        n = n + 1
    Loop
End Sub
Loop While
Now let’s run the same procedure, except we will move the condition to the end of the loop:
Sub DoLoopWhile()
    Dim n As Integer
    n = 1
    Do
        MsgBox n
        n = n + 1
    Loop While n < 11
End Sub
VBA Do Until Loop
Do Until Loops will repeat a loop until a certain condition is met. The syntax is essentially the same as the Do While loops:
Do Until Condition
[Do Something]
Loop
and similarly the condition can go at the start or the end of the loop:
Do
[Do Something]
Loop Until Condition
Do Until
This do Until loop will count to 10, like our previous examples
Sub DoUntilLoop()
    Dim n As Integer
    n = 1
    Do Until n > 10
        MsgBox n
        n = n + 1
    Loop
End Sub
AutoMacro | Ultimate VBA Add-in | Click for Free Trial!
Loop Until
This Loop Until loop will count to 10:
Sub DoLoopUntil()
    Dim n As Integer
    n = 1
    Do
        MsgBox n
        n = n + 1
    Loop Until n > 10
End Sub
Exit Do Loop
Similar to using Exit For to exit a For Loop, you use the Exit Do command to exit a Do Loop immediately
Exit DoHere is an example of Exit Do:
Sub ExitDo_Loop()

Dim i As Integer
i = 1

Do Until i > 1000
    If Range("A" & i).Value = "error" Then
        Range("A" & i).Select
        MsgBox "Error Found"
        Exit Do
    End If
    i = i + 1
Loop

End Sub
End or Break Loop
As we mentioned above, you can use the Exit For or Exit Do to exit loops:
Exit ForExit DoHowever, these commands must be added to your code before you run your loop.
If you are trying to “break” a loop that’s currently running, you can try pressing ESC or CTRL + Pause Break on the keyboard. However, this may not work. If it doesn’t work, you’ll need to wait for your loop to end or, in the case of an endless loop, use CTRL + ALT + Delete to force close Excel.
This is why I try to avoid Do loops, it’s easier to accidentally create an endless loop forcing you to restart Excel, potentially losing your work.
More Loop Examples
AutoMacro | Ultimate VBA Add-in | Click for Free Trial!
Loop Through Rows
This will loop through all the rows in a column:
Public Sub LoopThroughRows()

Dim cell As Range

For Each cell In Range("A:A")
    If cell.value <> "" Then MsgBox cell.address & ": " & cell.Value
Next cell

End Sub
Loop Through Columns
This will loop through all columns in a row:
Public Sub LoopThroughColumns()

Dim cell As Range

For Each cell In Range("1:1")
    If cell.Value <> "" Then MsgBox cell.Address & ": " & cell.Value
Next cell

End Sub
Loop Through Files in a Folder
This code will loop through all files in a folder, creating a list:
Sub LoopThroughFiles ()

Dim oFSO As Object
Dim oFolder As Object
Dim oFile As Object
Dim i As Integer

Set oFSO = CreateObject("Scripting.FileSystemObject")

Set oFolder = oFSO.GetFolder("C:Demo)

i = 2

For Each oFile In oFolder.Files
    Range("A" & i).value = oFile.Name
    i = i + 1
Next oFile

End Sub
Loop Through Array
This code will loop through the array ‘arrList’:
For i = LBound(arrList) To UBound(arrList)
    MsgBox arrList(i)
Next i
The LBound function gets the “lower bound” of the array and UBound gets the “upper bound”.
Loops in Access VBA
Most of the examples above will also work in Access VBA. However, in Access, we loop through the Recordset Object rather than the Range Object.
Sub LoopThroughRecords()
   On Error Resume Next
   Dim dbs As Database
   Dim rst As Recordset
   Set dbs = CurrentDb
   Set rst = dbs.OpenRecordset("tblClients", dbOpenDynaset)
   With rst
      .MoveLast
      .MoveFirst
      Do Until .EOF = True
         MsgBox (rst.Fields("ClientName"))
        .MoveNext
     Loop
   End With
   rst.Close
   Set rst = Nothing
   Set dbs = Nothing
End SubThis post provides a complete guide to the standard VBA For Loop and the VBA For Each Loop.
If you are looking for information about the VBA While and VBA Do Loop then go here.
If you want some quick info about the For loops then check out the Quick Guide table in the section below.
If you are looking for information on a particular topic then check out the Table of Contents below.
“History is about loops and continuums” – Mike Bidlo.
Related Links for the VBA For Loop
The Complete Guide to Ranges in Excel VBA.
The Complete Guide to Copying Data in Excel VBA.
VBA Do While Loop.
A Quick Guide to the VBA For Loop
| Loop format | Description | Example |
|---|---|---|
| For … Next | Run 10 times | For i = 1 To 10 Next |
| For … Next | Run 5 times. i=2,4, 6 etc. | For i = 2 To 10 Step 2 Next |
| For … Next | Run in reverse order | For i = 10 To 1 Step -1 Debug.Print i Next |
| For … Next | Go through Collection | For i = 1 To coll.Count Debug.Print coll(i) Next |
| For … Next | Go through array | For i = LBound(arr) To UBound(arr) Debug.Print arr(i) Next i |
| For … Next | Go through 2D array | For i = LBound(arr) To UBound(arr) For j = LBound(arr,2) To UBound(arr,2) Debug.Print arr(i, j) Next j Next i |
| For Each … Next | Go through Collection | Dim item As Variant For Each item In coll Debug.Print item Next item |
| For Each … Next | Go through array | Dim item As Variant For Each item In arr Debug.Print item Next item |
| For Each … Next | Go through 2D array | Dim item As Variant For Each item In arr Debug.Print item Next item |
| For Each … Next | Go through Dictionary | Dim key As Variant For Each key In dict.Keys Debug.Print key, dict(key) Next key |
| Both types | Exit Loop | For i = 1 To 10 If Cells(i,1) = «found» Then Exit For End If Next i |
The VBA For Loop Webinar
If you are a member of the website, click on the image below to view the webinar for this post.
(Note: Website members have access to the full webinar archive.)

Introduction to the VBA For Loop
Loops are by far the most powerful component of VBA. They are the rocket fuel of your Macros. They can perform tasks in milliseconds that would take humans hours. They also dramatically reduce the lines of code your applications need.
For Loops have been part of all major programming languages since they were first used with Fortan in 1957.
If you have never used loops before then this post is a great place to start. It provides an in-depth guide to loops, written in plain English without the jargon.
Let’s start with a very important question – what are loops and why do we need them?
What are VBA For Loops?
A loop is simply a way of running the same lines of code a number of times. Obviously running the same code over and over would give the same result.
So what is important to understand is that the lines of code normally contain a variable that changes slightly each time the loop runs.
For example, a loop could write to cell A1, then cell A2, A3 and so on. The slight change each time is the row.
Let’s look at a simple example.
VBA For Loop Example 1
The following code prints the values 1 to 5 in the Immediate Window(Ctrl + G to view).
Debug.Print 1
Debug.Print 2
Debug.Print 3
Debug.Print 4
Debug.Print 5
The Immediate Window
If you have not used the Immediate Window before then this section will get you up to speed quickly.
The function Debug.Print writes values to the Immediate Window. To view this window select View->Immediate Window from the menu( the shortcut is Ctrl + G)


VBA For Loop Example 2
Now imagine we want to print out the numbers 1 to 20. We would need to add 15 more lines to the example above.
However, using a loop we only need to write Debug.Print once.
    For i = 1 To 20
        Debug.Print i
    Next i
The output is:

Output
If we needed print the numbers 1 to 1000 then we only need to change the 20 to 1000.
Normally when we write code we would use a variable instead of a number like 20 or 1000. This gives you greater flexibility. It allows you to decide the number of times you wish to run the loop when the code is running. The following example explains this.
VBA For Loop Example 3
A common task in Excel is read all the rows with with data.
The way you approach this task is as follows
- Find the last row with data
- Store the value in variable
- Use the variable to determine how many times the loop runs
Using a variable in the loop makes your code very flexible. Your will work no matter how many rows there are.
Let’s have a look at an example. Imagine you receive a sheet with a list of fruit types and their daily sales. You want to count the number of Oranges sold and this list will vary in size depending on sales.
The following screenshot shows an example of this list

Sample Data of Fruit Sales
We can use the code to count the oranges
' https://excelmacromastery.com/
Sub CountFruit()

    ' Get the last row with text
    Dim LastRow As Long
    LastRow = Sheet1.Cells(Sheet1.Rows.Count, 1).End(xlUp).Row

    Dim i As Long, Total As Long
    ' Use LastRow in loop
    For i = 2 To LastRow
        ' Check if cell has text "Orange"
        If Sheet1.Cells(i, 1).Value = "Oranges" Then
            ' Add value in column B to total
            Total = Total + Sheet1.Cells(i, 2).Value
        End If
    Next i

    ' Print total
    Debug.Print "Total oranges sold was:"; Total

End Sub
You can try this code for yourself. Change the number of fruit items and you will see that the code still works fine.
If you were to increase the number fruit items to a large value like 10,000 then you will hardly notice the difference in the time it takes to run – almost instantly.
Loops are super fast. This is what makes them so powerful. Imagine performing a manual task on 10,000 cells. It would take a considerable amount of time.
Advantages of the VBA For Loop
4To conclude this section we will list the major advantages of using loops
- They reduce the lines code you need
- They are flexible
- They are fast
In the next sections we will look at the different types of loops and how to use them.
The Standard VBA For Loop
The VBA For loop is the most common loop you will use in Excel VBA. The For Loop is used when you can determine the number of times it will be run. For example, if you want to repeat something twenty times.
YouTube Video For Loop
Check out this YouTube Video of the For Loop:
Get the workbook and code for this video here
Format of the Standard VBA For Loop
The Standard VBA For Loop has the following format:
For <variable> = <start value> to <end value>
Next <variable>
The start and end values can be variables. Also the variable after Next is optional but it is useful and it makes it clear which for loop it belongs to.
How a For Loop Works
Let’s look at a simple for loop that prints the numbers 1 to 3
    Dim i As Long
    For i = 1 To 3
        Debug.Print i
    Next i
How this code works is as follows
i is set to 1
The value of i(now 1) is printed
i is set to 2
The value of i(now 2) is printed
i is set to 3
The value of i(now 3) is printed
If we did not use a loop then the equivalent code would be
    Dim i As Long
    i = i + 1
    Debug.Print i
    i = i + 1
    Debug.Print i
    i = i + 1
    Debug.Print i
The i = i + 1 line is used to add 1 to i and is a common way in programming to update a counter.
Using Step with the VBA For Loop
You can see that i is increased by one each time. This is the default. You can specify this interval using Step keyword.
The next example shows you how to do this:
    ' Prints the even numbers i.e. 2,4,6,8 ... 20
    For i = 2 To 20 Step 2
        Debug.Print i
    Next i
You can use a negative number with Step which will count in reverse
    ' Prints the even numbers in reverse i.e. 20,18,16,14 ... 2
    For i = 20 To 2 Step -2
        Debug.Print i
    Next i
Note: if Step is positive then your starting number must be lower than you ending number. The following loop will not run because the starting number 20 is greater than 10. VBA therefore, thinks it has already reached the target value 10.
    ' Will not run as starting number already greater than 10
    For i = 20 To 10 Step 1
        Debug.Print i
    Next i
If Step is negative then the start number must be greater than the end number.
Exit the For Loop
Sometimes you may want to leave the loop earlier if a certain condition occurs. For example if you read bad data.
You can use Exit For to automatically leave the loop as shown in the following code
    For i = 1 To 1000

        ' If cell is blank then exit for
        If Cells(i, 1) = "" Then
            MsgBox "Blank Cell found - Data error"
            Exit For
        End If

    Next i
Using the VBA For Loop with a Collection
The For loop can also be used to read items in a Collection.
In the following example, we display the name of all the open workbooks
    Dim i As Long
    For i = 1 To Workbooks.Count
        Debug.Print Workbooks(i).FullName
    Next i
Using Nested For Loops
Sometimes you may want to use a loop within a loop. An example of this would be where you want to print the names of the worksheets of each open workbook.
The first loop would go through each workbook. Each time this loop runs it would use a second loop to go through all the worksheets of that workbook. It is actually much easier to do than it sounds.
The following code shows how:
' https://excelmacromastery.com/
Sub ListWorksheets()

    Dim i As Long, j As Long
    ' First Loop goes through all workbooks
    For i = 1 To Workbooks.Count

        ' Second loop goes through all the worksheets of workbook(i)
        For j = 1 To Workbooks(i).Worksheets.Count
            Debug.Print Workbooks(i).Name + ":" + Worksheets(j).Name
        Next j

    Next i

End Sub
This works as follows:
The first loop sets i to 1
The second loop then uses the workbook at 1 to go through the worksheets.
The first loop sets i to 2
The second loop then uses the workbook at 2 to go through the worksheets.
and so on
It the next section we will use a For Each loop to perform the same task. You will find the For Each version much easier to read.
The VBA For Each Loop
The VBA For Each loop is used to read items from a collection or an array. We can use the For Each loop to access all the open workbooks. This is because Application.Workbooks is a collection of open workbooks.
This is a simple example of using the For Each Loop
    Dim wk As Workbook
    For Each wk In Workbooks
        Debug.Print wk.FullName
    Next wk
Format of the VBA For Each Loop
You can see the format of the VBA for each loop here(See Microsoft For Each Next documentation):
For Each <variable> in <collection>
Next <variable>
To create a For Each loop we need a variable of the same type that the collection holds. In the example here we created a variable of type Workbook.
If the collection has different types of items we can declare the variable as a variant.
VBA contains a collection called Sheets. This is a collection of sheets of type Worksheet(normal) and Chart(when you move a chart to be a full sheet). To go through this collection you would declare the variable as a Variant.
The following code uses For Each to print out the name of all the sheets in the current workbook
    Dim sh As Variant
    For Each sh In ThisWorkbook.Sheets
        Debug.Print sh.Name
    Next sh
Order of Items in the For Loop
For Each goes through items in one way only.
For example, if you go through all the worksheets in a workbook it will always go through from left to right. If you go through a range it will start at the lowest cell e.g. Range(“A1:A10”) will return A1,A2,A3 etc.
This means if you want any other order then you need to use the For loop.
Both loops in the following example will read the worksheets from left to right:
    ' Both loops read the worksheets from left to right
    Dim wk As Worksheet
    For Each wk In ThisWorkbook.Worksheets
        Debug.Print wk.Name
    Next

    Dim i As Long
    For i = 1 To ThisWorkbook.Worksheets.Count
        Debug.Print ThisWorkbook.Worksheets(i).Name
    Next
As you can see the For Each loop is neater to write. However if you want to read the sheets in any other order e.g. right to left then you have to use the for loop:
    ' Reading the worksheets from right to left
    Dim i As Long
    For i = ThisWorkbook.Worksheets.Count To 1 Step -1
        Debug.Print ThisWorkbook.Worksheets(i).Name
    Next
Using the VBA For Each Loop With Arrays
One thing to keep in my is that the For Each loop is that it is read-only when you use it with arrays.
The following example demonstrates this:
' https://excelmacromastery.com/
Sub UseForEach()

    ' Create array and add three values
    Dim arr() As Variant
    arr = Array("A", "B", "C")

    Dim s As Variant
    For Each s In arr
        ' Changes what s is referring to - not value of array item
        s = "Z"
    Next

    ' Print items to show the array has remained unchanged
    For Each s In arr
        Debug.Print s
    Next

End Sub
In the first loop we try to assign s to “Z”. When happens is that s is now referring the string “Z” and no longer to the item in the array.
In the second loop we print out the array and you can see that none of the values have changed.
When we use the For Loop we can change the array item. If we change the previous code to use the For Loop you it will change all the array values to “Z”
' https://excelmacromastery.com/
Sub UsingForWithArray()

    ' Create array and add three values
    Dim arr() As Variant
    arr = Array("A", "B", "C")

    Dim i As Long
    For i = LBound(arr) To UBound(arr)
        ' Changes value at position to Z
        arr(i) = "Z"
    Next

    ' Print items to show the array values have change
    For i = LBound(arr) To UBound(arr)
        Debug.Print arr(i)
    Next

End Sub
If your Collection is storing Objects the you can change the items using a For Each loop.
Using Nested For Each Loops
We saw already that you can have a loop inside other loops. Here is the example from above:
' https://excelmacromastery.com/
Sub ListWorksheets()

    Dim i As Long, j As Long
    ' First Loop goes through all workbooks
    For i = 1 To Workbooks.Count

        ' Second loop goes through all the worksheets of workbook(i)
        For j = 1 To Workbooks(i).Worksheets.Count
            Debug.Print Workbooks(i).Name + ":" + Worksheets(j).Name
        Next j

    Next i

End Sub
This time we will use the For Each loop to perform the same task:
' https://excelmacromastery.com/
Sub ReadAllWorksheets()

    Dim wk As Workbook, sh As Worksheet
    ' Read each workbook
    For Each wk In Workbooks

        ' Read each worksheet in the wk workbook
        For Each sh In wk.Worksheets
            ' Print workbook name and worksheet name
            Debug.Print wk.Name + ": " + sh.Name
        Next sh

    Next wk

End Sub
As you can see this is a neater way of performing this task than using the For Loop:
This code run as follows:
- Get the first Workbook from the Workbooks collection
- Go through all the worksheets in this workbook
- Print the workbook/worksheet details
- Get the next workbooks in the collection
- Repeat steps 2 to 3
- Continue until no more workbooks are left in the collection
How to Loop Through a Range
In Excel VBA, the most common use of a For Loop is to read through a range.
Imagine we have the data set in the screenshot below. Our task is to write code that will read through the data and copy the amounts to the column J. We are only going to copy amounts that are greater than 200,000.

The following example shows how we do it:
' Read through an Excel Range using the VBA For Loop
' https://excelmacromastery.com/
Sub ForLoopThroughRange()

    ' Get the worksheet
    Dim sh As Worksheet
    Set sh = ThisWorkbook.Worksheets("Sheet1")

    ' Get the Range
    Dim rg As Range
    Set rg = sh.Range("A1").CurrentRegion

    ' Delete existing output
    sh.Range("J1").CurrentRegion.ClearContents

    ' Set the first output row
    Dim row As Long
    row = 1

    ' Read through all the rows using the For Loop
    Dim i As Long
    For i = 2 To rg.Rows.Count

        ' Check if amount is greater than 200000
        If rg.Cells(i, 4).Value > 200000 Then

            ' Copy amount to column m
            sh.Cells(row, "J").Value = rg.Cells(i, 4).Value

            ' Move to next output row
            row = row + 1

        End If

    Next i

End Sub
This is a very basic example of copying data using Excel VBA. If you want a complete guide to copying data using Excel VBA then check out this post
Summary of the VBA For Loops
The Standard VBA For Loop
- The For loop is slower than the For Each loop.
- The For loop can go through a selection of items e.g. 5 to 10.
- The For loop can read items in reverse e.g. 10 to 1.
- The For loop is not as neat to write as the For Each Loop especially with nested loops.
- To exit a For loop use Exit For.
The VBA For Each Loop
- The For Each loop is faster than the For loop.
- The For Each loop goes through all items in the collectionarray.
- The For Each loop can go through items in one order only.
- The For Each loop is neater to write than a For Loop especially for nested loops.
- To exit a For Each loop use Exit For.
What’s Next?
Free VBA Tutorial If you are new to VBA or you want to sharpen your existing VBA skills then why not try out the The Ultimate VBA Tutorial.
Related Training: Get full access to the Excel VBA training webinars.
(NOTE: Planning to build or manage a VBA Application? Learn how to build 10 Excel VBA applications from scratch.)
If you’re looking to automate your Excel spreadsheets, macros are a good way to do so. Macros are automated scripts, typically written using Visual Basic for Applications (VBA), to help you perform certain actions in Excel, such as automate a button press or perform a calculation.
VBA is a useful programming language for new data analysts to learn as it supercharges the functionality of Excel, making it easier to perform certain tasks automatically (and repeatedly) with custom-made macro scripts. For instance, if you want a macro that repeats an action by a certain number of times, you can use a VBA For Loop.
Loops like this aren’t unique to VBA—indeed, they’re a common feature in most programming languages, allowing a program or script to run continuously in a sequence with a start and end point. For Excel data analysts, a VBA For Loop can allow you to loop through cells or perform a set number of actions once the criteria to do so are met.
This could be once a certain calculation is inserted or value reached, or when you perform a certain action in your spreadsheet itself (such as, for instance, pressing a custom-inserted button). Using a VBA For Loop is essential for creating macros that will run continuously as you work through your spreadsheet.
If you’re new to VBA programming and you’re looking to create a basic (or even advanced) macro using a VBA For Loop, this guide should help you. In this article, we’ll explain:
- What are VBA For Loops in Microsoft Excel and what are they used for?
- How do VBA For Loops work in Excel?
- Things to consider before using a VBA For Loop in Excel
- How to add a VBA For Loop in Excel using the Visual Basic Editor
How do VBA For Loops work in Excel? Let’s get familiar with the basics.
1. What are VBA For Loops in Microsoft Excel and what are they used for?
As we’ve mentioned already, loops are a programming concept that allows a program to repeat itself. They help to refract your code, reducing the number of specifically-coded actions that are written to help improve the speed and efficiency of your applications.
Loops are flexible tools, giving you the option to repeat a certain action (such as changing cell values) a set number of times. A loop could also be combined with other statements, such as For and If, that help to determine how often, and for how long, a script should run.
In VBA, a For Loop repeats an action (or set of actions) for a set number of times in a sequence. For instance, if you had a macro (written in VBA) that inserted values into a column, you could use a For Loop to do so, filling each cell sequentially (eg. A1, A2, A3, etc) until an end value is reached.

For instance, the VBA code snippet shown previously demonstrates such an action. In this example, the VBA macro is designed to insert values into cells in column A, from 1 to 10, and increase in single-digit increments. Once 10 is reached, the script stops.
This is a basic example, but For Loops are powerful enough to perform almost any action you desire in Excel repeatedly. While this guide isn’t a full VBA tutorial (and it assumes you have a certain level of basic VBA experience already), it should allow you to create basic VBA loops using For to repeat an action in sequence.
2. How do VBA For Loops work in Excel?
Let’s assume that you already have an idea in mind as to how your VBA macro should work. Introducing a For Loop into the mix allows you to set your code (or part of your code) to repeat itself a certain number of times.
We’ll explain the process using a simple-to-understand example. As VBA For Loops are useful for finite repetitive actions, let’s assume you want a pop-up to appear when you press a button (with the class name Button).

Pressing the button causes a pop-up box to appear a set number of times, in sequence, using the variable varButton as the end number (in this case, 10). This pop-up box displays the current variable, starting with zero. It then repeats this 9 more times until the varButton variable (10) is reached.
The action of pressing the button begins the loop. As the test has a start and end variable, the loop has a finite number of runs before it finishes. By default, the values increase by 1 (starting with 0, 1, 2, etc) but this can be changed by adding a Step value. For instance, changing this to 5 would mean only three pop-ups appear.

Once the end value is reached, the loop exits and the macro stops. You could, however, add additional actions to perform at this point, such as changing another cell’s value or creating a different pop-up message. You could nest the For Loop within other logical tests, such as a Do While or If statement.
This example contains all of the typical criteria needed to complete a For Loop using VBA, however. The code identifies how many times the action will be performed in a sequence (varButton) and the increment value used to iterate through the sequence (Step).
The only optional part of this example is the button used to start the macro. You don’t necessarily need to link your macro code to a button press, as you could easily begin this loop and activate the macro manually by pressing Developer > Macros > Run instead.
3. Things to consider before using a VBA For Loop in Excel
A VBA For Loop is a flexible and wide-ranging method that allows your code to perform an action sequentially and only stopping if (and when) certain criteria are met. To help you create this kind of macro in Excel, there are some pointers you’ll need to consider. These include:
- If you want to create a way for your For Loop to end before the final value is reached, you’ll need to add an Exit For statement to your code. This exits the loop and moves on to the next line of code outside of the loop (if your code continues). For instance, you could stop the loop when you press a button.
- A VBA For Loop can be used to cycle through a set number of numerical values in sequence in a basic way using a For Next Loop, but you can also cycle through more complex objects (such as workbooks in your spreadsheet) in sequence using a more complex VBA For Each Loop.
- VBA For Loops can be nested with other logical statements, such as an If or Do While statement. This allows you to integrate more complex decision-making into your code.
- A VBA For Loop will iterate in a sequence, but by changing the Step value, you can change how much the loop counter increases by during each iteration. For instance, if you want your loop to move ahead in a sequence that increases the value by 2, you’d need to use a Step value of 2. If you don’t provide a Step value, the loop counter will increase in increments of 1.
- If your VBA For Loop can’t be performed, or if your code has errors, VBA will exit into debug mode with an error. You’ll need to troubleshoot your code to fix this problem in Excel’s built-in VBA Editor.
While these examples are important, you should also consider any known VBA limitations that aren’t listed here (such as a lack of an undo function when using VBA) before you write your code.
4. How to add VBA For Loops in Excel using the Visual Basic Editor
You can create, test, and run a VBA For Loop in Excel by using the Visual Basic Editor. This is Excel’s built-in VBA editor that allows you to create your own macros using VBA, or edit existing macros created using the Macro Recorder tool.
To begin creating a VBA macro using a For Loop in the Visual Basic Editor, you can follow these steps:
Step 1: Open the VBA Editor
You’ll need to start by opening the Visual Basic Editor in your Excel workbook.
You can do this by pressing the Alt + F11 keys on your keyboard (or Option + F11 on Mac). If you’ve already enabled the Developer tab on the ribbon bar in your Excel’s settings menu, you can also press Developer > Visual Basic to open the editor instead.

Step 2: Create a new VBA Module
The VBA Editor will open in a new window at this point. The next step is to insert your VBA For Loop (and additional code) as a new VBA module. Modules are used to organize VBA code into groups.
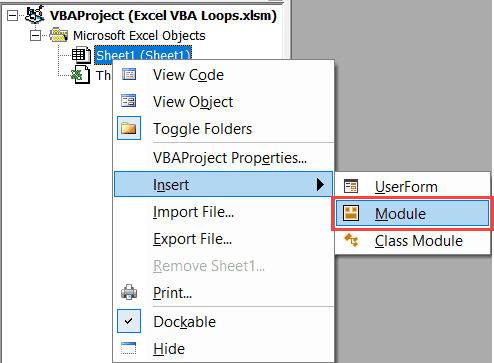
To do this, right-click your workbook listed in the tree menu on the left. From the drop-down menu, select Insert > Module.

Step 3: Insert your VBA For Loop code
A new window for your code will appear on the right. This is where you can type or insert the VBA code containing your For Loop. For instance, the following code will insert sequential values into cells A1 to A20 on any active worksheet:
Sub LoopVal()
Dim i As Integer
For i = 1 To 10
Range(“A” & i).Value = i
Next i
End Sub

Step 4: Rename your module and test your code
Once you’ve inserted your code, you’ll need to rename the module which contains the code in order to make it easy to refer to later. To do this, select the module name in the tree menu on the left, then rename it by typing a new module name into the Properties box underneath.

When you’re ready to test your code, press the Run Sub/User Form button. This will run the code in your active worksheet, allowing you to see the macro in action.

Assuming your VBA code worked as intended, you can then proceed to save your workbook with the macro included. If it doesn’t work, a debug message will appear, and you’ll need to troubleshoot the issue further.
Step 5: Save your workbook
With your VBA macro ready, you’ll need to save your Excel workbook as a Macro-enabled workbook in the XLSM format. To do this, press Ctrl + S on your keyboard, or press File > Save As.

Step 6: Run your VBA code
Your macro (containing a VBA For Loop) is ready to run once you’ve saved your workbook. To do this, press Alt + F8 on your keyboard to open the Macro window (or Option + F8 on Mac).

Select your macro (matching the Module name) from the list provided, then press Run. Alternatively, if your VBA For Loop is scheduled to activate based on another action (such as a cell value being reached, a button being pressed, etc), you’ll need to perform this action to begin the process.
Final thoughts
Once you’ve mastered VBA For Loops, you can take things further by experimenting with Do Until Loops, custom worksheet events, and more. VBA tricks like these allow data analysts to create complex applications inside Excel workbooks that can automate tasks or speed up calculations, but you’ll need to master VBA first.
If you’re new to Excel or you’re interested in a career in data analysis, our five-day short course can help you learn more about the fundamentals. If you’re curious to learn more about Excel, you can check out these articles next:
- How to use conditional formatting in Excel
- How to calculate variance in Excel
- How to convert texts to numbers in Excel
To get the most out of Excel and VBA, you need to know how to use loops efficiently.
In VBA, loops allow you to go through a set of objects/values and analyze it one by one. You can also perform specific tasks for each loop.
Here is a simple example of using VBA loops in Excel.
Suppose you have a dataset and you want to highlight all the cells in even rows. You can use a VBA loop to go through the range and analyze each cell row number. If it turns out to be even, you give it a color, else you leave it as is.
Now this, of course, is very simple of looping in Excel VBA (and you can also do this using conditional formatting).
In real life, you can do a lot more with VBA loops in Excel that can help you automate tasks.
Here are some more practical examples where VBA loops can be useful:
- Looping through a range of cells and analyzing each cell (highlight cells with a specific text in it).
- Looping through all the worksheets and do something with each (such as protect/unprotect it).
- Loop through all the open workbooks (and save each workbook or close all except the active workbook).
- Loop through all the characters in a cell (and extract the numeric part from a string).
- Loop through all the values an array.
- Loop through all the charts/objects (and give a border or change the background color).
Now to best use loops in Excel VBA, you need to know about the different kinds that exist and the correct syntax of each.

In this tutorial, I’ll showcase different types of Excel VBA loops and cover a few examples for each loop
Note: This is going to be a huge tutorial, where I will try and cover each VBA loop in some detail. I recommend you bookmark this page for future reference.
If you’re interested in learning VBA the easy way, check out my Online Excel VBA Training.
For Next Loop
The ‘For Next’ loop allows you to go through a block of code for the specified number of times.
For example, if I ask you to add the integers from 1 to 10 manually, you would add the first two numbers, then add the third number to the result, then add the fourth number to the result, as so on..
Isn’t it?
The same logic is used in the For Next loop in VBA.
You specify how many times you want the loop to run and also specify what you want the code to do each time the loop is run.
Below is the syntax of the For Next loop:
For Counter = Start To End [Step Value]
[Code Block to Execute]
Next [counter]
In the For Next loop, you can use a Counter (or any variable) that will be used to run the loop. This counter allows you to run this loop for a required number of times.
For example, if I want to add the first 10 positive integers, then my Counter value would be from 1 to 10.
Let’s have a look at a few examples to better understand how For Next loop works.
Example 1 – Adding the first 10 positive integers
Below is the code that will add the first 10 positive integers using a For Next loop.
It will then display a message box showing the sum of these numbers.
Sub AddNumbers()
Dim Total As Integer
Dim Count As Integer
Total = 0
For Count = 1 To 10
Total = Total + Count
Next Count
MsgBox Total
End Sub
In this code, the value of Total is set to 0 before getting into the For Next loop.
Once it gets into the loop, it holds the total value after every loop. So after the first loop, when Counter is 1, ‘Total’ value becomes 1, and after the second loop it becomes 3 (1+2), and so on.
And finally, when the loop ends, ‘Total’ variable has the sum of the first 10 positive integers.
A MsgBox then simply displays the result in a message box.
Example 2 – Adding the first 5 Even Positive Integers
To sum the first five even positive integers (i.e, 2,4,6,8, and 10), you need a similar code with a condition to only consider the even numbers and ignore the odd numbers.
Here is a code that will do it:
Sub AddEvenNumbers()
Dim Total As Integer
Dim Count As Integer
Total = 0
For Count = 2 To 10 Step 2
Total = Total + Count
Next Count
MsgBox Total
End Sub
Note that we started the Count value from 2 and also used ‘Step 2‘.
When you use ‘Step 2’, it tells the code to increment the ‘Count’ value by 2 every time the loop is run.
So the Count value starts from 2 and then becomes 4, 6, 8 and 10 as the looping occurs.
NOTE: Another way of doing this could be to run the loop from 1 to 10 and within the loop check whether the number is even or odd. However, using Step, in this case, is a more efficient way as it does not require the loop to run 10 times, but only 5 times.
The Step value can also be negative. In such as case, the Counter starts at a higher value and keeps getting decremented by the specified Step value.
Example 3 – Entering Serial Number in the Selected Cells
You can also use the For Next loop to go through a collection of objects (such as cells or worksheets or workbooks),
Here is an example that quickly enters serial numbers in all the selected cells.
Sub EnterSerialNumber()
Dim Rng As Range
Dim Counter As Integer
Dim RowCount As Integer
Set Rng = Selection
RowCount = Rng.Rows.Count
For Counter = 1 To RowCount
ActiveCell.Offset(Counter - 1, 0).Value = Counter
Next Counter
End Sub
The above code first counts the number of selected rows and then assigns this value to the variable RowCount. We then run the loop from ‘1 to RowCount’.
Also note that since selection can be any number of rows, we have Set the variable Rng to Selection (with the line ‘Set Rng = Selection’). Now we can use the ‘Rng’ variable to refer to the selection in our code.
Example 4 – Protect All Worksheets in the Active Workbook
You can use the ‘For Next’ loop to go through all the worksheets in the active workbook, and protect (or unprotect) each of the worksheets.
Below is the code that will do this:
Sub ProtectWorksheets()
Dim i As Integer
For i = 1 To ActiveWorkbook.Worksheets.Count
Worksheets(i).Protect
Next i
End Sub
The above code counts the number of sheets by using ActiveWorkbook.Worksheets.Count. This tells VBA how many times the loop needs to be run.
In each instance, it refers to the Ith workbook (using Worksheets(i)) and protects it.
You can use this same code to Unprotect worksheets too. Just change the line Worksheets(i).Protect to Worksheets(i).UnProtect.
Nested ‘For Next’ Loops
You can use nested ‘For Next’ loops to get more complex automation done in Excel. A nested ‘For Next’ loop would mean that there is a ‘For Next’ loop within a ‘For Next’ loop.
Let me show you how to use this using an example.
Suppose I have 5 workbooks open in my system and I want to protect all the worksheets in all these workbooks.
Below is the code that will do this:
Sub ProtectWorksheets()
Dim i As Integer
Dim j As Integer
For i = 1 To Workbooks.Count
For j = 1 To Workbooks(i).Worksheets.Count
Workbooks(i).Worksheets(j).Protect
Next j
Next i
End Sub
The above is a nested For Next loop as we have used one For Next loop within another.
‘EXIT For’ Statements in For Next Loops
‘Exit For’ statement allows you to exit the ‘For Next’ loop completely.
You can use it in cases where you want the For Next loop to end when a certain condition is met.
Let’s take an example where you have a set of numbers in Column A and you want to highlight all the negative numbers in red font. In this case, we need to analyze each cell for its value and then change the font color accordingly.
But to make the code more efficient, we can first check if there are any negative values in the list or not. If there are no negative values, we can use the Exit For the statement to simply come out of the code.
Below is the code that does this:
Sub HghlightNegative()
Dim Rng As Range
Set Rng = Range("A1", Range("A1").End(xlDown))
Counter = Rng.Count
For i = 1 To Counter
If WorksheetFunction.Min(Rng) >= 0 Then Exit For
If Rng(i).Value < 0 Then Rng(i).Font.Color = vbRed
Next i
End Sub
When you use the ‘Exit For’ statement within a nested ‘For Next’ loop, it will come out of the loop in which it is executed and go on to execute the next line in the code after the For Next loop.
For example, in the below code, the ‘Exit For’ statement will get you out of the inner loop, but the outer loop would continue to work.
Sub SampleCode()
For i = 1 To 10
For j = 1 to 10
Exit For
Next J
Next i
End Sub
Do While Loop
A ‘Do While’ loop allows you to check for a condition and run the loop while that condition is met (or is TRUE).
There are two types of syntax in the Do While Loop.
Do [While condition]
[Code block to Execute]
Loop
and
Do
[Code block to Execute]
Loop [While condition]
The difference between these two is that in the first, the While condition is checked first before any code block is executed, and in the second case, the code block is executed first and then the While condition is checked.
This means that if the While condition is False is both the cases, the code will still run at least once in the second case (as the ‘While’ condition is checked after the code has been executed once).
Now let’s see some examples of using Do While loops in VBA.
Example 1 – Add First 10 Positive Integers using VBA
Suppose you want to add the first ten positive integers using the Do While loop in VBA.
To do this, you can use the Do While loop until the next number is less than or equal to 10. As soon as the number is greater than 1o, your loop would stop.
Here is the VBA code that will run this Do While loop and the show the result in a message box.
Sub AddFirst10PositiveIntegers()
Dim i As Integer
i = 1
Do While i <= 10
Result = Result + i
i = i + 1
Loop
MsgBox Result
End Sub
The above loop continues to work until the value of ‘i’ becomes 11. As soon as it becomes 11, the loop ends (as the While condition becomes False).
Within the loop, we have used a Result variable that holds the final value Once the loop is completed, a message box shows the value of the ‘Result’ variable.
Example 2 – Enter Dates For the Current Month
Let’s say you want to enter all the dates of the current month into a worksheet column.
You can do that by using the following Do While loop code:
Sub EnterCurrentMonthDates()
Dim CMDate As Date
Dim i As Integer
i = 0
CMDate = DateSerial(Year(Date), Month(Date), 1)
Do While Month(CMDate) = Month(Date)
Range("A1").Offset(i, 0) = CMDate
i = i + 1
CMDate = CMDate + 1
Loop
End Sub
The above code would enter all the dates in the first column of the worksheet (starting from A1). The loops continue till the Month value of the variable ‘CMDate’ matches that of the current month.
Exit Do Statement
You can use the Exit Do statement to come out of the loop. As soon as the code executes the ‘Exit Do’ line, it comes out of the Do While loop and passes the control to the next line right after the loop.
For example, if you want to enter the first 10 dates only, then you can exit the loop as soon as the first 10 dates are entered.
The below code will do this:
Sub EnterCurrentMonthDates()
Dim CMDate As Date
Dim i As Integer
i = 0
CMDate = DateSerial(Year(Date), Month(Date), 1)
Do While Month(CMDate) = Month(Date)
Range("A1").Offset(i, 0) = CMDate
i = i + 1
If i >= 10 Then Exit Do
CMDate = CMDate + 1
Loop
End Sub
In the above code, the IF statement is used to check if the value of i is greater than 10 or not. As soon as the value of ‘i’ becomes 10, Exit Do statement is executed and the loop ends.
Do Until Loop
‘Do Until’ loops are very much like the ‘Do While’ loops.
In ‘Do While’, the loop runs till the given condition is met, while in ‘Do Until’, it loops until the specified condition is met.
There are two types of syntax in the Do Until Loop.
Do [Until condition]
[Code block to Execute]
Loop
and
Do
[Code block to Execute]
Loop [Until condition]
The difference between these two is that in the first, the Until condition is checked first before any code block is executed, and in the second case, the code block is executed first and then the Until condition is checked.
This means that if the Until condition is TRUE is both cases, the code will still run at least once in the second case (as the ‘Until’ condition is checked after the code has been executed once).
Now let’s see some examples of using Do Until loops in VBA.
Note: All the examples for Do Until are the same as that of Do While. These have been modified to show you how the Do Until loop works.
Example 1 – Add First 10 Positive Integers using VBA
Suppose you want to add the first ten positive integers using the Do Until loop in VBA.
To do this, you need to run the loop until the next number is less than or equal to 10. As soon as the number is greater than 1o, your loop would stop.
Here is the VBA code that will run this loop and show the result in a message box.
Sub AddFirst10PositiveIntegers()
Dim i As Integer
i = 1
Do Until i > 10
Result = Result + i
i = i + 1
Loop
MsgBox Result
End Sub
The above loop continues to work until the value of ‘i’ becomes 11. As soon as it becomes 11, the loop ends (as the ‘Until’ condition becomes True).
Example 2 – Enter Dates For the Current Month
Let’s say you want to enter all the dates of the current month into a worksheet column.
You can do that by using the following Do Until loop code:
Sub EnterCurrentMonthDates()
Dim CMDate As Date
Dim i As Integer
i = 0
CMDate = DateSerial(Year(Date), Month(Date), 1)
Do Until Month(CMDate) <> Month(Date)
Range("A1").Offset(i, 0) = CMDate
i = i + 1
CMDate = CMDate + 1
Loop
End Sub
The above code would enter all the dates in the first column of the worksheet (starting from A1). The loop continues until the Month of variable CMDate is not equal to that of the current month.
Exit Do Statement
You can use the ‘Exit Do’ statement to come out of the loop.
As soon as the code executes the ‘Exit Do’ line, it comes out of the Do Until loop and passes the control to the next line right after the loop.
For example, if you want to enter the first 10 dates only, then you can exit the loop as soon as the first 10 dates are entered.
The below code will do this:
Sub EnterCurrentMonthDates()
Dim CMDate As Date
Dim i As Integer
i = 0
CMDate = DateSerial(Year(Date), Month(Date), 1)
Do Until Month(CMDate) <> Month(Date)
Range("A1").Offset(i, 0) = CMDate
i = i + 1
If i >= 10 Then Exit Do
CMDate = CMDate + 1
Loop
End Sub
In the above code, as soon as the value of ‘i’ becomes 10, Exit Do statment is executed and the loop ends.
For Each
In VBA, you can loop through a set of collections using the ‘For Each’ loop.
Here are some examples of collections in Excel VBA:
- A collection of all the open Workbooks.
- A collection of all worksheets in a workbook.
- A collection of all the cells in a range of selected cells.
- A collection of all the charts or shapes in the workbook.
Using the ‘For Each’ loop, you can go through each of the objects in a collection and perform some action on it.
For example, you can go through all the worksheets in a workbook and protect these, or you can go through all the cells in the selection and change the formatting.
With the ‘For Each’ loop (also referred to as the ‘For Each-Next’ loop), you don’t need to know how many objects are there in a collection.
‘For Each’ loop would automatically go through each object and perform the specified action. For example, if you want to protect all the worksheets in a workbook, the code would be the same whether you have a workbook with 3 worksheets or 30 worksheets.
Here is the syntax of For Each-Next loop in Excel VBA.
For Each element In collection
[Code Block to Execute]
Next [element]
Now let’s see a couple of examples of using the For Each Loop in Excel.
Example 1 – Go through All the Worksheets in a Workbook (and Protect it)
Suppose you have a workbook where you want to protect all the worksheets.
Below For Each-Next loop can do this easily:
Sub ProtectSheets()
Dim ws As Worksheet
For Each ws In ActiveWorkbook.Worksheets
ws.Protect
Next ws
End Sub
In the above code, we have defined ‘ws’ variable as a Worksheet object. This tells VBA that ‘ws’ should be interpreted as a worksheet object in the code.
Now we use the ‘For Each’ statement to go through each ‘ws’ (which is a worksheet object) in the collection of all the worksheets in the active workbook (given by ActiveWorkbook.Worksheets).
Note that unlike other loops where we have tried to protect all the worksheets in a workbook, here we don’t need to worry about how many worksheets are there in the workbook.
We don’t need to count these to run the loop. For Each loop ensures that all the objects are analyzed one by one.
Example 2 – Go through All the Open Workbooks (and Save All)
If you work with multiple workbooks at the same time, it can come in handy to be able to save all these workbooks at once.
Below VBA code can do this for us:
Sub SaveAllWorkbooks()
Dim wb As Workbook
For Each wb In Workbooks
wb.Save
Next wb
End Sub
Note that in this code, you don’t get a prompt that asks you to save the workbook in a specific location (if saving it for the first time).
It saves it in the default folder (it was the ‘Documents’ folder in my case). This code works best when these files are already saved and you’re making changes and you want to save all the workbooks quickly.
Example 3 – Go through All the Cells in a Selection (Highlight negative values)
Using the ‘For Each’ loop, you can loop through all the cells in a specific range or in the selected range.
This can be helpful when you want to analyze each cell and perform an action based on it.
For example, below is the code that will go through all the cells in the selection and change the cell color of the cells with negative values to red.
Sub HighlightNegativeCells()
Dim Cll As Range
For Each Cll In Selection
If Cll.Value < 0 Then
Cll.Interior.Color = vbRed
End If
Next Cll
End Sub
(Note I’ve used Cll as a short variable name for Cell. It’s advisable not to use object names such as Sheets or Range as variable names)
In the above code, the For Each-Next loop goes through the collection of cells in the selection. IF statement is used to identify if the cell value is negative or not. In case it is, the cell is given a red interior color, else it goes to the next cell.
In case you don’t have a selection, and instead want VBA to select all the filled cells in a column, starting from a specific cell (just like we use Control + Shift + Down arrow key to select all filled cells), you can use the below code:
Sub HighlightNegativeCells()
Dim Cll As Range
Dim Rng As Range
Set Rng = Range("A1", Range("A1").End(xlDown))
For Each Cll In Rng
If Cll.Value < 0 Then
Cll.Interior.Color = vbRed
End If
Next Cll
End Sub
In the above example, it doesn’t matter how many filled cells are there. It will start from cell A1 and analyze all the contiguous filled cells in the column.
You also don’t need to have cell A1 selected. You can have any far-off cell selected and when the code runs, it will still consider all the cells in column A (starting from A1) and color the negative cells.
‘Exit For’ Statment
You can use the ‘Exit For’ statement in the For Each-Next loop to come out of the loop. This is usually done in case a specific condition is met.
For example, in Example 3, as we are going through a set of cells, it can be more efficient to check if there are any negative values or not. In case there are no negative values, we can simply exit the loop and save some VBA processing time.
Below is the VBA code that will do this:
Sub HighlightNegativeCells()
Dim Cll As Range
For Each Cll In Selection
If WorksheetFunction.Min(Selection) >= 0 Then Exit For
If Cll.Value < 0 Then
Cll.Interior.Color = vbRed
End If
Next Cll
End Sub
Where to Put the VBA Code
Wondering where the VBA code goes in your Excel workbook?
Excel has a VBA backend called the VBA editor. You need to copy and paste the code in the VB Editor module code window.
Here are the steps to do this:
- Go to the Developer tab.

- Click on the Visual Basic option. This will open the VB editor in the backend.
- In the Project Explorer pane in the VB Editor, right-click on any object for the workbook in which you want to insert the code. If you don’t see the Project Explorer go to the View tab and click on Project Explorer.
- Go to Insert and click on Module. This will insert a module object for your workbook.

- Copy and paste the code in the module window.


You May Also Like the Following Excel Tutorials:
- How to record a macro in Excel.
- Creating User-defined functions in Excel.
- Excel VBA Msgbox
- How to Run a Macro in Excel.
- How to Create and Use Add-ins in Excel.
- Excel VBA Events – An Easy (and Complete) Guide.
- How to Sort Data in Excel using VBA (A Step-by-Step Guide).
- 24 Useful Excel Macro Examples for VBA Beginners (Ready-to-use).
- How to Use Excel VBA InStr Function (with practical EXAMPLES).
- Excel Personal Macro Workbook | Save & Use Macros in All Workbooks.
- Using Select Case in Excel VBA.