
Add page numbers to a header or footer
-
Click or tap in the header or footer where you want the page numbers to go.
-
Go to Insert > Page Numbering.
-
Select Current Position.
-
Choose a style.
Change where the page number appears
-
In the header or footer area, select the page number.
-
Use the Tab key to position the page number left, center, or right. If the number is flush left, press Tab once for center, and twice for right. To go back, press Backspace until in position.
Change appearance of page number
-
Select the page number
-
On the Home tab, use the Font choices and dialog box to change the font family, style, size, and color.
Add page numbers to a header or footer
-
Click or tap in the header or footer where you want the page numbers to go.
-
Go to Insert > Page Number.
-
Choose a style.
Use the Page field code to insert page numbers
-
Double-click the header or the footer area (near the top or bottom of the page).
-
Go to Header & Footer > Field.
-
In the Field names list, Select Page, and then select OK.
-
To change the numbering format, go to Header & Footer > Page Number > Format Page Numbers.
Select the format you want, and then select OK.
-
To change the numbering alignment, go to Header & Footer > Page Number > Page Number. Choose the alignment you want and select OK.
-
Go to Header & Footer > Close Header and Footer or double-click outside the header to exit.
Tip: You might have to move some graphics or other elements in your header or footer to see the page numbers after you insert them.
Add page numbers to a header or footer
-
Go to Insert > Page Numbers.
-
Select a position (left, center, or right, and header or footer).
-
Select Include Page Count to show total number of pages too, such as page 7 of 9.
To see your header or footer with page numbers, go to View > Reading View.
Sometimes you’ve got to make longer documents—such as business reports, school papers, and book-length materials. Microsoft Word headers, footers, and page numbers organize the document and make it easier for your readers to navigate.


Here are a few good reasons to use Microsoft Word headers, footers, and page numbers:
- Find a page in the document. Imagine trying to find a specific passage in a 250-page document without page numbers! Microsoft Word page numbers update automatically as you add or delete pages. Plus, they’re easy to work with. You’ve got no excuse for not using this useful feature.
- Identify what you’re reading. Headers and footers also help the reader situate themselves in the document. For example, a glance at the footer can remind them that they’re reading Chapter 16 of The Greatest Novel Ever Written.
- Brand the document. Branding is another reason to use headers and footers. Add your organization’s name and logo. And, if you export your Word Doc into a PDF, you can even make the headers and footers clickable (or hyperlinked) to your website.
Insert Microsoft Word headers, footers, and page numbers in your document or start with a Microsoft Word template that includes pre-formatted headers, footers, and page numbers. Envato Elements and GraphicRiver are great sources of templates for Microsoft Word.
In this article, you’ll learn how to work with headers, footers, and page numbers in Microsoft Word. So, you and your readers can reap all their benefits. Let’s get started!
Note: I’m on Microsoft Word for Mac version 16.33. The steps may differ slightly depending on what version of Microsoft Word you’re using.
Your Quick Start Guide to Add Headers, Footers and Page Numbers (Video)
Are you ready to learn more about using headers, footers, and page numbers in Microsoft Word? Watch this quick screencast to learn all about Word headers and footers.

Or, study the complete written tutorial below.
Work With Headers and Footers in MS Word
Adding a Microsoft Word header or footer is quite intuitive. Follow these steps:
1. How to Insert Headers and Footers
To add a header, go to Insert > Header.


Choose the built-in format you want to use from the menu that appears. You’ve got the option of a blank header, a blank header with three columns, or other built-in styles.


Choose the style you wish to use.


Follow the same steps to add a Microsoft Word footer, but click Insert > Footer instead to get started.
2. How to Insert Text in a Header or Footer
Double-click into the header or footer to open it. Replace the placeholder text, if there’s one, with your own. Otherwise, type your text.


Then, format header or footer text to make it look the way you want. Select the text, then click on the Home tab. From there, change the font, font size, color, and other settings.


To close the header or footer, under the Header & Footer tab, click the Close Header and Footer button. Or, double-click outside the header or footer.


Note: When the header or footer is closed, it’s locked and can’t be edited. Double-click on the header or footer section to open the Header & Footer view.
3. How to Insert the Date or Time in a Header or Footer
To add a date or time in a header or footer, click Insert > Date & Time.


The Date and Time dialog opens.


Choose the format you wish you use. Check Update automatically, if you want the date and time to update each time you modify the document.


4. How to Insert a Logo in a Header or Footer
Aside from text, you can also insert images in a Microsoft Word header or footer. This is a good opportunity for you to brand your document by including your logo.
To insert a logo, open the header or footer. Double-click at the top (for header) or bottom (for footer) of the document. In this example, I’m adding a logo in the footer.
Click Insert > Pictures > Photo Browser.


Locate the logo on your computer, select the file, then click Insert.
![]()
![]()
![]()
The logo is now in the footer.
![]()
![]()
![]()
Double-click outside the footer or click on the Close Header and Footer button in the ribbon to close it.
Work With Microsoft Word Page Numbers
Page numbers are a common element to include in either the header or footer of your document. To learn how to number pages in Microsoft Word, follow these instructions:
1. How to Insert Page Numbers to a Header or Footer in Word
With the header or footer open, click Insert > Page Numbers ….


The Page Numbers dialog opens:


Select the settings you want to use. Decide on the page number’s position and alignment.
There’s also a radio button to Show number on first page. By default, this button is unchecked. This means the first page of your document can be its cover, and the page number won’t be displayed on it. If you want the page number to appear on the first page, check this button.
From here, you can also change the format of the page numbers. With the Header & Footer tab open, click Page Number > Format Page Numbers ….


This opens the page numbering format box, where you can make other settings:
- Number format allows you to choose from Roman numerals or Arabic numerals or letters
- Include chapter number, if you’ve set up chapters in your document and want to include them in the page numbering, then check this button.
- Page numbering
- Continue from previous section continues the page count from the previous page.
- Start at ___ lets you restart the page count at any number.
After making your settings, click OK to apply.
2. How to Make Page Numbering Not Appear on the First Page
If you want the first page of your document or section to be the cover page, then you wouldn’t want it to have a page number. To hide the page number from the first page of a document or section, do the following:
Click Insert > Page Numbers ….
The Page Numbers dialog opens. Uncheck the Show number on first page radio button.


Click OK.
3. How to Number Odd and Even Pages Differently
By default, headers and footers appear the same way on odd and even pages, like this:


But sometimes, you may want odd and even pages to appear differently. An example is in the case of books or magazines, where you want the page number to be on the outer edge of the spread when the (printed) document is open.
This is possible in Microsoft Word, where you can format headers, footers, and page numbers differently on odd and even pages.
To do this, double-click inside the header or footer. This opens the Header & Footer ribbon. Check the button for Different Odd & Even Pages.


Edit your odd and even headers/footers separately. When you’re done, double-click outside the header/footer to close.
Now, the positions of the logo and page numbers are different for odd and even pages on my document:


4. How to Add Different Numbers and Formats to Different Sections
You can also use different page numbers and formats for different sections of your document. For example, in my document I want the page numbers in the Introduction section to be Roman numerals.
First, make sure you’ve broken your document into sections.
To define a new section, place the cursor where you want a new section to begin. Then, click Insert > Break > Section Break. Choose whether you want the section to begin on the next page, continue on the same page as the previous section, or begin on either an odd or even page.


In this example, I inserted section breaks before and after the Introduction to make it a separate section from the rest of my document.
To double check if you’ve inserted section breaks where you want them, click on the Show/Hide Paragraph button on the ribbon. This displays how your document into paragraphs as well as sections.


Now, you’re ready to format the page numbers in a specific section.
Double-click in the footer part of the page to open the Header & Footer view. Click inside the footer you want to format.
On the Header & Footer ribbon, click Page Number > Format Page Numbers.


Change the format to the settings you wish to use.


Click OK.
5. How to Control Page Numbers Using Fields
So far, we’ve been using Microsoft Word’s built-in formats for page numbers. For more control over how the page numbers display, use fields.
Double-click on the top or bottom of page to open the Header & Footer view. In the header or footer, place the cursor where you want to insert the page number.
From the Header & Footer ribbon, click on the Field button.


The Field dialog box opens. To add a page number, scroll down Categories, and select Numbering. Then, under Field names, select Page.


Click Options to change the number formatting. Make the selections you want to use, then click OK.
6. How to Fix Broken Page Numbers
Sometimes as the document gets larger and new pages and sections are added, page numbering can break. Below are two common page number errors and how to fix them.
Example 1: Page number starts over at 1 in the middle of the document
This can happen when you’ve defined a section, formatted its page number to restart at 1, then inserted a section break again.
Solution:
Examine the section breaks in your document by clicking on the Show/Hide Paragraph button.
Check how the page numbers are formatted in the section, and make sure to uncheck Start at:___.


Example 2: Word is counting the cover page as page 1
The first page of the document is usually the cover page as well. Naturally, we don’t want it to be included in the page count. But what if your document does? Here’s one way to fix that.
Solution:
Insert a section break after the cover: click Insert > Break > Section break. Select one of the options that appear.
Check the button for Different First Page.


On the page where you want the page count to begin, go to Page Number > Format Page Numbers. Check the radio button for Start at:___. Type the page number that you want the page count to begin at.


Work With Templates With Header and Footer Designs for Microsoft Word
If you’d rather not make any design and formatting decisions, the easiest thing to do is to start with a Microsoft Word template. A good template comes with header, footer, and page numbers all pre-formatted. These will automatically update as you add or remove pages.
Select a Word template like this e-book template for Microsoft Word that I found in Envato Elements.


If you want to edit the header, footer, or page number, click into the header/footer to open it. Make the changes you want to make following the relevant steps above.


When you’re done, double-click outside the header/footer to close it.
Work With Other Header Options and Change Designs
Microsoft Word headers and footers also come with built-in designs for you to choose from.
To select one, click in the header or footer. Click the Header or Footer button on the ribbon. Scroll down to see all the available options. Choose a design from the selections that appear.


Note: This will override any header or footer and page number settings you’ve already made.
Use Microsoft Word Header, Footer, and Page Numbers to Give Readers a Good Experience
By following the steps in this article, even beginning users of Microsoft Word can add headers, footers, and page numbers in their documents. Or, if you’d rather not worry about formatting these page elements, use a Microsoft Word template instead of starting from scratch.
Envato Elements is a wonderful source of professionally designed Microsoft Word templates. Your subscription includes unlimited downloads of everything you need to produce a high-caliber document, from custom fonts to stock photos.
To get templates a la carte, then GraphicRiver is another source of great Microsoft Word templates for you to explore.
Whether creating your own layout or starting with a template, Microsoft Word headers, footers, and page numbers help you provide a better experience for your readers. They’ll be able to more easily navigate the document and find the pages or sections they need.
You can also make the most of headers and footers to brand the document. Add your logo and organization name, as well as the author’s name, to increase brand recognition and establish your thought leadership.
What are your tips for using Word in long documents? Leave a comment and let us know.
![]()
Download Article
Easily add page numbers to the header or footer in your Microsoft Word document
![]()
Download Article
- Inserting (PC & Mac)
- Formatting (PC & Mac)
- Inserting (Mobile)
- Video
- Expert Q&A
- Tips
|
|
|
|
|
Adding page numbers in Microsoft Word is easy! Whether you’re writing a 10-page essay or a thesis paper, there are a variety of ways to customize the page numbers. Use the Insert tab to quickly add page numbers. From there, you can change the formatting and numbering options. This wikiHow guide will show you how to add page numbers to your Microsoft Word document on Windows and macOS, as well as in the Word mobile app on your Android, iPhone, or iPad.
Things You Should Know
- On desktop or mobile, go to the Insert tab, then select «Page Number» to add page numbers.
- Double-click the page number to make changes to the font, color, or style.
- Double-click the header or footer, then go to Page Number > Format Page Numbers for additional options.
-

1
Click Insert. This is in the tab menu bar at the top of Word. Alternatively, double-click the top or bottom of the page to open the Header or Footer editing menu.
- Don’t forget to save your work as you go!
-
2
Click Page Number. This opens a pop-up menu for choosing where to place the page numbers.[1]
- In the Insert menu, Page Number is near the center.
- In the Header & Footer design tab, Page Number is on the left.
Advertisement
-
3
Choose a page number position. This can be in the header or footer, and located left, center, or right.
- You can also toggle the option to include the page count in the page numbering (e.g. 1 of 3).
- Selecting a page number position will open the “Header & Footer” tab.


Advertisement
-
1
Double-click a page number. This will select it and show a pop-up menu with options for changing the font, color, and style. This change will edit every page number automatically.
- You could even cross out the page numbers if that’s your style.
-
2
Start numbering on the second page. If you want the first page to have no numbering, and start at 1 on the second page, follow these steps:
- Double-click the header or footer to open the Header & Footer design tab.
- Check the “Different First Page” checkbox.
- Click Page Number then Format Page Numbers.
- Select “Start at” and change it to 0.
-
3
Restart page numbers by using page breaks. If you want to start a new numbering later in the document, you’ll need to use a page break.
- Place your cursor at the beginning of the page you want to restart the numbering on.
- Go to the Layout tab, then click Breaks.
- Select Next Page in the Breaks options menu.
- Double-click the header or footer in the second section. This will open the Header & Footer design tab.
- Click Page Number then Format Page Numbers.
- Select the radio button labeled «Start At,» then select «1» to restart the page count at 1.
-
4
Use «Format Page Numbers» for additional changes. This can be located by going to Insert > Page Number > Format Page Numbers. You can change:
- The number format. You can change this to Roman numerals, letters, or another style.
- The chapter number.
- The starting number.
-
5
Click Close Header and Footer. This will return you to editing the body of the document. Alternatively, press Esc to close the header and footer editor.


Advertisement
-
1
Open your Word document on your Android, iPhone, or iPad. It’s easy to use Word on your phone or tablet to insert page numbers into your document.
-
2
Tap the more button. While in Edit mode in the Word mobile app, tap the more button (three horizontal dots).
-
3
Tap Home. Then, select Insert to switch to the Insert menu.
-
4
Choose Page Numbers. Then, select the placement location for the numbers.
-
5
Format the page number. After selecting the placement, double-click the page number. Then, tap the text edit button (the icon with the letter A and a pen). You can change the font, size, color, and more!
-
6
Go to Headers and Footers. This is in the Insert menu. You can set a different first page, change how odd and even pages look, or remove the page numbers entirely.
- When working in Online mode, any changes made in the app will appear on your desktop version of Word.


Advertisement
Add New Question
-
Question
In the insert box, the page number icon is grayed out and not available for use. How do I activate it?

Kyle Smith is a wikiHow Technology Writer, learning and sharing information about the latest technology. He has presented his research at multiple engineering conferences and is the writer and editor of hundreds of online electronics repair guides. Kyle received a BS in Industrial Engineering from Cal Poly, San Luis Obispo.
wikiHow Technology Writer
Expert Answer
The page numbering feature isn’t available in certain layouts. Go to View and select Print Layout. If this doesn’t resolve the issue, try restarting and/or updating Microsoft Word.

Ask a Question
200 characters left
Include your email address to get a message when this question is answered.
Submit
Advertisement
Video
-
If you plan on creating a complex header or footer (like your name, or a title), try and add the page numbers first. They will be much easier to work with.
-
Looking for money-saving deals on Microsoft Office products? Check out our coupon site for tons of coupons and promo codes on your next subscription.
Thanks for submitting a tip for review!
Advertisement
About This Article
Article SummaryX
1. Click Insert.
2. Click Page Number.
3. Select a position.
4. Choose a style.
Did this summary help you?
Thanks to all authors for creating a page that has been read 423,281 times.
Is this article up to date?
For many, this is a frustrating problem—once the header is set up to satisfaction, inserting the page number causes the header to vanish, and reintroducing the header makes the page number go away—the two are seemingly mutually exclusive.
Here is what I am talking about
Let us start with a blank document, without header or page number.
![]()
Click on the Insert tab on the Menu Bar. The Ribbon changes to the Insert Menu. Click on Header and select any one of the Blanks to insert as Header. Here, we have chosen Austin, but any one of them will do.
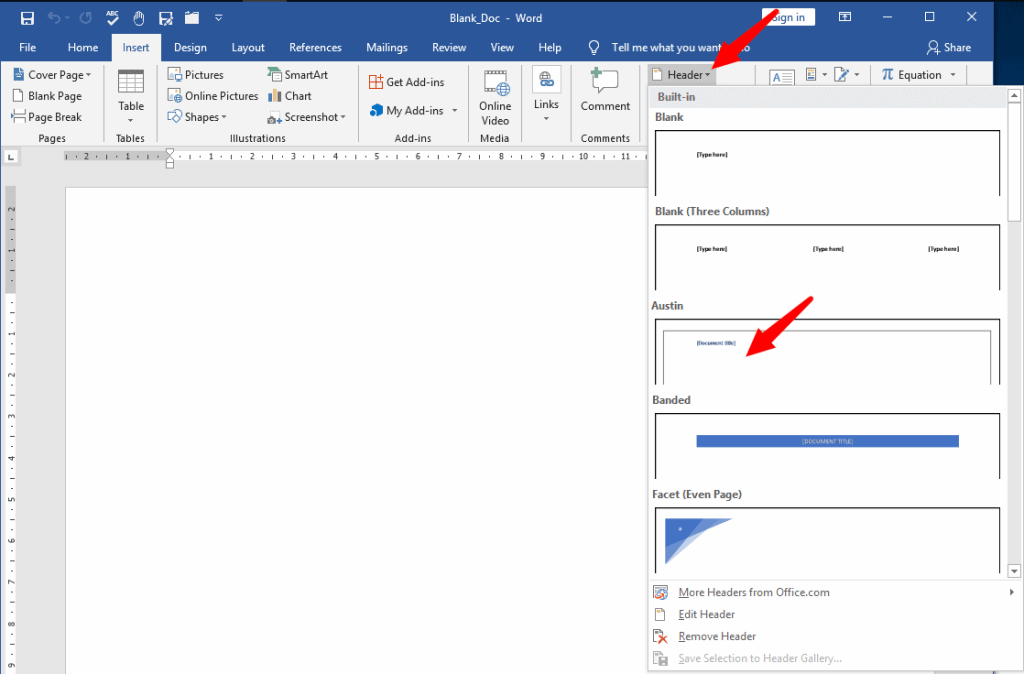
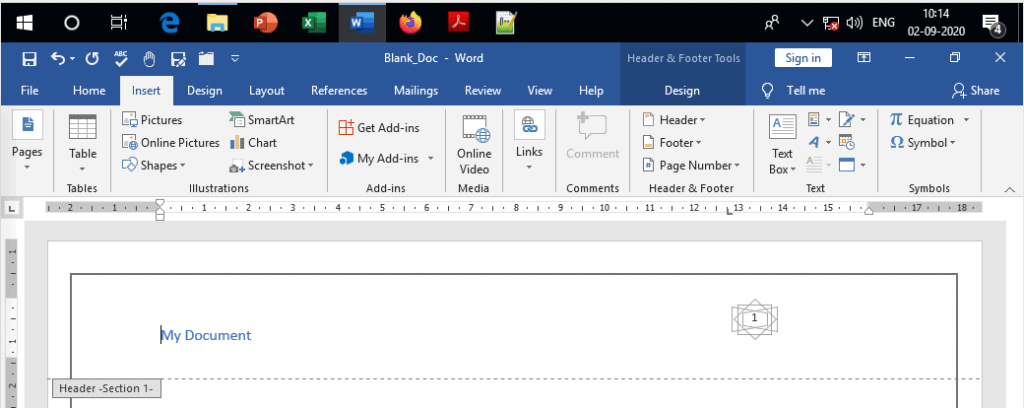
To identify the header, we have named it My Document. Click on Page Number and insert a page number at the Top of Page.

You will get the page number, but unfortunately, it has replaced the header you had inserted earlier.

The above anomaly happens because Word treats both the Header and the Page Number as building blocks, and each will replace the other. So how to get both?
In this post, I will share 2 methods:
- Insert Page number in Footer
- Insert Page number in Header
Lets start
Method #1: Insert Page Number in the Footer
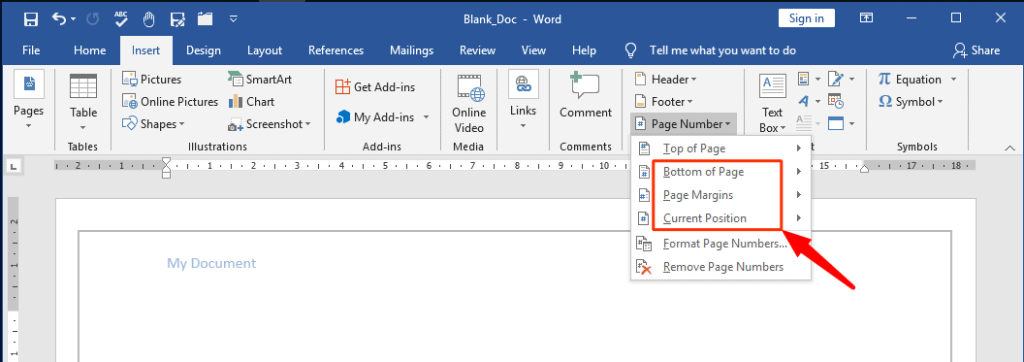
If you have noticed, we had inserted the page number at Top of the Page, and the Header vanished. However, if we insert the page number anywhere other than the Top of the Page, we can have both the header and the page number appear on the same page.
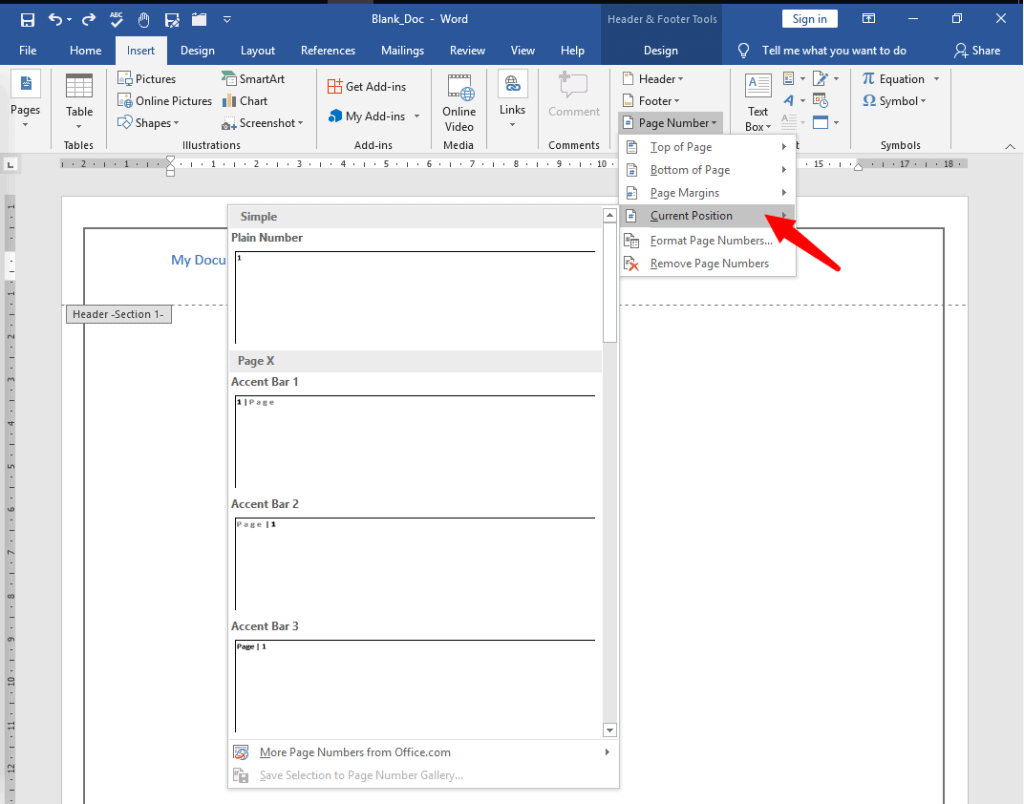
For instance, go to the Page Number menu (Insert>Page Number) and then click on either Bottom of Page, Page Margins, or Current Position.
This will put the page number where you want, and leave the Header untouched.
Method #2: Insert Page Number in the Header
When the position of the page number must be within the header, follow this simple method.
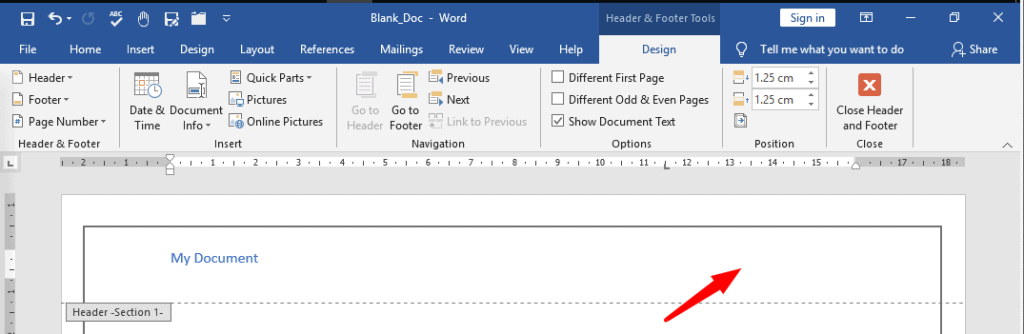
Step1: Insert the header you want (Insert>Header>Austin/any other). Double-click anywhere within your header, and position the cursor where you want the page number to appear.
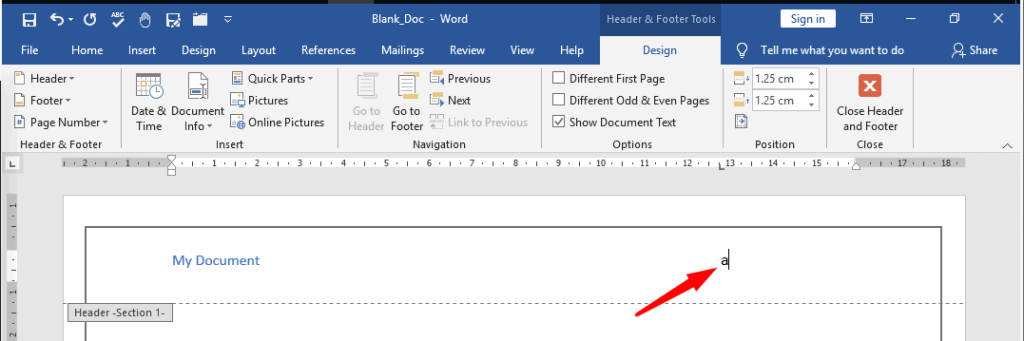
Step 2: Insert a PAGE field by pressing Alt+Shift+P. A simple page number will appear in the PAGE field.
Step 3: If instead of a simple page number, you would rather have a fancy page number, use the Current Position setting in the Page Number menu (Insert>Page Number>Current Position) and choose from the gallery.
Final Result: This is how the Page Number along with Header appears on our document
Conclusion
It may seem confusing at first trying to insert a page number and the header together, only to have them replace each other. However, the two methods explained above can solve the problem and one can place a fancy page number within a well-designed header.
Lesson 17: Headers, Footers, and Page Numbers
/en/word2013/columns/content/
Introduction
The header is a section of the document that appears in the top margin, while the footer is a section of the document that appears in the bottom margin. Headers and footers generally contain additional information such as page numbers, dates, an author’s name, and footnotes, which can help keep longer documents organized and make them easier to read. Text entered in the header or footer will appear on each page of the document.
Optional: Download our practice document.
To create a header or footer:
In our example, we want to display the author’s name at the top of each page, so we’ll place it in the header.
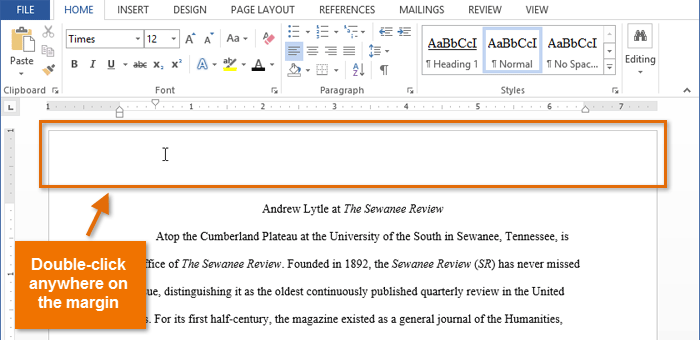
- Double-click anywhere on the top or bottom margin of your document. In our example, we’ll double-click the top margin.
 Double-clicking on the header
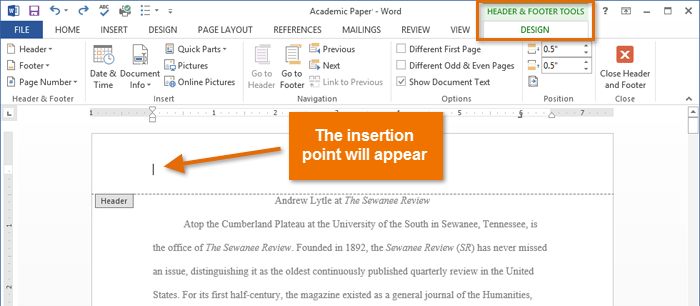
 - The header or footer will open, and a Design tab will appear on the right side of the Ribbon. The insertion point will appear in the header or footer.
 The open header
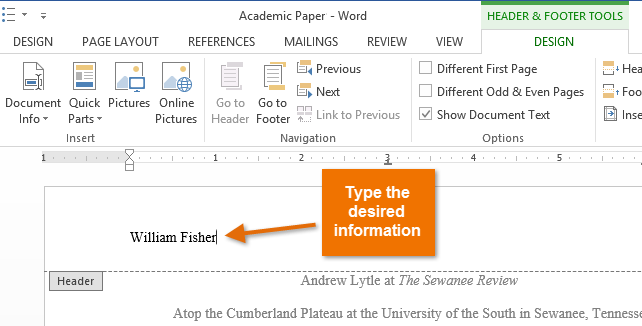
 - Type the desired information into the header or footer. In our example, we’ll type the author’s name.
 Typing text into a header
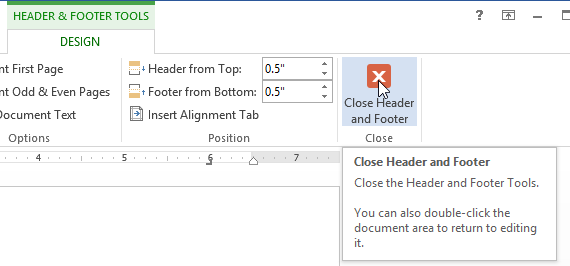
 - When you’re finished, click Close Header and Footer. Alternatively, you can press the Esc key.
 Clicking Close Header and Footer
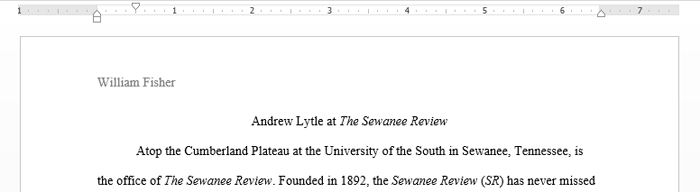
 - The header or footer text will appear.
 The finished header
To insert a preset header or footer:
Word has a variety of preset headers and footers you can use to enhance your document’s design and layout. In our example, we’ll add a preset header to our document.
- Select the Insert tab, then click the Header or Footer command. In our example, we’ll click the Header command.
 Clicking the Header command
 - In the menu that appears, select the desired preset header or footer. In our example, we’ll select a header.
 Selecting a preset header
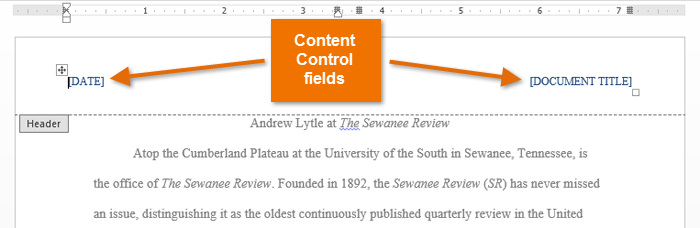
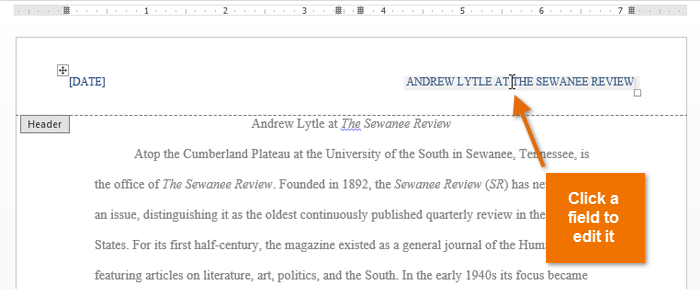
 - The header or footer will appear. Preset headers and footers contain placeholders for information such as the title or date; they are known as Content Control fields.
 Content Control fields
 - To edit a Content Control field, click it and type the desired information.
 Editing a Content Control field
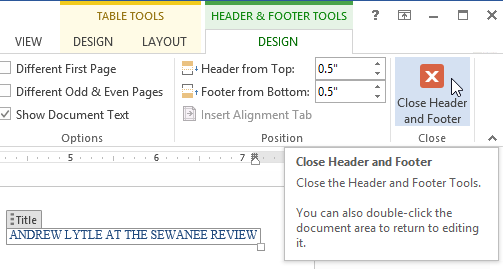
 - When you’re finished, click Close Header and Footer. Alternatively, you can press the Esc key.
 Closing the Header and Footer


If you want to delete a Content Control field, right-click it and select Remove Content Control from the menu that appears.
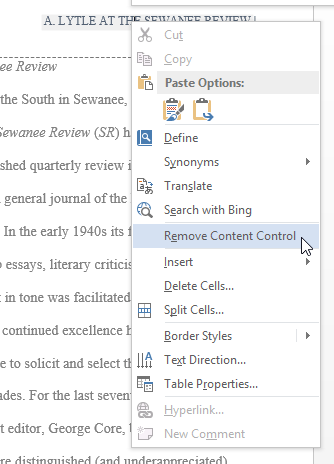 Removing a Content Control field
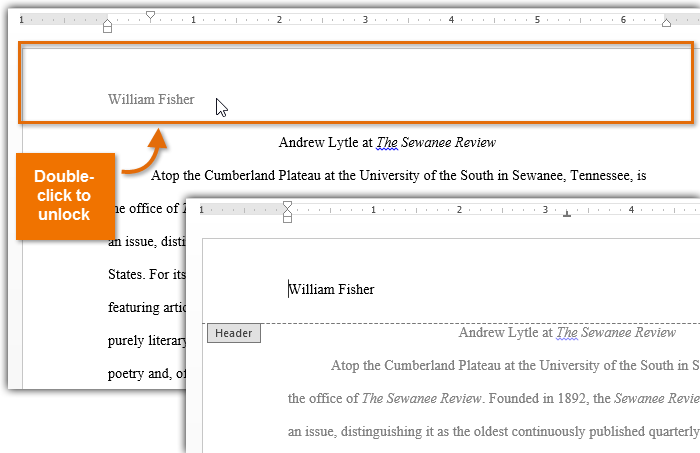
Editing headers and footers
After you close the header or footer, it will still be visible, but it will be locked. Simply double-click a header or footer to unlock it, which will allow you to edit it.
 Opening a header
Design tab options
When your document’s header and footer are unlocked, the Design tab will appear on the right side of the Ribbon, giving you various editing options:
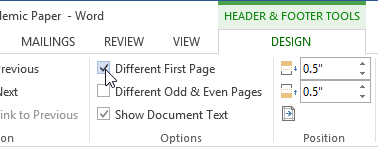
- Hide the first-page header and footer: For some documents, you may not want the first page to show the header and footer, like if you have a cover page and want to start the page numbering on the second page. If you want to hide the first page header and footer, check the box next to Different First Page.
 Hiding the first page header and footer
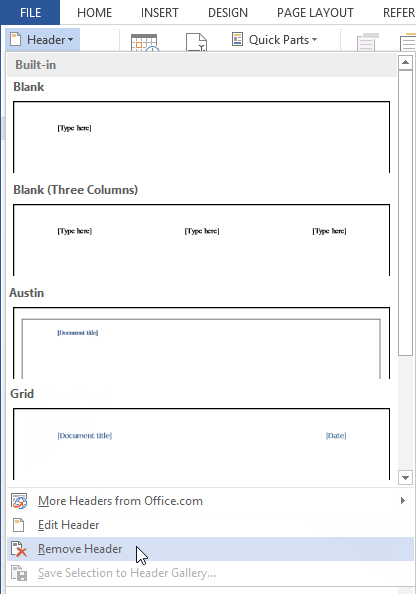
 - Remove the header: If you want to remove all information contained in the header, click the Header command and select Remove Header from the menu that appears.
 Removing the header
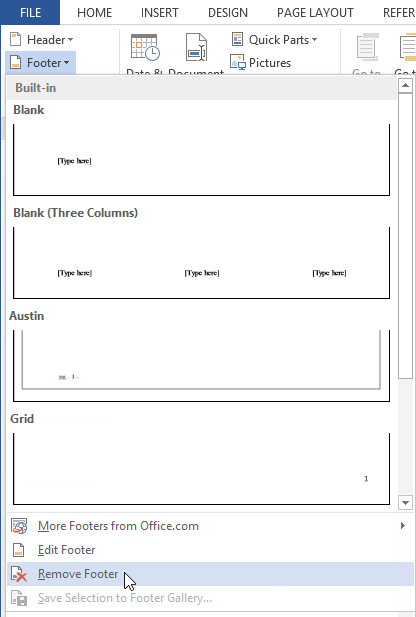
 - Remove the footer: If you want to remove all information contained in the footer, click the Footer command and select Remove Footer from the menu that appears.
 Removing the footer
 - Additional options: With the Page Number command and the commands available in the Insert group, you can add page numbers, the date and time, pictures, and more to your header or footer.
 Insert group on the Ribbon

To insert the date or time into a header or footer:
Sometimes it’s helpful to include the date or time in the header or footer. For example, you may want your document to show the date when it was created.
On the other hand, you may want to show the date when it was printed, which you can do by setting it to update automatically. This is useful if you frequently update and print a document because you’ll always be able to tell which version is the most recent.
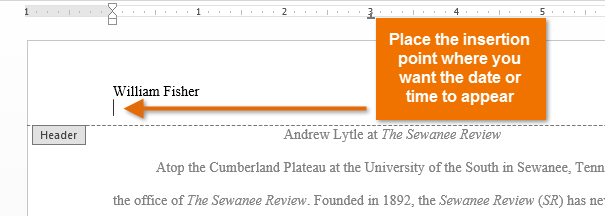
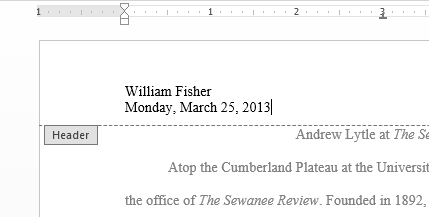
- Double-click anywhere on the header or footer to unlock it. Place the insertion point where you want the date or time to appear. In our example, we’ll place the insertion point on the line below the author’s name.
 Placing the insertion point in the unlocked header
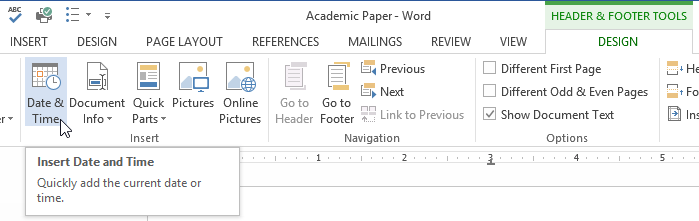
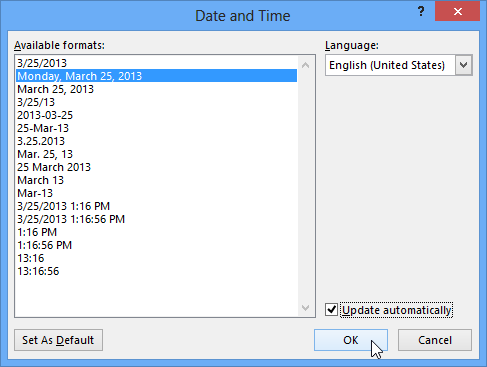
 - The Design tab will appear. Click the Date & Time command.
 Clicking the Date & Time command
 - The Date and Time dialog box will appear. Select the desired date or time format.
- Check the box next to Update Automatically if you want the date to change every time you open the document. If you don’t want the date to change, leave this option unchecked.
- Click OK.
 Selecting a date option
 - The date will appear in the header.
 The date in the header
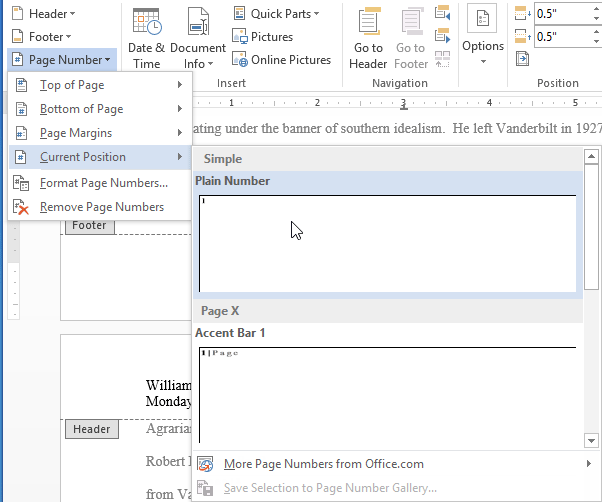
Adding page numbers
Word can automatically label each page with a page number and place it in a header, footer, or side margin. When you need to number some pages differently, Word allows you to restart page numbering.
To add page numbers to a document:
In our example, we’ll add page numbering to our document’s footer.
- Double-click anywhere on the header or footer to unlock it. If you don’t already have a header or footer, you can double-click near the top or bottom of the page. The Design tab will appear on the right side of the Ribbon.
 Unlocking the footer
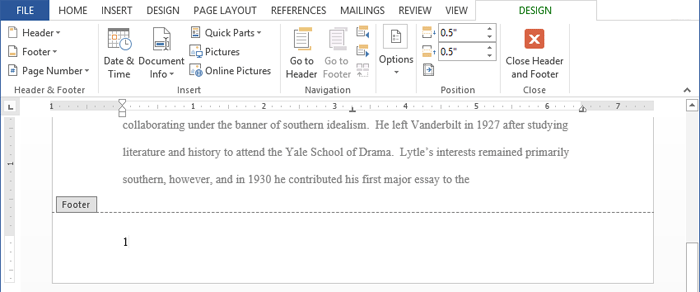
 - Click the Page Number command. In the menu that appears, hover the mouse over Current Position and select the desired page numbering style.
 Selecting a page number style
 - Page numbering will appear.
 A page number in the footer
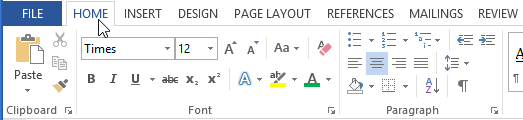
 - To edit the font, font size, and alignment of page numbers, select a page number and click the Home tab. Word’s text formatting options will appear.
 Clicking the Home tab
 - When you’re finished, press the Esc key. The page numbering will be formatted.
 A formatted page number

Alternatively, you can add page numbers to the header or footer by clicking the Page Number command and then selecting Top of Page or Bottom of Page. If you have an existing header or footer, it will be removed and replaced with the page number.
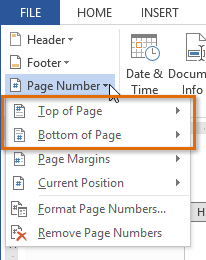 Top of Page and Bottom of Page options
To restart page numbering:
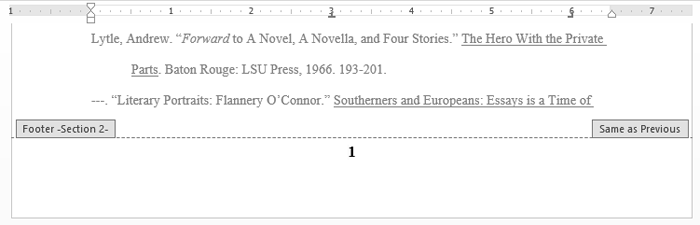
Word allows you to restart page numbering on any page of your document. You can do this by inserting a section break and then selecting the number you want to restart the numbering with. In our example, we’ll restart the page numbering for our document’s Works Cited section.
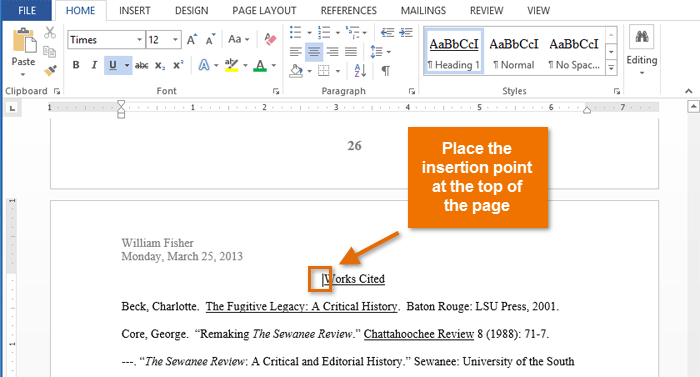
- Place the insertion point at the top of the page you want to restart page numbering for. If there is text on the page, place the insertion point at the beginning of the text.
 Placing the insertion point
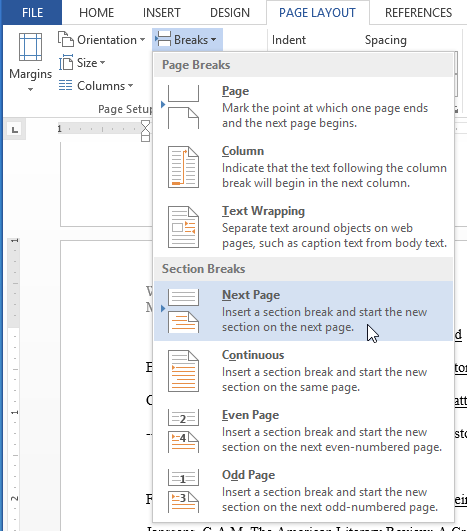
 - Select the Page Layout tab, then click the Breaks command. Select Next Page from the drop-down menu that appears.
 Selecting Next Page
 - A section break will be added to the document.
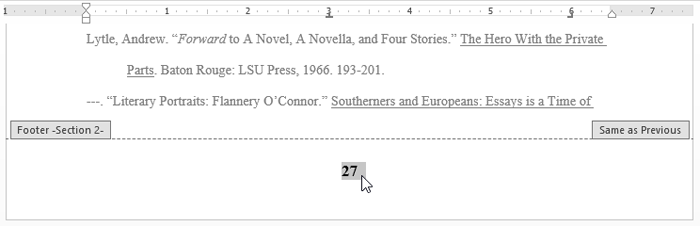
- Double-click the header or footer that contains the page number you want to restart.
 Selecting the page number to restart
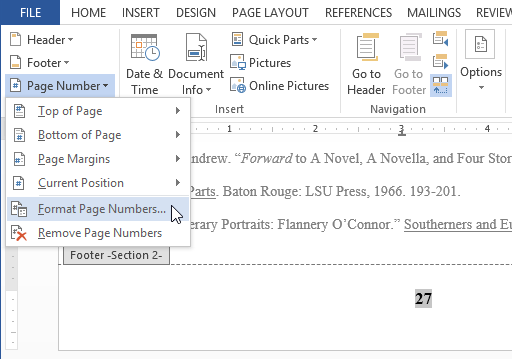
 - Click the Page Number command. In the menu that appears, select Format Page Numbers.
 Formatting the page number
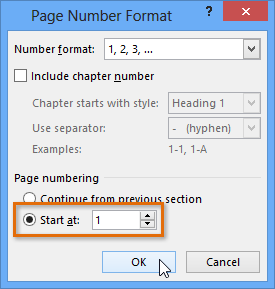
 - A dialog box will appear. Click the Start at: button. By default, it will start at 1. If you want, you can change the number.
- Click OK.
 Restarting the page numbering
 - The page numbering will restart.
 The restarted page numbering
To learn more about adding section breaks to your document, visit our lesson on Breaks.
Challenge!
- Create a new Word document. If you want, you can use our practice document.
- Create a blank header. If you’re using the example, unlock the header.
- Add a name to the header. If you’re using the example, type the name Tom Shelby after Professor.
- Try inserting a preset header or footer.
- Add today’s date to the header. If you’re using the example, add today’s date below Professor Tom Shelby.
- Try adding a page number to the footer. If you’re using the example, add a page number to the bottom of the page.
- Try restarting the page numbering.
/en/word2013/pictures-and-text-wrapping/content/