
Word for Microsoft 365 Word 2021 Word 2019 Word 2016 Word 2013 Word 2010 More…Less
-
Click or tap the page at the beginning of a section.
-
Select Layout > Breaks > Next Page.

-
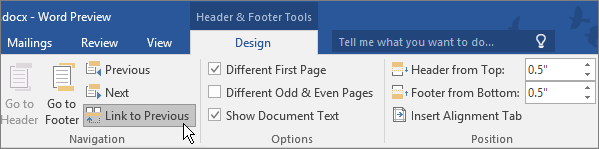
Double-click the header or footer on the first page of the new section.
-
Click Link to Previous to turn it off and unlink the header or footer from the previous section.
Note: Headers and footers are linked separately. If you’re using headers and footers that are different for each section, turn off linking for both header and footer.
-
Go the start of the next section and repeat steps 1-5. Continue for all sections.
-
Double click the header or footer in each section and choose styles or add content.
-
Select Close Header and Footer or press Esc to exit.

For more on headers and footers, see Headers and footers in Word.
Need more help?
The footer is the part of a document found at the bottom margin of each page. It usually contains information like the page number that appears throughout your document. Footers can also help keep documents organized and look more professional.
Corporate and academic standards typically call for more than just one footer in a document.
The cover page, the appendices, and other pages in different orientations can all have different footers.
MS Word offers more than one way to add different footers on each page.

- Using preset footer options
- By inserting section breaks
Method 1: Using the Preset Footer Options
Step 1: Open up a Word file.

Step 2: Access the footer section.
Once our document is opened, go to the Insert tab and click the footer drop-down menu. Then, select the Edit footer option found at the bottom of the menu.

Alternatively, you can double-click the bottom margin of your document to access the footer section.

Step 3: Access the footer design tools.
Now that the footer section is enabled, you’ll be directed to the Header & Footer Design tab. You’ll see two unticked checkboxes from the Options group: Different First Page and Odd & Even Pages checkboxes.

If you want the first page to have a different footer from the rest of your document, tick the Different First Page checkbox.

On the other hand, tick the checkbox next to Odd & Even Pages if you want the odd-numbered pages to have a different footer from the even-numbered pages.

Step 4: Add your content into your footer.
You can now start adding your text or object in the footer section. Once finished, simply double-click outside the footer section to go back to the main text.
You can also press the Close Header and Footer button.
Method 2: By Inserting Section Breaks
Section breaks mark the point at which a part of your document ends and another one starts. They help organize the different parts of your document to easily configure different footers for each page.
Here’s how you can create section breaks in your document.
Step 1: Open up an MS Word file.

Step 2: Create section breaks.
Once our document is ready, click at the start of the page that you want in a different footer. Then, move your cursor to the upper left part of your window and click the Layout tab. After that, click the Breaks drop-down menu. Finally, select the Next Page option in the selection.
For this example, we want the second paragraph with a different footer. So, we’ll insert section breaks before and after this paragraph. We’ll place our cursor right at the start of the second paragraph and insert the section break.

Now, place your cursor at the end of the section and repeat the process. You’ll notice that MS Word moved the section to a separate page.
Step 3: Access the footer section.
Now that our section is set up, go to the Insert tab and click the Footer drop-down menu. Then, select Edit Footer from the list of options.

Alternatively, you can simply double-click the bottom margin of the page to access the footer section.

Step 4: Unlink the section footer.
To make this successfully work, we’ll need to break the connection between the footer in the current section and the previous one. So, with your cursor still inside the footer section, click on the Link to Previous button found on the Header & Footer Design tab.

You can now insert your content in the footer section. Take note that you’ll have to repeat the same process for each page that you want to have a different footer.
To go back to the main text, simply double-click outside the footer or click on the Close Header and Footer button.
There you have it! You’ve just inserted section breaks to have a different footer on each page in MS Word.
Conclusion
We hope you’ve found this article helpful!
How to Add Advanced Headers and Footers in Word
Create different sections to apply different document headers and footers
Updated on August 4, 2021
What to Know
- Double-click the top or bottom margin of a section. Anything added to the field appears as a header or footer on subsequent pages.
- For advanced settings, select Insert. In Header and Footer, choose the Header or Footer drop-down menu and select your options.
- Headers and footers can be applied per section. To create a new section, go to desired spot in document and choose Insert > Break.
Microsoft Word provides advanced header and footer options for lengthy or complicated documents. In this guide, we show you how to add headers and footers, as well as how to add section breaks, page numbers, dates, times, and other information using Microsoft Word for Mac (2012 through 2019) and Microsoft Word Online.
Add Headers and Footers
The easiest way to insert a header or footer is to place the mouse pointer in the top or bottom margin of a section and double-click to open the Header and Footer workspace. Anything you add to this workspace appears on every page of the section. To return to the body of your document, double-click anywhere in it.
You can format the header and footer text, for example, with a different font or bold text, and insert an image, such as a logo.
Add a Heading or Footer From the Word Ribbon
You can also use the Microsoft Word ribbon to add a header or footer. The benefit of this method is that the options are preformatted. Microsoft Word provides headers and footers with colored dividing lines, document title placeholders, date placeholders, page number placeholders, and other elements. Using one of these preformatted styles can save time and add a touch of professionalism to your documents. Here’s how:
-
Click the Insert tab.
-
In the Header and Footer section, click the Header or Footer drop-down arrow.
-
Select the desired option.
Blank creates a blank header or footer, into which you can insert whatever text or graphics you like.
-
The Header & Footer tab appears.
-
Click Close Header and Footer to return to the main body of the document.
Unlink Headers and Footers From Previous Sections
-
Click anywhere in the header or footer.
-
Go to the Header & Footer tab, then click Link To Previous to turn off the link.
-
Type a new header or footer for this section. Now unlinked, it functions independently of the previous ones.
Add Section Breaks in Microsoft Word
Sections are parts of a document. Use sections to organize content into chapters, topics, or whatever other division helps your reader understand and use the document. Each section in a Word document can have its own formatting, page layouts, columns, headers, and footers.
Sections are created using section breaks. To use headers and footers, insert a section break at the beginning of each section for which you want to apply a unique header or footer. The formatting you set up extends to each page of the section until another section break is encountered.
To set up a section break:
-
Navigate to the spot where you want to create the break and select Insert > Break. Alternatively, click Layout > Breaks.
-
Select the type of break you want.
- Section Break (Next Page): The section starts on a new page.
- Section Break (Continuous): The section continues from the selected spot.
- Section Break (Odd Page): Starts a new section on the next odd-numbered page.
- Section Break (Even Page): Starts a new section on the next even-numbered page.
-
Section breaks aren’t visible by default. To see section breaks, go to the Home tab and click the section symbol.
After your document is divided into sections, you can apply headers and footers on a per-section basis.
Use headers and footers without inserting section breaks to use the same headers and footers throughout the document.
Include Page Numbers, Dates, Times, or Other Info
Word offers many options for including information automatically. For example, to insert page numbers:
-
Go to the Header & Footer tab, then click Insert > Page Number.
-
Click Format Page Numbers and select the appropriate settings. For example, select the Include Chapter Number check box if you formatted your document with Styles. To change the starting number, click the up or down arrow. Then, click OK.
-
To add the date or time, go to the Header & Footer tab and select Date & Time. Choose a date format in the dialog box that appears and click Update automatically so that the current date and time always display in the document.
Thanks for letting us know!
Get the Latest Tech News Delivered Every Day
Subscribe
Go to Insert > Header or Footer. Choose from a list of standard headers or footers, go to the list of Header or Footer options, and select the header or footer that you want. Or, create your own header or footer by selecting Edit Header or Edit Footer. When you’re done, select Close Header and Footer or press Esc.
Contents
- 1 How do I create a custom footer on each page?
- 2 How do you put a header and footer on each page in Word?
- 3 How do I create a header and footer in Word?
- 4 How do I make each footer different?
- 5 How do I create a footer section in Word?
- 6 What’s the footer on Microsoft Word?
- 7 What is footer in Word?
- 8 How do you put a footer on one page only?
- 9 How do I create a footer in Word 2016?
- 10 How do I save a footer in Word?
- 11 How do I make the headers different in Word 2019?
- 12 How do I change the footer on each page in Word?
- 13 How do you add sections to a Word document?
- 14 How do you add collapsible sections in Word?
- 15 How do you split a Word document into sections?
- 16 What is the difference between header and footer?
- 17 How do I set the default header and footer in Word?
- 18 What is footer with example?
- 19 How do you create a footer?
- 20 Where is the footer located?
Configure headers and footers for different sections of a…
- Click or tap the page at the beginning of a section.
- Select Layout > Breaks > Next Page.
- Double-click the header or footer on the first page of the new section.
How do you put a header and footer on each page in Word?
Use headers and footers to add a title, date, or page numbers to every page in a document.
Try it!
- Select Insert > Header or Footer.
- Select one of the built in designs.
- Type the text you want in the header or footer.
- Select Close Header and Footer when you’re done.
How do I create a header and footer in Word?
To create a header or footer:
- Double-click anywhere on the top or bottom margin of your document.
- The header or footer will open, and a Design tab will appear on the right side of the Ribbon.
- Type the desired information into the header or footer.
- When you’re finished, click Close Header and Footer.
Double-click the footer that you want to change, and uncheck the “Link to previous” checkbox under the Design tab (for Word 2018) or the “Header & Footer tools” tab (for earlier versions). The footer can now be edited independently of others. Repeat as needed for every page that requires a different footer.
Click anywhere in the section of your document for which you want to create a different header or footer. In Word 2010 and 2007, select the Insert tab, and then select either Header or Footer. Then, select Edit Header or Edit Footer. In earlier versions of Word, from the View menu, select Header and Footer.
A header is the top margin of each page, and a footer is the bottom margin of each page. Headers and footers are useful for including material that you want to appear on every page of a document such as your name, the title of the document, or page numbers.
In general, a footer is an area at the bottom of a document page containing data common to other pages.The information in footers may include page numbers, creation dates, copyrights, or references that appears on a single page, or on all pages.
Enter your content in the footer. Click on the Options button at the top of the header, go to Footer Format, and make sure that the footer applies to only this section. Now go to the footer of next page and UN-check the box for “Link to previous.” Now your footer will be only on that one page.
Follow these steps.
- Position the insertion pointer where you want the page number to appear.
- Click the Header & Footer Tools Design tab.
- In the Insert group, click the Document Info button and choose Field.
- From the Categories menu, choose Numbering.
- In the Field names list, click to select Page.
- Choose a Format.
Save header or footer in gallery: a. Click Footer (or Header, if saving header) on Insert tab. b. Select Save Section to Footer (or Header) Gallery…
Select Insert > Header & Footer. On the right side of the white area at the top of the document area, select Options > Different Even & Odd Pages. Type the text you want to appear on even pages. Select Odd Pages, and then type the text you want to appear on odd pages.
Edit your existing headers and footers
- Double-click the header or footer you want to edit, or select Header or Footer, and then select Edit Header or Edit Footer.
- Add or change text for the header or footer or do any of the following:
- When you’re done, select Close Header and Footer or press Esc.
How do you add sections to a Word document?
Insert a section break
- Select where you want a new section to begin.
- Go to Page Layout > Breaks.
- Section break that you want to add: A Next Page section break starts the new section on the next page. A Continuous section break starts the new section on the same page.
How do you add collapsible sections in Word?
Select all the headings you want to collapse. Then, on the HOME tab, click the Paragraph dialog box launcher, and check Collapsed by default. Now, when readers open the document, they can use the collapsed headings like a table of contents – choose the section they want to read and click the triangle to expand it.
How do you split a Word document into sections?
Divide a Document into Sections
- Place the insertion point where you want the section break.
- Choose the Page Layout tab.
- Click the down-arrow next to the Breaks button. A menu appears.
- Click the type of section break you want. Word inserts the section break.
What is the difference between header and footer?
Header and footer are areas at the top and the bottom of a page. A header is at the top of the page and footer is at the bottom of the page. This is the main difference between header and footer. Both header and footer are set up to stay constant (the area) throughout a document.
How do I set the default header and footer in Word?
Word gives you have several presets to select from; you can also begin with a blank header or footer.
- From the Insert command tab, in the Header & Footer section, click HEADER or FOOTER. The scroll list of preset headers or footers appears.
- Select the desired header or footer style.
The definition of a footer is the information that repeats throughout a document at the bottom of the page. An example of a footer is the page number listed along with your last name.In a document or report, common text that appears at the bottom of every page. It usually contains the page number.
Go to Insert > Header or Footer. Choose from a list of standard headers or footers, go to the list of Header or Footer options, and select the header or footer that you want. Or, create your own header or footer by selecting Edit Header or Edit Footer. When you’re done, select Close Header and Footer or press Esc.
In typography and word processing, the page footer (or simply footer) of a printed page is a section located under the main text, or body. It is typically used as the space for the page number.
В этой статье мы рассмотрим коллекцию Sections и ее объекты Section, которые предоставляют разделы документа Word. Существует тонкая грань между разделами и страницами документа, так, в созданном документе существует только один раздел, при желании можно добавить еще несколько, однако количество страниц может быть или равным количеству разделов, или больше. Добавление разделов документа Word актуально в том случае, если мы хотим оформить рамку для каждой страницы в индивидуальном стиле.
Возьмем такой пример: в документе 20 страниц и один раздел, которому они принадлежат, приложение Word позволяет применить заданную рамку ко всему разделу, к первой странице раздела или ко всем страницам кроме первой. Но, что если мы хотим, что бы каждая страница была оформлена индивидуальной рамкой (свет, стиль, толщина линии)? В таком случае, нам придется добавить 20 отдельных разделов в документ Word, и уже для каждого применить индивидуальное оформление.
Sections – разделы документа Word
Коллекция Sections содержит объекты Section для заданного документа, выделения или выбора. Отсюда следует, что мы можем получить доступ к данной коллекции тремя способами с помощью свойства Sections, которое есть у таких объектов:
Word Document – В данном случаем мы обрабатываем разделы для конкретного документа Word.
Word Selection – Тут мы можем получить те разделы документа Word, которое принадлежат заданному выделению.
Word Range – Тут мы можем получить те разделы документа Word, которое принадлежат заданному выбору.
Свойства
Count – Возвращает количество разделов (объектов Section) в коллекции.
First — Возвращает объект Section, представляющий первый элемент в коллекции Sections.
Last — Возвращает объект Section, представляющий последний элемент в коллекции Sections.
PageSetup — Возвращает объект PageSetup.
Методы
Add(Range, Start) — Возвращает объект Section, представляющий новый раздел, добавленный в документ Word. Оба параметра являются дополнительными.
Range — Диапазон перед которым нужно вставить раздел. Если этот аргумент опущен, раздел документа Word вставляется в конец.
Start — Тип раздела документа Word, который вы хотите добавить. Если параметр отсутствует, то раздел добавляется после следующей страницы. Значение константы WdSectionStart.
- wdSectionContinuous — 0 – Сплошной раздел.
- wdSectionEvenPage — 3 — Четные страницы.
- wdSectionNewColumn — 1 – Колонка.
- wdSectionNewPage — 2 — Страница.
- wdSectionOddPage — 4 — Нечетные страницы.
Item(index) – Доступ к заданному разделу по его номеру в коллекции.

Section – разделы документа Word
Свойства
Application — Возвращает объект Word Application.
Borders — Возвращает коллекцию Borders.
Footers и Headers — Свойства возвращают коллекцию HeadersFooters для нижнего или верхнего колонтитула.
Range — Возвращает объект Range.
PageSetup— Возвращает объект PageSetup.
Index — Возвращает позицию объекта Section в коллекции.
Теперь рассмотрим два программных кода на языке VBScript и JScript:
' ----------------------------------------------------------------------------
' Коллекция Sections и объект Section
' Добавление разделов в документ Word
' Sections.vbs
' ----------------------------------------------------------------------------
Option Explicit

dim oWord, oDoc, oSel, i, MyText

Set oWord = CreateObject("Word.Application")
Set oDoc = oWord.Documents
oDoc.Add()
oWord.Visible = True
Set oSel = oWord.Selection

MyText = "Разделы документа Word. "

For i=0 to 40
    oSel.TypeText MyText & MyText & MyText & MyText & MyText & MyText & MyText
    oSel.TypeParagraph
Next

MsgBox "Количество разделов в документе Word - " & oDoc(1).Sections.Count

oDoc(1).Sections.Add
oDoc(1).Sections.Add
oDoc(1).Sections.Add

MsgBox "Количество разделов в документе Word - " & oDoc(1).Sections.Count
<
// ----------------------------------------------------------------------------
// Коллекция Sections и объект Section
// Добавление разделов в документ Word
// Sections.js
// ----------------------------------------------------------------------------
var oWord, oDoc, oSel, i, MyText;

oWord = WScript.CreateObject("Word.Application");
oDoc = oWord.Documents;
oDoc.Add();
oWord.Visible = true
oSel = oWord.Selection;

MyText = "Разделы документа Word. ";

for(i=0; i<=40; i++){
    oSel.TypeText(MyText + MyText + MyText + MyText + MyText + MyText + MyText);
    oSel.TypeParagraph();
}

WScript.Echo("Количество разделов в документе Word - " + oDoc(1).Sections.Count);

oDoc(1).Sections.Add();
oDoc(1).Sections.Add();
oDoc(1).Sections.Add();

WScript.Echo("Количество разделов в документе Word - " + oDoc(1).Sections.Count);
В данных примерах все довольно просто. В самом начале мы создаем ссылку на объект Word Application, далее происходит создание нового документа и вставка в него заданного текста. Приложение Word автоматически создает один раздел для всего документа, плюс, данный раздел будет содержать в себе все страницы.
Далее в сценарии происходит вывод количества разделов документа Word, естественно, их значение равно 1. После, мы добавляем три новых раздела с помощью метода Add и снова выводим общее количество разделов.