
You can split fonts into two main styles. There are serif fonts (with lines flicking out of each letter) and sans-serif fonts (without the lines). Serif fonts tend to be easier to read, but they look more formal. This article will show you some of the best ones in Word.
The best serif fonts in Microsoft Word are Times New Roman, Garamond, and Palatino Linotype. They all work well to show a more formal look in your writing. They’re also very easy to read, making them solid choices if you’re looking to write an essay or academic paper.
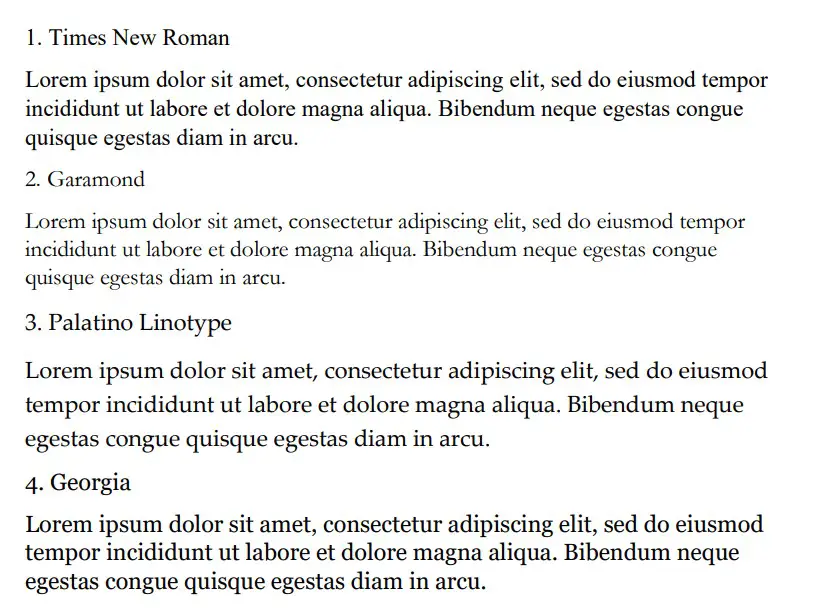
Times New Roman
Times New Roman is the default Microsoft Word font. You really can’t go wrong with it. Everyone knows what it looks like, and everyone uses it as the default serif font in Word. If you don’t actively change your font, it’s likely that you’re writing in Times New Roman.
It is a very professional font that has been proven to be one of the easiest to read on paper. It also makes your writing look more trustworthy, which works wonders when you use it for something like an academic or scientific paper.
You will find that Times New Roman is one of the most popular fonts in the world. It’s such a good choice because of how popular it is, and it can fit in just about anywhere in your writing. It works well for titles and in the main body of the text.
Garamond
Garamond is another great serif font that works really well. It comes in at a close second to Times New Roman, which is saying a lot considering how popular Times New Roman is. Garamond is fairly easy to read, and it even comes in slightly smaller in size.
Garamond is a great font that makes your writing much more concise. The smaller size of this font allows you to fit more words onto your page without feeling like you’re writing an essay full of gibberish and waffle.
If people decided to choose a different serif font in place of Times New Roman, it’s likely that Garamond would rank quite highly as their next favorite pick.
Palatino Linotype
Palatino Linotype is a great font choice that a lot of people enjoy using. It feels a bit fresher than some of the other serif fonts, and the size of the letters makes it a little more appealing when you are writing it for more informal purposes.
You will find that Palatino Linotype looks good wherever you put it. It can be both in a heading or in the main text body. As long as you like the look of the font, you’ll find a great place to put it to make sure it fits in.
The letters on Palatino Linotype feel a little more “open” than those of Times New Roman and Garamond. That’s what makes it a better choice if you’re looking for something that’s a little bit easier to read or comes across with more informal energy.
Georgia
Georgia is a very popular choice that a lot of essay writers are recommended to use. Many academics also vouch for Georgia, making it a really good choice if you’re looking to capture a more formal and trustworthy look.
People say that Georgia works really well as a heading. While this is definitely true, there is nothing wrong with using it as part of the main body of your text either. It can work in just about any situation, which makes it a great serif font choice.
While it’s not as popular as Times New Roman, it’s definitely up there in terms of how many people use it. It’s a fairly generic serif font, so there aren’t any specific style choices that stand it out from some of the rest.
Cambria
Cambria is another great serif font that is a default choice in Microsoft Word. While it isn’t automatically set as a font choice, it is automatic if you use the specific Word style that allows you to write headings and sub-headings.
Cambria is one of the best choices to introduce new ideas with headings and sub-headings. Of course, you don’t have to be limited to including it as a heading. If you want it as the text body, too, that’s fine.
You’ll find that this ranks highly in popularity compared to many of the other fonts. It looks really good on the page because of the more “square” feel that the letters have.
Bodoni MT
Bodoni MT is a classical serif font that works well. People like to use this font for novels, which shows that it must be an easy-to-read choice. The purpose of novels is to have thousands of words page after page, so having an easy-to-read font is always going to be ideal.
Bodoni MT is one of the thicker fonts on this list. It almost looks like it is written in bold, which really helps it to stand out from some of the other options. It works really well when it’s used to write multiple words at the same time.
The serif style looks very similar to some of the best fonts on this list, too. While this doesn’t allow Bodoni MT to be unique, it does allow it to have a familiar look and feel to it.
Bookman Old Style
Bookman Old Style is another great font that is common for novels. Again, if it works well in novels, you can bet that it works well in any situation when you might need someone to read through what you’re writing carefully.
Bookman Old Style is a large font. It allows the letters to appear more free and open compared to many of the other choices. This makes it a great font that’s worth trying out.
Lucida Bright
Lucida Bright is a good font choice. It’s part of the famous Lucida font family, and it works really well to show a large serif style. Lucida Bright is one of the larger fonts on this list, making it a great choice if you’re trying to make your writing really easy to read.
Some people would argue that Lucida Bright is too large for most formal documents. It does mean that you’ll take up a few extra pages because of your larger font choice, but this isn’t always a problem. Sometimes, it’s refreshing to include a larger font.
Modern No. 20
Modern No. 20 is an interesting serif font that doesn’t often get used. It’s a great choice nonetheless, and it applies to situations where some of the other serif fonts might feel a bit too pretentious or samey.
Modern No. 20 has very sharp serifs on its letters. While all of the fonts discussed so far have decent serif accents, Modern No. 20 seems to have some of the largest serifs that really help it to bring a unique style to your writing.
It’s much smaller than most of the other options too. It makes for a great choice if you’re trying to include a lot of information in one area without feeling like you have to fill up a lot of pages to get it to work.
Rockwell
Rockwell is a great option that many people like to use. It comes from the Rockwell family, which has made its name with more obvious and impactful fonts like ExtraBold and Condensed. Rockwell on its own is a great option for your serif-font needs.
It fits a similar style to most of the other serif fonts. There is nothing particularly unique that makes it stand out, which is usually a good thing. People don’t like their serif fonts to look out of place in their writing, and Rockwell will fit in no matter where you put it.
Poor Richard
Poor Richard is a great font in Microsoft Word that deserves more attention. It’s a very attractive font that comes with small lower-case letters. The capital letters tend to dwarf the lower-case ones, making it an interesting font style that the other serif fonts don’t have.
This font style is both a blessing and a curse, depending on how you look at it. It’s a blessing because it means that Poor Richard has a unique personality that allows it to stand out from the rest of the serif crowd.
It’s a curse because the uniqueness and size of the font in its style mean it doesn’t work very well formally. You’ll find that Poor Richard is a much better serif font for your informal writing.
Perpetua
Perpetua follows the same general idea as Poor Richard. It’s not all that popular, but it deserves to be. It’s a great font with an interesting style (most of which comes from the way some of the letters go below the written line, like the “p’s” and “q’s”).
Perpetua works really well in formal and informal contexts. It’s worth trying to use it yourself to see whether you can get along with it. A lot of people think it’s an attractive font, but it doesn’t often get used because it’s not a very well-known name.
You may also like:
12 Smallest Fonts In Microsoft Word
12 Best Cursive Fonts in Microsoft Word
12 Most Scary Fonts for Halooween in Microsoft Word

Martin holds a Master’s degree in Finance and International Business. He has six years of experience in professional communication with clients, executives, and colleagues. Furthermore, he has teaching experience from Aarhus University. Martin has been featured as an expert in communication and teaching on Forbes and Shopify. Read more about Martin here.
TheTechieSenior.com is reader supported. We may earn a commission if you buy through links on this site. As an Amazon Associate, we earn from qualifying purchases. Learn more here.
Microsoft Word users have access to dozens of fonts that can be used in our documents. But it frequently happens that we have a project in progress that calls for a font which is not available on our computers. We’ll show you how to add fonts in Microsoft Word.
Table of Contents
How to Add Fonts in Microsoft Word and Be Certain They’re Visible to Your Readers
In this article, I’ll be referring to Microsoft Word 365. I use that name for the version of MS Word that is part of the Microsoft 365 suite.
Fonts that you see in the font list in Microsoft Word 365 come from three likely sources:
- Several dozen are installed when Microsoft 365 is installed on your computer. Those are normally available for use in Word, Excel, Powerpoint, and Outlook.
- Microsoft Office 365 fonts that exist only in the cloud until you select one for use in your document.
- With a few possible exceptions, Microsoft Word has access to basically all of the additional fonts that are installed on your Windows or Mac computer.
How to use more cloud fonts in MS Word
Cloud fonts are fonts that are retrieved as needed from a server on the Internet. Standard fonts are stored on, and retrieved from, your computer.
You may have heard of Google fonts which are used on thousands of websites. In this article we’ll be referring to Microsoft cloud fonts which are only available to Microsoft 365 subscribers.
When you open the drop-down list of fonts in the text settings area of the Home tab, you see two groups of fonts comingled in one list—those that have a cloud icon before the font name and those that do not. (The cloud icon looks like a cloud with a downward pointing arrow through the bottom of it.)
Those that do not have the cloud icon preceding the font name are already in use on your computer. They are ready to use with or without an Internet connection, just by selecting them.
Those font names that do have the cloud icon preceding the name are also available for you to use in Microsoft 365 apps, but are not actually installed on your computer.
To use a font from the cloud, be sure your computer is connected to the Internet then select the font like any other on the list. That font will then be retrieved via the Internet and cached on your computer, ready for use in Word and other Microsoft 365 apps.
Download and add custom fonts
You can install additional fonts on your computer which will be available for most apps to use, including Microsoft Word.
There are many sources for fonts online, some offering them free of charge and others offering fonts that require you to purchase a license to use them.
Whether you download paid or free fonts, you will want to look for fonts in the OTF or TTF format. Many fonts will download as a .zip file that contains both versions. OTF is a newer format and will normally work fine. If you have an older app on your computer that does not seem to work with the OTF version, try installing the TTF version.
Fonts normally download in a zipped file (with a .zip file extension). Before you can install them, you’ll need to unzip them.
To unzip a file on a Mac computer, just double click it. A folder with the same name as the zipped file will appear in the same folder. The contents of the .zip file will be inside that folder.
To unzip a file on a Windows 10 computer, right-click the .zip file and choose Extract all. A folder containing the actual font files will be created in the same location as the .zip file.
Once the file is unzipped, follow the instructions below for Windows or Macs.
Install fonts in Windows 10
With the font unzipped, right-click the font file itself and choose to install. Remember, you are installing the font file with a .ttf or .otf extension, not the .zip file.
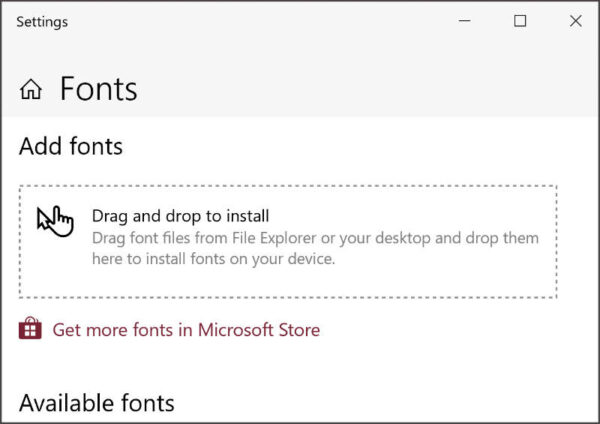
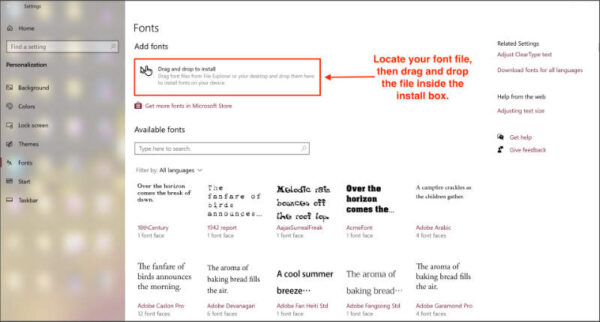
If the font doesn’t install correctly using the right-click method, you can use another method. In the search bar in the bottom left of your screen, type Fonts. The fonts tool should be the first item shown in the search results that appear.
- Click the Fonts tool.
- The window that appears will probably be a small window with a box in the center where you can drag and drop your font tile to install it. Drag your unzipped font file into that box. The font will automatically install.
You can also reach the Fonts management area in Windows 10 by clicking the Start button in the bottom left of the screen. Then:
- Click Settings
- Click Personalization
- Click Fonts
That should open the font settings page shown in the following image. If the smaller drag and drop panel described in the previous instruction is maximized, you will see the following page as well.
Install fonts on Mac computers
The easiest way to install fonts on Mac computers is to simply double click the unzipped font file. A box will open with your font listed and an install button in the lower right corner. Click the install button and you’ll be on your way.
You can also add fonts using the Font Book app.
- Open Font Book.
- Locate the + icon.
- Locate the .ttf or .otf file and click Open.
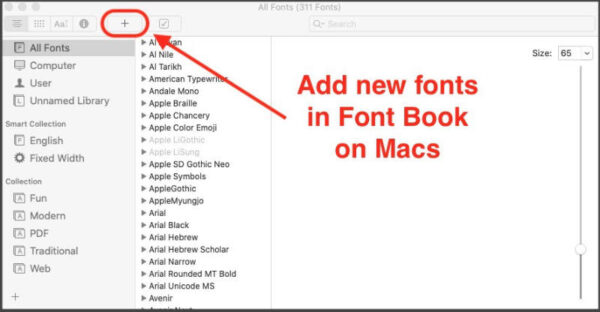
If your Font Book app is pinned to the dock, you can simply drag the font file onto the Font Book icon.
Restart may be required
On both Windows and Mac computers you may have to restart your computer before Word or other apps will recognize the new fonts that you installed.
Be sure your recipient can view your document as you designed it
If you plan to send your Word document to another person, and it matters to you whether or not that person views your document exactly as you designed it, you may need to take an extra step when you save the file.
Whoever receives your document will need to have the same font available on his computer if he is to see the document exactly as you sent it. This is true whether you used only those that are available via Microsoft 365 or you used custom fonts that you bought and installed as instructed above.
If your document uses only cloud fonts that are available with recent versions of Word (Microsoft) 365, the fonts aren’t embedded into the document by default and will only be displayed on the recipient’s computer if that person also has Microsoft 365 installed on a computer that is connected to the internet.
If your recipient’s computer is not connected to the Internet or he uses an older version of Microsoft Word, or your document includes custom fonts that you installed, your recipient will not be able to view your document as you designed it unless you embed the fonts into the document.
Embedding the fonts into the document insures that the recipient will see the document as you intended, whether or not he has the included fonts available. Note that it is possible for font creators to make their fonts unembeddable. However, most commonly available OTF and TTF fonts can be embedded.
How to embed fonts into your Word document on Windows computers
With your document open, click the File tab, then:
- Near the bottom left corner of the window, click Options.
- In the Options panel, look for Save in the left column and click it.
- Near the bottom of the panel, look for “Preserve fidelity when sharing this presentation.”
- Check the first box labeled, “Embed fonts in the file.”
Be sure you save the document after you check the box to embed the fonts.
I recommend that you not check the box labeled, “Embed only the characters used in the presentation.” Leaving it unchecked helps to insure that your recipient sees the document as you intended and, if you intended that person to be able to edit the file in the same font, insures that will be possible.
How to embed fonts into your Word document on Mac computers
The ability to embed fonts in Word documents that were created on Mac computers is only available to Microsoft 365 subscribers as of the time this article was written.
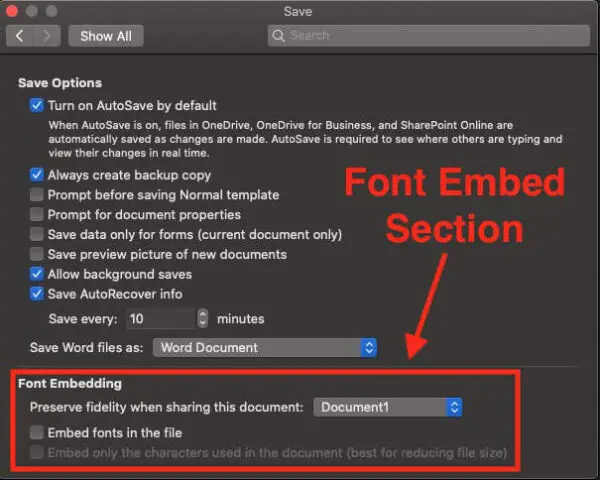
To embed fonts in Word documents that were created on Mac computers, first go to Preferences under the Word menu.
- Under the Output and Sharing section, click the Save icon.
- At the bottom of the Output and Sharing panel, under Font Embedding, check the box beside “Embed fonts in the file.”
- Be sure to do the preceding before you save your document for the last time.
What happens if you don’t embed your custom fonts
If the recipient of your document is using an older version of Microsoft Word, if she uses Microsoft 365 but her computer is not connected to the Internet, or if you do not embed the fonts into your document, your recipient’s computer will substitute a different font for your chosen ones. That may cause your document to be displayed in a undesirable manner.
A bonus tip
If it’s important to you that your Word document appears exactly as you created it, but it’s not important that the person who you send it to can read or edit it in MS Word, sending the file as a PDF may be just what you need.
In MS Word 365 for Macs and Windows, to create a PDF of your document with the fonts embedded, go to the File menu. Click Save As… and for the file type select PDF. Be sure you check the box to create a PDF for printing.
In MS Word 365 for Windows, you can also go to the File menu and select Export. Then choose PDF. That option will give you a PDF with fonts embedded.
Find more articles about using fonts and text here.
Learn more about Microsoft cloud fonts here.
Word for Microsoft 365 PowerPoint for Microsoft 365 PowerPoint for Microsoft 365 for Mac Word 2021 PowerPoint 2021 PowerPoint 2021 for Mac Word 2019 PowerPoint 2019 PowerPoint 2019 for Mac Word 2016 PowerPoint 2016 PowerPoint 2016 for Mac Word 2013 PowerPoint 2013 Word 2010 PowerPoint 2010 More…Less
Some Office apps let you embed fonts in your documents. That way, if you share your document with someone else who doesn’t have the same fonts installed that you do, the fonts, layout, and styling of the document won’t change, and special characters won’t turn into meaningless rectangles.
In recent years we’ve moved our Office fonts to the cloud, so they’re available to all Office subscribers with Internet access and there’s no need to embed them. Font embedding is still useful when using non-standard fonts, or if you expect the presentation to be edited or viewed offline by someone else.
Also, embedding custom fonts into your document does help with the online conversion to pdf files.
When we embed such custom fonts into the document, the online conversion will use these fonts (if they comply with the following constraints: Some of your fonts can’t be saved with the presentation) to avoid font substitution.
Embed fonts in Word or PowerPoint
-
Click the File tab and then click Options (it’s near the bottom left corner of the window).
-
In the left column, select the Save tab.
-
At the bottom, under Preserve fidelity when sharing this presentation, select the Embed fonts in the file check box.

Selecting Embed only the characters used in the presentation reduces the file size but limits editing of the file using the same font. Leaving that check box blank increases the file size, but is best for allowing others to edit the document and keep the same font.
We recommend leaving the check box blank if the other person may edit the file.
-
Click OK.

Troubleshooting
-
Is embedding your font still not working?
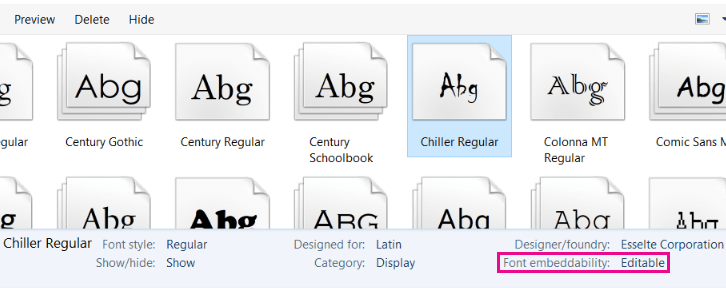
Not all TrueType fonts can be embedded. Font creators can set different options for their fonts, including: Non-embeddable, Preview/Print, Editable, and Installable. To see what level of embedding your installed font is, go to Control Panel in Windows and click Fonts. Clicking on the font shows the Font embeddability setting.
Office cloud fonts won’t appear in this list, but you rarely need to embed those anyhow since they’ll automatically download if they’re not already installed on the machine that opened the file.
-
Is your file size too large after embedding fonts?
Certain fonts can be very large compared to others, so if file size is a concern, consider using alternative fonts. If you want to remove the embedding, you can turn off the Embed setting in the File > Options dialog box (described above) and save the file. Then, once you close and re-open the file, a different font is substituted for the font that had been embedded previously.
In Word for Microsoft 365 for Mac, PowerPoint for Microsoft 365 for Mac, PowerPoint 2021 for Mac, and PowerPoint 2019 for Mac, you can embed fonts in a file.
Word 2019 for Mac and Excel 2019 for Mac don’t currently support embedded fonts.
Embed fonts in a document or presentation
-
Open the file you want to embed fonts in.
-
On the application (PowerPoint or Word) menu, select Preferences.
-
In the dialog box, under Output and Sharing, select Save.
-
Under Font Embedding, select Embed fonts in the file.

When you save the file, the fonts used in it will be embedded in the file.
Recommendations for embedding fonts
-
When embedding a font, avoid using Embed only the characters used in the presentation. It is better to embed all the characters in a font so that another user can successfully edit the file, if necessary.
-
Use OpenType (.OTF) or TrueType (.TTF), if possible. OpenType fonts consume the least storage space when embedded in an Office document.
-
Avoid embedding Postscript fonts (.PFB, .PFM) if possible. Some users report having difficulty opening an Office document that has a Postscript font embedded in it.
Troubleshooting
-
Check this article to make sure you are using the best file format of the font for this feature: Some of your fonts can’t be saved with the presentation
-
Is embedding your font still not working?
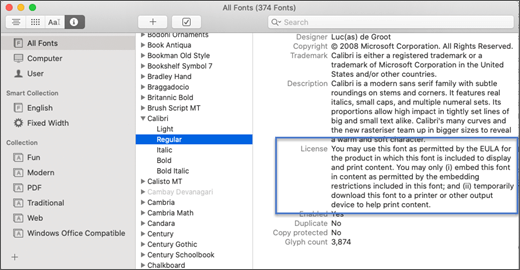
Not all TrueType fonts can be embedded. Font creators can set different options for their fonts, including: Non-embeddable, Preview/Print, Editable, and Installable. To see what level of embedding your installed font is, go to the Font Book app and select the Information button at the top left. Clicking on the font shows the font information in the right-hand panel, and for many (but not all) fonts you’ll be able to locate information on whether the font can be embedded. -
Is your file size too large after embedding fonts?
Certain fonts can be very large compared to others, so if file size is a concern, consider using alternative fonts. If you want to remove the embedding, you can turn off the Embed setting in the Preferences dialog box (described in the procedure above) and save the file. Then, once you close and re-open the file, a different font is substituted for the font that had been embedded previously.
Requirements for embedded fonts

|
Applies to |
|---|---|
|
Save embedded fonts in a file |
Word for Microsoft 365 for Mac, PowerPoint for Microsoft 365 |
You can’t embed fonts in PowerPoint 2016 for Mac but it does correctly display fonts that have been embedded in the file by a more modern version of PowerPoint.
The other Office 2016 for Mac apps don’t support embedded fonts.
Requirements for displaying embedded fonts
|
|
Applies to |
|---|---|
|
Display fonts that have been embedded |
PowerPoint 2016 for Mac, version 16.11 |
See Also
Some of your fonts can’t be saved with the presentation
Download and install custom fonts to use with Office
Need more help?
Want more options?
Explore subscription benefits, browse training courses, learn how to secure your device, and more.
Communities help you ask and answer questions, give feedback, and hear from experts with rich knowledge.
![]()
To add a font to Microsoft Word on Windows, download the font file, right-click the font file, then click «Install» or «Install for All Users.» To install a font on Mac, download the font file and double click it, then click «Install Font.»
Microsoft Word comes with a long list of fonts to choose from, but depending on what your goal with the document is, you may want to use a font that’s not on the list. Good news—installing fonts is easy.
Download the Font Files
Before you can add a font in Word, you’ll need to download the font file. When you download a font from an online resource, they’re usually downloaded as a ZIP file, which you’ll need to unzip. The font files themselves will usually be TrueType (.ttf) or OpenType (.otf) files—both of which work with Word.
There are many sites where you can download font files for free, but make sure you trust the source before downloading anything. If you download anything from an unknown source, you run the risk of getting infected with malware.
RELATED: How to Remove Viruses and Malware on Your Windows PC
Microsoft recommends using DaFont, but Font Squirrel and FontSpace are also good sites for downloading fonts. If you like the fonts available in Google Docs, you can even download Google fonts to your PC.
How to Install Font Files to Word on Windows
Adding a font in Word on Windows is easy and only takes a few clicks. First, locate the font file on your PC and then right-click it. In the context menu that appears, click “Install” to install it for the current user, or “Install for All Users” to install the font for every user profile on the PC. You must have administrator privileges to install a font for all users.

The font is now installed on your Windows device and will appear in different apps such as Excel, PowerPoint, and Word. If you want your new font to be the default when you create a new document, be sure to set it as the default font in Word.
How to Import Fonts Into Word on Mac
To add fonts in Word on Mac, locate the font file and then double-click it.
The Font Preview window will appear. Click “Install Font” in the bottom-right corner of the window.
The font is now installed on your Mac and will appear in different apps such as Excel, PowerPoint, and Word.
You can now use the installed font next time you use Word. However, if the recipient of that document doesn’t also have that font installed on their device, the font will usually be displayed in a default font. If you want the recipient to view the document with the font you used, you’ll need to embed the font in the document.
RELATED: How to Embed Fonts in a Microsoft Word Document
READ NEXT
- › How to Draw a Custom Table in Microsoft Word
- › BLUETTI Slashed Hundreds off Its Best Power Stations for Easter Sale
- › Expand Your Tech Career Skills With Courses From Udemy
- › The New NVIDIA GeForce RTX 4070 Is Like an RTX 3080 for $599
- › Google Chrome Is Getting Faster
- › Mozilla Wants Your Feature Suggestions for Thunderbird
- › How to Adjust and Change Discord Fonts
How-To Geek is where you turn when you want experts to explain technology. Since we launched in 2006, our articles have been read billions of times. Want to know more?
In MS Word, an entire family of fonts is usually referred to as a Typeface (like Times New Roman). People also prefer using font style or font type.
And “Font” as a word, is reserved for a combination of different features such as font style, size, color and weight (like Arial, 12 pt, Red, Bold).
Therefore, the word “Font” in MS Word often means a whole family of display features such as the typeface, color, weight, and/or size.
If this distinction makes sense to you, let’s now see how we can explore the list of font styles in MS Word as well as how to add new font types or typeface.
Below is an illustration of the various fonts and how they look when applied.


Below is the list of All fonts in MS Word. The above pictures are illustrations of how these fonts look like.
| Abadi MT Condensed Light | Impact |
| Albertus Extra Bold | Incised901 Bd BT |
| Albertus Medium | Incised901 BT |
| Allegro | Incised901 Lt BT |
| Amazone BT | Informal011 BT |
| AmerType Md BT | Jester |
| Antique Olive | Kabel Bk BT |
| Arial | Kabel Ult BT |
| Arial Black | Kaufmann Bd BT |
| Arial MT | Kaufmann BT |
| Arial Narrow | Korinna BT |
| Arrus BT | Letter Gothic |
| Aurora Cn BT | Lithograph |
| AvantGarde Bk BT | Lithograph Light |
| AvantGarde Md BT | Long Island |
| BankGothic Md BT | Lucida Console |
| Bazooka | Lucida Handwriting |
| Benguiat Bk BT | Lucida Sans |
| BernhardFashion BT | Lucida Sans Unicode |
| BernhardMod BT | Lydian BT |
| BinnerD | Marigold |
| Book Antiqua | Market |
| Bookman Old Style | Matisse ITC |
| Boulder | Monotype Corsiva |
| Bremen Bd BT | MS LineDraw |
| Calisto MT | News GothicMT |
| Calligrapher | NewsGoth BT |
| CaslonOpnface BT | OCR A Extended |
| Century Gothic | Old Century |
| Century Schoolbook | Onyx BT |
| Cezanne | OzHandicraft BT |
| CG Omega | Pegasus |
| CG Times | Pickwick |
| Charlesworth | Poster |
| Charter Bd BT | PosterBodoni BT |
| Charter BT | PTBarnum BT |
| Chaucer | Pythagoras |
| ChelthmITC Bk BT | Ribbon131 Bd BT |
| Clarendon Condensed | Sceptre |
| CloisterBlack BT | Serifa BT |
| Comic Sans MS | Serifa Th BT |
| Copperplate Gothic Bold | ShelleyVolante BT |
| Copperplate Gothic Light | Sherwood |
| CopperplGoth Bd BT | Signboard |
| Cornerstone | Socket |
| Coronet | Souvenir Lt BT |
| Courier | Staccato222 BT |
| Courier New | Steamer |
| Cuckoo | Storybook |
| Dauphin | Subway |
| Denmark | Swis721 BlkEx BT |
| English 111 Vivace BT | Swiss911 XCm BT |
| EngraversGothic BT | Tahoma |
| Exotc350 Bd BT | Technical |
| Fransiscan | Teletype |
| Freefrm721 Blk BT | Tempus Sans ITC |
| FrnkGothITC Bk BT | Times |
| Futura Bk BT | Times New Roman |
| Futura Lt BT | Times New Roman PS |
| Futura Md BT | Trebuchet MS |
| Futura ZBlk BT | Tristan |
| FuturaBlack BT | Tubular |
| Galliard BT | TypoUpright BT |
| Garamond | Unicorn |
| Geneva | Univers |
| Geometr231 BT | Univers Condensed |
| Geometr231 Hv BT | Vagabond |
| Geometr231 Lt BT | Verdana |
| GeoSlab 703 Lt BT | Westminster |
| GeoSlab 703 XBd BT | ZapfEllipt BT |
| GoudyHandtooled BT | ZapfHumnst BT |
| GoudyOLSt BT | ZapfHumnst Dm BT |
| Haettenschweiler | Zurich BlkEx BT |
| Heather | Zurich Ex BT |
| Helvetica | |
| Herald | |
| Humanst 521 Cn BT | |
| Humanst521 BT | |
| Humanst521 Lt BT |
How to add new fonts to Word
Despite the fact that Microsoft Word and the other office apps have plenty of font styles, you may need to add new fancy fonts into your Word document.
You have no problem because, in this tutorial, I will show how to add any new font into MS Word and use it in your projects.
However, there are several ways you can add new fonts in MS Word.
I’ll go through each option one after the other here in this article.
Option 1: Using the Microsoft Store
Using the Microsoft Store, you can add new fonts into your
Word document or other office apps.
The steps are outlined below:
- Go to Settings on your PC
To open settings on your PC, type settings in the search bar
and press the Enter key.

- Click on Fonts > Get more fonts in
Microsoft Store

Upon clicking on Get more fonts, the Microsoft Store will open with a list of available fonts in the store.
- If you find the font you want to add, click on
it.

- Then click on the Get button to download the font.

Of course, some of the fonts aren’t free. Some of them require you to make a little contribution before you can download.
After completing the above steps, the downloaded font family
will be available in Word and the other office apps like Excel or PowerPoint.
Option 2: Using the Font Installer
Microsoft Store doesn’t have lots of fonts. Therefore, you may not get the font you are looking for from there.
However, you can download whatever new font you want from other sources and install it into MS Word or other office apps.
Obey the steps below:
- Download the font you wish to add to MS Word.
Download Fonts Here: AbstractFonts.Com
There are several places you can download awesome fonts from. The above link also has a lot of amazing free fonts for you to explore. Click here for more resources on free fonts.
- After downloading the new font you want to add, browse to the folder that has the font file.
Note: The font may be in a zip file. If that’s the case, you
should unzip the file first.

- Right-Click on the font file. A shortcut menu will
appear, select Install or Install for all users.

After applying all the steps above, the installed font will
now be available in your list of fonts in MS Word and the other office apps.

These are the various ways you may add new fonts into MS Word.

Here is how to quickly change the font or format of your entire Word document.
So you have your document written out, but you don’t like the way it looks. No problem. Changing the font of the entire document in Microsoft Word is easy and can be done in a few simple steps. If you are using Open Office, Google Docs, or another alternative, the process is very similar. Once you learn how to do it with a one-word processing program, you can pretty much do it in all of them.
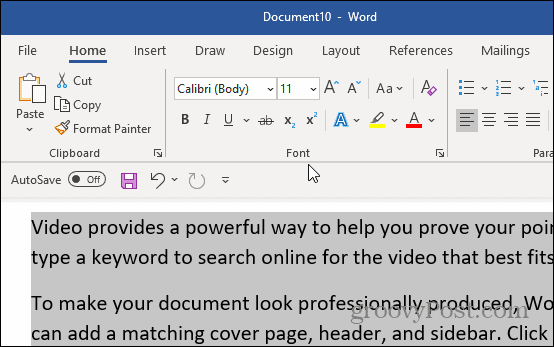
First, select all of the text in the document. To do that, just use the keyboard shortcut Ctrl + A on your keyboard. Or, if you don’t like using keyboard shortcuts, select the Home tab on the Ribbon and from the “Editing” section, click Select > Select All.
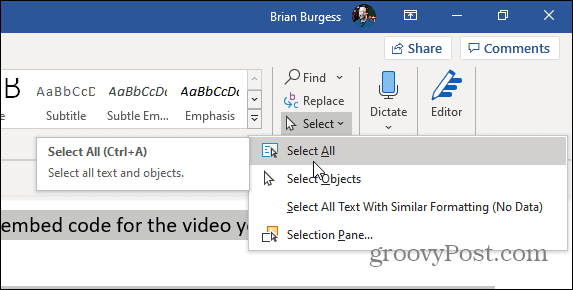
All of the text in your document should now be selected and highlighted. With this done, you can edit the entire document at once.
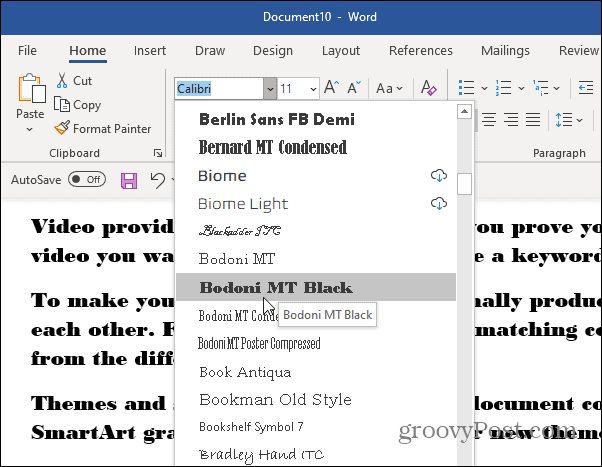
On the Home ribbon, you’ll find everything you need under the “Font” heading.
Click the wide font box to display a list of fonts. From this list, you can hover the mouse over a font to preview it or click it to change the text to that font. You can also adjust boldness, italics, color, size, and underline.
But, manually adjusting the font might not be the easiest or the fastest way to make your document look great. The first thing you should try is styles; I’ll show you where they are below.
Word Document Styles
Alternatively, you can use the “Styles” menu from the Home tab to select pre-made font sets. A style will automatically adjust the color and font of your document. It also applies different values to headings, titles, and other special text.
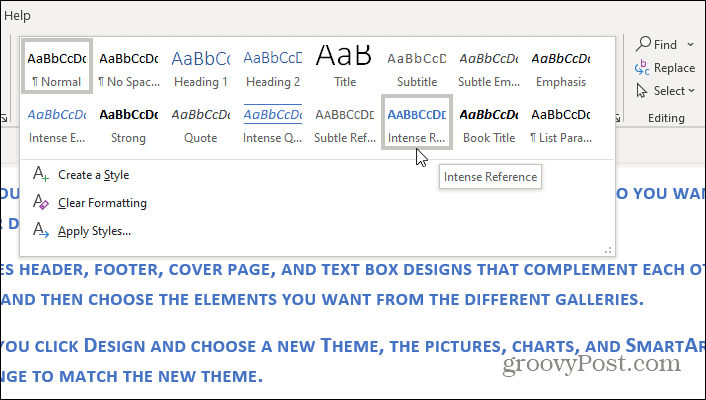
With a pre-made style, you can change the look of your entire document to something professional and appropriate with a click of the mouse.
Styles allow you to quickly apply a set of formatting choices consistently throughout your document.
![]()
В Microsoft Office Word есть шрифты на любой вкус. Чтобы нестандартно оформить текст или напечатать красивую листовку, используйте оригинальную каллиграфию или графический объект. Но встроенные возможности программы меркнут в сравнении с тысячами разнообразных стилей, которые можно скачать в сети. Если вам не хватает того, что есть в офисе, узнайте, как установить шрифт в Ворд.

Где найти новый шрифт
Существуют целые сервера, на которых выложены коллекции бесплатной каллиграфии. Там сразу можно посмотреть, как будут выглядеть буквы и цифры. Вы подберёте печатные знаки под любые нужды. Доступна даже имитация рукописного ввода.
Перед тем как добавить шрифт в Word, его надо найти в интернете. Скачивайте файлы только из надёжных источников. Есть несколько проверенных сайтов. Например, «Fontspace» или «Xfont». После загрузки каллиграфию можно будет установить в Ворд. Если вы хотите посмотреть весь ассортимент, сделайте следующее:
- Откройте любой поисковик.
- Введите запрос «Скачать шрифт для Word». На первых страницах будут самые популярные сервисы. Можете задать конкретные параметры: «Готические буквы», «Фигурные символы», «Старославянская кириллица» и тому подобное. Всегда найдётся какой-нибудь новый, никем не используемый стиль.

- Зайдите на понравившийся сайт.
- Не загружайте исполняемые файлы с расширением .EXE — скорее всего, это вирус или другая вредоносная программа. Каллиграфия для Ворд имеет формат .TTF (True Type Font) или .OTF, а коллекции стилей хранятся в архивах .ZIP или .RAR.

- Если вы знаете, какой шрифт вам нужен, вбейте в строку поиска его название вместе с фразой «Скачать для Word». Так вы быстрее найдёте то, что хотите.


Лучше брать архив со стилями, а не качать по одному файлу. Вы сможете добавить несколько видов печатных знаков и уже в самой программе посмотреть, что вам подходит.
Когда вы нашли каллиграфию, можно разбираться, как вставить шрифт в Word.
- Распакуйте архив со стилями, если качали их в сжатом виде. Для этого надо установить архиватор. Подойдёт WinZip или WinRar. Кликните правой кнопкой мыши по файлу с коллекцией и в выпавшем списке выберите «Извлечь». Теперь вы можете копировать и перемещать данные, которые хранились в архиве. Чтобы посмотреть, как выглядят символы, откройте один из файлов с каллиграфией. И для этого не надо открывать Ворд.

- Перейдите в Пуск — Панель управления. В разделе «Оформление и персонализация» кликните значок «Шрифты». Он открывает папку со стилями символов в Word. В неё также можно войти через С:WindowsFonts. Чтобы лучше ориентироваться в панели управления, в меню «Просмотр» (находится в правом верхнем углу) выберете подходящие настройки отображения.

- Скопируйте скачанные файлы с каллиграфией в папку «Fonts» (не сам архив, а извлечённые из него данные). Новый вид символов должен появиться и в Office. Некоторые из них уже могут быть в системе. В таком случае появится диалоговое окно, предлагающее заменить имеющиеся печатные знаки. Не соглашайтесь, чтобы случайно не удалить «родные» стили офиса.


Если не получилось добавить их таким образом, попробуйте другой способ.
- Откройте папку с загруженной каллиграфией.
- Кликните по одному из файлов правой кнопкой мыши.
- Нажмите «Установить».

После этого стили точно отобразятся в Word.
Как добавить шрифты в файл Word
Если вы решите поработать с текстом на компьютере, на котором отсутствует используемая вами каллиграфия, она не отобразится. Но можно добавить стиль в прямо документ.
- Нажмите синюю кнопку «Файл». В Office 2007 это меню вызывается кликом на логотип в левой верхней части окна.
- Выберете «Параметры», раздел «Сохранение».

- Галочку рядом с пунктом «Внедрять шрифты в файл».


Лучше активировать эту опцию, если вы используете не только системные стили. У вас ведь не будет возможности установить свою каллиграфию на чужой ПК.
Как узнать название шрифта
Вам понравился внешний вид символов, но вы не знаете название этого дизайна? И как загрузить шрифты в Word, если вы не можете их найти? Не надо ходить по сайтам, надеясь случайно наткнуться на нужные символы. Название легко узнать. Для этого существуют специальные программы и даже целые сайты.
- What The Font. Популярный и надёжный сервис. Определяет вид каллиграфии по картинке. Найденный стиль можно сразу же скачать и установить в Word. Ресурс имеет свой форум. Если поиск по базе данных ничего не дал, можете спросить совета у других пользователей.
- Расширение для браузера Google Chrome. Сканирует HTML-код страницы и выдаёт название.
- Определяет шрифт, задавая вопросы о его внешнем виде. Если вы примерно представляете, что ищите, но конкретной информации у вас нет — этот ресурс подойдёт.
- Bowfin Printworks. Здесь можно подобрать стиль вплоть до мельчайших деталей. Спрашивает о форме каждого символа.
- Сообщество людей, которые занимаются дизайном каллиграфии или просто в ней разбираются. Надо создать тему и вставить рисунок с символами. Пользователи форума помогут найти нужный стиль.
- WhatTheFont для мобильных устройств. Сфотографируйте слово — приложение определит, какой это стиль.

Если вы увидели интересную каллиграфию в интернете или хотите расширить возможности Office, разберитесь, как установить новый шрифт в Word. Нестандартными надписями можно разбавить скучный текст. Их используют для листовок, поздравлений, открыток, презентаций. Их существуют тысячи — вы обязательно найдёте подходящий.
When it comes to creating a compelling and effective document, one of the most important tools at your disposal is the font (also known as «typeface»).
Fonts do much more than improve—or hamper—the legibility of your piece. They set a tone. They’ve got personalities. They evoke feelings. As such, fonts can either reinforce or undermine your brand.


Because fonts are so important, you may want to change the default fonts in Microsoft Word. In this article, you’ll see, step-by-step how to add fonts to Microsoft Word so you can change the default fonts in your document.
You’ll also learn tips on where to find the best Microsoft Word fonts and how to choose the best ones for your document.
(Note: In the tutorials below, I use Microsoft Word for macOS. If you’re on Windows or a different version of Word, then your interface will look different.)
Why Use Premium Fonts in Your Microsoft Word Document?
When it comes to creating documents that get and keep your readers’ attention, fonts are some of your most powerful tools. The right fonts:
- reinforce your branding
- express the right tone
- direct the reader’s attention
- improve readability
You might be tempted to use free fonts for Microsoft Word in your next document. But remember, those built-in MS Word fonts are exactly the same fonts that everyone else is using. Or, you might find a free Microsoft Word fonts download. But free fonts are often not as well-designed as premium fonts.
You can easily add fonts to Microsoft Word from outstanding sources like Envato Elements or GraphicRiver. To be able to download unlimited fonts, then look to Envato Elements. You get access to thousands of fonts. Download as many as you need for one small subscription price.


For one-off projects, GraphicRiver is a great source of the best Microsoft Word fonts on a pay-per-use basis.
And lastly, use the tips above to choose and use fonts effectively in your document. The misuse and overuse of fonts are sure signs of an amateur.
How to Change Microsoft Word Default Font
Word comes with default fonts, but you can change the font to match your branding or to change the tone and personality of the document.
You’ll find that dozens of fonts are already built into Word, and you can replace the default fonts with those. And you can also add new fonts. We’ll talk about how to add fonts to Microsoft Word later in this post.
To change the Microsoft Word default font, you’ve got three options:
1. How to Change the Microsoft Word Default Font for a Block of Text
This is a quick method that’s good to use if you want to change the default font only for one or a few bits of text. Here are the steps:
Step 1. Select the Text


Step 2. Open the Font Selection Tool


Click on the Font selection tool on the ribbon. You must be on the Home tab to see the buttons for formatting text. The Microsoft Word fonts list opens.
Step 3. Find the font you wish to use.
The Microsoft Word fonts list shows the Theme Fonts, Recent Fonts, and All Fonts. Scroll down farther to see all the fonts available on your computer. This includes fonts that are built-in as well as fonts you’ve added, listed in alphabetical order. The fonts list also gives you a preview of what each font looks like.
Click on the font you wish to use. A triangle next to the font means there are further selections you can make.


Step 4. Change the Font Size
Go to the font-size button to change the font size.


Or, click the Increase Font Size or Decrease Font Size buttons to change the font size by increments.
Step 5. Change Other Text and Paragraph Settings
Use the other buttons on the ribbon to add emphasis (bold, italics, underline), change the font color, and apply other effects.


We’ve now changed the default font in Microsoft Word.


2. How to Replace the Default Font Based on Paragraph Style
By changing the font used for a paragraph style, the change is applied globally in your document for all text with that paragraph style. Use this if you want to change the default font for large sections of text.
Follow the steps on how to change the Microsoft Word default font for a paragraph style:
Step 1. Select the Text
Highlight text that’s representative of the paragraph style you want to re-format. Make sure it’s got the paragraph style you want to change.


In this example, I’ll replace the default font for the Normal paragraph style.
Step 2. Apply the Font Settings You Wish to Use
Follow the steps in Method 1 to change the font, font size, font color, and apply other settings. You may also want to change the paragraph settings, such as alignment, line spacing, etc.


Step 3. Apply the New Formatting to the Paragraph Style
With the cursor in the paragraph you’ve formatted, click on the Styles button on the ribbon. This opens the paragraph Styles selection.


The current paragraph style will be highlighted. In this case, it’s the Normal style. Right-click on the Normal style, then click on Update Normal to Match Selection.


All other paragraphs with the Normal style are updated with the new font and settings you made.


3. How to Change the Font Based on Paragraph Styles Button
This method has the same end-result as Method 2. It changes the default font for a specific paragraph style. The steps are slightly different, as you’ll see:
Step 1. Open the Styles Settings
Click on the Styles button on the ribbon. This displays the paragraph styles.


Step 2. Modify the Paragraph Style
Right-click on the style you wish to change. Click Modify…


The Modify Style dialog opens.


Change the font, font size, and other settings. The box shows a preview of what the paragraph will look like when the settings you chose are applied. If you’re happy with the way it looks, click OK.


The new font (and other settings) will be applied to all paragraphs with that paragraph style.
How to Add Fonts to Microsoft Word
Right out of the box, Microsoft Word comes with dozens of fonts built in. But what if you want to use a font and you don’t see it on the Microsoft Word fonts list?
In that case, you add the font to Microsoft Word. I’ll walk you through how to do that in this section:
Step 1. Find New Fonts
The first step is to find the font you want to use. There are many sources of custom fonts. One to consider is Envato Elements, where you can download an unlimited number of fonts for one small subscription price.
To find a font you like, log into your Envato Elements account.


On the search bar, click on the downward arrow, then select Fonts.


Type a keyword into the search bar, depending on what kind of font you’re looking for. Click the search icon. The most relevant results appear.


Refine the results by Categories, Spacing, Optimum Size, and Properties. You can also sort the results by popularity (Popular) and newness (New).
Click on a font image or name to see its details.


When you find a font you like, click on any of the Download buttons on the page.


The Add this file to a project dialog box pops up.


Select a project to add the font file to. Or, click Create new project to add it to a new project. For this example, I’ll add the font to my existing tutorial project. Click the Add & Download button.
The file manager opens (Finder, if you’re on macOS; File Explorer, if you’re on Windows). Specify where you want to save the font file on your computer. Click Save.


The font files are now saved on your computer as a zip file.


Double-click on the zip file to unzip it.


Double-click on the font file itself to open it. It’ll usually have an extension like OTF or TTF. Click Install Font.


This adds the font to your computer’s fonts library.


The new font should now appear in the All Fonts list in Microsoft Word. To confirm, click on the Fonts button on the ribbon and scroll down the list until you see the new font. If you don’t see it, you may have to restart your computer.


Now, follow any of the methods above to change the default font with the new one.
2 Types of Fonts
Now that you know how to add fonts to Microsoft Word and replace the default fonts in your document, it would help for you to know more about fonts. This will help you choose the best fonts for your Word document.
There are two basic types of fonts you can use in your documents:
1. Serif Fonts
Serif fonts have little lines at the end of each stroke, like this:


Common examples of serif fonts include:


Various research studies have shown that, when it comes to printed matter, serif fonts are the easiest to read and result in the best comprehension.
2. Sans Serif Fonts
As the name implies, sans serif fonts don’t have little lines at the end of each stroke (“sans” means “without” in French):


These are some of the most common sans serif fonts:


Citing research by the Software Usability Research Laboratory, Drew E. Whitman in his book Ca$vertising, noted that sans serif fonts are the most legible fonts to use on a computer screen. Specifically, Arial, Courier, and Verdana were considered the best for online reading.
But these studies were conducted when the resolution of online screens was still very low (below 100 dpi) compared to printed materials (300 dpi). As computer screen resolutions get closer to 300 dpi, serif fonts may prove to be legible both online and offline.
In the meantime, you can use both serif and sans serif fonts in one document—if you know how. Read on for tips on how to use combine fonts.
5 Tips on Using Typography Effectively in Your Word Documents
It’s easy to get carried away with fonts! You may find that having so many kinds of fonts available at your fingertips unleashes your creativity. Yet, as with most things, fonts can either enhance or sabotage your document.
Follow these tips to harness the power of typography:
1. Keep It Simple
When it comes to choosing fonts, legibility is of utmost importance. Sure, it’s easier than ever now for you to find the most creative and outrageous fonts. But if nobody can read your text, then they defeat their purpose. If you must use an ornate font, restrict it to one letter or word.
2. Stick to Two Fonts
A document that’s dripping with many different fonts makes it look amateurish, confusing, and incoherent. For best results, stick to a maximum of two fonts: one serif and one sans serif. (More on this in tip #4).
Remember, use formatting like bold, italics, underlines, different font sizes and colors to add emphasis and variety.
3. Match the Tone and Goals for the Document
Fonts have personality, so pick the ones that match the tone and goals of the document. For example, the fonts for a 16th birthday party invitation will be different from the ones in a financial business report.
When in doubt, pre-test the document. Show it to other people, especially those who are like the intended audience. Make sure they can comprehend the document, first, and that they respond favorably.
4. Choose Fonts Appropriate for the Document’s Intended Use
Whether the document will be printed out or consumed on a computer screen will also affect your choice of fonts.
If you’re making a printed document, use the sans serif font for headings and the serif font for body text. For a web-based document, switch it: Use a serif font for headings and sans serif for body text.
5. Use Handwritten, Cursive, and Decorative Fonts Sparingly


There are other font types that may not fit easily in either serif or sans serif categories. These include handwritten, cursive, and decorative fonts. Handwritten fonts, as the name says, look like they were written by hand. These are extremely popular and useful for adding a warm, personal touch on materials. They can range from casual to glamorous.
Cursive fonts are a kind of handwritten font that look like they’re written in longhand. Beware of using cursive and handwritten fonts because they can be difficult to read. Use them for short bits of text you want to emphasize.
You can easily find handwritten fonts in marketplaces like Envato Elements or GraphicRiver.
Decorative fonts have special effects or treatments. They may be serif or sans serif. And some handwritten fonts can be considered decorative as well.
Here’s a sampling of the decorative fonts available in Envato Elements:
5 Best Font Styles for 2020
Designers come up with new fonts every day. Below are five of the best and freshest Microsoft Word font styles we’re seeing for 2020, along with two fresh examples of each style:
1. Vintage Fonts
Vintage fonts evoke the aesthetic of times past. If you’re working on a document that’s about a specific time, you’re bound to find a font to match.
Anthique — Vintage Typeface


Anthique is reminiscent of handmade Victorian hand lettering but with a modern flavor. It works best for materials that relate to the early 1800s. The font includes three variations in TTF and OTF formats. It also supports multilingual characters.
Middle Class Script


Middle Class is a script font that’s evocative of the bold style of the ’60s and ’70s. It’s got a hand-drawn and layered style, and includes punctuation, common ligatures, and extra swashes (lines).
2. Brush Script Fonts
Brush script fonts are handwritten fonts that look like they were written with a brush, such as a calligraphy or a paintbrush. These are increasingly popular as brands want to add a personal touch to their materials.
Eberthany Brush Script


Eberthany is a modern brush script signature font that works for:
- social media posts
- logos
- wedding invitations
- labels
- quotes
- and more
It works best with software that supports OpenType fonts like Adobe Illustrator CS, Adobe Photoshop CC, Adobe InDesign, and Corel Draw.
Mistrully Brush Script


Mistrully is a stylish brush script that looks like natural handwriting. It comes with special swashes or handwritten lines that you can use to add emphasis. Mistrully works well for logos, social media posts, advertisements, product designs and labels, stationery, among others.
3. Font Duos
Font Duos take the guesswork out of choosing fonts that work well together. These two-for-one font packages are designed to complement each other. You only need to pick the font duo that aligns with your branding and the tone of the material you’re designing. Examples of font duos include:
Chiladepia — Font Duo


The Chiladepia Font Duo is made up of two handwritten fonts. One’s a cursive font and the other’s a sans serif font. This font duo would work well on a computer screen. Use the cursive font for titles or headers and the sans serif font for the rest of the document.
Perkin | Duo Font Pack


The Perkin Duo Font combines a bold sans serif and a serif font. The sans serif font is best for titles and headings, while the serif font works great for body text. This duo is ideal for printed materials.
4. 3D Decorative Fonts
3D decorative fonts look like they’re popping off the pages. These fonts are incredibly eye-catching. For that reason, they’re great for titles. But, they’re not the most legible fonts, so use them sparingly for short bits of text.
Ultra — Modern Font


If you’re creating a futuristic document, then consider the Ultra — Modern Font. It’s got a modern and futuristic style. This pack is actually made up of four font styles: regular, bold, 3D, and bold 3D. It also comes in both OTF and TTF formats.
Under Construction 3D Color Font


Under Construction is a stunning 3D decorative font to use on materials related to industry, construction, technology, and the like. Each letter looks like it floats on top of the page. It’s a color or SVG OpenType font, which works only in Photoshop CC 2017+, Illustrator CC 2018, and some Mac apps.
5. Tech Sans Serif Fonts
Tech sans serif fonts have gone a long way since the pixelized arcade fonts of the ‘80s. Many are also much more legible and modern. Below are two examples:
Azuria — Technology Science Font


The Azuria — Technology Science Font evokes technology, science, and outer space. Its metallic, 3D look would work well in video games, movie titles, and tech-related branding. The font includes all Latin letters from A-Z, numbers, and punctuation marks.
Cyborg — Futuristic Technology Typeface


Cyborg is another futuristic tech font. Inspired by science fiction, it’s perfect for titles related to space, technology, and science. It comes in OTF, TTF, and WOFF formats.
Put Fonts to Work in Your Microsoft Word Document Today
As you’ve learned in this article, you don’t need to stick to the default fonts in Microsoft Word. Follow the steps outlined above to replace the default fonts with ones that are more appropriate to your document.
Now that you understand how to add fonts to Microsoft Word, you’re ready to start taking advantage of the unique look a professionally designed font can give your documents.
At Envato Elements and GraphicRiver we’ve got some of the best Microsoft Word fonts available. Take a look at our Microsoft Word fonts list today. Download your favorites for your next MS Word document.


Disclosure: Some of the links below are affiliate links, meaning that at no additional cost to you, I will receive a commission if you click through and make a purchase. Read our full affiliate disclosure here.
Great graphic design is powered by great font selection. But picking great fonts is a challenge most people. Luckily, Word has made adding great fonts to your designs much easier. In this tutorial, our team of design experts will cover the best fonts in Word.
Best Fonts in Word
1. PT Serif

PT Serif™ is the second pan-Cyrillic font family developed for the project “Public Types of the Russian Federation.” The first family of the project, PT Sans, was released in 2009.
2. Sorts Mill Goudy

Sorts Mill Goudy is a revival of Frederic Goudy’s ‘Goudy Oldstyle’ with Regular and Italic styles, and extended Latin character coverage.
3. GFS Didot

GSF Didot was designed by the famous French typecutter Firmin Didot, a new Greek typeface in Paris in 1805, under the influence of the neoclassical ideals of the late 18th century. It was immediately used in the publishing program of Adamantios Korai, the prominent intellectual figure of the Greek diaspora and leading scholar of the Greek Enlightenment.
4. Courier Prime

Courier Prime is a new take on IBM’s Courier which was designed in 1956 by Howard Kettler.
5. David Libre Regular

David Libre is a Libre David Hebrew, based on David Hadash Formal, released by Monotype Corporation in 2012. David Hadash Formal is modern digitization made from original large-scale technical drawings for the typeface drawn by Ismar David.
6. Cardo

Cardo contains features that are required for high-quality typography such as ligatures, text figures (also known as old-style numerals), true small capitals, and a variety of punctuation and space characters.
7. Tahomo Font TH

Tahoma is a humanist sans-serif typeface that Matthew Carter designed for Microsoft Corporation. Microsoft first distributed it, along with Carter’s Verdana, as a standard font in the initial release of Windows 95. Tahoma is often compared with Fruiter, another humanist sans-serif typeface.
8. Glass Antigua

Glass Antiqua is a revival of the 1913 typeface “Glass Antiqua” by “Genzsch & Heyse” found in the Taschen book “Type: A Visual History of Typefaces and Graphic Styles, 1901-1938.” A magnificent and unique design with a Jugenstile fleur, combining Slab Serif and Antiqua, plus elements of cursive calligraphy.
9. Arturo

Arturo is a sans serif family designed by Francesco Canovaro as part of his research on the digital reinvention of handmade brush lettering.
10. Calistoga

Calistoga is a cheerful, space-saving display typeface. It was inspired by Oscar M. Bryn’s lettering as seen on the posters made for the Western US-based Santa Fe Railroad. Its vintage railroad flavor is found in the whole design.
Conclusion
Word is an amazing tool, and I hope you found this tutorial covering the best fonts in Word, useful! Below are several related tutorials that you might find useful.