
Office 2021 Office 2021 for Mac Office 2019 Office 2019 for Mac Office 2016 Office 2016 for Mac Office 2013 Office 2010 Word 2007 PowerPoint 2007 More…Less
Most applications (such as Microsoft Word, Excel, and PowerPoint) include fonts that are automatically installed when you install the software. For example, applications that are created especially for document design projects, such as Microsoft Publisher, often come with quite a few extra fonts that you can use with any other program on your computer.
However, sometimes you may want to install custom fonts that you’ve created, purchased or downloaded from somewhere else. In this article we’ll talk about how to install those fonts so you can use them in Microsoft Office.
Locate custom fonts on the Web
In addition to acquiring and using fonts installed with other applications, you can download fonts from the Internet. Some fonts on the Internet are sold commercially, some are distributed as shareware, and some are free. The Microsoft Typography site site provides links to other font foundries (the companies or individuals outside of Microsoft who create and distribute fonts) where you can find additional fonts.
After you find a font that you would like to use with an Office application, you can download it and install it through the operating system that you are currently using on your computer. Because fonts work with the operating system, they are not downloaded to Office directly. You should go through the system’s Fonts folder in Windows Control Panel and the font will work with Office automatically. On the Mac you use the Font Book to add the font and then copy it to the Windows Office Compatible folder.
Many third parties outside of Microsoft package their fonts in .zip files to reduce file size and to make downloading faster. If you have downloaded a font that is saved in .zip format double-click the zip file to open it.
Install a custom font you have downloaded
Once you’ve downloaded the font you want to install you need to install it in the operating system. Once the font is properly installed in the operating system Microsoft Office will be able to see and use it. For detailed instructions select the operating system you’re using from the drop-down box below.
-
Find the font file that you downloaded, keeping in mind that it may be contained within a .zip file. It’s probably located in your downloads folder.
-
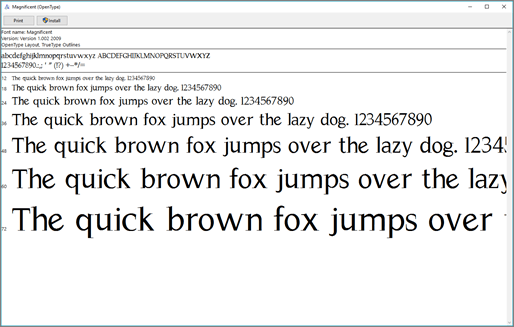
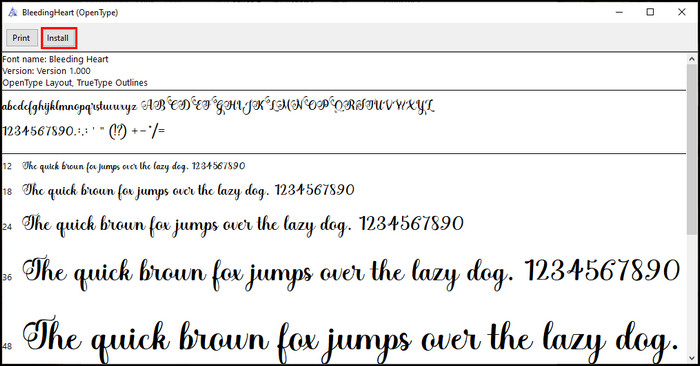
Double-click the font file to open it in the Font Previewer

-
If you’re satisfied that this is the font you want, click Install at the top left.
-
Close the Font Previewer, and open your Office program. You should now see your new font included on the font list.

-
Find the font file you downloaded — it likely has a .ttf or .otf extension and it’s probably in your downloads folder. Double-click on it.
Note: If the font file has a .zip extension you need to open that .zip file and open the font file from there.
-
It will open in the font previewer. Click Install Font. It will open in the Font Book.
-
Close the Font Book. Your font should now be available to Microsoft Office.
Note: If you’re using Office 2011 for Mac, you may need to drag and drop the font to the Windows Office Compatible collection in the Font Book to make it available to Microsoft Office.
Sharing files that contain non-standard fonts
When you install a custom font, each font will work only with the computer you’ve installed it on. Custom fonts that you’ve installed on your computer might not display the same way on a different computer. Text that is formatted in a font that is not installed on a computer will display in Times New Roman or the default font.
Therefore, if you plan to share Microsoft Office Word, PowerPoint, or Excel files with other people, you’ll want to know which fonts are native to the version of Office that the recipient is using. If it isn’t native, you may have to embed or distribute the font along with the Word file, PowerPoint presentation, or Excel spreadsheet. For more information about this see Fonts that are installed with Microsoft Office.
See also
-
Microsoft Typography
-
Change or set the default Font in Microsoft Office
-
Language Accessory Pack for Office
Do you have ideas for how we can improve Microsoft Office?
See How do I give feedback on Microsoft Office?
Need more help?
Want more options?
Explore subscription benefits, browse training courses, learn how to secure your device, and more.
Communities help you ask and answer questions, give feedback, and hear from experts with rich knowledge.
Привет, это команда «Логомашины». Рассказываем, что делать, если заблокированные шрифты были вашими фирменными, и все документы заполнялись Times New Roman или Arial.
День для всех, кто каждый день пользуется шрифтами Monotype, начался не радостно: компания закрыла доступ к своей библиотеке для российских пользователей. И если блокировка Times New Roman вызывает только облегчение, то с Arial всё обстоит сложнее — этот шрифт используется в документах сотен компаний.
Мы подобрали 23 шрифта, которые можно использовать вместо Arial, если его удалят даже из уже установленных программ: простые, бесплатные и читабельные.
Если Arial — один из фирменных шрифтов вашей компании, о его замене лучше задуматься уже сейчас. Главное при выборе нового шрифта — не забудьте обратить внимание на то, как выглядят цифры.
Отдельно рекомендуем установить шрифты петербургской шрифтовой студии Paratype: их не заблокируют.
Вместо вывода делимся тремя универсальными правилами типографики, которые будут полезны и недизайнерам:
- Делайте заголовки в два раза больше основного текста
Так читателю будет проще понять, что в вашей информации важное, а что второстепенное.
- Если хотите сделать текст контрастным — пропустите одно начертание
Лучше сочетать тонкое начертание с полужирным, а регулярное — с жирным.
- Чем важнее текст, тем стандартнее шрифт
Не усложняйте витиеватыми шрифтами то, что несёт ключевой смысл текста.
***
Мы осознаём кризис, с которым все столкнулись, и хотим сделать дизайн доступнее для российских компаний.
В апреле дарим скидку 50 000₽ на все услуги Логомашины первым десяти компаниям, которые обратятся в студию.
Вы можете разработать логотип, фирменный стиль, название или полноценный брендинг для вашего проекта. Оставьте заявку на сайте — https://logomachine.ru/maysale, вам позвонят наши менеджеры и сделают скидку.
You can split fonts into two main styles. There are serif fonts (with lines flicking out of each letter) and sans-serif fonts (without the lines). Serif fonts tend to be easier to read, but they look more formal. This article will show you some of the best ones in Word.
The best serif fonts in Microsoft Word are Times New Roman, Garamond, and Palatino Linotype. They all work well to show a more formal look in your writing. They’re also very easy to read, making them solid choices if you’re looking to write an essay or academic paper.
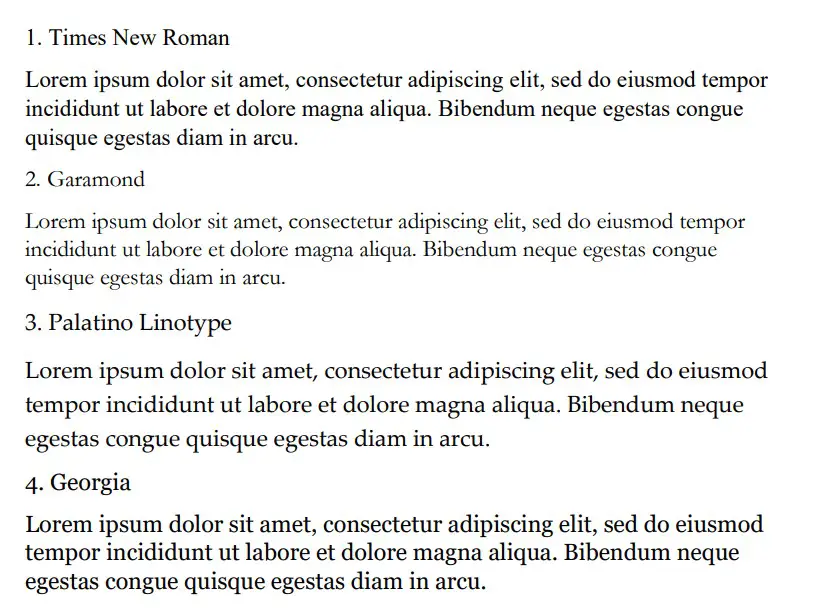
Times New Roman
Times New Roman is the default Microsoft Word font. You really can’t go wrong with it. Everyone knows what it looks like, and everyone uses it as the default serif font in Word. If you don’t actively change your font, it’s likely that you’re writing in Times New Roman.
It is a very professional font that has been proven to be one of the easiest to read on paper. It also makes your writing look more trustworthy, which works wonders when you use it for something like an academic or scientific paper.
You will find that Times New Roman is one of the most popular fonts in the world. It’s such a good choice because of how popular it is, and it can fit in just about anywhere in your writing. It works well for titles and in the main body of the text.
Garamond
Garamond is another great serif font that works really well. It comes in at a close second to Times New Roman, which is saying a lot considering how popular Times New Roman is. Garamond is fairly easy to read, and it even comes in slightly smaller in size.
Garamond is a great font that makes your writing much more concise. The smaller size of this font allows you to fit more words onto your page without feeling like you’re writing an essay full of gibberish and waffle.
If people decided to choose a different serif font in place of Times New Roman, it’s likely that Garamond would rank quite highly as their next favorite pick.
Palatino Linotype
Palatino Linotype is a great font choice that a lot of people enjoy using. It feels a bit fresher than some of the other serif fonts, and the size of the letters makes it a little more appealing when you are writing it for more informal purposes.
You will find that Palatino Linotype looks good wherever you put it. It can be both in a heading or in the main text body. As long as you like the look of the font, you’ll find a great place to put it to make sure it fits in.
The letters on Palatino Linotype feel a little more “open” than those of Times New Roman and Garamond. That’s what makes it a better choice if you’re looking for something that’s a little bit easier to read or comes across with more informal energy.
Georgia
Georgia is a very popular choice that a lot of essay writers are recommended to use. Many academics also vouch for Georgia, making it a really good choice if you’re looking to capture a more formal and trustworthy look.
People say that Georgia works really well as a heading. While this is definitely true, there is nothing wrong with using it as part of the main body of your text either. It can work in just about any situation, which makes it a great serif font choice.
While it’s not as popular as Times New Roman, it’s definitely up there in terms of how many people use it. It’s a fairly generic serif font, so there aren’t any specific style choices that stand it out from some of the rest.
Cambria
Cambria is another great serif font that is a default choice in Microsoft Word. While it isn’t automatically set as a font choice, it is automatic if you use the specific Word style that allows you to write headings and sub-headings.
Cambria is one of the best choices to introduce new ideas with headings and sub-headings. Of course, you don’t have to be limited to including it as a heading. If you want it as the text body, too, that’s fine.
You’ll find that this ranks highly in popularity compared to many of the other fonts. It looks really good on the page because of the more “square” feel that the letters have.
Bodoni MT
Bodoni MT is a classical serif font that works well. People like to use this font for novels, which shows that it must be an easy-to-read choice. The purpose of novels is to have thousands of words page after page, so having an easy-to-read font is always going to be ideal.
Bodoni MT is one of the thicker fonts on this list. It almost looks like it is written in bold, which really helps it to stand out from some of the other options. It works really well when it’s used to write multiple words at the same time.
The serif style looks very similar to some of the best fonts on this list, too. While this doesn’t allow Bodoni MT to be unique, it does allow it to have a familiar look and feel to it.
Bookman Old Style
Bookman Old Style is another great font that is common for novels. Again, if it works well in novels, you can bet that it works well in any situation when you might need someone to read through what you’re writing carefully.
Bookman Old Style is a large font. It allows the letters to appear more free and open compared to many of the other choices. This makes it a great font that’s worth trying out.
Lucida Bright
Lucida Bright is a good font choice. It’s part of the famous Lucida font family, and it works really well to show a large serif style. Lucida Bright is one of the larger fonts on this list, making it a great choice if you’re trying to make your writing really easy to read.
Some people would argue that Lucida Bright is too large for most formal documents. It does mean that you’ll take up a few extra pages because of your larger font choice, but this isn’t always a problem. Sometimes, it’s refreshing to include a larger font.
Modern No. 20
Modern No. 20 is an interesting serif font that doesn’t often get used. It’s a great choice nonetheless, and it applies to situations where some of the other serif fonts might feel a bit too pretentious or samey.
Modern No. 20 has very sharp serifs on its letters. While all of the fonts discussed so far have decent serif accents, Modern No. 20 seems to have some of the largest serifs that really help it to bring a unique style to your writing.
It’s much smaller than most of the other options too. It makes for a great choice if you’re trying to include a lot of information in one area without feeling like you have to fill up a lot of pages to get it to work.
Rockwell
Rockwell is a great option that many people like to use. It comes from the Rockwell family, which has made its name with more obvious and impactful fonts like ExtraBold and Condensed. Rockwell on its own is a great option for your serif-font needs.
It fits a similar style to most of the other serif fonts. There is nothing particularly unique that makes it stand out, which is usually a good thing. People don’t like their serif fonts to look out of place in their writing, and Rockwell will fit in no matter where you put it.
Poor Richard
Poor Richard is a great font in Microsoft Word that deserves more attention. It’s a very attractive font that comes with small lower-case letters. The capital letters tend to dwarf the lower-case ones, making it an interesting font style that the other serif fonts don’t have.
This font style is both a blessing and a curse, depending on how you look at it. It’s a blessing because it means that Poor Richard has a unique personality that allows it to stand out from the rest of the serif crowd.
It’s a curse because the uniqueness and size of the font in its style mean it doesn’t work very well formally. You’ll find that Poor Richard is a much better serif font for your informal writing.
Perpetua
Perpetua follows the same general idea as Poor Richard. It’s not all that popular, but it deserves to be. It’s a great font with an interesting style (most of which comes from the way some of the letters go below the written line, like the “p’s” and “q’s”).
Perpetua works really well in formal and informal contexts. It’s worth trying to use it yourself to see whether you can get along with it. A lot of people think it’s an attractive font, but it doesn’t often get used because it’s not a very well-known name.
You may also like:
12 Smallest Fonts In Microsoft Word
12 Best Cursive Fonts in Microsoft Word
12 Most Scary Fonts for Halooween in Microsoft Word

Martin holds a Master’s degree in Finance and International Business. He has six years of experience in professional communication with clients, executives, and colleagues. Furthermore, he has teaching experience from Aarhus University. Martin has been featured as an expert in communication and teaching on Forbes and Shopify. Read more about Martin here.
11 free fonts
Related Styles
Cool
Script
Bold
Modern
Retro
Vintage
Logo
Ligatures
Techno
Black
Tech
Wordmark
Blog
Capital
Clean
Digital
Mark
Technology
Business
All Caps
Future
Futuristic
Game
Hand
Hard
Head
Illustration
Massive
Music
Professional
Sign
Simple
Title
Banana
Coma
Samutojj
Adobe
Commercial-use
Sort by
- Popular
- Trending
- Newest
- Name
Aftetir
by
AmruID
Personal Use Free

Regular
6869 downloads
Autobus Bold
by
NimaType
Personal Use Free

99819 downloads
Dispence
by
Chequered Ink
Personal Use Free

51450 downloads
Love Nature
by
Chequered Ink
Personal Use Free

36783 downloads
b Break Password
by
wepfont
Personal Use Free

1364 downloads
Aisy Khadijah
by
Syukur Setiyadi
Personal Use Free

Regular
23605 downloads
Miamagon
by
Chequered Ink
Personal Use Free

16733 downloads
Moonwalk Miss
by
Chequered Ink
Personal Use Free

6820 downloads
Tibet
by
Rémi Godefroid
100% Free

15682 downloads
Gameshow
by
Darrell Flood
Personal Use Free

Regular
2294 downloads
SAMUTOJJ handwrite massive skul
by
SAMUTOJJ
100% Free

3480 downloads
Содержание
- Установка нового шрифта в систему
- Установка нового шрифта в Word
- Внедрение шрифта в документ
- Вопросы и ответы

В последних версиях текстового редактора Microsoft Word имеется довольно большой набор встроенных шрифтов. Большинство из них, как и полагается, состоят из букв, но в некоторых вместо букв используются различные символы и знаки, что тоже весьма удобно и необходимо во многих ситуациях.
Урок: Как в Ворде поставить галочку
И все же, сколько бы в MS Word не было встроенных шрифтов, активным пользователям программы стандартного набора всегда будет мало, особенно, если хочется чего-то действительно необычного. Неудивительно, что на просторах интернета можно найти множество шрифтов для этого текстового редактора, созданных сторонними разработчиками. Именно поэтому в данной статье мы расскажем о том, как добавить шрифт в Ворд.
Важное предупреждение: Скачивайте шрифты, как и любое другое ПО, только с проверенных сайтов, так как во многих из них вполне могут содержаться вирусы и прочий вредоносный софт. Не забывайте о собственной безопасности и сохранности личных данных, не качайте шрифты, представленные в установочных файлах EXE, так как на самом деле распространяются они в архивах, внутри которых содержатся файлы форматов OTF или TTF, поддерживаемых ОС Windows.
Вот список безопасных ресурсов, с которых можно скачивать шрифты для MS Word и других совместимых программ:
www.dafont.com
www.fontsquirrel.com
www.fontspace.com
www.1001freefonts.com
Отметим, что все вышеперечисленные сайты крайне удобно реализованы и каждый из шрифтов там представлен наглядно и понятно. То есть, вы смотрите на картинку превью, решаете, нравиться ли вам этот шрифт и нужен ли он вам вообще, и только после этого качаете. Итак, приступим.

Установка нового шрифта в систему
1. Выберите на одном из предложенных нами сайтов (либо на другом, которому полностью доверяете) подходящий шрифт и скачайте его.
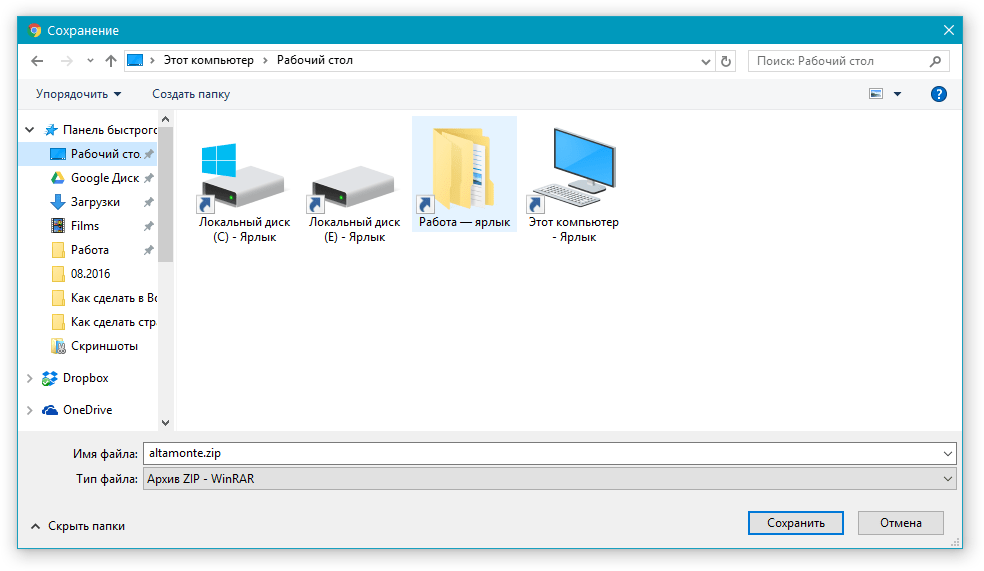
2. Перейдите в папку, в которую вы скачали архив (или просто файл) со шрифтом (шрифтами). В нашем случае это рабочий стол.
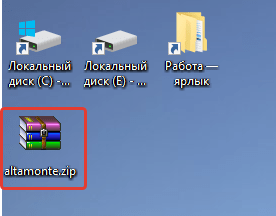
3. Откройте архив и извлеките его содержимое в любую удобную папку. Если вы скачали шрифты, не запакованные в архив, просто переместите их туда, откуда вам будет удобно к ним добраться. Не закрывайте эту папку.

Примечание: В архиве со шрифтами помимо файла OTF или TTF могут также содержаться и файлы другого формата, к примеру, изображение и текстовый документ, как в нашем примере. Извлекать эти файлы отнюдь не обязательно.

4. Откройте “Панель управления”.
В Windows 8 — 10 сделать это можно с помощью клавиш Win+X, где в появившемся списке нужно выбрать “Панель управления”. Вместо клавиш также можно использовать клик правой кнопкой мышки по значку меню “Пуск”.
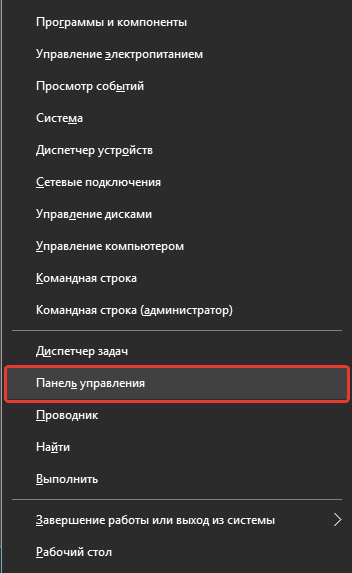
В Windows XP — 7 этот раздел находится в меню “Пуск” — “Панель управления”.

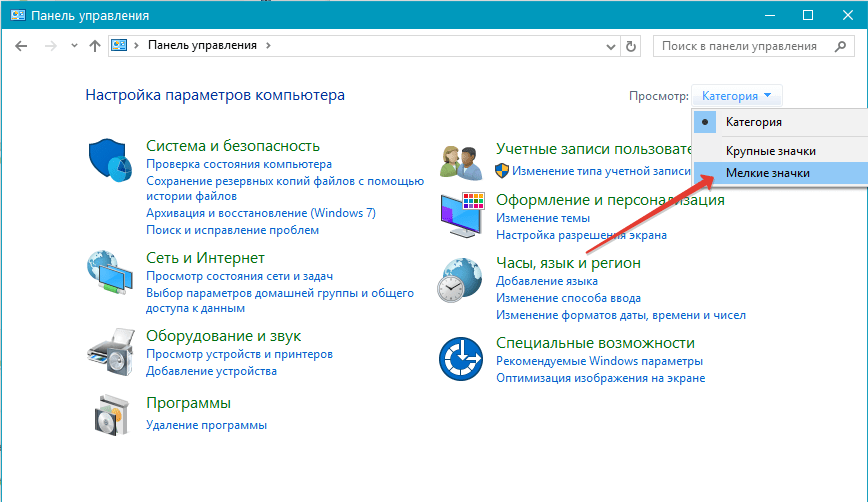
5. Если “Панель управления” находится в режиме просмотра “Категории”, как на нашем примере, переключитесь на режим отображения мелких значков — так вы сможете быстрее найти необходимый пункт.
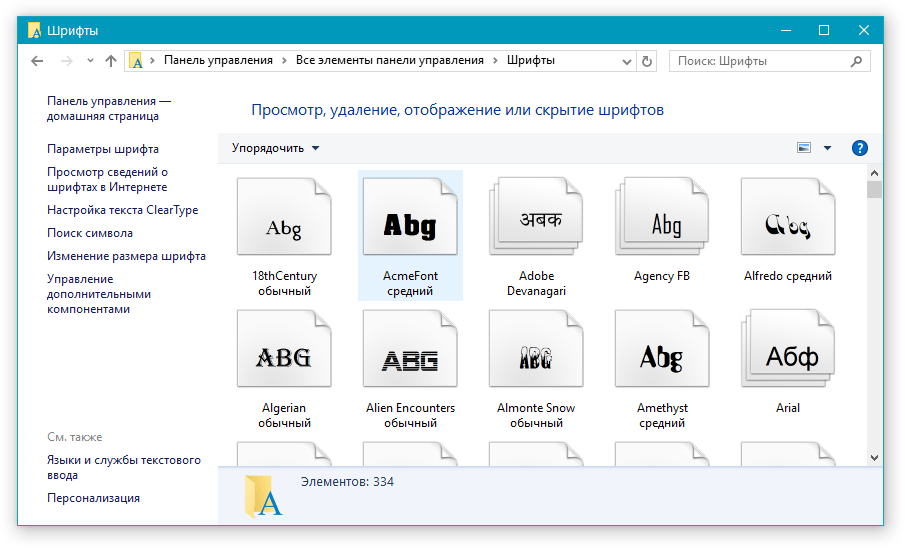
6. Найдите там пункт “Шрифты” (скорее всего, он будет одним из последних), и нажмите на него.
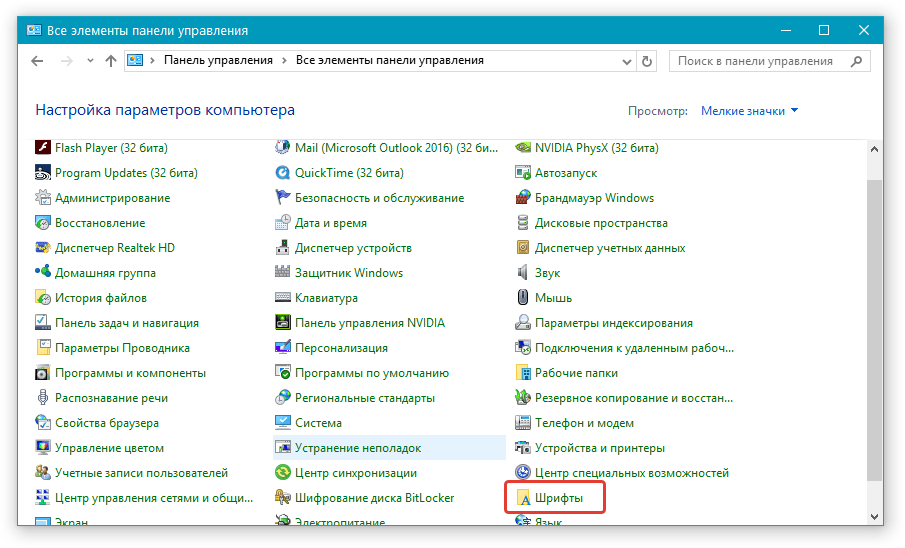
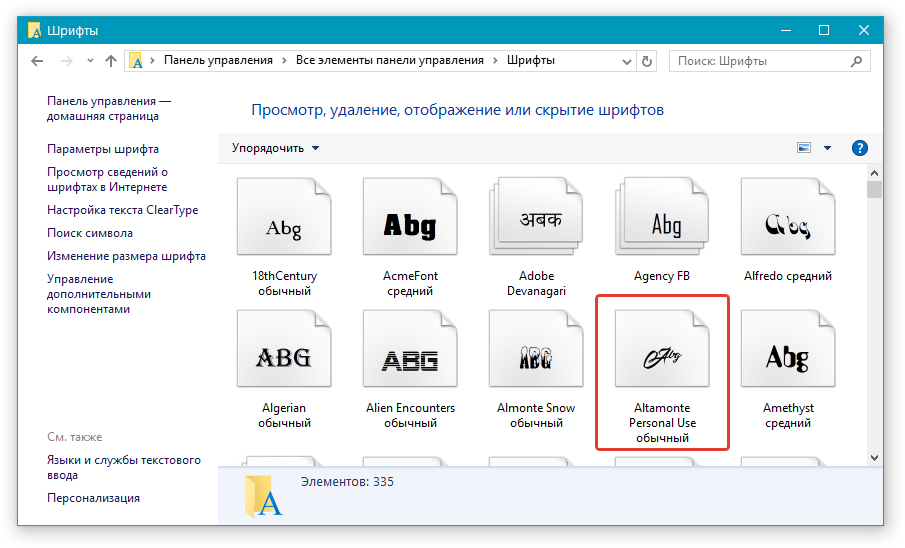
7. Откроется папка со шрифтами, установленными в ОС Windows. Поместите в нее файл шрифта (шрифтов), ранее скачанный и извлеченный из архива.
Совет: Вы можете просто перетащить его (их) мышкой из папки в папку или использовать команды Ctrl+C (копировать) или Ctrl+X (вырезать), а затем Ctrl+V (вставить).
8. После короткого процесса инициализации шрифт будет установлен в систему и появится в папке, в которую вы его переместили.
Примечание: Некоторые шрифты могут состоять из нескольких файлов (например, обычный, курсив и полужирный). В таком случае необходимо помещать в папку со шрифтами все эти файлы.
На данном этапе мы добавили новый шрифт в систему, теперь же нам необходимо добавить его и непосредственно в Ворд. О том, как это сделать, читайте ниже.
Установка нового шрифта в Word
1. Запустите Ворд и найдите новый шрифт в списке со стандартными, встроенными в программу.
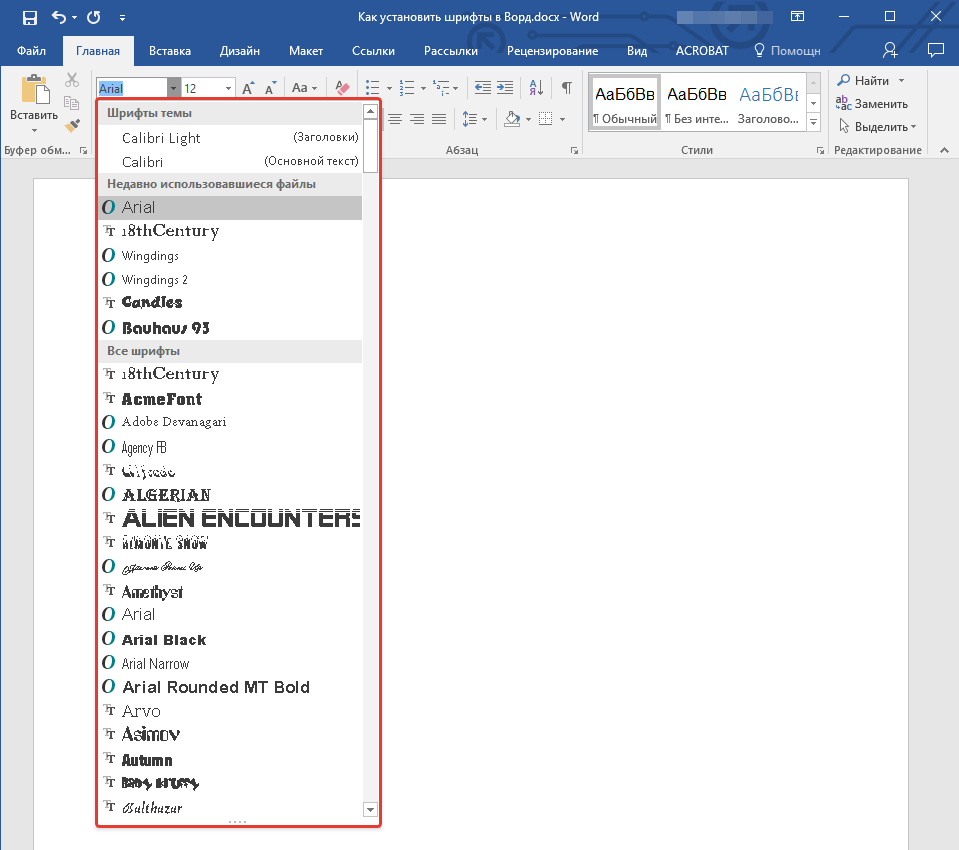
2. Зачастую, отыскать новый шрифт в списке не так просто, как может показаться: во-первых, их там и без того довольно много, во-вторых, его название, хоть и написано собственным шрифтом, но довольно мелкое.
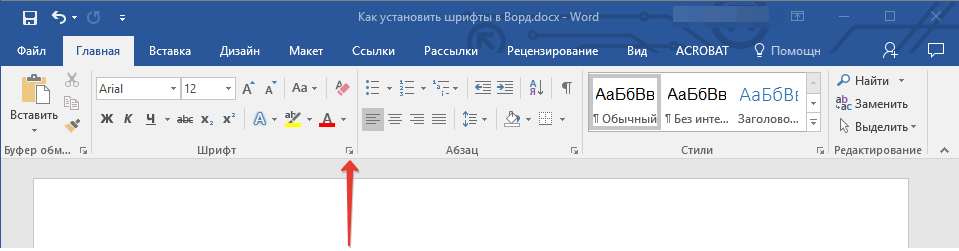
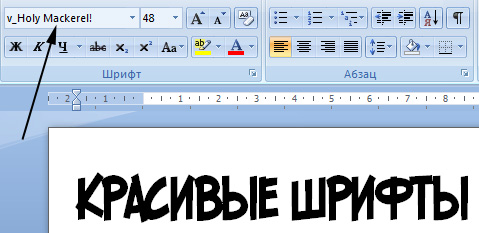
Чтобы быстро отыскать новый шрифт в MS Word и приступить к его использованию в наборе текста, откройте диалоговое окно группы “Шрифт”, нажав на небольшую стрелочку, расположенную в правом нижнем углу этой группы.
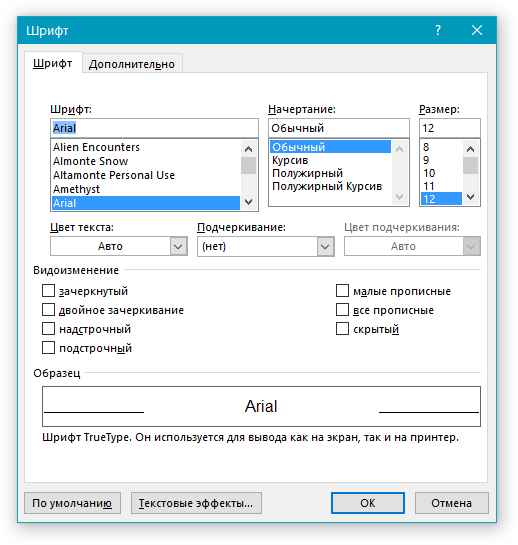
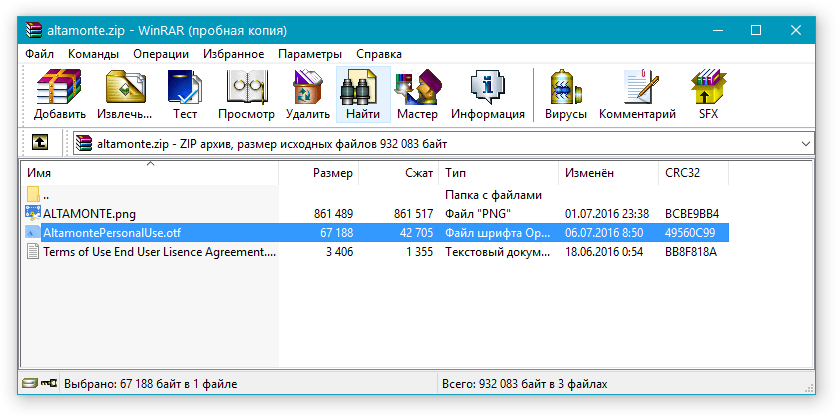
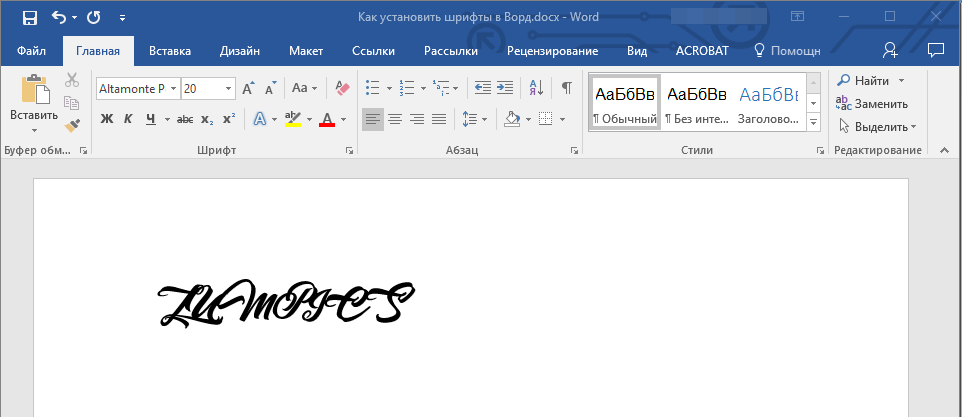
3. В списке “Шрифт” найдите название нового, установленного вами шрифта (в нашем случае это Altamonte Personal Use) и выберите его.
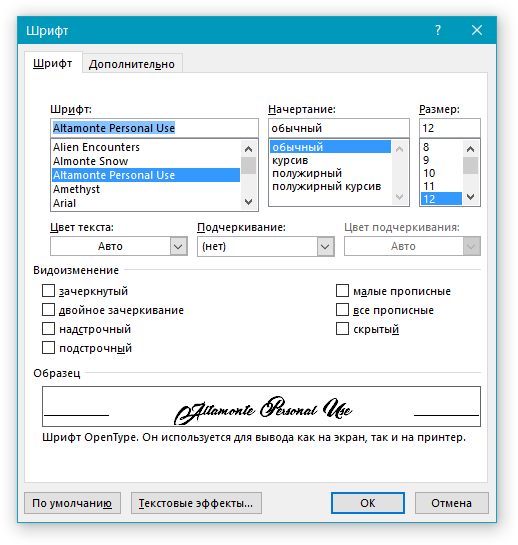
Совет: В окне “Образец” вы можете видеть то, как выглядит шрифт. Это поможет быстрее его найти, если вы не запомнили название шрифта, но запомнили его визуально.
4. После того, как вы нажмете “ОК” в диалоговом окне “Шрифт”, вы переключитесь на новый шрифт и сможете начать его использовать.
Внедрение шрифта в документ
После того, как вы установите новый шрифт на свой компьютер, использовать его вы сможете только у себя. То есть, если вы отправите текстовый документ, написанный новым шрифтом другому человеку, у которого этот шрифт не установлен в системе, а значит, и не интегрирован в Ворд, то у него он отображаться не будет.
Если вы хотите, чтобы новый шрифт был доступен не только на вашем ПК (ну и на принтере, точнее, уже на распечатанном листе бумаги), но и на других компьютерах, другим пользователям, его необходимо внедрить в текстовый документ. О том, как это сделать, читайте ниже.
Примечание: Внедрение шрифта в документ приведет к увеличению объема документа MS Word.
1. В вордовском документе перейдите во вкладку “Параметры”, открыть которую можно через меню “Файл” (Word 2010 — 2016) или кнопку “MS Word” (2003 — 2007).
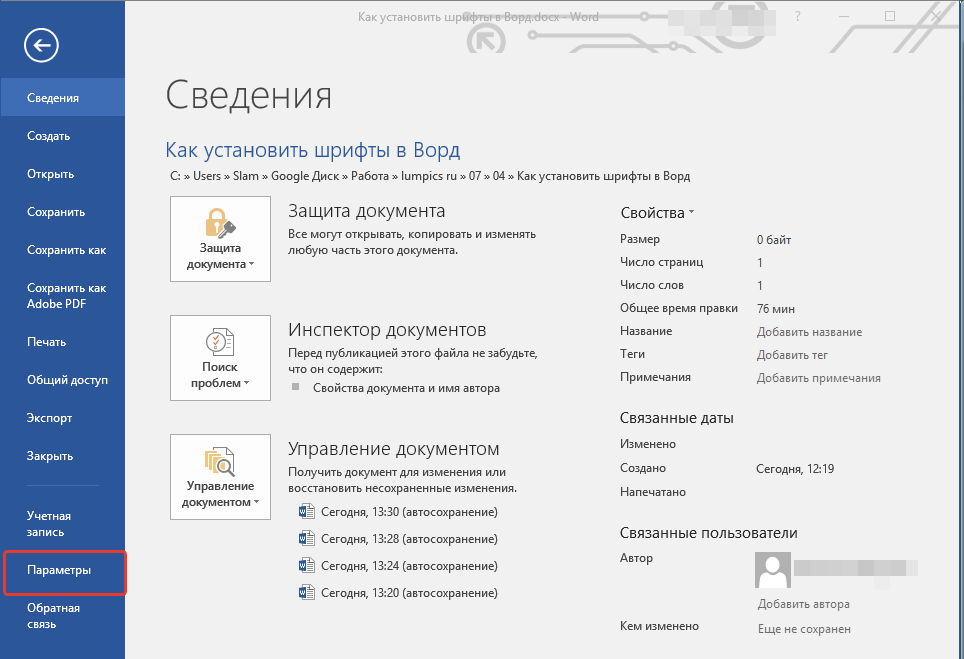
2. В диалоговом окне “Параметры”, которое перед вами откроется, перейдите к разделу “Сохранение”.

3. Установите галочку напротив пункта “Внедрить шрифты в файл”.

4. Выберите, хотите ли вы внедрить только знаки, которые используются в текущем документе (это уменьшит объем файла), хотите ли вы исключить внедрение системных шрифтов (по сути, оно и не нужно).
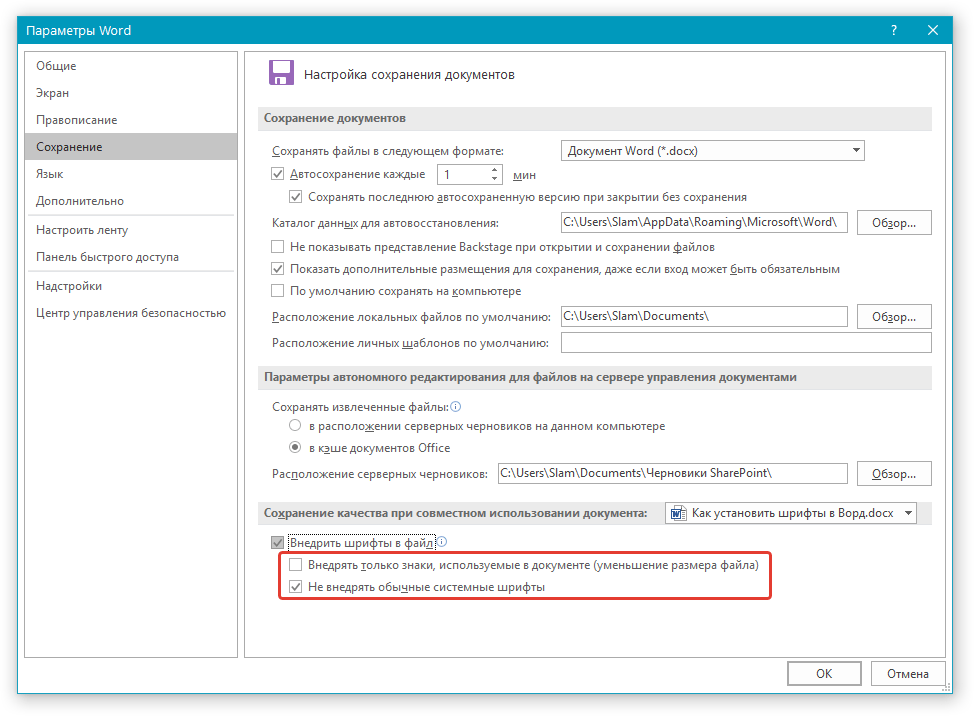
5. Сохраните текстовый документ. Теперь вы можете поделиться им с другими пользователями, ведь новый, добавленный вами шрифт будет отображаться и на их компьютере.
Собственно, на этом можно и закончить, ведь теперь вы знаете о том, как установить шрифты в Ворд, предварительно инсталлировав их в ОС Windows. Желаем вам успехов в освоении новых функций и безграничных возможностей программы Microsoft Word.
Microsoft Word is the ultimate tool to fulfill your writing requirements. It offers almost every possible function for a better user experience, except the ability to add a new font directly to Word documents.
Word has a ton of pre-installed fonts to choose from. However, you may need to add a font to your Word file to make the document more visually satisfying and appealing.
Though Word doesn’t have any option to add a font to the Word font list, you can install any font on your device and use them on Microsoft Word.
In this guide, I will walk you through the steps to installing or removing a new font for Word and other MS Office applications.
Tag Along!
Check out our separate post on how to Double Space in Microsoft Word
Adding fonts to MS Word is very straightforward. There are several ways to install fonts. On Windows, you can directly install a font by right-clicking on it, or you can use your Windows settings.
There are two types of font files; one of them is TrueType (.ttf), and the other one is OpenType (.otf). You can download font files from numerous websites, including Google Fonts, DaFont, or FontSpace.
Many more websites also offer a vast list of font collections. Before downloading any font, ensure the site is trusted; otherwise, you can download a file that contains viruses and malware.
After downloading the fonts, unzip the font folder if the folder is zipped. Now follow the below instructions to install the fonts on your system directly.
Also, check out our separate post on how to Fix: Microsoft Word Table Of Contents Not Updating
1. Install Fonts Using the Installer
Use the basic installer to install any font for word or other Office applications. Go through the subsequent instructions to successfully install a fond with the installer.
Here are the steps to install fonts using the installer:
- Open the File Explorer by pressing the Windows + E keys.
- Go to the folder where you stored the font files.
- Double-click on the font file.
- Click on the Install button.

After successfully installing the font, you can now access the font on your MS Word application along with other Office apps. Install each font individually to access additional styles of a font family.
Read more on Microsoft Word Read Aloud Stopped Working
2. Install Fonts Using Settings
You can also use the Settings of Windows to install a font. The process is almost similar for Windows 10, 7, & 8. Follow the following methods to install fonts using Settings.
Here are the methods to install fonts using Settings:
Following the above steps will install your fonts on your device, instantly available within any Office application, including MS Word.
You can also search for fonts in the Microsoft Store and install them directly on your computer from the Get more fonts in Microsoft Store option. 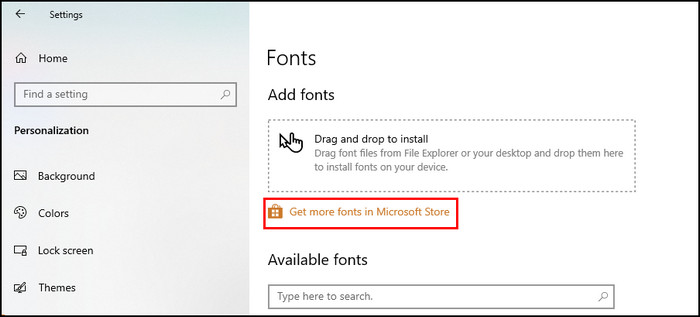
Also, check out our separate post on how to Unlock Selection in Word
If you have multiple users on your computer, you can install fonts using the context menu to limit the access to who can use the specific font. The instructions below show you how to install fonts using the context menu.
Here are the ways to install fonts using the context menu:
- Launch the File Explorer.
- Navigate to the font folder.
- Right-click on the font file.
- Select Install to install the font only for your account. You can also select the Install for all users option to install the font for all user’s accounts.

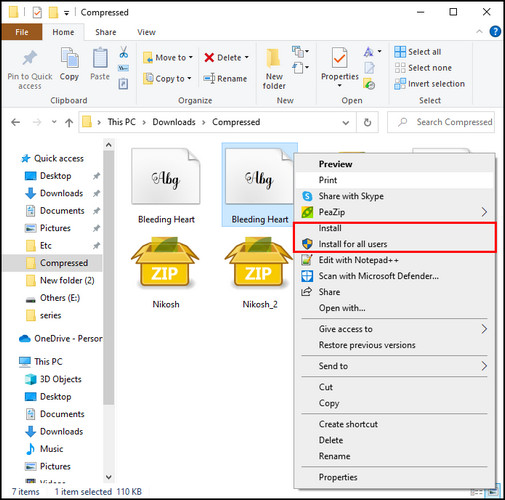
Installing the font with the context menu will immediately install your fonts on your computer. And the font can be used by every user if you choose the Install for all users option when installing the font.
After completing the installation, your font will be ready to use on MS Word and other Office applications. It is also possible to add fonts on your Mac devices. Keep reading the following to install fonts on your Mac successfully.
Check out our separate post on Fix Export to PDF Error in Word
How to Install Fonts to MS Word on Mac
Installing fonts to Mac is super simple; download your desired fonts from any trusted site and unzip the file. After unzipping, place the file in a folder and follow the instructions below to install fonts on your Mac.
Here are the steps to install fonts to MS Word on Mac:
- Navigate to the folder where you stored the font files.
- Open the file by double-clicking on it.
- Wait for the Font Preview window to appear.
- Click Install Font from the bottom-right corner.

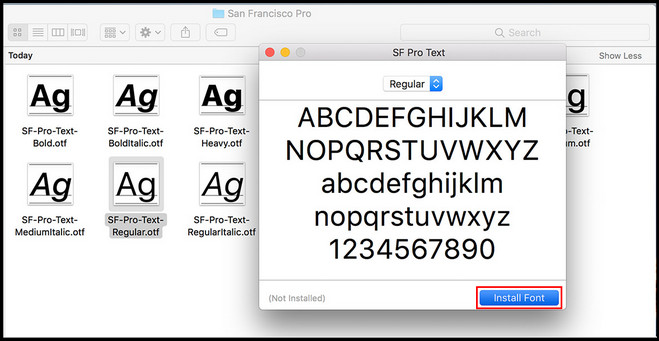
That will successfully install the font on your Mac device. It will be available on MS Word and other applications.
There are also some font manager applications for better managing your fonts on Mac. Font Book is one of them. In case you use Microsoft Word Online, you can easily add any fonts to MS Word. To learn more, keep reading.
Also, check out our separate post on how to Fix: Find and Replace Not Working On Microsoft Word
How to Add Fonts to Word Online
You can use your device fonts for the Word online version. To use any font in the Word web version, first install the font on your device by following the previous methods.
Quick Note: When installing a new font on your device, ensure the Word Online is closed. If you install the font while Word Online is running, you may not be able to see the font on the Word font list.
The instructions below will help you use any font for Word Online. Just type the font’s name in the font name box to use the desired font.
Here are the steps to add fonts to Word Online:
- Install the font on your device while Word Online is closed.
- Launch Microsoft Word Online on your web browser.
- Select the Font tab from the top toolbar.
- Type the font name in the display box.
- Press the Enter button to apply the font for your current document.

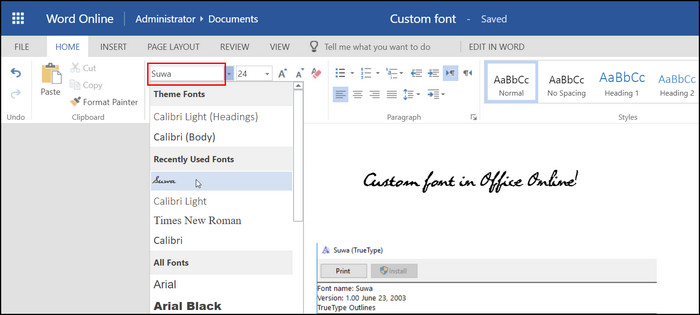
Following the above steps, you can quickly use any preferred font for your Word document or as a part of your Word file’s text.
You may also like to read How to Flip Quotation Marks in Word
How to Embed Fonts in a Microsoft Word Document
When you use a less popular font style for your word file and share it with someone, there is an excellent chance that they will not be able to see the font on their device if they don’t have the specific font installed.
To avoid this unwanted situation, you can embed the font with your word file, so the receiver can easily enjoy the doc with your favorite font. Follow the instructions below to embed a fond within the word file.
Here are the methods to embed a font within the Word file:
The above process will embed the essential font styles within the Word document, and anyone from any device can easily read the document with the embedded fonts.
Here’s a complete guide on how to Make a Resume in Word
Frequently Asked Questions
How do I import a font into Word?
You can import a font into Word by installing the font on your device. Right-click on the font file you want to import and click Install. After the installation, launch Word and search by the font name and select it to use for your document.
How do I remove fonts from Word?
In Windows, navigate to Control Panel > Fonts. Search for the font name, then choose the font you want to remove. Select the Delete button and click Yes to successfully remove the font.
Why does the font change in Word?
When you use a font installed on your device, and then you open the same document with another device that doesn’t have the same font installed. The MS Word will automatically change the font for the missing one.
A Final Thought
Though you will find a considerable pre-installed font collection in Microsoft Word or other programs, you can efficiently add various fonts to enhance the quality and looks of your documents.
While adding a new font to your Word document, remember that the document with not be able to show the fonts appropriately on other devices that don’t have the same font installed. In that case, embed your fonts with the document.
In this article, I have covered all the possible ways to download, install and use any fonts in your Word document. Do you have any additional queries? Mention them in the below comment section.
В Microsoft Office Word есть шрифты на любой вкус. Чтобы нестандартно оформить текст или напечатать красивую листовку, используйте оригинальную каллиграфию или графический объект. Но встроенные возможности программы меркнут в сравнении с тысячами разнообразных стилей, которые можно скачать в сети. Если вам не хватает того, что есть в офисе, узнайте, как установить шрифт в Ворд.

Где найти новый шрифт
Существуют целые сервера, на которых выложены коллекции бесплатной каллиграфии. Там сразу можно посмотреть, как будут выглядеть буквы и цифры. Вы подберёте печатные знаки под любые нужды. Доступна даже имитация рукописного ввода.
Перед тем как добавить шрифт в Word, его надо найти в интернете. Скачивайте файлы только из надёжных источников. Есть несколько проверенных сайтов. Например, «Fontspace» или «Xfont». После загрузки каллиграфию можно будет установить в Ворд. Если вы хотите посмотреть весь ассортимент, сделайте следующее:
- Откройте любой поисковик.
- Введите запрос «Скачать шрифт для Word». На первых страницах будут самые популярные сервисы. Можете задать конкретные параметры: «Готические буквы», «Фигурные символы», «Старославянская кириллица» и тому подобное. Всегда найдётся какой-нибудь новый, никем не используемый стиль.

- Зайдите на понравившийся сайт.
- Не загружайте исполняемые файлы с расширением .EXE — скорее всего, это вирус или другая вредоносная программа. Каллиграфия для Ворд имеет формат .TTF (True Type Font) или .OTF, а коллекции стилей хранятся в архивах .ZIP или .RAR.

- Если вы знаете, какой шрифт вам нужен, вбейте в строку поиска его название вместе с фразой «Скачать для Word». Так вы быстрее найдёте то, что хотите.


Лучше брать архив со стилями, а не качать по одному файлу. Вы сможете добавить несколько видов печатных знаков и уже в самой программе посмотреть, что вам подходит.
Когда вы нашли каллиграфию, можно разбираться, как вставить шрифт в Word.
- Распакуйте архив со стилями, если качали их в сжатом виде. Для этого надо установить архиватор. Подойдёт WinZip или WinRar. Кликните правой кнопкой мыши по файлу с коллекцией и в выпавшем списке выберите «Извлечь». Теперь вы можете копировать и перемещать данные, которые хранились в архиве. Чтобы посмотреть, как выглядят символы, откройте один из файлов с каллиграфией. И для этого не надо открывать Ворд.

- Перейдите в Пуск — Панель управления. В разделе «Оформление и персонализация» кликните значок «Шрифты». Он открывает папку со стилями символов в Word. В неё также можно войти через С:WindowsFonts. Чтобы лучше ориентироваться в панели управления, в меню «Просмотр» (находится в правом верхнем углу) выберете подходящие настройки отображения.

- Скопируйте скачанные файлы с каллиграфией в папку «Fonts» (не сам архив, а извлечённые из него данные). Новый вид символов должен появиться и в Office. Некоторые из них уже могут быть в системе. В таком случае появится диалоговое окно, предлагающее заменить имеющиеся печатные знаки. Не соглашайтесь, чтобы случайно не удалить «родные» стили офиса.


Если не получилось добавить их таким образом, попробуйте другой способ.
- Откройте папку с загруженной каллиграфией.
- Кликните по одному из файлов правой кнопкой мыши.
- Нажмите «Установить».

После этого стили точно отобразятся в Word.
Как добавить шрифты в файл Word
Если вы решите поработать с текстом на компьютере, на котором отсутствует используемая вами каллиграфия, она не отобразится. Но можно добавить стиль в прямо документ.
- Нажмите синюю кнопку «Файл». В Office 2007 это меню вызывается кликом на логотип в левой верхней части окна.
- Выберете «Параметры», раздел «Сохранение».

- Галочку рядом с пунктом «Внедрять шрифты в файл».


Лучше активировать эту опцию, если вы используете не только системные стили. У вас ведь не будет возможности установить свою каллиграфию на чужой ПК.
Как узнать название шрифта
Вам понравился внешний вид символов, но вы не знаете название этого дизайна? И как загрузить шрифты в Word, если вы не можете их найти? Не надо ходить по сайтам, надеясь случайно наткнуться на нужные символы. Название легко узнать. Для этого существуют специальные программы и даже целые сайты.
- What The Font. Популярный и надёжный сервис. Определяет вид каллиграфии по картинке. Найденный стиль можно сразу же скачать и установить в Word. Ресурс имеет свой форум. Если поиск по базе данных ничего не дал, можете спросить совета у других пользователей.
- Расширение для браузера Google Chrome. Сканирует HTML-код страницы и выдаёт название.
- Определяет шрифт, задавая вопросы о его внешнем виде. Если вы примерно представляете, что ищите, но конкретной информации у вас нет — этот ресурс подойдёт.
- Bowfin Printworks. Здесь можно подобрать стиль вплоть до мельчайших деталей. Спрашивает о форме каждого символа.
- Сообщество людей, которые занимаются дизайном каллиграфии или просто в ней разбираются. Надо создать тему и вставить рисунок с символами. Пользователи форума помогут найти нужный стиль.
- WhatTheFont для мобильных устройств. Сфотографируйте слово — приложение определит, какой это стиль.

Если вы увидели интересную каллиграфию в интернете или хотите расширить возможности Office, разберитесь, как установить новый шрифт в Word. Нестандартными надписями можно разбавить скучный текст. Их используют для листовок, поздравлений, открыток, презентаций. Их существуют тысячи — вы обязательно найдёте подходящий.
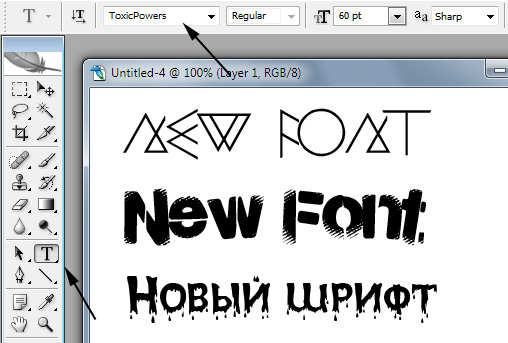
 Встречайте очередное масштабное пополнение раздела красивых шрифтов где я собираю все соответствующие подборки. В отличии от других заметок с материалами здесь дополнительно будут представлены пояснения по процессу их установки в Ворде (и заодно Фотошопе).
Заметка пригодится пока я работаю над обновлением поста о красивых русских шрифтах. Решил немного развить эту тему т.к. на прошлую статью часто заходят из поиска по фразам похожим на «красивые шрифты для word» или «где найти русские шрифты для ворда«. А ведь там нет вообще никакой информации по данному текстовому редактору! Поэтому и придумал сочинить отдельный пост, дополнив его ответами на вопросы пользователей.
Заметка состоит из нескольких частей. Если вы что-то уже знаете, можете смело промотать текст дальше, непосредственно к подборкам.
- Руководство по установке шрифтов.
- Красивые фонты для Word.
- Рукописные русские варианты под Ворд.
- Отличные русские шрифты в word.
Необычный вид текстов в Ворде может использоваться, например, для разного рода торжественных документов (тех же поздравлений, грамот). Для фотошопа такие красивые материалы вообще незаменимая вещь: открытки, афиши, баннеры, иллюстрации — все это выглядит намного лучше с рукописным текстом нежели со стандартным простым оформлением.
Установка шрифтов в Ворде и Фотошопе (для Windows)
Первым делом рассмотрим вопрос как установить новые шрифты в ворде или графическом редакторе Фотошоп. Алгоритм действий, в принципе, один и тот же, хотя вариантов реализации несколько.
Первым делом вам нужно скачать один из бесплатных шрифтов из данного раздела блога или с других тематических сайтов в сети. Файл должен иметь формат TTF (True Type Fonts) или OTF (OpenType, поддерживающий Unicode-кодировку).
Вариант1. Раньше для установки шрифтов в Windows (рассматриваю только эту ОС, поскольку с ней работаю) нужно было просто скопировать данный файл в официальную директорию фонтов, которая находится по адресу C:WindowsFonts. Как только файл попадал туда, им можно было воспользоваться в Word и Фотошопе. Данный метод еще работает, хотя сейчас все делается намного проще.
Вариант2. Вы выделяете один или несколько TTF/OTF файлов, а затем правой кнопкой мышки вызываете меню, где кликаете по пункту «Install».
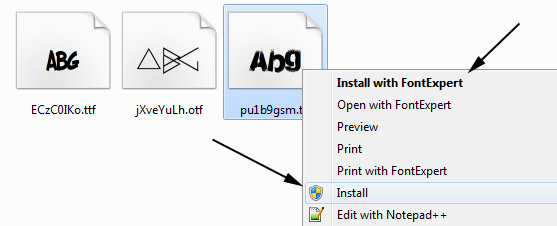
Через пару секунд установка шрифта для Ворда и других программ будет завершена. Заходите в текстовый редактор и выбираете для фрагмента статьи нужное вам оформление.
Вариант3. На первой картинке второго метода вы могли видеть пункт всплывающего меню «Install with FontExpert». Если у вас на компьютере имеется специальная программа, то можете установить шрифты с ее помощью.
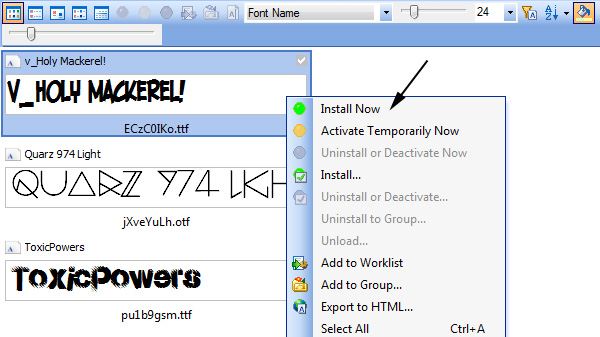
Данный менеджер позволяет просматривать и выполнять разные операции с ними (в том числе и установку). Процедура аналогична предыдущему второму методу — вызываете всплывающее меню правой кнопкой мышки и кликаете «Install Now».
Все эти три варианта позволяют не только установить шрифты в Word, но и автоматически добавляют их в разные другие программы, например, Фотошоп и т.п. После этого вы сможете и там использовать новый стиль оформления текста.
В общем, думаю, после таких детальных пояснений вопрос как установить и сделать красивый шрифт в Ворде для вас больше не актуален. Однако, если есть, какие-то непонятные нюансы, пишите в комментариях.
Теперь переходим непосредственно к шрифтам.
Красивые шрифты для Word
Вообще, конечно, красота — понятие субъективное, особенно когда речь идет о дизайне. Я лично старался выбирать красивые шрифты для Word, которые бы сам использовал в работе. В подборке всего 10 вариантов (зато бесплатных), скачать их можете, перейдя по ссылке.
После тестирования некоторых решений, заметил еще один нюанс. Какой бы красивый шрифт в Ворде вы не выбрали, он должен быть простым и понятным для читателя, поскольку у вас все же документ, а не графическая иллюстрация. Это в Фотошопе можно применить разные эффекткы оформления, в текстовом редакторе, как правило, выделения и стили более-менее простые. Тут скорее важна практичность.
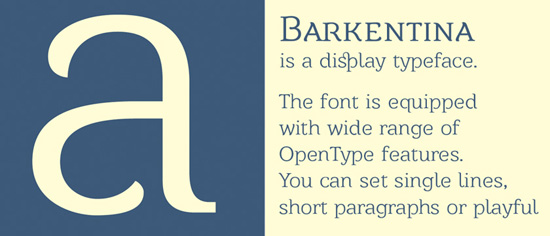
Barkentina
NeSkid (Comica BD)

Gecko

m_Acadian

Docker Three

Anime Ace v3

FoglihtenNo06

MerriWeather

ZnikomitNo25

Bulgaria Moderna V3 font

Все представленные в подборке красивые шрифты для Word бесплатны, хотя некоторые можно использовать лишь для персональных проектов (см. их описание).
Рукописные русские шрифты для Ворда
Лучше всего для текстового редактора подходят, конечно, рукописные фонты, т.к. они соответствуют стилистике написания документов, писем, заметок. Тут вам не фотошоп дабы экспериментировать с гранжевыми, готическими надписями  Хотя рукописные шрифты для Word также могут иметь разное оформление, отличаясь друг от другая определенными нюансами: аккуратностью письма, отступами между буквами, жирностью линий и т.п.
Nautilus

Good Vibes Pro

Liana

Pecita

Gunny Rewritten

Wolgast Two Font Family

Не обращайте внимание на примеры, где используются англоязычные тексты — они взяты с сайтов источников. Все эти 3 варианта — полноценные русские шрифты для Word (можете сами проверить).
Azbuka03_D

Denistina

Katherine

Shlapak Script

Напомню, дабы скачать данные рукописные шрифты для Word кликаете по картинке, после чего попадаете на сайт-источник, где и будет линк загрузки. Специально искал для вас бесплатные варианты.
Кириллические / русские шрифты для word
Подходим к последнему блоку. Не смотря на то, что здесь в названии четко указаны русские шрифты для Word, во всех остальных разделах я также старался подбирать кириллические материалы. Опять же в Фотошопе для иллюстраций, сайтов, баннеров вам могли бы пригодиться и англоязычные экземпляры, но текстовые документы, думаю, вы пишете в основном без латиницы.
Данный заключительный инфоблок содержит обычные (не супер красочные и не рукописные), а вполне себе традиционные наработки. Отчасти они напоминают шрифты печатной машинки для Word, но здесь чуть больше разнообразия.
Если честно, все три раздела можно было смело объединять в один, так как многие файлы перекликаются, но я просто хотел хоть немного систематизировать информацию. Еще больше вариантов найдете на разных сайтах архивах русских шрифтов в онлайне (в статье по ссылке аж 7 таких проектов).
Sports World

Majestic X

Hattori Hanzo

Staromoskovsky

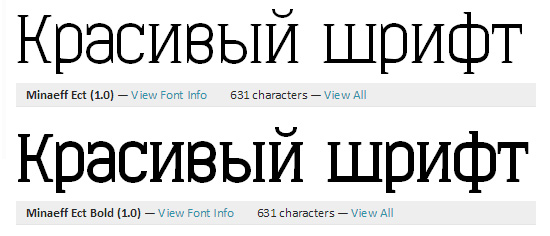
Minaeff Ect
Kelly Slab

Playfair Display

Izvestija

Blogger Sans

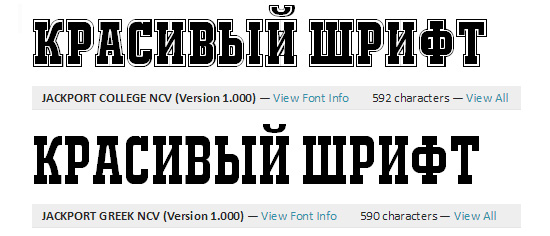
Jackport College NCV
Что касается первой части статьи, то думаю, с вопросом их установки в Ворде проблем не возникнет, однако, если что, пишите. Надеюсь, вам понравилась данная подборка 30-ти отличных русских шрифтов для Word, которые можно использовать при оформлении текстов.