
Excel for Microsoft 365 Word for Microsoft 365 PowerPoint for Microsoft 365 Excel 2021 Word 2021 PowerPoint 2021 Excel 2019 Word 2019 PowerPoint 2019 Excel 2016 Word 2016 PowerPoint 2016 Excel 2013 Word 2013 PowerPoint 2013 Excel 2010 Word 2010 PowerPoint 2010 More…Less
You can change the font size for all text or just selected text in desktop Excel, PowerPoint, or Word.
Change the default font size for all text
The way you change the default font size varies by app. Select your app below, and then follow the steps.
-
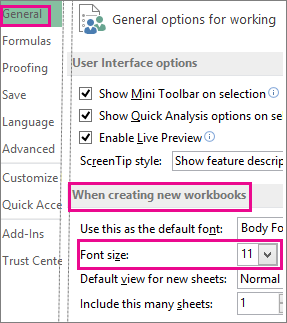
Click File > Options.
-
In the dialog box, click General.
-
Under When creating new workbooks, in the Font Size box, enter the font size you want.

Or, you can type in any size you want, between 1 and 409, in multiples of .5, such as 10.5 or 105.5. You can also choose a different default font style.
Note: To begin using the new default font size or font, you must restart Excel. The new default font and font size are used only in new workbooks created after you restart Excel; any existing workbooks are not affected. To use the new default font and size in existing workbooks, move worksheets from an existing workbook to a new workbook.
To change the font size for all slides, change it on the slide master. Every PowerPoint presentation contains a slide master with related slide layouts.
Note: If you want to change the theme, you should do that before changing the font, as a different theme may use different fonts.
-
On the View tab, click Slide Master.
In Slide Master View, the slide master is at the top of the thumbnail pane with the related layouts beneath it.
-
Click the slide master to change the font on all slides, or click any of the layouts to change the font size on just that layout.
-
On the slide master or layout, select the level of placeholder text for which you want to change the font size.
-
On the Home tab, click the font size you want in the Font Size box.
You can also type in any size you want in multiples of .1, such as 10.3 or 105.7.
The bullet automatically increases or decreases in size to match the font size changes.


-
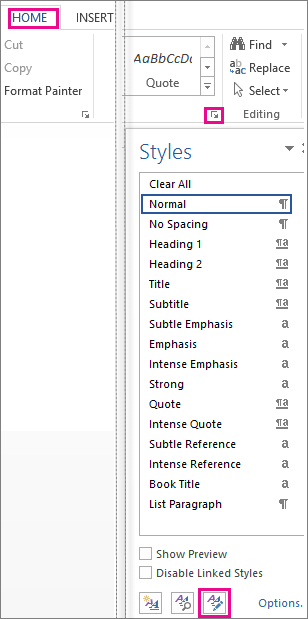
Open a new blank document.
-
On the Home tab, in the Styles group, click the dialog box launcher
..Or press Ctrl+Alt+Shift+S.
-
Click the Manage Styles button (third from left at the bottom).
-
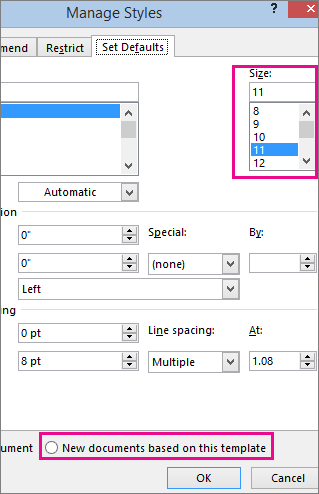
Click the Set Defaults tab and pick the size you want in the Size box.
You can also type in any size you want, between 1 and 1638, in multiples of .5, such as 10.5 or 105.5.
-
Click the New documents based on this template option.
-
Close and reopen Word. If you’re prompted to save the Normal template, say Yes.
Tip: You can also change the default font or font color on the Set Defaults tab.
 ..
..
When you set a default font, every new document you open will use the font settings you selected and set as the default. The default font applies to new documents that are based on the active template, usually Normal.dotm. You can create different templates to use different default font settings.
Change the size of selected text
To change the font size of selected text in desktop Excel, PowerPoint, or Word:
-
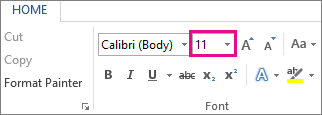
Select the text or cells with text you want to change. To select all text in a Word document, press Ctrl + A.
-
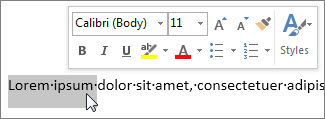
On the Home tab, click the font size in the Font Size box.
You can also type in any size you want, within the following limits:
-
Excel: between 1 and 409, between 1 and 409, in multiples of .5 (such as 10.5 or 105.5)
-
PowerPoint: between 1 and 3600, in multiples of .1 (such as 10.3 or 105.7)
-
Word: between 1 and 1638, in multiples of .5 (such as 10.5 or 105.5)
-
Tips:
-
When you select text, a mini toolbar appears near your cursor. You can also change the text size in this toolbar.
-
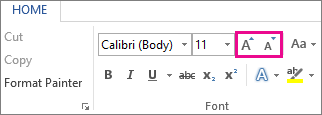
You can also click the Increase Font Size or Decrease Font Size (Grow Font and Shrink Font in some earlier versions of Office programs) icons until the size you want is displayed in the Font Size box.
See Also
Change or set the default font in Word
Change the fonts in a footer on a slide
Change a theme (Excel and Word)
Format text in cells (Excel)
Need more help?
Updated: 05/03/2022 by

When you open the program Microsoft Word, a font and font size are chosen for you. Usually, the default font is Calibri or Times New Roman, and the default font size is 11 or 12 point. If you want to change the default font attributes, find your version of Microsoft Word on the list below and follow the instructions.
Microsoft Word 2010 and later
- Make sure the toolbar is currently on the Home tab. If not, click the Home tab.
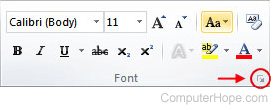
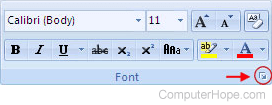
- In the Font section, click the Font Dialog Box Launcher (shown below).
- In the Font window, change the font attributes to your liking.
- Click the Set As Default button.
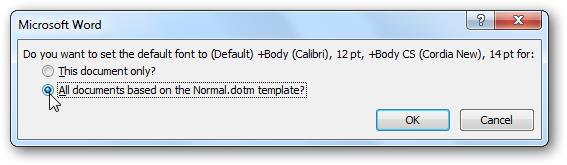
- In the dialog window that opens, select the All documents based on the Normal.dotm template option and click OK.
Microsoft Word 2007
- From the Home tab, click the Font Dialogue Box Launcher (shown below).
- Click the Font tab, and choose your new default font attributes.
- Click Default, and then click Yes.
Microsoft Word Online
Unlike the versions of Microsoft Word you install on a computer, you cannot change the default font type or size in Word Online. If you make a change to the font type or size for a Word Online document, the next time you create a new blank document, the font settings defaults to 11-point Calibri.
Содержание
- Изменение размера шрифта на нестандартные значения
- Пошаговое изменение размера шрифта
- Вопросы и ответы

Те, кто хотя бы пару раз в своей жизни пользовался текстовым процессором MS Word, наверняка знают о том, где в этой программе можно изменить размер шрифта. Это небольшое окошко во вкладке «Главная», расположенное в группе инструментов «Шрифт». В выпадающем списке этого окошка представлен перечень стандартных значений от меньшего к большему — выбирайте любой.
Проблема в том, что далеко не все пользователи знают, как увеличить шрифт в Ворде больше 72 единиц, указанных по умолчанию, или как сделать его меньше стандартных 8, или же как можно задать любое произвольное значение. На самом деле сделать это довольно просто, о чем мы и расскажем ниже.
Изменение размера шрифта на нестандартные значения
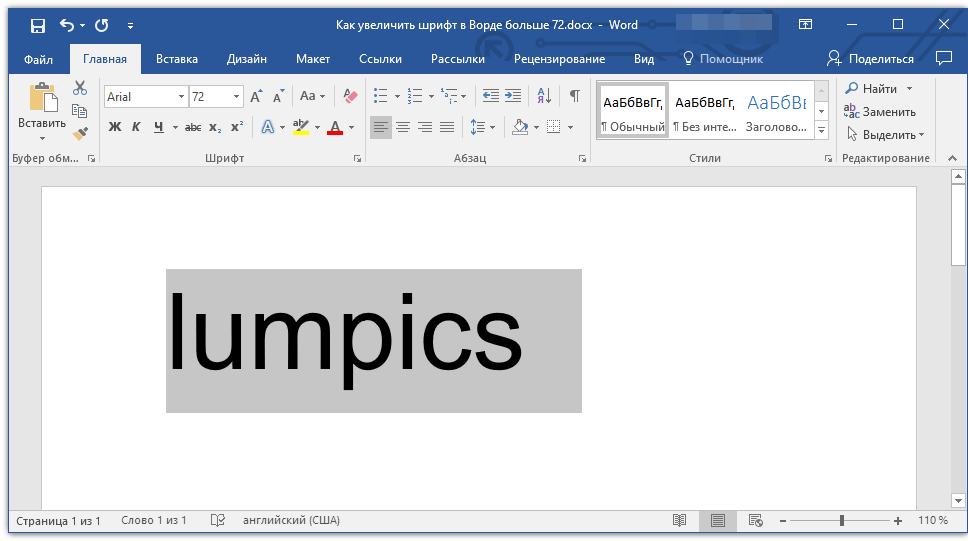
1. Выделите текст, размер которого вы хотите сделать больше стандартных 72 единиц, с помощью мышки.
Примечание: Если вы только планируете ввести текст, просто кликните в том месте, где он должен находиться.
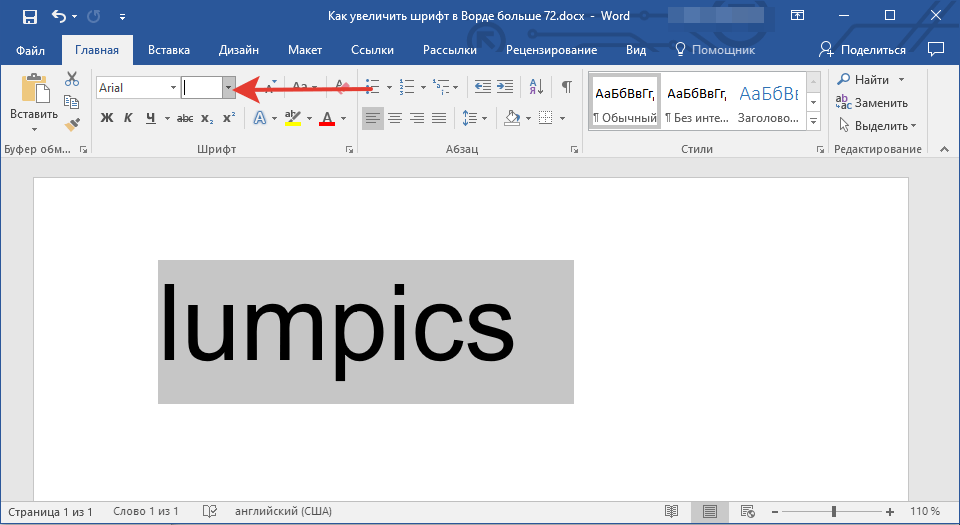
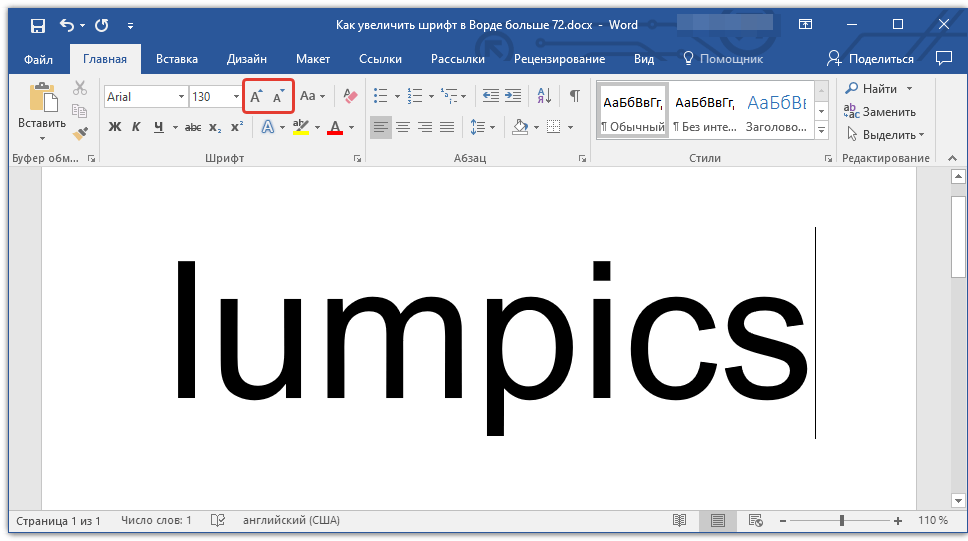
2. На панели быстрого доступа во вкладке «Главная» в группе инструментов «Шрифт», в окошке, расположенном рядом с названием шрифта, где указано его числовое значение, кликните мышкой.

3. Выделите заданное значение и удалите его, нажав «BackSpace» или «Delete».
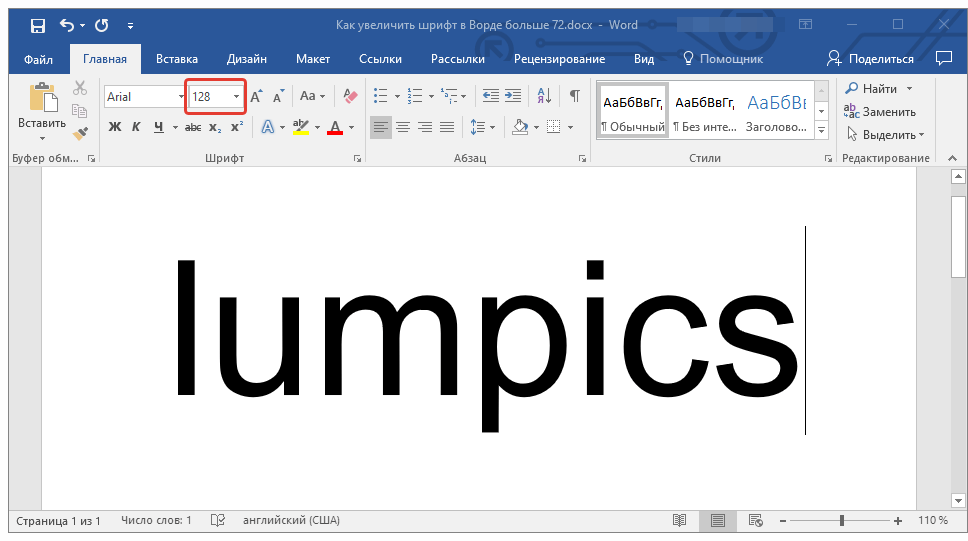
4. Введите необходимое значение размера шрифта и нажмите «ENTER», не забывая о том, что текст все же должен как-то уместиться на странице.
Урок: Как изменить формат страницы в Word
5. Размер шрифта будет изменен согласно заданным вами значениям.
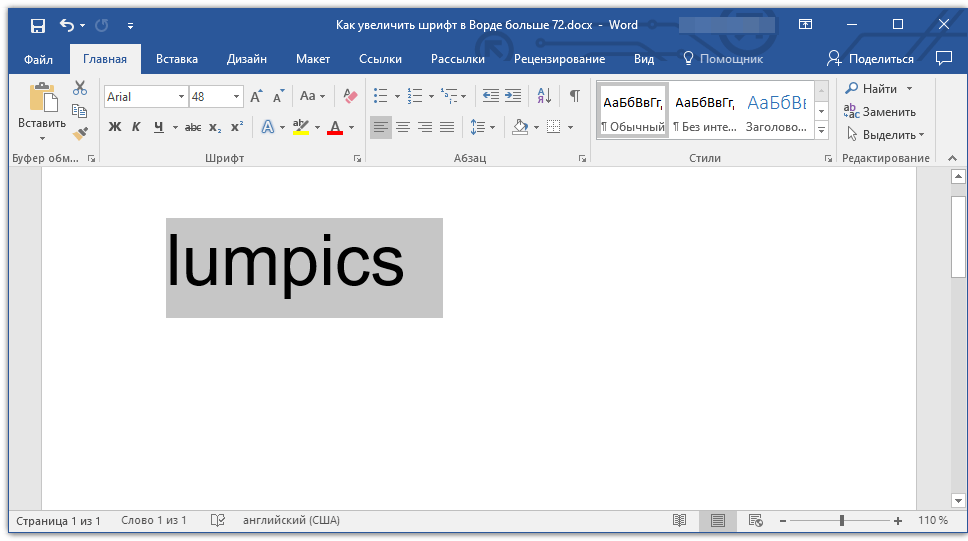
Точно таким же образом вы можете изменить размер шрифта и в меньшую сторону, то есть, меньше стандартных 8. Кроме того, аналогично можно задавать и произвольные значения, отличные от стандартных шагов.

Пошаговое изменение размера шрифта
Далеко не всегда можно понять сразу, какой именно размер шрифта нужен. Если и вы этого не знаете, можете попробовать изменять размер шрифта по шагам.
1. Выделите фрагмент текста, размер которого требуется изменить.
2. В группе инструментов «Шрифт» (вкладка «Главная») нажмите кнопку с большой буквой А (справа от окна с размером) для увеличения размера или кнопку с меньшей буквой А для его уменьшения.

3. Размер шрифта будет изменяться с каждым нажатием на кнопку.
Примечание: Использование кнопок для пошагового изменения размера шрифта позволяет увеличивать или уменьшать шрифт только по стандартным значениям (шагам), но не по порядку. И все же, таким образом можно сделать размер больше стандартных 72 или меньше 8 единиц.
Узнать больше о том, что еще можно делать со шрифтами в Ворде и как их изменять, вы можете узнать из нашей статьи.
Урок: Как в Word изменить шрифт
Как видите, увеличить или уменьшить шрифт в Ворде свыше или ниже стандартных значений довольно просто. Желаем вам успехов в дальнейшем освоении всех тонкостей этой программы.
Еще статьи по данной теме:
Помогла ли Вам статья?
Change the size of selected text
- Select the text or cells with text you want to change. To select all text in a Word document, press Ctrl + A.
- On the Home tab, click the font size in the Font Size box. You can also type in any size you want, within the following limits:
let’s discuss this in detail below!
When working in Microsoft Word, your highest priorities should include the look and feel of your document. It’s possible that you just typed up an excellent essay or made an awesome business report. However, if you don’t format your documents correctly, people might have a hard time reading your files. This can cause dissatisfied teachers, clients or employers.
If you want to avoid making this mistake, you need to learn how to format your Word documents correctly. The very first step is learning how you can modify the size of your text, as well as the font you’re using. Follow our step-by-step guide to make your documents more readable, eye-catching and memorable.
Things you’ll need
- A device with Microsoft Word installed and activated.
How to change Text Size and Font in Word
Let’s start learning!
- Launch Word, then either open an existing document or create a new one from the welcome screen, then type in your text.
- If you only want to change the size and font of a portion of your text, you need to select it. Hold down the left mouse key and make your selection. Now, only the selected text will be affected by the font and size change. If you want to change your entire document, you need to select everything by pressing the Ctrl + A keys on your keyboard.

- To change your text to a different font or size, you need to be on the Home tab in the Ribbon.

- In the Font section, you’ll see two drop-down menus. The one on the left shows the name of the current font you’re using. The default font in Word is either Calibri or Times New Roman, you’re most likely seeing one of the two.

- The other drop-down menu shows the current size of your text. By default, Word sets the size to either 11 or 12 points.
- To change the font you’re using, open the first drop-down menu. This will display every font installed on your computer. When you hover over a font, you’ll see a preview of how it’ll look like in your document. Simply click on the font you want to use to select it.

- Similarly, you can click on the second drop-down menu with the numbers to change the text size. Hovering over a number will preview how your text will look like, and clicking on it finalizes the change.


How to Change the default text size and font in Word
You can also change the default text size and font in Word. This means that each time you start a new document, Word will automatically use the font and text size you define.
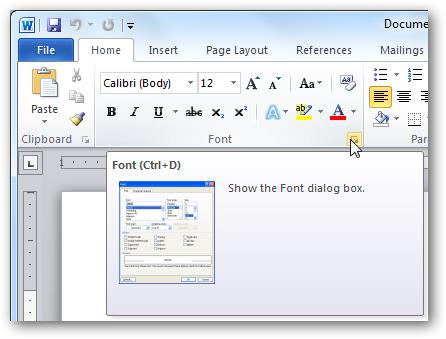
- Click on the arrow in the bottom-right corner of the Font section (again, found in the Home tab).

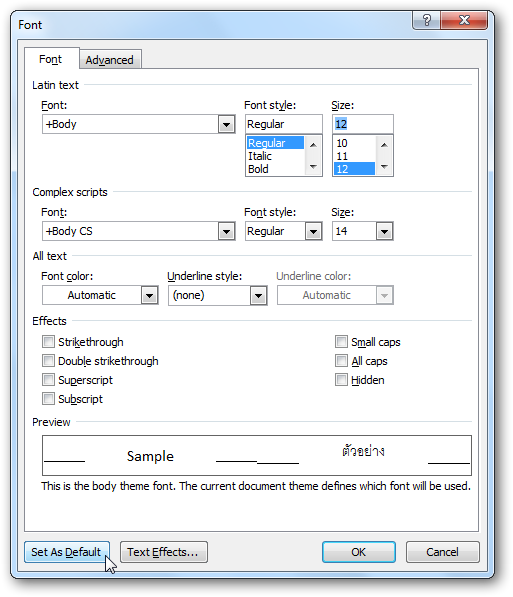
- A new window will appear. Here, you can select a font, modify the size of it and even apply font styles and effects. However, if you’re settings a default font, we recommend sticking to the Regular style without any effects.

- After you customized the font you want to use, click on the Set As Default button in the bottom-left corner of the window.

- Another window will come up. Here, select if you want to make your settings the default font in the currently open document only (first option), or make it the default font for all documents (second option).
- Press the OK button.


We hope that this article was able to help you learn how you can change the size and font of your text in Microsoft Word. Do you know someone who’s starting out with Word and other Microsoft Office products? Don’t forget to share this article with them! Your friends, classmates, colleagues or employees can all get help in getting started with Word. If you want to learn more about Word or other Microsoft Office suite applications, feel free to browse our section of guides.
If you’re looking for a software company you can trust for its integrity and honest business practices, look no further than SoftwareKeep. We are a Microsoft Certified Partner and a BBB Accredited Business that cares about bringing our customers a reliable, satisfying experience on the software products they need. We will be with you before, during, and after all the sales.
Learn Microsoft Word from articles in our Help Center
Here are some more content to help you learn Microsoft Word:
» How To Change Your Apple ID Password on Any Device
» 7 Microsoft Word Hacks You Need to Know in 2022
» MS Word Features: 20 Secret Functions Revealed
» How to Create a Hanging Indent in Microsoft Word
» How to make columns in Microsoft Word
» How to Fix the Spell Check Not Working in Word
» How to Install Fonts to Word on Mac
» How to Unfreeze Word on Mac Without Losing Work
» Top 14 Microsoft Word Tips and Tricks for Productivity
Final Thoughts
This guide has been about Microsoft Word. We hope you’ve learned how to use Microsoft Word and more tricks.
We’re glad you read the article up to here  Thank you
As we’ve shared above, there are more articles you can read about Microsoft Word and Microsoft Office in our Help Center and Blog.
Please share this article on your socials or with your friends. Someone else may benefit from it too.
One more thing …
Subscribe to our newsletter and be among the first to receive these documents in your inbox. We also share deals, promotions, and more through email. Don’t be left out.
Select the text or cells with text you want to change. To select all text in a Word document, press Ctrl + A. On the Home tab, click the font size in the Font Size box.
Contents
- 1 How do I increase the height of my font?
- 2 How do I stretch font height in Word?
- 3 How do you change the width and height of a text box in Word?
- 4 How do you change height in Word?
- 5 How do I change the Font size in Windows 10?
- 6 How do I stretch text to fill a text box?
- 7 What is font stretch?
- 8 How do you add 6 spaces in Word?
- 9 Can you change the size of the text box?
- 10 How do I increase the height of a textbox in Windows form?
- 11 How do I center text vertically in Word?
- 12 Why can’t I adjust cell height in Word?
- 13 When we increase the font size the Row height is automatically adjusted?
- 14 How do I make the text on my screen bigger?
- 15 What is the shortcut for increasing font size?
- 16 How do I make my computer screen bigger using the keyboard?
- 17 How do I automatically expand a text box in Word?
- 18 Can I use font-stretch?
- 19 Why font-stretch is not working?
- 20 What is font size adjust?
How do I increase the height of my font?
Changing the Height of a Font
- Select the text you want to affect.
- Enlarge the font size to 15 points. (12 times 1.25 is 15.)
- Display the Character Spacing tab of the Font dialog box. (See Figure 1.)
- Using the Scale control, specify a scaling of 80%. (100 divided by 1.25 is 80.)
How do I stretch font height in Word?
You can scale text by stretching it or by compressing it.
- Select the text that you want to stretch or compress.
- On the Home tab, click the Font Dialog Box Launcher, and then click the Advanced tab. Note: If you’re using Word 2007 the tab is called Character Spacing.
- In the Scale box, enter the percentage that you want.
How do you change the width and height of a text box in Word?
To resize a shape, text box, or WordArt, under Drawing Tools, on the Format tab, in the Size group, enter the measurements that you want into the Height and Width boxes.
How do you change height in Word?
To fit the table to the text, click [AutoFit] > select “AutoFit Window.” To keep Word from automatically adjusting your column size, click [AutoFit] > select “Fixed Column Width.” To adjust the row height, click the up and down arrows within the “Height” field.
How do I change the Font size in Windows 10?
To change your display in Windows 10, select Start > Settings > Ease of Access > Display.To make only the text on your screen larger, adjust the slider under Make text bigger. To make everything larger, including images and apps, choose an option from the drop-down menu under Make everything bigger.
How do I stretch text to fill a text box?
Click anywhere in the text. On the Text Box Tools Format tab, in the Text group, click Text Fit, and do one of the following: To reduce the point size of text until there is no text in overflow, click Shrink Text On Overflow. To shrink or expand text to fit in the text box when you resize the box, click Best Fit.
What is font stretch?
Definition and Usage. The font-stretch property allows you to make text narrower (condensed) or wider (expanded). Note: Some fonts provide additional faces; condensed faces and expanded faces. For these fonts, you can use the font-stretch property to select a normal, condensed, or expanded font face.
How do you add 6 spaces in Word?
Select the paragraphs you want to change. Go to Home > Line and Paragraph Spacing. Choose the number of line spaces you want or select Line Spacing Options, and then select the options you want under Spacing.
Can you change the size of the text box?
Resize a text box
Select the text box. Select one of the handles and drag until the text box is the size you want.
How do I increase the height of a textbox in Windows form?
There are two ways to do this : Set the textbox’s “multiline” property to true, in this case you don’t want to do it so; Set a bigger font size to the textbox.
- Set the textboxes to multiline.
- Change the height.
- Change the font size. (so it fit into the big textboxes)
- Set the textboxes back to non-multiline.
How do I center text vertically in Word?
1 Select the text you want to center between the top and bottom margins. 2 On the Page Layout tab, click the Page Setup Dialog Box Launcher. 3 Select the Layout tab. 4 In the Vertical alignment box, click Center 5 In the Apply to box, click Selected text, and then click OK.
Why can’t I adjust cell height in Word?
From the Table menu, select “Table Properties.” Click on the Table tab, then the Options button. Uncheck “Automatically resize to fit contents.” Click “OK.” Now click on the “Row” tab in Table Properties. Make sure that “Specify Height” is checked and the size in the middle box is the height you want your rows to be.
When we increase the font size the Row height is automatically adjusted?
yes, it is true that when you increase the font size,the row height is automatically adjusted.
How do I make the text on my screen bigger?
Make text bigger on your screen
- To go to the Ease of Access settings on your computer, press the Windows key+U.
- Under Make text bigger on the Display tab, drag the slider to the right to increase the size of the sample text.
- Once you’re happy with the text size, select Apply. Windows scales up the size of all text.
What is the shortcut for increasing font size?
Keyboard shortcut
Hold down the Ctrl and press the + to increase the font size or – to decrease the font size. Pressing either of these keys while continuing to hold down the control key continues to increase or decrease the font until it reaches its maximum.
How do I make my computer screen bigger using the keyboard?
You can use your keyboard to zoom in or out. This method works in many applications and web browsers. Click anywhere on the Windows desktop or open the webpage you want to view. Press and hold the CTRL key, and then press either the + (Plus sign) or – (Minus sign) to make objects on the screen larger or smaller.
How do I automatically expand a text box in Word?
Follow these general steps.
- Place the text box in your document.
- Adjust the width of your text box to reflect what you need.
- Right-click the text box and choose Format Text Box from the resulting Context menu.
- Make sure the Text Box tab is displayed.
- Make sure the Resize AutoShape to Fit Text check box is selected.
Can I use font-stretch?
You can use font-stretch to select a condensed or expanded face from such fonts. If the font you are using does not offer condensed or expanded faces, this property has no effect.
Why font-stretch is not working?
According to this, here is why : In order to use font-stretch and see a result of some kind, the font being used has to have a face that matches the value given. In other words, font-stretch will not work on just any font, but only on fonts that are designed with different faces matching the defined sizes.
What is font size adjust?
The font-size-adjust CSS property sets the size of lower-case letters relative to the current font size (which defines the size of upper-case letters).
 Please Note:
This article is written for users of the following Microsoft Word versions: 2007, 2010, 2013, and 2016. If you are using an earlier version (Word 2003 or earlier), this tip may not work for you. For a version of this tip written specifically for earlier versions of Word, click here: Adjusting the Width of Characters.
![]()
Written by Allen Wyatt (last updated May 7, 2016)
This tip applies to Word 2007, 2010, 2013, and 2016
Word provides a way you can adjust the horizontal size of characters in your document. Actually, the scaling can be applied to any characters in a selection. To format characters in this way, follow these steps:
- Select the characters you want to scale.
- Press Ctrl+D to display the Font dialog box.
- Make sure the Character Spacing tab (Word 2007) or the Advanced tab (Word 2010, Word 2013, and Word 2016) is selected. (See Figure 1.)
- Use the Scale drop-down list to specify the scaling you want applied to the characters. You can select from a pre-defined scale, or enter any value between 1% and 600%.
- Click on OK.
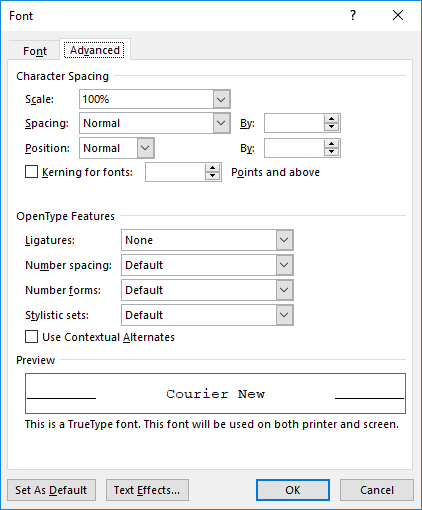
Figure 1. The Advanced tab of the Font dialog box.
If you find you have a need to scale quite a few selections in your documents, you can add a scaling tool to the Quick Access Toolbar by following these steps:
- Display the Word Options dialog box. (In Word 2007 click the Office button and then click Word Options. In Word 2010 and later versions display the File tab of the ribbon and then click Options.)
- At the left side of the dialog box, click the Customize option (Word 2007) or Quick Access Toolbar option (Word 2010, Word 2013, or Word 2016).
- Using the Choose Commands From drop-down list, choose All Commands.
- Scroll through the list of commands until you find the Character Scaling command.
- Select the command by clicking it once.
- Click the Add button. The command now appears at the right side of the dialog box.
- Click the OK button. The command now appears on the Quick Access Toolbar.
With the Character Scaling tool in place, you can easily change the scaling of any selected text at any time.
WordTips is your source for cost-effective Microsoft Word training.
(Microsoft Word is the most popular word processing software in the world.)
This tip (6009) applies to Microsoft Word 2007, 2010, 2013, and 2016. You can find a version of this tip for the older menu interface of Word here: Adjusting the Width of Characters.
Author Bio
With more than 50 non-fiction books and numerous magazine articles to his credit, Allen Wyatt is an internationally recognized author. He is president of Sharon Parq Associates, a computer and publishing services company. Learn more about Allen…
MORE FROM ALLEN
Saving in Two Locations
When you save a workbook to disk, you may want to automatically save a duplicate workbook in a separate location. This …
Discover More
Using RD Fields with Chapter Headings
The RD field can be handy for pulling together a bunch of documents into a single file. However, using the field can play …
Discover More
Wrapping Text in Merged Cells
When you are formatting your worksheet, Excel lets you easily merge adjacent cells together. If you want to wrap the text …
Discover More
More WordTips (ribbon)
Copying Character Formatting
If you are applying character formatting directly to text rather than using a character style you can copy it from one …
Discover More
Adjusting Small Caps Text
If you use small caps text in a document, you know that there are several steps involved in properly formatting the text. …
Discover More
Protecting Hidden Text
Formatting some of your text as hidden can be a great help when you need to keep some things from being viewed or …
Discover More
Вас раздражает необходимость каждый раз изменять размер шрифта при создании документа в Word? Хотите узнать способ, как покончить с этим раз и навсегда и установить Ваш любимый размер шрифта по умолчанию для всех документов?!
Корпорация Microsoft установила в Word 2007 шрифт Calibri размером 11 после того, как долгие годы в этой роли был Times New Roman размером 12. Хоть к этому и легко привыкнуть, тем не менее в Microsoft Word можно изменить практически все настройки, заданные по умолчанию. Например, Вы можете использовать шрифт Calibri размером 12 или Comic Sans размером 48 – как Вам угодно! Далее Вы узнаете, как изменить настройки шрифта, заданные по умолчанию, в Microsoft Word 2007 и 2010.
Содержание
- Как изменить настройки шрифта в Microsoft Word
- Редактирование файла шаблона
- Заключение
Как изменить настройки шрифта в Microsoft Word
Чтобы изменить настройки шрифта, установленные по умолчанию, щелкните по маленькой иконке со стрелкой в правом нижнем углу раздела Font (Шрифт) на вкладке Home (Главная).
В диалоговом окне Font (Шрифт) установите желаемые параметры для шрифта. Обратите внимание на строку +Body (+Основной текст) в поле Font (Шрифт), она говорит о том, что сам шрифт будет определен стилем документа, который Вы выберете, а настраиваются только стиль и размер шрифта. То есть, если в настройках стиля документа использован шрифт Calibri, значит шрифт по умолчанию будет использован Calibri, а размер и стиль шрифта будут те, что Вы выберете. Если же Вы хотите установить по умолчанию какой-то определённый шрифт, просто выберите его в выпадающем списке, и этот выбор будет иметь преимущество перед тем шрифтом, который выбран в настройках стиля документа.
Здесь мы оставим все настройки без изменений, только установим размер символов шрифта равным 12 (это размер текста для тела документа). Те, кто использует азиатские языки, такие как китайский, могут увидеть поле настроек для азиатских языков. Когда параметры выбраны, нажмите кнопку Set as Default (По умолчанию) в нижнем левом углу диалогового окна.
Вас попросят подтвердить, действительно ли Вы хотите установить эти настройки по умолчанию. В Word 2010 Вам будет предложено на выбор два варианта – изменить настройки по умолчанию только для этого документа или для всех документов. Отметьте вариант All documents based on the Normal.dotm template (всех документов, основанных на шаблоне Normal.dotm) и нажмите ОК.
В Word 2007 просто нажмите ОК, чтобы сохранить изменения в настройках по умолчанию.
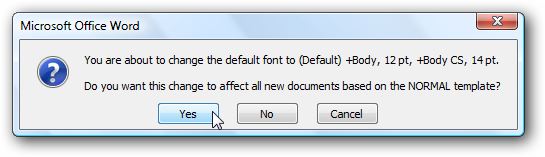
С этого момента каждый раз при запуске Word или при создании нового документа, Ваш шрифт, заданный по умолчанию, будет именно таким, как Вы указали. Если решите вновь изменить настройки, просто повторите все шаги заново.
Редактирование файла шаблона
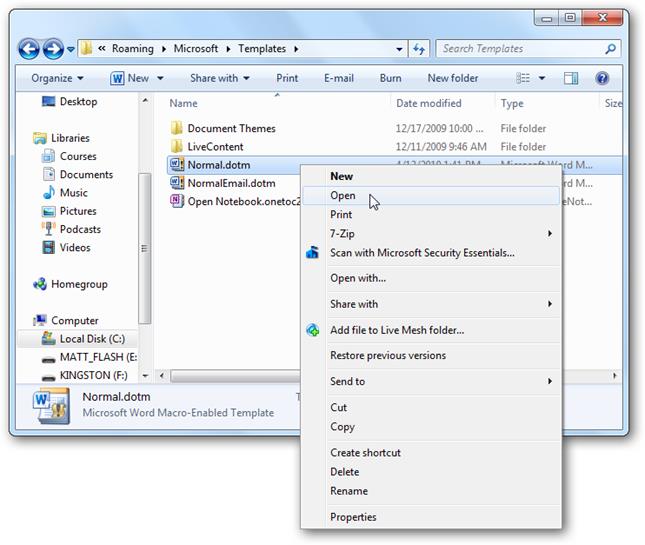
Другой способ изменить настройки шрифта, заданные по умолчанию, это изменить файл Normal.dotm. Из этого файла Word создает новые документы. Обычно он просто копирует форматирование из этого файла во вновь созданный документ.
Чтобы изменить файл Normal.dotm, введите вот такое выражение в адресной строке проводника или в командной строке:
%appdata%MicrosoftTemplates
%appdata%MicrosoftШаблоны
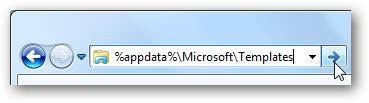
Эта команда откроет папку с шаблонами Microsoft Office. Нажмите правой кнопкой мыши на файле Normal.dotm и из контекстного меню выберите Open (Открыть), чтобы открыть файл для редактирования.
Не пытайтесь открыть файл двойным щелчком левой кнопки мыши – это приведёт всего лишь к созданию нового документа из шаблона Normal.dotm, а все изменения, которые Вы сделаете, не сохранятся в файле шаблона.
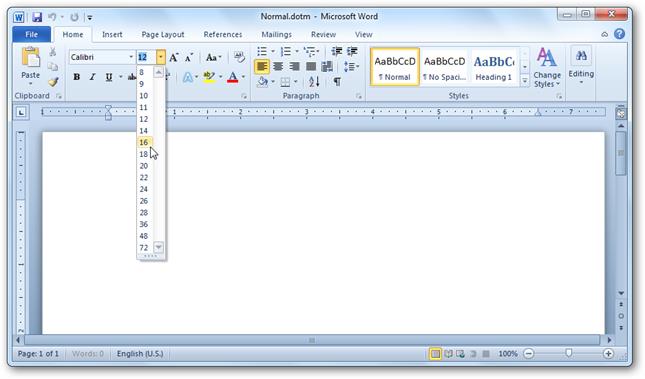
Теперь изменяйте любые настройки шрифта, как Вы это делаете обычно.
Запомните: Всё, что Вы измените или введёте в этом документе, будет появляться в каждом новом документе Word, который Вы создадите.
Если Вы вдруг захотите сбросить все настройки до начальных, просто удалите файл Normal.dotm. Word создаст его заново со стандартными настройками сразу же при очередном запуске программы.
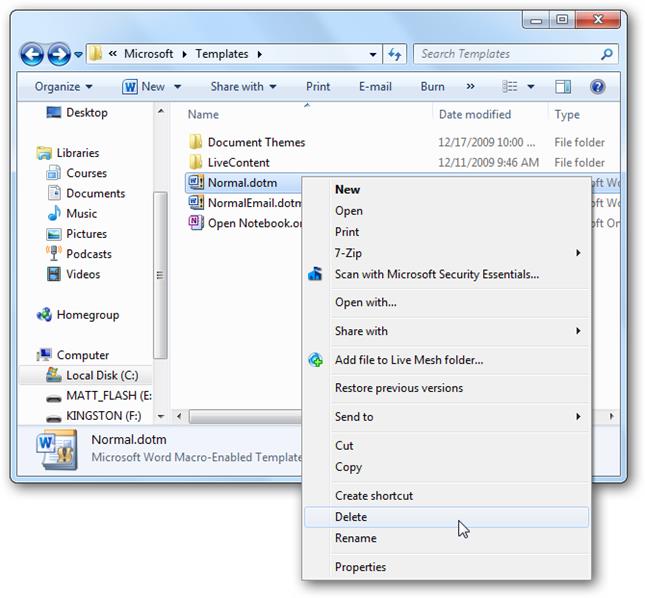
Пожалуйста, помните: Изменение размера шрифта, заданного по умолчанию, не затронет размер шрифта в уже существующих документах. В них по-прежнему будут использованы настройки, заданные при создании этих документов. Кроме того, на шаблон Normal.dotm могут влиять некоторые надстройки. Если Вам кажется, что Word не запоминает настройки шрифта, попробуйте отключить надстройки и посмотрите на результат.
Заключение
Иногда мелочи могут раздражать очень сильно. Возможность настроить шрифт по умолчанию так, как Вам это нужно, отлично помогает избавиться от раздражения и сделать работу более продуктивной.
А теперь ответьте на вопрос: Какой шрифт, заданный по умолчанию, Вы предпочитаете – Calibri размер 11, Times New Roman размер 12 или какую-то другую комбинацию? Ответы пишите в комментариях, дайте миру знать, что Вам нравится!
Оцените качество статьи. Нам важно ваше мнение:
Select the text that you want to change. On the Home tab, click the Font Dialog Box Launcher, and then click the Advanced tab. Note: If you’re using Word 2007 the tab is called Character Spacing. In the Spacing box, click Expanded or Condensed, and then specify how much space you want in the By box.
Just so, How do I make my font bolder?
Select the text that you want to make bold, and do one of the following:
- Move your pointer to the Mini toolbar above your selection and click Bold. .
- Click Bold. in the Font group on the Home tab.
- Type the keyboard shortcut: CTRL+B.
Besides, What is a narrow font? A condensed or a narrow font is a typeface that features characters with narrow widths but it also refers to fonts with taller character designs as well. Condensed fonts also have much narrower space between characters than a regular font.
What is font width? Typographers measure the cap height of a font in units called points. A point is 1/72nd of an inch. There are twelve points in a pica, and six picas equal one inch. The width of each character is called the set width.
Subsequently, How do you use full width in Word? To fit the table to the text, click [AutoFit] > select “AutoFit Window.” To keep Word from automatically adjusting your column size, click [AutoFit] > select “Fixed Column Width.” To adjust the row height, click the up and down arrows within the “Height” field.
What is faux bold?
A faux bold (top) slightly stretches the vertical strokes of the original font. This creates odd shapes, like the pointy top of the letter “e.” A true bold (bottom) is more consistent between horizontal and vertical strokes.
How do I make font bold in design space?
The basic text tools in Cricut Design Space and Silhouette Studio will be familiar to you. You can change the font, the size, and style of your text the same way you can in most word processors. The easiest way to make a font thicker is to use the bold setting under the style menu.
Can you make a font thicker in design space?
Changing the Size
You can easily change the size of your text by using the drag and drop arrow in the corner of your text box, or by using the size panel at the top of your workspace. You can also select an actual font size in the same menu.
What is the thinnest font?
Thin fonts examples
- OPEN SANS CONDENSED.
- Roboto Font Family.
- EXO.
- Diner- Font Family.
- Aaargh.
- Aspergit Font Family.
- DISCO.
- Caledo Font Family.
Which font is best for small size?
Premium Small Fonts at Envato Elements (Unlimited Downloads)
- HAMLIN. One of the most readable small fonts, HAMLIN is a modern sans serif typeface dedicated to simplicity. …
- Fibon Sans. …
- Metrisch. …
- SIGNAL. …
- Oliver Sans Font. …
- Hurst Sans Serif Font Family Pack. …
- Albori Sans-Serif. …
- Catesque.
Which fonts are tall and narrow?
tall and thin fonts
- Neumatic Compressedby Arkitype. Style: Semi Bold. …
- Pen And Inkby Mini Press. Style: Regular. …
- Neumatic Gothic Roundby Arkitype. Style: Regular. …
- Kutilangby Allouse Studio. Style: Regular. …
- Six Feet Overby Brad Mead. …
- Exorts Compressedby Seventh Imperium. …
- Tall Talesby Comicraft. …
- Porcelainby Up Up Creative.
How do I size my font?
To make your font size smaller or larger:
- Open your device’s Settings app.
- Select Accessibility. Text and display.
- Select Font size.
- Use the slider to choose your font size.
How do I work out my font size?
Point size measures from the height of the highest ascender (peak) to the baseline of the lowercase x. It then measures from the lowest descender (valley) of the font to the top of the lowercase x.
What is 7 point text size?
Comparison table
| Point | Metric size | American system |
|---|---|---|
| American | ||
| 6 | ≈ 2.117 mm | Nonpareil |
| 6+1/2 | ≈ 2.293 mm | Minionette |
| 7 |
≈ 2.469 mm |
Minion |
How do I make text fit the page?
Shrink Text in Word on the Web
- Open your document in Word on the web and select all of the text. You can use the keyboard shortcut Ctrl + A on Windows or Command + A on Mac.
- Go to the Home tab and click the Shrink Text Size button.
- You can click the button as many times as you need to shrink the text to fit one page.
How do I fit text to page?
Press Ctrl+A to select all the text in your document. Click Home > Shrink Font one or more times. As you click Shrink Font, Word decreases the size of every font in your document.
How do I reduce page width in Word?
Page size
- Select the Page Layout tab, then click the Size command. Clicking the Size command.
- A drop-down menu will appear. The current page size is highlighted. Click the desired predefined page size. Changing the page size.
- The page size of the document will be changed.
Is italic a weight?
In CSS, the default font-weight property has a value of 400 (regular). A bold font-weight has the same style as a regular font, with thicker letters. An italic font is a left-to-right slanted version of your typeface’s regular font. a bold italic is both slanted & thicker version of your typeface.
How do I make my font italic?
1.
Transform > Shear
- Step 1: Use the type tool to add text to the artboard.
- Step 2: Select the text, go to the top menu, and select Object > Transform > Shear.
- Step 1: Select the text and find a font that has a small arrow next to it and a number next to the font name. …
- Step 2: Click on Italic and that’s it.
What is faux italic?
A faux italic is what happens in some text editors when you hit that little ‘i’ button. You may also see a faux italic on websites that are using fancy web fonts without an italic version.
- Reference 1
- Reference 2
- Reference 3
- Reference 4
- Reference 5
Содержание
- 0.1 Изменение размера шрифта на нестандартные значения
- 0.2 Пошаговое изменение размера шрифта
- 0.3 Помогла ли вам эта статья?
- 1 Способ первый
- 2 Способ второй
- 3 Способ третий
- 4 Видео в помощь
- 5 Инструкция
- 6 Видео: Как выровнять текст в Ворде. Как сделать поля в Word

Те, кто хотя бы пару раз в своей жизни пользовался текстовым процессором MS Word, наверняка знают о том, где в этой программе можно изменить размер шрифта. Это небольшое окошко во вкладке «Главная», расположенное в группе инструментов «Шрифт». В выпадающем списке этого окошка представлен перечень стандартных значений от меньшего к большему — выбирайте любой.
Проблема в том, что далеко не все пользователи знают, как увеличить шрифт в Ворде больше 72 единиц, указанных по умолчанию, или как сделать его меньше стандартных 8, или же как можно задать любое произвольное значение. На самом деле сделать это довольно просто, о чем мы и расскажем ниже.
Изменение размера шрифта на нестандартные значения
1. Выделите текст, размер которого вы хотите сделать больше стандартных 72 единиц, с помощью мышки.

Примечание: Если вы только планируете ввести текст, просто кликните в том месте, где он должен находиться.
2. На панели быстрого доступа во вкладке «Главная» в группе инструментов «Шрифт», в окошке, расположенном рядом с названием шрифта, где указано его числовое значение, кликните мышкой.

3. Выделите заданное значение и удалите его, нажав «BackSpace» или «Delete».

4. Введите необходимое значение размера шрифта и нажмите «ENTER», не забывая о том, что текст все же должен как-то уместиться на странице.
Урок: Как изменить формат страницы в Word
5. Размер шрифта будет изменен согласно заданным вами значениям.

Точно таким же образом вы можете изменить размер шрифта и в меньшую сторону, то есть, меньше стандартных 8. Кроме того, аналогично можно задавать и произвольные значения, отличные от стандартных шагов.
Пошаговое изменение размера шрифта
Далеко не всегда можно понять сразу, какой именно размер шрифта нужен. Если и вы этого не знаете, можете попробовать изменять размер шрифта по шагам.
1. Выделите фрагмент текста, размер которого требуется изменить.

2. В группе инструментов «Шрифт» (вкладка «Главная») нажмите кнопку с большой буквой А (справа от окна с размером) для увеличения размера или кнопку с меньшей буквой А для его уменьшения.

3. Размер шрифта будет изменяться с каждым нажатием на кнопку.

Примечание: Использование кнопок для пошагового изменения размера шрифта позволяет увеличивать или уменьшать шрифт только по стандартным значениям (шагам), но не по порядку. И все же, таким образом можно сделать размер больше стандартных 72 или меньше 8 единиц.
Узнать больше о том, что еще можно делать со шрифтами в Ворде и как их изменять, вы можете узнать из нашей статьи.
Урок: Как в Word изменить шрифт
Как видите, увеличить или уменьшить шрифт в Ворде свыше или ниже стандартных значений довольно просто. Желаем вам успехов в дальнейшем освоении всех тонкостей этой программы.
Мы рады, что смогли помочь Вам в решении проблемы.
Задайте свой вопрос в комментариях, подробно расписав суть проблемы. Наши специалисты постараются ответить максимально быстро.
Помогла ли вам эта статья?
Да Нет
Как и в любой другой программе, в текстовом редакторе Word во время рабочего процесса легко можно ошибиться. Думаю, не ошибусь, если скажу, что самая распространенная ошибка пользователей заключается в том, что они забывают включить или, наоборот, выключить волшебную кнопочку .
Например, бывает так, что вы печатаете текст, а потом оказывается, что он должен быть выполнен исключительно большими буквами. Не перепечатывать же все заново! Разумеется, нет, предусмотрительные разработчики позаботились о том, чтобы вы могли выполнить это действие в считанные минуты! Итак, поговорим о том, как сделать большие буквы в ворде.
Способ первый
Знакомясь с возможностями Word, вы наверняка обращали внимание на то, что практически все действия в нем можно выполнить несколькими способами. И это очень удобно, ведь все люди разные, и то, что один привык делать по-своему, другому может вовсе не подойти. Сделать все буквы текста большими можно также несколькими способами, с которыми я вас и познакомлю.
Начнем с первого способа, на мой взгляд, самого простого и доступного для восприятия:
- На клавиатуре зажмите комбинацию клавиш Ctrl+A, после чего весь текст документа выделится.
- После этого нажмите Shift+F3, и все слова, которые были выделены, станут большими. Очень просто, не так ли?
Способ второй
Если вы не ищете легких путей, предлагаю воспользоваться другим способом, суть которого вот в чем: выделите весь текст комбинацией Ctrl+A. Теперь кликните правой кнопкой мыши по любой выделенной области, и в выпавшем меню выберите строчку «Шрифт». Далее откроется окошко, и в блоке «Видоизменение» необходимо поставить галочку напротив пункта «Все прописные». После того, как вы нажмете «ОК», все маленькие буквы превратятся в большие. В этом же окне вы сможете установит шрифт для все документа.

Кстати, если у вас еще нет текста, но вы хотите напечатать его, используя исключительно большие буквы, просто перед началом процесса включите кнопку . Напечатав нужный материал, снова нажмите на нее, чтобы она отключилась.
Способ третий
И, наконец, еще один простенький способ, который поможет сделать буквы в Word большими. Опять-таки, выделите текст в своем документе так, как это было предложено сделать выше. Теперь откройте вкладку «Главная», категорию «Шрифт». В нижней правой части есть маленькая кнопка с надписью «Аа». После клика на нее, выпадет небольшая менюшка, выберите из перечисленных пунктов «Все прописные». Теперь, как по заказу, весь ваш текст написан большими буквами.

Выбирайте любой из перечисленных способов, и смело экспериментируйте!
Видео в помощь
Текстовый редактор Word обладает различными инструментами для работы с текстом. О многих возможностях редактора простые пользователи даже не догадываются. При работе с определенными документами у пользователей может возникнуть необходимость растянуть текст по горизонтали или вертикали, данное действие выполнить достаточно просто, для этого понадобится:
— Компьютер;
— Текстовый редактор Word(Данная программа входит в пакет лицензионных офисных программ Microsoft Office 2016, который можно купить у нас недорого).
Инструкция
- Если вам нужно растянуть текст по всей ширине строки, то можно применить специальный инструмент «Выравнивание по ширине». Выделите фрагмент текста, который нужно растянуть по ширине листа, при необходимости выравнивания всего документа нажмите комбинацию клавиш Ctrl+A. Откройте в редакторе вкладку «Главная» и в группе опций «Абзац» нажмите на значок «Выровнять по ширине», также можно использовать комбинацию «горячих клавиш» Ctrl+J. В указанном тексте автоматически изменится ширина пробелов и текст равномерно будет распределен по всему листу. Количество строк и листов документа останется неизменным.
- Текст в документе можно растянуть по вертикали, для этого придется самостоятельно подобрать междустрочный интервал. Выделите весь текст или его фрагмент и перейдите на вкладку редактора «Главная». В разделе опций «Абзац» нажмите на выпадающий список «Интервал» и подберите подходящее значение междустрочного интервала. Если вас не устраивают предложенные варианты интервала, то его можно задать самостоятельно, для этого нажмите «Другие варианты междустрочных интервалов» и установите нужное значение. В конечном итоге число строк в документе останется неизменным, но будет увеличено его число страниц.
 Опция «Интервал»
 - Растянуть текст в документе Word можно, используя инструмент изменения пропорции букв, при этом высота символов останется прежней. Выделите нужный фрагмент текста и перейдите на вкладку «Главная», в правом нижнем углу раздела «Шрифт» имеется маленький маркер, нажмите на него. Будет загружено окно настроек шрифта, этот диалог можно вызвать «горячими клавишами» Ctrl+D.
- Откройте страницу настроек «Дополнительно» и в раскрывающемся списке «Масштаб» укажите нужное значение растягивания текста в процентах. Для растягивания текста можете использовать изменения в строке «Интервал» данного окна. В выпадающем списке соответствующего поля выберите «Разреженный» и установите в соседнем поле значение в пунктах. Предварительный результат изменения вы увидите в окне предварительного просмотра. Сохраните изменения нажатием на кнопку ОК.
 Опция «Интервал»
При работе с текстовыми документами в редакторе Word обычно используются шрифты небольшого размера. Поэтому, когда возникает необходимость сделать действительно большой шрифт, то большинство пользователей сталкивается с трудностями. Они просто не знают, как в Word сделать шрифт больше 72. Если вы также столкнулись с подобной задачей, то данный материал должен вам помочь.
Делаем большой шрифт с помощью выпадающего списка
Если вам нужно сделать большой шрифт в Word 2010, 2007, 2013 или 2016, то для этого проще всего воспользоваться выпадающим списком «Размер шрифта», который доступен на вкладке «Главная». Данный список находится в левой верхней части окна программы, рядом со списком доступных шрифтов. На скриншоте внизу показано, как это выглядит в текстовом редакторе Word 2010.

По умолчанию, в списке доступны размеры шрифта от 8 до 72. Если вам подходит один из стандартных размеров, то его можно просто выбрать из списка. Если же вам нужен шрифт с размером больше 72, то в этом тоже нет никакой проблемы. Просто выделяете мышкой текущее значение размера шрифта и вводите любое другое значение с помощью клавиатуры. Например, можно ввести число 100 и получить шрифт размеров в 100 пунктов.

Если вы используете Word 2003, то там все примерно также. На панели с инструментами есть выпадающее меню со списком размеров шрифта. В нем можно выбрать один из стандартных размеров либо можно ввести нужный размер шрифта с помощью клавиатуры.

Шрифты с размером больше 72 также отлично поддерживаются Word 2003.
Делаем большой шрифт с помощью кнопки «Увеличить размер шрифта»
Кроме этого в новых версиях Word (например, в Word 2007, 2010, 2013 и 2016) есть еще один инструмент для изменения размер шрифта. Это кнопки «Увеличить размер» и «Уменьшить размер», которые находятся справа от выпадающего списка с размерами шрифта.
Данные кнопки позволяют увеличить или уменьшить размер шрифта на один шаг согласно списку размеров. То есть, если у вас сейчас установлен 14 шрифт, то после нажатия на кнопку «Увеличить размер» вы получите 16 шрифт (следующее значение в списке размеров шрифта).

После 72 размера шрифта увеличение происходит на 10 пунктов (80, 90, 100, 110 и т.д.).
Делаем большой шрифт с помощью окна «Шрифт»
Также вы можете сделать большой шрифт с помощью окна «Шрифт», которое открывается с помощью комбинаций клавиш CTRL+D или CTRL-SHIFT-P. В данном окне сосредоточены все настройки, которые касаются шрифтов. Среди прочего здесь есть и размер шрифта.

Для того чтобы сделать шрифт с размером больше 72 нужно ввести свое значение в поле «Размер» и сохранить настройки с помощью кнопки «Ок».
Автор
Александр Степушин
Создатель сайта comp-security.net, автор более 2000 статей о ремонте компьютеров, работе с программами, настройке операционных систем.
Остались вопросы?
Задайте вопрос в комментариях под статьей или на странице
«Задать вопрос»
и вы обязательно получите ответ.