
One way you can change the style of a document is by adding a new text font. To add a font to Word, download and install the font in Windows, where it will become available to all Microsoft 365 applications.
Fonts come as files, and there are many sites on the Internet where you can download free fonts, such as DaFont. You can also import font files from a CD, a DVD, or your organization’s network. TrueType (file extension .ttf) and OpenType (.otf) fonts both work fine.
Note: Before you download a font, make sure that you trust the source.
Add a font
-
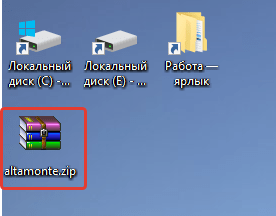
Download the font files. These often come compressed in .zip folders. In one .zip folder, you might find several variations on the same font, such as “light” and “heavy.” A .zip folder usually looks like this:

-
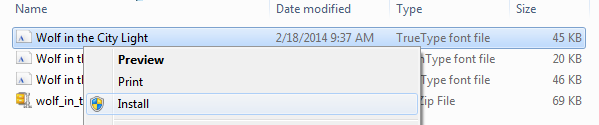
If the font files are zipped, unzip them by right-clicking the .zip folder and then clicking Extract. Now you’ll see the available TrueType and OpenType font files:
-
Right-click the fonts you want, and click Install.
-
If you’re prompted to allow the program to make changes to your computer, and if you trust the source of the font, click Yes.
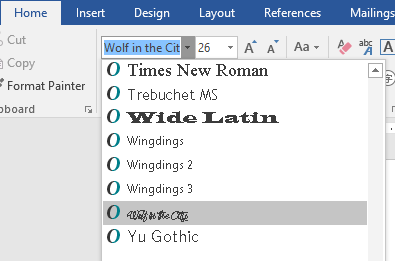
Your new fonts will appear in the fonts list in Word.


Here are two other ways to install and manage fonts:
-
All fonts are stored in the C:WindowsFonts folder. You can also add fonts by simply dragging font files from the extracted files folder into this folder. Windows will automatically install them. If you want to see what a font looks like, open the Fonts folder, right-click the font file, and then click Preview.
-
Another way to see your installed fonts is through Control Panel. In Windows 7 and Windows 10, go to Control Panel > Fonts. In Windows 8.1, go to Control Panel > Appearance and Personalization > Fonts.
The next time you start Word, you’ll see the fonts you added in the Font list.
Need more help?
Want more options?
Explore subscription benefits, browse training courses, learn how to secure your device, and more.
Communities help you ask and answer questions, give feedback, and hear from experts with rich knowledge.
-
1
Download the font from a trusted website. Fonts are a common way to transmit viruses, so take care to only download fonts from trusted sources, and avoid any fonts that come in EXE format. Fonts typically come packed into ZIP files, or in TTF or OTF format. A few of the more popular font sites include the following:
- dafont.com
- fontspace.com
- fontsquirrel.com
- 1001freefonts.com
-
2
Extract the font file if necessary. If your font downloads in a ZIP folder, double-click the folder, then click Extract at the top of the window, click Extract all, and click Extract at the bottom of the window.
- Skip this step if the font downloads in TTF or OTF format, not in a ZIP folder.
Advertisement
-
3
Double-click the font file. Doing so will open the font in a preview window.
-
4
Click Install. It’s at the top of the preview window.
-
5
Click Yes if prompted. Since installing a font requires administrator permissions, you may be prompted to confirm this step.
- If you aren’t on an administrator account, you can’t install a font.
-
6
Wait for the font to install. This will usually only take a few seconds. Once the font is installed on your computer, it will be accessible by any programs which use system fonts, including Microsoft Word.


Advertisement
-
1
Download a font. There are tons of sites that host font files that you can download for free (for home use). MacOS supports both OTF and TTF font formats, which are two of the most common font types. Some of the more popular font sites include the following:
- dafont.com
- fontspace.com
- fontsquirrel.com
- 1001freefonts.com
-
2
Extract the font file if necessary. Since most font files download in a ZIP folder, you’ll need to unzip the folder by double-clicking it and waiting for the extracted folder to open.
- Skip this step if your font downloads as a TTF or OTF file, not a ZIP folder.
-
3
Double-click the font file. Doing so will bring up a preview window.
-
4
Click Install Font. It’s at the top of the preview window. This will install your font for all text-based programs on your Mac, thus making it usable with Microsoft Word.[1]


Advertisement
-
1
Note the installed font’s name. Since fonts in Word are listed in alphabetical order, you’ll need to know the first few letters of your font in order to find it.
-
2
Open Microsoft Word. Its app icon resembles a white «W» on a dark-blue background.
- If Microsoft Word was already open, close it and then re-open it. Failing to do this may prevent your font from showing up until you restart Word.
-
3
Click Blank document. You’ll find this option in the upper-left side of the launch page. Doing so opens a new Word document.
-
4
Click the Home tab. It’s at the top of the Word window.
-
5
Open the «Font» drop-down menu. Click
to the right of the current font’s name in the toolbar. You should see a drop-down menu appear.
-
6
Find your new font. Scroll through the drop-down menu until you find your font’s name.
-
7
Test the font. Click the font’s name, then try typing using the font. You may need to adjust the size of the font in order for it to appear normal.


Advertisement
Add New Question
-
Question
What can I do if my fonts don’t appear in the dropdown?

Closing Microsoft Word and then opening it again will usually refresh the font list. If this doesn’t work, try re-installing the font.
-
Question
It says it does not appear to be a valid font and cannot install. What should I do?
Instead of copying onto the control panel, double click on the extracted font file. You will then see either an open type or a true type file, double click on this and a preview of the font will show up. On the top left area of the window, there will be a button saying install. Click that.
-
Question
How do I rename the font?
Never rename a font while it’s in the installed folder; it could get corrupted. Delete the font, and reinstall it. Before putting it into the fonts folder, right-click it, and select the option «Rename.» After naming it whatever you want, put it into the fonts folder normally.
See more answers
Ask a Question
200 characters left
Include your email address to get a message when this question is answered.
Submit
Advertisement
-
After a font is installed, it will be available in all Microsoft Office programs.
-
If you plan on sending your Word document to someone else, save it as a PDF to ensure that your custom font is retained. You can save as a PDF by clicking the «Save as type» (Windows) or «Format» (Mac) drop-down box on the «Save» window and then selecting PDF.
Thanks for submitting a tip for review!
Advertisement
-
Some symbols aren’t available in all fonts.
Advertisement
About This Article
Article SummaryX
1. Download the font.
2. Unzip the font if necessary.
3. Double-click the font.
4. Click Install or Install Font.
Did this summary help you?
Thanks to all authors for creating a page that has been read 1,721,498 times.
Is this article up to date?
Inject some personality into your words
What to Know
- Easiest option for Windows: Right-click the .ttf or .otf file and select Install.
- Next easiest: Go to Start > Control Panel > Fonts. In another window, drag the .ttf or .otf file into the font folder you just opened.
- For Word for Mac, double-click the font file to open a preview > Install Font.
This article explains how to install fonts in Windows, Word for macOS, Microsoft Word Online, Word for Android, and Word for iOS. Instructions in this article apply to all versions of Word going back to 2011 as well for Windows 10, 8, and 7, macOS, Android, and iOS.
How to Install a Font on Windows
Let’s learn how to install a font on Windows so we can then add it to Word. Installing a font on Windows is the same from Windows 10 all the way back to Windows 7. There are 2 ways to install.
Method 1
-
If you don’t see a .ttf or .otf file, you may have to extract it from a zip file.
-
Once you have a .ttf or .otf file, right-click the file and select Install.
-
You will briefly see an installation progress window as it installs.
Method 2
-
Select Start > Control Panel > Fonts to open your system’s font folder.
-
In another window, find the font you want to install. If you downloaded the font from a website, then the file is probably in your Downloads folder. The font file will likely have a .ttf or .otf extension.
-
Drag the desired font into your system’s font folder. You can drop it into any white space between the other font icons in the font control panel.
Font sets are often contained within .zip files, so you must extract them before dragging the actual font files into your system’s Fonts folder. For guidance on how to extract, or unzip, a .zip file, see Zip Files: Unzip Them With the Right Software. If a .zip file contains multiple variations of a font, you must install each one individually.
-
Once the font is in the correct folder, it should install automatically. If it doesn’t, double-click the font file to open the Font Previewer, and click the Install button in the upper-left corner. The next time you open Word, the new font should appear as an option in the font list.
How to Add Fonts to Word for Mac
Before you can use new Microsoft Word fonts on Mac, you must add them to the app for managing fonts on macOS, the Font Book:
-
Locate your font file and double-click it to open the font preview window. You may need to unzip the file first.
-
Click Install Font near the bottom of the font preview window, which should open the Font Book.
-
If you’re using the 2011 version of Office for Mac, then you must also drag and drop the font file into the Windows Office Compatible collection, which can be found in the left sidebar of the Font Book.
-
After restarting your Mac, the font should be available in Word and most other apps including PowerPoint and Excel.
Fonts will only display properly in Word if they are installed on the user’s device. Text formatted with unsupported fonts will usually appear in a default font such as Times New Roman. If you plan on sharing your Word files with others, you may need to embed some fonts. You can only embed fonts in the Windows versions of Word, and the specific font must allow embedding. Check the list of Microsoft fonts supported by each version of MS Office to determine which fonts you might need to embed.
How to Add Fonts to Word Online
If you’re using the Microsoft Word Online app as part of Microsoft 365, you can make use of any font installed on your system. Just type the name of the font file minus the extension into the Font Options box.
When you save the document, the font name will appear in the font options box and display properly for any user who has that font installed on their device. Unfortunately, Word Online doesn’t let you embed fonts.
If I Add Fonts in Word, Do They Transfer Over to Excel or PowerPoint?
Yes. Once you add a font to your operating system and ensure that it’s compatible with Word, then you should be able to use it in any MS Office application including Microsoft Excel and PowerPoint.
How to Add Fonts to Microsoft Word for Android
Unfortunately, adding fonts to the newest version of MS Word for Android is much more difficult than it used to be. Before you begin, you’ll need root access to your device. Lifewire has an in-depth guide explaining how to root any Android device.
Rooting your device could void the warranty and cause hardware malfunctions. Before you attempt rooting, back up your important data using an app like Helium.
-
With your rooted Android device, download FX File Explorer and install the root add-on.
-
Open FX File Explorer and locate your font file.
-
Select the font file by holding your finger on it for a few seconds, and then tap Copy in the upper right corner of the screen. If successful, you’ll see a new icon in the upper right corner that says «1 copied.»
Use the FX File Explorer app to locate your font and copy it.
-
Now, close out FX File Explorer, locate the MS Word app and hold your finger on the file icon to make a menu pop up. If your device has been rooted, you should see an Explore data option in addition to Open and Uninstall.
-
Tap Explore data and find the font directory by navigating to Files > Data > Fonts.
-
Paste the font file inside the font directory by tapping the «1 copied» icon in the upper right of your screen and selecting Paste from the menu that appears.
-
The font will now appear as an option in MS Word.
How to Add Fonts to Microsoft Word for iOS
To add a font to an iPhone or iPad, you’ll need a font installer app such as AnyFont, which you can download from the App Store.
-
Move the desired font file into your iCloud.
-
From iCloud, tap the font file, and then tap Share > More (ellipsis) in the upper right corner of your screen.
-
From the Apps menu, tap AnyFont.
-
Once AnyFont opens, you should see your font file. Tap > next to the font on the right side.
-
Tap Install on the next screen that appears.
-
Tap Allow if prompted to allow a configuration profile download.
-
Go to Settings > General > Profiles,
-
Under Downloaded Profile, select the font.
-
Select Install on the top right corner.
-
Select Next.
-
Select Install on the Unsigned Profile window.
-
When asked for confirmation, select Install.
-
Select Done.
-
Open Word and select font under iOS Fonts.
Download Fonts for Microsoft Word
You can install any font file on any OS. You can find fonts online at Creative Market, Dafont, FontSpace, MyFonts, FontShop, and Awwwards. Some fonts are free while others must be purchased. When you download a font, it typically goes to your system’s Downloads folder unless you specify otherwise.
FAQ
-
How do I embed my Word fonts into a PDF?
On a Mac, select File > Print > PDF > Save as PDF > Save to convert the document to a PDF and embed all fonts. Windows machines should also automatically embed fonts when you convert a Word document to a PDF. To check, open the PDF in Acrobat Reader then select File > Properties > Fonts tab and make sure your fonts are embedded.
-
Why aren’t the correct fonts appearing in my PDF?
You might need to adjust your Acrobat conversion settings. In Word, select Acrobat > Preferences > Advanced Settings. Select the Fonts section and check Embed all fonts.
-
How do I remove fonts from Word?
In Windows, open the Control Panel and enter fonts into the search, then choose the font you don’t want and select Delete. On a Mac, open Font Book and pick the font you want to get rid of, then select File > Remove.
Thanks for letting us know!
Get the Latest Tech News Delivered Every Day
Subscribe
В Microsoft Office Word есть шрифты на любой вкус. Чтобы нестандартно оформить текст или напечатать красивую листовку, используйте оригинальную каллиграфию или графический объект. Но встроенные возможности программы меркнут в сравнении с тысячами разнообразных стилей, которые можно скачать в сети. Если вам не хватает того, что есть в офисе, узнайте, как установить шрифт в Ворд.

Где найти новый шрифт
Существуют целые сервера, на которых выложены коллекции бесплатной каллиграфии. Там сразу можно посмотреть, как будут выглядеть буквы и цифры. Вы подберёте печатные знаки под любые нужды. Доступна даже имитация рукописного ввода.
Перед тем как добавить шрифт в Word, его надо найти в интернете. Скачивайте файлы только из надёжных источников. Есть несколько проверенных сайтов. Например, «Fontspace» или «Xfont». После загрузки каллиграфию можно будет установить в Ворд. Если вы хотите посмотреть весь ассортимент, сделайте следующее:
- Откройте любой поисковик.
- Введите запрос «Скачать шрифт для Word». На первых страницах будут самые популярные сервисы. Можете задать конкретные параметры: «Готические буквы», «Фигурные символы», «Старославянская кириллица» и тому подобное. Всегда найдётся какой-нибудь новый, никем не используемый стиль.

- Зайдите на понравившийся сайт.
- Не загружайте исполняемые файлы с расширением .EXE — скорее всего, это вирус или другая вредоносная программа. Каллиграфия для Ворд имеет формат .TTF (True Type Font) или .OTF, а коллекции стилей хранятся в архивах .ZIP или .RAR.

- Если вы знаете, какой шрифт вам нужен, вбейте в строку поиска его название вместе с фразой «Скачать для Word». Так вы быстрее найдёте то, что хотите.


Лучше брать архив со стилями, а не качать по одному файлу. Вы сможете добавить несколько видов печатных знаков и уже в самой программе посмотреть, что вам подходит.
Когда вы нашли каллиграфию, можно разбираться, как вставить шрифт в Word.
- Распакуйте архив со стилями, если качали их в сжатом виде. Для этого надо установить архиватор. Подойдёт WinZip или WinRar. Кликните правой кнопкой мыши по файлу с коллекцией и в выпавшем списке выберите «Извлечь». Теперь вы можете копировать и перемещать данные, которые хранились в архиве. Чтобы посмотреть, как выглядят символы, откройте один из файлов с каллиграфией. И для этого не надо открывать Ворд.

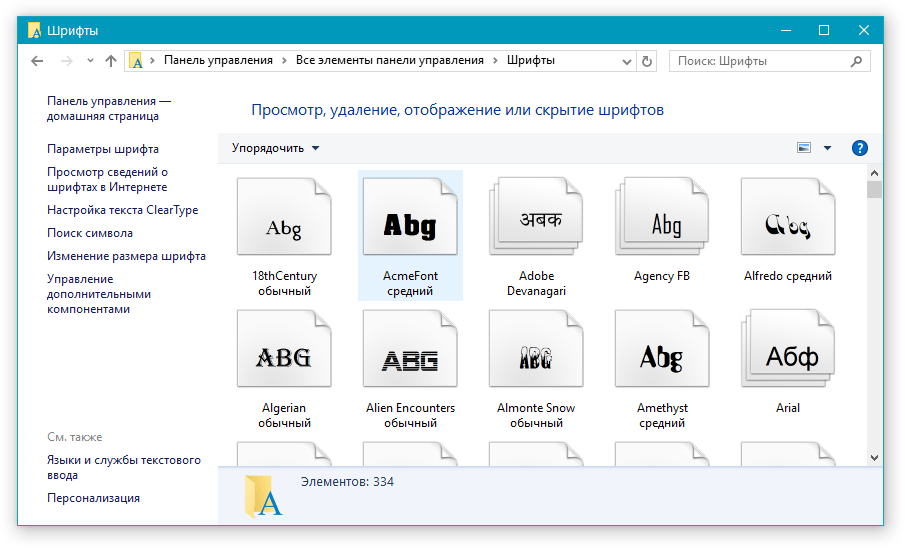
- Перейдите в Пуск — Панель управления. В разделе «Оформление и персонализация» кликните значок «Шрифты». Он открывает папку со стилями символов в Word. В неё также можно войти через С:WindowsFonts. Чтобы лучше ориентироваться в панели управления, в меню «Просмотр» (находится в правом верхнем углу) выберете подходящие настройки отображения.

- Скопируйте скачанные файлы с каллиграфией в папку «Fonts» (не сам архив, а извлечённые из него данные). Новый вид символов должен появиться и в Office. Некоторые из них уже могут быть в системе. В таком случае появится диалоговое окно, предлагающее заменить имеющиеся печатные знаки. Не соглашайтесь, чтобы случайно не удалить «родные» стили офиса.


Если не получилось добавить их таким образом, попробуйте другой способ.
- Откройте папку с загруженной каллиграфией.
- Кликните по одному из файлов правой кнопкой мыши.
- Нажмите «Установить».

После этого стили точно отобразятся в Word.
Как добавить шрифты в файл Word
Если вы решите поработать с текстом на компьютере, на котором отсутствует используемая вами каллиграфия, она не отобразится. Но можно добавить стиль в прямо документ.
- Нажмите синюю кнопку «Файл». В Office 2007 это меню вызывается кликом на логотип в левой верхней части окна.
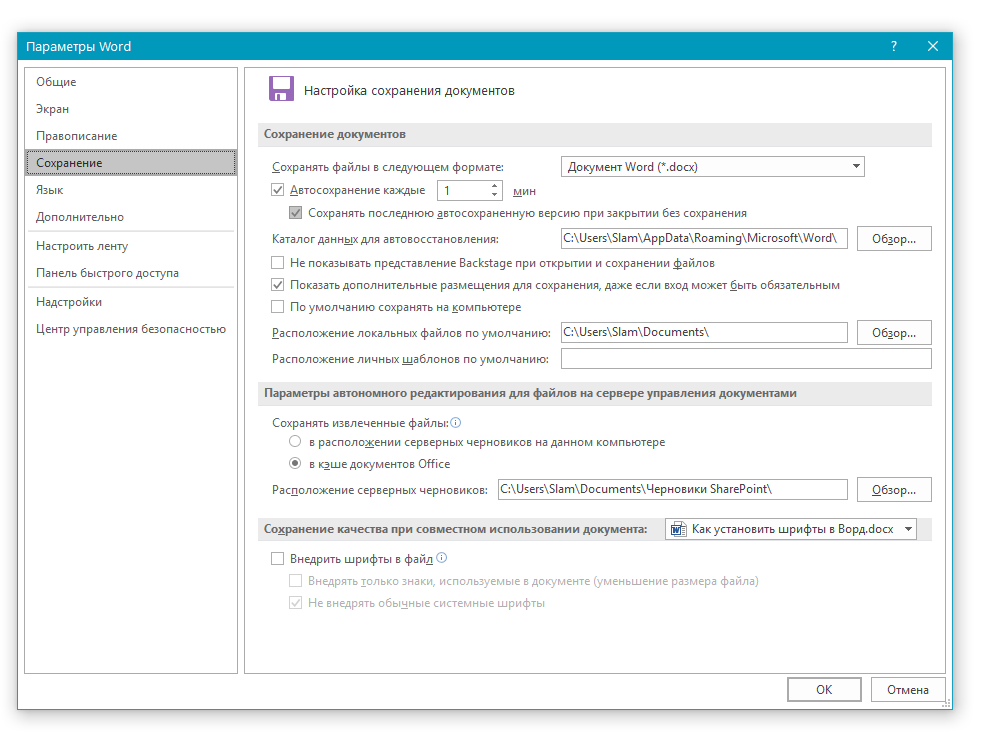
- Выберете «Параметры», раздел «Сохранение».

- Галочку рядом с пунктом «Внедрять шрифты в файл».


Лучше активировать эту опцию, если вы используете не только системные стили. У вас ведь не будет возможности установить свою каллиграфию на чужой ПК.
Как узнать название шрифта
Вам понравился внешний вид символов, но вы не знаете название этого дизайна? И как загрузить шрифты в Word, если вы не можете их найти? Не надо ходить по сайтам, надеясь случайно наткнуться на нужные символы. Название легко узнать. Для этого существуют специальные программы и даже целые сайты.
- What The Font. Популярный и надёжный сервис. Определяет вид каллиграфии по картинке. Найденный стиль можно сразу же скачать и установить в Word. Ресурс имеет свой форум. Если поиск по базе данных ничего не дал, можете спросить совета у других пользователей.
- Расширение для браузера Google Chrome. Сканирует HTML-код страницы и выдаёт название.
- Определяет шрифт, задавая вопросы о его внешнем виде. Если вы примерно представляете, что ищите, но конкретной информации у вас нет — этот ресурс подойдёт.
- Bowfin Printworks. Здесь можно подобрать стиль вплоть до мельчайших деталей. Спрашивает о форме каждого символа.
- Сообщество людей, которые занимаются дизайном каллиграфии или просто в ней разбираются. Надо создать тему и вставить рисунок с символами. Пользователи форума помогут найти нужный стиль.
- WhatTheFont для мобильных устройств. Сфотографируйте слово — приложение определит, какой это стиль.

Если вы увидели интересную каллиграфию в интернете или хотите расширить возможности Office, разберитесь, как установить новый шрифт в Word. Нестандартными надписями можно разбавить скучный текст. Их используют для листовок, поздравлений, открыток, презентаций. Их существуют тысячи — вы обязательно найдёте подходящий.
In MS Word, an entire family of fonts is usually referred to as a Typeface (like Times New Roman). People also prefer using font style or font type.
And “Font” as a word, is reserved for a combination of different features such as font style, size, color and weight (like Arial, 12 pt, Red, Bold).
Therefore, the word “Font” in MS Word often means a whole family of display features such as the typeface, color, weight, and/or size.
If this distinction makes sense to you, let’s now see how we can explore the list of font styles in MS Word as well as how to add new font types or typeface.
Below is an illustration of the various fonts and how they look when applied.


Below is the list of All fonts in MS Word. The above pictures are illustrations of how these fonts look like.
| Abadi MT Condensed Light | Impact |
| Albertus Extra Bold | Incised901 Bd BT |
| Albertus Medium | Incised901 BT |
| Allegro | Incised901 Lt BT |
| Amazone BT | Informal011 BT |
| AmerType Md BT | Jester |
| Antique Olive | Kabel Bk BT |
| Arial | Kabel Ult BT |
| Arial Black | Kaufmann Bd BT |
| Arial MT | Kaufmann BT |
| Arial Narrow | Korinna BT |
| Arrus BT | Letter Gothic |
| Aurora Cn BT | Lithograph |
| AvantGarde Bk BT | Lithograph Light |
| AvantGarde Md BT | Long Island |
| BankGothic Md BT | Lucida Console |
| Bazooka | Lucida Handwriting |
| Benguiat Bk BT | Lucida Sans |
| BernhardFashion BT | Lucida Sans Unicode |
| BernhardMod BT | Lydian BT |
| BinnerD | Marigold |
| Book Antiqua | Market |
| Bookman Old Style | Matisse ITC |
| Boulder | Monotype Corsiva |
| Bremen Bd BT | MS LineDraw |
| Calisto MT | News GothicMT |
| Calligrapher | NewsGoth BT |
| CaslonOpnface BT | OCR A Extended |
| Century Gothic | Old Century |
| Century Schoolbook | Onyx BT |
| Cezanne | OzHandicraft BT |
| CG Omega | Pegasus |
| CG Times | Pickwick |
| Charlesworth | Poster |
| Charter Bd BT | PosterBodoni BT |
| Charter BT | PTBarnum BT |
| Chaucer | Pythagoras |
| ChelthmITC Bk BT | Ribbon131 Bd BT |
| Clarendon Condensed | Sceptre |
| CloisterBlack BT | Serifa BT |
| Comic Sans MS | Serifa Th BT |
| Copperplate Gothic Bold | ShelleyVolante BT |
| Copperplate Gothic Light | Sherwood |
| CopperplGoth Bd BT | Signboard |
| Cornerstone | Socket |
| Coronet | Souvenir Lt BT |
| Courier | Staccato222 BT |
| Courier New | Steamer |
| Cuckoo | Storybook |
| Dauphin | Subway |
| Denmark | Swis721 BlkEx BT |
| English 111 Vivace BT | Swiss911 XCm BT |
| EngraversGothic BT | Tahoma |
| Exotc350 Bd BT | Technical |
| Fransiscan | Teletype |
| Freefrm721 Blk BT | Tempus Sans ITC |
| FrnkGothITC Bk BT | Times |
| Futura Bk BT | Times New Roman |
| Futura Lt BT | Times New Roman PS |
| Futura Md BT | Trebuchet MS |
| Futura ZBlk BT | Tristan |
| FuturaBlack BT | Tubular |
| Galliard BT | TypoUpright BT |
| Garamond | Unicorn |
| Geneva | Univers |
| Geometr231 BT | Univers Condensed |
| Geometr231 Hv BT | Vagabond |
| Geometr231 Lt BT | Verdana |
| GeoSlab 703 Lt BT | Westminster |
| GeoSlab 703 XBd BT | ZapfEllipt BT |
| GoudyHandtooled BT | ZapfHumnst BT |
| GoudyOLSt BT | ZapfHumnst Dm BT |
| Haettenschweiler | Zurich BlkEx BT |
| Heather | Zurich Ex BT |
| Helvetica | |
| Herald | |
| Humanst 521 Cn BT | |
| Humanst521 BT | |
| Humanst521 Lt BT |
How to add new fonts to Word
Despite the fact that Microsoft Word and the other office apps have plenty of font styles, you may need to add new fancy fonts into your Word document.
You have no problem because, in this tutorial, I will show how to add any new font into MS Word and use it in your projects.
However, there are several ways you can add new fonts in MS Word.
I’ll go through each option one after the other here in this article.
Option 1: Using the Microsoft Store
Using the Microsoft Store, you can add new fonts into your
Word document or other office apps.
The steps are outlined below:
- Go to Settings on your PC
To open settings on your PC, type settings in the search bar
and press the Enter key.

- Click on Fonts > Get more fonts in
Microsoft Store

Upon clicking on Get more fonts, the Microsoft Store will open with a list of available fonts in the store.
- If you find the font you want to add, click on
it.

- Then click on the Get button to download the font.

Of course, some of the fonts aren’t free. Some of them require you to make a little contribution before you can download.
After completing the above steps, the downloaded font family
will be available in Word and the other office apps like Excel or PowerPoint.
Option 2: Using the Font Installer
Microsoft Store doesn’t have lots of fonts. Therefore, you may not get the font you are looking for from there.
However, you can download whatever new font you want from other sources and install it into MS Word or other office apps.
Obey the steps below:
- Download the font you wish to add to MS Word.
Download Fonts Here: AbstractFonts.Com
There are several places you can download awesome fonts from. The above link also has a lot of amazing free fonts for you to explore. Click here for more resources on free fonts.
- After downloading the new font you want to add, browse to the folder that has the font file.
Note: The font may be in a zip file. If that’s the case, you
should unzip the file first.

- Right-Click on the font file. A shortcut menu will
appear, select Install or Install for all users.

After applying all the steps above, the installed font will
now be available in your list of fonts in MS Word and the other office apps.

These are the various ways you may add new fonts into MS Word.
Содержание
- Установка нового шрифта в систему
- Установка нового шрифта в Word
- Внедрение шрифта в документ
- Вопросы и ответы

В последних версиях текстового редактора Microsoft Word имеется довольно большой набор встроенных шрифтов. Большинство из них, как и полагается, состоят из букв, но в некоторых вместо букв используются различные символы и знаки, что тоже весьма удобно и необходимо во многих ситуациях.
Урок: Как в Ворде поставить галочку
И все же, сколько бы в MS Word не было встроенных шрифтов, активным пользователям программы стандартного набора всегда будет мало, особенно, если хочется чего-то действительно необычного. Неудивительно, что на просторах интернета можно найти множество шрифтов для этого текстового редактора, созданных сторонними разработчиками. Именно поэтому в данной статье мы расскажем о том, как добавить шрифт в Ворд.
Важное предупреждение: Скачивайте шрифты, как и любое другое ПО, только с проверенных сайтов, так как во многих из них вполне могут содержаться вирусы и прочий вредоносный софт. Не забывайте о собственной безопасности и сохранности личных данных, не качайте шрифты, представленные в установочных файлах EXE, так как на самом деле распространяются они в архивах, внутри которых содержатся файлы форматов OTF или TTF, поддерживаемых ОС Windows.
Вот список безопасных ресурсов, с которых можно скачивать шрифты для MS Word и других совместимых программ:
www.dafont.com
www.fontsquirrel.com
www.fontspace.com
www.1001freefonts.com
Отметим, что все вышеперечисленные сайты крайне удобно реализованы и каждый из шрифтов там представлен наглядно и понятно. То есть, вы смотрите на картинку превью, решаете, нравиться ли вам этот шрифт и нужен ли он вам вообще, и только после этого качаете. Итак, приступим.

Установка нового шрифта в систему
1. Выберите на одном из предложенных нами сайтов (либо на другом, которому полностью доверяете) подходящий шрифт и скачайте его.
2. Перейдите в папку, в которую вы скачали архив (или просто файл) со шрифтом (шрифтами). В нашем случае это рабочий стол.
3. Откройте архив и извлеките его содержимое в любую удобную папку. Если вы скачали шрифты, не запакованные в архив, просто переместите их туда, откуда вам будет удобно к ним добраться. Не закрывайте эту папку.
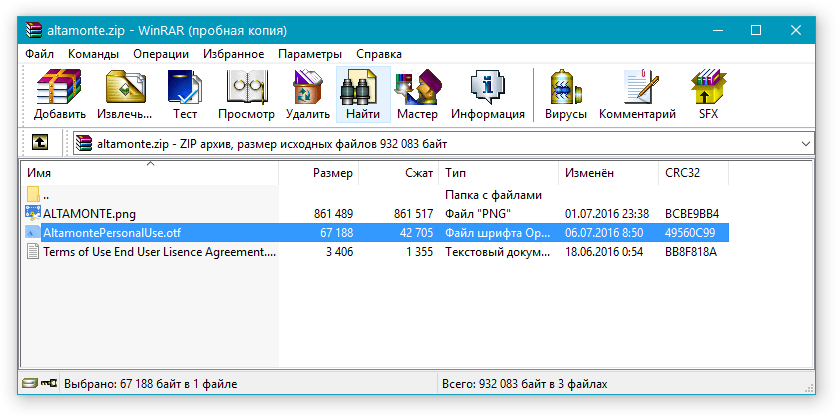

Примечание: В архиве со шрифтами помимо файла OTF или TTF могут также содержаться и файлы другого формата, к примеру, изображение и текстовый документ, как в нашем примере. Извлекать эти файлы отнюдь не обязательно.

4. Откройте “Панель управления”.
В Windows 8 — 10 сделать это можно с помощью клавиш Win+X, где в появившемся списке нужно выбрать “Панель управления”. Вместо клавиш также можно использовать клик правой кнопкой мышки по значку меню “Пуск”.
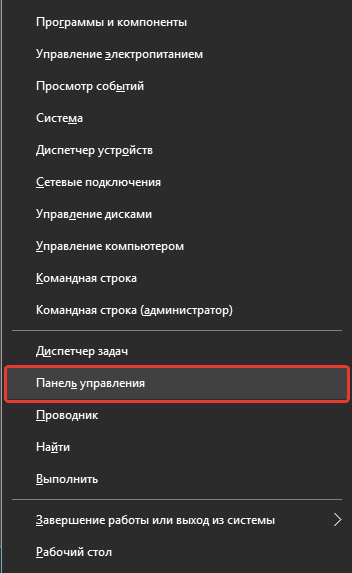
В Windows XP — 7 этот раздел находится в меню “Пуск” — “Панель управления”.

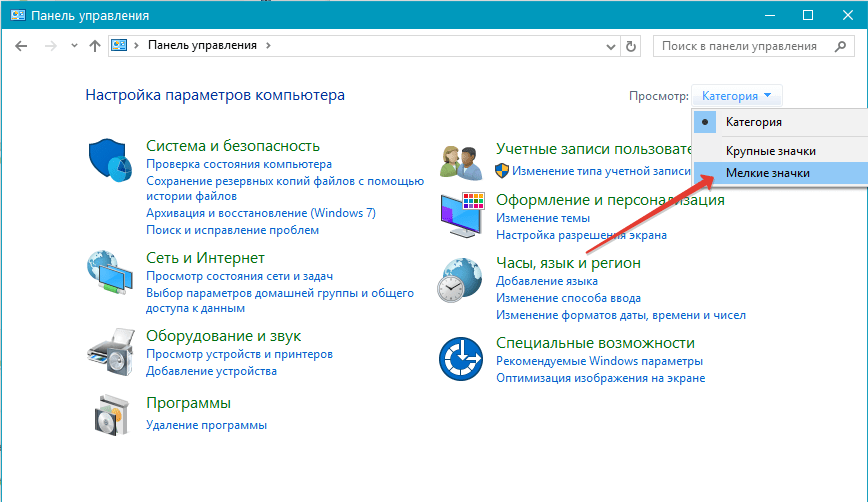
5. Если “Панель управления” находится в режиме просмотра “Категории”, как на нашем примере, переключитесь на режим отображения мелких значков — так вы сможете быстрее найти необходимый пункт.
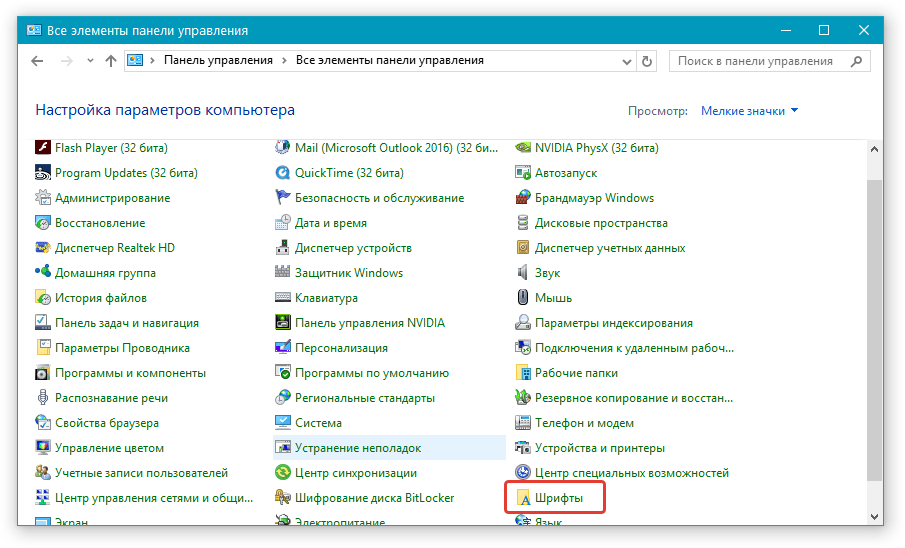
6. Найдите там пункт “Шрифты” (скорее всего, он будет одним из последних), и нажмите на него.
7. Откроется папка со шрифтами, установленными в ОС Windows. Поместите в нее файл шрифта (шрифтов), ранее скачанный и извлеченный из архива.
Совет: Вы можете просто перетащить его (их) мышкой из папки в папку или использовать команды Ctrl+C (копировать) или Ctrl+X (вырезать), а затем Ctrl+V (вставить).
8. После короткого процесса инициализации шрифт будет установлен в систему и появится в папке, в которую вы его переместили.
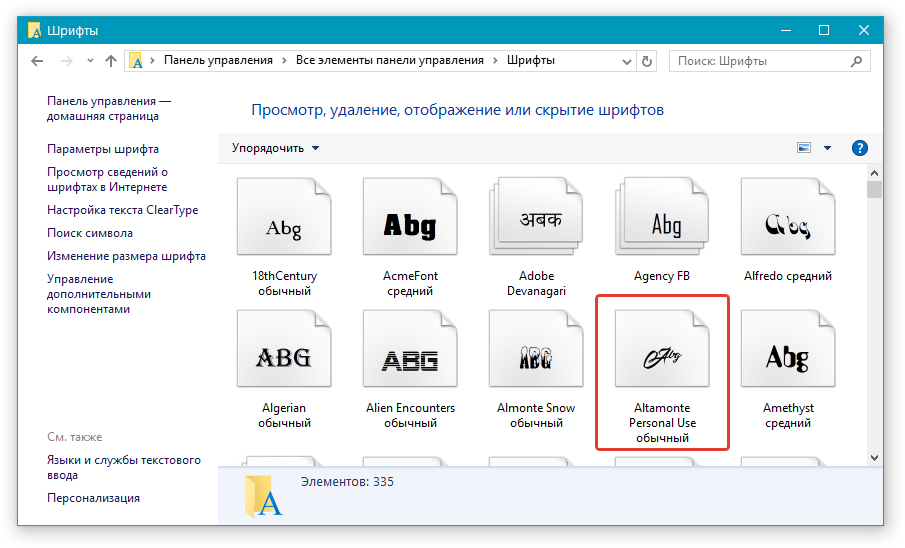
Примечание: Некоторые шрифты могут состоять из нескольких файлов (например, обычный, курсив и полужирный). В таком случае необходимо помещать в папку со шрифтами все эти файлы.
На данном этапе мы добавили новый шрифт в систему, теперь же нам необходимо добавить его и непосредственно в Ворд. О том, как это сделать, читайте ниже.
Установка нового шрифта в Word
1. Запустите Ворд и найдите новый шрифт в списке со стандартными, встроенными в программу.
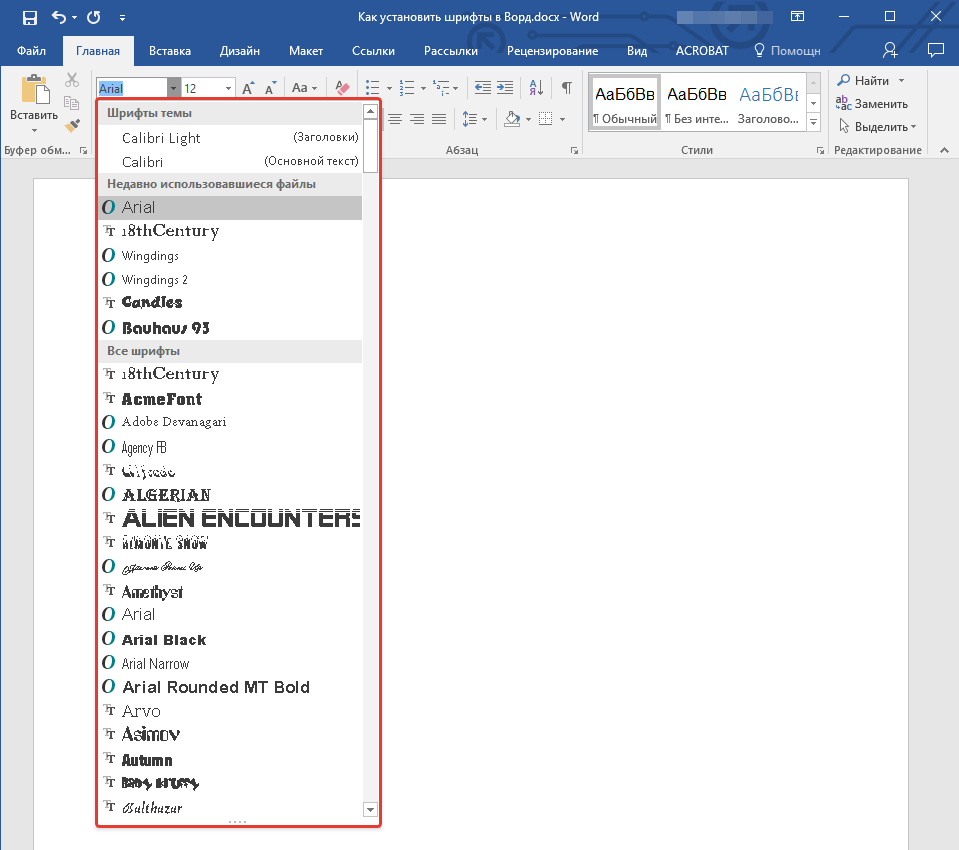
2. Зачастую, отыскать новый шрифт в списке не так просто, как может показаться: во-первых, их там и без того довольно много, во-вторых, его название, хоть и написано собственным шрифтом, но довольно мелкое.
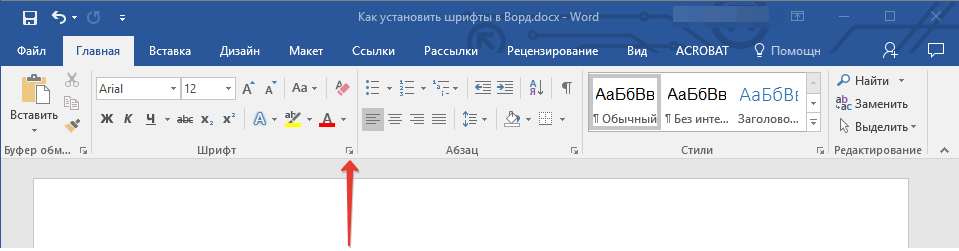
Чтобы быстро отыскать новый шрифт в MS Word и приступить к его использованию в наборе текста, откройте диалоговое окно группы “Шрифт”, нажав на небольшую стрелочку, расположенную в правом нижнем углу этой группы.
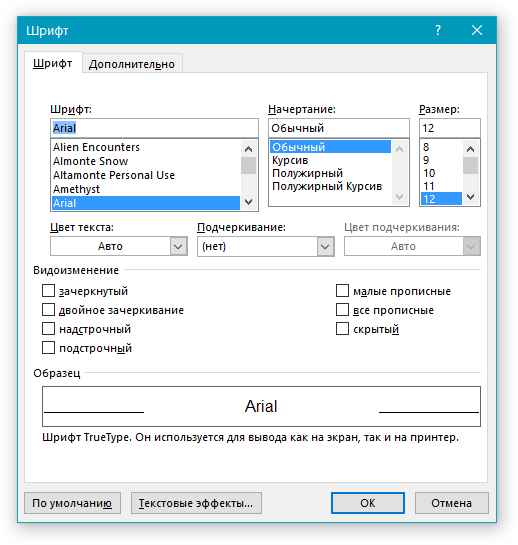
3. В списке “Шрифт” найдите название нового, установленного вами шрифта (в нашем случае это Altamonte Personal Use) и выберите его.
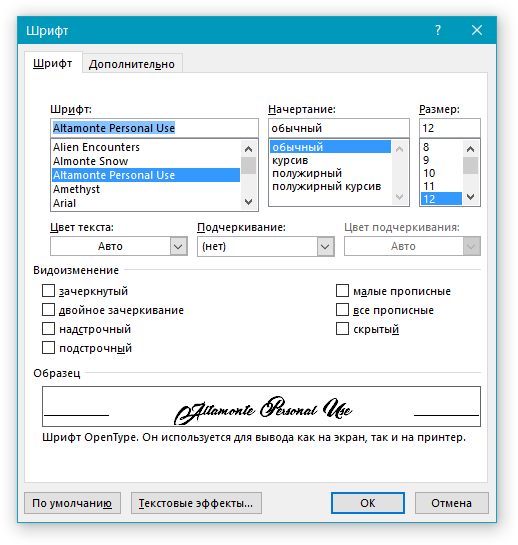
Совет: В окне “Образец” вы можете видеть то, как выглядит шрифт. Это поможет быстрее его найти, если вы не запомнили название шрифта, но запомнили его визуально.
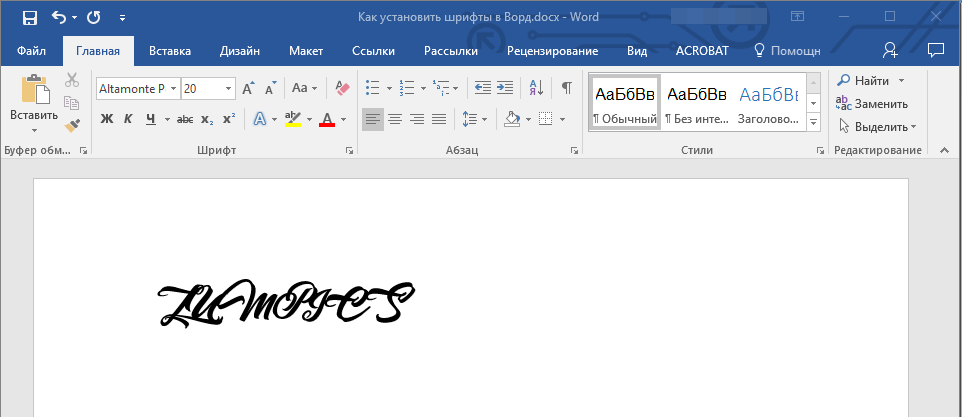
4. После того, как вы нажмете “ОК” в диалоговом окне “Шрифт”, вы переключитесь на новый шрифт и сможете начать его использовать.
Внедрение шрифта в документ
После того, как вы установите новый шрифт на свой компьютер, использовать его вы сможете только у себя. То есть, если вы отправите текстовый документ, написанный новым шрифтом другому человеку, у которого этот шрифт не установлен в системе, а значит, и не интегрирован в Ворд, то у него он отображаться не будет.
Если вы хотите, чтобы новый шрифт был доступен не только на вашем ПК (ну и на принтере, точнее, уже на распечатанном листе бумаги), но и на других компьютерах, другим пользователям, его необходимо внедрить в текстовый документ. О том, как это сделать, читайте ниже.
Примечание: Внедрение шрифта в документ приведет к увеличению объема документа MS Word.
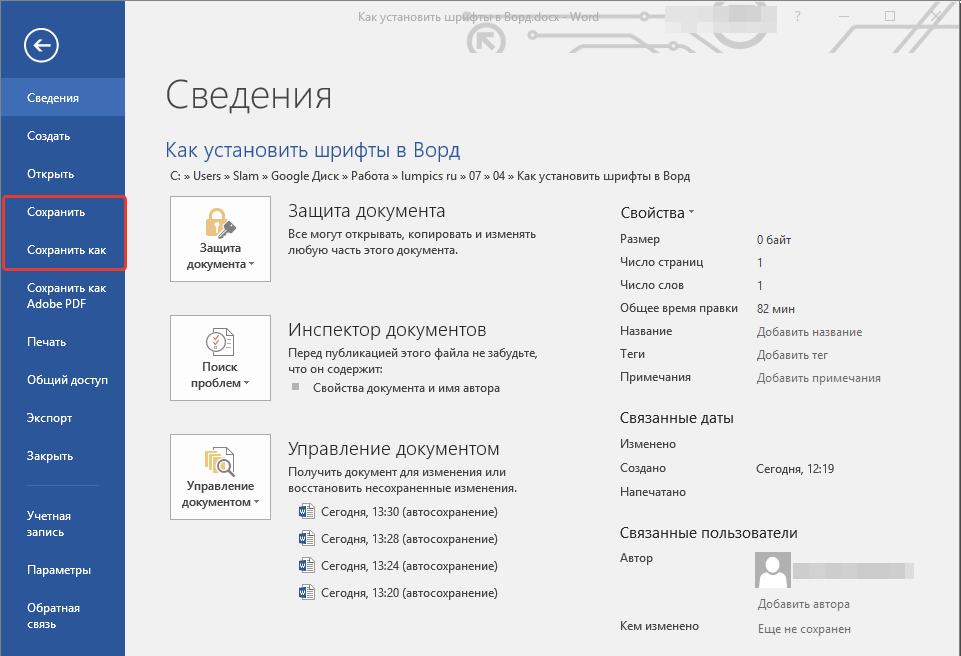
1. В вордовском документе перейдите во вкладку “Параметры”, открыть которую можно через меню “Файл” (Word 2010 — 2016) или кнопку “MS Word” (2003 — 2007).
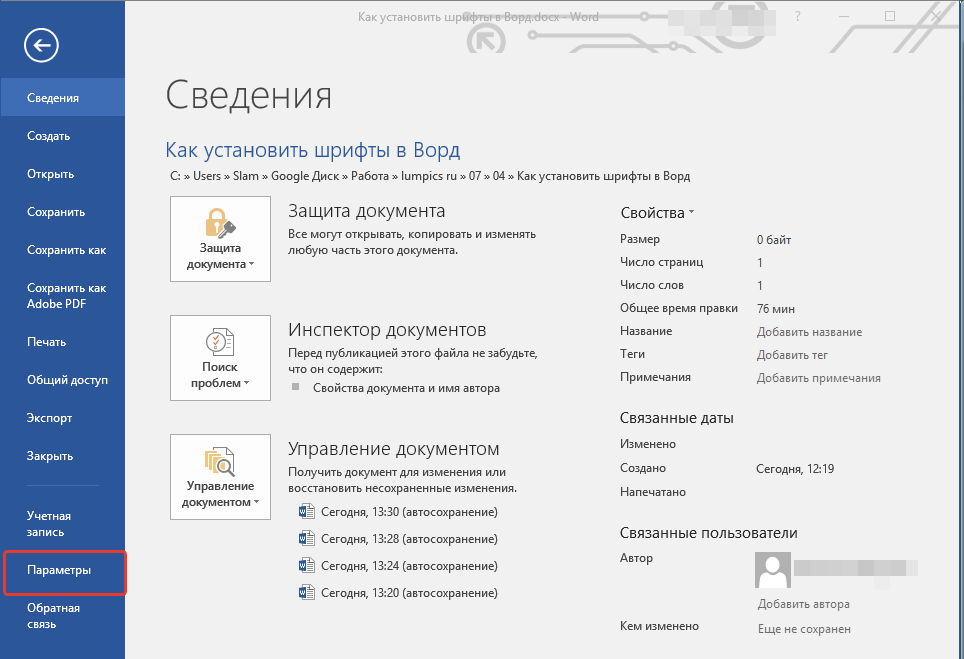
2. В диалоговом окне “Параметры”, которое перед вами откроется, перейдите к разделу “Сохранение”.
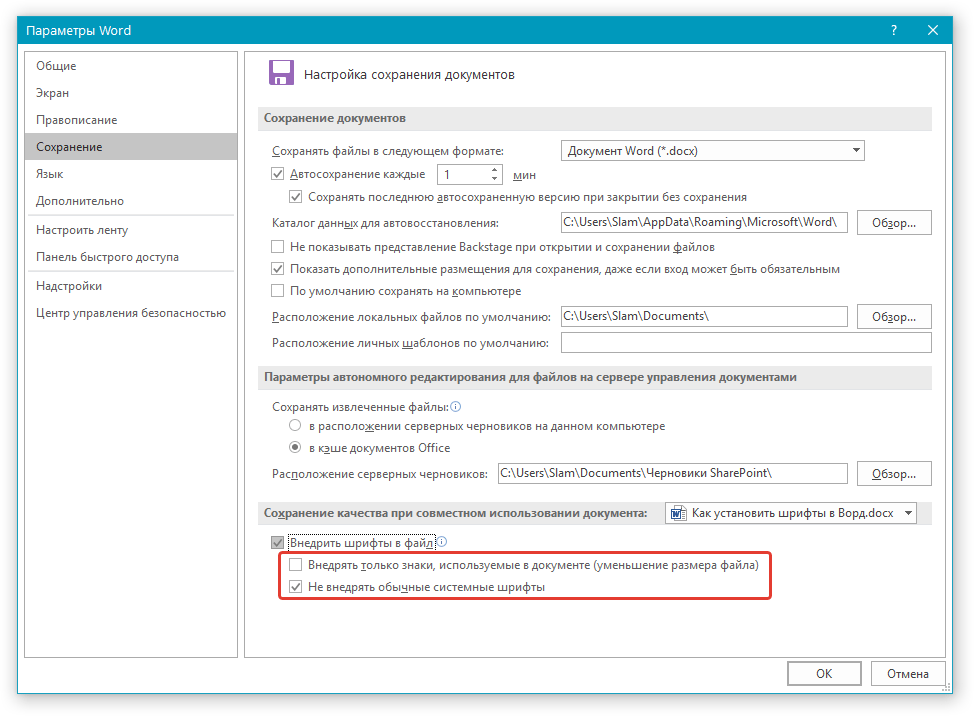
3. Установите галочку напротив пункта “Внедрить шрифты в файл”.

4. Выберите, хотите ли вы внедрить только знаки, которые используются в текущем документе (это уменьшит объем файла), хотите ли вы исключить внедрение системных шрифтов (по сути, оно и не нужно).
5. Сохраните текстовый документ. Теперь вы можете поделиться им с другими пользователями, ведь новый, добавленный вами шрифт будет отображаться и на их компьютере.
Собственно, на этом можно и закончить, ведь теперь вы знаете о том, как установить шрифты в Ворд, предварительно инсталлировав их в ОС Windows. Желаем вам успехов в освоении новых функций и безграничных возможностей программы Microsoft Word.
![]()
To add a font to Microsoft Word on Windows, download the font file, right-click the font file, then click «Install» or «Install for All Users.» To install a font on Mac, download the font file and double click it, then click «Install Font.»
Microsoft Word comes with a long list of fonts to choose from, but depending on what your goal with the document is, you may want to use a font that’s not on the list. Good news—installing fonts is easy.
Download the Font Files
Before you can add a font in Word, you’ll need to download the font file. When you download a font from an online resource, they’re usually downloaded as a ZIP file, which you’ll need to unzip. The font files themselves will usually be TrueType (.ttf) or OpenType (.otf) files—both of which work with Word.
There are many sites where you can download font files for free, but make sure you trust the source before downloading anything. If you download anything from an unknown source, you run the risk of getting infected with malware.
RELATED: How to Remove Viruses and Malware on Your Windows PC
Microsoft recommends using DaFont, but Font Squirrel and FontSpace are also good sites for downloading fonts. If you like the fonts available in Google Docs, you can even download Google fonts to your PC.
How to Install Font Files to Word on Windows
Adding a font in Word on Windows is easy and only takes a few clicks. First, locate the font file on your PC and then right-click it. In the context menu that appears, click “Install” to install it for the current user, or “Install for All Users” to install the font for every user profile on the PC. You must have administrator privileges to install a font for all users.

The font is now installed on your Windows device and will appear in different apps such as Excel, PowerPoint, and Word. If you want your new font to be the default when you create a new document, be sure to set it as the default font in Word.
How to Import Fonts Into Word on Mac
To add fonts in Word on Mac, locate the font file and then double-click it.
The Font Preview window will appear. Click “Install Font” in the bottom-right corner of the window.
The font is now installed on your Mac and will appear in different apps such as Excel, PowerPoint, and Word.
You can now use the installed font next time you use Word. However, if the recipient of that document doesn’t also have that font installed on their device, the font will usually be displayed in a default font. If you want the recipient to view the document with the font you used, you’ll need to embed the font in the document.
RELATED: How to Embed Fonts in a Microsoft Word Document
READ NEXT
- › How to Draw a Custom Table in Microsoft Word
- › BLUETTI Slashed Hundreds off Its Best Power Stations for Easter Sale
- › Expand Your Tech Career Skills With Courses From Udemy
- › The New NVIDIA GeForce RTX 4070 Is Like an RTX 3080 for $599
- › Google Chrome Is Getting Faster
- › Mozilla Wants Your Feature Suggestions for Thunderbird
- › How to Adjust and Change Discord Fonts
How-To Geek is where you turn when you want experts to explain technology. Since we launched in 2006, our articles have been read billions of times. Want to know more?
TheTechieSenior.com is reader supported. We may earn a commission if you buy through links on this site. As an Amazon Associate, we earn from qualifying purchases. Learn more here.
Microsoft Word users have access to dozens of fonts that can be used in our documents. But it frequently happens that we have a project in progress that calls for a font which is not available on our computers. We’ll show you how to add fonts in Microsoft Word.
Table of Contents
How to Add Fonts in Microsoft Word and Be Certain They’re Visible to Your Readers
In this article, I’ll be referring to Microsoft Word 365. I use that name for the version of MS Word that is part of the Microsoft 365 suite.
Fonts that you see in the font list in Microsoft Word 365 come from three likely sources:
- Several dozen are installed when Microsoft 365 is installed on your computer. Those are normally available for use in Word, Excel, Powerpoint, and Outlook.
- Microsoft Office 365 fonts that exist only in the cloud until you select one for use in your document.
- With a few possible exceptions, Microsoft Word has access to basically all of the additional fonts that are installed on your Windows or Mac computer.
How to use more cloud fonts in MS Word
Cloud fonts are fonts that are retrieved as needed from a server on the Internet. Standard fonts are stored on, and retrieved from, your computer.
You may have heard of Google fonts which are used on thousands of websites. In this article we’ll be referring to Microsoft cloud fonts which are only available to Microsoft 365 subscribers.
When you open the drop-down list of fonts in the text settings area of the Home tab, you see two groups of fonts comingled in one list—those that have a cloud icon before the font name and those that do not. (The cloud icon looks like a cloud with a downward pointing arrow through the bottom of it.)
Those that do not have the cloud icon preceding the font name are already in use on your computer. They are ready to use with or without an Internet connection, just by selecting them.
Those font names that do have the cloud icon preceding the name are also available for you to use in Microsoft 365 apps, but are not actually installed on your computer.
To use a font from the cloud, be sure your computer is connected to the Internet then select the font like any other on the list. That font will then be retrieved via the Internet and cached on your computer, ready for use in Word and other Microsoft 365 apps.
Download and add custom fonts
You can install additional fonts on your computer which will be available for most apps to use, including Microsoft Word.
There are many sources for fonts online, some offering them free of charge and others offering fonts that require you to purchase a license to use them.
Whether you download paid or free fonts, you will want to look for fonts in the OTF or TTF format. Many fonts will download as a .zip file that contains both versions. OTF is a newer format and will normally work fine. If you have an older app on your computer that does not seem to work with the OTF version, try installing the TTF version.
Fonts normally download in a zipped file (with a .zip file extension). Before you can install them, you’ll need to unzip them.
To unzip a file on a Mac computer, just double click it. A folder with the same name as the zipped file will appear in the same folder. The contents of the .zip file will be inside that folder.
To unzip a file on a Windows 10 computer, right-click the .zip file and choose Extract all. A folder containing the actual font files will be created in the same location as the .zip file.
Once the file is unzipped, follow the instructions below for Windows or Macs.
Install fonts in Windows 10
With the font unzipped, right-click the font file itself and choose to install. Remember, you are installing the font file with a .ttf or .otf extension, not the .zip file.
If the font doesn’t install correctly using the right-click method, you can use another method. In the search bar in the bottom left of your screen, type Fonts. The fonts tool should be the first item shown in the search results that appear.
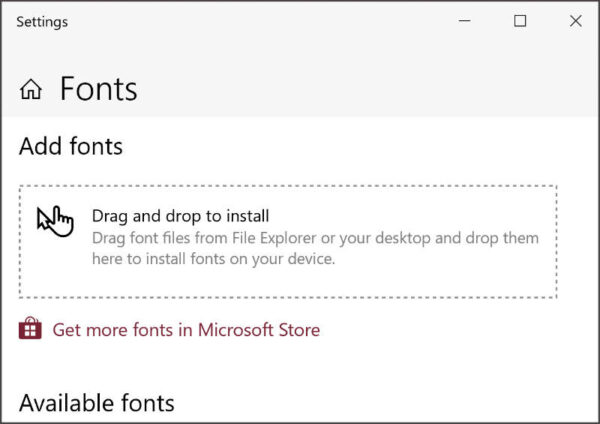
- Click the Fonts tool.
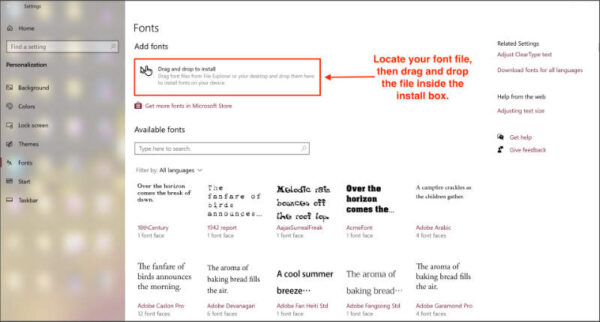
- The window that appears will probably be a small window with a box in the center where you can drag and drop your font tile to install it. Drag your unzipped font file into that box. The font will automatically install.
You can also reach the Fonts management area in Windows 10 by clicking the Start button in the bottom left of the screen. Then:
- Click Settings
- Click Personalization
- Click Fonts
That should open the font settings page shown in the following image. If the smaller drag and drop panel described in the previous instruction is maximized, you will see the following page as well.
Install fonts on Mac computers
The easiest way to install fonts on Mac computers is to simply double click the unzipped font file. A box will open with your font listed and an install button in the lower right corner. Click the install button and you’ll be on your way.
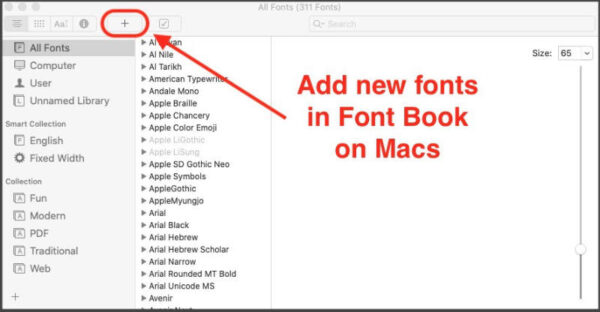
You can also add fonts using the Font Book app.
- Open Font Book.
- Locate the + icon.
- Locate the .ttf or .otf file and click Open.
If your Font Book app is pinned to the dock, you can simply drag the font file onto the Font Book icon.
Restart may be required
On both Windows and Mac computers you may have to restart your computer before Word or other apps will recognize the new fonts that you installed.
Be sure your recipient can view your document as you designed it
If you plan to send your Word document to another person, and it matters to you whether or not that person views your document exactly as you designed it, you may need to take an extra step when you save the file.
Whoever receives your document will need to have the same font available on his computer if he is to see the document exactly as you sent it. This is true whether you used only those that are available via Microsoft 365 or you used custom fonts that you bought and installed as instructed above.
If your document uses only cloud fonts that are available with recent versions of Word (Microsoft) 365, the fonts aren’t embedded into the document by default and will only be displayed on the recipient’s computer if that person also has Microsoft 365 installed on a computer that is connected to the internet.
If your recipient’s computer is not connected to the Internet or he uses an older version of Microsoft Word, or your document includes custom fonts that you installed, your recipient will not be able to view your document as you designed it unless you embed the fonts into the document.
Embedding the fonts into the document insures that the recipient will see the document as you intended, whether or not he has the included fonts available. Note that it is possible for font creators to make their fonts unembeddable. However, most commonly available OTF and TTF fonts can be embedded.
How to embed fonts into your Word document on Windows computers
With your document open, click the File tab, then:
- Near the bottom left corner of the window, click Options.
- In the Options panel, look for Save in the left column and click it.
- Near the bottom of the panel, look for “Preserve fidelity when sharing this presentation.”
- Check the first box labeled, “Embed fonts in the file.”
Be sure you save the document after you check the box to embed the fonts.
I recommend that you not check the box labeled, “Embed only the characters used in the presentation.” Leaving it unchecked helps to insure that your recipient sees the document as you intended and, if you intended that person to be able to edit the file in the same font, insures that will be possible.
How to embed fonts into your Word document on Mac computers
The ability to embed fonts in Word documents that were created on Mac computers is only available to Microsoft 365 subscribers as of the time this article was written.
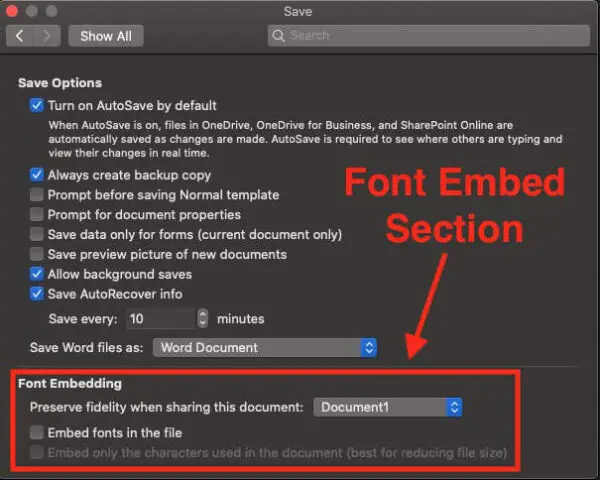
To embed fonts in Word documents that were created on Mac computers, first go to Preferences under the Word menu.
- Under the Output and Sharing section, click the Save icon.
- At the bottom of the Output and Sharing panel, under Font Embedding, check the box beside “Embed fonts in the file.”
- Be sure to do the preceding before you save your document for the last time.
What happens if you don’t embed your custom fonts
If the recipient of your document is using an older version of Microsoft Word, if she uses Microsoft 365 but her computer is not connected to the Internet, or if you do not embed the fonts into your document, your recipient’s computer will substitute a different font for your chosen ones. That may cause your document to be displayed in a undesirable manner.
A bonus tip
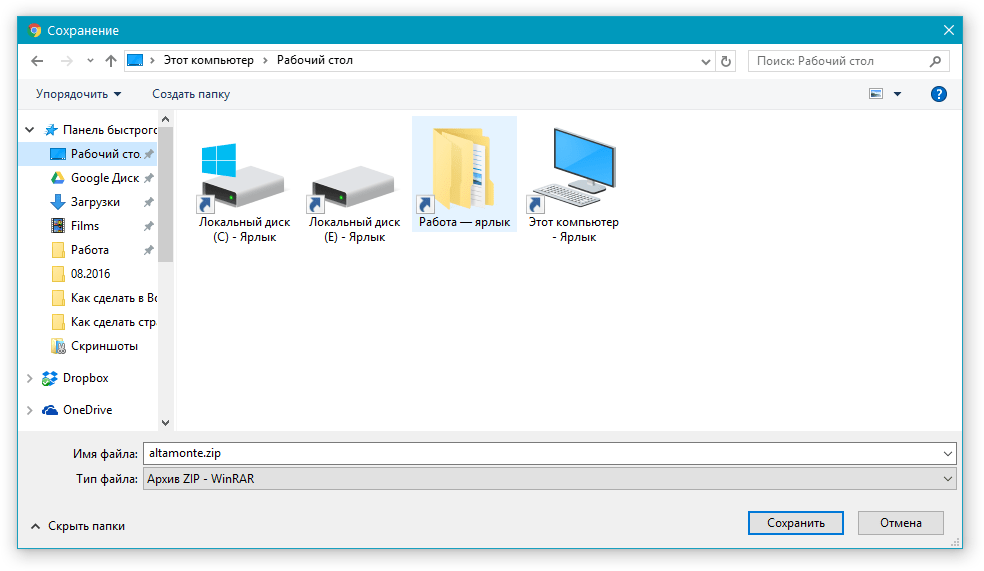
If it’s important to you that your Word document appears exactly as you created it, but it’s not important that the person who you send it to can read or edit it in MS Word, sending the file as a PDF may be just what you need.
In MS Word 365 for Macs and Windows, to create a PDF of your document with the fonts embedded, go to the File menu. Click Save As… and for the file type select PDF. Be sure you check the box to create a PDF for printing.
In MS Word 365 for Windows, you can also go to the File menu and select Export. Then choose PDF. That option will give you a PDF with fonts embedded.
Find more articles about using fonts and text here.
Learn more about Microsoft cloud fonts here.