Excel for Microsoft 365 Word for Microsoft 365 PowerPoint for Microsoft 365 Excel 2021 Word 2021 PowerPoint 2021 Excel 2019 Word 2019 PowerPoint 2019 Excel 2016 Word 2016 PowerPoint 2016 Excel 2013 Word 2013 PowerPoint 2013 Excel 2010 Word 2010 PowerPoint 2010 More…Less
You can change the font size for all text or just selected text in desktop Excel, PowerPoint, or Word.
Change the default font size for all text
The way you change the default font size varies by app. Select your app below, and then follow the steps.
-
Click File > Options.
-
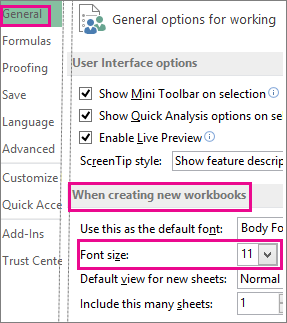
In the dialog box, click General.
-
Under When creating new workbooks, in the Font Size box, enter the font size you want.
Or, you can type in any size you want, between 1 and 409, in multiples of .5, such as 10.5 or 105.5. You can also choose a different default font style.
Note: To begin using the new default font size or font, you must restart Excel. The new default font and font size are used only in new workbooks created after you restart Excel; any existing workbooks are not affected. To use the new default font and size in existing workbooks, move worksheets from an existing workbook to a new workbook.
To change the font size for all slides, change it on the slide master. Every PowerPoint presentation contains a slide master with related slide layouts.
Note: If you want to change the theme, you should do that before changing the font, as a different theme may use different fonts.
-
On the View tab, click Slide Master.
In Slide Master View, the slide master is at the top of the thumbnail pane with the related layouts beneath it.
-
Click the slide master to change the font on all slides, or click any of the layouts to change the font size on just that layout.
-
On the slide master or layout, select the level of placeholder text for which you want to change the font size.
-
On the Home tab, click the font size you want in the Font Size box.
You can also type in any size you want in multiples of .1, such as 10.3 or 105.7.
The bullet automatically increases or decreases in size to match the font size changes.
-
Open a new blank document.
-
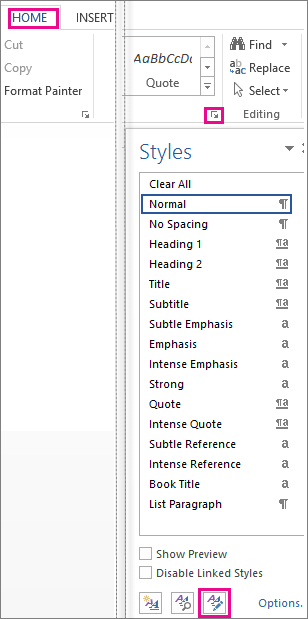
On the Home tab, in the Styles group, click the dialog box launcher
..
Or press Ctrl+Alt+Shift+S.
-
Click the Manage Styles button (third from left at the bottom).
-
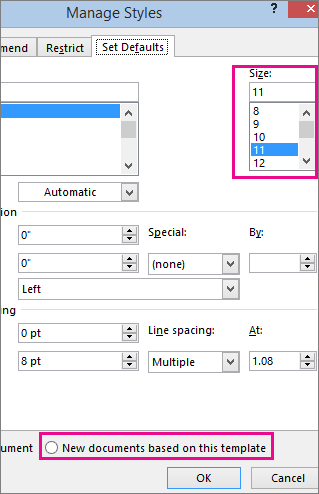
Click the Set Defaults tab and pick the size you want in the Size box.
You can also type in any size you want, between 1 and 1638, in multiples of .5, such as 10.5 or 105.5.
-
Click the New documents based on this template option.
-
Close and reopen Word. If you’re prompted to save the Normal template, say Yes.
Tip: You can also change the default font or font color on the Set Defaults tab.
When you set a default font, every new document you open will use the font settings you selected and set as the default. The default font applies to new documents that are based on the active template, usually Normal.dotm. You can create different templates to use different default font settings.
Change the size of selected text
To change the font size of selected text in desktop Excel, PowerPoint, or Word:
-
Select the text or cells with text you want to change. To select all text in a Word document, press Ctrl + A.
-
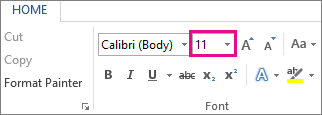
On the Home tab, click the font size in the Font Size box.
You can also type in any size you want, within the following limits:
-
Excel: between 1 and 409, between 1 and 409, in multiples of .5 (such as 10.5 or 105.5)
-
PowerPoint: between 1 and 3600, in multiples of .1 (such as 10.3 or 105.7)
-
Word: between 1 and 1638, in multiples of .5 (such as 10.5 or 105.5)
-
Tips:
-
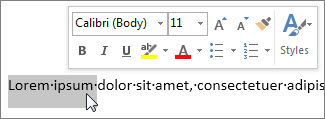
When you select text, a mini toolbar appears near your cursor. You can also change the text size in this toolbar.
-
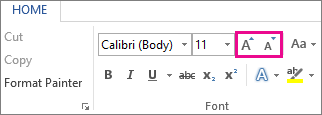
You can also click the Increase Font Size or Decrease Font Size (Grow Font and Shrink Font in some earlier versions of Office programs) icons until the size you want is displayed in the Font Size box.
See Also
Change or set the default font in Word
Change the fonts in a footer on a slide
Change a theme (Excel and Word)
Format text in cells (Excel)
Need more help?
Want more options?
Explore subscription benefits, browse training courses, learn how to secure your device, and more.
Communities help you ask and answer questions, give feedback, and hear from experts with rich knowledge.
Excel for Microsoft 365 Word for Microsoft 365 PowerPoint for Microsoft 365 Excel 2021 Word 2021 PowerPoint 2021 Excel 2019 Word 2019 PowerPoint 2019 Excel 2016 Word 2016 PowerPoint 2016 Excel 2013 Word 2013 PowerPoint 2013 Excel 2010 Word 2010 PowerPoint 2010 More…Less
You can change the font size for all text or just selected text in desktop Excel, PowerPoint, or Word.
Change the default font size for all text
The way you change the default font size varies by app. Select your app below, and then follow the steps.
-
Click File > Options.
-
In the dialog box, click General.
-
Under When creating new workbooks, in the Font Size box, enter the font size you want.
Or, you can type in any size you want, between 1 and 409, in multiples of .5, such as 10.5 or 105.5. You can also choose a different default font style.
Note: To begin using the new default font size or font, you must restart Excel. The new default font and font size are used only in new workbooks created after you restart Excel; any existing workbooks are not affected. To use the new default font and size in existing workbooks, move worksheets from an existing workbook to a new workbook.
To change the font size for all slides, change it on the slide master. Every PowerPoint presentation contains a slide master with related slide layouts.
Note: If you want to change the theme, you should do that before changing the font, as a different theme may use different fonts.
-
On the View tab, click Slide Master.
In Slide Master View, the slide master is at the top of the thumbnail pane with the related layouts beneath it.
-
Click the slide master to change the font on all slides, or click any of the layouts to change the font size on just that layout.
-
On the slide master or layout, select the level of placeholder text for which you want to change the font size.
-
On the Home tab, click the font size you want in the Font Size box.
You can also type in any size you want in multiples of .1, such as 10.3 or 105.7.
The bullet automatically increases or decreases in size to match the font size changes.
-
Open a new blank document.
-
On the Home tab, in the Styles group, click the dialog box launcher
..
Or press Ctrl+Alt+Shift+S.
-
Click the Manage Styles button (third from left at the bottom).
-
Click the Set Defaults tab and pick the size you want in the Size box.
You can also type in any size you want, between 1 and 1638, in multiples of .5, such as 10.5 or 105.5.
-
Click the New documents based on this template option.
-
Close and reopen Word. If you’re prompted to save the Normal template, say Yes.
Tip: You can also change the default font or font color on the Set Defaults tab.
When you set a default font, every new document you open will use the font settings you selected and set as the default. The default font applies to new documents that are based on the active template, usually Normal.dotm. You can create different templates to use different default font settings.
Change the size of selected text
To change the font size of selected text in desktop Excel, PowerPoint, or Word:
-
Select the text or cells with text you want to change. To select all text in a Word document, press Ctrl + A.
-
On the Home tab, click the font size in the Font Size box.
You can also type in any size you want, within the following limits:
-
Excel: between 1 and 409, between 1 and 409, in multiples of .5 (such as 10.5 or 105.5)
-
PowerPoint: between 1 and 3600, in multiples of .1 (such as 10.3 or 105.7)
-
Word: between 1 and 1638, in multiples of .5 (such as 10.5 or 105.5)
-
Tips:
-
When you select text, a mini toolbar appears near your cursor. You can also change the text size in this toolbar.
-
You can also click the Increase Font Size or Decrease Font Size (Grow Font and Shrink Font in some earlier versions of Office programs) icons until the size you want is displayed in the Font Size box.
See Also
Change or set the default font in Word
Change the fonts in a footer on a slide
Change a theme (Excel and Word)
Format text in cells (Excel)
Need more help?
This tutorial shows three ways to change the font, font size, and font color in Microsoft Word. First, we’ll use the font options in the ribbon. Then, we’ll use the Mini toolbar. Finally, we’ll use the Font dialog box.
Do you want to change your default font, font size, or font color? Check out my other tutorial “How to Change the Default Font in Microsoft Word.”
Quick Links:
- How to Change the Font, Font Size, and Font Color in the Ribbon
- How to Change the Font, Font Size, and Font Color in the Mini Toolbar
- How to Change the Font, Font Size, and Font Color in the Font Dialog Box
This tutorial is also available as a YouTube video showing all the steps in real time.
Watch more than 200 other document software tutorials on my YouTube channel.
The images below are from Word for Microsoft 365. The steps are the same in Word 2019, Word 2016, Word 2013, and Word 2010. However, your interface may look slightly different in those older versions of the software.
In Word, the main toolbar at the top of the screen is called the ribbon. The ribbon offers many of the font options most users will need for general content.
- Select the Home tab in the ribbon.
If your document is blank, skip to step 3.
- Select the text with the font you want to change.
To select the entire document, press Ctrl + A on your keyboard.
Alternatively, select Select in the Editing group, and then select Select All from the drop-down menu.
- Select the Font menu arrow to choose a new font. (This menu lists the fonts installed on your computer. Your fonts may differ from those shown in figure 3.)
- Select the Font Size menu arrow to choose a new font size. (The numbers represent typography points. Each point is 1/72 of an inch.)
Alternatively, you can select the Increase Font Size or Decrease Font Size buttons to increase or decrease the font by one point.
- Select the Font Color menu arrow to choose a new color.
For additional color options, select More Colors in the Font Color drop-down menu (see figure 6). Choose a color in the Standard tab of the Colors dialog box. Or, enter a custom color in the Advanced tab.
Pro Tip: Select the Change Case button to choose Sentence case, lowercase, UPPERCASE, Capitalize Each Word, or tOGGLE cASE.
Your text should change to your new font choices immediately.
The Mini toolbar offers many of the same font options as the ribbon from within the text.
- Select and then right-click the text to display the Mini toolbar.
- Select the arrow menus to select a font, font size, or font color. (Note that the Mini toolbar includes the Increase Font Size or Decrease Font Size buttons to increase or decrease the font by one point.)
Once again, your text should change to your new font choices immediately.
How to Change the Font, Font Size, and Font Color in the Font Dialog Box
The Font dialog box offers advanced options that aren’t available in the ribbon or the Mini shortcut menu.
- Select the Home tab in the ribbon (see figure 1).
If your document is blank, skip to step 3.
- Select the text with the font you want to change.
To select the entire document, press Ctrl + A on your keyboard.
Alternatively, select Select in the Editing group, and then select Select All from the drop-down menu (see figure 2).
- Select the dialog box launcher in the Font group.
- Select a new font, font size, and font color from the Font tab in the Font dialog box.
- (Optional Step) Select the Advanced tab for additional options for character spacing and OpenType features.
- Select the OK button.
Your text should change to your new font choices as soon as the Font dialog box closes.
Related Resources
How to Create Drop Caps in Microsoft Word
How to Adjust Line Spacing in Microsoft Word
How to Adjust Page Margins in Microsoft Word
How to Adjust Letter Spacing in Microsoft Word (PC & Mac)
Updated January 14, 2023
This tip contains Shortcut Keys or Hotkeys for changing font size.
To change a font size, follow these steps:
1. Select the text that you want to change to a different font size. If
you want to type new text in a different font size, position the insertion point where you want the new
font size to begin.
2. Do one of the following:
- Click the down arrow to the right of the Font size list box on the Formatting toolbar,
and select the font size that you want. You may use fraction (E.g. font size 10 and 8,5). - Press Ctrl+Shift+P, and enter the font size that you want. Alternatively, press the
up- or down-arrow keys to scroll through the list of font sizes one at a time, and
then select the font size that you want from the list by pressing Enter. - Press one of the shortcut keys:
| Ctrl+Shift+> | Increases the font to the next larger point size available in the Font size list box. |
| Ctrl+Shift+< | Decreases the font to the next smaller point size available in the Font size list box. |
| Ctrl+[ | Increases the font size by one point. |
| Ctrl+] | Decreases the font size by one point. |
3. If you didn’t select text before choosing your font size, enter
the text that you want to appear in the font size that you selected. Then choose a different font size
to end the task.
Note: more details are available
in the Increase/decrease font size section
in the Format the document lesson
of the Create basic documents free course.
See also this tip in French:
Augmenter,
diminuer et changer la taille de la police sans la souris.
Please, disable AdBlock and reload the page to continue
Today, 30% of our visitors use Ad-Block to block ads.We understand your pain with ads, but without ads, we won’t be able to provide you with free content soon. If you need our content for work or study, please support our efforts and disable AdBlock for our site. As you will see, we have a lot of helpful information to share.
Updated: 05/03/2022 by
When you open the program Microsoft Word, a font and font size are chosen for you. Usually, the default font is Calibri or Times New Roman, and the default font size is 11 or 12 point. If you want to change the default font attributes, find your version of Microsoft Word on the list below and follow the instructions.
Microsoft Word 2010 and later
- Make sure the toolbar is currently on the Home tab. If not, click the Home tab.
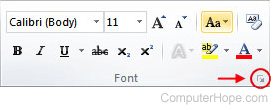
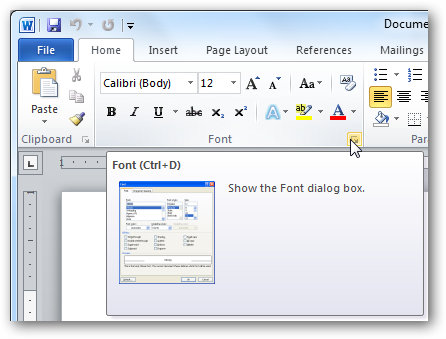
- In the Font section, click the Font Dialog Box Launcher (shown below).
- In the Font window, change the font attributes to your liking.
- Click the Set As Default button.
- In the dialog window that opens, select the All documents based on the Normal.dotm template option and click OK.
Microsoft Word 2007
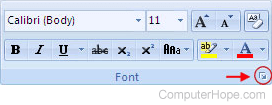
- From the Home tab, click the Font Dialogue Box Launcher (shown below).
- Click the Font tab, and choose your new default font attributes.
- Click Default, and then click Yes.
Microsoft Word Online
Unlike the versions of Microsoft Word you install on a computer, you cannot change the default font type or size in Word Online. If you make a change to the font type or size for a Word Online document, the next time you create a new blank document, the font settings defaults to 11-point Calibri.
Changing font size is a basic operation in Word. In this article, we summarized 5 simple ways to change font size in your Word that applies to different situations.
As of today, almost all of the Word users know how to adjust the font size in a document. However, we still have much to explore as regards setting font sizes. The following 5 methods will provide you with different ways to change font sizes.
Method 1: Select Your Font Size
The most commonly used method is to select a font size in the “Home” menu. However, the limit is that there are only limited size options, and you will only be able to choose from one of the installed fonts.
- First, elect the text that you want to change font size.
- On the “Home” tab, click the down arrow for the font in the “Font” section. Scroll down the list, you can select each of the installed fonts on your computer.
Method 2: Enter a Specific Font Size
You can also specify a font size on the “Home” menu, if you need to apply a font size that is not included in the font size drop-down list, such as “30”. In addition, provided you need large font sizes above “72”, which is the upper limit in the font size list, you can adopt this method.
- First, select the text that you want to change font size.
- On the “Home” tab, click the box for the font in the “Font” section, where you can input the font size you desire and simply press “Enter” to change font size.
Method 3: Change Font Size via Shortcut Keys
We all know Word has many useful shortcut keys such as “Ctrl + C” and “Ctrl + V”. Less well known are the shortcut keys to change the point size of a text selection. In this section, we will introduce a way to change font sizes by 10 points with your keyboard.
Select the texts and press one of the following combination keys:
- To make the texts larger, press “Ctrl + Shift + >”.
- To make the texts smaller, press “Ctrl + Shift + <”.
Method 4: Adjust Font Size Precisely
Alternatively, you can also use another shortcut key to change the point size of texts. The difference is that you can control the point size more precisely, since it will change font sizes by 1 point every time you press the shortcut keys.
Select the texts and select one of the following combination keys:
- To make the texts larger, press “Ctrl + ]”.
- To make the texts smaller, press “Ctrl + [”.
Method 5: Set Default Font in Word
If you want to use the font settings that you desire every time you open a new document, you can set is as default font. That way, your selected font will apply to all the new documents
- Under “Home” tab, click the “Font” Dialog Box Launcher.
- A “Font” dialog comes up, you can select the options that you desire, such as font style and font size, and then click “Set As Default”.
Salvage Your Data in Times of Word Corruptions
As a regular Word user, you may have on more than one occasion, inadvertently causes Word corruptions. Also, external factors such as power failure, infection from viruses and malware will result in Word damages as well, which will render huge loss of data. In such situations, the very first tool to take use of is the in-built repair tool in Word. But still, you can take aid of external word repair, which feature powerful capabilities to repair severely word files in no time.
Author Introduction
Kelly Zhao is a data recovery expert in DataNumen, Inc., which is the world leader in data recovery technologies, including excel recovery and pdf repair software products. For more information visit www.datanumen.com
Change the size of selected text
- Select the text or cells with text you want to change. To select all text in a Word document, press Ctrl + A.
- On the Home tab, click the font size in the Font Size box. You can also type in any size you want, within the following limits:
let’s discuss this in detail below!
When working in Microsoft Word, your highest priorities should include the look and feel of your document. It’s possible that you just typed up an excellent essay or made an awesome business report. However, if you don’t format your documents correctly, people might have a hard time reading your files. This can cause dissatisfied teachers, clients or employers.
If you want to avoid making this mistake, you need to learn how to format your Word documents correctly. The very first step is learning how you can modify the size of your text, as well as the font you’re using. Follow our step-by-step guide to make your documents more readable, eye-catching and memorable.
Things you’ll need
- A device with Microsoft Word installed and activated.
How to change Text Size and Font in Word
Let’s start learning!
- Launch Word, then either open an existing document or create a new one from the welcome screen, then type in your text.
- If you only want to change the size and font of a portion of your text, you need to select it. Hold down the left mouse key and make your selection. Now, only the selected text will be affected by the font and size change. If you want to change your entire document, you need to select everything by pressing the Ctrl + A keys on your keyboard.
- To change your text to a different font or size, you need to be on the Home tab in the Ribbon.
- In the Font section, you’ll see two drop-down menus. The one on the left shows the name of the current font you’re using. The default font in Word is either Calibri or Times New Roman, you’re most likely seeing one of the two.
- The other drop-down menu shows the current size of your text. By default, Word sets the size to either 11 or 12 points.
- To change the font you’re using, open the first drop-down menu. This will display every font installed on your computer. When you hover over a font, you’ll see a preview of how it’ll look like in your document. Simply click on the font you want to use to select it.
- Similarly, you can click on the second drop-down menu with the numbers to change the text size. Hovering over a number will preview how your text will look like, and clicking on it finalizes the change.
How to Change the default text size and font in Word
You can also change the default text size and font in Word. This means that each time you start a new document, Word will automatically use the font and text size you define.
- Click on the arrow in the bottom-right corner of the Font section (again, found in the Home tab).
- A new window will appear. Here, you can select a font, modify the size of it and even apply font styles and effects. However, if you’re settings a default font, we recommend sticking to the Regular style without any effects.
- After you customized the font you want to use, click on the Set As Default button in the bottom-left corner of the window.
- Another window will come up. Here, select if you want to make your settings the default font in the currently open document only (first option), or make it the default font for all documents (second option).
- Press the OK button.
We hope that this article was able to help you learn how you can change the size and font of your text in Microsoft Word. Do you know someone who’s starting out with Word and other Microsoft Office products? Don’t forget to share this article with them! Your friends, classmates, colleagues or employees can all get help in getting started with Word. If you want to learn more about Word or other Microsoft Office suite applications, feel free to browse our section of guides.
If you’re looking for a software company you can trust for its integrity and honest business practices, look no further than SoftwareKeep. We are a Microsoft Certified Partner and a BBB Accredited Business that cares about bringing our customers a reliable, satisfying experience on the software products they need. We will be with you before, during, and after all the sales.
Learn Microsoft Word from articles in our Help Center
Here are some more content to help you learn Microsoft Word:
» How To Change Your Apple ID Password on Any Device
» 7 Microsoft Word Hacks You Need to Know in 2022
» MS Word Features: 20 Secret Functions Revealed
» How to Create a Hanging Indent in Microsoft Word
» How to make columns in Microsoft Word
» How to Fix the Spell Check Not Working in Word
» How to Install Fonts to Word on Mac
» How to Unfreeze Word on Mac Without Losing Work
» Top 14 Microsoft Word Tips and Tricks for Productivity
Final Thoughts
This guide has been about Microsoft Word. We hope you’ve learned how to use Microsoft Word and more tricks.
We’re glad you read the article up to here 

As we’ve shared above, there are more articles you can read about Microsoft Word and Microsoft Office in our Help Center and Blog.
Please share this article on your socials or with your friends. Someone else may benefit from it too.
One more thing …
Subscribe to our newsletter and be among the first to receive these documents in your inbox. We also share deals, promotions, and more through email. Don’t be left out.
Вас раздражает необходимость каждый раз изменять размер шрифта при создании документа в Word? Хотите узнать способ, как покончить с этим раз и навсегда и установить Ваш любимый размер шрифта по умолчанию для всех документов?!
Корпорация Microsoft установила в Word 2007 шрифт Calibri размером 11 после того, как долгие годы в этой роли был Times New Roman размером 12. Хоть к этому и легко привыкнуть, тем не менее в Microsoft Word можно изменить практически все настройки, заданные по умолчанию. Например, Вы можете использовать шрифт Calibri размером 12 или Comic Sans размером 48 – как Вам угодно! Далее Вы узнаете, как изменить настройки шрифта, заданные по умолчанию, в Microsoft Word 2007 и 2010.
Содержание
- Как изменить настройки шрифта в Microsoft Word
- Редактирование файла шаблона
- Заключение
Как изменить настройки шрифта в Microsoft Word
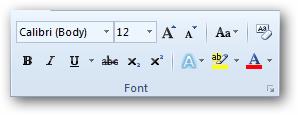
Чтобы изменить настройки шрифта, установленные по умолчанию, щелкните по маленькой иконке со стрелкой в правом нижнем углу раздела Font (Шрифт) на вкладке Home (Главная).
В диалоговом окне Font (Шрифт) установите желаемые параметры для шрифта. Обратите внимание на строку +Body (+Основной текст) в поле Font (Шрифт), она говорит о том, что сам шрифт будет определен стилем документа, который Вы выберете, а настраиваются только стиль и размер шрифта. То есть, если в настройках стиля документа использован шрифт Calibri, значит шрифт по умолчанию будет использован Calibri, а размер и стиль шрифта будут те, что Вы выберете. Если же Вы хотите установить по умолчанию какой-то определённый шрифт, просто выберите его в выпадающем списке, и этот выбор будет иметь преимущество перед тем шрифтом, который выбран в настройках стиля документа.
Здесь мы оставим все настройки без изменений, только установим размер символов шрифта равным 12 (это размер текста для тела документа). Те, кто использует азиатские языки, такие как китайский, могут увидеть поле настроек для азиатских языков. Когда параметры выбраны, нажмите кнопку Set as Default (По умолчанию) в нижнем левом углу диалогового окна.
Вас попросят подтвердить, действительно ли Вы хотите установить эти настройки по умолчанию. В Word 2010 Вам будет предложено на выбор два варианта – изменить настройки по умолчанию только для этого документа или для всех документов. Отметьте вариант All documents based on the Normal.dotm template (всех документов, основанных на шаблоне Normal.dotm) и нажмите ОК.
В Word 2007 просто нажмите ОК, чтобы сохранить изменения в настройках по умолчанию.
С этого момента каждый раз при запуске Word или при создании нового документа, Ваш шрифт, заданный по умолчанию, будет именно таким, как Вы указали. Если решите вновь изменить настройки, просто повторите все шаги заново.
Редактирование файла шаблона
Другой способ изменить настройки шрифта, заданные по умолчанию, это изменить файл Normal.dotm. Из этого файла Word создает новые документы. Обычно он просто копирует форматирование из этого файла во вновь созданный документ.
Чтобы изменить файл Normal.dotm, введите вот такое выражение в адресной строке проводника или в командной строке:
%appdata%MicrosoftTemplates
%appdata%MicrosoftШаблоны
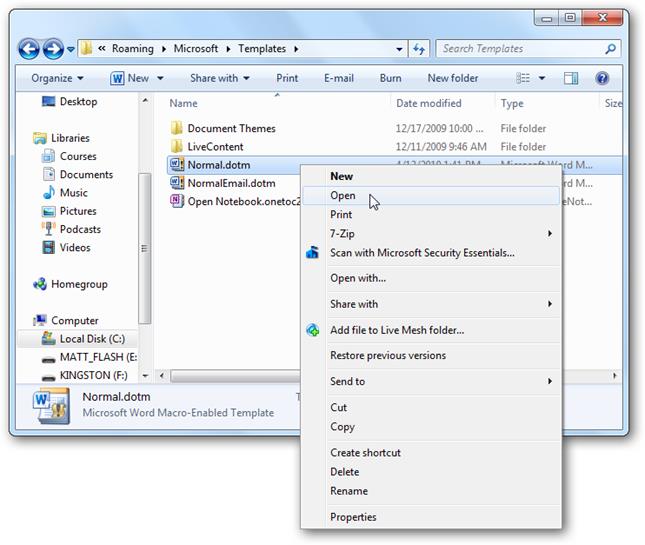
Эта команда откроет папку с шаблонами Microsoft Office. Нажмите правой кнопкой мыши на файле Normal.dotm и из контекстного меню выберите Open (Открыть), чтобы открыть файл для редактирования.
Не пытайтесь открыть файл двойным щелчком левой кнопки мыши – это приведёт всего лишь к созданию нового документа из шаблона Normal.dotm, а все изменения, которые Вы сделаете, не сохранятся в файле шаблона.
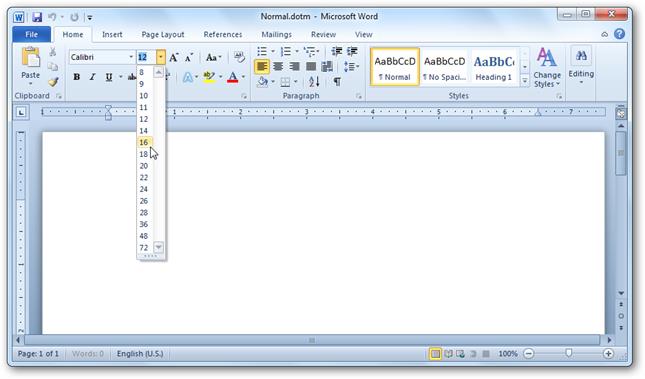
Теперь изменяйте любые настройки шрифта, как Вы это делаете обычно.
Запомните: Всё, что Вы измените или введёте в этом документе, будет появляться в каждом новом документе Word, который Вы создадите.
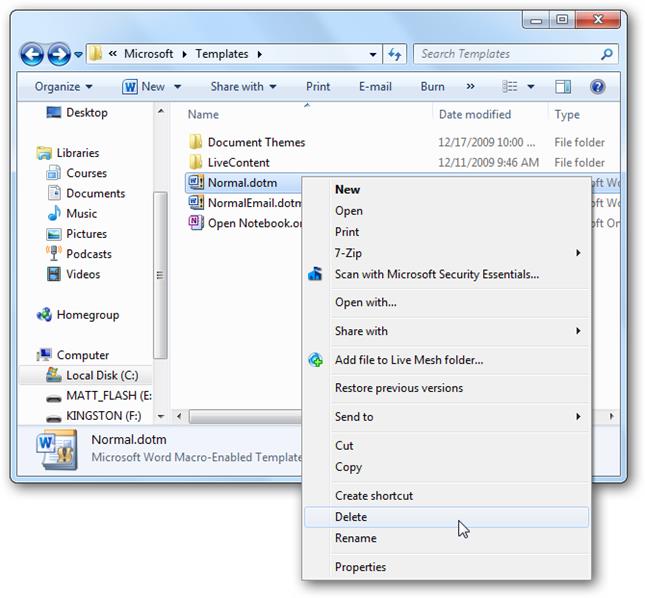
Если Вы вдруг захотите сбросить все настройки до начальных, просто удалите файл Normal.dotm. Word создаст его заново со стандартными настройками сразу же при очередном запуске программы.
Пожалуйста, помните: Изменение размера шрифта, заданного по умолчанию, не затронет размер шрифта в уже существующих документах. В них по-прежнему будут использованы настройки, заданные при создании этих документов. Кроме того, на шаблон Normal.dotm могут влиять некоторые надстройки. Если Вам кажется, что Word не запоминает настройки шрифта, попробуйте отключить надстройки и посмотрите на результат.
Заключение
Иногда мелочи могут раздражать очень сильно. Возможность настроить шрифт по умолчанию так, как Вам это нужно, отлично помогает избавиться от раздражения и сделать работу более продуктивной.
А теперь ответьте на вопрос: Какой шрифт, заданный по умолчанию, Вы предпочитаете – Calibri размер 11, Times New Roman размер 12 или какую-то другую комбинацию? Ответы пишите в комментариях, дайте миру знать, что Вам нравится!
Оцените качество статьи. Нам важно ваше мнение:
Содержание
- Как изменить шрифт?
- Как изменить размер шрифта?
- Как изменить толщину и наклон шрифта?
- Как изменить цвет и фон шрифта?
- Изменяем стиль шрифта
- Изменяем фон за текстом
- Изменяем цвет текста
- Как установить понравившийся шрифт в качестве используемого по умолчанию?
- Как изменить шрифт в формуле?
- Вопросы и ответы
В программе MS Word имеется довольно большой набор встроенных шрифтов, доступных к использованию. Проблема в том, что далеко не все пользователи знают о том, как изменить не только сам шрифт, но и его размер, толщину, а также ряд других параметров. Именно о том, как изменить шрифт в Ворде и пойдет речь в этой статье.
Урок: Как установить шрифты в Word
В Ворде есть специальный раздел для работы со шрифтами и их изменения. В новых версиях программы группа “Шрифт” расположена во вкладке “Главная”, в более ранних версиях этого продукта средства для работы со шрифтами находятся во вкладке “Разметка страницы” или “Формат”.
Как изменить шрифт?
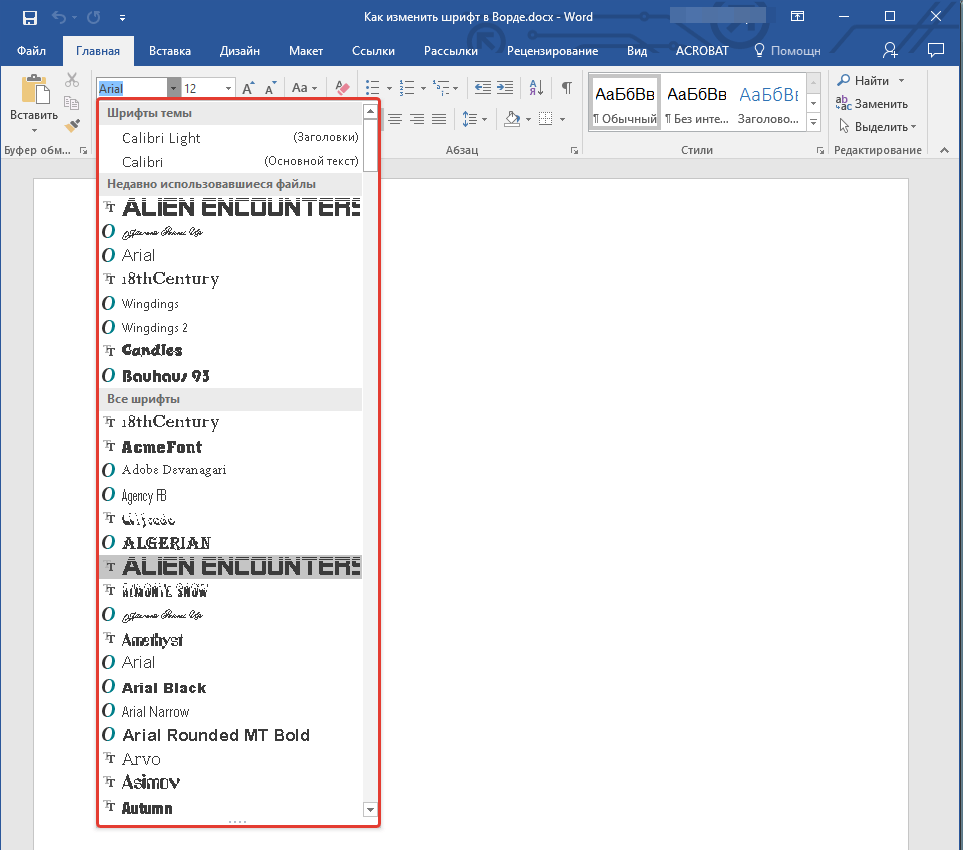
1. В группе “Шрифт” (вкладка “Главная”) разверните окошко с активным шрифтом, нажав на небольшой треугольник возле него, и выберите в списке тот, который вы хотите использовать
Примечание: В нашем примере шрифт по умолчанию — Arial, у вас он может быть другим, к примеру, Open Sans.
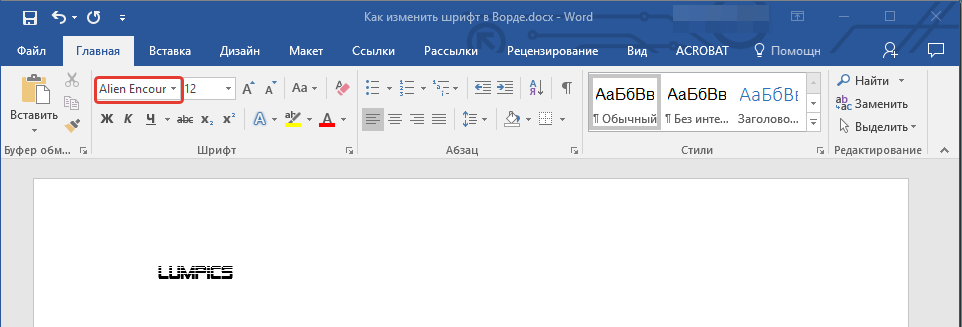
2. Активный шрифт изменится, и вы сразу же сможете начать его использовать.
Примечание: Название всех шрифтов, представленных в стандартном наборе MS Word отображается в том виде, в котором будут отображаться буквы, напечатанные этим шрифтом на листе.
Как изменить размер шрифта?
Прежде, чем изменить размер шрифта, необходимо усвоить один нюанс: если вы хотите изменить размер уже набранного текста, его сначала нужно выделить (это же касается и самого шрифта).
Нажмите “Ctrl+A”, если это весь текст в документе, или же используйте для выделения фрагмента мышку. Если же вы хотите изменить размер текста, который только планируете набирать, ничего выделять не нужно.
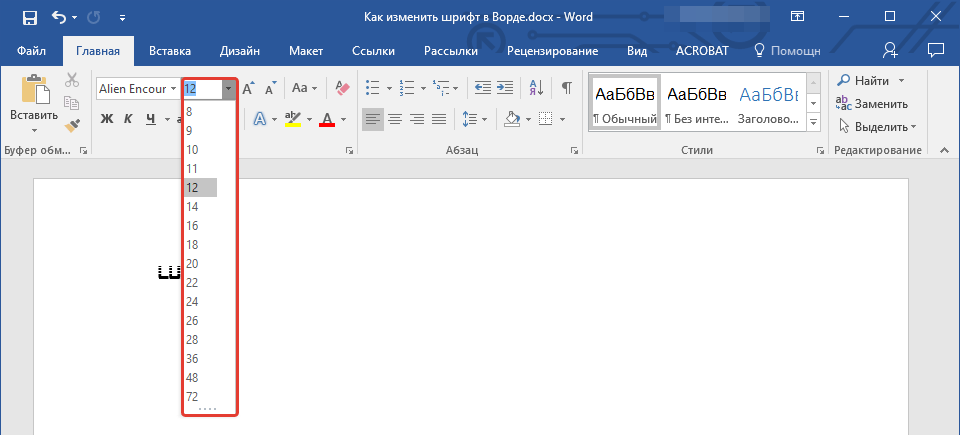
1. Разверните меню окошка, расположенного рядом с активным шрифтом (там указаны цифры).
Примечание: В нашем примере размер шрифта по умолчанию — 12, у вас он может быть другим, например, 11.
2. Выберите подходящий размер шрифта.
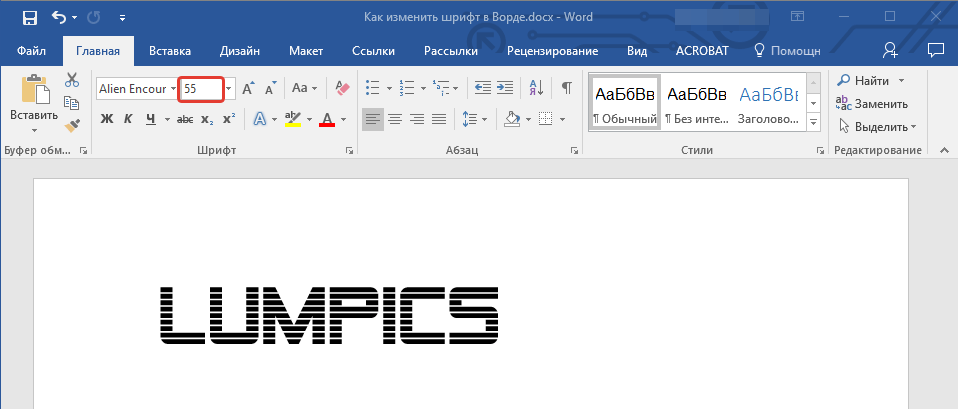
Совет: Стандартный размер шрифтов в Ворде представлен с определенным шагом в несколько единиц, а то и десятков. Если вас не устраивают конкретные значения, вы можете ввести их вручную в окне с активным размером шрифта.
3. Размер шрифта изменится.
Совет: Рядом с цифрами, показывающими значение активного шрифта, расположены две кнопки с буквой “А” — одна из них больше, другая меньше. Нажимая на эту кнопку, вы можете пошагово менять размер шрифта. Большая буква увеличивает размер, а та что поменьше — уменьшает.
Кроме того, рядом с этими двумя кнопками находится еще одна — “Аа” — развернув ее меню, вы можете выбрать подходящий тип написания текста.
Как изменить толщину и наклон шрифта?
Помимо стандартного вида больших и маленьких букв в MS Word, написанных в том или ином шрифте, они также могут быть жирными, курсивными (курсив — с наклоном), и подчеркнутыми.
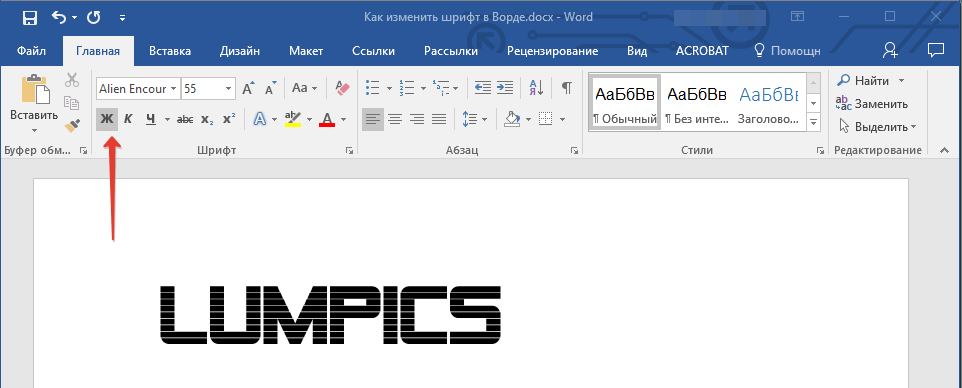
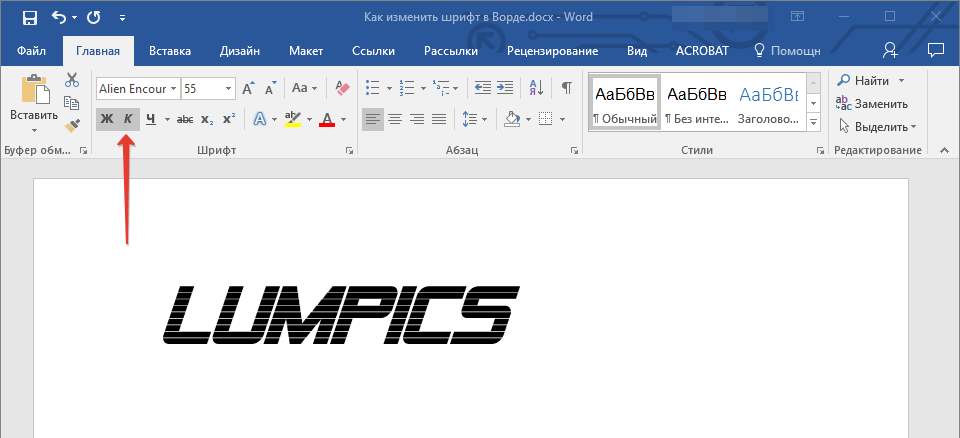
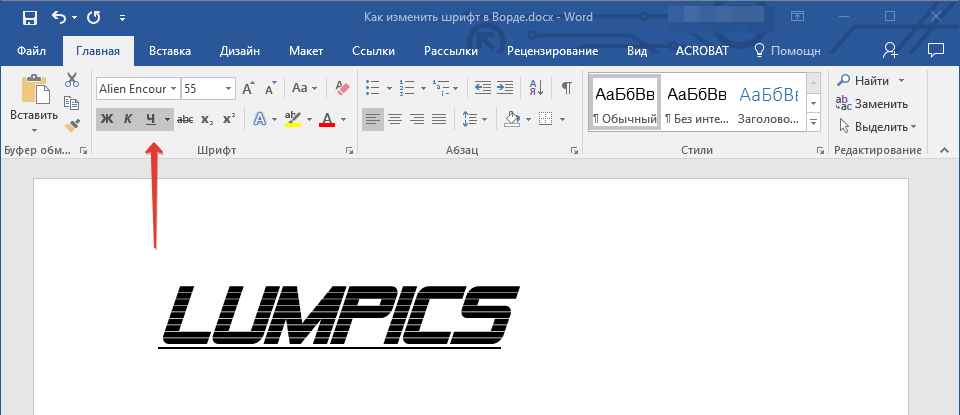
Чтобы изменить вид шрифта, выделите необходимый фрагмент текста (ничего не выделяйте, если вы только планируете что-то написать в документе новым типом шрифта), и нажмите одну из кнопок, расположенных в группе “Шрифт” на панели управления (вкладка “Главная”).
Кнопка с буквой “Ж” делает шрифт жирным (вместо нажатия кнопки на панели управления можно использовать клавиши “Ctrl+B”);
“К” — курсив (“Ctrl+I”);
“Ч” — подчеркнутый (“Ctrl+U”).
Примечание: Жирный шрифт в Ворде, хоть и обозначается буквой “Ж”, на самом деле является полужирным.
Как вы поняли, текст может быть одновременно жирным, курсивом и подчеркнутым.
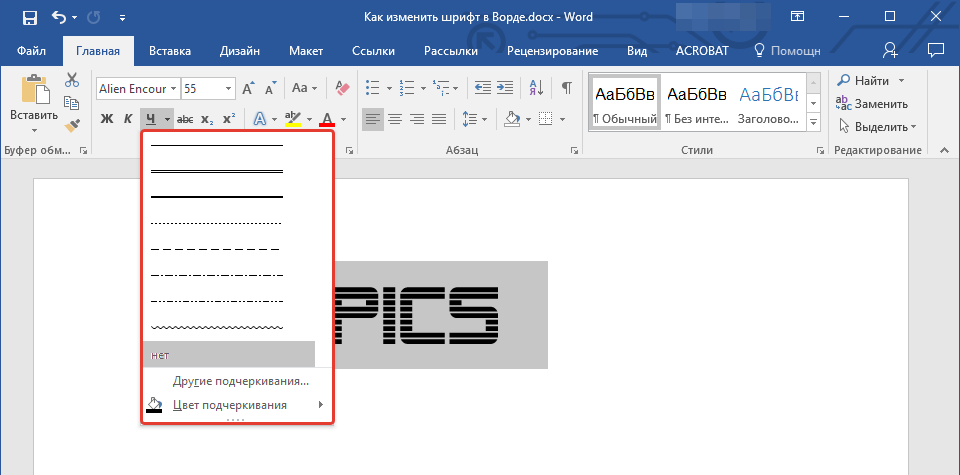
Совет: Если вы хотите выбрать толщину линии подчеркивания, нажмите на треугольничек, расположенный возле буквы “Ч” в группе “Шрифт”.
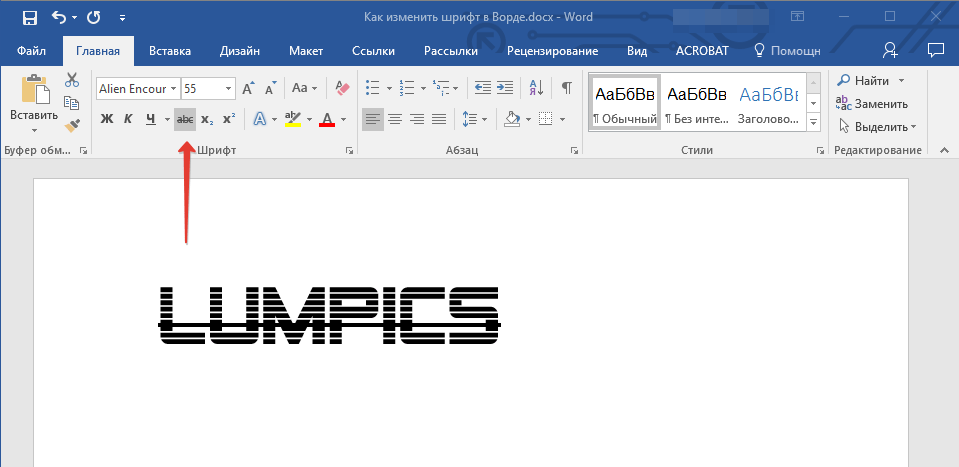
Рядом с буквами “Ж”, “К” и “Ч” в группе шрифт находится кнопка “abc” (зачеркнутые латинские буквы). Если вы выделите текст, а затем нажмете на эту кнопку, текст будет зачеркнут.
Как изменить цвет и фон шрифта?
Помимо внешнего вида шрифта в MS Word можно также изменить его стиль (текстовые эффекты и оформление), цвет и фон, на котором текст будет находиться.
Изменяем стиль шрифта
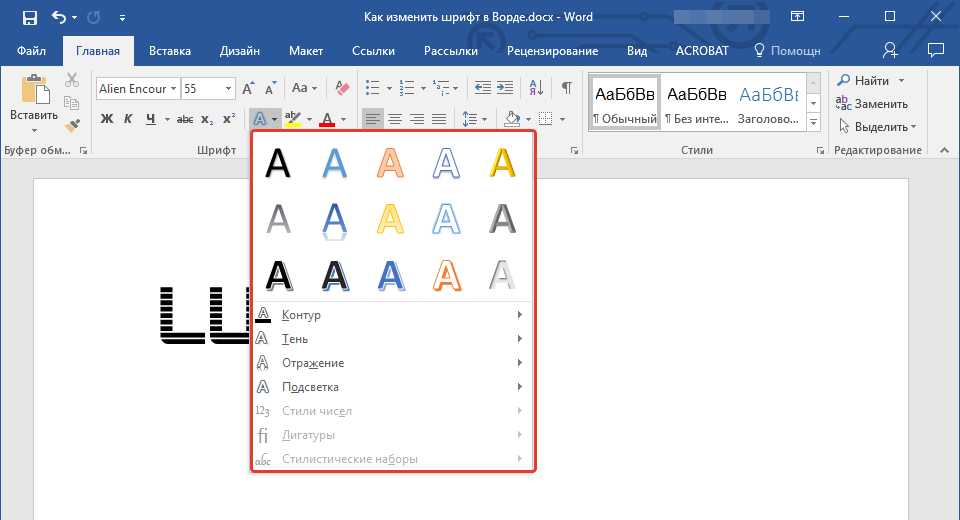
Чтобы изменить стиль шрифта, его оформление, в группе “Шрифт”, которая расположена во вкладке “Главная” (ранее “Формат” или “Разметка страницы”) нажмите на небольшой треугольник, расположенный справа от полупрозрачной буквы “А” (“Текстовые эффекты и оформление”).
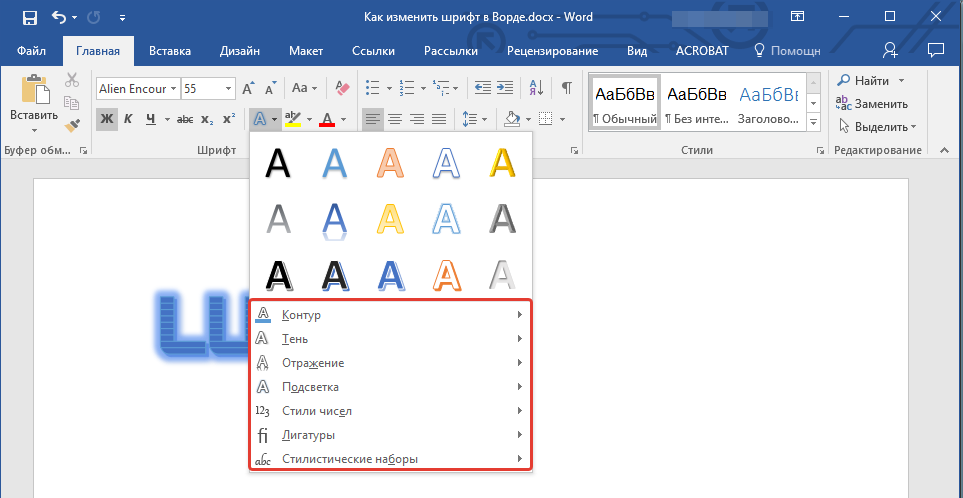
В появившемся окошке выберите то, что бы вы хотели изменить.
Важно: Помните, если вы хотите изменить внешний вид уже имеющегося текста, предварительно выделите его.
Как видите, один этот инструмент уже позволяет изменить цвет шрифта, добавить к нему тень, контур, отражение, подсветку и другие эффекты.
Изменяем фон за текстом
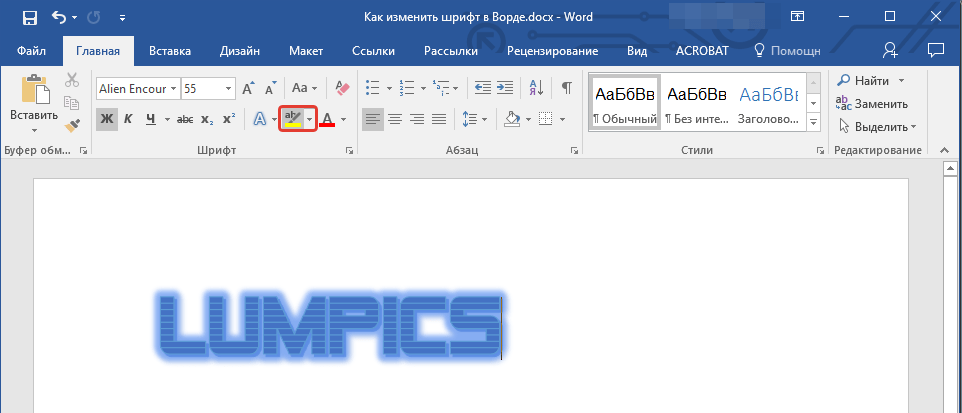
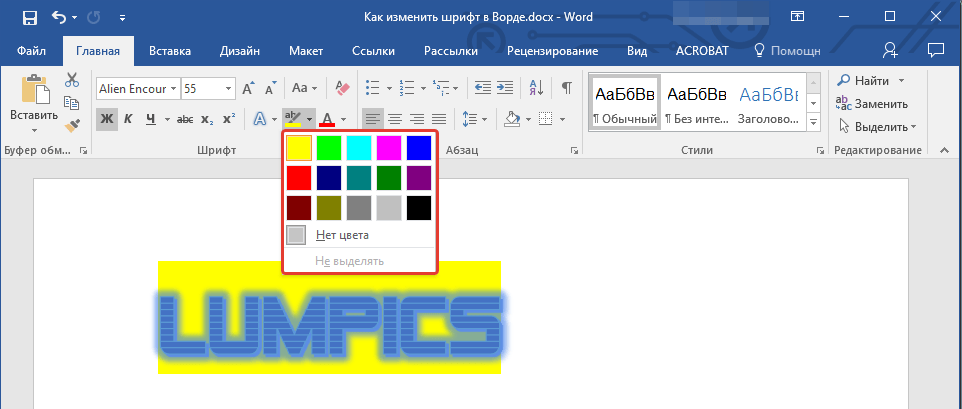
В группе “Шрифт” рядом с кнопкой, рассмотренной выше, находится кнопка “Цвет выделения текста”, с помощью которой можно изменить фон, на котором находится шрифт.
Просто выделите фрагмент текста, фон которого хотите изменить, а затем нажмите на треугольничек возле этой кнопки на панели управления и выберите подходящий фон.
Вместо стандартного белого фона, текст будет находиться на фоне того цвета, который вы выбрали.
Урок: Как убрать фон в Ворде
Изменяем цвет текста
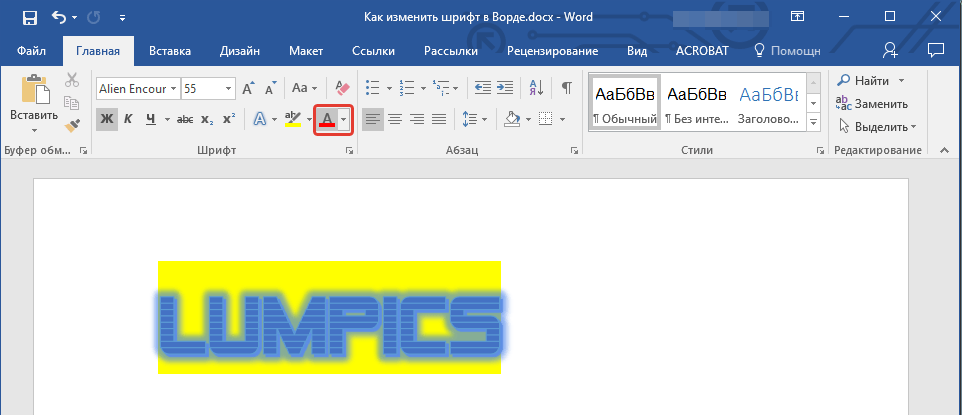
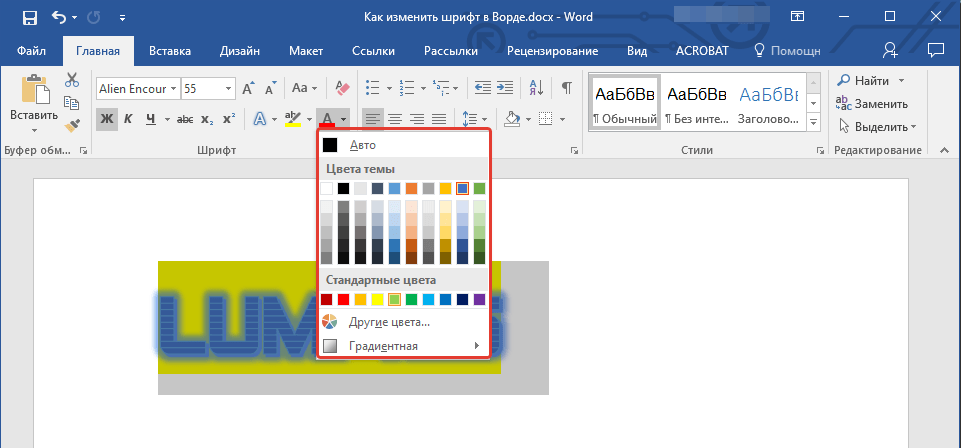
Следующая кнопка в группе “Шрифт” — “Цвет шрифта” — и, как понятно из названия, она позволяет этот самый цвет изменить.
Выделите фрагмент текста, цвет которого необходимо изменить, а затем нажмите на треугольник возле кнопки “Цвет шрифта”. Выберите подходящий цвет.
Цвет выделенного текста изменится.
Как установить понравившийся шрифт в качестве используемого по умолчанию?
Если вы часто используете для набора текста один и тот же, отличный от стандартного, доступного непосредственно при запуске MS Word, шрифт, не лишним будет установить его в качестве используемого по умолчанию — это позволит сэкономить немного времени.
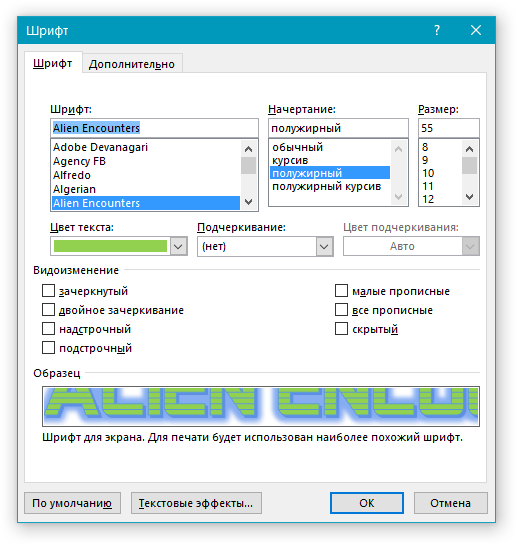
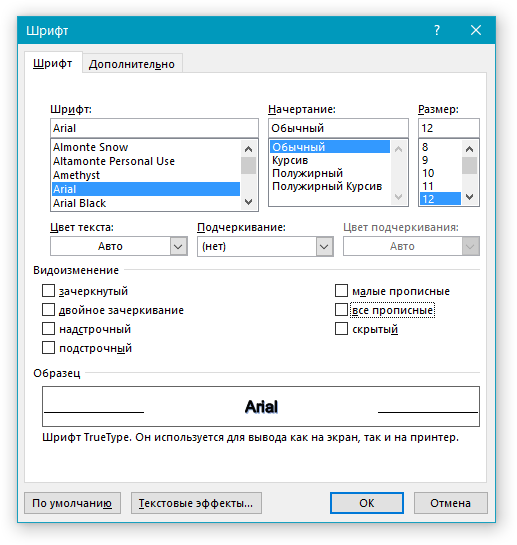
1. Откройте диалоговое окно “Шрифт”, нажав на стрелочку, расположенную в правом нижнем углу одноименной группы.
2. В разделе “Шрифт” выберите тот, который вы хотите установить в качестве стандартного, доступного по умолчанию при запуске программы.
В этом же окне вы можете установить подходящий размер шрифта, его начертание (обычный, полужирный или курсив), цвет, а также многие другие параметры.
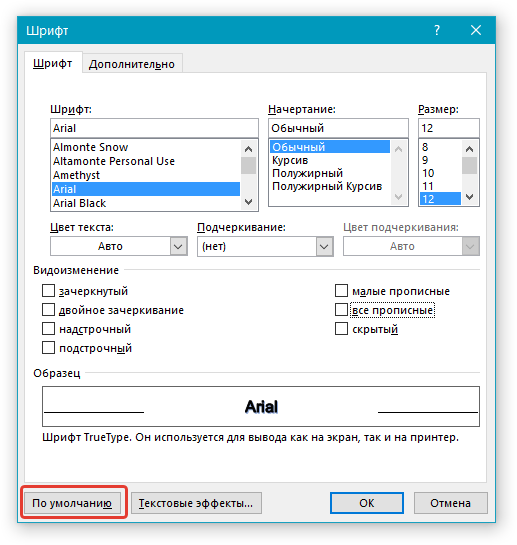
3. Выполнив необходимые настройки, нажмите на кнопку “По умолчанию”, расположенную в нижней левой части диалогового окна.
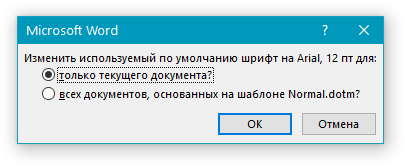
4. Выберите, как вы хотите сохранить шрифт — для текущего документа или для всех, с которыми будете работать в дальнейшем.
5. Нажмите кнопку “ОК”, чтобы закрыть окно “Шрифт”.
6. Шрифт по умолчанию, как и все дополнительные настройки, которые вы могли выполнить в этом диалоговом окне, изменится. Если вы применили его для всех последующих документов, то при каждом создание/запуске нового документа Ворд сразу же будет установлен ваш шрифт.
Как изменить шрифт в формуле?
Мы уже писали о том, как в Microsoft Word добавлять формулы, и как с ними работать, более подробно об этом вы можете узнать из нашей статьи. Здесь же мы расскажем о том, как изменить шрифт в формуле.
Урок: Как в Ворде вставить формулу
Если вы просто выделите формулу и попробуете изменить ее шрифт точно так же, как вы это делаете с любым другим текстом, ничего не получится. В данном случае действовать необходимо немного иначе.
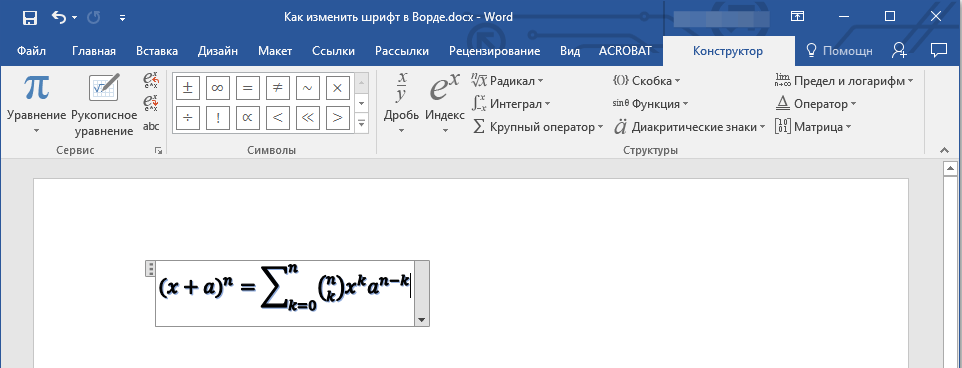
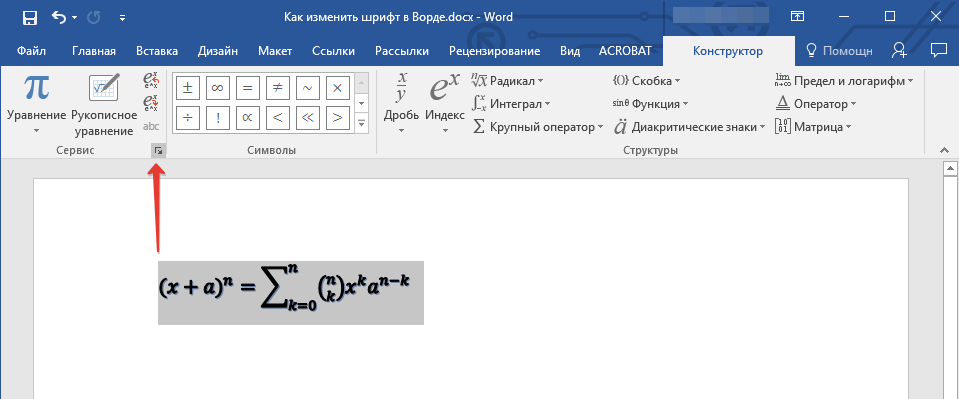
1. Перейдите во вкладку “Конструктор”, которая появляется после клика по области формулы.
2. Выделите содержимое формулы, нажав “Ctrl+A” внутри области, в которой она находится. Для этого также можно использовать мышку.
3. Откройте диалоговое окно группы “Сервис”, нажав на стрелочку, расположенную в правой нижней части этой группы.
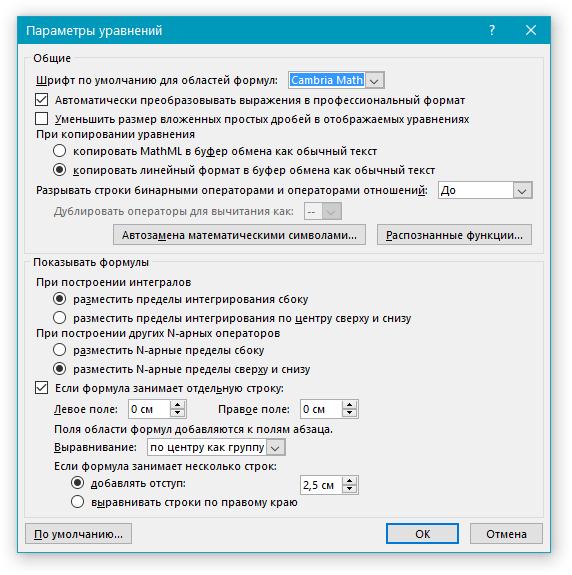
4. Перед вами откроется диалоговое окно, где в строке “Шрифт по умолчанию для областей формул” можно изменить шрифт, выбрав понравившийся из доступного списка.
Примечание: Несмотря на то, что в Word имеется довольно большой набор встроенных шрифтов, далеко не каждый из них может быть использован для формул. Кроме того, возможно, что помимо стандартного Cambria Math вы не сможете выбрать никакой другой шрифт для формулы.
На этом все, теперь вам известно, как изменить шрифт в Ворде, также из этой статьи вы узнали о том, как настроить другие параметры шрифта, в числе которых его размер, цвет и т.д. Желаем вам высокой продуктивности и успехов в освоение всех тонкостей Microsoft Word.
Are you frustrated by always having to change the font size before you create a document it Word? Here’s how you can end that frustration and set your favorite default font size for once and for all!
Microsoft changed the default font font to 11 point Calibri in Word 2007 after years of 12 point Times New Roman being the default. Although it can be easily overlooked, there are ways in Word to change the default settings to anything you want. Whether you want to change your default to 12 point Calibri or to 48 point Comic Sans…here’s how to change your default font settings in Word 2007 and 2010.
Changing Default Fonts in Word
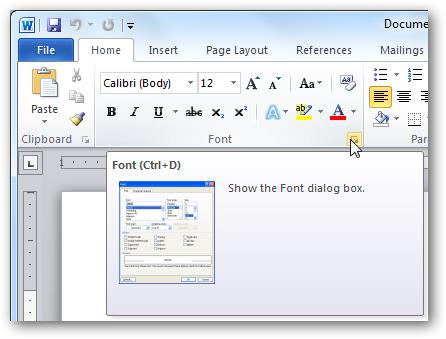
To change the default font settings, click the small box with an arrow in the lower right corner of the Font section of the Home tab in the Ribbon.
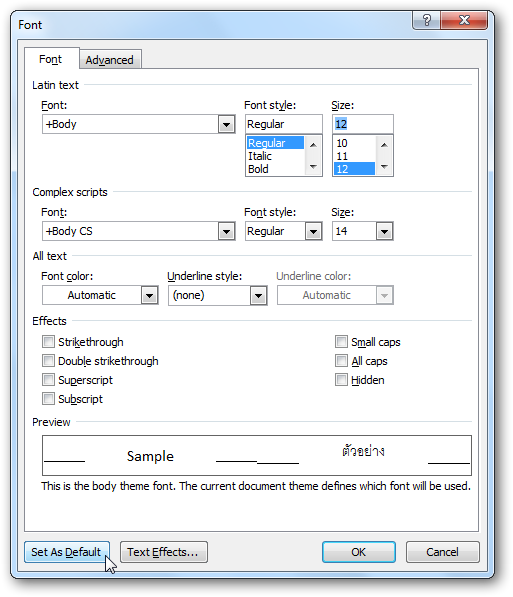
In the Font dialog box, choose the default font settings you want. Notice in the Font box it says “+Body”; this means that the font will be chosen by the document style you choose, and you are only selecting the default font style and size. So, if your style uses Calibri, then your font will be Calibri at the size and style you chose. If you’d prefer to choose a specific font to be the default, just select one from the drop-down box and this selection will override the font selection in your document style.
Here we left all the default settings, except we selected 12 point font in the Latin text box (this is your standard body text; users of Asian languages such as Chinese may see a box for Asian languages). When you’ve made your selections, click the “Set as Default” button in the bottom left corner of the dialog.
You will be asked to confirm that you want these settings to be made default. In Word 2010, you will be given the option to set these settings for this document only or for all documents. Click the bullet beside “All documents based on the Normal.dotm template?”, and then click Ok.
In Word 2007, simply click Ok to save these settings as default.
Now, whenever you open Word or create a new document, your default font settings should be set exactly to what you want. And simply repeat these steps to change your default font settings again if you want.
Editing your default template file
Another way to change your default font settings is to edit your Normal.dotm file. This file is what Word uses to create new documents; it basically copies the formatting in this document each time you make a new document.
To edit your Normal.dotm file, enter the following in the address bar in Explorer or in the Run prompt:
%appdata%MicrosoftTemplates
This will open your Office Templates folder. Right-click on the Normal.dotm file, and click Open to edit it. Note: Do not double-click on the file, as this will only create a new document based on Normal.dotm and any edits you make will not be saved in this file.
Now, change any font settings as you normally would. Remember: anything you change or enter in this document will appear in any new document you create using Word.
If you want to revert to your default settings, simply delete your Normal.dotm file. Word will recreate it with the standard default settings the next time you open Word.
Please Note: Changing your default font size will not change the font size in existing documents, so these will still show the settings you used when these documents were created. Also, some addins can affect your Normal.dotm template. If Word does not seem to remember your font settings, try disabling Word addins to see if this helps.
Conclusion
Sometimes it’s the small things that can be the most frustrating. Getting your default font settings the way you want is a great way to take away a frustration and make you more productive.
And here’s a quick question: Do you prefer the new default 11 point Calibri, or do you prefer 12 point Times New Roman or some other combination? Sound off in the comments, and let the world know your favorite font settings.
READ NEXT
- › 8 Default Microsoft Word Settings You Should Change
- › The Best How-To Geek Articles About Microsoft Office
- › 8 Microsoft Word Tips for Professional Looking Documents
- › The New NVIDIA GeForce RTX 4070 Is Like an RTX 3080 for $599
- › This New Google TV Streaming Device Costs Just $20
- › How to Adjust and Change Discord Fonts
- › Expand Your Tech Career Skills With Courses From Udemy
- › Google Chrome Is Getting Faster
How-To Geek is where you turn when you want experts to explain technology. Since we launched in 2006, our articles have been read billions of times. Want to know more?



 ..
..