
Форматирование текста в ячейке при помощи кода VBA Excel. Объект Font и его основные свойства. Примеры изменения начертания строк в заданном диапазоне.
В этой статье рассмотрены свойства шрифта (объекта Font), определяющие внешнее оформление (начертание) видимого значения ячейки. Это касается не только текста (строк), но и визуального начертания отображаемых дат и числовых значений.
Формат отображаемого значения
Когда мы из кода VBA Excel записываем в ячейку текстовое или другое значение, оно отображается в формате, присвоенном данной ячейке. Это может быть формат:
- рабочего листа по умолчанию;
- установленный для диапазона пользователем;
- примененный к диапазону из кода VBA Excel.
Если ячейка содержит текстовое значение, его начертание можно форматировать по отдельным частям (подстрокам). Такое форматирование доступно как в ручном режиме на рабочем листе, так и из кода VBA Excel.
У объекта Range есть свойство Font (шрифт), которое отвечает за форматирование (начертание) визуально отображаемого текста в ячейках рабочего листа. Его применение вызывает объект Font, который в свою очередь обладает собственным набором свойств, отвечающих за конкретный стиль начертания отображаемого значения.
| Свойство | Описание | Значения |
|---|---|---|
| Name | наименование шрифта | «Arial», «Calibri», «Courier New», «Times New Roman» и т.д. |
| Size | размер шрифта | от 1 до 409 пунктов |
| Bold | полужирное начертание | True, False |
| Italic | курсивное начертание | True, False |
| FontStyle | заменяет Bold и Italic | «обычный», «полужирный», «курсив», «полужирный курсив» |
| Superscript | надстрочный текст | True, False |
| Subscript | подстрочный текст | True, False |
| Underline | подчеркнутый текст | True, False |
| Color* | цвет текста | от 0 до 16777215 |
*Color — это не единственное свойство, отвечающее за цвет отображаемого текста в ячейке. Оно также может принимать и другие значения, кроме указанных в таблице. Смотрите подробности в статьях Цвет текста (шрифта) в ячейке и Цвет ячейки (заливка, фон).
Примеры форматирования текста
Пример 1
В этом примере ячейкам диапазона «A1:A3» присвоим шрифты разных наименований:
|
Sub Primer1() Range(«A1»).Font.Name = «Courier» Range(«A1») = «Шрифт «Courier»» Range(«A2»).Font.Name = «Verdana» Range(«A2») = «Шрифт «Verdana»» Range(«A3»).Font.Name = «Times New Roman» Range(«A3») = «Шрифт «Times New Roman»» End Sub |
Пример 2
В этом примере рассмотрим применение одного свойства объекта Font к одной ячейке:
|
Sub Primer2() Range(«A5»).Font.Bold = True Range(«A5») = «Полужирное начертание» Range(«A6»).Font.FontStyle = «полужирный курсив» Range(«A6») = «Полужирный курсив» Range(«A7»).Font.Superscript = True Range(«A7») = «Надстрочное начертание» End Sub |
Пример 3
Форматирование диапазона из нескольких ячеек:
|
Sub Primer3() With Range(«A9:C11») .Value = «Форматируем диапазон» .Font.Underline = True .Font.Color = 75962 End With End Sub |
Пример 4
Пример форматирования шрифта в разных ячейках по одному свойству:
|
1 2 3 4 5 6 7 8 9 10 11 12 13 14 15 16 17 18 19 20 21 22 |
Sub Primer4() Cells(1, 1) = «Свойство шрифта Bold = True» Cells(1, 1).Font.Bold = True Cells(2, 1) = «Свойство шрифта Color = xlGreen» Cells(2, 1).Font.Color = xlGreen Cells(3, 1) = «Свойство шрифта ColorIndex = 32» Cells(3, 1).Font.ColorIndex = 32 Cells(4, 1) = «Свойство шрифта FontStyle = ««Bold Italic»«» Cells(4, 1).Font.FontStyle = «Bold Italic» Cells(5, 1) = «Свойство шрифта Italic = True» Cells(5, 1).Font.Italic = True Cells(6, 1) = «Свойство шрифта Name = ««Courier New»«» Cells(6, 1).Font.Name = «Courier New» Cells(7, 1) = «Свойство шрифта Size = 14» Cells(7, 1).Font.Size = 14 Cells(8, 1) = «Свойство шрифта Subscript = True» Cells(8, 1).Font.Subscript = True Cells(9, 1) = «Свойство шрифта Superscript = True» Cells(9, 1).Font.Superscript = True Cells(10, 1) = «Свойство шрифта Underline = True» Cells(10, 1).Font.Underline = True End Sub |
Written by Puneet for Excel 2007, Excel 2010, Excel 2013, Excel 2016, Excel 2019, Excel for Mac
Key Notes
- To make changes in a font, you need to use the VBA Font object.
- There is a total of 18 properties with the font object that you can access and make changes.
VBA Font Object
In VBA, there is a font object which you can use to change properties of the font from a cell, like, font color, font size, font type, and you can also apply bold and italic to the font.
Syntax
expression.fontTo use it, first, you need to define the cell address, which you can specify in the following ways.
Selection.Font
Range("A1").Font
Cells(1, 1).Font
Range("A1:A5").Font
To change the color of the font, you have two different ways:
1. Using Color Constants
Excel has a few color constants that you can use to apply color to the font. For example, if you want to apply the red color to the font in cell A1, the code would be like the below:
Range("A1").Font.Color = vbRed
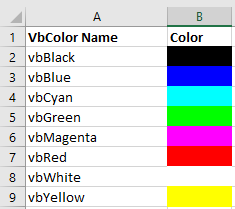
In the above code, after the font object, color is the property and you have used the vbRed constant that tells VBA to apply the red color to the cell A1. There is a total of eight constants that you can use:
- vbBlack: Black
- vbRed: Red
- vbGreen: Green
- vbYellow: Yellow
- vbBlue: Blue
- vbMagenta: Magenta
- vbCyan: Cyan
- vbWhite: White
2. Using RGB
You can also use the RGB color code to apply color to the font. RGB is the combination of red, green, and blue colors, where you can create a custom color using the code. Let’s say if you want to apply a combination of green and blue color to cell A1 the code would be:
Range("A1").Font.Color = RGB(0, 255, 255)
VBA Font Size
Font object also gives you access to the size property of the font. Let’s say you want to apply the font size of 16 to the font in the cell A1, the code would be:
Range("A1").Font.Size = 16
If you want to apply font size to all cells in a worksheet you can use the following code:
Cells.Font.Size = 16And if only want to apply font size to cells where you have data, the code would be:
ActiveSheet.UsedRange.Font.Size = 16Or to the selected cell.
Selection.Font.Size = 16VBA Font Name
In the same way, you can also change the font name using the name property of the font object. Let’s say you want to apply the “Consolas” font the cell A1. The code would be:
Range("A1").Font.Name = "Consolas"
While using this property, you need to type the correct name of the font that you want to apply, and if somehow the name is incorrect, it won’t show you an error.
VBA Font Bold, Italic, and Underline
There are also properties that you can use to make the font bold, italic, and underline. Below are the codes that you need to write for this.
Range("A1").Font.Bold = True
Range("A1").Font.Italic = True
Range("A1").Font.Underline = True
With these properties, you need to define TRUE or FALSE. So if the font is already bold or italic and you want to remove it, then you need to use FALSE to remove them.
Other Useful Font Properties
Here add a few more properties that can be useful for you (Strikethrough, Subscript, and Superscript).
Range("A1").Font.Strikethrough = True
Range("A1").Font.Subscript = True
Range("A1").Font.Superscript = True
More Tutorials
- Count Rows using VBA in Excel
- Excel VBA Hide and Unhide a Column or a Row
- Excel VBA Range – Working with Range and Cells in VBA
- Apply Borders on a Cell using VBA in Excel
- Find Last Row, Column, and Cell using VBA in Excel
- Insert a Row using VBA in Excel
- Merge Cells in Excel using a VBA Code
- Select a Range/Cell using VBA in Excel
- SELECT ALL the Cells in a Worksheet using a VBA Code
- ActiveCell in VBA in Excel
- Special Cells Method in VBA in Excel
- UsedRange Property in VBA in Excel
- VBA AutoFit (Rows, Column, or the Entire Worksheet)
- VBA ClearContents (from a Cell, Range, or Entire Worksheet)
- VBA Copy Range to Another Sheet + Workbook
- VBA Enter Value in a Cell (Set, Get and Change)
- VBA Insert Column (Single and Multiple)
- VBA Named Range | (Static + from Selection + Dynamic)
- VBA Range Offset
- VBA Sort Range | (Descending, Multiple Columns, Sort Orientation
- VBA Wrap Text (Cell, Range, and Entire Worksheet)
- VBA Check IF a Cell is Empty + Multiple Cells
⇠ Back to What is VBA in Excel
Helpful Links – Developer Tab – Visual Basic Editor – Run a Macro – Personal Macro Workbook – Excel Macro Recorder – VBA Interview Questions – VBA Codes
Return to VBA Code Examples
In this Article
- VBA Cell Font
- Change Font Color
- vbColor
- Color – RGB
- ColorIndex
- Font Size
- Bold Font
- Font Name
- Cell Style
VBA Cell Font
In VBA, you can change font properties using the VBA Font Property of the Range Object. Type the following code into the VBA Editor and you’ll see a list of all the options available:
Range("A1).Font.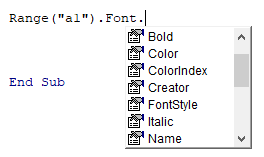
We will discuss a few of the most common properties below.
Change Font Color
There are a few ways to set font colors.
vbColor
The easiest way to set colors is with vbColors:
Range("a1").Font.Color = vbRedHowever, you’re very limited in terms of colors available. These are the only options available:
Color – RGB
You can also set colors based on RGB (Red Green Blue). Here you enter color values between 0-255 for Red, Green, and Blue. Using those three colors you can make any color:
Range("a1").Font.Color = RGB(255,255,0)ColorIndex
VBA / Excel also has a ColorIndex property. This makes pre-built colors available to you. However, they’re stored as Index numbers, which makes it hard to know what color is what:
Range("a1").Font.ColorIndex = …..We wrote an article about VBA Color codes, including a list of the VBA ColorIndex codes. There you can learn more about colors.
Font Size
This will set the font size to 12:
Range("a1").Font.Size = 12or to 16:
Range("a1").Font.Size = 16VBA Coding Made Easy
Stop searching for VBA code online. Learn more about AutoMacro — A VBA Code Builder that allows beginners to code procedures from scratch with minimal coding knowledge and with many time-saving features for all users!

Learn More
Bold Font
It is easy to set a cell font to Bold:
Range("A1").Font.Bold = Trueor to clear Bold formatting:
Range("A1").Font.Bold = FalseFont Name
To change a font name use the Name property:
Range("A1").Font.Name = "Calibri"Range("A1").Font.Name = "Arial"Range("A1").Font.Name = "Times New Roman"Cell Style
Excel offers the ability to create Cell “Styles”. Styles can be found in the Home Ribbon > Styles:

Styles allow you to save your desired Cell Formatting. Then assign that style to a new cell and all of the cell formatting is instantly applied. Including Font size, cell color, cell protections status, and anything else available from the Cell Formatting Menu:
Personally, for many of the models that I work on, I usually create an “Input” cell style:
Range("a1").Style = "Input"By using styles you can also easily identify cell types on your worksheet. The example below will loop through all the cells in the worksheet and change any cell with Style = “Input” to “InputLocked”:
Dim Cell as Range

For Each Cell in ActiveSheet.Cells
  If Cell.Style = "Input" then
    Cell.Style = "InputLocked"
  End If
Next Cell In this VBA Tutorial, you learn how to change or set the font characteristics of a cell range.
This VBA Font Tutorial is accompanied by Excel workbooks containing the data and macros I use in the examples below. You can get immediate free access to these example workbooks by subscribing to the Power Spreadsheets Newsletter.
Use the following Table of Contents to navigate to the section you’re interested in.
Related Excel VBA and Macro Tutorials
The following VBA and Macro Tutorials may help you better understand and implement the contents below:
- General VBA constructs and structures:
- Learn the basics of how to work with macros here.
- Learn about essential VBA terms here.
- Learn how to enable and disable macros here.
- Learn how to work with the Visual Basic Editor (VBE) here.
- Learn how to create object references here.
- Learn about the R1C1-style system here.
- Learn how to create Sub procedures here.
- Learn how to declare and work with variables here.
- Learn how to work with VBA data types here.
- Learn how to work with object properties here.
- Learn how to work with functions in VBA here.
- Learn how to work with loops here.
- Practical VBA applications and macro examples:
- Learn how to refer to worksheets here.
- Learn how to refer to cell ranges here.
- Learn how to find the last row in a worksheet here.
- Learn how to find the last column in a worksheet here.
- Learn how to specify a column’s width here.
- Learn how to identify empty cells here.
- Learn how to clear a cell here.
You can find additional VBA and Macro Tutorials in the Archives.
#1: Change or set font with theme fonts
VBA code to change or set font with theme fonts
To change or set the font by referring to the applicable theme fonts, use a statement with the following structure:
Range.Font.ThemeFont = xlThemeFontConstant
Process to change or set font with theme fonts
To change or set the font by referring to the applicable theme fonts, follow these steps:
- Identify the cell range whose font you modify (Range).
- Refer to the Font object representing Range’s font (Font).
- Set the Font.ThemeFont property to an xlThemeFont constant (Font.ThemeFont = xlThemeFontConstant), which specifies the theme font to be used.
VBA statement explanation
Item: Range
Range object representing the cell range whose font you modify.
You can usually work with, among others, the following properties to refer to this Range object:
- Worksheet.Range.
- Worksheet.Cells.
Item: Font
The Range.Font property returns a Font object representing Range’s font.
Item: ThemeFont
The Font.ThemeFont property sets the font by referring to the applicable theme fonts.
Item: =
The assignment operator assigns a new value (xlThemeFontConstant) to the Font.ThemeFont property.
Item: xlThemeFontConstant
The constants in the xlThemeFont enumeration specify the theme font. Therefore, set the Font.ThemeFont property to one of the following xlThemeFont constants:
| xlThemeFont constant | Value | Description |
| xlThemeFontMajor | 2 | Major theme font |
| xlThemeFontMinor | 1 | Minor theme font |
| xlThemeFontNone | 0 | Don’t use a theme font |
Macro example to change or set font with theme fonts
The following macro example sets the font in cell A5 (Range(“A5”)) of the “VBA Font” worksheet (Worksheets(“VBA Font”)) in the workbook where the macro is stored (ThisWorkbook) to the major theme font (font.ThemeFont = xlThemeFontMajor).
Sub fontThemeFont()
    'Source: https://powerspreadsheets.com/
    'sets the font by referring to applicable theme fonts
    'For further information: https://powerspreadsheets.com/excel-vba-font/

    'specify the theme font from the applied font scheme
    ThisWorkbook.Worksheets("VBA Font").Range("A5").font.ThemeFont = xlThemeFontMajor

End Sub
Effects of executing macro example to change or set font with theme fonts
The following GIF illustrates the results of executing the macro example. As expected, Excel sets the font of cell A5 to the major theme font.

#2: Change or set font name
VBA code to change or set font name
To change or set the font name, use a statement with the following structure:
Range.Font.Name = "FontName"
Process to change or set font name
To change or set the font name, follow these steps:
- Identify the cell range whose font you name you change (Range).
- Refer to the Font object representing Range’s font (Font).
- Set the Font.Name property to a string specifying the font you use (Font.Name = “FontName”).
VBA statement explanation
Item: Range
Range object representing the cell range whose font name you change.
You can usually work with, among others, the following properties to refer to this Range object:
- Worksheet.Range.
- Worksheet.Cells.
Item: Font
The Range.Font property returns a Font object representing Range’s font.
Item: Name
The Font.Name property sets the font’s name.
Item: =
The assignment operator assigns a new value (“FontName”) to the Font.Name property.
Item: “FontName”
Set the Font.Name property to a string specifying the font you use (FontName).
If you explicitly declare a variable to represent “FontName”, work with the String data type.
Macro example to change or set font name
The following macro example sets the font in cell A6 (Range(“A6”)) of the “VBA Font” worksheet (Worksheets(“VBA Font”)) in the workbook where the macro is stored (ThisWorkbook) to Verdana (font.Name = “Verdana”).
Sub fontName()
    'Source: https://powerspreadsheets.com/
    'sets the font
    'For further information: https://powerspreadsheets.com/excel-vba-font/

    'specify the font name
    ThisWorkbook.Worksheets("VBA Font").Range("A6").font.Name = "Calibri"

End Sub
Effects of executing macro example to change or set font name
The following GIF illustrates the results of executing the macro example. As expected, Excel sets the font of cell A6 to Verdana.

#3: Change or set font size
VBA code to change or set font size
To change or set the font size, use a statement with the following structure:
Range.Font.Size = FontSize#
Process to change or set font size
To change or set the font size, follow these steps:
- Identify the cell range whose font size you change (Range).
- Refer to the Font object representing Range’s font (Font).
- Set the Font.Size property to a number specifying the size (in points) of the font you use (Font.Size = FontSize#).
VBA statement explanation
Item: Range
Range object representing the cell range whose font size you change.
You can usually work with, among others, the following properties to refer to this Range object:
- Worksheet.Range.
- Worksheet.Cells.
Item: Font
The Range.Font property returns a Font object representing Range’s font.
Item: Size
The Font.Size property sets the font’s size.
Item: =
The assignment operator assigns a new value (FontSize#) to the Font.Size property.
Item: FontSize#
Set the Font.Size property to a number specifying the size (in points) of the font you use (FontSize#).
Macro example to change or set font size
The following macro example sets the font size of cell A7 (Range(“A7”)) of the “VBA Font” worksheet (Worksheets(“VBA Font”)) in the workbook where the macro is stored (ThisWorkbook) to 13 (font.Size = 13).
Sub fontSize()
    'Source: https://powerspreadsheets.com/
    'sets the font size
    'For further information: https://powerspreadsheets.com/excel-vba-font/

    'specify the font size
    ThisWorkbook.Worksheets("VBA Font").Range("A7").font.Size = 13

End Sub
Effects of executing macro example to change or set font size
The following GIF illustrates the results of executing the macro example. As expected, Excel sets the font size of cell A7 to 13.

#4: Change or set font style
VBA code to change or set font style
To change or set the font style, use a statement with the following structure:
Range.Font.FontStyle = "FontStyle"
Process to change or set font style
To change or set the font style, follow these steps:
- Identify the cell range whose font you style you change (Range).
- Refer to the Font object representing Range’s font (Font).
- Set the Font.Style property to a string specifying the font style you use (Font.FontStyle = “FontStyle”).
VBA statement explanation
Item: Range
Range object representing the cell range whose font style you change.
You can usually work with, among others, the following properties to refer to this Range object:
- Worksheet.Range.
- Worksheet.Cells.
Item: Font
The Range.Font property returns a Font object representing Range’s font.
Item: FontStyle
The Font.FontStyle property sets the font style.
Item: =
The assignment operator assigns a new value (“FontStyle”) to the Font.FontStyle property.
Item: “FontStyle”
Set the Font.FontStyle property to one of the following strings (FontStyle):
- Regular;
- Italic;
- Bold; or
- Bold Italic.
Macro example to change or set font style
The following macro example sets the font style of cell A8 (Range(“A8”)) of the “VBA Font” worksheet (Worksheets(“VBA Font”)) in the workbook where the macro is stored (ThisWorkbook) to bold and italic (font.fontStyle = “Bold Italic”).
Sub fontStyle()
    'Source: https://powerspreadsheets.com/
    'sets the font style
    'For further information: https://powerspreadsheets.com/excel-vba-font/

    'specify the font style
    ThisWorkbook.Worksheets("VBA Font").Range("A8").font.fontStyle = "Bold Italic"

End Sub
Effects of executing macro example to change or set font style
The following GIF illustrates the results of executing the macro example. As expected, Excel sets the font style of cell A8 to bold and italic.

#5: Set font bold
VBA code to set font bold
To set the font to bold, use a statement with the following structure:
Range.Font.Bold = True
Process to set font bold
To set the font to bold, follow these steps:
- Identify the cell range whose font you set to bold (Range).
- Refer to the Font object representing Range’s font (Font).
- Set the Font.Bold property to True (Font.Bold = True).
VBA statement explanation
Item: Range
Range object representing the cell range whose font you set to bold.
You can usually work with, among others, the following properties to refer to this Range object:
- Worksheet.Range.
- Worksheet.Cells.
Item: Font
The Range.Font property returns a Font object representing Range’s font.
Item: Bold
The Font.Bold property sets the font to bold (or not bold).
Item: =
The assignment operator assigns a new value (True) to the Font.Bold property.
Item: True
To make the font bold, set the Font.Bold property to True.
To remove the font’s bold formatting, set the Font.Bold property to False.
Macro example to set font bold
The following macro example makes the font of cell A9 (Range(“A9”)) of the “VBA Font” worksheet (Worksheets(“VBA Font”)) in the workbook where the macro is stored (ThisWorkbook) bold (font.Bold = True).
Sub fontBold()
    'Source: https://powerspreadsheets.com/
    'sets font to bold
    'For further information: https://powerspreadsheets.com/excel-vba-font/

    'make font bold
    ThisWorkbook.Worksheets("VBA Font").Range("A9").font.Bold = True

End Sub
Effects of executing macro example to set font bold
The following GIF illustrates the results of executing the macro example. As expected, Excel makes the font of cell A9 bold.

#6: Set font italic
VBA code to set font italic
To set the font to italic, use a statement with the following structure:
Range.Font.Italic = True
Process to set font italic
To set the font to italic, follow these steps:
- Identify the cell range whose font you set to italic (Range).
- Refer to the Font object representing Range’s font (Font).
- Set the Font.Italic property to True (Font.Italic = True).
VBA statement explanation
Item: Range
Range object representing the cell range whose font you set to italic.
You can usually work with, among others, the following properties to refer to this Range object:
- Worksheet.Range.
- Worksheet.Cells.
Item: Font
The Range.Font property returns a Font object representing Range’s font.
Item: Italic
The Font.Italic property sets the font to italic (or not italic).
Item: =
The assignment operator assigns a new value (True) to the Font.Italic property.
Item: True
To make the font italic, set the Font.Italic property to True.
To remove the font’s italic formatting, set the Font.Bold property to False.
Macro example to set font italic
The following macro example makes the font of cell A10 (Range(“A10”)) of the “VBA Font” worksheet (Worksheets(“VBA Font”)) in the workbook where the macro is stored (ThisWorkbook) italic (font.Italic = True).
Sub fontItalic()
    'Source: https://powerspreadsheets.com/
    'sets font style to italic
    'For further information: https://powerspreadsheets.com/excel-vba-font/

    'make font italic
    ThisWorkbook.Worksheets("VBA Font").Range("A10").font.Italic = True

End Sub
Effects of executing macro example to set font italic
The following GIF illustrates the results of executing the macro example. As expected, Excel makes the font of cell A10 italic.

#7: Set font underline
VBA code to set font underline
To underline the font, use a statement with the following structure:
Range.Font.Underline = xlUnderlineStyleConstant
Process to set font underline
To underline the font, follow these steps:
- Identify the cell range whose font you underline (Range).
- Refer to the Font object representing Range’s font (Font).
- Set the Font.Underline property to an xlUnderlineStyle constant (Font.Underline = xlUnderlineStyleConstant), which specifies the type of font underline.
VBA statement explanation
Item: Range
Range object representing the cell range whose font you underline.
You can usually work with, among others, the following properties to refer to this Range object:
- Worksheet.Range.
- Worksheet.Cells.
Item: Font
The Range.Font property returns a Font object representing Range’s font.
Item: Underline
The Font.Underline property sets the type of font underline.
Item: =
The assignment operator assigns a new value (xlUnderlineStyleConstant) to the Font.Underline property.
Item: xlUnderlineStyleConstant
The constants in the xlUnderlineStyle enumeration specify the type of font underline. Therefore, set the Font.Underline property to one of the following xlUnderlineStyle constants:
| xlUnderlineStyle constant | Value |
| xlUnderlineStyleDouble | -4119 |
| xlUnderlineStyleDoubleAccounting | 5 |
| xlUnderlineStyleNone | -4142 |
| xlUnderlineStyleSingle | 2 |
| xlUnderlineStyleSingleAccounting | 4 |
Macro example to set font underline
The following macro example underlines with a double line (font.Underline = xlUnderlineStyleDouble) the font of cell A11 (Range(“A11”)) of the “VBA Font” worksheet (Worksheets(“VBA Font”)) in the workbook where the macro is stored (ThisWorkbook).
Sub fontUnderline()
    'Source: https://powerspreadsheets.com/
    'underlines the font
    'For further information: https://powerspreadsheets.com/excel-vba-font/

    'underline the font
    ThisWorkbook.Worksheets("VBA Font").Range("A11").font.Underline = xlUnderlineStyleDouble

End Sub
Effects of executing macro example to set font underline
The following GIF illustrates the results of executing the macro example. As expected, Excel underlines the font of cell A11 with a double line.

#8: Set font strikethrough
VBA code to set font strikethrough
To strike the font through, use a statement with the following structure:
Range.Font.Strikethrough = True
Process to set font strikethrough
To strike the font through, follow these steps:
- Identify the cell range whose font you strike through (Range).
- Refer to the Font object representing Range’s font (Font).
- Set the Font.Strikethrough property to True (Font.Strikethrough = True).
VBA statement explanation
Item: Range
Range object representing the cell range whose font you strike through.
You can usually work with, among others, the following properties to refer to this Range object:
- Worksheet.Range.
- Worksheet.Cells.
Item: Font
The Range.Font property returns a Font object representing Range’s font.
Item: Strikethrough
The Font.Strikethrough property strikes through (or not) the font with a horizontal line.
Item: =
The assignment operator assigns a new value (True) to the Font.Strikethrough property.
Item: True
To strike through the font with a horizontal line, set the Font.Strikethrough property to True.
To remove a font’s strike through horizontal line, set the Font.Strikethrough property to False.
Macro example to set font strikethrough
The following macro example strikes through (font.Strikethrough = True) the font of cell A12 (Range(“A12”)) of the “VBA Font” worksheet (Worksheets(“VBA Font”)) in the workbook where the macro is stored (ThisWorkbook).
Sub fontStrikethrough()
    'Source: https://powerspreadsheets.com/
    'strikes font through
    'For further information: https://powerspreadsheets.com/excel-vba-font/

    'strike through font
    ThisWorkbook.Worksheets("VBA Font").Range("A12").font.Strikethrough = True

End Sub
Effects of executing macro example to set font strikethrough
The following GIF illustrates the results of executing the macro example. As expected, Excel strikes the font of cell A12 through.

#9: Change or set font color with RGB color model
VBA code to change or set font color with RGB color model
To change or set the font color with the RGB color model, use a statement with the following structure:
Range.Font.Color = RGB(Red, Green, Blue)
Process to change or set font color with RGB color model
To change or set the font color with the RGB color model, follow these steps:
- Identify the cell range whose font color you change with the RGB color model (Range).
- Refer to the Font object representing Range’s font (Font).
- Specify the red, green and blue components of the color with the RGB function (RGB(Red, Green, Blue)).
- Set the Font.Color property to the value returned by the RGB Function (Font.Color = RGB(Red, Green, Blue)).
VBA statement explanation
Item: Range
Range object representing the cell range whose font color you change with the RGB color model.
You can usually work with, among others, the following properties to refer to this Range object:
- Worksheet.Range.
- Worksheet.Cells.
Item: Font
The Range.Font property returns a Font object representing Range’s font.
Item: Color
The Font.Color property sets the font color using a numeric value.
Item: =
The assignment operator assigns a new value (returned by the RGB function) to the Font.Color property.
Item: RGB(Red, Green, Blue)
Theoretically, you can set the Font.Color property to a value specifying the font color you use.
In practice, you can use the RGB function to obtain the value specifying the font color. For these purposes, specify the Red, Green and Blue components of the color.
When working with the RGB function, consider the following:
- Specify each component (Red, Green and Blue) as numbers between 0 and 255 (inclusive).
- If you use a value exceeding 255, VBA assumes that the value is 255.
Macro example to change or set font color with RGB color model
The following macro example sets the font color of cell A13 (Range(“A13”)) of the “VBA Font” worksheet (Worksheets(“VBA Font”)) in the workbook where the macro is stored (ThisWorkbook) to red with the RGB color model (font.Color = RGB(255, 0, 0)).
Sub fontColorRgb()
'Source: https://powerspreadsheets.com/
'sets font color using RGB color model
'For further information: https://powerspreadsheets.com/excel-vba-font/

'specify font color with RGB function
ThisWorkbook.Worksheets("VBA Font").Range("A13").font.Color = RGB(255, 0, 0)

End Sub
Effects of executing macro example to change or set font color with RGB color model
The following GIF illustrates the results of executing the macro example. As expected, Excel sets the font color of cell A13 to red with the RGB color model.

#10: Change or set font color with color index (ColorIndex)
VBA code to change or set font color with color index (ColorIndex)
To change or set the font color with the ColorIndex property, use a statement with the following structure:
Range.Font.ColorIndex = ColorIndex#
Process to change or set font color with color index (ColorIndex)
To change or set the font color with the ColorIndex property, follow these steps:
- Identify the cell range whose font color you change with the ColorIndex property (Range).
- Refer to the Font object representing Range’s font (Font).
- Set the Font.ColorIndex property to a value between 0 and 56 or an xlColorIndex constant (Font.ColorIndex = ColorIndex#).
VBA statement explanation
Item: Range
Range object representing the cell range whose font color you change with the ColorIndex property.
You can usually work with, among others, the following properties to refer to this Range object:
- Worksheet.Range.
- Worksheet.Cells.
Item: Font
The Range.Font property returns a Font object representing Range’s font.
Item: ColorIndex
The Font.ColorIndex property sets the font color using the current color palette or a constant from the xlColorIndex enumeration.
Item: =
The assignment operator assigns a new value (ColorIndex#) to the Font.ColorIndex property.
Item: ColorIndex#
Set the Font.ColorIndex to one of the following:
- A value between 0 and 56, representing a color from the current color palette.
- One of the following xlColorIndex constants:
- xlColorIndexAutomatic (-4105), which represents automatic color.
- xlColorIndexNone (-4142), which represents no color.
Macro example to change or set font color with color index (ColorIndex)
The following macro example sets the font color of cell A14 (Range(“A14”)) of the “VBA Font” worksheet (Worksheets(“VBA Font”)) in the workbook where the macro is stored (ThisWorkbook) to blue with the ColorIndex property (font.ColorIndex = 5).
Sub fontColorIndex()
    'Source: https://powerspreadsheets.com/
    'sets the font color by referring to the current color palette or a constant
    'For further information: https://powerspreadsheets.com/excel-vba-font/

    'specify font color as index value of the current color palette or an XlColorIndex constant
    ThisWorkbook.Worksheets("VBA Font").Range("A14").font.ColorIndex = 5

End Sub
Effects of executing macro example to change or set font color with color index (ColorIndex)
The following GIF illustrates the results of executing the macro example. As expected, Excel sets the font color of cell A14 to blue with the ColorIndex property.

#11: Set font color to Automatic
VBA code to set font color to Automatic
To set the font color to Automatic (within the color palette), use a statement with the following structure:
Range.Font.ColorIndex = xlColorIndexAutomatic
Process to set font color to Automatic
To set the font color to Automatic (within the color palette), follow these steps:
- Identify the cell range whose font color you set to Automatic (Range).
- Refer to the Font object representing Range’s font (Font).
- Set the Font.ColorIndex property to xlColorIndexAutomatic (Font.ColorIndex = xlColorIndexAutomatic).
VBA statement explanation
Item: Range
Range object representing the cell range whose font color you set to Automatic (within the color palette).
You can usually work with, among others, the following properties to refer to this Range object:
- Worksheet.Range.
- Worksheet.Cells.
Item: Font
The Range.Font property returns a Font object representing Range’s font.
Item: ColorIndex
The Font.ColorIndex property sets the font color using the current color palette or a constant from the xlColorIndex enumeration.
Item: =
The assignment operator assigns a new value (xlColorIndexAutomatic) to the Font.ColorIndex property.
Item: xlColorIndexAutomatic
To set the font color to Automatic, set the Font.ColorIndex to:
- xlColorIndexAutomatic (-4105); or
- 0.
Macro example to set font color to Automatic
The following macro example sets the font color of cell A15 (Range(“A15”)) of the “VBA Font” worksheet (Worksheets(“VBA Font”)) in the workbook where the macro is stored (ThisWorkbook) to Automatic (font.ColorIndex = xlColorIndexAutomatic).
Sub fontColorAutomatic()
    'Source: https://powerspreadsheets.com/
    'sets the font color to automatic
    'For further information: https://powerspreadsheets.com/excel-vba-font/

    'specify the font color as Automatic
    ThisWorkbook.Worksheets("VBA Font").Range("A15").font.ColorIndex = xlColorIndexAutomatic

End Sub
Effects of executing macro example to set font color to Automatic
The following GIF illustrates the results of executing the macro example. As expected, Excel sets the font color of cell A15 to Automatic (from blue).

#12: Change or set font color with theme color scheme (ThemeColor, xlThemeColorAccent)
VBA code to change or set font color with theme color scheme (ThemeColor, xlThemeColorAccent)
To change or set the font color with the theme color scheme, use a statement with the following structure:
Range.Font.ThemeColor = xlThemeColorConstant
Process to change or set font color with theme color scheme (ThemeColor, xlThemeColorAccent)
To change or set the font color with the theme color scheme, follow these steps:
- Identify the cell range whose font color you change with the theme color scheme (Range).
- Refer to the Font object representing Range’s font (Font).
- Set the Font.ThemeColor property to an xlThemeColor constant (Font.ThemeColor = xlThemeColorConstant).
VBA statement explanation
Item: Range
Range object representing the cell range whose font color you change with the theme color scheme.
You can usually work with, among others, the following properties to refer to this Range object:
- Worksheet.Range.
- Worksheet.Cells.
Item: Font
The Range.Font property returns a Font object representing Range’s font.
Item: ThemeColor
The Font.ThemeColor property sets the font color using the theme color scheme.
Item: =
The assignment operator assigns a new value (xlThemeColorConstant) to the Font.ThemeColor property.
Item: xlThemeColorConstant
The constants in the xlThemeColor enumeration specify the theme color. Therefore, set the Font.ThemeColor property to one of the following xlThemeColor constants:
| xlThemeColor constant | Value | Description |
| xlThemeColorAccent1 | 5 | Accent 1. |
| xlThemeColorAccent2 | 6 | Accent 2. |
| xlThemeColorAccent3 | 7 | Accent 3. |
| xlThemeColorAccent4 | 8 | Accent 4. |
| xlThemeColorAccent5 | 9 | Accent 5. |
| xlThemeColorAccent6 | 10 | Accent 6. |
| xlThemeColorDark1 | 1 | Dark 1. |
| xlThemeColorDark2 | 3 | Dark 2. |
| xlThemeColorFollowedHyperlink | 12 | Followed hyperlink. |
| xlThemeColorHyperlink | 11 | Hyperlink. |
| xlThemeColorLight1 | 2 | Light 1. |
| xlThemeColorLight2 | 4 | Light 2. |
Macro example to change or set font color with theme color scheme (ThemeColor, xlThemeColorAccent)
The following macro example sets the font color of cell A16 (Range(“A16”)) of the “VBA Font” worksheet (Worksheets(“VBA Font”)) in the workbook where the macro is stored (ThisWorkbook) to the accent 1 of the theme color (font.ThemeColor = xlThemeColorAccent1).
Sub fontThemeColor()
    'Source: https://powerspreadsheets.com/
    'sets font color by referring to applicable theme colors
    'For further information: https://powerspreadsheets.com/excel-vba-font/

    'specify the font color from the theme color scheme
    ThisWorkbook.Worksheets("VBA Font").Range("A16").font.ThemeColor = xlThemeColorAccent1

End Sub
Effects of executing macro example to change or set font color with theme color scheme (ThemeColor, xlThemeColorAccent)
The following GIF illustrates the results of executing the macro example. As expected, Excel sets the font color of cell A16 to the accent 1 of the theme color.

#13: Change or set font tint and shade
VBA code to change or set font tint and shade
To change or set the font tint and shade, use a statement with the following structure:
Range.Font.TintAndShade = TintAndShade#
Process to change or set font tint and shade
To change or set the font tint and shade, follow these steps:
- Identify the cell range whose font tint and shade you change (Range).
- Refer to the Font object representing Range’s font (Font).
- Set the Font.TintAndShade property to a value (Font.TintAndShade = TintAndShade#) between -1 (darkest shade) and 1 (lightest shade).
VBA statement explanation
Item: Range
Range object representing the cell range whose font tint and shade you change.
You can usually work with, among others, the following properties to refer to this Range object:
- Worksheet.Range.
- Worksheet.Cells.
Item: Font
The Range.Font property returns a Font object representing Range’s font.
Item: TintAndShade
The Font.TintAndShade property lightens or darkens the font color.
Item: =
The assignment operator assigns a new value (TintAndShade#) to the Font.TintAndShade property.
Item: TintAndShade#
Set the Font.TintAndShade property to a value between -1 (darkest shade) and 1 (lightest shade). If you attempt to set the Font.TintAndShade property to a value outside this range, a run-time error (5: Invalid procedure call or argument) occurs.
Macro example to change or set font tint and shade
The following macro example lightens the font (font.TintAndShade = 0.5) of cell A17 (Range(“A17”)) of the “VBA Font” worksheet (Worksheets(“VBA Font”)) in the workbook where the macro is stored (ThisWorkbook).
Sub fontTintAndShade()
    'Source: https://powerspreadsheets.com/
    'lightens or darkens the font color
    'For further information: https://powerspreadsheets.com/excel-vba-font/

    'lighten or darken the font color
    ThisWorkbook.Worksheets("VBA Font").Range("A17").font.TintAndShade = 0.5

End Sub
Effects of executing macro example to change or set font tint and shade
The following GIF illustrates the results of executing the macro example. As expected, Excel lightens the font color of cell A17.

#14: Set font subscript
VBA code to set font subscript
To format the font as subscript, use a statement with the following structure:
Range.Font.Subscript = True
Process to set font subscript
To format the font as subscript, follow these steps:
- Identify the cell range whose font you format as subscript (Range).
- Refer to the Font object representing Range’s font (Font).
- Set the Font.Subscript property to True (Font.Subscript = True).
VBA statement explanation
Item: Range
Range object representing the cell range whose font you format as subscript.
You can usually work with, among others, the following properties to refer to this Range object:
- Worksheet.Range.
- Worksheet.Cells.
Item: Font
The Range.Font property returns a Font object representing Range’s font.
Item: Subscript
The Font.Subscript property formats the font as subscript (or not).
Item: =
The assignment operator assigns a new value (True) to the Font.Subscript property.
Item: True
To format the font as subscript, set the Font.Subscript property to True.
To remove the font’s subscript formatting, set the Font.Subscript property to False.
Macro example to set font subscript
The following macro example formats the font of cell A18 (Range(“A18”)) of the “VBA Font” worksheet (Worksheets(“VBA Font”)) in the workbook where the macro is stored (ThisWorkbook) as subscript (font.Subscript = True).
Sub fontSubscript()
    'Source: https://powerspreadsheets.com/
    'formats the font as a subscript
    'For further information: https://powerspreadsheets.com/excel-vba-font/

    'format the font as subscript
    ThisWorkbook.Worksheets("VBA Font").Range("A18").font.Subscript = True

End Sub
Effects of executing macro example to set font subscript
The following GIF illustrates the results of executing the macro example. As expected, Excel formats the font of cell A18 as subscript.

#15: Set font superscript
VBA code to set font superscript
To format the font as superscript, use a statement with the following structure:
Range.Font.Superscript = True
Process to set font superscript
To format the font as superscript, follow these steps:
- Identify the cell range whose font you format as superscript (Range).
- Refer to the Font object representing Range’s font (Font).
- Set the Font.Superscript property to True (Font.Superscript = True).
VBA statement explanation
Item: Range
Range object representing the cell range whose font you format as superscript.
You can usually work with, among others, the following properties to refer to this Range object:
- Worksheet.Range.
- Worksheet.Cells.
Item: Font
The Range.Font property returns a Font object representing Range’s font.
Item: Superscript
The Font.Superscript property formats the font as superscript (or not).
Item: =
The assignment operator assigns a new value (True) to the Font.SuperScript property.
Item: True
To format the font as superscript, set the Font.Superscript to True.
To remove the font’s superscript formatting, set the Font.Superscript to False.
Macro example to set font superscript
The following macro example formats the font of cell A19 (Range(“A19”)) of the “VBA Font” worksheet (Worksheets(“VBA Font”)) in the workbook where the macro is stored (ThisWorkbook) as superscript (font.Superscript = True).
Sub fontSuperscript()
    'Source: https://powerspreadsheets.com/
    'formats the font as a superscript
    'For further information: https://powerspreadsheets.com/excel-vba-font/

    'format the font as superscript
    ThisWorkbook.Worksheets("VBA Font").Range("A19").font.Superscript = True

End Sub
Effects of executing macro example to set font superscript
The following GIF illustrates the results of executing the macro example. As expected, Excel formats the font of cell A19 as superscript.

Learn more about specifying font characteristics with VBA
Workbook examples used in this VBA Font Tutorial
You can get immediate free access to the example workbooks that accompany this VBA Font Tutorial by subscribing to the Power Spreadsheets Newsletter.
References to constructs used in this VBA Font Tutorial
Use the following links to visit the appropriate webpage in the Microsoft Developer Network:
- Refer to the workbook containing the cell range you work with:
- Workbook object.
- Application.ThisWorkbook property.
- Refer to the worksheet containing the cell range you work with:
- Worksheet object.
- Workbook.Worksheets property.
- Refer to the cell range you work with:
- Range object.
- Worksheet.Range property.
- Refer to a cell range’s font:
- Font object.
- Range.Font property.
- Set or change a font’s properties:
- Font.Bold property.
- Font.Color property.
- Font.ColorIndex property and xlColorIndex enumeration.
- Font.FontStyle property.
- Font.Italic property.
- Font.Name property.
- Font.Size property.
- Font.Strikethrough property.
- Font.Subscript property.
- Font.Superscript property.
- Font.ThemeColor property and xlThemeColor enumeration.
- Font.ThemeFont property and xlThemeFont enumeration.
- Font.TintAndShade property.
- Font.Underline property and xlUnderlineStyle enumeration.
- Assign a new value to a property:
- = operator.
- Obtain a color with the RGB color model:
- RGB function.
- Work with variables and data types:
- Boolean data type.
- String data type.
Excel VBA, Font Size
In this article I will explain how you can change the size of the font for a cell or range in Excel using VBA. I’ve also provided an example on how you can retrieve the size of the font used in a cell or range.
Jump To:
- Basics
- Example 1, Set Font Size
- Example 2, Get Font Size
You can download the code and file related to this article here.
–
Basics:
The following line of code changes the size of the font used in cell A1 to l8:
Range("A1").Font.Size = 18
Before:

After:

The line below retrieves the size of the font used in cell A1 and prints the value in cell B1:
Cells(1, 2) = Range("A1").Font.Size
Result:

–
Example 1, Set Font Size:
In this example there are drop down lists in row 2. The user selects a font size from them. Upon selecting a value from the drop down lists the size of the font in row 1 is updated:

After the user selects 14 from the drop down list the size of the font in cell D1 is changed to 14:

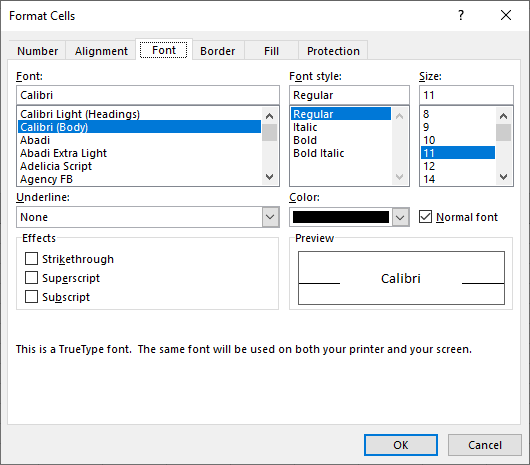
The drop down lists are created using data validation. The source for the data validation is in sheet 2:

For more information about using drop down lists in Excel please see Excel VBA Drop Down Lists.
The program uses a Worksheet_Change event handler. The event handler executes when the user selects a new value from the drop down lists:
'executes when the user selects a new value from

'the drop down lists

Private  Sub  worksheet_change(ByVal  target As  Range)

Dim  i As  Integer

'loops through the cells in row 1

For  i = 1 To  4

    'adjusts the font of the cells in row 1 to

    'the font selected in row 2

    Range(Cells(1, i), Cells(1, i)).Font.Size _

    = Cells(2, i)

Next  i

End  Sub
–
Example 2, Get Font Size:
The example below gets the font size used in a cell. There is text written in row 1. When the user presses the Run button their size is printed in row 2:

After changing the font size of the cells in row 1 and pressing the Run button:

The code used in this program can be seen below:
'executes when the user presses the Run button

Private  Sub  btnRun_Click()

Dim  i As  Integer

'loops through the cells in row 1

For  i = 1 To  4

    'gets the font size

    Cells(2, i) = Range(Cells(1, i), _

    Cells(1, i)).Font.Size

Next  i

End  Sub
You can download the code and file related to this article here.
See also:
- VBA, Excel Font Formatting
- Excel VBA, Formatting Cells and Ranges Using the Macro Recorder
If you need assistance with your code, or you are looking for a VBA programmer to hire feel free to contact me. Also please visit my website www.software-solutions-online.com
| title | keywords | f1_keywords | ms.prod | api_name | ms.assetid | ms.date | ms.localizationpriority |
|---|---|---|---|---|---|---|---|
|
Font.Size property (Excel) |
vbaxl10.chm559082 |
vbaxl10.chm559082 |
excel |
Excel.Font.Size |
45f409cd-768b-0794-4fe9-ef002fa69606 |
04/26/2019 |
medium |
Font.Size property (Excel)
Returns or sets the size of the font. Read/write Variant.
Syntax
expression.Size
expression A variable that represents a Font object.
Example
This example sets the font size for cells A1:D10 on Sheet1 to 12 points.
With Worksheets("Sheet1").Range("A1:D10")
 .Value = "Test"
 .Font.Size = 12
End With
[!includeSupport and feedback]
I have a userform to display my terms and conditions which is picked up directly from a cell. Upon Activation I call TandC.Text = Worksheets("Master").Range("L41") which works perfectly when I run the form directly — correct font size, multiple lines, word wrap, etc. However, when I run the form from another userform, the text box text suddenly displays the text in a tiny unreadable font. Even when I put a test button on my form to set the font size to 28, it doesn’t work when the form is kicked off from another form; however, it does change it when it’s running on its own.
It appears to be an issue when Multiline is turned on, I turn it off and the font is the correct size but the text spans for miles to the right. I turn it back on and again I have a tiny unreadable font.
It’s driving me insane, can anyone offer any advice on this?
See below my code, kicking the form off from the originating form is just a simple UF.Show.
Mine is really similar other then in my initialize are i have some code that centralizes the form on the screen if you have multiple monitors.
Private Sub CommandButton2_Click()
TandC.WordWrap = True
TandC.Font.Size = 8
TandC.MultiLine = True

End Sub

Private Sub UserForm_Initialize()

Dim TopOffset As Integer
Dim LeftOffset As Integer
TopOffset = (Application.UsableHeight / 2) - (Me.Height / 2)
LeftOffset = (Application.UsableWidth / 2) - (Me.Width / 2)
Me.Top = Application.Top + TopOffset
Me.Left = Application.Left + LeftOffset

TandC.Text = Worksheets("MasterData").Range("L21")
TandC.WordWrap = True
TandC.MultiLine = True
TandC.Font.Size = 8

End Sub
![]()
TylerH
20.6k64 gold badges76 silver badges97 bronze badges
asked Oct 30, 2013 at 22:04
![]()
Try turning on autosize for your text box. Looks like multi-line is trying to fit all text into your text box by adjusting the font size rather than adjusting the box size. You can also try setting the box height.
TextBox1.AutoSize = True
You can try this too (from MSDN ):
textBox1.Height = textBox1.PreferredHeight
I tried to duplicate your problem by calling one form from another form and even used a button to dynamically update the text size. I haven’t been able to observe your issue. Here is my test code:
Behind userform1
Private Sub CommandButton1_Click()
    TextBox1.Font.Size = 11
End Sub

Private Sub UserForm_Initialize()
    TextBox1.Text = Range("A1")
    TextBox1.WordWrap = True
    TextBox1.MultiLine = True
    TextBox1.Font.Size = 28
End Sub
Behind userform2
Private Sub CommandButton1_Click()
  UserForm1.Show
End Sub
EDIT
I found this post which talkes about others having the same issue in Excel 2013. One person wrote that toggling the wordwrap back and forth in the getfocus event solve the issue. I don’t have 2013 so I can’t test it unfortunately.
You can try it inside the initialize event or try an activate event like this:
Private Sub UserForm_Activate()
    TandC.WordWrap = False
    TandC.WordWrap = True
End Sub
answered Oct 30, 2013 at 22:19
![]()
Automate ThisAutomate This
30.5k11 gold badges62 silver badges82 bronze badges
4
My program, using visual basic within Excel, works out data then presents it in a textbox. It works perfectly in Excel 2010 but shows only unreadable pixel-high output in Excel 2013 regardless of how the text size is set in the textbox properties section.
Using the above comments I found that turning the multiline property off and on immediately before the data is displayed served as a workaround for this infuriating problem.
My data was collected in a string variable called ‘answer’, so the final lines of my program read as follows:
TextBox3.Multiline = False
TextBos3.Multiline = True
TextBox3.Value = answer

End Sub
answered Dec 28, 2013 at 19:00
![]()
Had the same issue and this fixed it.
Private Sub TextBox1_Change()
    Me.txt_Body.WordWrap = False
    Me.txt_Body.WordWrap = True
End Sub
answered Feb 3, 2014 at 22:30
![]()
Tylor HessTylor Hess
6395 silver badges15 bronze badges
I’ve been struggling with this for the last few hours, but finally found a solution. But first, I found that clicking inside the textbox is what was triggering the font size enlargement. To test it, I repeatedly clicked in the textbox, then clicked on a different cell; I did this 4 or 5 times and quickly realized this was the culprit. The font size increases in the standard MS Office increments (8, 9, 10, 11, 12, 14, etc.).
I also found that the only thing that resets the font size to what it should be was resizing the textbox itself. For some reason, that forces it to reload the font size set in the properties menu, regardless of what is in the VBA code. Once I figured that out, all I had to do was write some simple code that changes the height of the textbox by a pixel or two, then the next line of code changed the height back to its original value. Here’s my code:
Private Sub Textbox1_Change()
Textbox1.Font.Size = 10
Textbox1.Height = 20
Textbox1.Height = 18
End Sub
Bam. Problem solved. This code should run every time the value in the textbox’s linked cell changes. Hope this helps someone else!
answered Mar 23, 2018 at 5:20
![]()
For anyone coming to this question from Google and wondering how to change the font size of a textbox or label control, since only the Font family appears to be configurable
There is a small button with ... just to the right of the font family name — click it.

Otherwise, you can always use code:
TextBox1.Font.Size = 18
Label1.Font.Size = 32
answered Jun 21, 2018 at 18:12
![]()
cssyphuscssyphus
37.1k18 gold badges93 silver badges109 bronze badges
I solved the problem in a different way:
I created two TextBoxes and filled them with the same content. While running the code I observed which of the two Textboxes showed the unreadable font. On runtime I turned Visibility of that textbox to False.
It may take some trial and error, because the position of the Textboxes on the userform seems to matter.
Another option is to create a second (identical) textbox and position the one with the wrong fontsize outside the userform.
Be sure to put the same content in both textboxes and make all attributes identical: enterkeybehavior, multiline, wordwrap
answered Apr 1, 2014 at 17:08
![]()
This has been plaguing me ever since I upgraded to 2013 earlier this year. After many attempts and utilizing what is in this trail along with other investigations, I found a solution that works. The problem is that «focus» needs to be set as well. So the final coding that worked for me is
TandC.TextBox1.SetFocus
TandC.TextBox1.MultiLine = False
TandC.TextBox1.MultiLine = True
TandC.TextBox1.WordWrap = False
TandC.TextBox1.WordWrap = True
Thanks everyone. 
answered Nov 11, 2015 at 20:08
![]()
ChrisChris
11 bronze badge
Just an addendum to what was said here for Word users facing the same problem.
I was experiencing the same issue and it seems the property TextBox.WordWrap was the problem.
Here is how you can solve this for Word users:
- Turn off the WordWrap property of the Text Box in the graphic interface/
-
Add something like this:
Private Sub TextBox9_Change()
    TextBox9.WordWrap = True
End Sub
It is a workaround, but does not necessarily solve the problem.
![]()
TylerH
20.6k64 gold badges76 silver badges97 bronze badges
answered Apr 14, 2015 at 15:11
![]()
I had the same problem. In my case none of the solutions above worked. But when I changed the top position of the textbox (e.g. Top 42 instead of Top 45) the font appeared correctly.
answered Feb 15, 2018 at 22:44
![]()