Excel for Microsoft 365 Word for Microsoft 365 PowerPoint for Microsoft 365 Excel 2021 Word 2021 PowerPoint 2021 Excel 2019 Word 2019 PowerPoint 2019 Excel 2016 Word 2016 PowerPoint 2016 Excel 2013 Word 2013 PowerPoint 2013 Excel 2010 Word 2010 PowerPoint 2010 More…Less
You can change the font size for all text or just selected text in desktop Excel, PowerPoint, or Word.
Change the default font size for all text
The way you change the default font size varies by app. Select your app below, and then follow the steps.
-
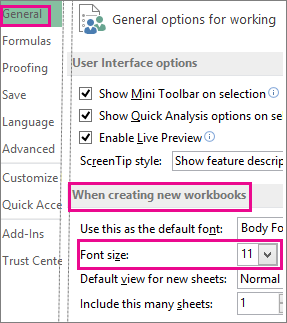
Click File > Options.
-
In the dialog box, click General.
-
Under When creating new workbooks, in the Font Size box, enter the font size you want.
Or, you can type in any size you want, between 1 and 409, in multiples of .5, such as 10.5 or 105.5. You can also choose a different default font style.
Note: To begin using the new default font size or font, you must restart Excel. The new default font and font size are used only in new workbooks created after you restart Excel; any existing workbooks are not affected. To use the new default font and size in existing workbooks, move worksheets from an existing workbook to a new workbook.
To change the font size for all slides, change it on the slide master. Every PowerPoint presentation contains a slide master with related slide layouts.
Note: If you want to change the theme, you should do that before changing the font, as a different theme may use different fonts.
-
On the View tab, click Slide Master.
In Slide Master View, the slide master is at the top of the thumbnail pane with the related layouts beneath it.
-
Click the slide master to change the font on all slides, or click any of the layouts to change the font size on just that layout.
-
On the slide master or layout, select the level of placeholder text for which you want to change the font size.
-
On the Home tab, click the font size you want in the Font Size box.
You can also type in any size you want in multiples of .1, such as 10.3 or 105.7.
The bullet automatically increases or decreases in size to match the font size changes.
-
Open a new blank document.
-
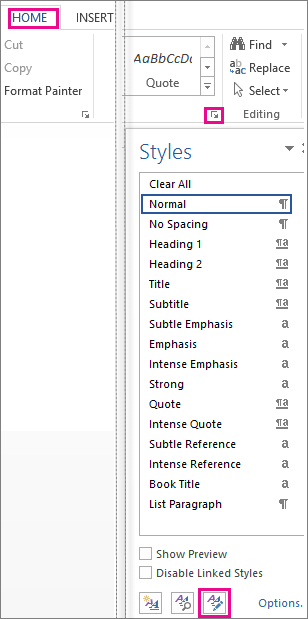
On the Home tab, in the Styles group, click the dialog box launcher
..
Or press Ctrl+Alt+Shift+S.
-
Click the Manage Styles button (third from left at the bottom).
-
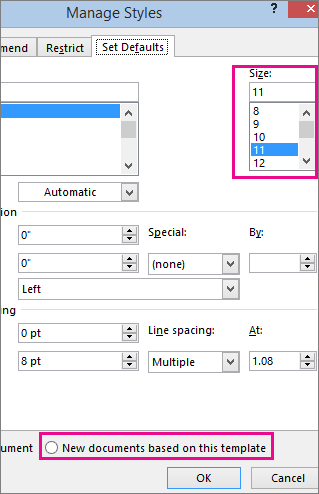
Click the Set Defaults tab and pick the size you want in the Size box.
You can also type in any size you want, between 1 and 1638, in multiples of .5, such as 10.5 or 105.5.
-
Click the New documents based on this template option.
-
Close and reopen Word. If you’re prompted to save the Normal template, say Yes.
Tip: You can also change the default font or font color on the Set Defaults tab.
When you set a default font, every new document you open will use the font settings you selected and set as the default. The default font applies to new documents that are based on the active template, usually Normal.dotm. You can create different templates to use different default font settings.
Change the size of selected text
To change the font size of selected text in desktop Excel, PowerPoint, or Word:
-
Select the text or cells with text you want to change. To select all text in a Word document, press Ctrl + A.
-
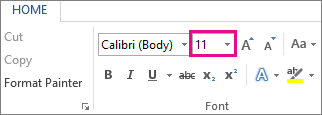
On the Home tab, click the font size in the Font Size box.
You can also type in any size you want, within the following limits:
-
Excel: between 1 and 409, between 1 and 409, in multiples of .5 (such as 10.5 or 105.5)
-
PowerPoint: between 1 and 3600, in multiples of .1 (such as 10.3 or 105.7)
-
Word: between 1 and 1638, in multiples of .5 (such as 10.5 or 105.5)
-
Tips:
-
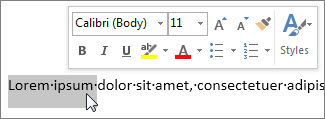
When you select text, a mini toolbar appears near your cursor. You can also change the text size in this toolbar.
-
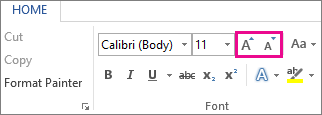
You can also click the Increase Font Size or Decrease Font Size (Grow Font and Shrink Font in some earlier versions of Office programs) icons until the size you want is displayed in the Font Size box.
See Also
Change or set the default font in Word
Change the fonts in a footer on a slide
Change a theme (Excel and Word)
Format text in cells (Excel)
Need more help?
Want more options?
Explore subscription benefits, browse training courses, learn how to secure your device, and more.
Communities help you ask and answer questions, give feedback, and hear from experts with rich knowledge.
Updated: 12/31/2020 by
To increase or decrease the font size of text in Microsoft Word, follow these steps.
- Highlight the text that you want to make bigger or smaller.
- To increase the font size, press Ctrl+]. (Press and hold the Ctrl, then press the right bracket key.)
- To decrease the font size, press Ctrl+[. (Press and hold the Ctrl, then press the left bracket key.)
Tip
The keyboard shortcuts above are verified to work in Microsoft Word 2010 through Word 2019. If you cannot get the shortcuts to work, make sure you are pressing and holding the Ctrl key down when you press the left or right bracket key. Each time you press a bracket key, the text increases or decreases one point in size.
This tip contains Shortcut Keys or Hotkeys for changing font size.
To change a font size, follow these steps:
1. Select the text that you want to change to a different font size. If
you want to type new text in a different font size, position the insertion point where you want the new
font size to begin.
2. Do one of the following:
- Click the down arrow to the right of the Font size list box on the Formatting toolbar,
and select the font size that you want. You may use fraction (E.g. font size 10 and 8,5). - Press Ctrl+Shift+P, and enter the font size that you want. Alternatively, press the
up- or down-arrow keys to scroll through the list of font sizes one at a time, and
then select the font size that you want from the list by pressing Enter. - Press one of the shortcut keys:
| Ctrl+Shift+> | Increases the font to the next larger point size available in the Font size list box. |
| Ctrl+Shift+< | Decreases the font to the next smaller point size available in the Font size list box. |
| Ctrl+[ | Increases the font size by one point. |
| Ctrl+] | Decreases the font size by one point. |
3. If you didn’t select text before choosing your font size, enter
the text that you want to appear in the font size that you selected. Then choose a different font size
to end the task.
Note: more details are available
in the Increase/decrease font size section
in the Format the document lesson
of the Create basic documents free course.
See also this tip in French:
Augmenter,
diminuer et changer la taille de la police sans la souris.
Please, disable AdBlock and reload the page to continue
Today, 30% of our visitors use Ad-Block to block ads.We understand your pain with ads, but without ads, we won’t be able to provide you with free content soon. If you need our content for work or study, please support our efforts and disable AdBlock for our site. As you will see, we have a lot of helpful information to share.
Содержание
- Изменение размера шрифта на нестандартные значения
- Пошаговое изменение размера шрифта
- Вопросы и ответы
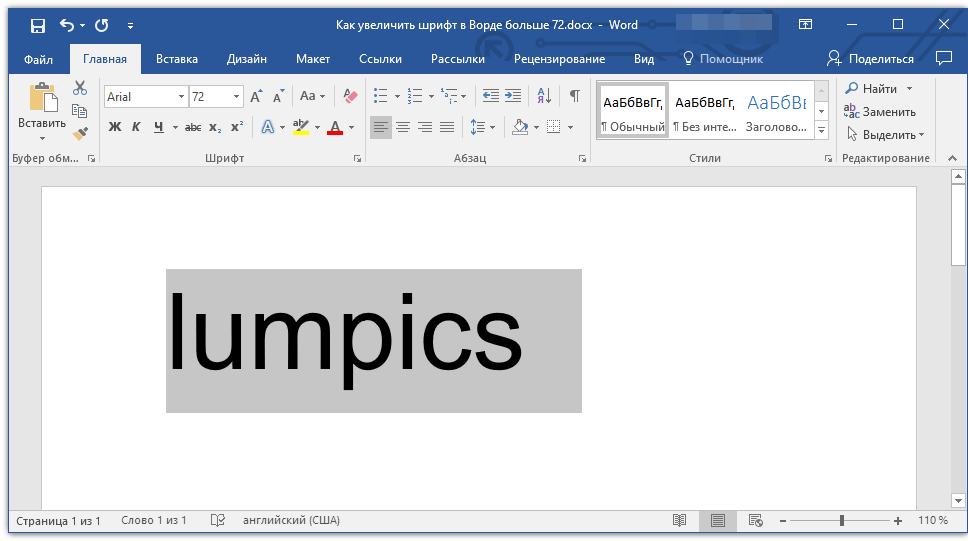
Те, кто хотя бы пару раз в своей жизни пользовался текстовым процессором MS Word, наверняка знают о том, где в этой программе можно изменить размер шрифта. Это небольшое окошко во вкладке «Главная», расположенное в группе инструментов «Шрифт». В выпадающем списке этого окошка представлен перечень стандартных значений от меньшего к большему — выбирайте любой.
Проблема в том, что далеко не все пользователи знают, как увеличить шрифт в Ворде больше 72 единиц, указанных по умолчанию, или как сделать его меньше стандартных 8, или же как можно задать любое произвольное значение. На самом деле сделать это довольно просто, о чем мы и расскажем ниже.
Изменение размера шрифта на нестандартные значения
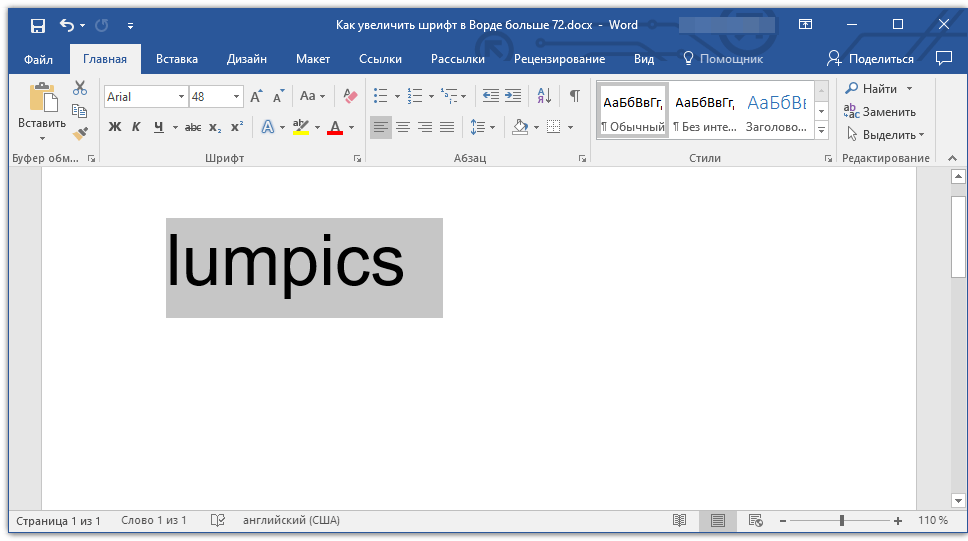
1. Выделите текст, размер которого вы хотите сделать больше стандартных 72 единиц, с помощью мышки.
Примечание: Если вы только планируете ввести текст, просто кликните в том месте, где он должен находиться.
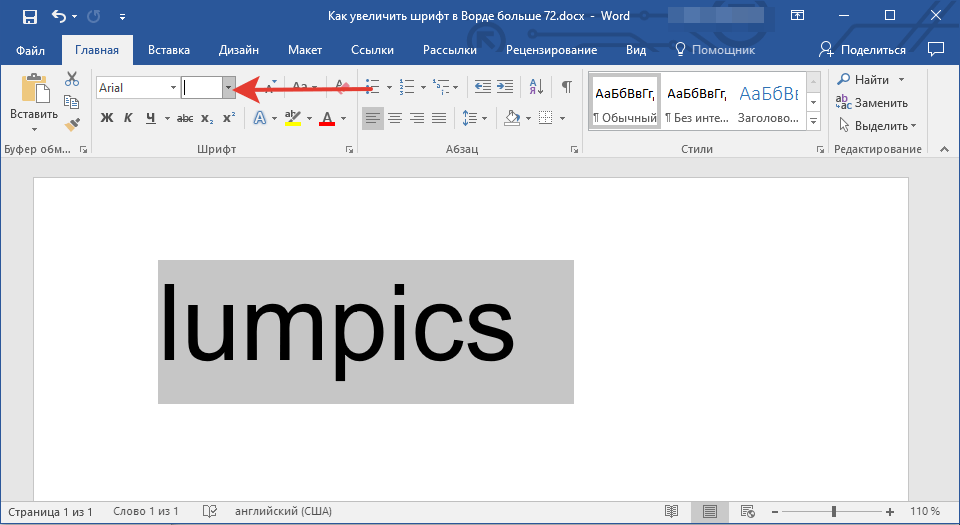
2. На панели быстрого доступа во вкладке «Главная» в группе инструментов «Шрифт», в окошке, расположенном рядом с названием шрифта, где указано его числовое значение, кликните мышкой.
3. Выделите заданное значение и удалите его, нажав «BackSpace» или «Delete».
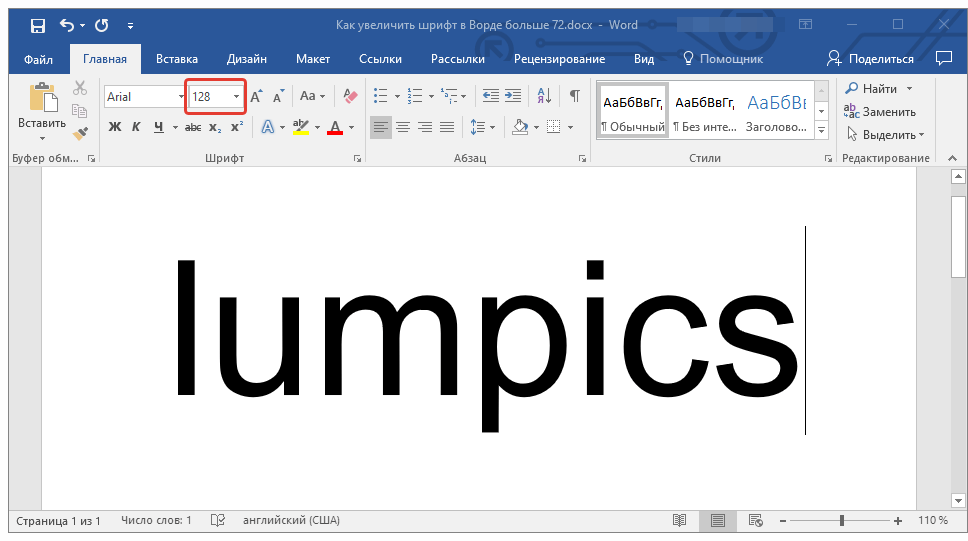
4. Введите необходимое значение размера шрифта и нажмите «ENTER», не забывая о том, что текст все же должен как-то уместиться на странице.
Урок: Как изменить формат страницы в Word
5. Размер шрифта будет изменен согласно заданным вами значениям.
Точно таким же образом вы можете изменить размер шрифта и в меньшую сторону, то есть, меньше стандартных 8. Кроме того, аналогично можно задавать и произвольные значения, отличные от стандартных шагов.
Пошаговое изменение размера шрифта
Далеко не всегда можно понять сразу, какой именно размер шрифта нужен. Если и вы этого не знаете, можете попробовать изменять размер шрифта по шагам.
1. Выделите фрагмент текста, размер которого требуется изменить.
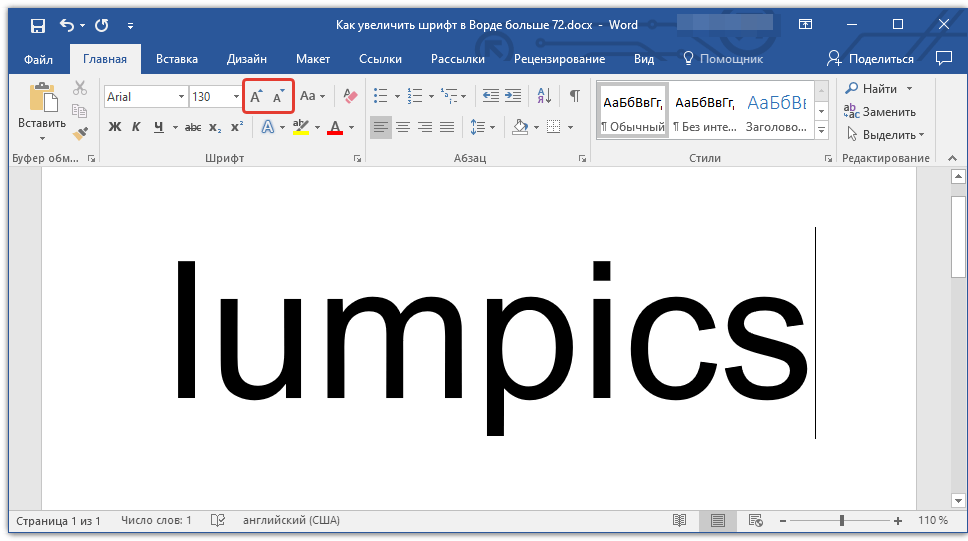
2. В группе инструментов «Шрифт» (вкладка «Главная») нажмите кнопку с большой буквой А (справа от окна с размером) для увеличения размера или кнопку с меньшей буквой А для его уменьшения.
3. Размер шрифта будет изменяться с каждым нажатием на кнопку.
Примечание: Использование кнопок для пошагового изменения размера шрифта позволяет увеличивать или уменьшать шрифт только по стандартным значениям (шагам), но не по порядку. И все же, таким образом можно сделать размер больше стандартных 72 или меньше 8 единиц.
Узнать больше о том, что еще можно делать со шрифтами в Ворде и как их изменять, вы можете узнать из нашей статьи.
Урок: Как в Word изменить шрифт
Как видите, увеличить или уменьшить шрифт в Ворде свыше или ниже стандартных значений довольно просто. Желаем вам успехов в дальнейшем освоении всех тонкостей этой программы.
Еще статьи по данной теме:
Помогла ли Вам статья?
This tutorial shows three ways to change the font, font size, and font color in Microsoft Word. First, we’ll use the font options in the ribbon. Then, we’ll use the Mini toolbar. Finally, we’ll use the Font dialog box.
Do you want to change your default font, font size, or font color? Check out my other tutorial “How to Change the Default Font in Microsoft Word.”
Quick Links:
- How to Change the Font, Font Size, and Font Color in the Ribbon
- How to Change the Font, Font Size, and Font Color in the Mini Toolbar
- How to Change the Font, Font Size, and Font Color in the Font Dialog Box
This tutorial is also available as a YouTube video showing all the steps in real time.
Watch more than 200 other document software tutorials on my YouTube channel.
The images below are from Word for Microsoft 365. The steps are the same in Word 2019, Word 2016, Word 2013, and Word 2010. However, your interface may look slightly different in those older versions of the software.
In Word, the main toolbar at the top of the screen is called the ribbon. The ribbon offers many of the font options most users will need for general content.
- Select the Home tab in the ribbon.
If your document is blank, skip to step 3.
- Select the text with the font you want to change.
To select the entire document, press Ctrl + A on your keyboard.
Alternatively, select Select in the Editing group, and then select Select All from the drop-down menu.
- Select the Font menu arrow to choose a new font. (This menu lists the fonts installed on your computer. Your fonts may differ from those shown in figure 3.)
- Select the Font Size menu arrow to choose a new font size. (The numbers represent typography points. Each point is 1/72 of an inch.)
Alternatively, you can select the Increase Font Size or Decrease Font Size buttons to increase or decrease the font by one point.
- Select the Font Color menu arrow to choose a new color.
For additional color options, select More Colors in the Font Color drop-down menu (see figure 6). Choose a color in the Standard tab of the Colors dialog box. Or, enter a custom color in the Advanced tab.
Pro Tip: Select the Change Case button to choose Sentence case, lowercase, UPPERCASE, Capitalize Each Word, or tOGGLE cASE.
Your text should change to your new font choices immediately.
The Mini toolbar offers many of the same font options as the ribbon from within the text.
- Select and then right-click the text to display the Mini toolbar.
- Select the arrow menus to select a font, font size, or font color. (Note that the Mini toolbar includes the Increase Font Size or Decrease Font Size buttons to increase or decrease the font by one point.)
Once again, your text should change to your new font choices immediately.
How to Change the Font, Font Size, and Font Color in the Font Dialog Box
The Font dialog box offers advanced options that aren’t available in the ribbon or the Mini shortcut menu.
- Select the Home tab in the ribbon (see figure 1).
If your document is blank, skip to step 3.
- Select the text with the font you want to change.
To select the entire document, press Ctrl + A on your keyboard.
Alternatively, select Select in the Editing group, and then select Select All from the drop-down menu (see figure 2).
- Select the dialog box launcher in the Font group.
- Select a new font, font size, and font color from the Font tab in the Font dialog box.
- (Optional Step) Select the Advanced tab for additional options for character spacing and OpenType features.
- Select the OK button.
Your text should change to your new font choices as soon as the Font dialog box closes.
Related Resources
How to Create Drop Caps in Microsoft Word
How to Adjust Line Spacing in Microsoft Word
How to Adjust Page Margins in Microsoft Word
How to Adjust Letter Spacing in Microsoft Word (PC & Mac)
Updated January 14, 2023
Usually, increasing or decreasing the font size with the mouse is a time-consuming task. So, you can quickly and easily change the font size by using keyboard shortcuts instead of the mouse.
You can also learn other commands to change the font size in addition to these six.
That is why they are necessary for formatting text in a Word document. With the help of these shortcuts, you can change the size of the text format for all levels, like heading, body, or text, in an entire document.
This article will teach you six shortcuts that will help you change the size of the text quickly or slowly.
Table of Contents
- 6 Shortcuts to Increase or Decrease Font Size in MS Word
- Shortcuts for Increasing (Grow) Font Size in MS Word
- Shortcuts for Decreasing (Shrinking) Font Size in MS-Word
- Shortcut to Increase or Decrease (Grow or Shrink) Font SizeVideo Tutorial

Shortcuts for Increasing (Grow) Font Size in MS Word
Word provides users with a number of options through which they can make the text larger. But the following keyboard shortcuts will help you quickly and easily increase the size of the font.
Increase (grow) font size for 1 point: Ctrl + ]
→ Select the text that you want to increase the size slower
→ Then press Ctrl + ]
Increase (grow) font size for 2 or more points: Ctrl + Shift + >
→ Select the text that you want to increase the size faster
→Then press Ctrl + Shift + >
Shortcuts for Decreasing (Shrinking) Font Size in MS-Word
In Microsoft Word, reducing the size of the font can be accomplished in a number of different ways. Word’s shortcut keys and various other commands are included in this. These are covered in the following section.
Reduce the font size by one point. Ctrl + [
→ Select the text that you want to decrease the size slower
→ Then press Ctrl + [
Decrease (shrink) font size for 2 or more points: Ctrl + Shift + <
→ Select the text that you want to decrease the size faster
→ Then press Ctrl + Shift + <
Shortcut to Increase or Decrease (Grow or Shrink) Font Size
Select the text that you want to increase or decrease the size.
As soon as you press Ctrl + Shift + P or Ctrl + D, a dialogue box will open.
(Or)
On the Home tab, in the Font group, click on the font pane, which appears in the bottom right corner, as shown in the picture below.

On the dialogue box, under the Size, scroll up or down the scroll bar and select the font size you want and then press OK.

Other Way to grow or shrink font size
You can make the font larger or smaller by adjusting the settings for the Font Size commands, which are located in the Font group of the Home tab. Take a look at the picture that’s down here. To change the size of the font quickly with the keyboard, press Ctrl+Shift+P.

Video Tutorial
What are the Shortcuts to Shrink Font Size in MS Word?
Shrink font size for 1 point: Ctrl + [
Shrink font size for 2 or more points: Ctrl + Shift + <
What are the Shortcuts to Shrink Font Size in MS Word?
Grow font size to 1 point: Ctrl + ]
Grow font size to 2 or more than two point size: Ctrl + Shift + >
Select the text or cells with text you want to change. To select all text in a Word document, press Ctrl + A. On the Home tab, click the font size in the Font Size box.
Contents
- 1 How do I increase the height of my font?
- 2 How do I stretch font height in Word?
- 3 How do you change the width and height of a text box in Word?
- 4 How do you change height in Word?
- 5 How do I change the Font size in Windows 10?
- 6 How do I stretch text to fill a text box?
- 7 What is font stretch?
- 8 How do you add 6 spaces in Word?
- 9 Can you change the size of the text box?
- 10 How do I increase the height of a textbox in Windows form?
- 11 How do I center text vertically in Word?
- 12 Why can’t I adjust cell height in Word?
- 13 When we increase the font size the Row height is automatically adjusted?
- 14 How do I make the text on my screen bigger?
- 15 What is the shortcut for increasing font size?
- 16 How do I make my computer screen bigger using the keyboard?
- 17 How do I automatically expand a text box in Word?
- 18 Can I use font-stretch?
- 19 Why font-stretch is not working?
- 20 What is font size adjust?
How do I increase the height of my font?
Changing the Height of a Font
- Select the text you want to affect.
- Enlarge the font size to 15 points. (12 times 1.25 is 15.)
- Display the Character Spacing tab of the Font dialog box. (See Figure 1.)
- Using the Scale control, specify a scaling of 80%. (100 divided by 1.25 is 80.)
How do I stretch font height in Word?
You can scale text by stretching it or by compressing it.
- Select the text that you want to stretch or compress.
- On the Home tab, click the Font Dialog Box Launcher, and then click the Advanced tab. Note: If you’re using Word 2007 the tab is called Character Spacing.
- In the Scale box, enter the percentage that you want.
How do you change the width and height of a text box in Word?
To resize a shape, text box, or WordArt, under Drawing Tools, on the Format tab, in the Size group, enter the measurements that you want into the Height and Width boxes.
How do you change height in Word?
To fit the table to the text, click [AutoFit] > select “AutoFit Window.” To keep Word from automatically adjusting your column size, click [AutoFit] > select “Fixed Column Width.” To adjust the row height, click the up and down arrows within the “Height” field.
How do I change the Font size in Windows 10?
To change your display in Windows 10, select Start > Settings > Ease of Access > Display.To make only the text on your screen larger, adjust the slider under Make text bigger. To make everything larger, including images and apps, choose an option from the drop-down menu under Make everything bigger.
How do I stretch text to fill a text box?
Click anywhere in the text. On the Text Box Tools Format tab, in the Text group, click Text Fit, and do one of the following: To reduce the point size of text until there is no text in overflow, click Shrink Text On Overflow. To shrink or expand text to fit in the text box when you resize the box, click Best Fit.
What is font stretch?
Definition and Usage. The font-stretch property allows you to make text narrower (condensed) or wider (expanded). Note: Some fonts provide additional faces; condensed faces and expanded faces. For these fonts, you can use the font-stretch property to select a normal, condensed, or expanded font face.
How do you add 6 spaces in Word?
Select the paragraphs you want to change. Go to Home > Line and Paragraph Spacing. Choose the number of line spaces you want or select Line Spacing Options, and then select the options you want under Spacing.
Can you change the size of the text box?
Resize a text box
Select the text box. Select one of the handles and drag until the text box is the size you want.
How do I increase the height of a textbox in Windows form?
There are two ways to do this : Set the textbox’s “multiline” property to true, in this case you don’t want to do it so; Set a bigger font size to the textbox.
- Set the textboxes to multiline.
- Change the height.
- Change the font size. (so it fit into the big textboxes)
- Set the textboxes back to non-multiline.
How do I center text vertically in Word?
1 Select the text you want to center between the top and bottom margins. 2 On the Page Layout tab, click the Page Setup Dialog Box Launcher. 3 Select the Layout tab. 4 In the Vertical alignment box, click Center 5 In the Apply to box, click Selected text, and then click OK.
Why can’t I adjust cell height in Word?
From the Table menu, select “Table Properties.” Click on the Table tab, then the Options button. Uncheck “Automatically resize to fit contents.” Click “OK.” Now click on the “Row” tab in Table Properties. Make sure that “Specify Height” is checked and the size in the middle box is the height you want your rows to be.
When we increase the font size the Row height is automatically adjusted?
yes, it is true that when you increase the font size,the row height is automatically adjusted.
How do I make the text on my screen bigger?
Make text bigger on your screen
- To go to the Ease of Access settings on your computer, press the Windows key+U.
- Under Make text bigger on the Display tab, drag the slider to the right to increase the size of the sample text.
- Once you’re happy with the text size, select Apply. Windows scales up the size of all text.
What is the shortcut for increasing font size?
Keyboard shortcut
Hold down the Ctrl and press the + to increase the font size or – to decrease the font size. Pressing either of these keys while continuing to hold down the control key continues to increase or decrease the font until it reaches its maximum.
How do I make my computer screen bigger using the keyboard?
You can use your keyboard to zoom in or out. This method works in many applications and web browsers. Click anywhere on the Windows desktop or open the webpage you want to view. Press and hold the CTRL key, and then press either the + (Plus sign) or – (Minus sign) to make objects on the screen larger or smaller.
How do I automatically expand a text box in Word?
Follow these general steps.
- Place the text box in your document.
- Adjust the width of your text box to reflect what you need.
- Right-click the text box and choose Format Text Box from the resulting Context menu.
- Make sure the Text Box tab is displayed.
- Make sure the Resize AutoShape to Fit Text check box is selected.
Can I use font-stretch?
You can use font-stretch to select a condensed or expanded face from such fonts. If the font you are using does not offer condensed or expanded faces, this property has no effect.
Why font-stretch is not working?
According to this, here is why : In order to use font-stretch and see a result of some kind, the font being used has to have a face that matches the value given. In other words, font-stretch will not work on just any font, but only on fonts that are designed with different faces matching the defined sizes.
What is font size adjust?
The font-size-adjust CSS property sets the size of lower-case letters relative to the current font size (which defines the size of upper-case letters).
Changing font size is a basic operation in Word. In this article, we summarized 5 simple ways to change font size in your Word that applies to different situations.
As of today, almost all of the Word users know how to adjust the font size in a document. However, we still have much to explore as regards setting font sizes. The following 5 methods will provide you with different ways to change font sizes.
Method 1: Select Your Font Size
The most commonly used method is to select a font size in the “Home” menu. However, the limit is that there are only limited size options, and you will only be able to choose from one of the installed fonts.
- First, elect the text that you want to change font size.
- On the “Home” tab, click the down arrow for the font in the “Font” section. Scroll down the list, you can select each of the installed fonts on your computer.
Method 2: Enter a Specific Font Size
You can also specify a font size on the “Home” menu, if you need to apply a font size that is not included in the font size drop-down list, such as “30”. In addition, provided you need large font sizes above “72”, which is the upper limit in the font size list, you can adopt this method.
- First, select the text that you want to change font size.
- On the “Home” tab, click the box for the font in the “Font” section, where you can input the font size you desire and simply press “Enter” to change font size.
Method 3: Change Font Size via Shortcut Keys
We all know Word has many useful shortcut keys such as “Ctrl + C” and “Ctrl + V”. Less well known are the shortcut keys to change the point size of a text selection. In this section, we will introduce a way to change font sizes by 10 points with your keyboard.
Select the texts and press one of the following combination keys:
- To make the texts larger, press “Ctrl + Shift + >”.
- To make the texts smaller, press “Ctrl + Shift + <”.
Method 4: Adjust Font Size Precisely
Alternatively, you can also use another shortcut key to change the point size of texts. The difference is that you can control the point size more precisely, since it will change font sizes by 1 point every time you press the shortcut keys.
Select the texts and select one of the following combination keys:
- To make the texts larger, press “Ctrl + ]”.
- To make the texts smaller, press “Ctrl + [”.
Method 5: Set Default Font in Word
If you want to use the font settings that you desire every time you open a new document, you can set is as default font. That way, your selected font will apply to all the new documents
- Under “Home” tab, click the “Font” Dialog Box Launcher.
- A “Font” dialog comes up, you can select the options that you desire, such as font style and font size, and then click “Set As Default”.
Salvage Your Data in Times of Word Corruptions
As a regular Word user, you may have on more than one occasion, inadvertently causes Word corruptions. Also, external factors such as power failure, infection from viruses and malware will result in Word damages as well, which will render huge loss of data. In such situations, the very first tool to take use of is the in-built repair tool in Word. But still, you can take aid of external word repair, which feature powerful capabilities to repair severely word files in no time.
Author Introduction
Kelly Zhao is a data recovery expert in DataNumen, Inc., which is the world leader in data recovery technologies, including excel recovery and pdf repair software products. For more information visit www.datanumen.com
Change the size of selected text
- Select the text or cells with text you want to change. To select all text in a Word document, press Ctrl + A.
- On the Home tab, click the font size in the Font Size box. You can also type in any size you want, within the following limits:
let’s discuss this in detail below!
When working in Microsoft Word, your highest priorities should include the look and feel of your document. It’s possible that you just typed up an excellent essay or made an awesome business report. However, if you don’t format your documents correctly, people might have a hard time reading your files. This can cause dissatisfied teachers, clients or employers.
If you want to avoid making this mistake, you need to learn how to format your Word documents correctly. The very first step is learning how you can modify the size of your text, as well as the font you’re using. Follow our step-by-step guide to make your documents more readable, eye-catching and memorable.
Things you’ll need
- A device with Microsoft Word installed and activated.
How to change Text Size and Font in Word
Let’s start learning!
- Launch Word, then either open an existing document or create a new one from the welcome screen, then type in your text.
- If you only want to change the size and font of a portion of your text, you need to select it. Hold down the left mouse key and make your selection. Now, only the selected text will be affected by the font and size change. If you want to change your entire document, you need to select everything by pressing the Ctrl + A keys on your keyboard.
- To change your text to a different font or size, you need to be on the Home tab in the Ribbon.
- In the Font section, you’ll see two drop-down menus. The one on the left shows the name of the current font you’re using. The default font in Word is either Calibri or Times New Roman, you’re most likely seeing one of the two.
- The other drop-down menu shows the current size of your text. By default, Word sets the size to either 11 or 12 points.
- To change the font you’re using, open the first drop-down menu. This will display every font installed on your computer. When you hover over a font, you’ll see a preview of how it’ll look like in your document. Simply click on the font you want to use to select it.
- Similarly, you can click on the second drop-down menu with the numbers to change the text size. Hovering over a number will preview how your text will look like, and clicking on it finalizes the change.
How to Change the default text size and font in Word
You can also change the default text size and font in Word. This means that each time you start a new document, Word will automatically use the font and text size you define.
- Click on the arrow in the bottom-right corner of the Font section (again, found in the Home tab).
- A new window will appear. Here, you can select a font, modify the size of it and even apply font styles and effects. However, if you’re settings a default font, we recommend sticking to the Regular style without any effects.
- After you customized the font you want to use, click on the Set As Default button in the bottom-left corner of the window.
- Another window will come up. Here, select if you want to make your settings the default font in the currently open document only (first option), or make it the default font for all documents (second option).
- Press the OK button.
We hope that this article was able to help you learn how you can change the size and font of your text in Microsoft Word. Do you know someone who’s starting out with Word and other Microsoft Office products? Don’t forget to share this article with them! Your friends, classmates, colleagues or employees can all get help in getting started with Word. If you want to learn more about Word or other Microsoft Office suite applications, feel free to browse our section of guides.
If you’re looking for a software company you can trust for its integrity and honest business practices, look no further than SoftwareKeep. We are a Microsoft Certified Partner and a BBB Accredited Business that cares about bringing our customers a reliable, satisfying experience on the software products they need. We will be with you before, during, and after all the sales.
Learn Microsoft Word from articles in our Help Center
Here are some more content to help you learn Microsoft Word:
» How To Change Your Apple ID Password on Any Device
» 7 Microsoft Word Hacks You Need to Know in 2022
» MS Word Features: 20 Secret Functions Revealed
» How to Create a Hanging Indent in Microsoft Word
» How to make columns in Microsoft Word
» How to Fix the Spell Check Not Working in Word
» How to Install Fonts to Word on Mac
» How to Unfreeze Word on Mac Without Losing Work
» Top 14 Microsoft Word Tips and Tricks for Productivity
Final Thoughts
This guide has been about Microsoft Word. We hope you’ve learned how to use Microsoft Word and more tricks.
We’re glad you read the article up to here 

As we’ve shared above, there are more articles you can read about Microsoft Word and Microsoft Office in our Help Center and Blog.
Please share this article on your socials or with your friends. Someone else may benefit from it too.
One more thing …
Subscribe to our newsletter and be among the first to receive these documents in your inbox. We also share deals, promotions, and more through email. Don’t be left out.
Fonts, Microsoft 365, Microsoft Office for Mac, Microsoft Word, Office 2003, Office 2007, Office 2010, Office 2013, Office 2016, Office 2019, Office 2021 / Office LTSC, Office 365 /
18 July 2021
Microsoft Word seems to have two pairs of shortcuts that do the same thing – increase or decrease the font size. This is how they are different.
The shortcuts are:
Ctrl + Shift + < or Ctrl + Shift + > – which are also buttons on the Home tab.

Ctrl + [ and Ctrl + ] – that have been in Word for as long as we can remember.
There’s a subtle difference between the two.
Change Font Size – Ctrl + Shift + < or >
The buttons on the Home tab and “< >” shortcuts step through the predefined font sizes on the Font Size pull-down list:

Change font size by 1pt Ctrl + [ or ]
Ctrl + [ and Ctrl + ] step one point , up or down the font sizes.
Use this shortcut to fine tune type sizes, e.g. adjust a heading to be as large as possible without going over a single line.
Word tables for formatting magic
Tricks to formatting Word’s Footnotes and Endnotes
Hidden text positioning and formatting tricks in Word



 ..
..