
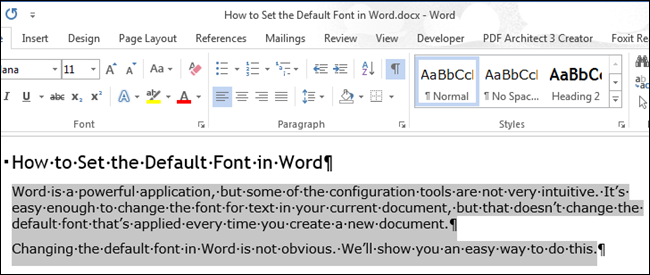
To use your favorite font in Word all the time, set it as the default.
-
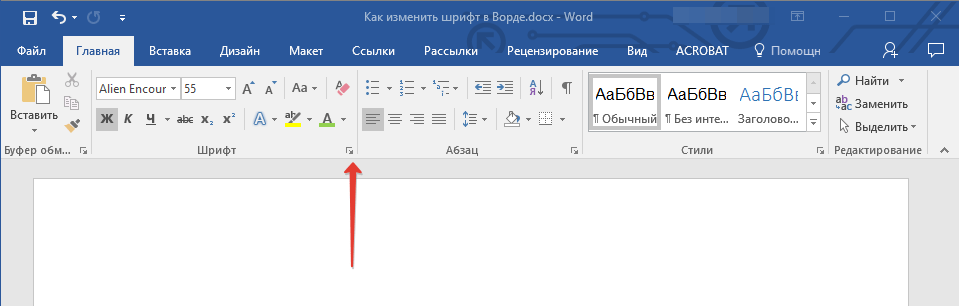
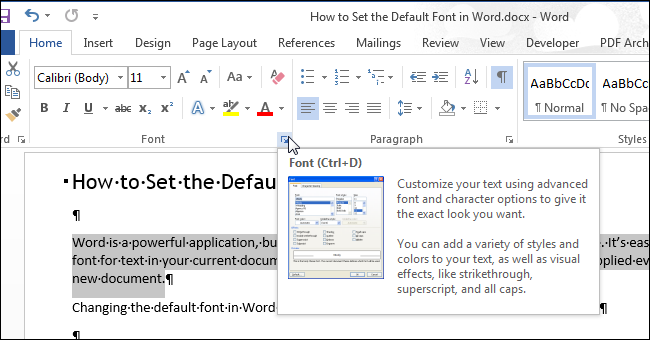
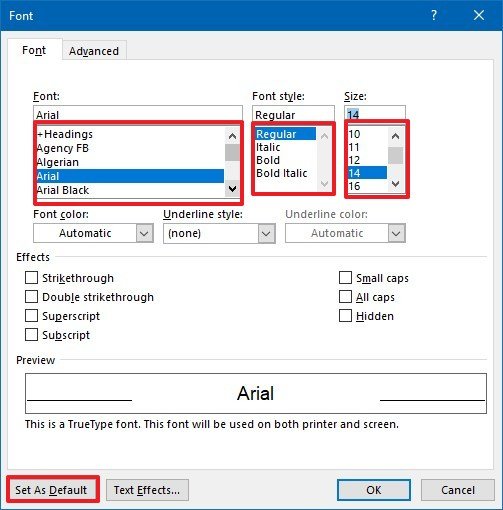
Go to Home, and then select the Font Dialog Box Launcher
 .
. -
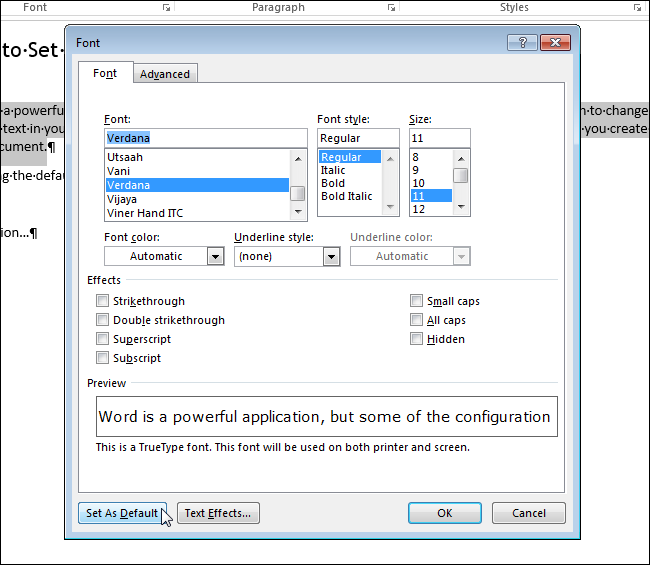
Select the font and size you want to use.
-
Select Set As Default.
-
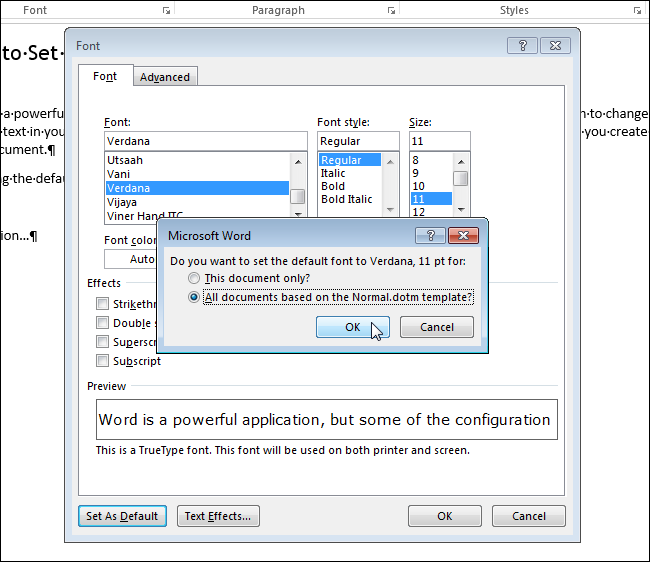
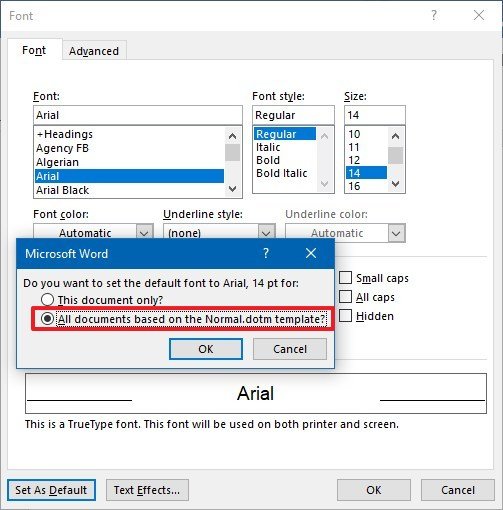
Select one of the following:
-
This document only
-
All documents based on the Normal template.
-
-
Select OK twice.
 .
.
If the default font setting doesn’t persist
Sometimes, a company’s permission settings or some add-ins change the default font back to the original font. If that’s happening, here are some things to try.
-
Select Start.
-
In the Search box, type Normal.dotm and select Search.
-
Right-click Normal.dotm, and select Properties.
-
On the General tab, make sure Read-only isn’t checked. If it’s checked, uncheck it.
-
Select the Security tab. Under Group or user names, select your name, and then make sure you have Write permission in the Permissions box.
-
Select OK.
If you aren’t able to uncheck the Read-only box or if you don’t have Write permission, contact the person who’s in charge of your company’s computer systems.
If you have Write permissions and the default font setting still doesn’t stick, you might have to turn off Word add-ins and change the default font setting. Here’s how:
-
Select File > Options > Add-Ins.
-
In the Add-ins box, find one of the add-ins you want to turn off and note the add-in type listed in the Type column.
-
Select that add-in type in the Manage list, and select Go.
-
Uncheck the boxes for the add-ins you want to turn off, and select OK.
-
Repeat steps 1-4 for other types of add-ins.
After you change the default font, turn on the add-ins.
-
Select File > Options > Add-Ins.
-
Select an Add-in type in the Manage list, and select Go.
-
Check the boxes for the add-ins you want to turn on, and select OK.
-
Repeat steps 1-3 for the other types of add-ins you want to turn on.
Note: You don’t have to turn off the Document Inspector type add-ins.
To use your favorite font in Word all the time, set it as the default.
-
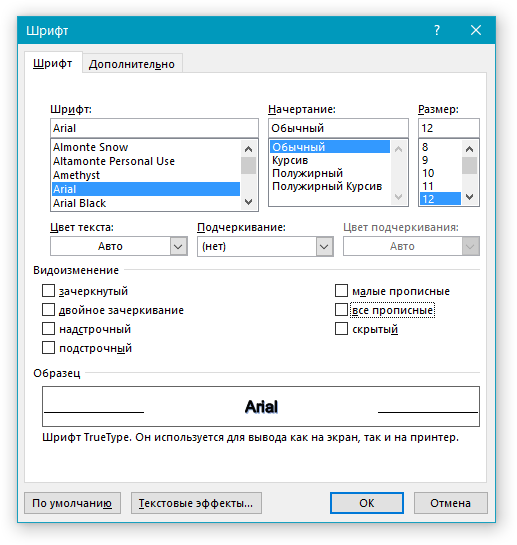
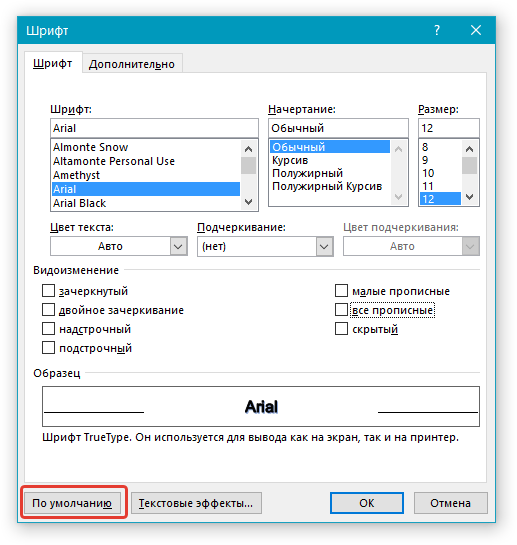
Go to Format > Font > Font.
You can also press and hold
+ D to open the Font dialog box. -
Select the font and size you want to use.
-
Select Default, and then select Yes.
-
Select OK.
 + D to open the Font dialog box.
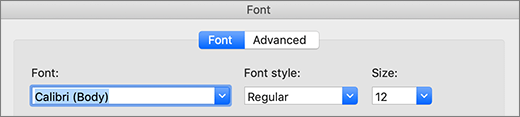
Содержание
- Как изменить шрифт?
- Как изменить размер шрифта?
- Как изменить толщину и наклон шрифта?
- Как изменить цвет и фон шрифта?
- Изменяем стиль шрифта
- Изменяем фон за текстом
- Изменяем цвет текста
- Как установить понравившийся шрифт в качестве используемого по умолчанию?
- Как изменить шрифт в формуле?
- Вопросы и ответы

В программе MS Word имеется довольно большой набор встроенных шрифтов, доступных к использованию. Проблема в том, что далеко не все пользователи знают о том, как изменить не только сам шрифт, но и его размер, толщину, а также ряд других параметров. Именно о том, как изменить шрифт в Ворде и пойдет речь в этой статье.
Урок: Как установить шрифты в Word
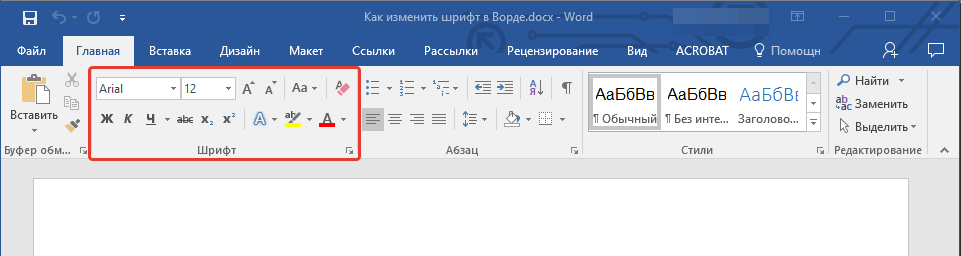
В Ворде есть специальный раздел для работы со шрифтами и их изменения. В новых версиях программы группа “Шрифт” расположена во вкладке “Главная”, в более ранних версиях этого продукта средства для работы со шрифтами находятся во вкладке “Разметка страницы” или “Формат”.
Как изменить шрифт?
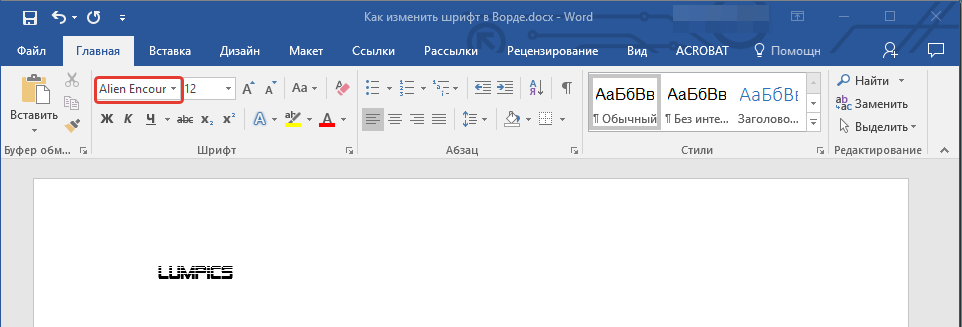
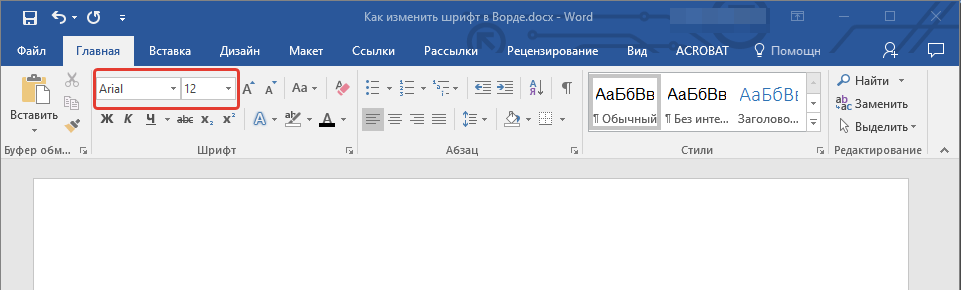
1. В группе “Шрифт” (вкладка “Главная”) разверните окошко с активным шрифтом, нажав на небольшой треугольник возле него, и выберите в списке тот, который вы хотите использовать
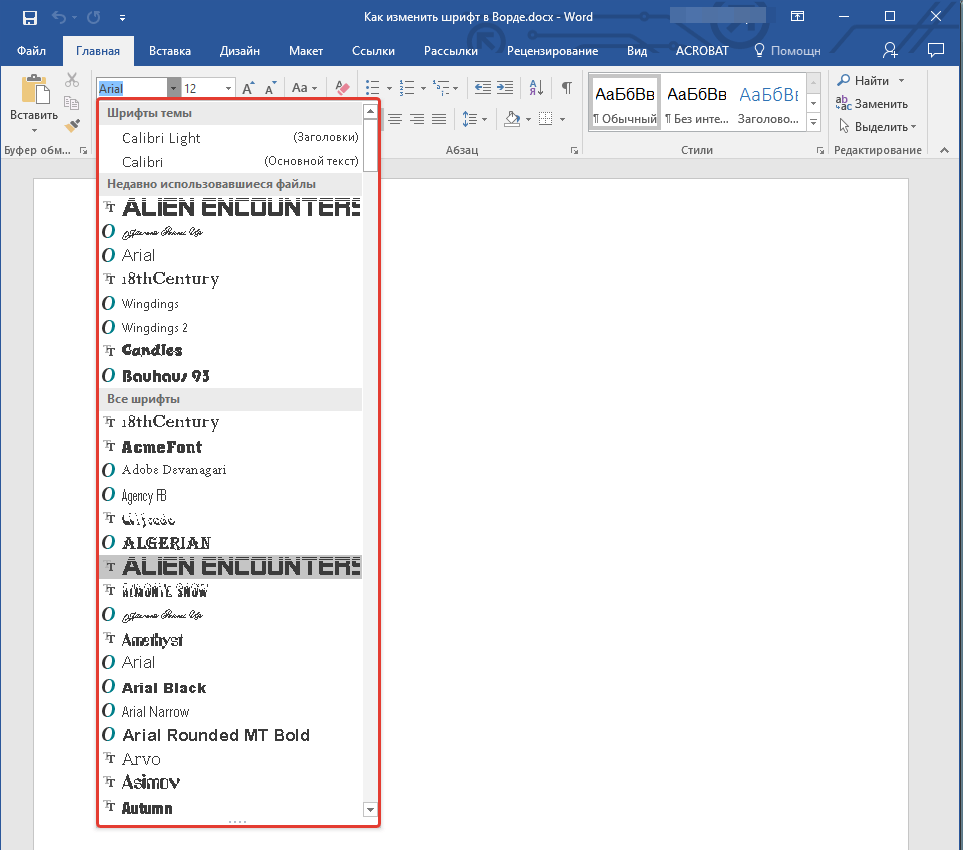
Примечание: В нашем примере шрифт по умолчанию — Arial, у вас он может быть другим, к примеру, Open Sans.
2. Активный шрифт изменится, и вы сразу же сможете начать его использовать.
Примечание: Название всех шрифтов, представленных в стандартном наборе MS Word отображается в том виде, в котором будут отображаться буквы, напечатанные этим шрифтом на листе.
Как изменить размер шрифта?
Прежде, чем изменить размер шрифта, необходимо усвоить один нюанс: если вы хотите изменить размер уже набранного текста, его сначала нужно выделить (это же касается и самого шрифта).
Нажмите “Ctrl+A”, если это весь текст в документе, или же используйте для выделения фрагмента мышку. Если же вы хотите изменить размер текста, который только планируете набирать, ничего выделять не нужно.
1. Разверните меню окошка, расположенного рядом с активным шрифтом (там указаны цифры).
Примечание: В нашем примере размер шрифта по умолчанию — 12, у вас он может быть другим, например, 11.

2. Выберите подходящий размер шрифта.
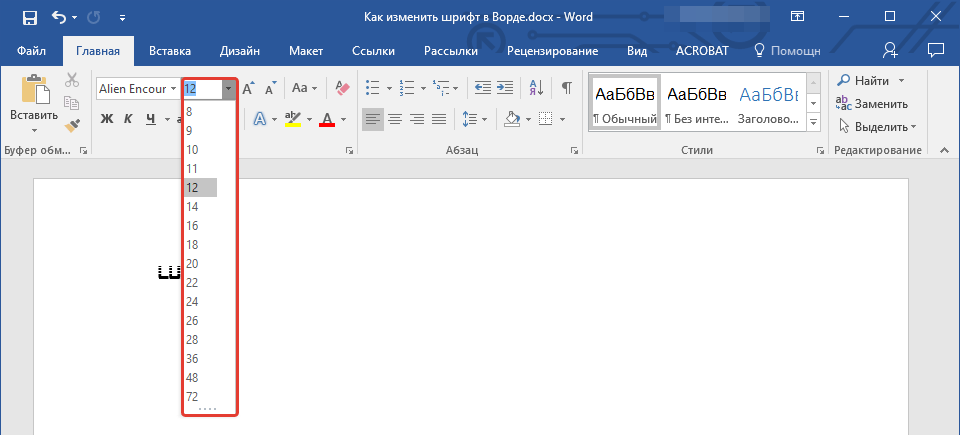
Совет: Стандартный размер шрифтов в Ворде представлен с определенным шагом в несколько единиц, а то и десятков. Если вас не устраивают конкретные значения, вы можете ввести их вручную в окне с активным размером шрифта.

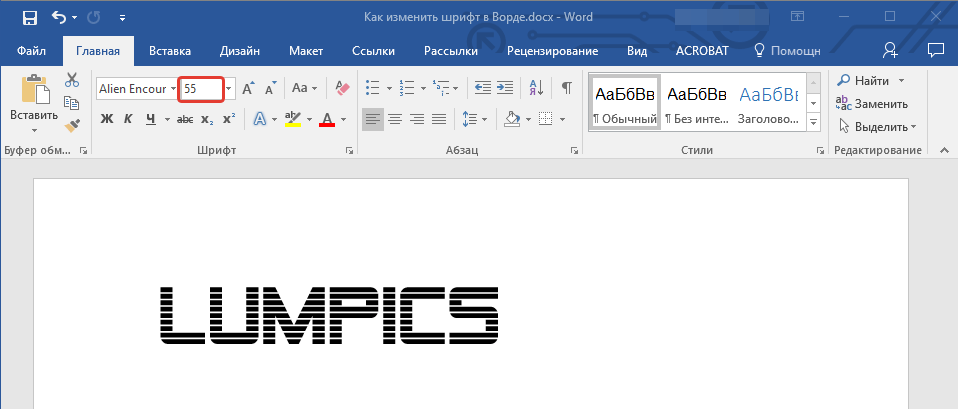
3. Размер шрифта изменится.
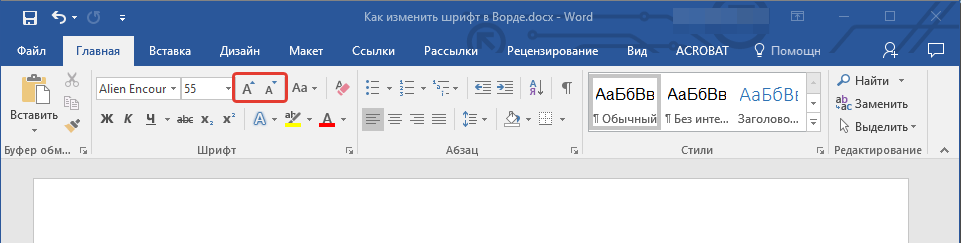
Совет: Рядом с цифрами, показывающими значение активного шрифта, расположены две кнопки с буквой “А” — одна из них больше, другая меньше. Нажимая на эту кнопку, вы можете пошагово менять размер шрифта. Большая буква увеличивает размер, а та что поменьше — уменьшает.
Кроме того, рядом с этими двумя кнопками находится еще одна — “Аа” — развернув ее меню, вы можете выбрать подходящий тип написания текста.

Как изменить толщину и наклон шрифта?
Помимо стандартного вида больших и маленьких букв в MS Word, написанных в том или ином шрифте, они также могут быть жирными, курсивными (курсив — с наклоном), и подчеркнутыми.
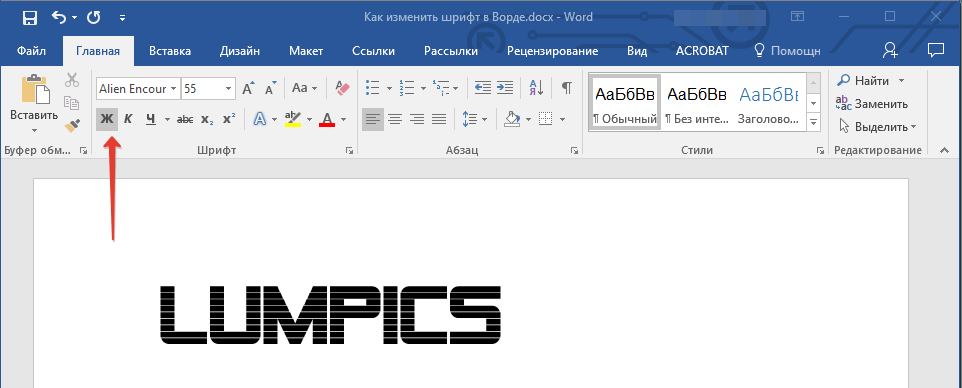
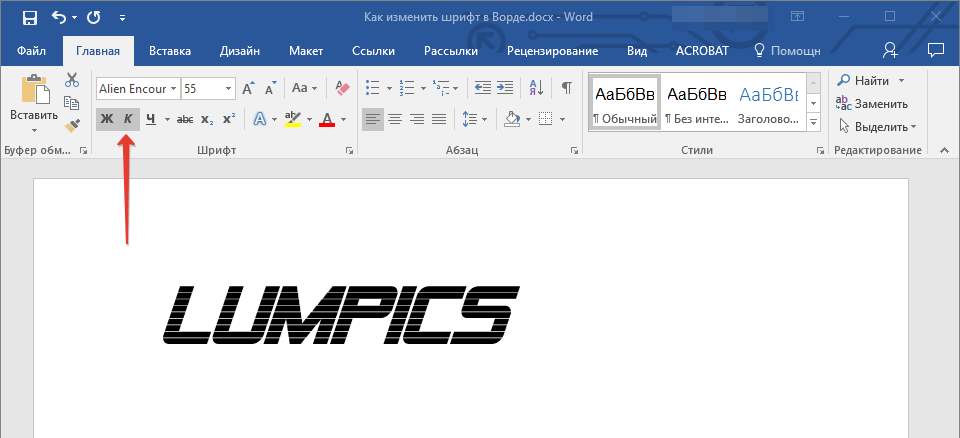
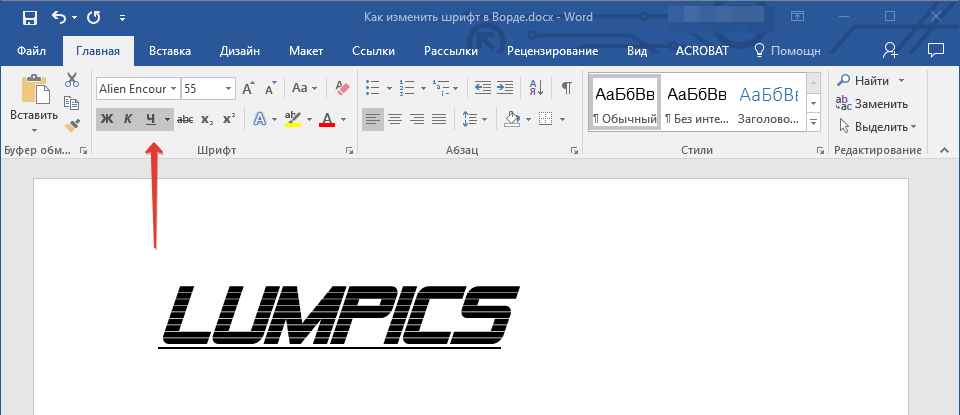
Чтобы изменить вид шрифта, выделите необходимый фрагмент текста (ничего не выделяйте, если вы только планируете что-то написать в документе новым типом шрифта), и нажмите одну из кнопок, расположенных в группе “Шрифт” на панели управления (вкладка “Главная”).

Кнопка с буквой “Ж” делает шрифт жирным (вместо нажатия кнопки на панели управления можно использовать клавиши “Ctrl+B”);
“К” — курсив (“Ctrl+I”);
“Ч” — подчеркнутый (“Ctrl+U”).
Примечание: Жирный шрифт в Ворде, хоть и обозначается буквой “Ж”, на самом деле является полужирным.
Как вы поняли, текст может быть одновременно жирным, курсивом и подчеркнутым.
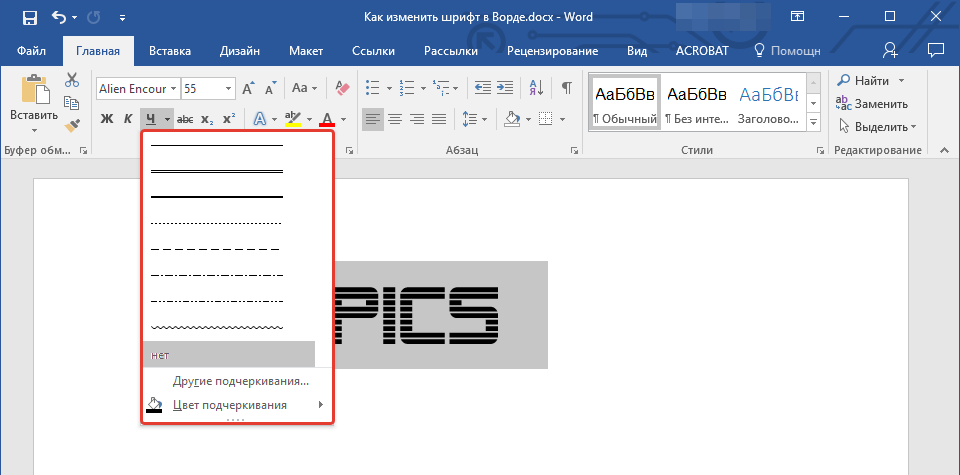
Совет: Если вы хотите выбрать толщину линии подчеркивания, нажмите на треугольничек, расположенный возле буквы “Ч” в группе “Шрифт”.
Рядом с буквами “Ж”, “К” и “Ч” в группе шрифт находится кнопка “abc” (зачеркнутые латинские буквы). Если вы выделите текст, а затем нажмете на эту кнопку, текст будет зачеркнут.
Как изменить цвет и фон шрифта?
Помимо внешнего вида шрифта в MS Word можно также изменить его стиль (текстовые эффекты и оформление), цвет и фон, на котором текст будет находиться.
Изменяем стиль шрифта
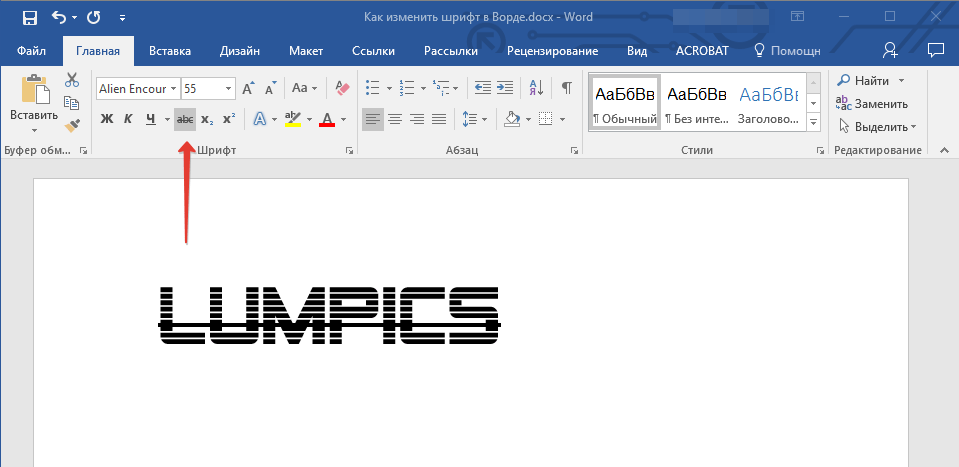
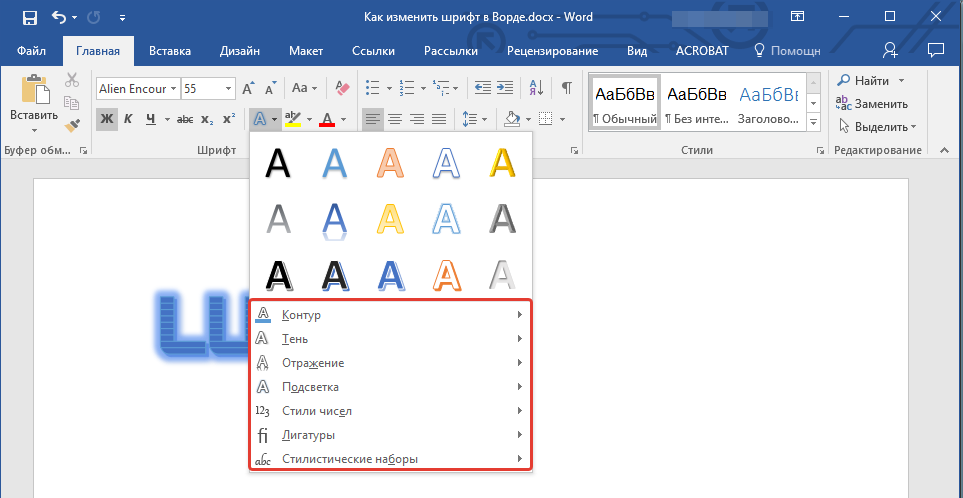
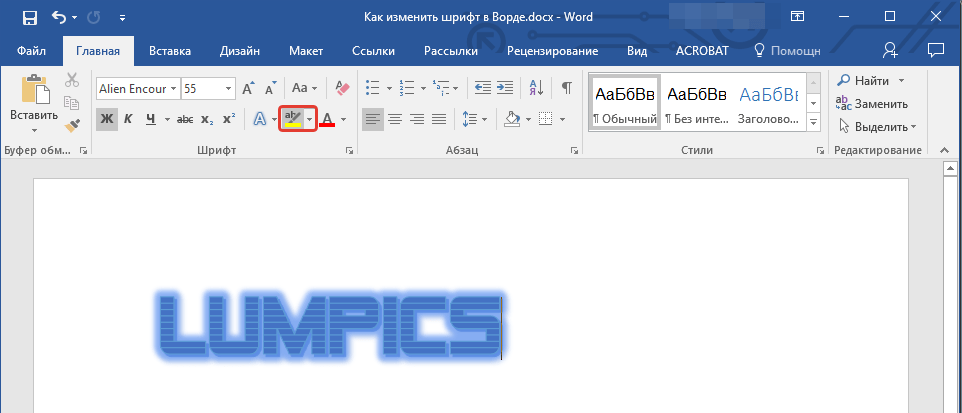
Чтобы изменить стиль шрифта, его оформление, в группе “Шрифт”, которая расположена во вкладке “Главная” (ранее “Формат” или “Разметка страницы”) нажмите на небольшой треугольник, расположенный справа от полупрозрачной буквы “А” (“Текстовые эффекты и оформление”).
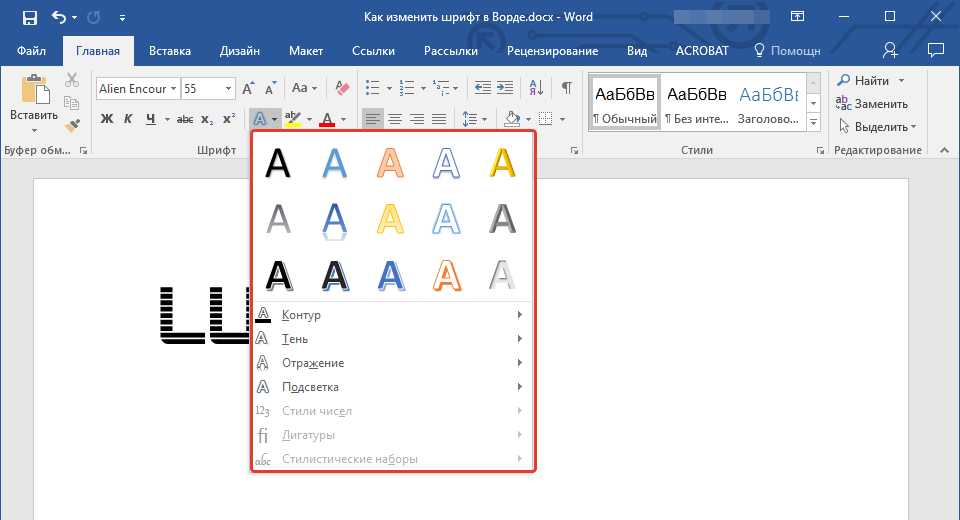
В появившемся окошке выберите то, что бы вы хотели изменить.
Важно: Помните, если вы хотите изменить внешний вид уже имеющегося текста, предварительно выделите его.
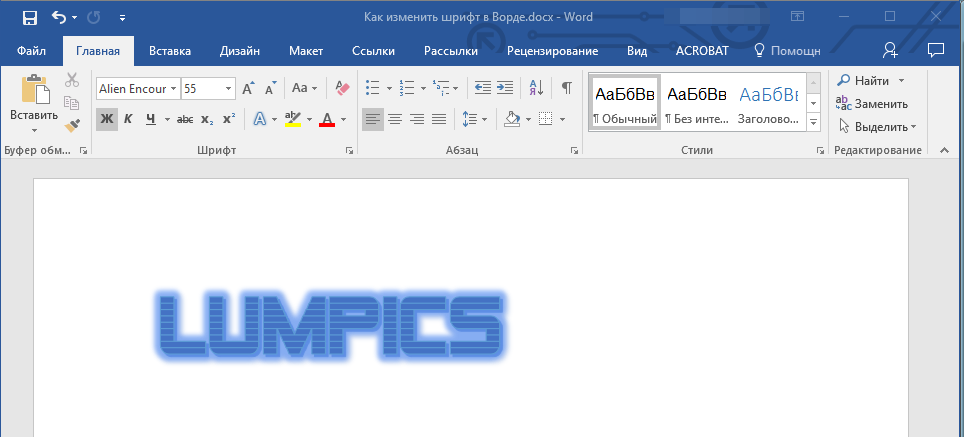
Как видите, один этот инструмент уже позволяет изменить цвет шрифта, добавить к нему тень, контур, отражение, подсветку и другие эффекты.
Изменяем фон за текстом
В группе “Шрифт” рядом с кнопкой, рассмотренной выше, находится кнопка “Цвет выделения текста”, с помощью которой можно изменить фон, на котором находится шрифт.
Просто выделите фрагмент текста, фон которого хотите изменить, а затем нажмите на треугольничек возле этой кнопки на панели управления и выберите подходящий фон.
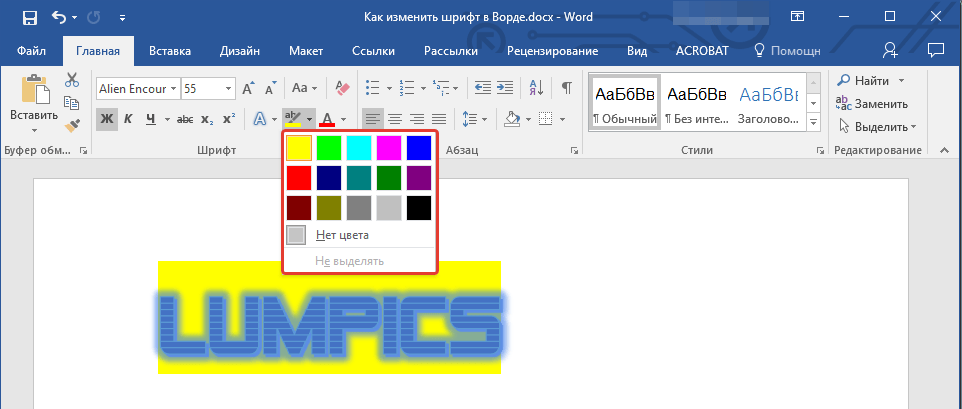
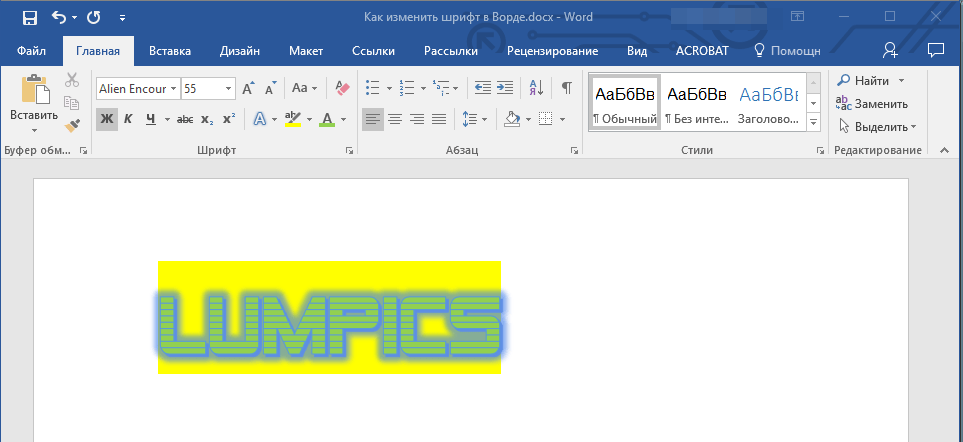
Вместо стандартного белого фона, текст будет находиться на фоне того цвета, который вы выбрали.
Урок: Как убрать фон в Ворде
Изменяем цвет текста
Следующая кнопка в группе “Шрифт” — “Цвет шрифта” — и, как понятно из названия, она позволяет этот самый цвет изменить.

Выделите фрагмент текста, цвет которого необходимо изменить, а затем нажмите на треугольник возле кнопки “Цвет шрифта”. Выберите подходящий цвет.
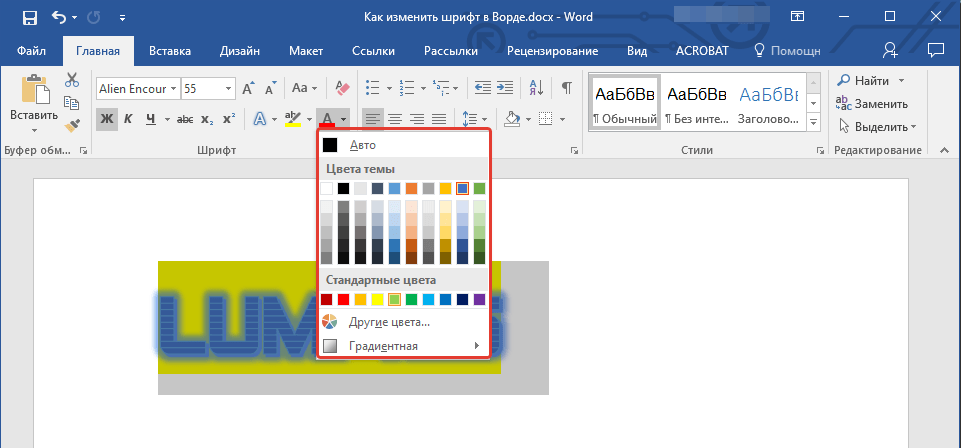
Цвет выделенного текста изменится.
Как установить понравившийся шрифт в качестве используемого по умолчанию?
Если вы часто используете для набора текста один и тот же, отличный от стандартного, доступного непосредственно при запуске MS Word, шрифт, не лишним будет установить его в качестве используемого по умолчанию — это позволит сэкономить немного времени.
1. Откройте диалоговое окно “Шрифт”, нажав на стрелочку, расположенную в правом нижнем углу одноименной группы.
2. В разделе “Шрифт” выберите тот, который вы хотите установить в качестве стандартного, доступного по умолчанию при запуске программы.
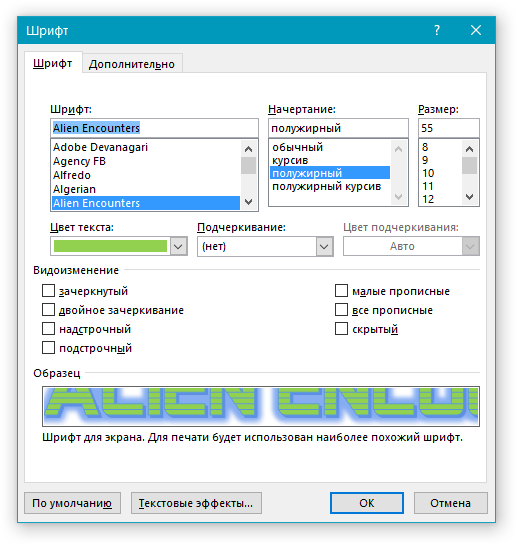
В этом же окне вы можете установить подходящий размер шрифта, его начертание (обычный, полужирный или курсив), цвет, а также многие другие параметры.
3. Выполнив необходимые настройки, нажмите на кнопку “По умолчанию”, расположенную в нижней левой части диалогового окна.
4. Выберите, как вы хотите сохранить шрифт — для текущего документа или для всех, с которыми будете работать в дальнейшем.
5. Нажмите кнопку “ОК”, чтобы закрыть окно “Шрифт”.
6. Шрифт по умолчанию, как и все дополнительные настройки, которые вы могли выполнить в этом диалоговом окне, изменится. Если вы применили его для всех последующих документов, то при каждом создание/запуске нового документа Ворд сразу же будет установлен ваш шрифт.
Как изменить шрифт в формуле?
Мы уже писали о том, как в Microsoft Word добавлять формулы, и как с ними работать, более подробно об этом вы можете узнать из нашей статьи. Здесь же мы расскажем о том, как изменить шрифт в формуле.
Урок: Как в Ворде вставить формулу
Если вы просто выделите формулу и попробуете изменить ее шрифт точно так же, как вы это делаете с любым другим текстом, ничего не получится. В данном случае действовать необходимо немного иначе.
1. Перейдите во вкладку “Конструктор”, которая появляется после клика по области формулы.
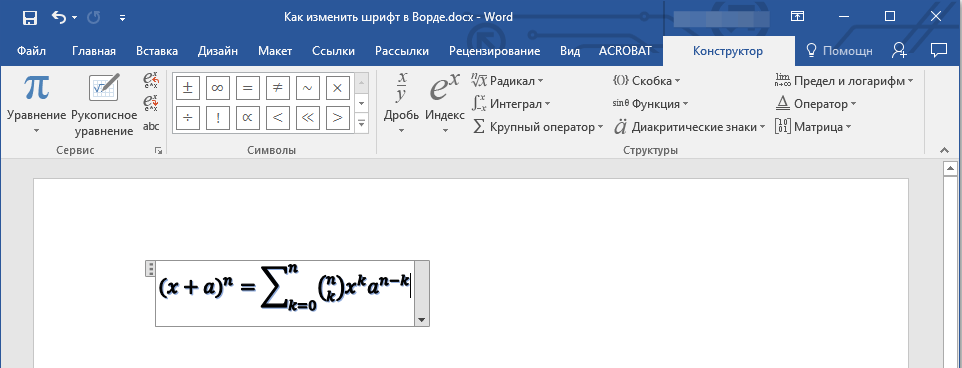
2. Выделите содержимое формулы, нажав “Ctrl+A” внутри области, в которой она находится. Для этого также можно использовать мышку.
3. Откройте диалоговое окно группы “Сервис”, нажав на стрелочку, расположенную в правой нижней части этой группы.
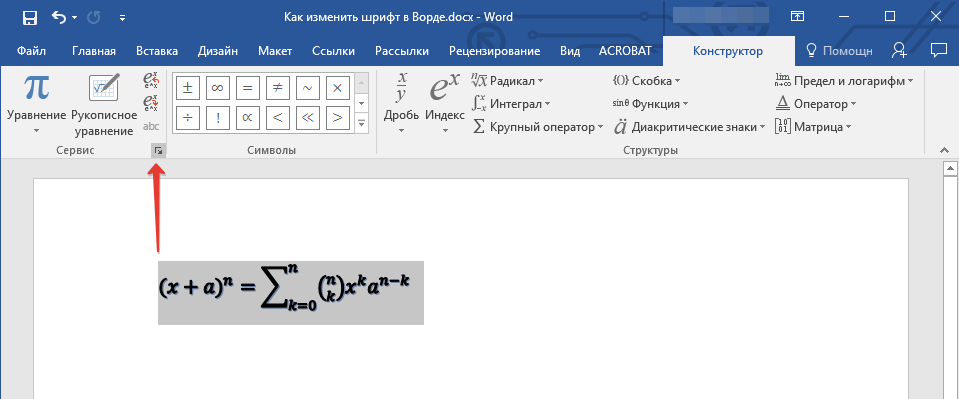
4. Перед вами откроется диалоговое окно, где в строке “Шрифт по умолчанию для областей формул” можно изменить шрифт, выбрав понравившийся из доступного списка.

Примечание: Несмотря на то, что в Word имеется довольно большой набор встроенных шрифтов, далеко не каждый из них может быть использован для формул. Кроме того, возможно, что помимо стандартного Cambria Math вы не сможете выбрать никакой другой шрифт для формулы.
На этом все, теперь вам известно, как изменить шрифт в Ворде, также из этой статьи вы узнали о том, как настроить другие параметры шрифта, в числе которых его размер, цвет и т.д. Желаем вам высокой продуктивности и успехов в освоение всех тонкостей Microsoft Word.

If you’re creating different styles of Microsoft Word documents, you may want to set a new default font. Here’s how.
How many Microsoft Word documents have you seen using Calibri or Times New Roman? Too many to count, we’d surmise. Unfortunately, most users don’t stray past the default formatting when they’re creating Word documents. That’s a shame, as there’s actually a wide range of fonts to choose from to fit with the style of document you’re creating.
If you have a font that you use regularly, having to change the font every time can be a pain. The good news is that it’s possible to change the default font in Word. This allows you to use the same font in every new Microsoft Word documents you create.
If you want to change the default font in Word, here’s what you’ll need to do.
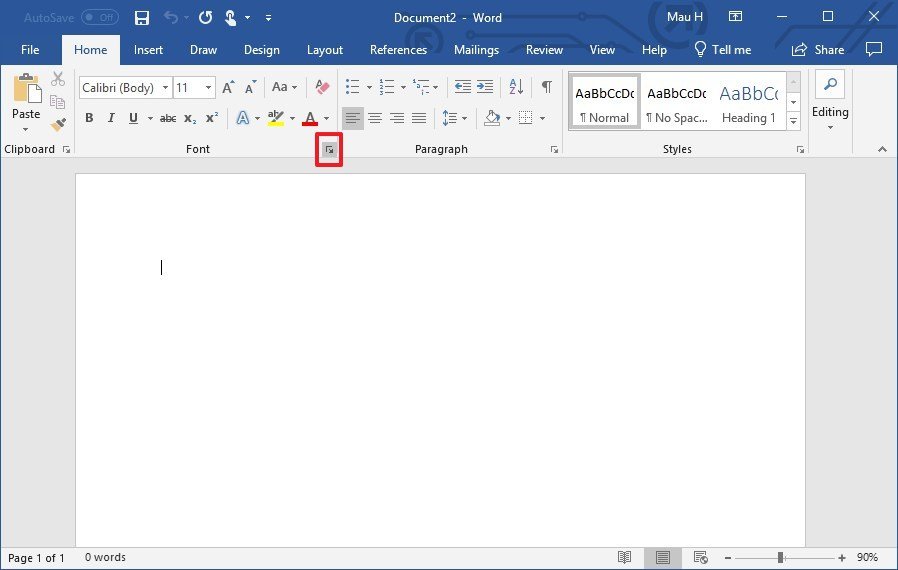
In order to change the default font, you need to open your Word document and access the Font dialog box. There are two ways to do this.
How to Change the Default Font in Word
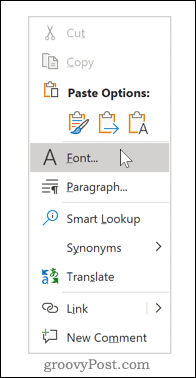
- To start, open your document, right-click in the text body (it doesn’t matter where), and hit the Font option.

- Alternatively, you can click the Font dialog box launcher. To do this, select the Home tab on the ribbon bar, then click the small arrow icon in the bottom right-hand corner of the Font section.

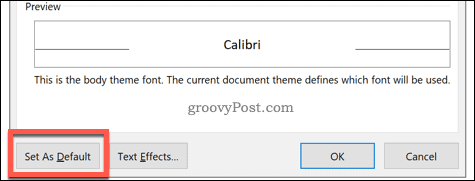
- Once the dialog box opens, you can choose the font that you wish to use. As well as changing the font itself, you can also change the style, size, and color of your text.

- Once you have made your changes, click the Set as Default button. This will set the font you’ve selected as the default font for all future documents.

- Select All documents based on the Normal template.

- Click OK to confirm your choice. Once confirmed, your chosen font should appear as the new, default font in any new document.


Editing or Deleting the Word Template File
If changing the default Word font hasn’t worked, it’s possible that you don’t have permission to edit the Normal.dotm template file. This is the template that Word uses to create new documents that contain your default formatting settings.
Access to this file can be restricted in some workplace environments for security reasons. You may need to unlock access to edit or delete the file. Deleting the template file will restore your default Word formatting settings, should you wish to do so.
How to Delete the Word Template File
- Close any open Word documents begin you begin.
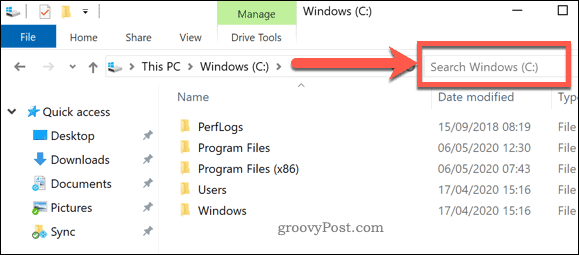
- Open a new File Explorer window and type Normal.dotm into the search bar in the top-right.

- Allow time for Windows to locate the file. To allow for changes to your Word template file, right-click the Normal file and press Properties.

- In the Normal properties window, make sure the General tab is selected. Uncheck the Read-only checkbox in the Attributes section to allow changes to the file to be made.

- Press Save to save your settings.


You should now be able to make changes to your default Word formatting settings. If you are unable to change these settings, consult with your IT administrator for access.
How to Reset the Word Template File
If you want to reset your Word template file, you can delete it entirely. This will force Word to recreate the Normal.dotm template document using its preset default settings, including the default font choice.
- To reset your Word template file, open a new File Explorer window.
- Use the search bar in the top-right to locate the Normal.dotm file.
- After Windows locates the file, right-click it and select Delete to remove it.
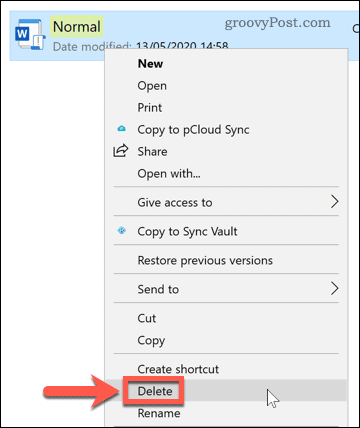
With the file removed, open Microsoft Word again to regenerate the template and restore your default settings.
Using Microsoft Word
If you use Word regularly, setting a default font can save you a lot of time. You can take this a step further by creating your own Microsoft Office templates with the formatting you’re looking to use on a regular basis. You can set your own fonts, page sizes, and more.
If you’re happy with your Word document, then consider how you can create more advanced documents. For example, adding a table of contents could help you to organize much longer documents.
![]()
This tutorial shows three ways to change the font, font size, and font color in Microsoft Word. First, we’ll use the font options in the ribbon. Then, we’ll use the Mini toolbar. Finally, we’ll use the Font dialog box.
Do you want to change your default font, font size, or font color? Check out my other tutorial “How to Change the Default Font in Microsoft Word.”
Quick Links:
- How to Change the Font, Font Size, and Font Color in the Ribbon
- How to Change the Font, Font Size, and Font Color in the Mini Toolbar
- How to Change the Font, Font Size, and Font Color in the Font Dialog Box
This tutorial is also available as a YouTube video showing all the steps in real time.
Watch more than 200 other document software tutorials on my YouTube channel.
The images below are from Word for Microsoft 365. The steps are the same in Word 2019, Word 2016, Word 2013, and Word 2010. However, your interface may look slightly different in those older versions of the software.
In Word, the main toolbar at the top of the screen is called the ribbon. The ribbon offers many of the font options most users will need for general content.
- Select the Home tab in the ribbon.

If your document is blank, skip to step 3.
- Select the text with the font you want to change.
To select the entire document, press Ctrl + A on your keyboard.
Alternatively, select Select in the Editing group, and then select Select All from the drop-down menu.

- Select the Font menu arrow to choose a new font. (This menu lists the fonts installed on your computer. Your fonts may differ from those shown in figure 3.)

- Select the Font Size menu arrow to choose a new font size. (The numbers represent typography points. Each point is 1/72 of an inch.)

Alternatively, you can select the Increase Font Size or Decrease Font Size buttons to increase or decrease the font by one point.

- Select the Font Color menu arrow to choose a new color.

For additional color options, select More Colors in the Font Color drop-down menu (see figure 6). Choose a color in the Standard tab of the Colors dialog box. Or, enter a custom color in the Advanced tab.

Pro Tip: Select the Change Case button to choose Sentence case, lowercase, UPPERCASE, Capitalize Each Word, or tOGGLE cASE.

Your text should change to your new font choices immediately.
The Mini toolbar offers many of the same font options as the ribbon from within the text.
- Select and then right-click the text to display the Mini toolbar.
- Select the arrow menus to select a font, font size, or font color. (Note that the Mini toolbar includes the Increase Font Size or Decrease Font Size buttons to increase or decrease the font by one point.)

Once again, your text should change to your new font choices immediately.
How to Change the Font, Font Size, and Font Color in the Font Dialog Box
The Font dialog box offers advanced options that aren’t available in the ribbon or the Mini shortcut menu.
- Select the Home tab in the ribbon (see figure 1).
If your document is blank, skip to step 3.
- Select the text with the font you want to change.
To select the entire document, press Ctrl + A on your keyboard.
Alternatively, select Select in the Editing group, and then select Select All from the drop-down menu (see figure 2).
- Select the dialog box launcher in the Font group.

- Select a new font, font size, and font color from the Font tab in the Font dialog box.

- (Optional Step) Select the Advanced tab for additional options for character spacing and OpenType features.

- Select the OK button.

Your text should change to your new font choices as soon as the Font dialog box closes.
Related Resources
How to Create Drop Caps in Microsoft Word
How to Adjust Line Spacing in Microsoft Word
How to Adjust Page Margins in Microsoft Word
How to Adjust Letter Spacing in Microsoft Word (PC & Mac)
Updated January 14, 2023
В Microsoft Office Word есть шрифты на любой вкус. Чтобы нестандартно оформить текст или напечатать красивую листовку, используйте оригинальную каллиграфию или графический объект. Но встроенные возможности программы меркнут в сравнении с тысячами разнообразных стилей, которые можно скачать в сети. Если вам не хватает того, что есть в офисе, узнайте, как установить шрифт в Ворд.

Где найти новый шрифт
Существуют целые сервера, на которых выложены коллекции бесплатной каллиграфии. Там сразу можно посмотреть, как будут выглядеть буквы и цифры. Вы подберёте печатные знаки под любые нужды. Доступна даже имитация рукописного ввода.
Перед тем как добавить шрифт в Word, его надо найти в интернете. Скачивайте файлы только из надёжных источников. Есть несколько проверенных сайтов. Например, «Fontspace» или «Xfont». После загрузки каллиграфию можно будет установить в Ворд. Если вы хотите посмотреть весь ассортимент, сделайте следующее:
- Откройте любой поисковик.
- Введите запрос «Скачать шрифт для Word». На первых страницах будут самые популярные сервисы. Можете задать конкретные параметры: «Готические буквы», «Фигурные символы», «Старославянская кириллица» и тому подобное. Всегда найдётся какой-нибудь новый, никем не используемый стиль.

- Зайдите на понравившийся сайт.
- Не загружайте исполняемые файлы с расширением .EXE — скорее всего, это вирус или другая вредоносная программа. Каллиграфия для Ворд имеет формат .TTF (True Type Font) или .OTF, а коллекции стилей хранятся в архивах .ZIP или .RAR.

- Если вы знаете, какой шрифт вам нужен, вбейте в строку поиска его название вместе с фразой «Скачать для Word». Так вы быстрее найдёте то, что хотите.


Лучше брать архив со стилями, а не качать по одному файлу. Вы сможете добавить несколько видов печатных знаков и уже в самой программе посмотреть, что вам подходит.
Когда вы нашли каллиграфию, можно разбираться, как вставить шрифт в Word.
- Распакуйте архив со стилями, если качали их в сжатом виде. Для этого надо установить архиватор. Подойдёт WinZip или WinRar. Кликните правой кнопкой мыши по файлу с коллекцией и в выпавшем списке выберите «Извлечь». Теперь вы можете копировать и перемещать данные, которые хранились в архиве. Чтобы посмотреть, как выглядят символы, откройте один из файлов с каллиграфией. И для этого не надо открывать Ворд.

- Перейдите в Пуск — Панель управления. В разделе «Оформление и персонализация» кликните значок «Шрифты». Он открывает папку со стилями символов в Word. В неё также можно войти через С:WindowsFonts. Чтобы лучше ориентироваться в панели управления, в меню «Просмотр» (находится в правом верхнем углу) выберете подходящие настройки отображения.

- Скопируйте скачанные файлы с каллиграфией в папку «Fonts» (не сам архив, а извлечённые из него данные). Новый вид символов должен появиться и в Office. Некоторые из них уже могут быть в системе. В таком случае появится диалоговое окно, предлагающее заменить имеющиеся печатные знаки. Не соглашайтесь, чтобы случайно не удалить «родные» стили офиса.


Если не получилось добавить их таким образом, попробуйте другой способ.
- Откройте папку с загруженной каллиграфией.
- Кликните по одному из файлов правой кнопкой мыши.
- Нажмите «Установить».

После этого стили точно отобразятся в Word.
Как добавить шрифты в файл Word
Если вы решите поработать с текстом на компьютере, на котором отсутствует используемая вами каллиграфия, она не отобразится. Но можно добавить стиль в прямо документ.
- Нажмите синюю кнопку «Файл». В Office 2007 это меню вызывается кликом на логотип в левой верхней части окна.
- Выберете «Параметры», раздел «Сохранение».

- Галочку рядом с пунктом «Внедрять шрифты в файл».


Лучше активировать эту опцию, если вы используете не только системные стили. У вас ведь не будет возможности установить свою каллиграфию на чужой ПК.
Как узнать название шрифта
Вам понравился внешний вид символов, но вы не знаете название этого дизайна? И как загрузить шрифты в Word, если вы не можете их найти? Не надо ходить по сайтам, надеясь случайно наткнуться на нужные символы. Название легко узнать. Для этого существуют специальные программы и даже целые сайты.
- What The Font. Популярный и надёжный сервис. Определяет вид каллиграфии по картинке. Найденный стиль можно сразу же скачать и установить в Word. Ресурс имеет свой форум. Если поиск по базе данных ничего не дал, можете спросить совета у других пользователей.
- Расширение для браузера Google Chrome. Сканирует HTML-код страницы и выдаёт название.
- Определяет шрифт, задавая вопросы о его внешнем виде. Если вы примерно представляете, что ищите, но конкретной информации у вас нет — этот ресурс подойдёт.
- Bowfin Printworks. Здесь можно подобрать стиль вплоть до мельчайших деталей. Спрашивает о форме каждого символа.
- Сообщество людей, которые занимаются дизайном каллиграфии или просто в ней разбираются. Надо создать тему и вставить рисунок с символами. Пользователи форума помогут найти нужный стиль.
- WhatTheFont для мобильных устройств. Сфотографируйте слово — приложение определит, какой это стиль.

Если вы увидели интересную каллиграфию в интернете или хотите расширить возможности Office, разберитесь, как установить новый шрифт в Word. Нестандартными надписями можно разбавить скучный текст. Их используют для листовок, поздравлений, открыток, презентаций. Их существуют тысячи — вы обязательно найдёте подходящий.
На чтение 2 мин Опубликовано 12.10.2015
Word, без сомнения, очень мощное и интуитивно понятное приложение. Однако некоторые его параметры понятны не сразу. К примеру, если изменить шрифт в текущем документе, то это ни как не повлияет на то, какой шрифт будет использоваться каждый раз при создании нового документа.
Изменить шрифт в Word, который задан по умолчанию, не очевидная, но легко решаемая задача. Мы покажем Вам лёгкий способ осуществить это.
Откройте ранее созданный документ или введите какой-либо текст в новый документ. Выберите часть текста и на вкладке Главная (Home) нажмите кнопку открытия диалогового окна с расширенным списком параметров в правом нижнем углу группы Шрифт (Font).
В списке Шрифт (Font) выберите шрифт, который Вы хотите использовать по умолчанию, и нажмите кнопку По умолчанию (Set As Default).
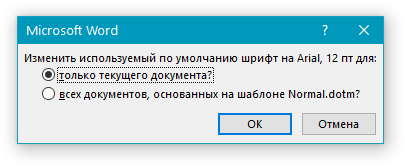
Появится диалоговое окно с вопросом, хотите ли Вы изменить используемый по умолчанию шрифт только для текущего документа или для всех документов, основанных на шаблоне «Normal». Выберите вариант Всех документов, основанных на шаблоне Normal (All documents based on the Normal.dotm template). Нажмите ОК.
Замечание: Новый шрифт, заданный по умолчанию, сохраняется в шаблоне для дальнейшего использования. В документах, уже созданных ранее на основе этого шаблона, никаких изменений при их открытии не произойдёт.
Если текущий документ создан на основе пользовательского настраиваемого шаблона, то шрифт по умолчанию будет сохранён в этом шаблоне, а не в шаблоне «Normal». Простейший способ изменить шрифт, используемый по умолчанию в шаблоне «Normal», это создать новый пустой документ и проделать все шаги, описанные в этой статье.
Оцените качество статьи. Нам важно ваше мнение:
![]()
Download Article
![]()
Download Article
Do you want to switch things up in Word by changing the default Times New Roman or Calibri font to something else? There’s an easy way to adjust settings so you can set a new default font. This wikiHow article will show you how to set the default font in Word Office 365 (for all versions since Word 2013) on Windows and macOS.
-
1
Open Word. On your Windows PC, open up the Microsoft Word application.
-
2
Open up a document. You can use any document you want, but if you want to start a new document, click on File > New > Blank Document in the top left corner of the window.[1]
Advertisement
-
3
Click on Home. This is located in the left corner of the top Windows menu bar.
-
4
Click on the Font Dialogue Box Launcher. This is the small square icon with an arrow inside. It is located in the bottom right corner of the “Font” section above the document.[2]
-
5
Select your font. In the pop-up window, you’ll see a drop down menu labeled “Font” in the top left corner. Simply scroll until you find the font that you want to set as the default. Click on it.
- You can see a preview of your font in the “Preview” section near the bottom of this pop-up window. This will show you exactly what your font looks like as you make changes.
-
6
Set your Font style and Size. There are two drop down menus to the left of “Font.” Scroll through each to set your desired default font style and size.
-
7
Set other font preferences (optional). If you also want to change features such as «Font color,» «Underline style,» or «Effects,» simply adjust these settings within the same pop-up window.
- You can also click on Advanced near the top of this pop-up window to change more settings such as “Character Spacing” and “Advanced Typography.”
-
8
Click on Default…. This is located in the bottom left corner of the pop-up window.
-
9
Click on This document only or All documents based on the Normal template. The former will only change the default font for this particular document, while the latter will change the default font for all future Word documents.
-
10
Click on OK. This is located in the bottom right corner of the pop-up window. You have now successfully changed the default font in Word.
- If you’ve tried this method and the font you chose still does not appear as the default font, look towards the next method for troubleshooting.


Advertisement
-
1
Open the Start menu. This is located on the left or center of your PC’s taskbar. This button is the Windows logo, which looks like four squares.[3]
-
2
Type Normal.dotm into the search bar. The search bar is located in the bottom left corner of the Search menu. If your office template directory is not indexed and you are unable to find «Normal.dotm» through search, Right click start menu and select «Run» option. Then type «%Appdata%/Microsoft/Templates» in run dialogue box and click «OK». This will open office’s templates directory and you will find Normal.dotm in this directory.
-
3
Right-click the Normal.dotm. Now click on Properties at the bottom of this drop down menu.
-
4
Navigate to General. If it isn’t already displayed, click on this button near the top of the pop-up window to view the general information.
-
5
Uncheck Read-only (if necessary). If you see that the checkbox next to “Read-only” is selected, simply click on it to uncheck it. You should now be able to change default settings on Word.
- If you are unable to uncheck this box, look towards the last step of this method.
-
6
Click on the Security tab. This is located at the top of the pop-up window.
-
7
Click on your name. You should see your name located underneath “Group or user names.” Now look and see if there’s a checkmark in the “Allow” section of the “Write” permission.
- If there isn’t, look to the last step.
-
8
Click on OK. This is located at the bottom of the Normal Properties pop-up window.
-
9
Contact your company (if necessary). If you weren’t able to uncheck the “Read-only” box, or did not see the “Write” permission allowed, this means that your company will not allow you to change the default font. We recommend that you contact your company’s technology or computer services to try and resolve this issue.


Advertisement
-
1
Open Word. On your Mac, open up the Microsoft Word application.
-
2
Open up a document. You can use any document you want, but if you want to start a new document, click on File > New Document in the top left Apple menu bar.
-
3
Click on Format > Font. These are located in your top Apple menu bar.[4]
-
4
Click on the “Font” drop down menu. This is located in the top left corner of the “Font” pop-up window. Simply click on the arrow.
-
5
Select your font. In the drop down menu that appears below “Font,” you’ll see all of the fonts available to you. Simply scroll until you find the font that you want to set as the default. Click on it.
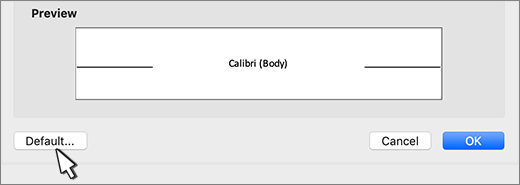
- You can see a preview of your font in the “Preview” section near the bottom of this pop-up window. This will show you exactly what your font looks like as you make changes.
-
6
Set your Font style and Size. There are two drop down menus to the left of “Font.” Click on each to set your desired default font style and size.
-
7
Set other font preferences (optional). If you also want to change features such as «Font color,» «Underline style,» or «Effects,» simply adjust these settings within the same pop-up window.
- You can also click on Advanced near the top of this pop-up window to change more settings such as “Character Spacing” and “Advanced Typography.”
-
8
Click on Default…. This is located in the bottom left corner of the pop-up window.
-
9
Click on This document only or All documents. The former will only change the default font for this particular document, while the latter will change the default font for all future Word documents.
-
10
Click on OK. This is located in the bottom right corner of the pop-up window. You have now successfully changed the default font in Word.
- If you’ve tried this method and the font you chose still does not appear as the default font, look towards the next method for troubleshooting.


Advertisement
-
1
Open Finder. If the default font you chose isn’t remaining as the default, use these steps to check your permissions. The Finder application is blue and white with a smiley face inside.
- Some companies have permission settings that don’t allow default font changes, which is why you may want to check and see if this is the case for you.
-
2
Type Normal.dotm into the search bar. Click on the magnifying glass in the top left corner to open the search bar. Press Enter on your keyboard after typing it in.
-
3
Click on the Normal.dotm file. If you don’t see this file in your search results, you may need to click on This Mac near the top left corner of the window.
-
4
Click on File > Get Info. These are located in the top Apple menu bar.
-
5
Navigate to General. If it isn’t already displayed, click on this button near the top of the pop-up window to view the general information.
-
6
Uncheck Locked (if necessary). If you see that the checkbox next to “Locked” is selected, simply click on it to uncheck it. You should now be able to change default settings on Word.
- If you are unable to uncheck this box, look towards the last step of this method.
-
7
Click on Sharing & Permissions. This is located at the bottom of the pop-up window. Now look and see if the “Read & Write” privilege appears next to your name. If it doesn’t, look to the next step.
-
8
Contact your company (if necessary). If you weren’t able to uncheck the “Locked” box, or did not see “Read & Write” next to your name, this means that your company does not allow you to change the default font. We recommend that you contact your company’s technology or computer services to try and resolve this issue.


Advertisement
Ask a Question
200 characters left
Include your email address to get a message when this question is answered.
Submit
Advertisement
References
About This Article
Article SummaryX
1. Open a document in Word.
2. Click on Home > Font Dialogue Box Launcher.
3. Select your font.
4. Change font style.
5. Click on Default.
6. Click on This document only or All documents.
7. Click on OK.
Did this summary help you?
Thanks to all authors for creating a page that has been read 2,627 times.
Is this article up to date?
When it comes to creating a compelling and effective document, one of the most important tools at your disposal is the font (also known as «typeface»).
Fonts do much more than improve—or hamper—the legibility of your piece. They set a tone. They’ve got personalities. They evoke feelings. As such, fonts can either reinforce or undermine your brand.


Because fonts are so important, you may want to change the default fonts in Microsoft Word. In this article, you’ll see, step-by-step how to add fonts to Microsoft Word so you can change the default fonts in your document.
You’ll also learn tips on where to find the best Microsoft Word fonts and how to choose the best ones for your document.
(Note: In the tutorials below, I use Microsoft Word for macOS. If you’re on Windows or a different version of Word, then your interface will look different.)
Why Use Premium Fonts in Your Microsoft Word Document?
When it comes to creating documents that get and keep your readers’ attention, fonts are some of your most powerful tools. The right fonts:
- reinforce your branding
- express the right tone
- direct the reader’s attention
- improve readability
You might be tempted to use free fonts for Microsoft Word in your next document. But remember, those built-in MS Word fonts are exactly the same fonts that everyone else is using. Or, you might find a free Microsoft Word fonts download. But free fonts are often not as well-designed as premium fonts.
You can easily add fonts to Microsoft Word from outstanding sources like Envato Elements or GraphicRiver. To be able to download unlimited fonts, then look to Envato Elements. You get access to thousands of fonts. Download as many as you need for one small subscription price.


For one-off projects, GraphicRiver is a great source of the best Microsoft Word fonts on a pay-per-use basis.
And lastly, use the tips above to choose and use fonts effectively in your document. The misuse and overuse of fonts are sure signs of an amateur.
How to Change Microsoft Word Default Font
Word comes with default fonts, but you can change the font to match your branding or to change the tone and personality of the document.
You’ll find that dozens of fonts are already built into Word, and you can replace the default fonts with those. And you can also add new fonts. We’ll talk about how to add fonts to Microsoft Word later in this post.
To change the Microsoft Word default font, you’ve got three options:
1. How to Change the Microsoft Word Default Font for a Block of Text
This is a quick method that’s good to use if you want to change the default font only for one or a few bits of text. Here are the steps:
Step 1. Select the Text


Step 2. Open the Font Selection Tool


Click on the Font selection tool on the ribbon. You must be on the Home tab to see the buttons for formatting text. The Microsoft Word fonts list opens.
Step 3. Find the font you wish to use.
The Microsoft Word fonts list shows the Theme Fonts, Recent Fonts, and All Fonts. Scroll down farther to see all the fonts available on your computer. This includes fonts that are built-in as well as fonts you’ve added, listed in alphabetical order. The fonts list also gives you a preview of what each font looks like.
Click on the font you wish to use. A triangle next to the font means there are further selections you can make.


Step 4. Change the Font Size
Go to the font-size button to change the font size.


Or, click the Increase Font Size or Decrease Font Size buttons to change the font size by increments.
Step 5. Change Other Text and Paragraph Settings
Use the other buttons on the ribbon to add emphasis (bold, italics, underline), change the font color, and apply other effects.


We’ve now changed the default font in Microsoft Word.


2. How to Replace the Default Font Based on Paragraph Style
By changing the font used for a paragraph style, the change is applied globally in your document for all text with that paragraph style. Use this if you want to change the default font for large sections of text.
Follow the steps on how to change the Microsoft Word default font for a paragraph style:
Step 1. Select the Text
Highlight text that’s representative of the paragraph style you want to re-format. Make sure it’s got the paragraph style you want to change.


In this example, I’ll replace the default font for the Normal paragraph style.
Step 2. Apply the Font Settings You Wish to Use
Follow the steps in Method 1 to change the font, font size, font color, and apply other settings. You may also want to change the paragraph settings, such as alignment, line spacing, etc.


Step 3. Apply the New Formatting to the Paragraph Style
With the cursor in the paragraph you’ve formatted, click on the Styles button on the ribbon. This opens the paragraph Styles selection.


The current paragraph style will be highlighted. In this case, it’s the Normal style. Right-click on the Normal style, then click on Update Normal to Match Selection.


All other paragraphs with the Normal style are updated with the new font and settings you made.


3. How to Change the Font Based on Paragraph Styles Button
This method has the same end-result as Method 2. It changes the default font for a specific paragraph style. The steps are slightly different, as you’ll see:
Step 1. Open the Styles Settings
Click on the Styles button on the ribbon. This displays the paragraph styles.


Step 2. Modify the Paragraph Style
Right-click on the style you wish to change. Click Modify…


The Modify Style dialog opens.


Change the font, font size, and other settings. The box shows a preview of what the paragraph will look like when the settings you chose are applied. If you’re happy with the way it looks, click OK.


The new font (and other settings) will be applied to all paragraphs with that paragraph style.
How to Add Fonts to Microsoft Word
Right out of the box, Microsoft Word comes with dozens of fonts built in. But what if you want to use a font and you don’t see it on the Microsoft Word fonts list?
In that case, you add the font to Microsoft Word. I’ll walk you through how to do that in this section:
Step 1. Find New Fonts
The first step is to find the font you want to use. There are many sources of custom fonts. One to consider is Envato Elements, where you can download an unlimited number of fonts for one small subscription price.
To find a font you like, log into your Envato Elements account.


On the search bar, click on the downward arrow, then select Fonts.


Type a keyword into the search bar, depending on what kind of font you’re looking for. Click the search icon. The most relevant results appear.


Refine the results by Categories, Spacing, Optimum Size, and Properties. You can also sort the results by popularity (Popular) and newness (New).
Click on a font image or name to see its details.


When you find a font you like, click on any of the Download buttons on the page.


The Add this file to a project dialog box pops up.


Select a project to add the font file to. Or, click Create new project to add it to a new project. For this example, I’ll add the font to my existing tutorial project. Click the Add & Download button.
The file manager opens (Finder, if you’re on macOS; File Explorer, if you’re on Windows). Specify where you want to save the font file on your computer. Click Save.


The font files are now saved on your computer as a zip file.


Double-click on the zip file to unzip it.


Double-click on the font file itself to open it. It’ll usually have an extension like OTF or TTF. Click Install Font.


This adds the font to your computer’s fonts library.


The new font should now appear in the All Fonts list in Microsoft Word. To confirm, click on the Fonts button on the ribbon and scroll down the list until you see the new font. If you don’t see it, you may have to restart your computer.


Now, follow any of the methods above to change the default font with the new one.
2 Types of Fonts
Now that you know how to add fonts to Microsoft Word and replace the default fonts in your document, it would help for you to know more about fonts. This will help you choose the best fonts for your Word document.
There are two basic types of fonts you can use in your documents:
1. Serif Fonts
Serif fonts have little lines at the end of each stroke, like this:


Common examples of serif fonts include:


Various research studies have shown that, when it comes to printed matter, serif fonts are the easiest to read and result in the best comprehension.
2. Sans Serif Fonts
As the name implies, sans serif fonts don’t have little lines at the end of each stroke (“sans” means “without” in French):


These are some of the most common sans serif fonts:


Citing research by the Software Usability Research Laboratory, Drew E. Whitman in his book Ca$vertising, noted that sans serif fonts are the most legible fonts to use on a computer screen. Specifically, Arial, Courier, and Verdana were considered the best for online reading.
But these studies were conducted when the resolution of online screens was still very low (below 100 dpi) compared to printed materials (300 dpi). As computer screen resolutions get closer to 300 dpi, serif fonts may prove to be legible both online and offline.
In the meantime, you can use both serif and sans serif fonts in one document—if you know how. Read on for tips on how to use combine fonts.
5 Tips on Using Typography Effectively in Your Word Documents
It’s easy to get carried away with fonts! You may find that having so many kinds of fonts available at your fingertips unleashes your creativity. Yet, as with most things, fonts can either enhance or sabotage your document.
Follow these tips to harness the power of typography:
1. Keep It Simple
When it comes to choosing fonts, legibility is of utmost importance. Sure, it’s easier than ever now for you to find the most creative and outrageous fonts. But if nobody can read your text, then they defeat their purpose. If you must use an ornate font, restrict it to one letter or word.
2. Stick to Two Fonts
A document that’s dripping with many different fonts makes it look amateurish, confusing, and incoherent. For best results, stick to a maximum of two fonts: one serif and one sans serif. (More on this in tip #4).
Remember, use formatting like bold, italics, underlines, different font sizes and colors to add emphasis and variety.
3. Match the Tone and Goals for the Document
Fonts have personality, so pick the ones that match the tone and goals of the document. For example, the fonts for a 16th birthday party invitation will be different from the ones in a financial business report.
When in doubt, pre-test the document. Show it to other people, especially those who are like the intended audience. Make sure they can comprehend the document, first, and that they respond favorably.
4. Choose Fonts Appropriate for the Document’s Intended Use
Whether the document will be printed out or consumed on a computer screen will also affect your choice of fonts.
If you’re making a printed document, use the sans serif font for headings and the serif font for body text. For a web-based document, switch it: Use a serif font for headings and sans serif for body text.
5. Use Handwritten, Cursive, and Decorative Fonts Sparingly


There are other font types that may not fit easily in either serif or sans serif categories. These include handwritten, cursive, and decorative fonts. Handwritten fonts, as the name says, look like they were written by hand. These are extremely popular and useful for adding a warm, personal touch on materials. They can range from casual to glamorous.
Cursive fonts are a kind of handwritten font that look like they’re written in longhand. Beware of using cursive and handwritten fonts because they can be difficult to read. Use them for short bits of text you want to emphasize.
You can easily find handwritten fonts in marketplaces like Envato Elements or GraphicRiver.
Decorative fonts have special effects or treatments. They may be serif or sans serif. And some handwritten fonts can be considered decorative as well.
Here’s a sampling of the decorative fonts available in Envato Elements:
5 Best Font Styles for 2020
Designers come up with new fonts every day. Below are five of the best and freshest Microsoft Word font styles we’re seeing for 2020, along with two fresh examples of each style:
1. Vintage Fonts
Vintage fonts evoke the aesthetic of times past. If you’re working on a document that’s about a specific time, you’re bound to find a font to match.
Anthique — Vintage Typeface


Anthique is reminiscent of handmade Victorian hand lettering but with a modern flavor. It works best for materials that relate to the early 1800s. The font includes three variations in TTF and OTF formats. It also supports multilingual characters.
Middle Class Script


Middle Class is a script font that’s evocative of the bold style of the ’60s and ’70s. It’s got a hand-drawn and layered style, and includes punctuation, common ligatures, and extra swashes (lines).
2. Brush Script Fonts
Brush script fonts are handwritten fonts that look like they were written with a brush, such as a calligraphy or a paintbrush. These are increasingly popular as brands want to add a personal touch to their materials.
Eberthany Brush Script


Eberthany is a modern brush script signature font that works for:
- social media posts
- logos
- wedding invitations
- labels
- quotes
- and more
It works best with software that supports OpenType fonts like Adobe Illustrator CS, Adobe Photoshop CC, Adobe InDesign, and Corel Draw.
Mistrully Brush Script


Mistrully is a stylish brush script that looks like natural handwriting. It comes with special swashes or handwritten lines that you can use to add emphasis. Mistrully works well for logos, social media posts, advertisements, product designs and labels, stationery, among others.
3. Font Duos
Font Duos take the guesswork out of choosing fonts that work well together. These two-for-one font packages are designed to complement each other. You only need to pick the font duo that aligns with your branding and the tone of the material you’re designing. Examples of font duos include:
Chiladepia — Font Duo


The Chiladepia Font Duo is made up of two handwritten fonts. One’s a cursive font and the other’s a sans serif font. This font duo would work well on a computer screen. Use the cursive font for titles or headers and the sans serif font for the rest of the document.
Perkin | Duo Font Pack


The Perkin Duo Font combines a bold sans serif and a serif font. The sans serif font is best for titles and headings, while the serif font works great for body text. This duo is ideal for printed materials.
4. 3D Decorative Fonts
3D decorative fonts look like they’re popping off the pages. These fonts are incredibly eye-catching. For that reason, they’re great for titles. But, they’re not the most legible fonts, so use them sparingly for short bits of text.
Ultra — Modern Font


If you’re creating a futuristic document, then consider the Ultra — Modern Font. It’s got a modern and futuristic style. This pack is actually made up of four font styles: regular, bold, 3D, and bold 3D. It also comes in both OTF and TTF formats.
Under Construction 3D Color Font


Under Construction is a stunning 3D decorative font to use on materials related to industry, construction, technology, and the like. Each letter looks like it floats on top of the page. It’s a color or SVG OpenType font, which works only in Photoshop CC 2017+, Illustrator CC 2018, and some Mac apps.
5. Tech Sans Serif Fonts
Tech sans serif fonts have gone a long way since the pixelized arcade fonts of the ‘80s. Many are also much more legible and modern. Below are two examples:
Azuria — Technology Science Font


The Azuria — Technology Science Font evokes technology, science, and outer space. Its metallic, 3D look would work well in video games, movie titles, and tech-related branding. The font includes all Latin letters from A-Z, numbers, and punctuation marks.
Cyborg — Futuristic Technology Typeface


Cyborg is another futuristic tech font. Inspired by science fiction, it’s perfect for titles related to space, technology, and science. It comes in OTF, TTF, and WOFF formats.
Put Fonts to Work in Your Microsoft Word Document Today
As you’ve learned in this article, you don’t need to stick to the default fonts in Microsoft Word. Follow the steps outlined above to replace the default fonts with ones that are more appropriate to your document.
Now that you understand how to add fonts to Microsoft Word, you’re ready to start taking advantage of the unique look a professionally designed font can give your documents.
At Envato Elements and GraphicRiver we’ve got some of the best Microsoft Word fonts available. Take a look at our Microsoft Word fonts list today. Download your favorites for your next MS Word document.
Updated: 05/03/2022 by

When you open the program Microsoft Word, a font and font size are chosen for you. Usually, the default font is Calibri or Times New Roman, and the default font size is 11 or 12 point. If you want to change the default font attributes, find your version of Microsoft Word on the list below and follow the instructions.
Microsoft Word 2010 and later
- Make sure the toolbar is currently on the Home tab. If not, click the Home tab.
- In the Font section, click the Font Dialog Box Launcher (shown below).
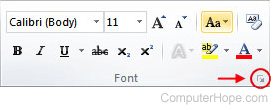
- In the Font window, change the font attributes to your liking.
- Click the Set As Default button.
- In the dialog window that opens, select the All documents based on the Normal.dotm template option and click OK.
Microsoft Word 2007
- From the Home tab, click the Font Dialogue Box Launcher (shown below).
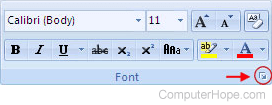
- Click the Font tab, and choose your new default font attributes.
- Click Default, and then click Yes.
Microsoft Word Online
Unlike the versions of Microsoft Word you install on a computer, you cannot change the default font type or size in Word Online. If you make a change to the font type or size for a Word Online document, the next time you create a new blank document, the font settings defaults to 11-point Calibri.
Microsoft Office apps (such as Word, Excel, PowerPoint, and Outlook) come with a set of default settings to start working with a document immediately. This includes a default font family (Calibri), font style (regular), and font size (11-point) on the current default document template, but you can specify your preferred font settings if your requirements are different.
While adjusting the font settings in Office is easy enough, you may want a new default configuration, to save unnecessary steps every time you open an Office app. Maybe you want to start with documents using a newly installed font. Or you find yourself changing the same settings every time you create a blank document using an Office 365 subscription (opens in new tab), the standalone version of Office 2019, Office 2016, or an older version.
In this Windows 10 guide, we walk you through the steps to change the default font settings in all your Office apps.
- How to set default font settings in Word
- How to set default font settings in Outlook
How to set default font settings in Word
Important: These instructions will only apply to Word. If you want to set a default font for Excel, PowerPoint, or another app, you need to use the same steps but in the individual apps that you want to customize.
To set a new default font in Word (or other Office apps), use these steps:
- Open Word.
- Create a new blank document.
- Click the Home tab.
- Click the button in the bottom-right corner from the Font section.
- In the «Font» section, select the new font that you want as the new default.
- (Optional) In the «Font style» section, set the preferred style (such as regular, italic, or bold).
- (Optional) In the «Size» section, select the default font size.
- Click the Set As Default button.
- Select the All documents based on the Normal.dotm template option.
- Click the OK button.
Once you complete these steps, every time you create a new document in Word using the default blank template, you’ll be able to start typing with the new default font settings.
Although you can change the font settings in a document, this option is only available for the desktop version of the Office apps. If you try to change the settings in the online version of Word, Excel, or PowerPoint, the next time you create a new document, the font settings will reset to its original configuration.
If you no longer need the new settings, you can revert the changes using the same instructions, but on step No. 8, make sure to select the +Body option in the «Font» section.
How to set default font settings in Outlook
To change the default font settings using the desktop version of Outlook, use these steps:
- Open Outlook.
- Click on File.
- Click on Options.
- Click on Mail.
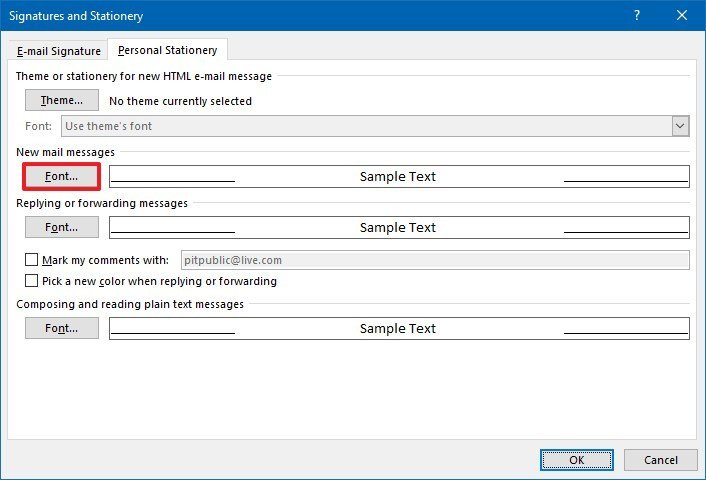
- Under the «Compose messages» section, click the Stationery and Fonts button.

- Under the «New mail messages» section, click the Font button to specify the default settings for the original message.
- In the «Font» section, select the new font that you want as the new default.
- (Optional) In the «Font style» section, set the preferred style (such as regular, italic, or bold).
- (Optional) In the «Size» section, select the default font size.
- Click the OK button.
- Under the «Replying or forwarding messages» section, click the Font button to specify the default settings for forwarding or replying messages.
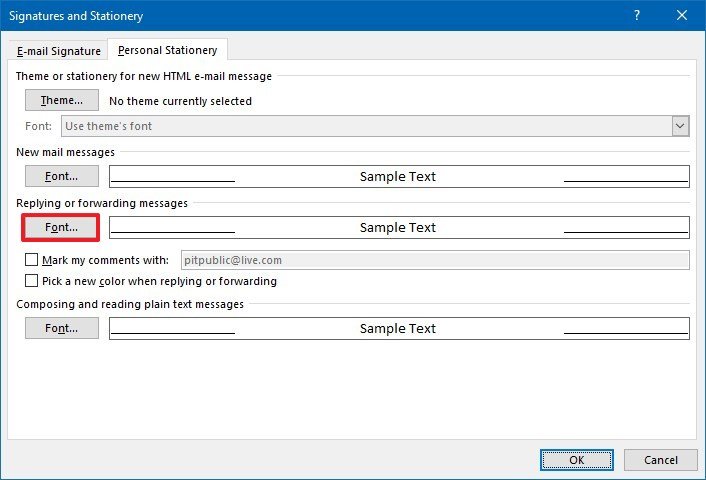
- In the «Font» section, select the new font that you want as the new default.
- (Optional) In the «Font style» section, set the preferred style.
- (Optional) In the «Size» section, select the default font size.
- Click the OK button.
- Under the «Composing and reading plain text messages» section, click the Font button to specify the default settings for received messages using plain text. (This formatting is only visible to you.)
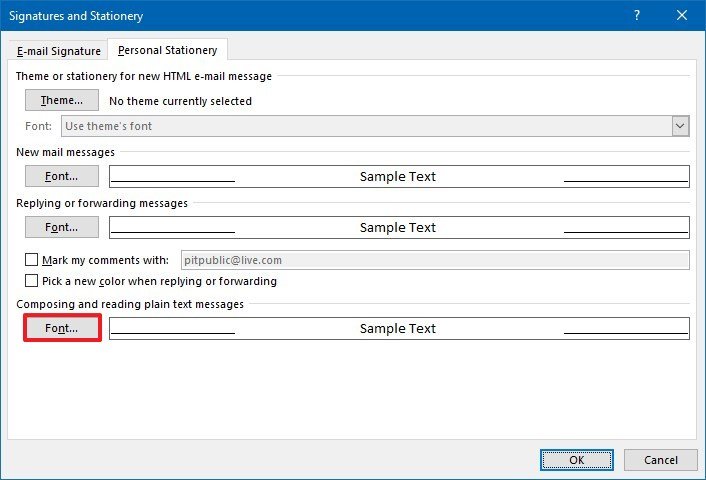
- In the «Font» section, select the new font that you want as the new default.
- (Optional) In the «Font style» section, set the preferred style.
- (Optional) In the «Size» section, select the default font size.
- Click the OK button.
- Click the OK button again.
- Click the OK button one more time.
After you complete the steps, depending on your new configuration, every time you compose, reply, or forward a message, you’ll be able to start typing immediately with the new default font settings.
Mauro recommends all these affordable accessories
Hi, I’m Mauro Huculak, Windows Central’s help and how-to guru. I wrote the post you’re reading now, and I know the Windows OS inside and out. But I’m also a bit of a hardware geek. These are some of the affordable gadgets on my desk today.
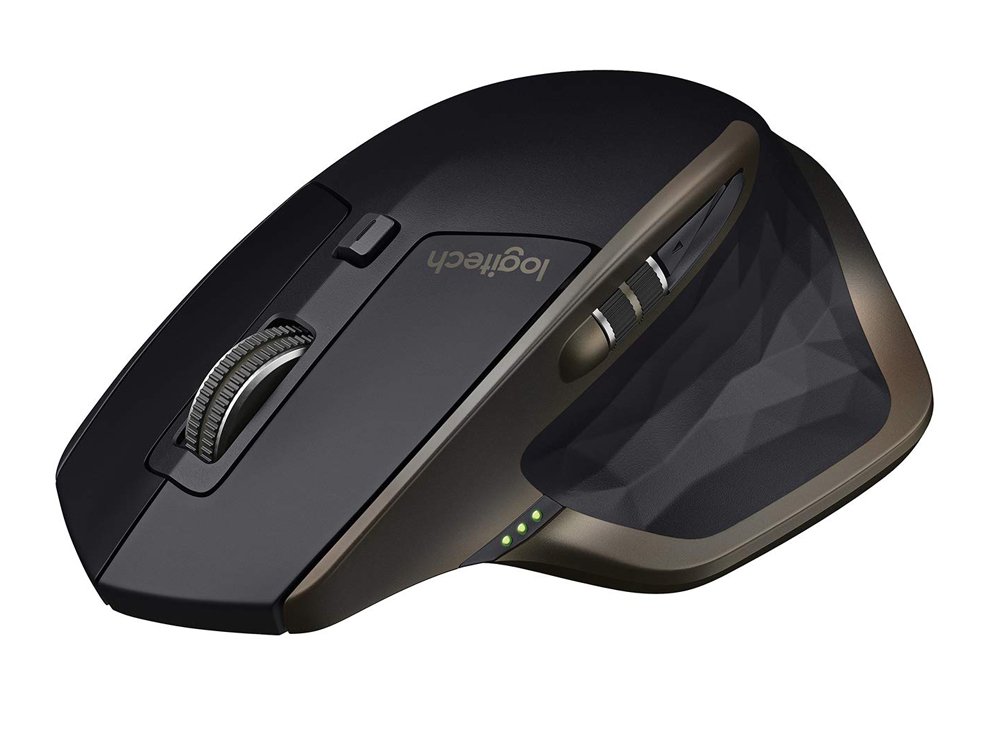
Logitech MX Master Wireless Mouse (opens in new tab) ($72 at Amazon)
I know mice, and this is the one I use every day. The MX Master is a wireless high-precision mouse that’s very comfortable to use and has many great features, including the ability to connect with multiple devices, an infinite scroll wheel, back and forward buttons, all of which you can customize.

Ktrio Extended Gaming Mouse Pad (opens in new tab) ($12 at Amazon)
If you spend a lot of time typing, your palms and mouse will leave tracks on your desk. My solution was to start using gaming mouse pads, which are big enough for you to use the keyboard and the mouse comfortably. This is the one I use and recommend.
Supernight LED light strip (opens in new tab) ($20 at Amazon)
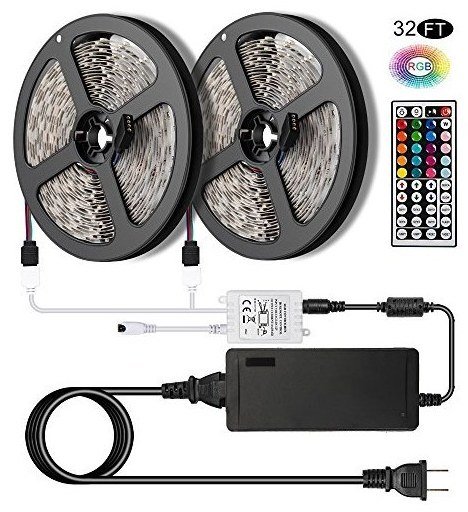
You could just use a regular light bulb in your office, but if you want to add some ambient lighting with different colors, an RGB LED strip is the way to go. This one is Mauro-approved.
All the latest news, reviews, and guides for Windows and Xbox diehards.
Mauro Huculak is technical writer for WindowsCentral.com. His primary focus is to write comprehensive how-tos to help users get the most out of Windows 10 and its many related technologies. He has an IT background with professional certifications from Microsoft, Cisco, and CompTIA, and he’s a recognized member of the Microsoft MVP community.