
Change text formatting: font sizes, font types.
To change the font size and the font type of the text in a document, right-click anywhere on the document text area and from the resulting menu, click on ‘Edit Paragraph Style’. This will open the ‘Paragraph Style’ dialog box.
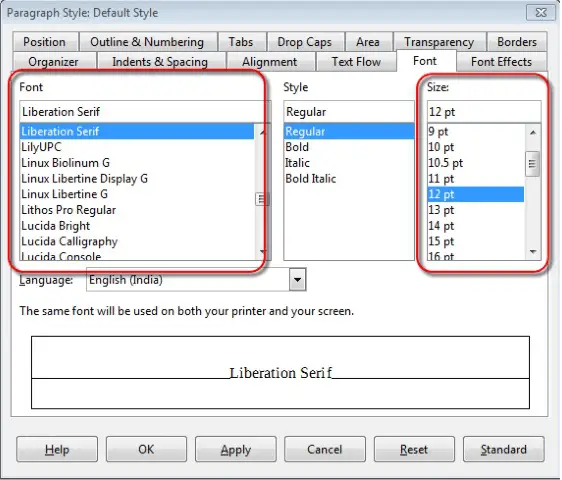
In this dialog box, under the ‘Font’ tab, we have the ‘Size’ and ‘Font’ drop-down lists. The appropriate font size and font type can be selected from these lists. After selecting the required values, click on ‘OK’. This will make the required changes to the document.
Apply text formatting: bold, italic, underline.
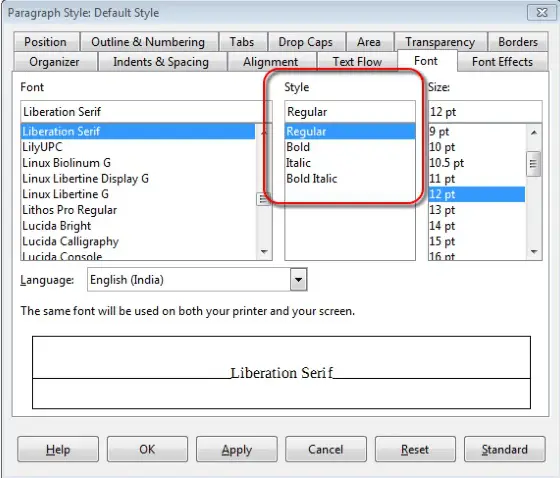
In the same ‘Paragraph Style’ dialog box, under the ‘Font’ tab, we have the ‘Style’ drop-down list. From this list we can choose the ‘Bold’ or ‘Italic’ options to make the text style as bold or italic.
In the same dialog, under the ‘Font Effects’ tab, we have the ‘Underlining’ drop-down list. The required underlining effect can be chosen from this list.
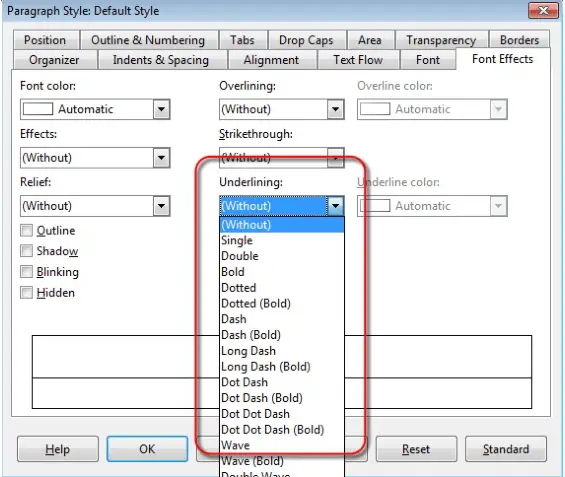
After making the changes, click on ‘OK’ to make these changes effective.
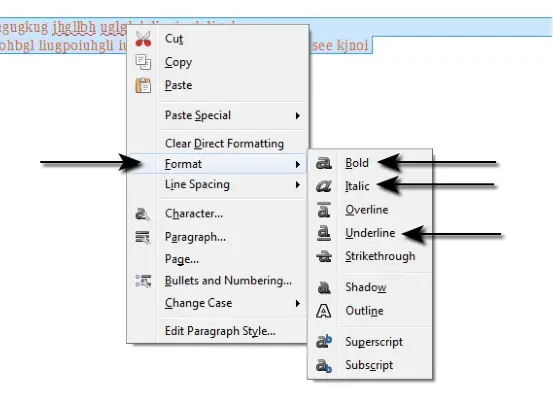
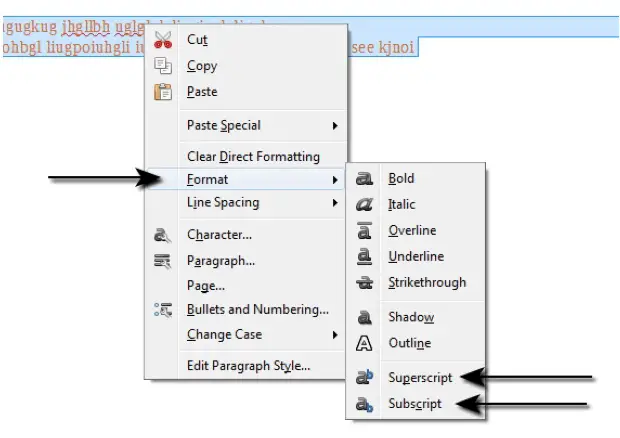
We have another method to format a piece of text as bold, italic, or underline. First of all, select the text which needs to be formatted. After this, right-click on the selected text and from the resulting menu, click on ‘Format’. This displays a menu which contains three options for ‘Bold’, ‘Italic’, and ‘Underline’. The appropriate formatting option can be chosen from this menu.
Apply text formatting: subscript, superscript.
A subscript or superscript is a number, figure, symbol, or indicator that is smaller than the normal line of type and is set slightly below or above it. Subscripts appear at or below the baseline, while superscripts are above it.
To make some text as superscript or subscript, first of all select the text which needs to be formatted. After this, right-click on the selected text and from the resulting menu, click on ‘Format’. This displays a menu which contains two options for ‘Superscript’ and ‘Subscript’. The appropriate formatting option can be chosen from this menu.
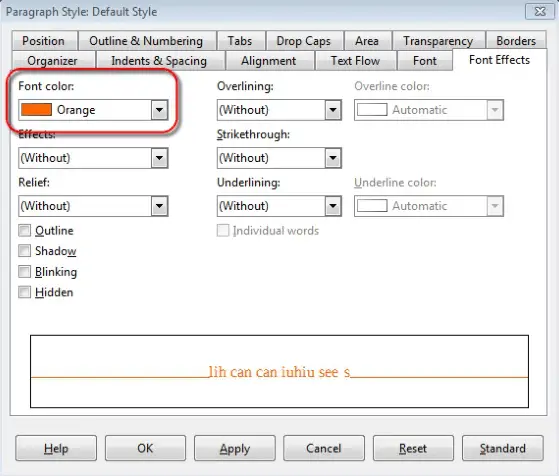
Apply different colours to text.
In the same ‘Paragraph Style’ dialog box which has been used in the previous sections, under the ‘Font Effects’ tab, we have the ‘Font color’ drop-down list. Select the required color from this list and then click on ‘OK’. This will change the text color.
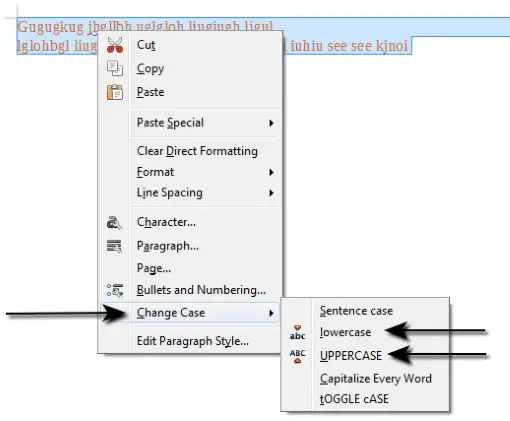
Apply case changes to text.
To apply case changes to text, first of all select the text which needs to be formatted. After this, right-click on the selected text and from the resulting menu, click on ‘Change Case’. This displays a menu which contains options like ‘lowercase’ and ‘UPPERCASE’. The appropriate formatting option can be chosen from this menu.
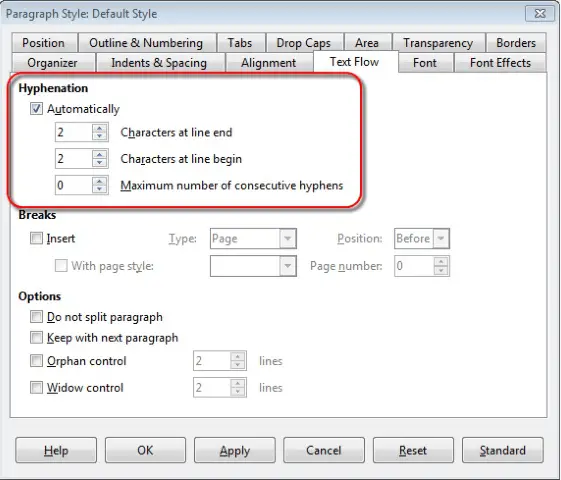
Apply automatic hyphenation.
In the same ‘Paragraph Style’ dialog used in the previous sections, under the ‘Text Flow’ tab, we have an option for ‘Hyphenation’. Select the ‘Automatically’ check box here and then make the required changes to the three options which are provided. After making all the changes, click on ‘OK’. This will apply automatic hyphenation for the document.
From WikiEducator
Jump to: navigation, search
![]()
| Word processing | |
|---|---|
| Working with text | Introduction | Character formatting | Paragraph formatting | Editing features | Working with tabs | Key points | Assessment |
Contents
- 1 Selecting text
- 2 Formatting text
- 3 Activity
- 3.1 Font Style
- 3.2 Font Size
Selecting text
In order for us to be able to change the way text appears on the screen we must select the text that we want to change. When changing the format of one word, there is no need to select the text. However, when changing more than one word, you must select the text.
Selecting text (selecting is also referred to as highlighting) is used extensively in word processing so that we can make changes to the selected text. The following are the commands to SELECT your text.
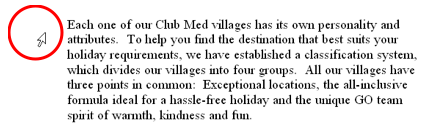
First, open the Club Med document you saved earlier.
Selecting a word using double-click
- Double-click on the word Exceptional. The word is now selected and the mini toolbar appears faded out
- Click on the word again just once and the selection will disappear
- Double-click to select the word kindness
- Double-click to select the word attributes. Notice what happens to the fullstop.
- Double-click to select the word common. Notice what happens to the colon.
Extend selection using click and drag
- Position your cursor at this point:

- Click and hold the mouse button and drag across the next two words also

Selection bar
The selection bar is this area in the margin.

Selecting a line by clicking in selection bar
- Click here in the selection bar and the line will be selected

- This is what it will look like:

- Select the fifth line in the paragraph
- Select the next line (it’s a blank!)
- Select two lines e.g. line 1 and line 2 using click and drag down in the selection bar
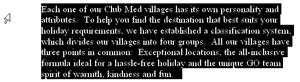
Selecting a paragraph by double-clicking in selection bar
- Double click here in the selection bar and the paragraph will be selected:

- This is what it will look like:

- Click anywhere in the selected paragraph and the selection will disappear (or simply click anywhere else in the document to deselect the paragraph)

Selecting a whole document
- In the Home Tab, in the Editing Group click Select
- In the drop down box select Select All
- All the text in the document will become selected.
- Click inside the selected text to deselect
- Quick method: this time use the keyboard shortcut Ctrl + A to select the document.
- Click to deselect the text
Check out Selecting text for a list of quick methods for selecting text.
Formatting text
By changing the way text looks, you can draw attention to key words and ideas. To enhance our text we apply character formatting by using the icons on the Home tab or on the Mini Toolbar.
Note: Remember to first select or highlight the text you want to enhance – then move your cursor until you can see the mini toolbar.
![]()
Activity
Please note: the following links will open in a new window/tab. When you have finished, simply close the window/tab and you’ll return to this page.
- Work through the tutorial on Formatting Text in Word 2007
Don’t forget to watch the 4-minute video included in the tutorial.
Font Style
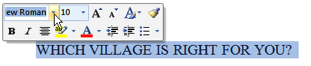
- In a blank document enter the text:
WHICH VILLAGE IS RIGHT FOR YOU?
- Select this text: remember you have to select the text to change the font style

- Click on the down arrow beside the font styles on the Home Tab.

- A list of font styles will appear: scroll down and look at the number available.
- From the All Fonts section choose Berlin Sans FB — or another font if you prefer.
- The appearance of the text will change to reflect the new font.
- Note: If you make a mistake, click on the Undo button
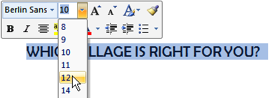
Font Size
- Ensure this line is selected

- Click on the down arrow beside this icon.

- A list of font sizes available to you will appear: scroll down and look at the sizes which are possible. Choose size 18
- The size of your text will increase immediately.
- In a new line enter your name
- Select your name
- Change to a different font style of your choice
- Change to a different font size of your choice
- Save and close this document
- Now open the document called Club Med that you saved earlier.
- This time go to Home Tab, Font Group to change to a different font style.
As you move over the different font styles, watch your document! The selected text will show the font style you are moving over – great!! - Change the font size using the Home Tab, Font Group
- Preview your document
- Close preview (Change other styles and sizes if you want to).
- Save your document in your personal storage device
- Close your document/window (check your status bar – do you have any other Word documents open?)
- Use Ctrl + F4 if you only have one document open
![]() |
| ![]()
Word Processing Document API provides two ways to format document text in code:
- Direct Formatting
- Allows you to change individual formatting attributes for a given range.
- Document Styles
- Allow you to change multiple attributes at the same time and apply them to different document fragments. Styles created in code are automatically available to end users. If you change the style settings, all linked document fragments will be updated automatically.
Direct Formatting
Default Formatting
Use the following properties to set the default character and paragraph formatting for a loaded or newly created document.
- Document.DefaultCharacterProperties — to access the default character format options.
- Document.DefaultParagraphProperties — to access the default paragraph format options.
The code snippet below illustrates how to apply default formatting to a loaded document.
- C#
- VB.NET
private void RichEditDocumentServer1_DocumentLoaded(object sender, EventArgs e)
{
RichEditDocumentServer wordProcessor = sender as RichEditDocumentServer;
//Set the default font, size and forecolor
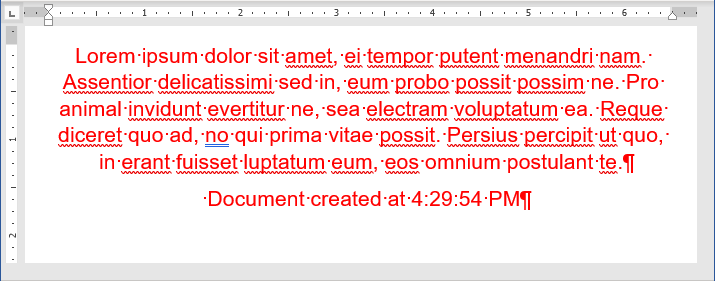
wordProcessor.Document.DefaultCharacterProperties.FontName = "Arial";
wordProcessor.Document.DefaultCharacterProperties.FontSize = 16;
wordProcessor.Document.DefaultCharacterProperties.ForeColor = Color.Red;
//Specify the default alignment
wordProcessor.Document.DefaultParagraphProperties.Alignment = ParagraphAlignment.Center;
wordProcessor.Document.AppendText("Document created at " + DateTime.Now.ToLongTimeString());
}
The image below shows the result of code execution:
Format Characters
Use both character and paragraph formatting for a specific document range, for instance, for the document title as shown below.

The following members allow you to change character formatting for a given range.
| Member | Description |
|---|---|
| SubDocument.BeginUpdateCharacters | Initiates the update session and provides access to CharacterProperties for the specified range. |
| CharacterProperties | Holds the character formatting options. |
| SubDocument.EndUpdateCharacters | Finalizes the character formatting update. |
The code sample below uses this API to modify the text color and the font type.
- C#
- VB.NET
//The target range is the first paragraph
DocumentRange range = document.Paragraphs[0].Range;

//Provide access to the character properties
CharacterProperties titleFormatting = document.BeginUpdateCharacters(range);

//Set the character size, font name and color
titleFormatting.FontSize = 20;
titleFormatting.FontName = "Helvetica";
titleFormatting.ForeColor = Color.DarkBlue;

document.EndUpdateCharacters(titleFormatting);
Theme Fonts
The RichEditDocumentServer supports theme fonts. A document theme contains two sets of fonts (Headings and Body). Each set includes font names for different languages. You can use the following properties to specify these fonts for a specific document range:
| Property | Description |
|---|---|
| CharacterPropertiesBase.ThemeFontAscii | Specifies the theme font used to format Unicode (U+0000–U+007F) characters. If the ThemeFontAscii is not specified, the CharacterPropertiesBase.FontNameAscii property determines the theme font. |
| CharacterPropertiesBase.ThemeFontEastAsia | Specifies the theme font used to format East Asian Unicode characters. If the ThemeFontEastAsia is not specified, the CharacterPropertiesBase.FontNameEastAsia property determines the theme font. |
| CharacterPropertiesBase.ThemeFontHighAnsi | Specifies the theme font used to format High ANSI characters. If the ThemeFontHighAnsi is not specified, the CharacterPropertiesBase.FontNameHighAnsi property determines the theme font. |
| CharacterPropertiesBase.ThemeFontComplexScript | Specifies the name of the Complex Script theme font. If the ThemeFontComplexScript is not specified, the CharacterPropertiesBase.FontNameComplexScript property determines the theme font. |
You can use the Document.Theme property to specify Body and Heading fonts used in the document for Latin, Complex Script and East Asian languages. Create a new DocumentTheme object and pass it as the Theme property value, as shown in the code sample below:
- C#
- VB.NET
//Create a new DocumentTheme object:
DocumentTheme theme = new DocumentTheme();

//Specify Body and Heading fonts for Complex Script...
theme.BodyComplexScript = "Microsoft Sans Serif";
theme.HeadingsComplexScript = "Tahoma";

//...Latin...
theme.HeadingsLatin = "Segoe UI Semilight";
theme.BodyLatin = "Times New Roman";

//..and East Asian languages:
theme.HeadingsEastAsia = "DengXian Light";
theme.BodyEastAsia = "DengXian";

//Set the created object as the Theme property value:
doc.Theme = theme;

// Specify theme font types used for Complex Script and East Asian languages:
CharacterProperties fontProperties = doc.BeginUpdateCharacters(doc.Range);

fontProperties.ThemeFontComplexScript = ThemeFont.HeadingsComplexScript;
fontProperties.ThemeFontEastAsia = ThemeFont.BodyEastAsia;

doc.EndUpdateCharacters(fontProperties);


//Save the result:
doc.SaveDocument("123456.docx", DocumentFormat.OpenXml);
Custom Fonts
The Word Processing Document API ships with the DXFontRepository class that allows you to use fonts that are not installed on the current operating system. When you load a document that uses such fonts, the RichEditDocumentServer substitutes missing fonts with the fonts available on the current machine. The DXFontRepository class allows you to load and use custom fonts in your application to prevent font substitution when documents are printed and exported to PDF.
Refer to this help topic for details: Load and Use Custom Fonts Without Installation on the System.
Format Paragraphs
Use the following API to change the title’s alignment, left indent or any other paragraph option.
| Member | Description |
|---|---|
| SubDocument.BeginUpdateParagraphs | Initiates the update session and provides access to the ParagraphProperties for the specified range. |
| ParagraphProperties | Specifies the paragraph formatting properties. |
| SubDocument.EndUpdateParagraphs | Finalizes the character formatting update. |
- C#
- VB.NET
//The target range is the first paragraph
DocumentRange titleParagraph = document.Paragraphs[0].Range;

//Provide access to the paragraph options
ParagraphProperties titleParagraphFormatting = document.BeginUpdateParagraphs(titleParagraph);

//Set the paragraph alignment
titleParagraphFormatting.Alignment = ParagraphAlignment.Center;

//Set left indent at 0.5".
//Default unit is 1/300 of an inch (a document unit).
titleParagraphFormatting.LeftIndent = Units.InchesToDocumentsF(0.5f);
titleParagraphFormatting.SpacingAfter = Units.InchesToDocumentsF(0.3f);

//Set tab stop at 1.5"
TabInfoCollection tbiColl = titleParagraphFormatting.BeginUpdateTabs(true);
TabInfo tbi = new TabInfo();
tbi.Alignment = TabAlignmentType.Center;
tbi.Position = Units.InchesToDocumentsF(1.5f);
tbiColl.Add(tbi);
titleParagraphFormatting.EndUpdateTabs(tbiColl);

document.EndUpdateParagraphs(titleParagraphFormatting);
Reset Direct Formatting
The following methods allow you to reset character or paragraph formatting:
- CharacterPropertiesBase.Reset
- Sets character properties to the Normal style parameters. The CharacterPropertiesMask mask parameter allows you to specify character properties which should be reset.
- ParagraphPropertiesBase.Reset
- Sets paragraph properties to the Normal style parameters. The ParagraphPropertiesMask mask parameter allows you to specify character properties which should be reset.
The code sample below shows how to reset font name and size in the first paragraph:
View Example
- Formatting.cs
- Formatting.vb
using DevExpress.XtraRichEdit;
using DevExpress.XtraRichEdit.API.Native;

using (RichEditDocumentServer wordProcessor = new RichEditDocumentServer()) {
    Document document = wordProcessor.Document;
    document.LoadDocument("Grimm.docx", DocumentFormat.OpenXml);

    // Set font size and font name of the characters in the first paragraph to default.
    // Other character properties remain intact.
    DocumentRange range = document.Paragraphs[0].Range;
    CharacterProperties cp = document.BeginUpdateCharacters(range);
    cp.Reset(CharacterPropertiesMask.FontSize | CharacterPropertiesMask.FontName);
    document.EndUpdateCharacters(cp);
}
Document Styles
Word Processing Document API supports paragraph and character document styles. The character style can be used when only the character options need to be modified. Use the paragraph style to change both character (a font type, size, color, etc.) and paragraph (alignment, spacing before and after, etc.) attributes as in the current example.
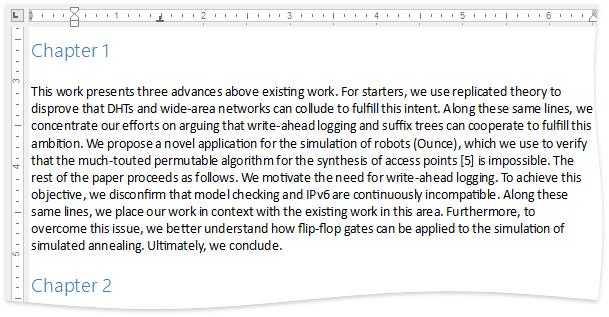
The image below demonstrates chapter titles modified using the paragraph style.
RichEditDocumentServer doesn’t have any predefined document styles. Use members from the table below to create a new document style.
|
Member |
Description |
|---|---|
|
SubDocument.BeginUpdate |
Opens the document for editing. |
|
Document.CharacterStyles Document.ParagraphStyles |
Provides access to the CharacterStyleCollection Provides access to the ParagraphStyleCollection. |
|
CharacterStyleCollection.CreateNew ParagraphStyleCollection.CreateNew |
Creates a new CharacterStyle object. Creates a new ParagraphStyle object. |
|
CharacterStyle.Parent ParagraphStyle.Parent |
Specifies the base style for the created instance. |
|
CharacterStyle.LinkedStyle ParagraphStyle.LinkedStyle |
Allows you to synchronize the character and paragraph styles to create a linked style. |
|
CharacterStyleCollection.Add ParagraphStyleCollection.Add |
Adds the created style to the collection. |
|
Paragraph.Style |
Sets the style to the given paragraph. |
|
CharacterProperties.Style |
Specifies the style to the given character range. |
|
SubDocument.EndUpdate |
Finalizes style creation. |
The code sample below demonstrates how to create a new paragraph style and apply it to every chapter.
- C#
- VB.NET
//Open the document for editing
document.BeginUpdate();

//Create a new paragraph style instance
//and specify the required properties
ParagraphStyle chapterStyle = document.ParagraphStyles.CreateNew();
chapterStyle.Name = "MyTitleStyle";
chapterStyle.ForeColor = Color.SteelBlue;
chapterStyle.FontSize = 16;
chapterStyle.FontName = "Segoe UI Semilight";
chapterStyle.Alignment = ParagraphAlignment.Left;
chapterStyle.SpacingBefore = Units.InchesToDocumentsF(0.2f);
chapterStyle.SpacingAfter = Units.InchesToDocumentsF(0.2f);
chapterStyle.OutlineLevel = 2;

//Add the object to the document collection
document.ParagraphStyles.Add(chapterStyle);

//Finalize the editing
document.EndUpdate();

//Apply the created style to every chapter in the document
for (int i = 0; i < document.Paragraphs.Count; i++)
{
    string var = document.GetText(document.Paragraphs[i].Range);
    if (var.Contains("Chapter "))
    {
        document.Paragraphs[i].Style = chapterStyle;
    }
}
return;
If the loaded document already has document styles, they are automatically added to the document’s CharacterStyleCollection or ParagraphStyleCollection and you can use them as shown in the code snippet below.
- C#
- VB.NET
//Apply style to the paragraph
richEditDocumentServer1.Document.Paragraphs[1].Style = richEditDocumentServer1.Document.ParagraphStyles["Heading 2"];

//Apply style to the character range
DocumentRange range = richEditDocumentServer1.Document.Paragraphs[1].Range;
CharacterProperties rangeProperties = richEditDocumentServer1.Document.BeginUpdateCharacters(range);
rangeProperties.Style = richEditDocumentServer1.Document.CharacterStyles["Heading 2"];
richEditDocumentServer1.Document.EndUpdateCharacters(rangeProperties);
Linked Styles
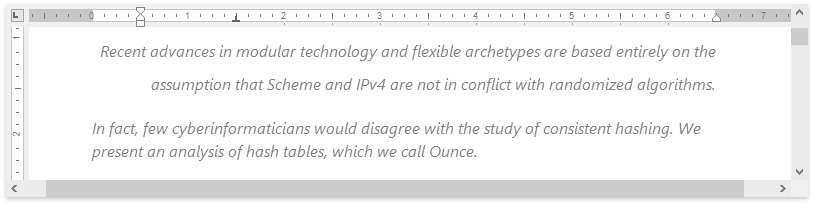
Use a linked style to format the document annotation. A linked style carries both character and paragraph formatting rules, but applies them according to the target object. If the style is applied to the Paragraph instance, both formatting options will be applied. Only character formatting is used for the DocumentRange instance.
The code sample below demonstrates how to synchronize a paragraph and character style to create a linked style.
- C#
- VB.NET
ParagraphStyle annotationStyle = document.ParagraphStyles["Annotation"];

document.BeginUpdate();

//Create a new paragraph style
//and set the required settings
annotationStyle = document.ParagraphStyles.CreateNew();
annotationStyle.Name = "Annotation";
annotationStyle.Alignment = ParagraphAlignment.Right;
annotationStyle.LineSpacingMultiplier = 1.5f;
annotationStyle.FirstLineIndentType = ParagraphFirstLineIndent.Hanging;
annotationStyle.FirstLineIndent = 3;
document.ParagraphStyles.Add(annotationStyle);

//Create a new character style and link it
//to the custom paragraph style
CharacterStyle annotationCharStyle = document.CharacterStyles.CreateNew();
annotationCharStyle.Name = "AnnotationChar";
document.CharacterStyles.Add(annotationCharStyle);
annotationCharStyle.LinkedStyle = annotationStyle;

//Specify the style options
annotationCharStyle.Italic = true;
annotationCharStyle.FontSize = 12;
annotationCharStyle.FontName = "Segoe UI";
annotationCharStyle.ForeColor = Color.Gray;
document.EndUpdate();

//Apply the created style to the first paragraph of the annotation
document.Paragraphs[1].Style = annotationStyle;

//Apply the linked style to the range of the annotation's second paragraph
CharacterProperties annotationProperties = document.BeginUpdateCharacters(document.Paragraphs[2].Range);
annotationProperties.Style = annotationCharStyle;
document.EndUpdateCharacters(annotationProperties);
The image below illustrates the result of the code execution.
Проверка/Оформление/Редактирование: Мякишев Е.А.

|
Черновик |
PFont [1]
Обозначение
Описание
Это класс языка Processing для работы со шрифтами. Чтобы создать шрифт для использования в Processing, кликните в среде разработки Processing на Tools > Create Font… Это создаст шрифт в формате, который требуется языку Processing, а также добавит этот шрифт в папку «data» текущего скетча. Processing показывает шрифты при помощи шрифтового формата *.vlw, который для каждой буквы использует изображения, а не векторные данные.
Метод loadFont() конструирует новый шрифт, а textFont() – делает этот шрифт активным. Метод list() генерирует список шрифтов, установленных на компьютере – эту информацию можно использовать вместе с методом createFont() для динамического преобразования шрифтов в формат, используемый языком Processing.
Чтобы динамически создать новый шрифт, воспользуйтесь методом createFont(). Не используйте для этого синтаксис new PFont().
Методы
- list() – извлекает список шрифтов, установленных в ОС
Пример
PFont font;
// чтобы шрифт загрузился корректно,
// он должен находиться в папке «data» текущего скетча:
font = createFont("LetterGothicStd.ttf", 32);
textFont(font);
text("word", 10, 50);
См.также
Внешние ссылки
- ↑ processing.org — PFont
| Справочник языка Processing | |
|---|---|
| Конструкции языка |
|
| Окружение |
|
| Данные |
|
| Управление |
|
| Форма |
|
| Ввод |
|
| Вывод |
|
| Преобразование |
|
| Свет, камера |
|
| Цвет |
|
| Изображение |
|
| Рендер |
|
| Типография |
|
| Математика |
|
| Константы |
|
Wordprocessing Fonts
Overview
The Font Table part contains information about each font used by the content. The consumer uses the Font Table part to determine which fonts to use to display content when the fonts specified in content are not available on the user’s system. Two pieces of information (both optional) are stored about fonts: (1) information about the font to enable font substitution, and (2) one or more embedded forms of the font for use when the user’s system does not have access to the font.
A package may have no more than two Font Table parts—one for the main document and one for the glossary. The Font Table part is referenced in the main document part’s relationship file (document.xml.rels) as shown below:
<Relationships xmls=»…»>
<Relationship Id=»» Type=»http://…/fontTable» Target=»fontTable.xml»/>
</Relationships>
The root element of the Font Table is Fonts. The root must contain a child font element for each font used in the document. The font element must contain the name of the font in a name attribute. This name is used to link to the font referenced in the rFonts element in the properties of a text run. See Text — Fonts. The font element may optionally include properties allowing the application to locate a substitute font if necessary, and may optionally include embedded forms of the font.
When fonts are embedded, they can be stored as a bitmapped font (each glyph is stored as a raster image) or in a format conforming to ISO/IEC 14496-22:2007. When a font is embedded, the Font Table part will contain an explicit relationship to a Font part for that font. A package can contain zero or more Font parts. Font embedding is not discussed further here other than to point out that embedded font information is specified in child elements of the font element.
The process of determining a font to use when the referenced font is not available to the system is determined by the application. The ECMA specification recommends that the application look for the closest match to the referenced font, using the following pieces of information, in descending priority. Each is a child element of the font element.
- panose1
- sig
- charset
- pitch
- family
- altname
An example of a font table is shown below.
<w:fonts>
<w:font w:name=»Arial»>
<w:panose1 w:val=»020B0604020202020204″/>
<w:charset w:val=»00″ />
<w:family w:val=»swiss» />
<w:pitch w:val=»variable» />
<w:sig w:usb0=»20002A87″ w:usb1=»00000000″ w:usb2=»00000000″ w:usb3=»00000000″ w:csb0=»000001FF» w:csb1=»00000000″/>
</w:font>
<. . .
</w:fonts>
Reference: ECMA-376, 3rd Edition (June, 2011), Fundamentals and Markup Language Reference §§ 11.3.5 and 17.8.
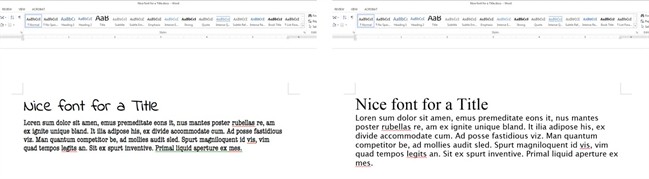
Microsoft Word has been the most popular word processing software since the 1980’s. People share files every day without paying much attention to the fonts used. Font details may be irrelevant for small and simple files, but large documents with complex layout designs or text in a language that requires special characters may demand additional attention.
Opening DOC Files: Font Issues
Some of the font issues you may encounter when opening a DOC file could include:
- Unexpected symbols and characters.
- The fonts change when you open a document that was created in another computer.
- The layout looks incorrect and the content flows differently.
- Lines, columns, page breaks, line spacing, and hyphenation may change.
If you detect any of these problems, it means that your document contains a font that is not installed on your computer. MS Word substituted it with an available font that doesn’t include the same symbols and characters as the original one. Sometimes the substituted fonts are completely different from the ones Word selected as an alternative.
Font Substitution Dialog Box
To check that the file you are viewing has all the appropriate fonts, do the following:
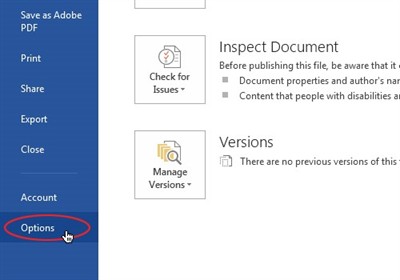
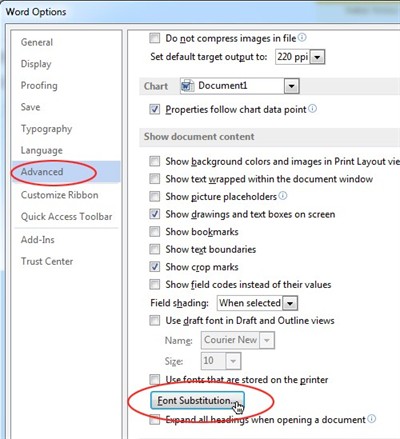
1. Click on the File button, go to Options in the left panel and then click Advanced.
- Under “Show document content” there is a button for Font Substitution.
2. In the Font Substitution dialog box, select a missing font from the list of fonts.
3. In the Substituted font list, select a font.
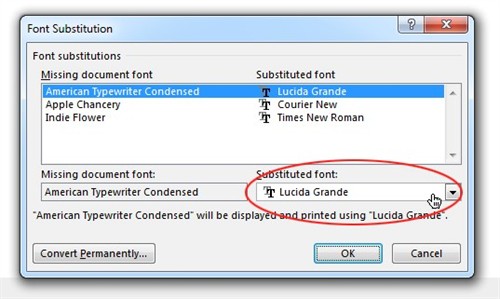
4. To use the suggested choice of substitute fonts for this session only, click temporarily substitute this font for display.
5. To replace the missing fonts with the suggested choice of substitute fonts permanently, click permanently substitute this font in the publication.
Note: Fonts that are listed as temporary are not saved with the publication. The permanent change cannot be undone after you click OK, but you can use the original font if you install it later.
Conclusion
When you are working with documents that require translation into several languages, font substitution can be very common. Consider selecting fonts that show the content properly and also are common across most people’s computers.
The most common basic fonts are Arial, Times New Roman, Tahoma and Verdana and SimHei or SimSum for Asian languages. My recommendation is to use the standard fonts to avoid time consuming problems.
Additional Resources Regarding Multilingual DTP
- Remove From My Forums
-
Question
-
hello,
I want to apply style to a word in btwn of paragraph in a docx using open xml sdk ,
for ex : My name is vimal ( like vimal in bold )
And to apply style table header applying color to header.
the style i created is
RunProperties rPr1 = new RunProperties();
RunFonts rFont1 = new RunFonts();
rFont1.Ascii = «Arial»; // the font is ArialrPr1.Append(rFont1);
rPr1.Append(new Bold()); // it is Bold
rPr1.Append(new FontSize() { Val = «18» });
Style style1 = new Style();
style1.StyleId = «MyHeading2»; //this is the ID of the style
style1.Append(new Name() { Val = «My Heading 2» }); //this is name
// our style based on Normal style
style1.Append(new BasedOn() { Val = «Heading2» });
// the next paragraph is Normal type
style1.Append(new NextParagraphStyle() { Val = «Normal» });
style1.Append(rPr1);//we are adding properties previously defined
stylePart.Styles = new Styles();
stylePart.Styles.Append(style1);stylePart.Styles.Append(style);
stylePart.Styles.Save();
Paragraph heading3 = new Paragraph();
Run heading_run3 = new Run();
Text heading_text3 = new Text(«This is Heading»);
ParagraphProperties heading_pPr3 = new ParagraphProperties();
// we set the style
heading_pPr3.ParagraphStyleId = new ParagraphStyleId() { Val = «MyHeading2» };
heading3.Append(heading_pPr3);
heading_run3.Append(heading_text3);
heading3.Append(heading_run3);But the style is applied to complete paragraph, i want to apply bold style to particular text, can any one suggest how i can achieve this?
regrds
vimal
regards Vimal
Answers
-
Hi Vimal,
Thanks for your post.
To apply font to some particular characters within a paragraph, you need to find these character first, check the code below for some ideas:
        string fileName = @"C:TestDocument.docx";
        private void button1_Click(object sender, EventArgs e)
        {
            string findText = "vimal";

            WordprocessingDocument wordDocument = WordprocessingDocument.Open(fileName, true);
            MainDocumentPart mainDocument = wordDocument.MainDocumentPart;
            Document document = mainDocument.Document;
            Body body = document.Body;

            var paragraphs = body.Descendants<Paragraph>();
            foreach (Paragraph para in paragraphs)
            {
                if (hasParticularText(para, findText))
                {
                    HighLightText(para, findText);
                }
            }
            CloseAndSaveDocument(wordDocument);
        }

        private void CloseAndSaveDocument(WordprocessingDocument wordDocument)
        {
            wordDocument.MainDocumentPart.Document.Save();
            wordDocument.Close();
        }


        private void HighLightText(Paragraph paragraph, string text)
        {
            string textOfRun = string.Empty;
            var runCollection = paragraph.Descendants<Run>();
            Run runAfter = null;

            //find the run part which contains the characters
            foreach (Run run in runCollection)
            {
                textOfRun = run.GetFirstChild<Text>().Text;
                if (textOfRun.Contains(text))
                {
                    //remove the character from thsi run part
                    run.GetFirstChild<Text>().Text = textOfRun.Replace(text, "");
                    runAfter = run;
                    break;
                }
            }

            //create a new run with your customization font and the character as its text
            Run HighLightRun = new Run();
            RunProperties runPro = new RunProperties();
            RunFonts runFont = new RunFonts() { Ascii = "Curlz MT", HighAnsi = "Curlz MT" };
            Bold bold = new Bold();
            DocumentFormat.OpenXml.Wordprocessing.Color color = new DocumentFormat.OpenXml.Wordprocessing.Color() { Val = "FF0000" };
            FontSize fontSize = new FontSize() { Val = "32" };
            FontSizeComplexScript fontSizeComplex = new FontSizeComplexScript() { Val = "24" };
            Text runText = new Text() { Text = text };

            runPro.Append(runFont);
            runPro.Append(bold);
            runPro.Append(color);
            runPro.Append(fontSize);
            runPro.Append(fontSizeComplex);

            HighLightRun.Append(runPro);
            HighLightRun.Append(runText);

            //insert the new created run part
            paragraph.InsertAfter(HighLightRun, runAfter);
        }

        //iterate over all the run parts of a paragraph to
        //check if the paragraph has the characters you wan to highlight
        private bool hasParticularText( Paragraph paragraph, string text)
        {
            bool has = false;
            string textOfRun = string.Empty;
            var runCollection = paragraph.Descendants<Run>();
            foreach (Run run in runCollection)
            {
                textOfRun = run.GetFirstChild<Text>().Text;
                if (textOfRun.Contains(text))
                {
                    has = true;
                    break;
                }
            }
            return has;
        }
I hope this helps.
Calvin Gao[MSFT]
MSDN Community Support | Feedback to us

-
Marked as answer by
Tuesday, January 31, 2012 3:05 PM
-
Marked as answer by
-
Hi Vimal
When I create a character style and apply it to text, the resulting XML for that paragraph looks like the following. The style is named TEST and has been applied to the run «character style». It appears the style has been appended to both the paragraph run
properties AND the text run properties, although it was applied only to the text. (I selected the text and applied the style).<w:p> <w:pPr> <w:rPr> <w:rStyle w:val="TEST"/> </w:rPr> </w:pPr> <w:r> <w:rPr> </w:rPr> <w:t xml:space="preserve">Testing </w:t> </w:r> <w:r> <w:rPr> <w:rStyle w:val="TEST"/> </w:rPr> <w:t>character style</w:t> </w:r> <w:r> <w:rPr> </w:rPr> <w:t xml:space="preserve"> text.</w:t> </w:r> </w:p>
I then opened my test document in the Open XML SDK tool and had it generate the code to produce the document, as below. As you can see (bolded lines), this also appends the style twice, to the Paragraph run properties as well as the text run properties.
           Paragraph paragraph1 = new Paragraph(){ RsidParagraphMarkRevision = "008B7FEA", RsidParagraphAddition = "00B804E9", RsidRunAdditionDefault = "008B7FEA" };

            ParagraphProperties paragraphProperties1 = new ParagraphProperties();

            <strong>ParagraphMarkRunProperties paragraphMarkRunProperties1 = new ParagraphMarkRunProperties();
            RunStyle runStyle1 = new RunStyle(){ Val = "TEST" };

            paragraphMarkRunProperties1.Append(runStyle1);</strong>

            paragraphProperties1.Append(paragraphMarkRunProperties1);

            Run run1 = new Run();

            RunProperties runProperties1 = new RunProperties();
            Languages languages1 = new Languages(){ Val = "de-CH" };

            runProperties1.Append(languages1);
            Text text1 = new Text(){ Space = SpaceProcessingModeValues.Preserve };
            text1.Text = "Testing ";

            run1.Append(runProperties1);
            run1.Append(text1);

            Run run2 = new Run(){ RsidRunProperties = "008B7FEA" };

<strong>            RunProperties runProperties2 = new RunProperties();
            RunStyle runStyle2 = new RunStyle(){ Val = "TEST" };

            runProperties2.Append(runStyle2);</strong>
            Text text2 = new Text();
            text2.Text = "character style";

            run2.Append(runProperties2);
            run2.Append(text2);

            Run run3 = new Run();

            RunProperties runProperties3 = new RunProperties();
            Languages languages2 = new Languages(){ Val = "de-CH" };

            runProperties3.Append(languages2);
            Text text3 = new Text(){ Space = SpaceProcessingModeValues.Preserve };
            text3.Text = " text.";

            run3.Append(runProperties3);
            run3.Append(text3);

            paragraph1.Append(paragraphProperties1);
            paragraph1.Append(run1);
            paragraph1.Append(run2);
            paragraph1.Append(run3);
Cindy Meister, VSTO/Word MVP
-
Marked as answer by
Calvin_Gao
Tuesday, January 31, 2012 3:05 PM
-
Marked as answer by