Text boxes in Microsoft Word are graphic elements that contain editable text. You add these objects to documents for extra visual appeal or to call out sections of text within the document. The default setting for an inserted text box is to sit in line with the text of your document just as a picture would. This position, however, can be adjusted. If you specify a text box object to sit in front of the text on the page instead of in line, the box appears to float over the words.
Add a Text Box
-
Open the Microsoft Word document that needs a floating text box added.
-
Click the «Insert» tab on the Ribbon and click «Text Box» on the Text panel. Choose the command «Draw Text Box» under the Text Box options.
-
Click in your document window and drag to set the dimensions of the box. When you release the mouse button, the text box appears.
-
Click inside the box to type text, or you can paste text into the box that you copy from another location.
-
Drag over the text in the box to highlight it if you want to change its appearance. Use the buttons on the Font panel of the Home tab to change typeface, size, color and other text style elements.
Make the Text Box Float
-
Double-click the border of the text box to select the text box as an object. This action also shows format commands that apply to a graphic object instead of text. A special Drawing Tools tab appears at the far right of the Ribbon.
-
Click the «Position» button on the Arrange panel of the Drawing Tools tab to open a drop-down menu of position options.
-
Select «More Layout Options» to open the options dialog box.
-
Click the «Text Wrapping» tab in this window and select the position option «In front of text.» Click «OK» to return to your document. The text box now sits on top of the text in the Word file.
-
Click the text box border to drag the box to where you want it to sit in your document.
-
Double-click the border of the text box to open the Drawing Tools tab. On the Shape Styles panel, select «Shape Effects,» then «Shadow.» Choose an outer shadow style to give the box the illusion it is floating over the page.
-
Use the «Shadow Options» command at the bottom of the shadow styles list to adjust the depth, color and angle of the shadow.
Click the text box border to drag the box to where you want it to sit in your document. Double-click the border of the text box to open the Drawing Tools tab. On the Shape Styles panel, select “Shape Effects,” then “Shadow.” Choose an outer shadow style to give the box the illusion it is floating over the page.
What is a floating object in Word?
Floating objects are those that are placed on a layer over the text. The thing that indicates essentially where a floating object is located in relation to the text in your document is referred to as an object anchor.
How do you insert a textbox without borders?
Remove the border If you want to change multiple text boxes or shapes, click the first text box or shape, and then press and hold Ctrl while you click the other text boxes or shapes. On the Format tab, click Shape Outline, and then click No Outline.
How do I get rid of floating text boxes in Excel?
Remove a text box
- Open the Excel spreadsheet containing the text box.
- Find the text box and click the outer edge to select it. When selected, there are small circles on each corner and in the middle of each side of the text box.
- Press the Del or Backspace on the keyboard to remove the text box from the spreadsheet.
How do I get rid of text boxes in Word?
Select the border of the text box that you want to delete, and then press DELETE. Make sure that the pointer is on the border of the text box and not inside the text box. If the pointer is not on the border, pressing DELETE will delete the text inside the text box.
How do I remove a text box but keep the text in Word 2010?
Remove all text boxes border and texts
- Please apply the utility by clicking Kutools > More > Remove All Text Boxes.
- In the Remove All Text Boxes dialog window, please uncheck Just remove text box, and keep the text option.
- After clicking OK, it will appear a dialog box to tell you how many text boxes have been removed.
Is there a floating text box in Excel?
But you said that’s not what you’re after. Excel does not support a floating textbox whose position is independent of the cells. One approach is to detect when the window is scrolling, and adjust the position of the textbox when that happens. However, Excel does not offer a built-in way to detect that the window is scrolling.
Why do you use a floating object on a page?
If you want an object to remain in place so that text on the page flows around it, use a floating object. Floating objects are anchored to a position on a page. Typing more text on the page, does not affect the position of a floating object, but you can drag a floating object to reposition it. Drag any of its selection handles to resize it.
Can you create three float boxes side by side?
You can easily create three floating boxes side by side. However, when you add something that enlarges the width of each box (e.g. padding or borders), the box will break.
How to use Flexbox to create flexible boxes?
Using Flexbox to create flexible boxes: Box 1 – This is some text to make sure that the content gets really tall. This is some text to make sure that the content gets really tall. This is some text to make sure that the content gets really tall.
Good Day All,
I have a Word (2016) Doc that I need to add DocuSign Custom Tags too.
As an example, to do to do this, you simply add the text «s1» on the Signature line in a Document. DocuSign then places that wonderful yellow «Sign Here» and the person who received the Document through DocuSign can e-Sign the document and send it back.
These «Tags» are not lining up in the professional looking way I would like them too (Picture #3 — Green Arrows). Please forgive and excuse the size of the images.
When I asked DocuSign, they tell me its something I need to correct in Word. (3rd party services are always trying to pass the buck).
So my question is this. Is there a way to add the text for the Custom tag (s1) to the document, only slightly above the line. In other words, I need the text to be «floating» slightly above the line of text that has the line when the signature line, date, etc. goes?
Thank you
Shawn,
what is a floating graphic in word
When you add an image to a document in Microsoft Word 2010, you can elect to place it on its own line or make text wrap around it. When you configure an image so text wraps around it, the image changes from an «inline» image to a «floating» one.
What is a floating image in Word?
Distinguish floating and in line images. In Word 2003 and earlier: When you click on a floating image, it has round handles on the corners, and a green handle to rotate it. When you click on an inline image, it has square handles and no rotation handle.
What is the difference between an inline and a floating object in Word?
Objects can be placed in your document in two ways: either inline or floating. Inline objects are those that reside on the same layer as your text and are positioned within the stream of text that surrounds the object. Floating objects are those that are placed on a layer over the text.
How do you move a floating object in Word?
Click on the object anchor icon and drag it either up (towards the beginning of the document) or down (towards the end of the document). Release the mouse button when the mouse pointer is next to the paragraph where you want the object anchored.
What is floating graphic?
[‚flōd·iŋ ′graf·ik] (computer science) A picture or graph that moves up or down on a page of a document as text is deleted or inserted above it.
What is a floating object in Word?
Floating objects are those that are placed on a layer over the text. The thing that indicates essentially where a floating object is located in relation to the text in your document is referred to as an object anchor.
How do you make a floating graphic?
When you add an image to a document in Microsoft Word 2010, you can elect to place it on its own line or make text wrap around it.
What is the difference between an inline graphic and a floating graphic?
Although it can be moved around, a floating image has an anchor point in relation to which its position is measured. You can tell whether an image is Inline or Floating by selecting it. Inline images have solid selection handles, while Floating images have hollow selection handles.
What is a floating picture word?
When you add an image to a document in Microsoft Word 2010, you can elect to place it on its own line or make text wrap around it. … Changing an inline image to a floating image allows you to continue modifying the document’s text without causing the image to move.
What is a inline graphic in Word?
inline graphic. a graphic that is part of a line of text. floating graphic. a graphic to which text wrapping has been applied, making the graphic independent of text and able to be moved anywhere on a page. tab leaders.
What is floating graphic in computer?
[‚flōd·iŋ ′graf·ik] (computer science) A picture or graph that moves up or down on a page of a document as text is deleted or inserted above it.
How do I make a picture float?
The float property is used for positioning and formatting content e.g. let an image float left to the text in a container. The float property can have one …Float None · Clear and clearfix · Try it Yourself · Tryit Editor v3.7
What do you need to do to make a graphic float on the page?
— HTML image alignment. Follow the steps below to image align to the left, the center, or the right of your webpage. Left align.
What is a floating graphic in Word?
When you add an image to a document in Microsoft Word 2010, you can elect to place it on its own line or make text wrap around it. When you configure an image so text wraps around it, the image changes from an «inline» image to a «floating» one.
How do I create a floating text box in Word?
In a word processing document, you can also create a floating text box by converting an inline text box. Choose Insert > Text Box; an inline text box appears. Click the inline text box to select it, and then click the Floating button in the format bar.
How do you make a floating graphic?
When you add an image to a document in Microsoft Word 2010, you can elect to place it on its own line or make text wrap around it.
What is a floating graphic?
[‚flōd·iŋ ′graf·ik] (computer science) A picture or graph that moves up or down on a page of a document as text is deleted or inserted above it.
What is an inline graphic?
An inline graphic is typically a small graphic, such as an icon or a small picture symbol, that is displayed or set in the same line as the text.
What is inline graphic in Word?
Filters. Graphics images that are embedded within a text document. Inline graphics on the Web are actually HTML pages with links to graphics files stored on the Web server. The browser displays the text and images as if they were physically on the same page.
How can you tell if an image is an inline graphic in Word?
the image to determine how it can be used legally. How can you tell if an image is an inline graphic? adding spaces or tabs, or by applying alignment settings.
What is the difference between an inline graphic and a floating graphic?
Although it can be moved around, a floating image has an anchor point in relation to which its position is measured. You can tell whether an image is Inline or Floating by selecting it. Inline images have solid selection handles, while Floating images have hollow selection handles.
If you still have questions like the ones below, please contact us for answers:
which of the following is true of a floating graphic
what is an inline object in word
inline graphic word 2016
move a floating object in word
what is a inline graphic in word
inline graphics
inline graphic definition
floating object definition computer
See more articles in the category: Wiki
Post Views:
67
Word’s Position and Wrap Text features help arrange images and text on the page. Position features automatically place the object at the location of your choice on the page (see how to position figures in Word for more details). Text Wrap features determine how text wraps around an image or other objects on the page, depending on the chosen option.
Wrap Text features work for figures in a Word document (see text wrapping for tables). Figures in Word mean any visual objects except tables and equations. So, using the same Wrap Text features can be used for images, ClipArt objects, charts, text boxes, diagrams, and SmartArt objects.
Change text wrapping
By default, Word inserts (see examples below):
- Pictures (images and photos), charts in line with the text.
- Text boxes, shapes in front of the text.
- WordArt objects behind the text.
To change the way how text should wrap the object, select it, then do one of the following:
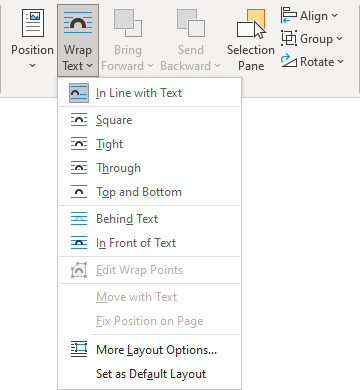
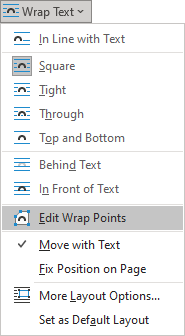
- On the Picture Format (Shape Format, Graphics Format) tab, in the Arrange group, click the Wrap Text button:
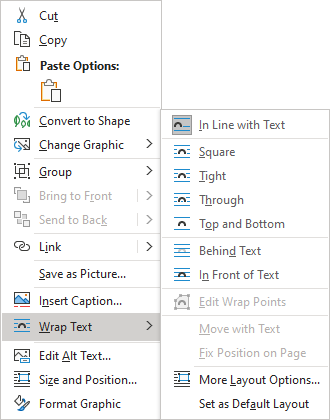
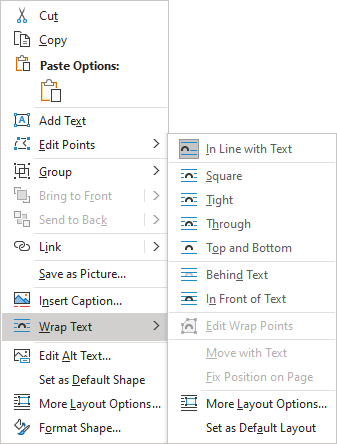
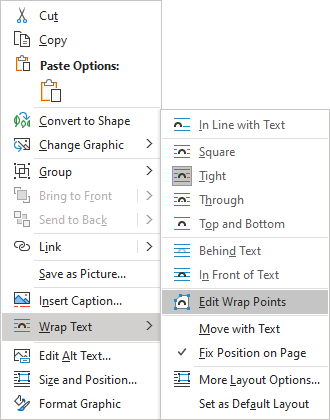
- Right-click on the object, then choose Wrap Text in the popup menu:
or
- Click the Layout Options button that appears next to the selected figure:
From the Wrap Text list, choose the option you prefer:
- In Line with Text places an object in a paragraph on the same line as the surrounding text. The text does not wrap around it.
- Square wraps the text around the picture or shape on all sides at right angles (a square pattern) as if it is rectangular. The text fills the remaining rectangular region.
This option is the most common form of text wrapping.
- Tight wraps the text around the edges of the figure. The text follows the shape.
This option is most useful for larger images covering most of the page width.
- Through wraps the text around the picture or shape edges, including any white gaps. If there is no white space in the image or shape, text wrapping works the same as Tight.
This option is an advanced setting because you pull or drag image and shape points in and out of their original borders:
See how to edit hyphenation points.
- Top and Bottom wraps the text above and below the figure to keep the image on its line. There is no text on either side of it.
- Behind Text places the figure behind, or underneath, any existing text. The text does not wrap around it.
The picture looks like a watermark or background image.
Note: Use the Selection pane when working with objects behind the text.
- In Front of Text places the object on top of the text. The text is not wrapped, so some of it may be blocked depending on the figure’s transparency.
Note: Figures that use the Square, Tight, Through, Top and Bottom, Behind Text, or In Front of Text wrapping style are all considered floating.
Position a figure to a paragraph or page
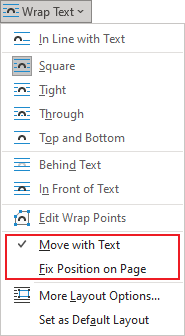
Also, Word offers two options for all wrapping styles except In line with Text (for floating figures):
or
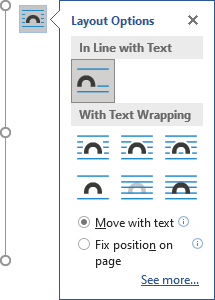
- Move with Text moves the figure along with the surrounding text.
If a figure is positioned inside the paragraph, and you delete or add any content before the paragraph, the figure moves with the paragraph. See more about Positioning a picture, text box, or shape on the page.
- Fix Position on Page keeps the figure at the same place on the page when text is added or removed.
If the paragraph where the figure is located (that paragraph contains anchor) moves to the next page, the figure moves and keeps its position relative to the page.
Note: The same options you can find in the Layout dialog box, on the Position tab, in the Options section:

Checking the Move object with text check box is equivalent to the Move with Text option from the Wrap Text dropdown list. Unchecking the Move object with text check box is equivalent to the Fix Position on Page option.
Wrap text on both sides, or one side only
To change additional options, choose More Layout Options… from the Wrap Text dropdown list or the See more… link in the Layout Options menu.
In the Layout dialog box, on the Text Wrapping tab:

- In the Wrapping style group, choose any style exact In line with text (see above).
- In the Wrap text group (available for the Square, Tight, and Thought wrapping styles), choose any of the additional options:
- Both sides wraps text around either side of the image or shape:
- Left only wraps text around only the left side of the image or shape:
- Right only wraps text around only the right side of the image or shape:
- Largest only wraps text on the side of the image or shape with the larger distance from the margin.
- Both sides wraps text around either side of the image or shape:
Change the distance between text and object
To change the distance between text and the visual object, open the Layout dialog box by one of the following methods:
- On the Picture Format (Shape Format, Graphics Format) tab, in the Arrange group, click the Wrap Text button, then select More Layout Options…
- Right-click on the object, click the Wrap Text list, then select More Layout Options… in the popup menu.
- Click the See more… link in the Layout Options menu.
In the Layout dialog box, on the Text Wrapping tab, in the Distance from text section, enter custom values for the distance between the text and the picture independently for:
- Top and Bottom (available for the Square, Tight, Thought, and Top and Bottom wrapping styles),
- Left and Right (available for the Square, Tight, and Thought wrapping styles).
For example, with the 0.3-inch distance on all sides:

Edit hyphenation points
To use the Tight or Through options effectively, you may need to adjust the wrapping points for the image or shape. To edit wrap points, select the object, then activate the Edit Wrap Points view by one of the following methods:
- Picture Format (Shape Format, Graphics Format) tab, in the Arrange group, click the Wrap Text button. Then choose Edit Wrap Points from the Wrap Text dropdown list:
- Right-click on the object and select Wrap Text -> Edit Wrap Points in the popup menu:
In the Edit Wrap Points view, drag the red lines to adjust where the text wraps:

Note: There is no way to add points. You can move existing wrap points however you want.
Be careful! After changing a text wrapping option or copy-pasting the picture, Word lost the changes of Wrap Points.

