
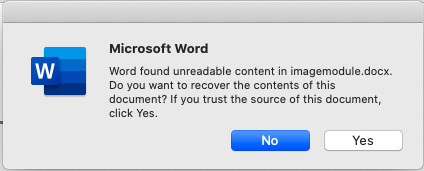
Real case from Microsoft community ( See it happens on your case): «Word found unreadable content error. Several of my Word files are unable to open and display the error message: «Word found unreadable content in……No matter which option I select, it then shows the message……I’ve tried Open and Repair, Recover Text from Any File, etc. but nothing has worked so far.
It is really frustrating that your files get such an error in the middle of the work. Here some methods come! In this article, we are going to provide different ways to fix unreadable content in word.
| Workable Solutions | Step-by-step Troubleshooting |
|---|---|
| Fix 1. Apply EaseUS Word Repair Tool | If Word unreadable error occurs, use EaseUS EaseUS Data Recovery Wizard to recover and repair corrupted Word documents. If can automatically repair damaged Word…Full steps |
| Fix 2. Use Recover Text from Any File Function | You can use a text recovery converter from Microsoft Word to fix the unreadable content error. Open Word, go to File tab > click Open > click Browse on the right panel…Full steps |
| Fix 3. Use Open and Repair Tool | Microsoft’s Open and Repair tool also can be helpful to solve unreadable content in Word. Open Word, click File tab > Open > Browse. Choose the damaged file…Full steps |
The error may happen when your files get damaged or corrupted for some reasons, such as:
1. The Word document was not closed correctly, including files that suddenly shut down, unexpected power interruption, laptop battery exhaustion, system crash, etc.
2. Virus attack.
The virus may attack your Office data contains Word file. If your file gets infected, then your document has unreadable content.
3. Text convert error. When you convert word files to another format, your file will appear «Word found unreadable content» message or «Word was unable to read this document» warning.
Don’t worry. Your Word document is still there. Follow us and pick out the great method in the next part.
How to Fix Unreadable Word Documents in Windows
Check one automatic way and two built-in functions in this part.
Fix 1 — Apply EaseUS Word Repair Tool
If an unreadable error happens, the most urgent thing you need to do is find and recover all lost documents. To save your time and apply the simple steps, one of the best data recovery software — EaseUS Data Recovery Wizard, is your wise choice.
Trusted by users for 17 years, EaseUS Data Recovery Wizard can retrieve and repair your lost data in a few clicks. No matter Word documents get corrupted by software or human errors, this app can get them back as soon as possible and repair your corrupted word files during the previewing process.
EaseUS File Repair Tool
- Fix corrupted JPEG, JPG, PNG, and BMP images efficiently
- Repair corrupted Excel, PPT, Word, and PDF documents
- Repair corrupted files for free after data recovery
- Fix damaged, broken, and corrupted files on various storage devices, such as HDD, USB, SD card, external hard drive, etc.
Download this utility and apply 3 simple steps to repair Word files:
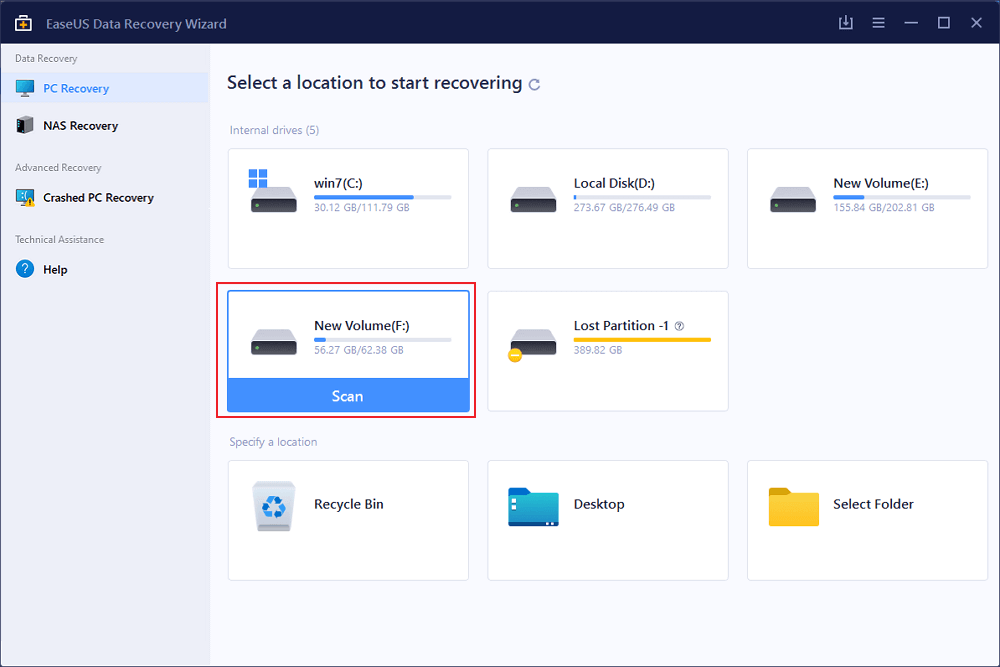
Step 1. Launch EaseUS Data Recovery Wizard, and then scan disk with corrupted documents. This software enables you to fix damaged Word, Excel, PPT, and PDF files in same steps.
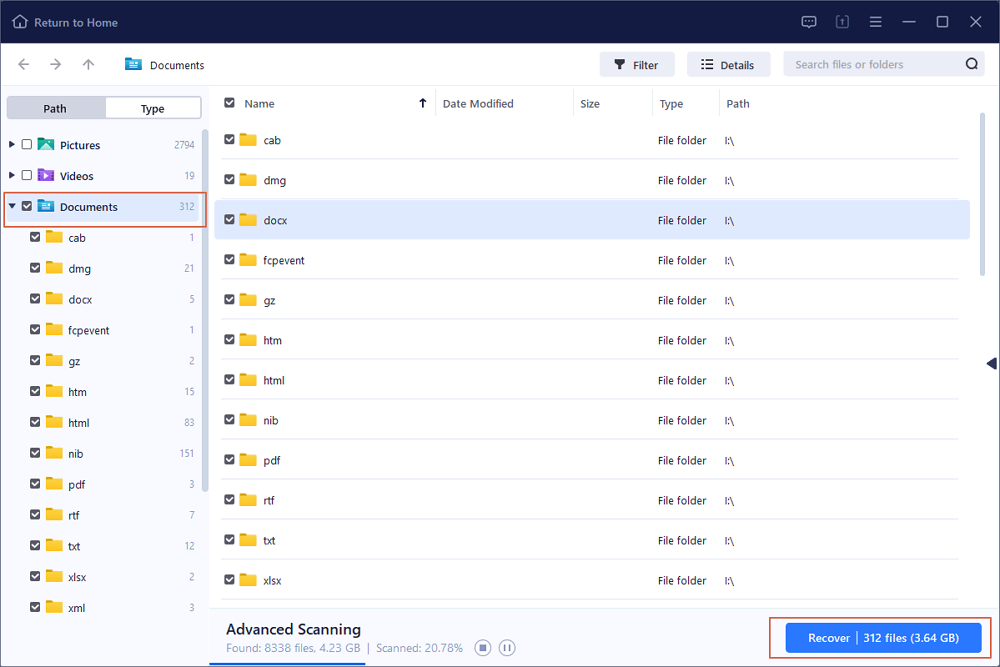
Step 2. EaseUS data recovery and repair tool will scan for all lost and corrupted files. You can find the target files by file type or type the file name in the search box.
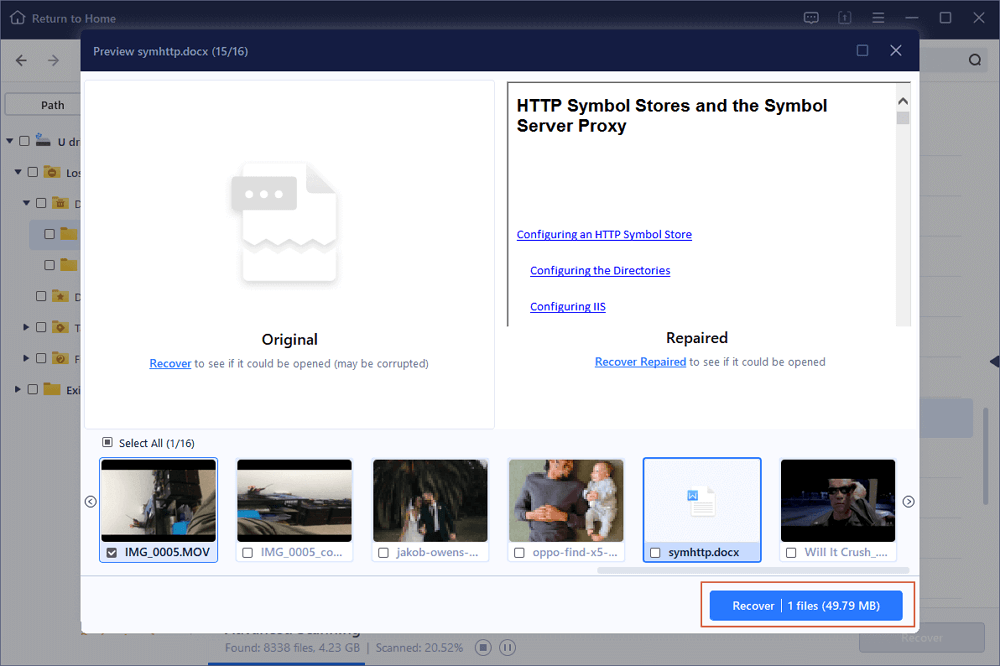
Step 3. EaseUS Data Recovery Wizard can repair your damaged documents automatically. After file preview, you can click «Recover» to save the repaired Word, Excel, and PDF document files to a safe location.
Fix 2 — Use «Recover Text from Any File» Function
If you want to search for some manual ways, you can use a text recovery converter from Microsoft Word. Now Open Microsoft word and follow the steps.
Step 1. Navigate to File tab > Click Open on the left panel > Click Browse on the right panel.

Step 2. On the Microsoft Open window, select the unreadable word files.
Step 3. Choose Recover Text from Any File from the drop-down menu.
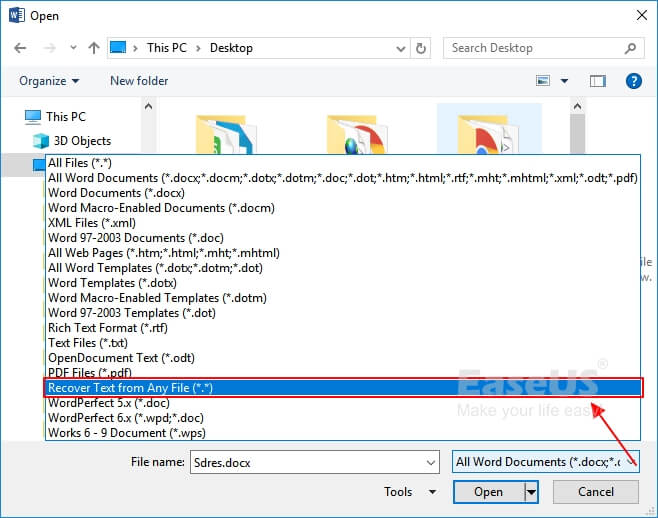
Step 4. Click Open and wait. Your damaged file will open and you had better save it as a new file.
Fix 3 — Use «Open and Repair» Function
Solution 3 is also a built-in function. And the steps part is the same as the second fix. Check step-by-step guide.
Step 1. Move to File tab > Open > Browse.
Step 2. Choose the damaged file in the new window.
Step 3. Click the small triangle arrow icon > Choose Open and Repair.
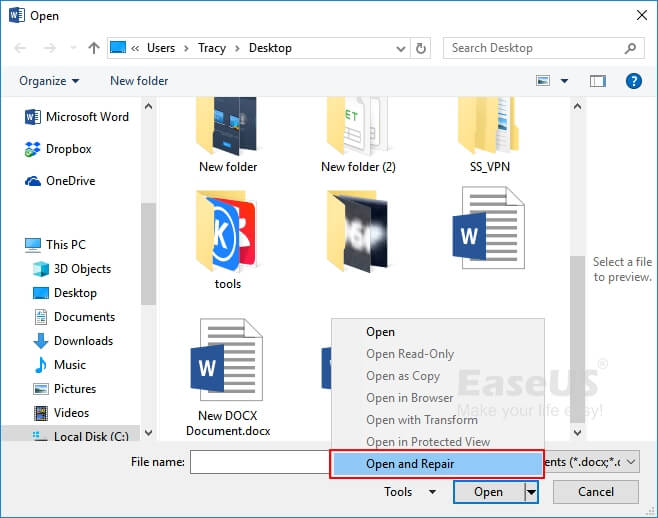
Step 4. The file can be open and you can save it as a new file.
Fix Word Found Unreadable Content Android by OneDrive
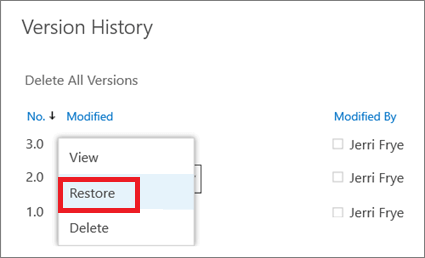
If you have saved your word files to OneDrive, then you can use the Version History function of OneDrive to restore the word document to the previous version. The following steps are best done on a computer.
If you are using the web version of OneDrive, follow the steps:
Step 1. Log in to your OneDrive account.
Step 2. Select the files you want to restore to the previous version, right-click it and choose Version History.
Step 3. On the Version History window, select the arrow next to the file, and click Restore.
If you are running the OneDrive app on PC, you can go to File Explorer.
Step 1. Click OneDrive on the left panel > Click Document folder and choose the files you want to recover.
Step 2. Choose Version History > Click the dots next to the wanted version > Click Restore.
Windows/Android User: Get Your Answer Here
Have you fixed the unreadable content error in Microsoft Word? We have outlined 3 ways compatible with Windows in part 1 and one reliable way available on Android in part 2. To avoid data loss down the alongside, we recommended you can use File History to back up your word file in your spare time.
Word Found Unreadable Content FAQs
Read the frequently asked questions to get additional help on unreadable content in Word.
1. Why did everything disappear from my Word document?
Here’s the reason why the Word document disappeared:
Microsoft Word documents can disappear in certain situations. For example, it may be gone after a forced quit, power interruption, or close without saving changes.
2. Can you fix a corrupted Word file?
Yes. Follow the steps below to repair corrupted Word online:
- Select the corrupted Word .doc/.docx file.
- Type your email address to receive repaired Word file.
- Wait for the repair process to complete.
3. How to recover unsaved Word documents?
Steps to recover unsaved word documents in Windows 10:
- In MS Word, click the File tab in the upper left.
- Click Manage Document and select Recover Unsaved Documents from the drop-down list.
- Check for your missing File in the dialog box. If it was a recent loss, it should appear.
- Open the recovered Word document and click the Save As button in the top banner.
How to fix text position in word 2016?
Adding new text in word results in pushing down the content of everything below as one expects. This creates usually problems with the formatting.
What I would like is to have fixed sections that are not affected by changes above.
Here is the problem.
Chapter 1
Bla bla
____________________________________________________end of previous 10
____________________________________________________new page 11
Chapter 2
Oops I forgot to add something Here is the problem.
Chapter 1
Bla bla
|new stuff added
|new stuff added
|new stuff added
|new stuff added
___________________________________________________end of previouspage 10
____________________________________________________new page 11
(shifted position of chapter all the stuff below and chapter 2 because of the added text )
|new stuff added
|new stuff added
|new stuff added
Chapter 2 (shifted formatting)
**Ideal would be
Chapter 1
Bla bla
|new stuff added
____________________________________________________end of previous 10
____________________________________________________beginning of page 11
automatically creates new page not to mess the
content below
|new stuff added
|new stuff added
|new stuff added
|new stuff added
____________________________________________________end of page 11
____________________________________________________page 12
Chapter 2 fixed position at top of page**
This article is a consolidation of the following previously available article: 211272
For a Microsoft Word 97 version of this article, see
184143.
For a Microsoft Word 7.0 for Windows 95 version of this article, see
184142.
When you view your document in Microsoft Word, some characters may be missing, or the top (or bottom) of some characters may be cut off.
This problem may affect the following types of characters:
-
Underscore
-
Character with an ascender
-
Character with a descender
-
International character that contains an umlaut, acute accent, grave accent, circumflex, or tilde
-
Object that is inline with the text of your document—for example, a picture that is not inserted in a frame or text box
NOTE: This problem does not affect printing; that is, underscores, characters with ascenders or descenders, and international characters are printed correctly although they may not be displayed correctly.
Symptoms
This problem may be caused by one of the following.
Case 1
The line spacing of your text may be set to an exact height. When you set the line spacing to Exactly and select a measurement that is equal to or less than the height of the font, underscore characters may not be displayed and characters that have an ascender, descender, or an umlaut may be cut off. For example, if you set line spacing to Exactly 9-point for a 10-point font, underscore characters may be cut off.
NOTE: This problem may occur differently with different fonts.
Case 2
The printer driver may incorrectly substitute screen fonts at certain view percentages. If you change the printer driver, you may notice an immediate difference, depending on the view you are using.
Case 3
The zoom percentage that the document is set to may cause characters to have the top or bottom portion of the screen font cut off. You can adjust the zoom percentage from 75 percent to 100 percent in most cases to correct this visually.
Cause
This problem is a display-only problem. Use one or more of the following methods appropriate for your situation.
Method 1: Change the Document Zoom Setting
When you change the zoom percentage, Word may allow you to view the full height of your text. To do this, use one of the following methods depending on the version of Word you are using:
Microsoft Office Word 2003, Microsoft Word 2002, or Microsoft Word 2000
-
On the View menu, click Zoom.
-
Do one of the following:
-
Under Zoom to, change to a larger setting. For example, change to 200% and then click OK.
-
Under Percent, change the percentage to a larger setting. For example, change it to 120%.
-
Microsoft Office Word 2007
-
On the View tab, click
Zoom in the Zoom group. -
Do one of the following:
-
Under Zoom to, change the value to a larger setting. For example, change the value to 200%.
-
Under Percent, change the percentage value to a larger setting. For example, change the value to 120%.
-
-
Click OK.
Method 2: Change the Document View
When you change the view of your document to outline view, Word shows the full height of your text.
To change the view of your document in Word 2003, in Word 2002, or in Word 2000, click Outline on the View menu.
To change the view of your document in Word 2007, click Outline in the
Document Views group on the
View tab.
NOTE: This problem may occur in normal, print layout, and Web layout views. When you view your document in outline view, paragraph formatting is ignored.
Method 3: Change the Line Spacing
Word 2003, Word 2002, or Word 2000
-
Select the text and then click Paragraph on the Format menu.
-
Do one or both of the following:
-
On the Indents and Spacing tab, change the Line spacing box to something other than Exactly. For example, change the Line spacing setting to Single.
-
Change the At setting to a setting slightly larger than the font point size you are using in your document. For example, if your font point size is 10 point, then change the At setting to 11 point.
-
Word 2007
-
Select the text.
-
On the Hometab, click the
Paragraph dialog box launcher in the Paragraph group. -
Do one or both of the following:
-
On the Indents and Spacing tab, change the setting in the Line spacing box to a setting other than
Exactly. For example, change the setting in the Line spacing box to Single. -
Change the At setting to a setting slightly larger than the font point size that you are using in your document. For example, if your font point size is 10 point, then change the
At setting to 11.
-
Method 4: Change the Font or Point Size
Word 2003, Word 2002, or Word 2000
-
Select your text and then click Font on the Format menu.
-
On the Font tab, do one or both of the following:
-
Change the Font setting to a different font.
-
Change the Size setting to a smaller size than what you have your line spacing set to. For example, if you have your line spacing set to Exactly 12 point, change the font size to 11 point.
-
Word 2007
-
Select the text.
-
On click the Hometab, click the
Font dialog box launcher in the Font group. -
On the Font tab, do one or both of the following:
-
Change the Font setting to a different font.
-
Change the Size setting to a smaller size than what you have your line spacing set to. For example, if you have your line spacing set to Exactly 12 point, change the font size to 11 point.
-
Resolution
Line spacing determines the amount of vertical space between lines of text. Word uses single line spacing by default. The line spacing that you select affects all lines of text in the selected paragraph or the paragraph that contains the insertion point. The following table describes the line spacing options:
This option Results in
————————————————————————
Single Line spacing for each line that accommodates the largest
font in that line, plus a small amount of extra space.
The amount of extra space varies depending on the font
used.
1.5 Lines Line spacing for each line that is one-and-one-half
times that of single line spacing. For example, if
10-point text is spaced at 1.5 lines, the line spacing
is approximately 15 points.
Double Line spacing for each line that is twice that of single
line spacing. For example, in double-spaced lines of
10-point text, the line spacing is approximately 20
points.
At Least Minimum line spacing that Word can adjust to accommodate
larger font sizes or graphics that otherwise do not
fit within the specified spacing.
Exactly Fixed line spacing that Word does not adjust. This
option makes all lines evenly spaced.
Multiple Line spacing that is increased or decreased by a
percentage that you specify. For example, setting line
spacing to a multiple of 1.2 increases the space by
20 percent, and setting line spacing to a multiple of
0.8 decreases the space by 20 percent. Setting the
line spacing at a multiple of 2 is equivalent to setting
the line spacing at Double. In the At box, type or
select the line spacing you want. The default is three
lines.
At The amount of line spacing you select. This option is
available only if you select At Least, Exactly, or
Multiple in the Line Spacing box.
NOTE: If a line contains a large text character, graphic, or formula, Word increases the spacing for that line. To space all lines evenly, click Exactly in the Line spacing box, and then select the line spacing in the At box that is large enough to fit the largest character or graphic in the line. If characters or graphics still appear cut off, select a larger number in the At box.
For more information, click the following article number to view the article in the Microsoft Knowledge Base:
192973 Definitions of typography terms in Word 2000
More Information
Well, if you have come to this article and are reading this article, I think you are having an error with words in the Word file, right? OK, then you have found the right article, because in this tutorial I will guide you in detail. how to fix text errors in Word 100% success.
Surely you can’t sit and type space for each word in that Word file, right? If there are a few letters, it’s okay, it can still be fixed, but the text file has thousands of words, but if you sit and edit it like that, it’ll be over for the day 😀
Okay, now let’s start. Oh wait, take a look at the demo image of the error for easy visualization.
I. Causes of text errors in Word?
This is one of the errors caused by Word’s spelling and grammar checking features and a few more due to conflicts between Word versions.
That is, if you edit documents on word versions from 2010 and above and open the file with a 2007 text editor, it is possible that a text error will often occur.
Read more:
For the error of words stuck together, you can fix it in 2 ways. Two ways fix errors with words in word This will perform based on the object using the file.
Sounds abstract and confusing, right? Then make it easy for you to understand…
1/ You are the one who received the corrupted Word file with that word
Well, if you are the recipient of the text file and when you open it, it shows a text error, then do the following:
+ Step 1: Open the corrupted text file (of course :D)
+ Step 2: Do the following for Word 2007
- Click the button
Button Officein the top left corner of the Word file. - Then choose Word Options (Word Options is a configuration part of MS Word. It’s like a control center.)
As for Word 2010, 2013… and above then you come in File => and choose Options is to be.
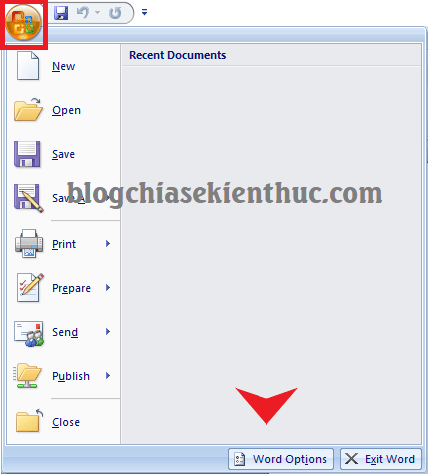
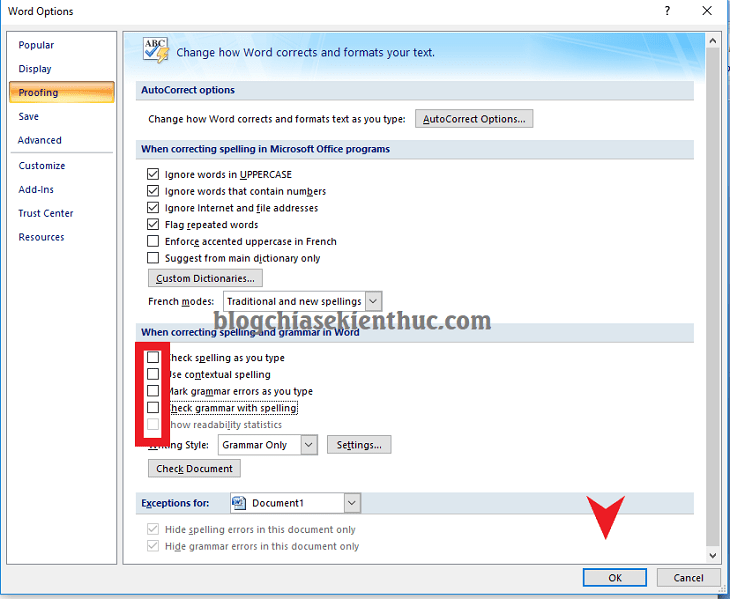
+ Step 3: In the table Word Options You will see the following settings:
Select tab Proofing and find the section When correcting spelling and grammar in Word you remove all the ticks in the boxes:
- Check spelling as you type.
- Mark grammar errors as you type.
- Frequently confused words.
- Check grammar with spelling.
- Show readability statistics.
=> Finally press OK to complete the typographical error correction.
Tips: If this does not work, please request to resend the Word file and save it in *.doc format. Then compress using Winrar or 7 Zip to compress the file before sending. To limit errors and virus infections.
2/ You are the person who directly created that document file
If you are the one who directly creates the text with text errors when opening it on another version of Word. Then everything is quite simple, you just need to save the file with the .doc extension instead of the .docx extension.
So how to save Word with the extension *.doc ? If you do not know, continue reading the article for reference.
Perform:
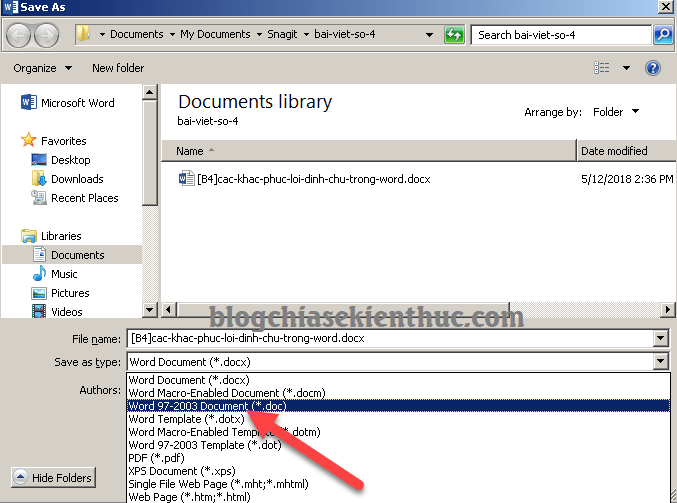
For versions of Word 2010 and later: You click File => choose Save as Word document that you need to save as extension .doc. You can use keyboard shortcuts F12 to open the window Save as for fast.
On Word 2007 then you click on the icon Office Button => and choose Save as..

The Save as window appears. You find the section Save as type and choose Word 97-2003 Document (*.doc) to save with format .doc
Save a few text files ending in *.doc then you do as above.
If you need to save a large number of files as *.doc This method is a bit time consuming. Your better solution is to use the default Save feature in Word Options. Please follow the words below…
- On Word 2007: You enter
Office Button=> SelectWord Options=> Select tabSave. - On Word 2010 and later: You enter
File=> SelectOptions=> Select tabSave.

Similar to how to fix text errors in You are the one who received the word file with the word error right ?
Here you find the section Save documents. And in the frame Save files in this format you also choose Word 97-2003 Document (*.doc)
=> Then press OK to consent to the installation.

That’s it, you don’t have to worry about getting word errors with Word files anymore.
Note: Word files have the extension .doc will have a heavier file size than that of a .docx file, because the *.docx file is optimized and compressed better. There’s no problem with the text file being a bit heavy, right 😛
III. Conclude
Error of letters stuck together in Word It sounds stressful 😛 but with the 2 ways to fix the error that I just shared above, surely you will apply it successfully? If not, please comment below this article for support :d
In addition to the ways that I have just described above, if you have another method that is also successfully applied, don’t forget to share it with your friends to learn more.
Hope the article will be useful to you, good luck!
CTV: Nguyen Nhu Truong Vu – techtipsnreview
The article achieved: 3.9/5 stars – (There are 33 reviews)
Note: Was this article helpful to you? Don’t forget to rate the article, like and share it with your friends and family!
Source: [Tricks] Instructions to fix text errors in Word with 100% success
– TechtipsnReview
Text errors in Word when users edit text are quite common, making many users feel uncomfortable. This error is generated when the computer system uses a heterogeneous Office suite. Therefore, with the following text correction operations in Word, readers can easily remove this error as well as help view text files quickly.
Text errors in Word often appear a lot on Office 2007 versions, especially when you open Word files created from other versions such as: 2010, 2013,… The main reason is due to system conflicts. For example, computers and text editors, if you install many addons in word, it can also affect it. And if readers are experiencing this situation, the following article will guide you how to fix text errors in Word 2007, 2003, 2013, 2010, 2016.

Cause: The cause of word sticking errors in Word mainly comes from errors caused by your Spelling and Grammar Check or your Word version being wrong. Therefore, depending on each different error, below Taimienphi will share with you some ways to fix word errors in Word. In the article we use Word 2013 to do it, with other versions like Word 2007, 2010, 2016 you can completely do the same.
JOB CONFIRMATION ONLY
Method 1: Save the file as *.Doc
Step 1: Open the corrupted Word document file with Word 2007, 2010, 2013, 2016 and select Save as

Step 2: Dialog box Save as open, at Save styles, templates you choose Word 97 – 2003 documents and press Rescue to save the file to .doc

Method 2: Adjust Word’s Settings.
Step 1: Open Word document file with word error, please click File and choose Option as shown below.

Step 2: Word interface Option Open, here you choose the item Proofreading and remove all checkmarks in item When correcting spelling and grammar errors in Word then press YES

Method 3: Use software to fix errors
This software is also released by Microsoft itself, so you can be assured of its safety. Software named File Format Converter (compatibility pack for 2007 office systems), it is responsible for transferring Office files from the old version to the new version quickly and easily.
Readers can download the File Format Converters software below
Thus, the above is a guide to correcting text errors in Word that readers can apply to overcome the situation that they are facing. In addition, to avoid this situation, you should also use the .doc format for Word 2007 documents to be compatible with other Word versions such as Word 2003, 2010 or 2013 and 2016.
Register for the course via Form Or contact via Zalo: O85 24O 118O
![]()

More From
About The Author
