
Excel for Microsoft 365 Word for Microsoft 365 Outlook for Microsoft 365 PowerPoint for Microsoft 365 Publisher for Microsoft 365 Excel for Microsoft 365 for Mac Word for Microsoft 365 for Mac Outlook for Microsoft 365 for Mac PowerPoint for Microsoft 365 for Mac Excel for the web Word for the web PowerPoint for the web Excel 2021 Word 2021 Outlook 2021 PowerPoint 2021 Publisher 2021 Office 2021 Excel 2021 for Mac Word 2021 for Mac Outlook 2021 for Mac PowerPoint 2021 for Mac Excel 2019 Word 2019 Outlook 2019 PowerPoint 2019 Publisher 2019 Office 2019 Excel 2019 for Mac Word 2019 for Mac Outlook 2019 for Mac PowerPoint 2019 for Mac Excel 2016 Word 2016 Outlook 2016 PowerPoint 2016 Publisher 2016 Office 2016 Excel 2016 for Mac Word 2016 for Mac Outlook 2016 for Mac PowerPoint 2016 for Mac Excel 2013 Word 2013 Outlook 2013 PowerPoint 2013 Publisher 2013 Office 2013 Excel for iPad Word for iPad PowerPoint for iPad Excel for iPhone Word for iPhone PowerPoint for iPhone Word for Android tablets Excel for Android tablets PowerPoint for Android tablets Excel 2010 Word 2010 Outlook 2010 PowerPoint 2010 Publisher 2010 Office 2010 Publisher 2007 Excel for Mac 2011 Word for Mac 2011 Outlook for Mac 2011 PowerPoint for Mac 2011 Excel for Android phones Excel for Windows Phone 10 Excel Mobile PowerPoint for Android phones PowerPoint for Windows Phone 10 PowerPoint Mobile Word for Android phones Word for Windows Phone 10 Word Mobile More…Less
There are three areas in Microsoft Office where you may want to change the language.
-
Editing or Authoring is the language in which you write and edit your content. You may need to install an associated keyboard for this language via Windows settings.
-
Proofing tools are spelling and grammar check. Typically, you’ll set this language to be the same as the editing or authoring language.
-
Display language is for all the buttons, menus, and controls in Office.
You can set the display and editing or authoring languages independently from each other. For example, you may want the display language to be English, but the document you’re writing or editing is in French.
Note: If you want to completely change Office, permanently, to a different language you’ll get the best results if you first set that to be your default display language in Windows as well. For more information on doing that see this article for Windows 10 or this article for Windows 7 or 8.
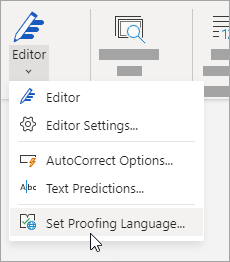
Tip: To prevent having to manually configure the proofing language with each new document in Word, switch on the option to detect the language you’re writing. On the Review tab, go to Language. Choose Language > Set Proofing Language, and then select Detect language automatically.
Note: If you’re using Office 365 and the commands available are different from what’s shown here, expand the Configure Office language for Office 2016 or earlier section and follow the instructions there.
In Office, the language options are in the Office Language Preferences dialog box. The display and authoring languages can be set independently. For example, you could have everything match the language of your operating system, or you could use a combination of languages for your operating system, authoring, and display.
To configure the display language:
-
Within any Office application, select File > Options > Language.
-
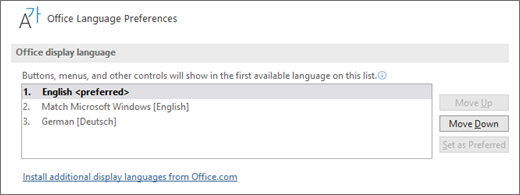
Under Office display Language, make sure the display language you want Office to use is listed.

-
Select the language you want, and then select Set as Preferred. If you want your Office display language to match the display language you have for Windows, select Match Microsoft Windows [Language].
-
If the language you want is not listed, select Install additional display languages from Office.com and follow the instructions there.
To configure the authoring and proofing language:
-
Within any Office application, select File > Options > Language.
-
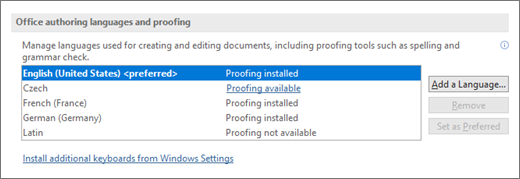
Under Office authoring languages and proofing, make sure the language you want to use for authoring your document is listed.
-
If the language you want appears in the list, select it, and then select Set as Preferred. If the language you want is not listed, select Add a language, and then follow the instructions in the Add an authoring language dialog box.
-
If the language accessory pack includes proofing tools for that language, its status appears as Proofing installed. If the status is Proofing available, click the link to install the proofing tools.
Tip: To prevent having to manually configure the proofing language with each new document in Word, switch on the option to detect the language you’re writing. On the Review tab, go to Language. Choose Language > Set Proofing Language, and then select Detect language automatically.
In Office, the language options are in the Set the Office Language Preferences dialog box. The display and help languages can be set independently. For example, you could have everything match the language of your operating system, or you could use a combination of languages for your operating system, editing, display, and Help.
To configure the editing and proofing language:
-
Within any Office application, select File > Options > Language.
-
If your language already appears among the editing languages press Set as Default. Otherwise select the language from the Add additional editing languages list then press the Add button. The new language will appear in the list of editing languages.
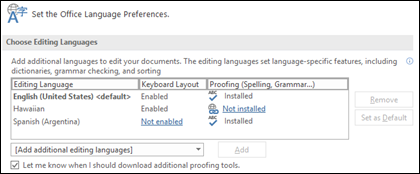
If the Keyboard Layout shows as Enabled, you’re all set for editing. If it says Not enabled in the Keyboard Layout column follow these steps to enable it:
-
Click the Not enabled link.
-
In the Add Languages dialog box, press Add a language, select your language in the list, and then press Add.
-
Close the Add Languages dialog box. Your language should display as Enabled under Keyboard Layout in the Choose Editing Languages section.
Under Proofing, if your language shows as Installed, you’re ready to go. Otherwise press Not installed and Office will take you to a page where you can download the necessary Language Accessory Pack for that language. Follow the instructions on that page to download and install the pack, then come back to the Office Language Preferences dialog box to confirm that it’s now installed.
To configure the display and help languages:
-
Within any Office application, select File > Options > Language.
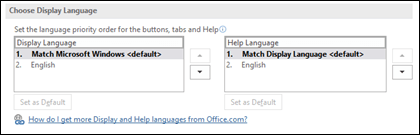
If you’ve already set your Microsoft Windows display language to be the language you want Office to display in you can leave this set to Match Microsoft Windows. Otherwise select your language and press Set as Default to move that language to the top of the list. The language that is listed first is the one Office will use for its menus and buttons. Please note, if your Windows display language is not also installed in Office, your Office display language will appear in the next language in the display list.
Repeat to configure your help language if you want to.
If the language you want isn’t available…
Download the proper Language Accessory Pack for the language you want to use from this page: Language Accessory Pack for Office. The Language Accessory Pack contains the display and proofing tools for most languages, but you can still choose to have your display in one language and editing or authoring in another.
Microsoft Office for Mac already contains all of the available languages, so there’s nothing to download. To configure Office to use those languages follow these steps:

User Interface — The display language for Office for Mac uses the primary language set for operating system. To change the display language for Office for Mac, you need to set a different primary language for your operating system:
-
On the Apple menu, choose System Preferences > Language & Region
-
In the Preferred Languages list, set the desired language to be your primary language by dragging it to the top of the list.
-
If the language you want doesn’t appear just press the + sign and add it.
-
You’ll have to restart your Office application for this change to take effect.
Editing — Setting the editing language depends on the program you’re working in.
Word and PowerPoint
To change your editing language in Word for Mac or PowerPoint for Mac, go to Tools > Language, select your language, and select OK.
To make it the default for all new documents select Default.
Tip: To prevent having to manually configure the proofing language with each new document in Word, switch on the option to detect the language you’re writing. On the Review tab, go to Language, and then select Detect language automatically.
Excel
To change your editing language in Excel for Mac, go to Tools > Language, select your language, and select OK.
OneNote
To change your editing language in OneNote for Mac, go to Tools > Set Proofing Language, select your language, and select OK.
User Interface & Editing — The display and keyboard languages for Office for Android is the same as the language that the device is set to. You can configure those by going to Settings > Language and Input.
Proofing — On Android you can change the proofing language in Word.
In Word on your Android phone, tap Edit  at the top of your screen, and then tap Proofing and Language under Review.
In Word on your Android tablet go to the Review tab and you can select your proofing language from the ribbon.
Proofing — On iOS you can change the proofing language in Word.
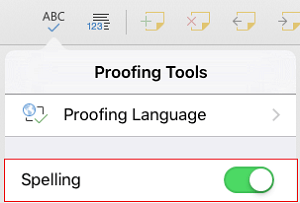
In Word on your iPhone, tap Edit , tap Home > Review > Proofing tools, and then tap Proofing Language.
In your document, on the Review tab, tap Spell Check  , and then tap Proofing Language.
Proofing — On Windows Mobile you can change the proofing language in Word.
In your document, on the Review tab, you can select the proofing language from the ribbon.
User Interface — The best way to set the display language in Office for the web is to set the language in the host where your documents live. That’s usually OneDrive, SharePoint, Dropbox, etc. When you open a document from one of those sites, Office Online will use the display language you have that service set to.
Tip: If you’re using a personal Microsoft account, you can choose your preferred display language in your profile settings at https://account.microsoft.com/profile.
-
Change views on OneDrive (Scroll to the bottom for language settings)
-
Set your language in SharePoint. If you’re using SharePoint, and want a language other than your system language, you’ll want to be sure to select a SharePoint language.
-
Change your language settings in Dropbox
To set the proofing tools language in your app go to the Review tab > Spelling & Grammar > Set Proofing Language. In OneNote for the web this is found on the Home tab.
Things to know
-
This change will only take effect from this point in the document forward.
-
To apply this change to any existing text in the document, press Ctrl+A to select all of the existing text, then set the proofing language with the steps above.
-
This change only affects the current document. For subsequent documents you’ll need to repeat these steps.
See Also
Check spelling and grammar in a different language
What languages are supported in Office?
Translate text into a different language
Remove languages and fonts you don’t use
Right-to-left language features
Need more help?
Want more options?
Explore subscription benefits, browse training courses, learn how to secure your device, and more.
Communities help you ask and answer questions, give feedback, and hear from experts with rich knowledge.
Find solutions to common problems or get help from a support agent.
Need to write or read in a different language? Follow these tips
Updated on October 15, 2022
What to Know
- In Windows: Choose the desired Display and Help Languages in File > Options > Word Options > Language.
- Then, select Choose Editing Options in the same section to change the editing language.
- All but the proofing language in Office for Mac are the same as those for the operating system. To change it in Word: Tools > Language.
This article explains how to change display and/or editing languages in Word for Office 365, Word 2019, Word 2016, Word 2013, Word 2010, Word Online, and Word for Mac. In Windows—but not in macOS—you can choose them independently of the language installed for your operating system.
How to Change the Display Language
The display language in Word governs the ribbon, buttons, tabs, and other controls. To force a display language in Word that’s different from that of your operating system:
-
Select File > Options.
-
In the Word Options dialog box, select Language.
-
In the Choose Display Language section, choose the Display Language and Help Language you want to use. Languages installed in Windows 10 are listed.
-
If a specific language is not listed, select Get more display and help languages from Office.com. If necessary, install a Language Accessory Pack, then close and re-launch Word. You may need to reboot your computer, as well. After a language pack loads, go to the Word Options menu and choose that pack in the Display Language and Help Language lists.
-
Select Set as Default for both the Display Language and the Help Language lists.
-
Select OK to save your changes.
How to Change the Editing Language in Word
The editing language—which governs spelling, grammar, and word sorting—can be changed in the Word Options screen. Go to the Choose Editing Languages section, and select a language from the list. If the language isn’t listed, select the Add additional editing languages drop-down arrow and choose a language.
To proofread in the selected language, highlight the text, then go to the Review tab and select Language > Set proofing language. Choose a language from the list. Word will consider the highlighted selection to be the non-default, selected language and will check the spelling and grammar accordingly.
How to Change Language in Word Online
Language options for Office Online are similar to those in desktop versions of Office. In Office Online, highlight the text for proofing in the non-default language. Select Review > Spelling and Grammar > Set Proofing Language, then choose your alternative language. All proofing in that selected block will be governed by the rules of the alternative language.
How to Change Language in Word for Mac
The display and keyboard layout languages used in Office for Mac are the same as the ones for the operating system. You cannot use separate languages for the OS and Office applications. However, you can specify a different proofing language for Office for Mac.
To change the proofing language in Office for Mac, select Tools > Language in Word or another Office application. To change the proofing language for new documents, select Default.
If you select OK instead of Default, the proofing language you chose will only apply to the current file.
Normally, Word defaults to the language of the operating system. As a rule, you should use Windows to install language files rather than rely on an application like Word to do it for you.
FAQ
-
How do you delete a page in Word?
To delete a page in Word, select View, then go to the Show section and select Navigation Pane. In the left pane, select Pages, choose the page you want to delete and tap the delete or backspace key.
-
How do I check the word count in Word?
To check the word count in Microsoft Word, look at the status bar. If you don’t see the number of words, right-click the status bar and choose Word Count.
-
How do I insert a signature in Word?
To insert a signature in Microsoft Word, scan and insert a signature image into a new Word document and type your information beneath the signature. Then, select the signature block and go to Insert > Quick Parts > Save Selection to Quick Part Gallery. Name the signature > AutoText > OK.
Thanks for letting us know!
Get the Latest Tech News Delivered Every Day
Subscribe
Содержание
- Изменение языка интерфейса в настройках программы
- Изменение языка интерфейса для одноязычных версий MS Office
- Вопросы и ответы

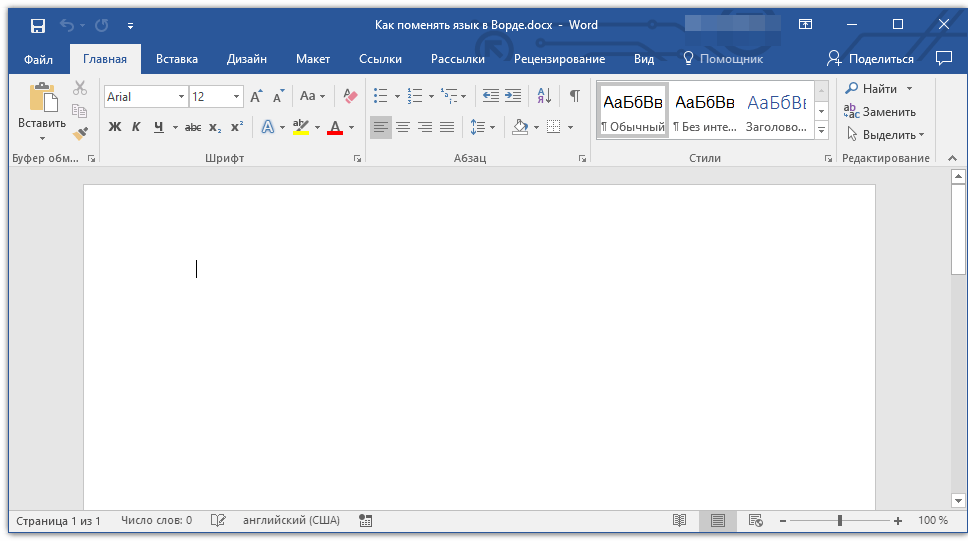
Когда пользователи задаются вопросом, как поменять язык в Word, в 99,9% случаев речь идет не об изменении раскладки клавиатуры. Последняя, как известно, во всей системе осуществляется одной комбинацией — нажатием клавиш ALT+SHIFT либо CTRL+SHIFT, в зависимости от того, что у вас выбрано в языковых настройках. И, если с переключением раскладки все просто и понятно, то со сменой языка интерфейса все чуточку сложнее. Особенно, если в Ворде у вас интерфейс на языке, который вы не совсем понимаете.
В данной статье мы рассмотрим то, как изменить язык интерфейса с английского на русский. В том же случае, если вам необходимо выполнить обратное действие, это будет еще проще. В любом случае, главное запомнить положение пунктов, которые необходимо выбирать (это если вы совсем не знаете языка). Итак, приступим.
Изменение языка интерфейса в настройках программы
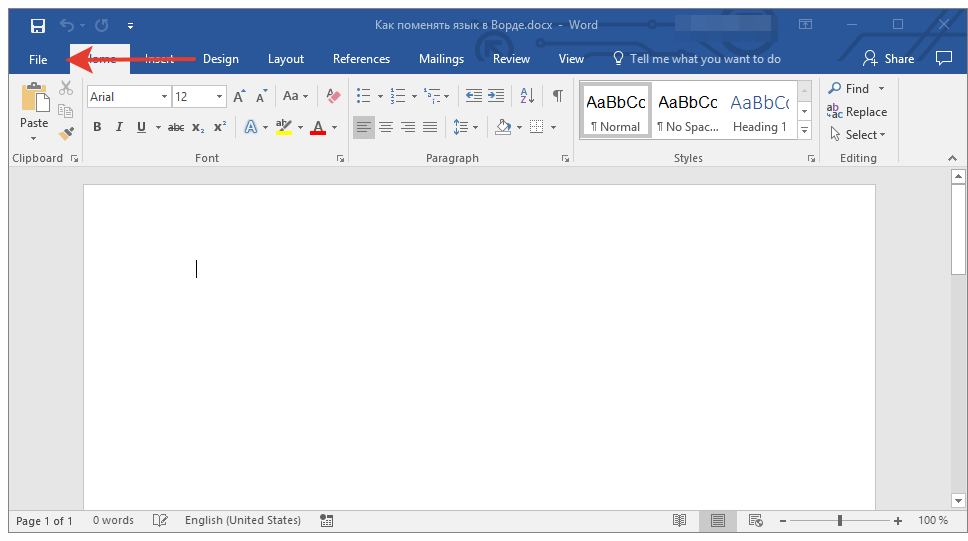
1. Откройте Word и перейдите в меню «File» («Файл»).
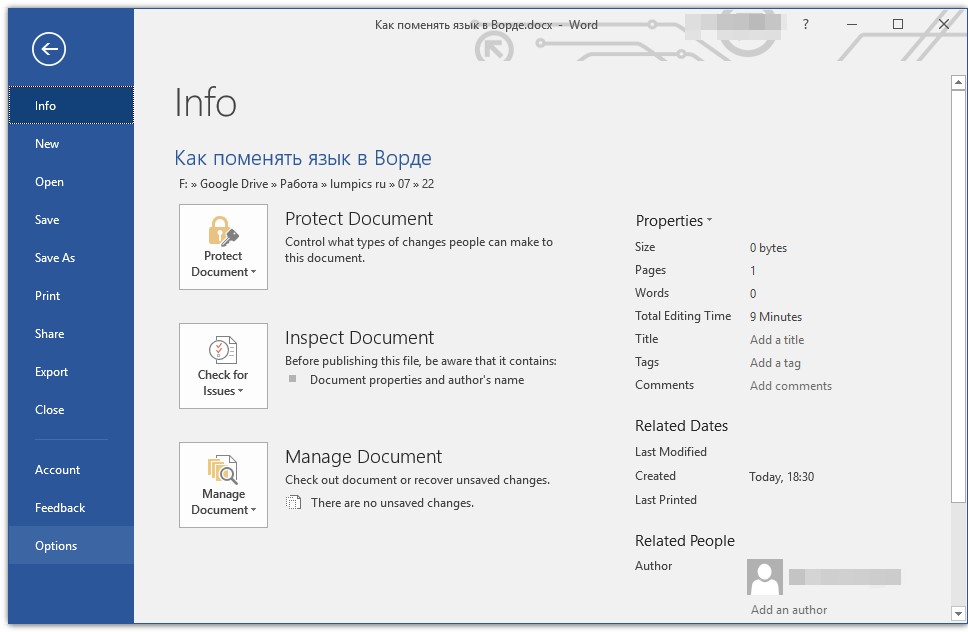
2. Перейдите в раздел «Options» («Параметры»).
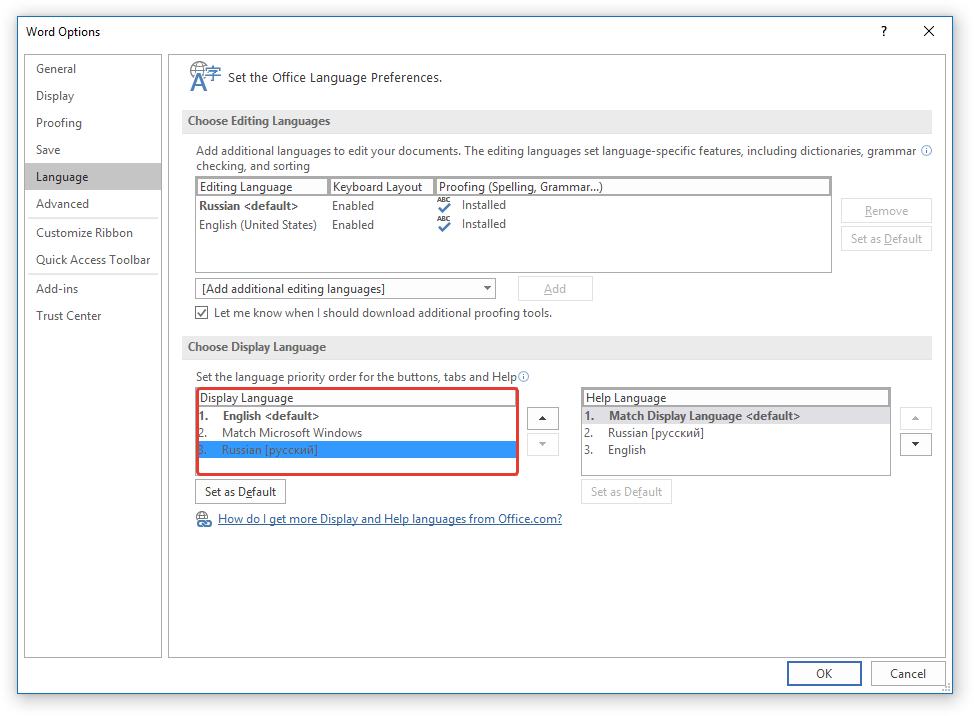
3. В окне настроек выберите пункт «Language» («Язык»).
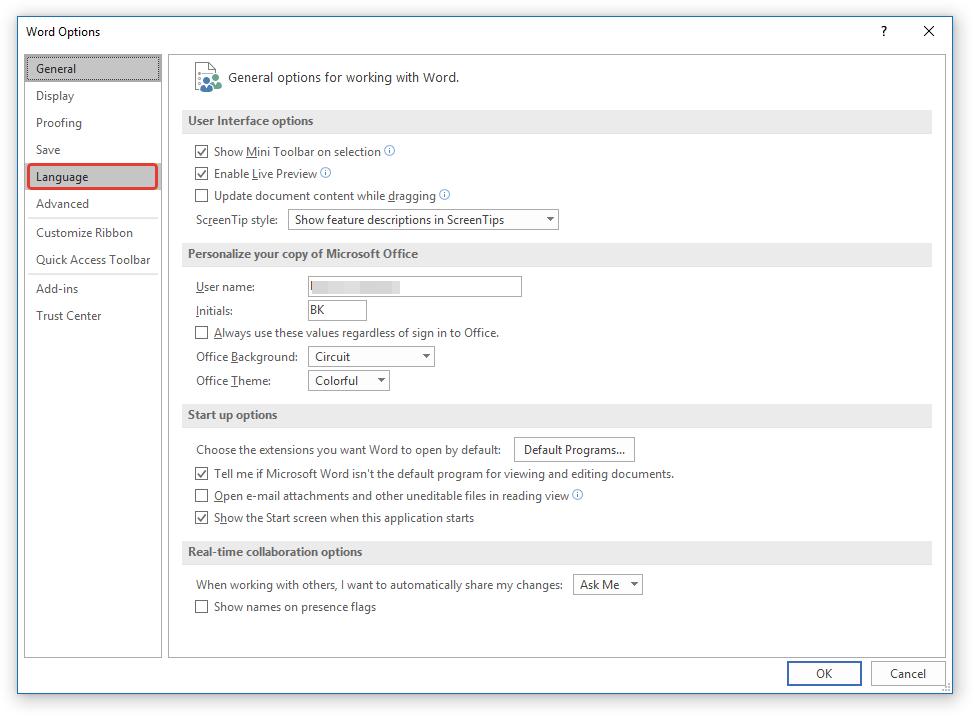
4. Пролистайте окно параметров до пункта «Display Language» («Язык интерфейса»).
5. Выберите «Russian» («Русский») или любой другой, который вы хотите использовать в программе в качестве языка интерфейса. Нажмите кнопку «Set As Default» («По умолчанию»), расположенную под окном выбора.
6. Нажмите «ОК» для закрытия окна «Параметры», перезапустите приложения из пакета «Microsoft Office».
Примечание: Язык интерфейса будет изменен на выбранный вами для всех программ, входящих в состав пакета Майкрософт Офис.

Изменение языка интерфейса для одноязычных версий MS Office
Некоторые версии Майкрософт Офис являются одноязычных, то есть, поддерживают только один язык интерфейса и в настройках его изменить нельзя. В таком случае следует скачать необходимый языковой пакет с сайта Microsoft и установить его на компьютер.
Скачать языковой пакет
1. Перейдите по ссылке выше и в пункте «Step 1» выберите язык, который вы хотите использовать в Word в качестве языка интерфейса по умолчанию.
2. В таблице, которая расположена под окном выбора языка, выберите версию для скачивания (32 бит или 64 бит):
- Download (x86);
- Download (x64).

3. Дождитесь скачивания языкового пакета на компьютер, установите его (для этого достаточно просто запустить установочный файл).
Примечание: Инсталляция языкового пакета происходит в автоматическом режиме и занимает некоторое время, так что придется немного подождать.
После того, как языковой пакет будет установлен на компьютер, запустите Ворд и измените язык интерфейса, следуя инструкции, описанной в предыдущем разделе этой статьи.
Урок: Проверка орфографии в Word
На этом все, теперь вы знаете, как в Ворд изменить язык интерфейса.
Еще статьи по данной теме:
Помогла ли Вам статья?
![]()
Download Article
![]()
Download Article
This wikiHow will show you how to change the language in Word. You can easily change the editing, display, and priority languages on a Windows computer, but if you have a Mac, Android, or iOS device, you cannot set Word to a language other than what your OS uses. However, you can specify a different editing language on these devices.
-
1
Open Word. This document icon looks like two pieces of paper, one with a bunch of lines and one with a large «W.» You can find this app on your Home screen, in the app drawer, or by searching.
-
2
Tap the icon that looks like a pencil and an «A» at the top of your screen. This will open the editing menu.
Advertisement
-
3
Tap Home. You’ll see a list of options.
-
4
Tap Review. The menu options to the right will change.[1]
-
5
Tap Proofing and Language. The options in the menu will change again.
-
6
Tap the right-pointing arrow
next to the current language. You’ll see a list of languages.
-
7
Tap the language you want for your document. You’ll be redirected back to the previous menu.
- You can tap to select boxes next to «Hide All Proofing Marks» and «Hide Proofing Marks in Selected Text» if you want your current text to remain un-edited.[2]
- You can tap to select boxes next to «Hide All Proofing Marks» and «Hide Proofing Marks in Selected Text» if you want your current text to remain un-edited.[2]


Advertisement
-
1
Open a document in Word. You can open a project you’re working on or you can create a new document to change these settings. But any settings you edit will apply every time you open Word. For example, if you set the language to French from a new document, the language will still be in French when you open Word later.
-
2
Click File. You’ll find this in the editing ribbon above the document.[3]
-
3
Click Options. A new window will open.
-
4
Click Language. You’ll see this tab in the left pane. A new window titled, «Set the Office Language Preferences» will open.
-
5
Choose an «editing language.« Remember that changing the language here will also change any language-specific features including dictionaries, grammar checking, and spelling.
- For example, if you type «casa» instead of «case» and your language is set to Spanish, Word won’t suggest it’s incorrectly spelled.
-
6
Click Set as Default to confirm.
-
7
Choose «Display and Help Languages.« This will change the language of any dialogue box that pops up.
-
8
Click OK. The «Set the Office Language Preferences» window will close and your settings will be applied.


Advertisement
-
1
Open a document in Word. You can open a project you’re working on or you can create a new document to change these settings. But any settings you edit will apply every time you open Word. For example, if you set the language to French from a new document, the language will still be in French when you open Word later.
- If you want to change the display and help languages, you’ll have to change your OS language in Apple menu>System Preferences>Language&Region.
-
2
Click Tools. You’ll see this in the menu along the top of your screen.[4]
-
3
Click Language. A new window will pop-up.
-
4
Click to select your language. If you want this to apply to every instance you open Word, click Default. If you don’t set the language as the default, then Word will return to the original language the next time you open it.
-
5
Click OK. You’ll see this in the bottom right of the pop-up window.


Advertisement
Ask a Question
200 characters left
Include your email address to get a message when this question is answered.
Submit
Advertisement
Thanks for submitting a tip for review!
References
About This Article
Article SummaryX
1. Open Word.
2. Tap the edit icon that looks like an «A» and pencil.
3. Tap Home and Review.
4. Tap Proofing and Language.
5. Tap the right-pointing arrow next to the current language.
6. Tap the language you want for your document.
Did this summary help you?
Thanks to all authors for creating a page that has been read 28,616 times.
Is this article up to date?
- Как русифицировать office через настройки софта?
- Смена языка в Word вторым методом
- Как поменять язык Office, если у вас установлен один (английский)?
- Как поменять язык в Word буквально за пару минут 2 метода!
Как поменять язык в Ворде на русский? Многие люди приобретают office и с удивлением узнают, что Word у них установлен на английском языке, или пользователи нажали на что-то. На что именно, они не помнят, и у них поменялся язык. Кроме этого, человек может просто изменить язык на клавиатуре, и в Word язык также поменяется.
Язык через клавиатуру поменять довольно легко (раскладка меняется с помощью кнопочек ALT+SHIFT или CTRL+SHIFT), но в самой программе изменить его сложнее. Поэтому, в этом тексте мы рассмотрим, как русифицировать office. У меня версия офис 2019. Но, если у вас другая, например 2013, то в этой версии и по нарастающей интерфейс Office схож с 2019 почти на 100%. Если ниже, к примеру Office 2010, то всё равно русификация пройдёт похожим образом (в нижних версий дизайн также сильно похож, но немного отличается).
Как русифицировать office через настройки софта?
- Открываем Ворд и переходим в настройки программы через вкладку «File»;
- Далее, нам нужно войти в подпункт «Options» (настройки);
- У нас появляется всплывающее окошко. В ней нам нужно выбрать вкладку настройки языка «Language» (Язык дизайна);
- Просматриваем поменявшееся окошко, и нажимаем на все надписи «Russian» или тот язык, который вам нужен, как язык дизайна (Как на скриншоте);
- Далее, в программе в программе есть три кнопочки «Set As Default» (по умолчанию), расположенных под каждой из надписей «Russian»;
- Нужно кликнуть по каждой из них. После того, как вы кликните по первой, у вас появится всплывающее окошко, в котором нажимаем «Да»;
- Затем, для сохранения настроек, кликнем по кнопочке ОК. После этого, возникнет другое всплывающее окошко, где также нажимаем ОК;
- Далее, нужно будет выключить программу, и включить вновь. Язык вы уже поменяли!


Важно: смена языка произойдёт во всех продуктах «Office», установленных на вашем компьютере, а не только в программе Word.
Смена языка в Word вторым методом
- В основном меню выбираем вкладку Review. Рядом с ней находится ярлык Language. Кликнем по нему;
- Кликнем по ярлыку, ЛКМ. У нас появляется выпадающее меню, где нам нужно нажать на второе меню «Language Preferences…»;
- У нас появляется то же окошко, что и в первом случае. Затем, проделываем всё по первому сценарию, и меняем язык.


На мой взгляд, второй метод проходит немного быстрее, а результат тот же!
Как поменять язык Office, если у вас установлен один (английский)?
Часть версий Microsoft office одноязычны. Другими словами, они имеют только английский язык. Разумеется, в таких версиях пакета Офис язык сменить у вас не получится. В этом случае остаётся один выход, установка на компьютер многоязычного пакета. Чтобы его установить сделаем следующее:
- Для начала, нужно узнать, какая версия данного пакета Office у вас установлена. Для этого, перейдём во вкладку «File», и в меню «Account» просматриваем, какая именно у вас установлена версия (На скриншоте я указал, где показаны название продукта, и номер версии. К примеру, у меня Office называется Professional Plus 2019. Номер сборки Click-to-Run. У вас может быть другая.
- Заходим на сайт и выбираем вашу версию со сборкой. Также, не забывает о разрядности системы (х86 или х64). Нам остаётся скачать нужную и установить (достаточно кликнуть по установочному элементу, и установка произойдёт на автомате. После этого, изменяем язык на Русский, как показано на странице выше.

Как поменять язык в Word буквально за пару минут 2 метода!
Скачать Office
Вывод: как поменять язык в Ворде на русский я показал. Как видите, это довольно просто. Иными словами, оба методов довольно просты. Немного сложнее третий. Но, менять вам его придётся не на много дольше. Успехов!
С уважением, Андрей Зимин 26.04.2021
Понравилась статья? Поделитесь с друзьями!
Комментировать
0
1 188 просмотров
похожие записи из этого раздела