

- Fit a picture by dragging and resizing
- Fit a picture by specifying its length and width
- You can Fit a picture using the Fill Effects tool
- Fit a picture using the Watermark tool
Method 1: Fit a Picture by Dragging and Resizing
Step 1: Open an MS Word document.

Step 2: Insert the image.
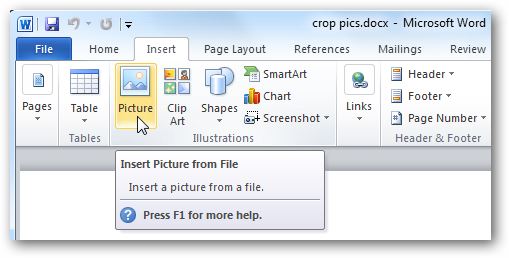
Now that we have our document opened, go to the Insert tab on the Ribbon and click on the Pictures button.
This will launch the Insert Picture dialogue box in the middle of your screen.
Locate the picture that you want to use and click the Insert button to proceed.

Step 3: Select the Text Wrap Style.
Right-click on the image and select the Wrap Text option.
This will display a horizontal drop-down menu.
From the list of choices, select either Behind Text or In front of Text style. This is to make sure that the image can be dragged and resized to our heart’s content.
Note that the other text wrapping options will limit the image within the document’s margins.

Step 4: Drag and resize the image.
Drag the top side of the image all the way up to the edge of the document page. Do the same with the bottom, left, and right sides of the image until no whitespace is visible.

In case you want to retain the aspect ratio of the image, resize it by dragging any of the four corners of your image instead.
Drag the upper left corner of the image all the way to the upper left corner of the document.
Repeat this with the lower right corner of the image and the lower right corner of your document.

Method 2: Fit a Picture by Specifying its Length and Width
Step 1: Select the text wrapping style.
Go to the Format tab.
Under the Arrange group on the Ribbon, click the Wrap Text button and select More Layout Options from the horizontal drop-down menu.

Doing so will launch the Layout dialog box in the middle of your screen.

On the Text Wrapping tab, select either Behind Text or In front of Text.

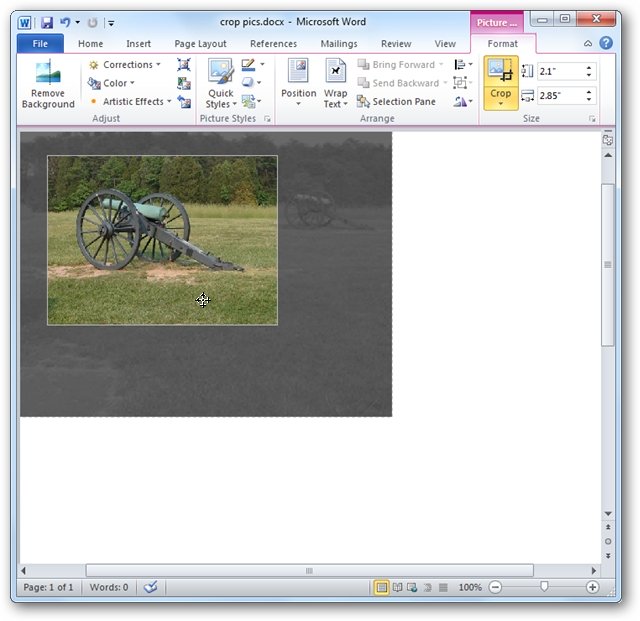
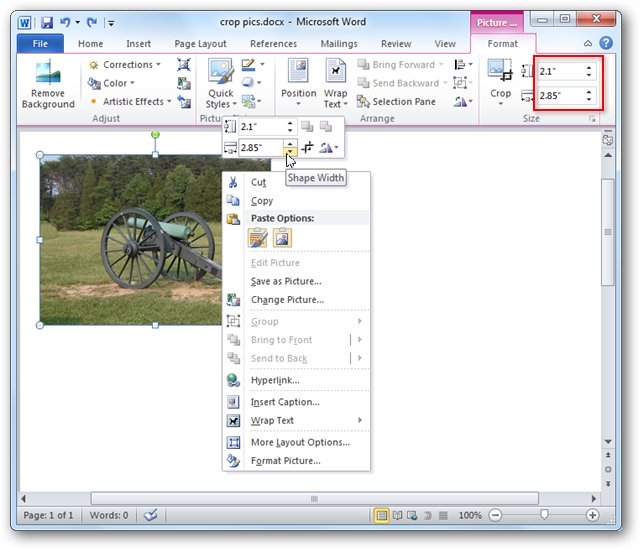
Step 4: Specify the length and width of the image.
Click the Size tab on the Layout dialog box.
Now, input your preferred image dimension into the Height and Width fields. Take note that, by default, MS Word uses the metric system.
So, for an 8.5” x 11” document, the values should be 27.94 cm and 21.59 cm for the height and width, respectively.

You can deselect the Lock aspect ratio and Relative to original picture size checkboxes found at the lower right corner of the dialog box.
This is in case your image’s dimension is not proportional to your document’s.

Click the OK button to proceed. Otherwise, click the Cancel button if you don’t want to retain any changes.

Finally, using the arrow keys or a mouse, reposition your image to fit it to your document.
Method 3: Fit a Picture Using the Fill Effects Tool
Step 1: Select fill effects on the page color option.
Once your document is ready, go to the Design tab and click the Page Color button under the Page Background group.
Then, select the Fill Effects option. This will launch the Fill Effects dialog box in the middle of your screen.

Now, go to the Picture tab and click the Select Picture button. Locate your image either from your device, Bing Image or through your Personal OneDrive. After that, click the Insert button, then the OK button.

Doing this will insert a fit-to-page background image.
Method 4: Fit a Picture Using the Watermark Tool
Step 1: Open up a Word document.

Step 2: Insert your image as a watermark.
Once you have your document opened, go to the Design tab and click the Watermark button found under the Page Background group.
Then, select Custom Watermark. This will prompt a dialog box.

On the dialog box, select Picture Watermark. Click Select Picture, then locate and insert your image file.

If you want to print the image with its original color, untick the washout option, then click the OK button.

You’ll notice that the image only fits the area inside the document’s margin.
Now, to resize it, access the Header by double-clicking the upper part of your document.
Click the image and start dragging it until no whitespace is visible. Double-click outside the document page to exit the Header.

Deleting the Image
For the first two methods, deleting the image is as simple as adding them. Simply click on the image and hit the Delete key on your keyboard.
Meanwhile, to remove the image you placed using Fill Effects, simply go back to the Page Color option on the Design tab, then select No Color.
Lastly, to delete the image as a watermark, simply click on the Watermark button under the Design tab, then select the Remove Watermark option.
Conclusion
We hope you’ve found this article helpful!
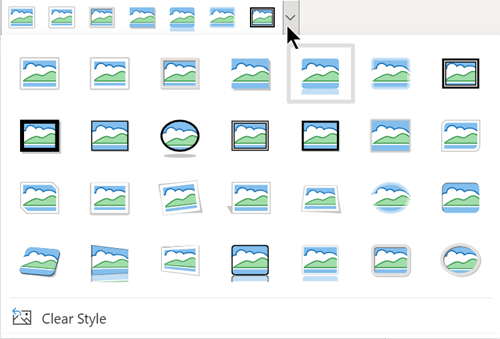
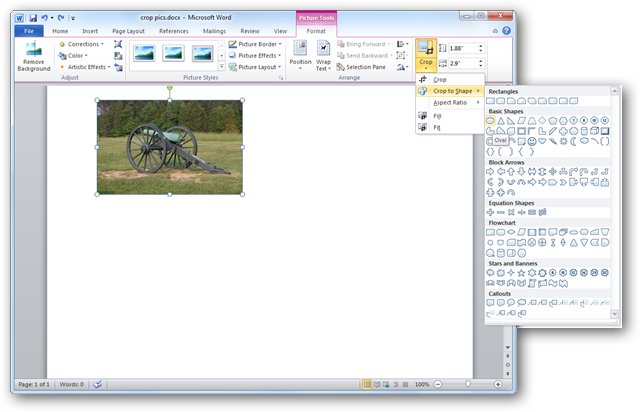
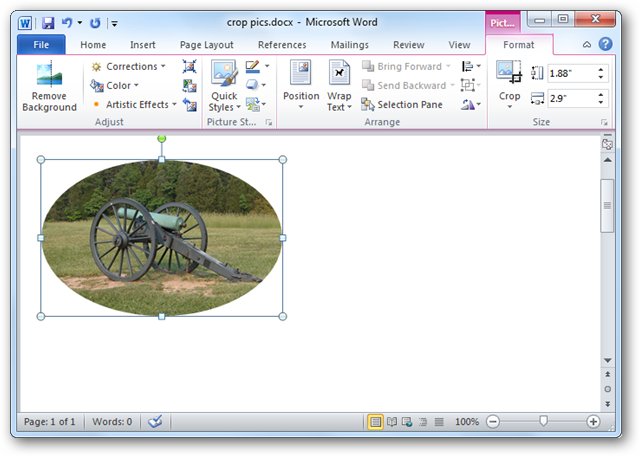
If you want to change the outline of a photo to make it a shape (like a circle or rounded rectangle), use the cropping tool on the ribbon  with the Crop to Shape option.
You can crop to a shape in Word, PowerPoint, Outlook, or Excel.
Crop an image to a shape, such as a circle
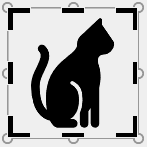
You can quickly change the shape of a picture by cropping it to a specific shape. The picture is automatically trimmed to fill the geometry of the selected shape while maintaining its proportions.
(If you want to crop the same picture to more than one shape, make copies of the picture and crop each to the desired shape individually.)

-
Use Insert > Picture to add the image to a Microsoft 365 file (such as a Word document, PowerPoint presentation, or an Outlook email message).
-
Click the picture.
You may crop multiple pictures at once, but you must crop them to the same shape. (But in Word, this is difficult, because you can’t multi-select pictures that have the default In Line with Text layout option.)
-
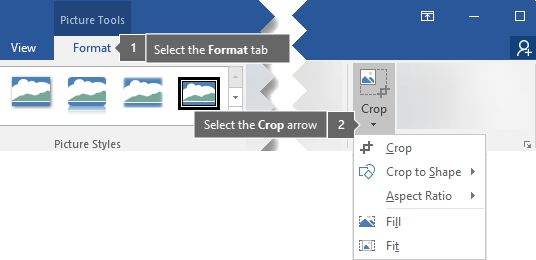
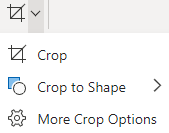
Click Picture Tools > Format, and in the Size group, click the arrow under Crop.

-
From the menu that appears, select Crop to Shape, and then click the shape you want to crop to.
The shape is immediately applied to the image.
-
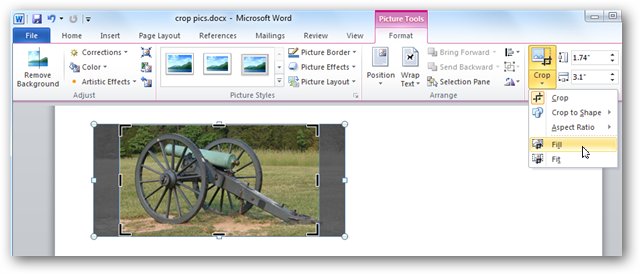
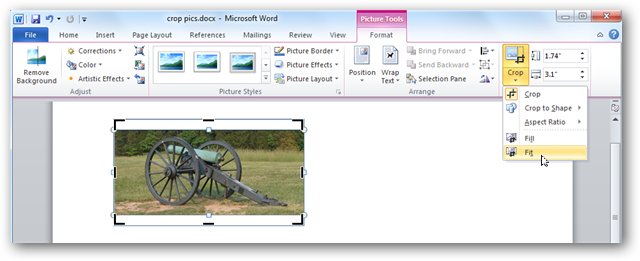
Next, use Crop > Fit or Crop > Fill to change how much of the picture fits within the shape you’ve applied:
-
Fill Fills the entire shape with the picture. Some outer edges of the picture may be cropped away. There won’t be any empty space at the margins of the shape.
-
Fit Makes the entire picture fit within the shape while maintaining the picture’s original aspect ratio. There may be empty space at the margins of the shape.
(Black crop handles appear on the edges and corners of the picture when you select the Fit or Fill option.)
-
-
You can adjust the position of the picture within the frame by selecting the picture and dragging it where you want. For example, this can help you center the most important part of the picture within the shape you’ve applied to the picture.
-
Crop the margins of the image by dragging a black crop handle as follows:
Description
Action
Crop one side
Drag inward on the side cropping handle
Crop two adjacent sides at the same time
Drag inward on the corner cropping handle
Crop equally on two parallel sides at once
Press and hold Ctrl while dragging inward on the side cropping handle
-
Click the Crop button again when you are done.
Start with a shape and add an image to it
You can add a picture as fill for a shape and then edit or crop the shape.
Add a picture to a shape
-
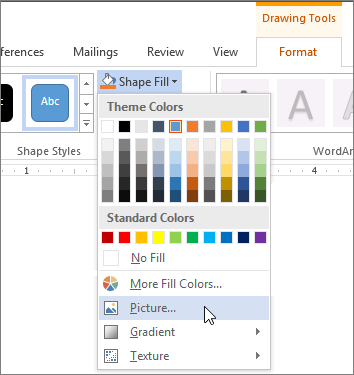
Add a shape to your document (see Add shapes for instructions) and click the shape to select it.
-
Click Drawing Tools > Format, and in the Shape Styles group, click Shape Fill > Picture.
-
Select the type of picture you want (such as From a File or Online Pictures) and then navigate to the picture you want and insert it.
Resize the shape
To change the filled shape’s dimensions while maintaining its basic format, select it and drag any of the sizing handles.
Choose how the picture fits in the shape
If your picture is skewed, cut off, or doesn’t fill the shape the way you want, use the Fit and Fill tools on the Crop menu for fine tuning:
-
Click a shape created using Shape Fill > Picture.
-
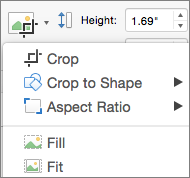
Click Picture Tools > Format, and in the Size group, click the arrow under Crop. A menu appears showing cropping options.
-
Choose Fit if you want as much of the picture as possible to fit within the shape; the original picture aspect ratio will be maintained, but you may have empty space inside your shape.
-
Choose Fill to have the shape fit within the bounds of the picture, cropping away everything outside the shape. You can drag the picture to change what part of it shows within the shape.
-
-
If you want, you can adjust the crop area by using the cropping handles, as described under Crop a picture.
-
When you’re finished, press Esc or click anywhere outside the picture within the document.
Use edit points to edit or crop the shape
Although cropping tools are not available for shapes, you can use the Edit Points tool to customize a shape.
-
Select the shape that you want to edit.
-
Click Shape Format, and in the Insert Shapes group, select Edit Shape
> Edit Points. -
Drag the shape’s vertex points (which appear as black dots around the shape’s perimeter) until the shape looks the way you want.
-
To delete a vertex point, hold Ctrl and click it. To add a vertex point, hold Ctrl while clicking anywhere on the perimeter of the shape that does not already have a vertex point.
 > Edit Points.
See Also
Crop a picture in Microsoft 365
Cut out or cover part of a picture
If you want to change the outline of a photo to make it a shape (like a circle or rounded rectangle), use the cropping tool on the ribbon .
You can crop to a shape in Word, PowerPoint, or Excel.
Crop to a specific shape
Quickly change the shape of a picture by cropping it to a specific shape. The picture is automatically trimmed to fill the geometry of the selected shape while maintaining its proportions.
If you want to crop the same picture to more than one shape, make copies of the picture and crop each to the desired shape individually.
-
Use Insert > Picture to add the image to an Office file (such as a Word document, PowerPoint presentation, or an Excel workbook).
-
In your file, select the picture that you want to crop.
-
On the Picture Format tab, click the arrow next to Crop.
(If you don’t see the Picture Format tab, make sure that you’ve selected a picture (not a shape).)
-
Point to Crop to Shape and then click the shape you want to crop to.
The shape is immediately applied to the image.
-
If you want to adjust the shape, click the Crop button again on the ribbon.
Black crop handles appear on the edges and corners of the picture.
-
Crop the image by dragging any crop handle inward. If you drag one of the corner handles, it crops two adjacent sides at the same time.

Crop to fit or fill a shape
After you have added a picture to a shape, you can choose how the picture fits in the shape by using the Fit and Fill tools for fine tuning.
-
In your file, select the picture that you want within the shape.
-
On the Picture Format tab, click the arrow next to Crop.
If you don’t see the Picture Format tab, make sure that you’ve selected a picture (and not a shape).
-
Click Fill or Fit, and then click outside the picture.
Option
Description
Fill
Removes (or «crops») part of the picture, but still fills the entire shape.
Fit
Makes the entire picture fit within the shape. The original picture aspect ratio is maintained, but you may have empty space inside your shape.
Which app are you using?
Word | PowerPoint
Word: Fit a picture inside a shape
Word for the web doesn’t have the «crop-to-shape» feature that the desktop app has, but you can still use quick picture-styles to apply some basic shapes to a picture, as described here:
-
Insert the image in your document. (Select Insert > Picture and then navigate to the picture you want to use.)
-
With the image selected on the canvas, select the Picture tab on the ribbon, and then open the Picture Styles gallery:
-
Select a shape to apply it to your picture.
-
Once the shape is applied, you can resize it as needed.
PowerPoint: Crop a picture to a shape
-
Select a picture on a slide to crop to a shape.
-
On the Picture tab, on the right end, select the arrow next to Crop.
Tip: If you don’t see the Picture tab, be sure to select a picture.
-
Select Crop to Shape, then choose a shape to apply to the border of the picture.
-
If you want to trim the margins of the picture, select Crop again, then drag a handle
inward as needed. Drag other handles as needed. -
To save your changes, select the Crop button again, or press Esc.
 inward as needed. Drag other handles as needed.
Having trouble with your Microsoft Word? Do not know how you can stretch a photo to fit in exactly in full page of the word file? Trying to change the margin of the page, yet it is not helpful? Trying to pull the photo to the edges but ended up shrinking or pushing the image to aside.
Here, let us try to fix it together.
As usual, if you want to insert a photo, you will go to «insert» and select a photo. But somehow the border of the margin makes it almost impossible to fit a photo in full page. There is a maximum limit for you to adjust.
So, here’s the trick. You can go to insert, select text box to draw a text box manually. Draw it from the edge to edge to cover the entire page. Select to insert a picture on the text box.
The picture will be able to fit in the page, for 99% of the page, if you did draw a perfect text box covering the entire page.
*New update!*
You should really try this, easiest and fastest.
1) Select to insert a picture.
2) Click on the picture. There should be a box around your picture. Go to «format» under the picture tools.
3) Select «Text wrapping«
4) Choose «behind text» and start dragging your picture to fit in the entire page. This works perfectly, covering 100% of the page.
*Reminder: you may want to insert a page break for that page so that the content from the next page will not move into the first page after you select «behind the text» for your picture.
* I own the full copyright of this article. If you like it you may share it or tweet it. Thanks for viewing.
TAGS :
Let us know how you like this article. Like it and Rate it below.
152.41K
8
Related Articles

How To Stay Offline For Specific Friend(s) In Facebook
Hi guys!
Are you being disturbed by someone ( may be stranger or may be your closed friend, you do not want to chat with him/her, but do not want to ignore also ) while you are chatting with your special one? Here I will show the way to remain Offline for specific friend(s) in Facebook chat..
In this article, you can learn how to resize the picture using the commands “Fill” and “Fit” in a word document. Follow the step-by-step instructions given below to apply these commands.

Table of Contents
- Resizing a picture using Fill in MS Word:
- Steps to follow in Filling a Picture:
- Resizing a picture using Fit in MS Word:
- Steps to follow in Fitting a Picture:
After you have cropped an image in any aspect ratio using the command “Crop”, when you use the command “Fill”, it fills from the Centre part of the original image into the currently cropped image while maintaining the original aspect ratio. To use the command “Fill” follow the steps given below.
Steps to follow in Filling a Picture:
Insert the Picture into the document you want using the “Picture” command which is in the “Illustrations” group, on the “Insert” tab
After inserting the picture, you can get the Picture Tools “Format” Tab (Make sure the picture selection) or double-click on the picture to open it
Then click on the “Crop” which is in the “Size” group, on the “Format” tab

Then crop an image in any aspect ratio you want using the outer thick dark lines with the mouse
Now click on the drop-down arrow of the “Crop”, and then click on the “Fill”.
Resizing a picture using Fit in MS Word:
After you have cropped an image in any aspect ratio by using the command “Crop”, you can fill the original image into the currently cropped image aspect ratio using the command “Fit”. To use the command “Fit” follow the steps given below.
Steps to follow in Fitting a Picture:
Go to the “Insert” tab
Click on the “Picture” which is in the “Illustrations” group
Go to the disk location of your computer where you saved the images
Double-click on the image or Select the image you want, and then click on “Insert” to insert it
After inserting a picture, immediately you can get the Picture Tools “Format” Tab (make sure the picture is in the selection) or double-click on the picture to open it

Click on the “Crop” which is in the “Size” group on the “Format” tab
Then Crop an image in any aspect ratio you want using the outer thick dark lines with the mouse
Now select “Fit”.
What is Fit in MS Word?
After cropping an image in any aspect ratio by using the command “Crop”, you can fill the original image into the currently cropped image aspect ratio using the command “Fit” option.
Когда Вы добавляете картинки в документы Microsoft Office, может возникнуть необходимость обрезать их, чтобы удалить ненужные области или выделить из рисунка определённую часть. Сегодня мы разберёмся, как обрезаются картинки в Office 2010.
Замечание: Мы покажем решение на примере Microsoft Word, но таким же образом Вы можете обрезать картинки в Excel и PowerPoint.
Чтобы вставить картинку в документ Office, нажмите команду Picture (Рисунки) на вкладке Insert (Вставка).
Вкладка Picture Tools/Format (Работа с рисунками/Формат) должна стать активной. Если нет – кликните по картинке.
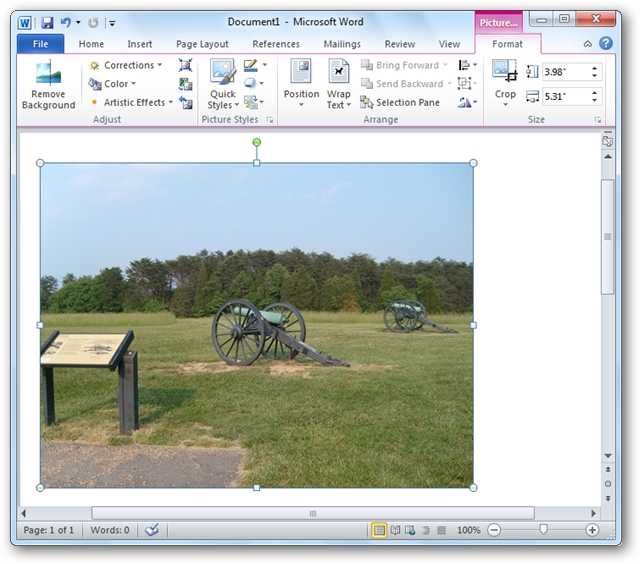
Новое, что появилось в Microsoft Office 2010, это возможность видеть, какую часть фото Вы оставляете, а какая будет обрезана. На вкладке Format (Формат) нажмите Crop (Обрезка).
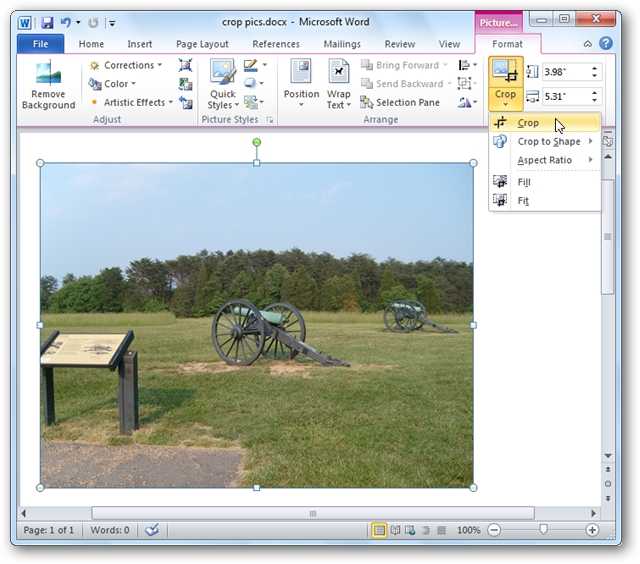
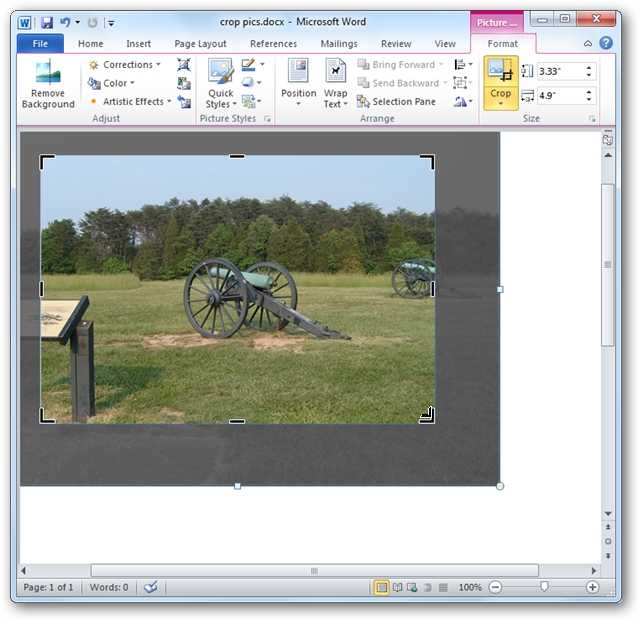
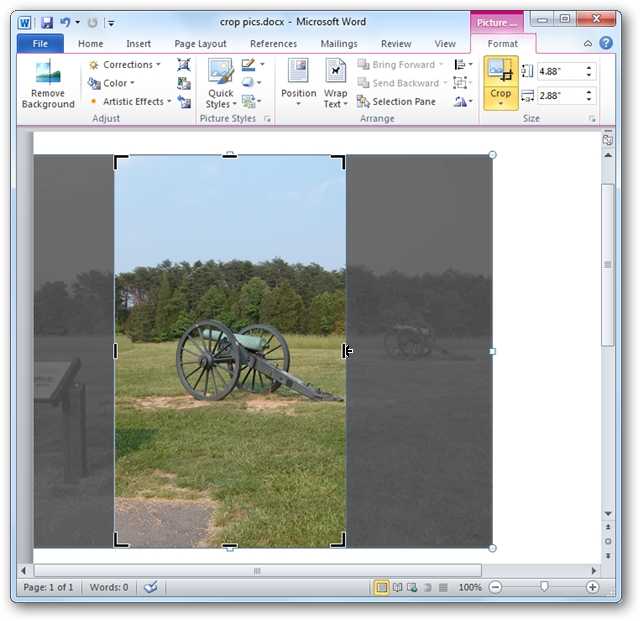
Перетащите мышкой вовнутрь картинки любой из четырёх углов рамки, чтобы обрезать одну из сторон. Обратите внимание, что вы по-прежнему видите участок рисунка, который будет обрезан. Он тонируется полупрозрачным серым цветом.
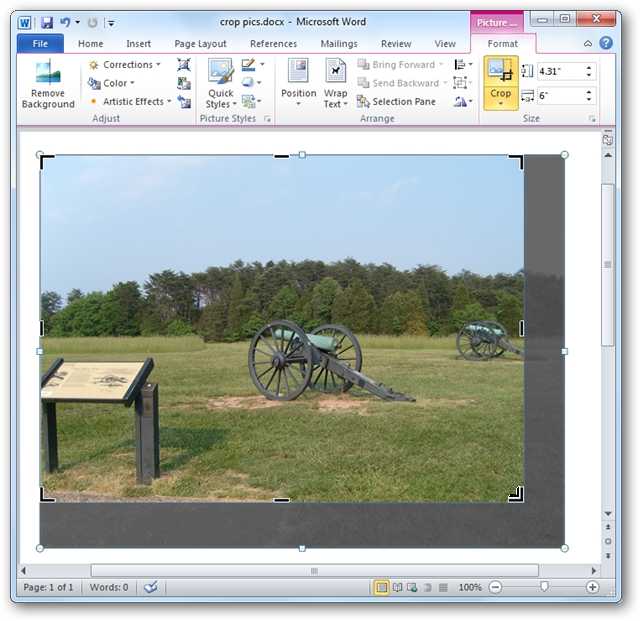
Перетаскивайте уголки рамки с нажатой клавишей Ctrl, чтобы обрезать симметрично со всех четырёх сторон.
Чтобы обрезать симметрично верх и низ или правый и левый край рисунка, перетаскивайте с нажатой клавишей Ctrl за середину рамки.
Далее Вы можете выровнять область обрезки, нажав и перетащив рисунок, находящийся под этой областью.
Чтобы принять текущие установки и обрезать рисунок, нажмите Esc или кликните в любом месте снаружи картинки.
Вы можете вручную обрезать картинку до необходимых размеров. Для этого нажмите правой кнопкой мыши на картинке и введите нужные размеры в поля Width (Ширина) и Height (Высота). Это же можно сделать в разделе Size (Размер) на вкладке Format (Формат).
Содержание
- Обрезать по фигуре
- Инструменты Fit (Вписать) и Fill (Заливка)
- Заключение
Обрезать по фигуре
Выделите картинку и нажмите команду Crop (Обрезка) в разделе Size (Размер) на вкладке Format (Формат). Из появившихся вариантов выберите Crop to Shape (Обрезать по фигуре) и укажите одну из предложенных фигур.
Ваша картинка будет обрезана по форме выбранной фигуры.
Инструменты Fit (Вписать) и Fill (Заливка)
Если необходимо обрезать фото и заполнить нужную площадь, используйте инструмент Fill (Заливка). Когда Вы выберете этот инструмент, некоторые края картинки будут скрыты, но пропорции останутся сохранены.
Если требуется, чтобы картинка полностью поместилась в выбранной для неё форме, примените инструмент Fit (Вписать). Размер рисунка изменится, но пропорции будут сохранены.
Заключение
Пользователям, перешедшим на Office 2010 с предыдущих версий Microsoft Office, наверняка понравятся улучшенные инструменты для обрезки картинок, особенно возможность видеть, какая часть рисунка останется, а какая будет обрезана.
Оцените качество статьи. Нам важно ваше мнение: