

Have a small amount of text carrying over to create a new page in your document? Learn how to shrink it to one page in Word.
Have you ever created a single-page document where you have a tiny amount of text carry over to the next page? You squish and squeeze and try to move that text up to keep your page count at one. It can be hard to do without messing up the structure or appearance of your document.
Here, we’ll show you how to shrink text to fit on one page in Microsoft Word. The options differ if you’re using Word on your desktop or the web. So we’ll include them both, so you’re covered either way.
Shrink to One Page in Word on Your Desktop
Whether you’re using Word on Windows or Mac, you can scoot that text from the second page up to the first for a nice one-page document.
Word has a hidden command to add to your ribbon or Quick Access Toolbar called Shrink One Page.
- On Windows, click File > Options > Customize Ribbon or Quick Access Toolbar. On Mac, click Word > Preferences > Ribbon & Toolbar and select Ribbon or Toolbar at the top.
- In the drop-down box on the left, pick All Commands.
- Scroll through the commands to Shrink One Page. Select it and click the arrow to add it to the right side. You can move it up or down wherever you’d like the button to appear.
- Click OK.

Now to use the feature, click the button you just added. Below, we added it to our Quick Access Toolbar.

Word will then adjust the document to fit on one page.

The online version of Microsoft Word doesn’t currently have the Shrink One Page feature that the desktop version does. So, you’ll shrink the text in Word on the web using the Shrink Font Size feature.
Note: You can also use the below option in the desktop version of Word if you prefer not to add the Shrink One Page button described above.
- Open your document in Word on the web and select all of the text. You can use the keyboard shortcut Ctrl + A on Windows or Command + A on Mac.
- Go to the Home tab and click the Shrink Text Size button.
- You can click the button as many times as you need to shrink the text to fit one page.

It would help if you had all of the neat text on one page. And for a good way to see this, head to the View tab and select Reading View.

To return to editing, click Edit Document > Edit in the ribbon in Reading View.
Make Your Text Fit on One Page in Word
Shrinking your text to fit on one page is easy to do with Word’s features. Whether on your desktop or online, you can keep your document as a single page just like you want.
For related help with Microsoft Word, take a look at how to work with page and sections breaks or make a one-page landscape in Word.
![]()
While adding a table to Microsoft Word is accomplished from the Insert tab, simply adding the table may not be enough.
Complex Word documents can often need to take advantage of various settings like line and page breaks and settings found on menus like the Paragraph dialog box to make their documents look the way they need.
One place where you can run into trouble in Word concerns tables. While you might be comfortable making changes in a Excel spreadsheet, like how to change a table boundary, row boundary, or column boundary, or how to perform basic data alignment so that you get the right cell spacing, the table adjusting tolls in Word are a little less extensive.
Microsoft Excel and Word integrate very well with one another, which is convenient when you are copying and pasting data between the programs. You can even learn how to create tables in Excel for an easy way to sort and filter your data.
But Excel does not work with the same page size limitations that Word does, which can make it difficult to copy large amounts of data from Excel into Word.
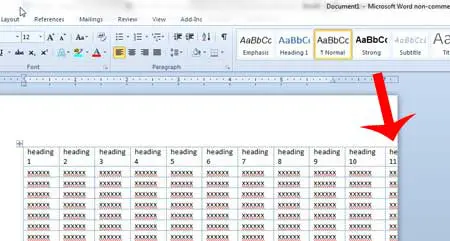
This is especially problematic when you need to copy an area from Excel with a lot of columns, as the columns that do not fit in the Word document are simply not displayed on the page.
Fortunately, there is a simple way to fix this problem and make your Excel table columns fit on one page in Word 2010.
You can make a Microsoft Word table fit onto one page by clicking inside the table, choosing the Layout tab, selecting Autofit, then Autofit Contents.
Use these steps to make a table fit to one page in Word 2010. We also discuss some other options that you can use to customize your desired Word document so that you can make your entire table look the way that you want it to in the Microsoft Office word processor.
How to Adjust Table Columns in Word with Autofit
- Click inside the table.
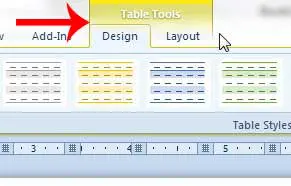
- Choose the Layout tab under Table Tools tab at the top of the window.
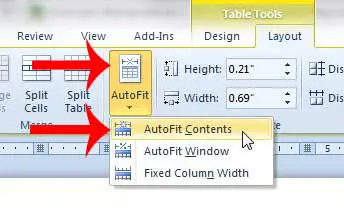
- Click the Autofit button.
- Select Autofit Contents.
Our guide continues below with additional information on how to get a table to fit on one page in Word, including pictures of these steps.
Last update on 2023-04-13 / Affiliate links / Images from Amazon Product Advertising API
| As an Amazon Associate, I earn from qualifying purchases.
You can read this article if you would like to quickly expand all of the rows in an Excel spreadsheet to make all of your data visible.
How to Fit an Excel Table to One Page in Word 2010 (Guide with Pictures)
This tutorial will focus specifically on making a table from Excel fit on one page in Word 2010, but the method below will work on tables from any program that you paste into Word, as everything that we will be doing is occurring within Microsoft Word.
This will also only make it possible to fit all of the columns of the table on one page.
If there are too many rows, then the table will still extend to a second page.
You can read this article to learn how to paste your Excel table as an image, which can be a much simpler solution when you are working with a very large table where you need to fit all of the rows and columns on one page.
Step 1: Open the Microsoft Word document containing the table that is too large to fit on one page.
Step 2: Click somewhere inside the table so that the Table Tools tabs appear at the top of the window.
Step 3: Click the Layout tab under Table Tools.
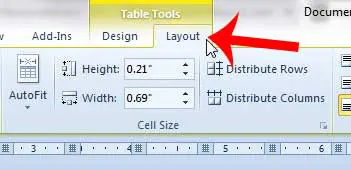
Step 4: Click the AutoFit button in the Cell Size section of the ribbon at the top of the window, then click the AutoFit Contents option.
Our tutorial continues below with more information on using some of the other table autofit options for your MS Word document.
Would you like to edit your table in a spreadsheet? Our export Word table to Excel article can help you to do it.
What Happens If I Use Fixed Column Width for a Table in a Microsoft Word Document?
If you are curious about what happens if you choose Fixed Column Width from that drop down list, then you might be looking for a solution to distribute columns or adjust column width in a different manner than what is accomplished with the autofit setting.
The Fixed Column Width option will stop Microsoft Word from automatically resizing the table to fit your content, and any column width you enter will not be adjusted, even if the cell content doesn’t fit inside that column.
The only major difference between these two options is that it can make it difficult to fit all of your columns on one page if they are too wide, as Word displays the columns with the width that you specify.
This means that when you choose Fixed Column Width, the table will automatically adjust to accommodate the value that you enter. If that corresponding adjustment will make a table cell go to another page, then you would need to change the width or click Cell Margins to automatically resize the document until it fits again.
Our tutorial continues below with additional discussion about making a table fit to a single page if it’s currently on two pages in a Word document.
More Information on How to Use the AutoFit Window to Adjust Tables in an existing or New Word Document
Making a table fit to one page in Microsoft Word is a much more common problem when the table has been added from a different location, such as a Microsoft Excel table. Specifically, these large tables often extend off the side of the page, which can be resolved by using the steps above to fit the table to the document.
However, large tables added through Word may extend to multiple pages if there are too many rows.
While there isn’t a simple solution to making a Microsoft Word table fit to one page in a document, you can try different options, such as selecting all of the content in the table and making it a smaller font or adjusting the padding of the cells.
Alternatively, you may want to try adding a page break before the table, so that it’s on its own page. This allows the table to be the top element on its own page, providing additional space to try and fit it on one page.
you probably noticed that there are Distribute Rows and Distribute Columns buttons in the Cell Size group on the Layout tab.
If you have multiple rows or multiple columns in your table that don’t seem to be sized properly then this can be a convenient way to make all the rows or all the columns fit better.
Learn how to print two pages of your document on one sheet in Word 2010 to help save paper.
See also
- How to insert a check mark in Microsoft Word
- How to do small caps in Microsoft Word
- How to center text in Microsoft Word
- How to merge cells in Microsoft Word tables
- How to insert a square root symbol in Microsoft Word

Matthew Burleigh has been writing tech tutorials since 2008. His writing has appeared on dozens of different websites and been read over 50 million times.
After receiving his Bachelor’s and Master’s degrees in Computer Science he spent several years working in IT management for small businesses. However, he now works full time writing content online and creating websites.
His main writing topics include iPhones, Microsoft Office, Google Apps, Android, and Photoshop, but he has also written about many other tech topics as well.
Read his full bio here.
How to Make a Word Document Fit on One Page
- Click the top, left “Office” button, point to “Print” and select “Print Preview.”
- Click “Shrink One Page” in the Preview group.
- Click the “Close Print Preview” button in the Preview group to exit print preview and retain your changes.
Contents
- 1 How do I make 2 pages into 1 page in Word?
- 2 How do I stop Word from showing two pages?
- 3 Is there a fit to page option in Word?
- 4 How do you make a document fit on one page?
- 5 Why does my Word document have two pages?
- 6 How do you change the layout of just one page in Word?
- 7 How do I get Word to open on one page?
- 8 How do I make a Word document fit to one page?
- 9 How do I make my Word document fit to paper?
- 10 How do you shrink a Word document to one page on a Mac?
- 11 How do you fit to page in Word on a Mac?
- 12 How do I reduce the size of a Word document?
- 13 How do you separate pages in Word?
- 14 How do I put pages side by side in Word?
- 15 How do I make just one page landscape?
- 16 How do I make one page landscape in Word 2020?
- 17 How do I fit to page?
- 18 How do I set scaling in Word?
How do I make 2 pages into 1 page in Word?
Click the “1 Page Per Sheet” button to open a drop-down menu with more options. Click “2 Pages Per Sheet.”
How do I stop Word from showing two pages?
All replies
- Open a Word document.
- On the View tab, in the Document Views group, click Full Screen Reading. Tip using the keyboard: Press ALT+W, and then press F.
- click View Options, select Show one page.
- Press and hold CTRL while you rotate the Wheel button to Zoom In or Out.
Is there a fit to page option in Word?
“Shrink to Fit” changes the font size and margins to make the document fit on one page. In Microsoft Word 2007 and 2010, go to “Print,” “Print Preview” and then “Shrink to Fit” under the “Preview” option.
How do you make a document fit on one page?
Shrink Text in Word on the Web
- Open your document in Word on the web and select all of the text. You can use the keyboard shortcut Ctrl + A on Windows or Command + A on Mac.
- Go to the Home tab and click the Shrink Text Size button.
- You can click the button as many times as you need to shrink the text to fit one page.
Why does my Word document have two pages?
As you adjust the zoom settings used by Word, you may notice that Word automatically displays multiple pages of your document at the same time.In that case, as you get your zoom factor down to near 50%, Word automatically switches to display two pages.
How do you change the layout of just one page in Word?
To change the orientation of one page, or a few pages of the document, do the following:
- Select the text of the page or of the several pages for which you want to change the page orientation.
- On the Layout tab, in the Page Setup group, click Margins:
- In the Page Setup dialog box, on the Margins tab:
- Click OK.
- Notes:
How do I get Word to open on one page?
In Word 2016 (365), in the View Ribbon, select Print View. Then Words opens to just one page.
Click Page Layout. Select the Page tab in the Page Setup dialog box. Select Fit to under Scaling. To fit your document to print on one page, choose 1 page(s) wide by 1 tall in the Fit to boxes.
How do I make my Word document fit to paper?
Scaling Your Output
- Load the document you want to print.
- Press Ctrl+P. Word displays the Print dialog box.
- Use the Scale to Paper Size drop-down list (lower-right corner) to specify the paper on which your document will be printed.
- Specify any other printing options, as desired.
- Click on OK to print your document.
How do you shrink a Word document to one page on a Mac?
In the Word Options window, the “Quick Access Toolbar” category should already be selected on the left. On the right, click the “Choose Commands From” drop-down menu and select the “All Commands” option. On the long list of commands on the left, scroll down and select the “Shrink One Page” command.
How do you fit to page in Word on a Mac?
Word for Mac 2011 Toolbar: Adding the Fit to Window Command
- In Word, choose View→Toolbars→Customize Toolbars and Menus.
- Click the Commands tab.
- In the Categories list (on the left), select the View category.
- In the Commands list (on the right), scroll down to find the Fit to Window command, and then select it.
How do I reduce the size of a Word document?
When you’re ready to change the paper size of a Word file, open the document and navigate to the “Page Setup” group in the “Layout” tab. Here, click “Size.” A drop-down menu appears in which you see a generous list of paper sizes. Just select an option from this list to change the paper size of the entire document.
How do you separate pages in Word?
To view multiple pages at one time, keep the “View” tab active. Place your cursor in the text of the first page you want to view in the multiple-page view. In the “Zoom” section, click “Multiple Pages.” By default, two pages are shown side-by-side.
How do I put pages side by side in Word?
How to Enable Side to Side View in Word
- Click the View tab and in the Views section of the ribbon, select Print Layout.
- Next, on the View tab, go to the Page Movement section of the ribbon and select Side to Side.
- You’ll immediately see the window adjust to show two pages at the same time.
How do I make just one page landscape?
Word 2019 & 2016: How to Make a Single Page Landscape
- Place your cursor at the very beginning of the page that you would like to flip to landscape. (
- Select “Layout” or “Page Layout” > “Breaks” > “Next Page” to create a section.
- Select the “Page Layout” tab and select “Orientation” > “Landscape“.
How do I make one page landscape in Word 2020?
Change part of a document to landscape
- Select the content that you want on a landscape page.
- Go to Layout, and open the Page Setup dialog box.
- Select Landscape, and in the Apply to box, choose Selected text.
How do I fit to page?
Fit to one page
- Click Page Layout. Click the small Dialog Box Launcher on the bottom right.
- Select the Page tab in the Page Setup dialog box.
- Select Fit to under Scaling.
- To fit your document to print on one page, choose 1 page(s) wide by 1 tall in the Fit to boxes.
- Press OK at the bottom of the Page Setup dialog box.
How do I set scaling in Word?
To change the scale of a Word document without adjusting its formatting, open the “File” menu, click “Print” and open the zoom option, which by default reads “1 Page Per Sheet.” Choose “Scale to Paper Size” and pick a new size.

Have a small amount of text carrying over to create a new page in your document? Learn how to shrink it to one page in Word.
Have you ever created a single-page document where you have a tiny amount of text carry over to the next page? You squish and squeeze and try to move that text up to keep your page count at one. It can be hard to do without messing up the structure or appearance of your document.
Here, we’ll show you how to shrink text to fit on one page in Microsoft Word. The options differ if you’re using Word on your desktop or the web. So we’ll include them both, so you’re covered either way.
Shrink to One Page in Word on Your Desktop
Whether you’re using Word on Windows or Mac, you can scoot that text from the second page up to the first for a nice one-page document.
Word has a hidden command to add to your ribbon or Quick Access Toolbar called Shrink One Page.
- On Windows, click File > Options > Customize Ribbon or Quick Access Toolbar. On Mac, click Word > Preferences > Ribbon & Toolbar and select Ribbon or Toolbar at the top.
- In the drop-down box on the left, pick All Commands.
- Scroll through the commands to Shrink One Page. Select it and click the arrow to add it to the right side. You can move it up or down wherever you’d like the button to appear.
- Click OK.

Now to use the feature, click the button you just added. Below, we added it to our Quick Access Toolbar.

Word will then adjust the document to fit on one page.

The online version of Microsoft Word doesn’t currently have the Shrink One Page feature that the desktop version does. So, you’ll shrink the text in Word on the web using the Shrink Font Size feature.
Note: You can also use the below option in the desktop version of Word if you prefer not to add the Shrink One Page button described above.
- Open your document in Word on the web and select all of the text. You can use the keyboard shortcut Ctrl + A on Windows or Command + A on Mac.
- Go to the Home tab and click the Shrink Text Size button.
- You can click the button as many times as you need to shrink the text to fit one page.

It would help if you then had all of the text nice and neat on one page. And for a good way to see this, head to the View tab and select Reading View.

To return to editing, click Edit Document > Edit in the ribbon in Reading View.
Make Your Text Fit on One Page in Word
Shrinking your text to fit on one page is easy to do with Word’s features. Whether on your desktop or online, you can keep your document as a single page just like you want.
For related help with Microsoft Word, take a look at how to work with page and sections breaks or make a one-page landscape in Word.

Easily reduce the text of your documents protruding on the second page to fit on one page using a hidden feature in Microsoft Word.
Creating a single page document in Word is not always easy. Getting a result on a single page as you imagined is nowhere near as easy as it sounds. Even if you play with the Font, its size, and leading, there will still be an element that ends up shifted and relegated to a second page. This kind of mishap is especially true when it comes to making, for example, a resume in Word.
But rather than playing the sorcerer’s apprentice trying painfully to fit everything on one page, you can ask Word to do it for you. Microsoft’s word processing software natively comes with a feature capable of doing the maneuver for you.
Unknown to users, the function Collapse text to fit is hidden deep within Word and requires a little manipulation to activate. Once in place, one click is all it takes for the text displayed on two pages to fit and fit on one.
Be careful, however, the function does not work miracles, and only a few lines that overflow on a second page can be reduced to fit on one.
Also to discover in video:
Also to discover in video:
1. Customize the quick access bar
Open your Word document, and click on the button to Customize the quick access bar. On Windows, this button is represented by a small arrow pointing downwards, while on macOS, the button takes the form of three small dots.
Once the menu is open, go to Other commands.

2. Add an order
In the window of Word Options displayed, expand the Common Commands drop-down menu, displayed on the left in the Choose commands from the following categories, and choose All Commands instead.
Scroll down the long list of commands and select Minimize One Page. Now click on the Add button displayed in the center of the window to add this command to the quick access bar. Then validate by clicking on OK.

3. Reduce your document
Now that the feature has been added to Word’s quick access bar, click the Minimize One Page icon, represented by two pages and a small arrow.

If the amount of text is not too much, Microsoft Word automatically adjusts and shrinks the text in your document to fit on one page.