
First two-digit number word craze
Word Craze January 25, 2022
If you are stuck with First two-digit number crossword clue then you have come to the right place for the answer. This clue was last seen today on January 25 2022 at the popular Word Craze Daily Puzzle. In our website you will find dozens of trivia games and their daily updated solutions.
Clue: First two-digit number
Possible Solution: TEN
If you are looking for other clues from the daily puzzle then visit: Word Craze Daily Puzzle January 25 2022 Answers
More About This
Порядковые числительные (Ordinal numbers) — используются для обозначения позиции чего-либо (кого-либо), ранга, а также для обозначения дат. Не пропустите в конце статьи видеоролик и тест. К данной теме рекомендовано переходить, только после изучения количественных числительных.

- Чтобы образовать порядковое числительное, необходимо в конце слова (числа) прибавить суффикс «-th«. Например:
four – fourth (четыре – четвёртый)
six – sixth (шесть – шестой)
ten – tenth (десять – десятый)
eleven – eleventh (одиннадцать – одиннадцатый)
twenty four — twenty fourth (двадцать четыре – двадцать четвёртый)
thirty six — thirty sixth (тридцать шесть – тридцать шестой)
Но здесь есть свои исключения, их немного и они быстро запоминаются:
one – first
two – second
three – third
five – fifth
eight – eighth
nine – ninth
twelve – twelfth
Уделите немного времени, и обратите внимание, как пишутся данные исключения.
- В записи, для сокращения, порядковые числительные пишут цифрами и добавляют две последние буквы от слова. Например:
first = 1st (или 1st)
second = 2nd (или 2nd)
third = 3rd (или 3rd)
fourth = 4th (или 4th)
twenty sixth = 26th (или 26th)
hundred (and) first = 101st (или 101st)

- Часто в разговорном варианте, определённый артикль ставят перед порядковым числительным. Например:
The second lesson
второй урок
The first mention
первое упоминание
А также при обозначении номеров комнат, этажей, столетий, автобусов, троллейбусов, трамваев, домов, глав, страниц, параграфов, размеров одежды и обуви и т.д.:
The sixth room
шестая комната
The seventeenth page
семнадцатая страницаThe mid nineteenth century
cередина девятнадцатого века
The seventh floor
седьмой этаж
- И последнее – имена королей и королев. Здесь порядковые числительные заменяются римскими цифрами или пишутся словами (но только с заглавной), также как в русском языке:
Charles II — Charles the Second
Edward VI — Edward the Sixth
Henry VIII — Henry the Eighth
Чтобы быстрее запомнить порядковые числительные и немного потренировать произношение и слух — смотрите видео ниже и повторяйте за носителем языка. Из этого видео Вы также узнает, как образуются и произносятся даты. После того, как усвоите данную тему — переходите к изучению особенностей чтения числительных.
Тест: «Порядковые числительные» — 30 вопросов
Ваше имя:
*
Ваш Email:
*
Подробности (URL не обязательно):
*
Customizing the page numbers in a Word document can be difficult the first couple of times you try.
Page numbers in the header or footer and handled a little differently than the rest of the content in a document, and there are several different options.
You may be wondering how to add a page 1 of 2 numbering style in Word if your document requirements include that formatting.
Page numbers are a very important organizational aspect of a document, particularly if someone is editing it and might separate the document pages eventually. But the page number only tells part of the story of the document’s structure. It might also be important to know how many pages are in the document.
Fortunately, Microsoft Word 2013 has a page numbering option that allows you to include the total number of document pages as part of the page numbering.
So, for example, if you wanted to have Page 1 of 2 in a Word 2013 document, you would be able to select that format and number your document pages in that manner.
Our tutorial continues below with more information on how you can add page numbers to the header or footer sections of your document, as well as how to format the appearance of those page numbers.
- Open the document.
- Click Insert.
- Select Page Number.
- Choose a location.
Our article continues below with additional information on adding the page 1 of 2 page numbering style in Word, including pictures of these steps.
How to Add Page X of Y Page Numbers in Word (Guide with Pictures)
The steps in this article were performed in Microsoft Word 2013. Once this is finished you will have a document with page numbers in the format Page X of Y. So if you are looking at the first page of a two page document, then the page number would be Page 1 of 2.
Step 1: Open your document in Word 2013.
Step 2: Click the Insert tab at the top of the window.
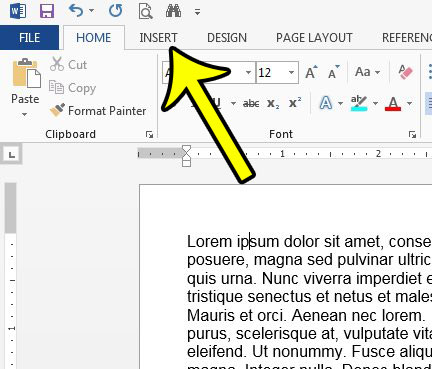
Step 3: Click the Page Number button in the Header & Footer section of the ribbon.

Step 4: Click the Top of Page or Bottom of Page option (depending on where you want your page numbers to display) then scroll down to the Page X of Y section and choose your preferred location.

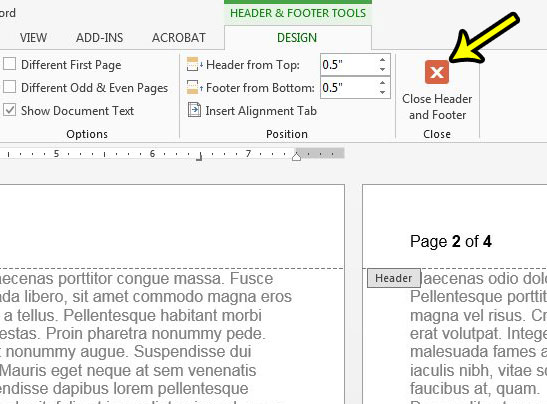
You can then make any adjustments to the page numbers using the options on the Header & Footer Tools Design tab.
Either double-click inside the body of the document or click the Close Header and Footer button to continue editing your document.
Our tutorial continues below with additional discussion about adding and customizing page number information in a Microsoft document.
How to Remove Page Numbers from the Title Page in Microsoft Word
One of the most common customizations that people want to make is whether or not their document has a different first page. if you have a title page and don’t want to include the first page number of that page, then you probably want to make use of that option.
These steps assume that you already have page numbers in the header or footer of your document.
- Double-click on your page number.
- Select Different First Page.
This will remove the page numbers from the header or footer on the first page.
If you want to choose the page number that your document starts with for your x of y format page numbers, then you can select the Insert tab, click Page Numbers, then select Format Page Numbers and click the Start at button and enter a number.
More Information on How to Add, Remove or Edit Page Numbers in a Word Document
Note that there are a handful of ways to alter the look of the page numbers that appear in your document. For example, in the article above we have chosen to use the option that shows the current page number, as well as the total number of pages in the document.
If you ever decide that you want to change the look of your page numbers then you can open the Insert menu by clicking Insert at the top of the window, select Page Numbers to expand the drop down menu, then click Format Page Numbers.
This opens a new Page Number Format dialog box that lets you select the number format (you could choose roman numerals, for example, if you wanted to), whether or not to include chapter numbers, and choose if you want your page numbering to have a different starting number, whether or not it should continue from the previous section if you have added a section break.
You can add a section break if you select the Layout tab, select Breaks in the Page Setup group, then click one of the Section Breaks options like Next Page, Continuous, Even Pages, or Odd Pages.
Do you also need to set up your Word document so that it isn’t displaying the page number on the first page, or title page? Learn how to skip the first page when numbering in Word 2013 to achieve this result.

Kermit Matthews is a freelance writer based in Philadelphia, Pennsylvania with more than a decade of experience writing technology guides. He has a Bachelor’s and Master’s degree in Computer Science and has spent much of his professional career in IT management.
He specializes in writing content about iPhones, Android devices, Microsoft Office, and many other popular applications and devices.
Read his full bio here.
 Please Note:
This article is written for users of the following Microsoft Word versions: 97, 2000, 2002, and 2003. If you are using a later version (Word 2007 or later), this tip may not work for you. For a version of this tip written specifically for later versions of Word, click here: Combining First and Second Numbered Levels on One Paragraph.
![]()
Written by Allen Wyatt (last updated April 9, 2020)
This tip applies to Word 97, 2000, 2002, and 2003
Alan uses the numbering feature in Word to create two-level paragraph numbering. He would like to create a numbering system that combines the first and second levels in the same paragraph so that the numbering appears as 1. a) and then the second paragraph as b), then c), and so on. He wonders how to accomplish this.
The bullets and numbering feature in Word allows you to automatically create numbered paragraphs where you can specify the format for the numbering, 1. 2. 3., or a. b. c. The Outline tab in the Bullets and Numbering dialog box makes this easy. Creating a custom outline can be done in several different ways. We’ll discuss a couple of them. Each option assumes that you have not yet entered any text and that you are beginning with a clean, blank document.
Your first option requires making some changes in the Outline Numbering dialog box.
- Place the insertion point where you want to begin paragraph 1.
- Type 1. (that’s the number one followed by a period).
- Press the Tab key.
- Type a) (that’s the lowercase letter ‘a’ followed by a right parenthesis).
- Press Enter.
- Choose Bullets and Numbering from the Format menu. Word displays the Bullets and Numbering dialog box.
- Click on the Outline Numbered tab.
- Click on the outline option to the right of the None box. (See Figure 1.)
- Click on Customize. Word displays the Customize Outline Numbered List dialog box.
- Select Level 1.
- Select the desired numbering style, in this case a, b, c, from the Number Style drop-down list.
- Select the letter or number to start with in the Start At field, in this case letter b.
- Click OK and OK. Word closes the dialog boxes and inserts b) in the document.
- Press Tab. The b) moves in line with the a) in the previous paragraph.

Figure 1. The Outline Numbered tab of the Bullets and Numbering dialog box.
Another option, if you want to avoid the automated aspects of numbered lists in Word, is to use the SEQ field. You could use SEQ fields for all of the numbering, or for one level and use the auto numbering feature for the other. You can create the SEQ fields using the menus. However, in this case it is much more cumbersome than it needs to be. Here is how to accomplish the task more quickly. In this case, we are assuming that the text is already in the document and just needs to be numbered.
- Place the insertion point in the document where you would like the numbering to appear.
- Press Ctrl+F9. Word inserts a pair of field braces.
- Inside the braces type the following: SEQ * alphabetic * MERGEFORMAT a
- Press F9. The letter a appears.
You can enter this field for each new paragraph that needs the numbering. Word keeps track of which letter comes next and will insert the correct one, assuming you are numbering your paragraphs in alphabetical order.
WordTips is your source for cost-effective Microsoft Word training.
(Microsoft Word is the most popular word processing software in the world.)
This tip (8094) applies to Microsoft Word 97, 2000, 2002, and 2003. You can find a version of this tip for the ribbon interface of Word (Word 2007 and later) here: Combining First and Second Numbered Levels on One Paragraph.
Author Bio
With more than 50 non-fiction books and numerous magazine articles to his credit, Allen Wyatt is an internationally recognized author. He is president of Sharon Parq Associates, a computer and publishing services company. Learn more about Allen…
MORE FROM ALLEN
Preserving Style Formatting when Combining Documents
Insert one document into another and you may not get the results you expect. Here’s why, along with what you can do about it.
Discover More
Number Formatting Shortcuts
Keyboard shortcuts can save time and make developing a workbook much easier. Here’s how to apply the most common of …
Discover More
Placing a Picture in a Comment
When editing a worksheet, you can place comments or notes that are associated with individual cells. If you want, you can …
Discover More
Multilevel numbering in Word is the #1 headache for many people working with large documents.
Believe it or not, it’s not complicated. It just takes somebody to lead the way and point out the pitfalls you need to avoid.
Today that pleasure falls to me!
Before I start, grab your free multilevel numbering troubleshooting guide that shows you the steps to get multilevel numbering working properly first time, every time, together with answers to over 20 FAQs and plenty of real client examples constructed step by step to help you fix what isn’t working with your numbering.

1. What Multi-level Numbering Looks Like
Often used in the legal profession or in large corporate documents, multilevel numbering creates a logical hierarchy and easy navigation within the document. The headings can also be summarised later on in a table of contents. Here is a simple example:

2. How to Set Up Multilevel Numbering
Here is the correct process:
1. Select the text that you want to number (this can be a section of text or the whole document).

2. Select the Home tab.
3. Click the multilevel numbering icon in the Paragraph group.
![]()
4. You can either select an existing layout from the list to use as a starting point, or you can create a new numbering system from scratch. As you hover over each thumbnail image, Word provides a larger image of the numbering system.
5. Choose Define New Multilevel List to display the control dialog.

The dialog box can be broken down as follows:
Step #1 Click level to modify
In the top left is a list of levels. As you select each level, the settings in the rest of the dialog box changes.
Level 1 is the highest level, i.e. the main headings such as chapter or section titles.
Level 2 is subordinate to level 1.
Level 3 is subordinate to level 2.

Step #2 Enter formatting for number
This is where the level number is constructed. If you include a previous level number, it will be displayed with a grey background, as will the number for the current level.
Type anything you wish to put in between the numbers such as dots, dashes, brackets etc.
Clear any text in the ‘Enter formatting for this number’ box.
Step #3 Include level number from
When creating a subordinate level (or child level), you can first specify the level number of the parent.
For example, for section 3.2
- ‘3’ is the parent level (level 1) and
- ‘2’ is the child level (level 2)

Step #4 Number style for this level
Each level can have its own number style. It may be a standalone style, e.g. 1, 2, 3 or a, b, c or continue on from a higher level, e.g. 1.1.1 or 1.a.i.
- When creating 1.1 numbering, this option is 1, 2, 3.
- When creating 1.a numbering, this option is a, b, c

Step #5 Font
Set the font formatting for the selected level, if you want.

Step #6 Position
What position from the left margin do you want items for each level of numbering. For example, level 1 items may be 0cm from the left margin, level 2, 1cm from the left margin and level 3, 2cm from the left margin.
Here’s what they mean:
- The Aligned At determines how far from the left margin the number appears.
- The Text indent at figure determines how far from the left margin the text following the number is.

6. Click OK to save all the settings and close the dialog box.
The text you selected in step 1 now looks like this.

The next part is where the magic happens …
3. How to Apply Multilevel Numbering
Once you have created your numbering system:
1. Position the cursor at the beginning of a line.

2. Press the TAB key to move the text down a level (demote).

3. Press the SHIFT and TAB keys together to move the text up a level (promote).

If you prefer, you can also click the indent icon to demote and the outdent icon to promote between levels.
![]()
4. How to Change Multilevel Settings
Once you have created your numbering system:
1. Reselect all text that is using the multilevel numbering.
2. Click the multilevel numbering icon and select Define New Multilevel List (yes, you choose this option even if you are modifying an existing multilevel list).

The original settings that you defined are redisplayed.
3. In the top-left box select the level that you wish to change, then change your settings.
4. Repeat for the other settings.
5. Click OK to save the settings. Your numbered list should now reflect your new settings.
5. Linking Multilevel Numbering to Styles
Each level of a multilevel numbering system can be linked to a style. This means that as you apply styles throughout the document, the numbering is applied appropriately and automatically. You can either use the built-in Heading 1, Heading 2, Heading 3 styles or use your own custom styles.
1. In the Numbering dialog box, click the MORE button in the bottom-left corner to expand the dialog box.
2. Select level to modify in the top-left box.
3. Open the Link level to style drop-down list and choose the style you wish to connect to the numbering level.

4. Click OK.
5. In the document, apply the Heading 1, Heading 2, Heading 3 styles where needed.
It’s a good idea to create a body text style and apply that where appropriate, so that the body text does not inadvertently get caught up in the multi-level numbering.
6. Select the whole document (or the portion of the document where you want to apply your numbered sections).
7. Click the icon in the Paragraph group (Home tab).
8. Select your custom numbering style from the gallery. The thumbnail image should show the linked styles.

6. How to Use Styles to Set Number Levels
1. Select all the text that you wish to apply the same number level to. Alternatively, if you wish to go line by line, you can place the cursor anywhere in a line of text.
2. In the Styles gallery, click the style that corresponds to the number level you wish to apply. For example, to apply the top level numbering click Heading 1 and for the third level numbering click Heading 3 (assuming those are the styles you assigned).
The numbering and all the numbering settings will be applied to the selected text or the paragraph in which the cursor was positioned.

And that, my friend, is how you do multilevel numbering in Word with no loose ends.
How to set up a dual-multilevel numbering system in Word
7. Two resources to help you
1. Grab your free multilevel numbering troubleshooting guide.

2. Watch over my shoulder as I set up multilevel numbering from scratch.

8. What next?
I hope you found plenty of value in this post. I’d love to hear your biggest takeaway in the comments below together with any questions you may have.
Have a fantastic day.


About the author
Jason Morrell
Jason loves to simplify the hard stuff, cut the fluff and share what actually works. Things that make a difference. Things that slash hours from your daily work tasks. He runs a software training business in Queensland, Australia, lives on the Gold Coast with his wife and 4 kids and often talks about himself in the third person!
SHARE