
In this Article
- Range.Find Syntax
- Range.Find What
- Range.Find After
- Range.Find LookIn
- Range.Find LookAt
- Range.Find SearchOrder
- Range.Find SearchDirection
- Range.Find MatchCase
- Range.Find MatchByte
- Range.Find SearchFormat
This article will demonstrate how to use Range.Find in VBA.
Range.Find in VBA is the same as using the Find command on the Excel Ribbon, but within our VBA Code.
Range.Find Syntax
The VBA Find function uses the Range object to search for a specified value in a Range of cells provided. When you use the VBA Range.Find Function, you provide the function with parameters, the syntax of which is shown below:

The only required parameter is What your are looking for. The rest of the parameters enable you to narrow down you search based on the criteria set in the parameters.
| Parameter | Type | Description | Values |
| What | Required | The value you are searching for | Any data |
| After | Optional | A single cell range that you start your search from | for example: Range(“A5”) |
| LookIn | Optional | What to search in eg: Formulas, Values or Comments | xlValues, xlFormulas, xlCommentsThreaded, xlNotes |
| LookAt | Optional | Look at a part or the whole of the cell | xlWhole, xlPart |
| SearchOrder | Optional | The order to search | xlByRows or xlByColumns. |
| SearchDirection | Optional | The direction to search | xlNext, xlPrevious |
| MatchCase | Optional | If search is case sensitive | True or False |
| MatchByte | Optional | Used for double byte languages | True or False |
| SearchFormat | Optional | Allow searching by format. The format is set using Application.FindFormat | True or False |
Range.Find What
As mentioned above, all the parameters except the What parameter are optional. Therefore, you can find the word “Tony” in the Range (“A1:A10”) by running the simple macro below. We can then select the found value by going to the cell where the word is found (rng.Select).
Sub FindName()
  Dim rng As Range
  Set rng = Range("A1:A10").Find("Tony")
  If Not rng Is Nothing Then rng.Select
End Sub
Range.Find After
If we wish to start searching for the word at a specific location, we can use the After parameter. The macro below will therefore only start searching for the word ‘Tony’ after cell A3 in the Range (“A1:A10”).
Sub FindNameAfter()
 Dim rng As Range
 Set rng = Range("A1:A10").Find("Tony", Range("A3"))
 If Not rng Is Nothing Then rng.Select
 rng.Select
End Sub
Range.Find LookIn
The Look In argument specifies to either look in the formula contained in the cell, in the value contained in the cell or in any comment/note that may be attached to a cell in the specified range that is being searched.
Sub FindComment()
 Dim rng As Range
 Set rng = Range("A1:A10").Find("Good", , xlCommentsThreaded)
 If Not rng Is Nothing Then rng.Select
End Sub
Note that we have left an empty parameter between the What and the LookIn parameters. If you do not want to leave this empty parameter, then you need to use named parameters in your code. The first parameter does not need naming however.
We can name the parameter as shown below:
Sub FindComment()
 Dim rng As Range
 Set rng = Range("A1:A10").Find("Good", LookIn:=xlCommentsThreaded)
 If Not rng Is Nothing Then rng.Select
End Sub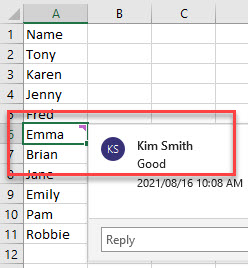
Range.Find LookAt
The Look At parameter gives you the option to find all cells that contain a certain part of the value you are looking for.
Sub FindComment()
 Dim rng As Range
 Set rng = Range("A1:A10").Find("Em", LookIn:=xlValues, Lookat:=xlPart)
 If Not rng Is Nothing Then rng.Select
End Sub
The code example below will first find the name “Emma” as it starts with “Em”
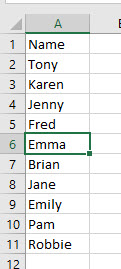
If we were to amend the code slightly to start looking from A7, then the name “Emily” would be found instead.
Sub FindComment()
 Dim rng As Range
 Set rng = Range("A1:A10").Find("Em", After:=Range("A3"), LookIn:=xlValues, Lookat:=xlPart)
 If Not rng Is Nothing Then rng.Select
End Sub
Range.Find SearchOrder
The Search Order parameter tells Excel to look first by Rows and then by Columns, or the other way around. The example below will look down column A, and then start looking in Column B to find the value required.
Sub FindComment()
 Dim rng As Range
 Set rng = Range("A1:B10").Find("Emily", SearchOrder:=xlColumns)
 If Not rng Is Nothing Then rng.Select
End Sub
This example however, will look in A1 and B1, and then in A2 and B2, and so on – in other words, it will search by Row.
Sub FindComment()
 Dim rng As Range
 Set rng = Range("A1:A10").Find("Emily", SearchOrder:=xlRows)
 If Not rng Is Nothing Then rng.Select
End Sub
VBA Coding Made Easy
Stop searching for VBA code online. Learn more about AutoMacro — A VBA Code Builder that allows beginners to code procedures from scratch with minimal coding knowledge and with many time-saving features for all users!

Learn More
Range.Find SearchDirection
The Search Direction parameter enables us to search forwards or backwards. For example, the code below would find Emily before it finds Emma as it starts the search at cell A10 and search backwards until it finds a match. Using xlNext will start the search at A1 and sort forwards until it finds a match. It it finds a match, it will select the cell where the match is.
Sub FindComment()
 Dim rng As Range
 Set rng = Range("A1:A10").Find("Em", SearchDirection:=xlPrevious)
 If Not rng Is Nothing Then rng.Select
End Sub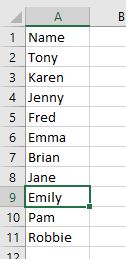
Range.Find MatchCase
The Match Case parameter enables us to search for an exact match based on upper, lower or proper case.
Sub MatchCase()
  Dim rng As Range
  Set rng = Range("A1:A10").Find("em",  Lookat:=xlPart, MatchCase:=True)
  If Not rng Is Nothing Then rng.Select
End Sub
The code above will not find anything as there is “Emma” and “Emily” in the data, but both begin with a capital “E”.
Sub MatchCase()
  Dim rng As Range
  Set rng = Range("A1:A10").Find("Em", Lookat:=xlPart, MatchCase:=True)
  If Not rng Is Nothing Then rng.Select
End Sub
Range.Find MatchByte
This parameter is only used with languages with a double-byte character set such as Japanese or Korean – it is not relevant to this article.
VBA Programming | Code Generator does work for you!
Range.Find SearchFormat
The Search Format parameter enables us to search for a specific format of a cell – such as background color or a bold format.
We first need to set the FindFormat Property of the Application object, and then set the SearchFormat parameter to True.
Sub FindFormat()
 Application.FindFormat.Clear
 Application.FindFormat.Font.Color = vbRed
 Dim rng As Range
 Set rng = Range("A1:A10").Find("em", SearchFormat:=True)
 If Not rng Is Nothing Then rng.Select
End Sub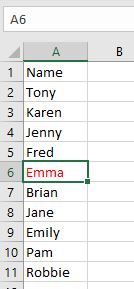
Метод Find объекта Range для поиска ячейки по ее данным в VBA Excel. Синтаксис и компоненты. Знаки подстановки для поисковой фразы. Простые примеры.
Метод Find объекта Range предназначен для поиска ячейки и сведений о ней в заданном диапазоне по ее значению, формуле и примечанию. Чаще всего этот метод используется для поиска в таблице ячейки по слову, части слова или фразе, входящей в ее значение.
Синтаксис метода Range.Find
|
Expression.Find(What, After, LookIn, LookAt, SearchOrder, SearchDirection, MatchCase, MatchByte, SearchFormat) |
Expression – это переменная или выражение, возвращающее объект Range, в котором будет осуществляться поиск.
В скобках перечислены параметры метода, среди них только What является обязательным.
Метод Range.Find возвращает объект Range, представляющий из себя первую ячейку, в которой найдена поисковая фраза (параметр What). Если совпадение не найдено, возвращается значение Nothing.
Если необходимо найти следующие ячейки, содержащие поисковую фразу, используется метод Range.FindNext.
Параметры метода Range.Find
| Наименование | Описание |
|---|---|
| Обязательный параметр | |
| What | Данные для поиска, которые могут быть представлены строкой или другим типом данных Excel. Тип данных параметра — Variant. |
| Необязательные параметры | |
| After | Ячейка, после которой следует начать поиск. |
| LookIn | Уточняет область поиска. Список констант xlFindLookIn:
|
| LookAt | Поиск частичного или полного совпадения. Список констант xlLookAt:
|
| SearchOrder | Определяет способ поиска. Список констант xlSearchOrder:
|
| SearchDirection | Определяет направление поиска. Список констант xlSearchDirection:
|
| MatchCase | Определяет учет регистра:
|
| MatchByte | Условия поиска при использовании двухбайтовых кодировок:
|
| SearchFormat | Формат поиска – используется вместе со свойством Application.FindFormat. |
* Примечания имеют две константы с одним значением. Проверяется очень просто: MsgBox xlComments и MsgBox xlNotes.
В справке Microsoft тип данных всех параметров, кроме SearchDirection, указан как Variant.
Знаки подстановки для поисковой фразы
Условные знаки в шаблоне поисковой фразы:
- ? – знак вопроса обозначает любой отдельный символ;
- * – звездочка обозначает любое количество любых символов, в том числе ноль символов;
- ~ – тильда ставится перед ?, * и ~, чтобы они обозначали сами себя (например, чтобы тильда в шаблоне обозначала сама себя, записать ее нужно дважды: ~~).
Простые примеры
При использовании метода Range.Find в VBA Excel необходимо учитывать следующие нюансы:
- Так как этот метод возвращает объект Range (в виде одной ячейки), присвоить его можно только объектной переменной, объявленной как Variant, Object или Range, при помощи оператора Set.
- Если поисковая фраза в заданном диапазоне найдена не будет, метод Range.Find возвратит значение Nothing. Обращение к свойствам несуществующей ячейки будет генерировать ошибки. Поэтому, перед использованием результатов поиска, необходимо проверить объектную переменную на содержание в ней значения Nothing.
В примерах используются переменные:
- myPhrase – переменная для записи поисковой фразы;
- myCell – переменная, которой присваивается первая найденная ячейка, содержащая поисковую фразу, или значение Nothing, если поисковая фраза не найдена.
Пример 1
|
Sub primer1() Dim myPhrase As Variant, myCell As Range myPhrase = «стакан» Set myCell = Range(«A1:L30»).Find(myPhrase) If Not myCell Is Nothing Then MsgBox «Значение найденной ячейки: « & myCell MsgBox «Строка найденной ячейки: « & myCell.Row MsgBox «Столбец найденной ячейки: « & myCell.Column MsgBox «Адрес найденной ячейки: « & myCell.Address Else MsgBox «Искомая фраза не найдена» End If End Sub |
В этом примере мы присваиваем переменной myPhrase значение для поиска – "стакан". Затем проводим поиск этой фразы в диапазоне "A1:L30" с присвоением результата поиска переменной myCell. Далее проверяем переменную myCell, не содержит ли она значение Nothing, и выводим соответствующие сообщения.
Ознакомьтесь с работой кода VBA в случаях, когда в диапазоне "A1:L30" есть ячейка со строкой, содержащей подстроку "стакан", и когда такой ячейки нет.
Пример 2
Теперь посмотрим, как метод Range.Find отреагирует на поиск числа. В качестве диапазона поиска будем использовать первую строку активного листа Excel.
|
Sub primer2() Dim myPhrase As Variant, myCell As Range myPhrase = 526.15 Set myCell = Rows(1).Find(myPhrase) If Not myCell Is Nothing Then MsgBox «Значение найденной ячейки: « & myCell Else: MsgBox «Искомая фраза не найдена» End If End Sub |
Несмотря на то, что мы присвоили переменной числовое значение, метод Range.Find найдет ячейку со значением и 526,15, и 129526,15, и 526,15254. То есть, как и в предыдущем примере, поиск идет по подстроке.
Чтобы найти ячейку с точным соответствием значения поисковой фразе, используйте константу xlWhole параметра LookAt:
|
Set myCell = Rows(1).Find(myPhrase, , , xlWhole) |
Аналогично используются и другие необязательные параметры. Количество «лишних» запятых перед необязательным параметром должно соответствовать количеству пропущенных компонентов, предусмотренных синтаксисом метода Range.Find, кроме случаев указания необязательного параметра по имени, например: LookIn:=xlValues. Тогда используется одна запятая, независимо от того, сколько компонентов пропущено.
Пример 3
Допустим, у нас есть многострочная база данных в Excel. В первой колонке находятся даты. Нам необходимо создать отчет за какой-то период. Найти номер начальной строки для обработки можно с помощью следующего кода:
|
Sub primer3() Dim myPhrase As Variant, myCell As Range myPhrase = «01.02.2019» myPhrase = CDate(myPhrase) Set myCell = Range(«A:A»).Find(myPhrase) If Not myCell Is Nothing Then MsgBox «Номер начальной строки: « & myCell.Row Else: MsgBox «Даты « & myPhrase & » в таблице нет» End If End Sub |
Несмотря на то, что в ячейке дата отображается в виде текста, ее значение хранится в ячейке в виде числа. Поэтому текстовый формат необходимо перед поиском преобразовать в формат даты.
A Powerful & Multi-purpose Templates for project management. Now seamlessly manage your projects, tasks, meetings, presentations, teams, customers, stakeholders and time. This page describes all the amazing new features and options that come with our premium templates.
Save Up to 85% LIMITED TIME OFFER

All-in-One Pack
120+ Project Management Templates
Essential Pack
50+ Project Management Templates
Excel Pack
50+ Excel PM Templates
PowerPoint Pack
50+ Excel PM Templates
MS Word Pack
25+ Word PM Templates
Ultimate Project Management Template
Ultimate Resource Management Template
Project Portfolio Management Templates
- VBA to Find Value in a Range – Syntax
- VBA to Find Value in a Range – Example
- VBA to Find Value in a Range – After
- VBA to Find Value in a Range – MatchCase
- VBA to Find Value in a Range – Instructions
Page load link
Go to Top
Ranges are a key concept in Excel, and knowing how to work with them is essential for anyone who wants to program or automate their work using Excel VBA.
In this tutorial, we’ll take a look at how to work with Excel ranges in VBA. We’ll start by discussing what a Range object is. Then, we’ll look at the different ways of referencing a range. Lastly, we’ll explore various examples of how to work with ranges using VBA code.
Excel VBA: The Range object
The Excel VBA Range object is used to represent a range in a worksheet. A range can be a cell, a group of cells, or even all the 17,179,869,184 cells in a sheet.
When programming with Excel VBA, the Range object is going to be your best friend. That’s because much of your work will focus on manipulating data within sheets. Understanding how to work with the Range object will make it easier for you to perform various actions on cells, such as changing their values, sorting, or doing a copy-paste.
The following is the Excel object hierarchy:
Application > Workbook > Worksheet > Range
You can see that the Excel VBA Range object is a property of the Worksheet object. This means that you can access a range by specifying the name of the sheet and the cell address you want to work with. When you don’t specify a sheet name, by default Excel will look for the range in the active sheet. For example, if Sheet1 is active, then both of these lines will refer to the same cell range:
Range("A1")
Worksheets("Sheet1").Range("A1")
Let’s have a closer look at how to reference a range in the section below.


Referencing a range of cells in Excel VBA
Referring to a Range object in Excel VBA can be done in several ways. We’ll discuss the basic syntax and some alternatives that you might want to use, depending on your needs.
Excel VBA: Syntax for specifying a cell range
To refer to a range that consists of one cell, for example, cell D5, you can use the syntax below:
Range("D5")
To refer to a range of cells, you have two acceptable syntaxes. For example, A1 through D5 can be specified using any one below:
Range("A1:D5")
Range("A1", "D5")
To refer to a range outside the active sheet, you need to include the worksheet name. Here’s an example:
Worksheets("Sheet1").Range("A1:D5")
To refer to an entire row, for example, Row 5:
Range("5:5")
To refer to an entire column, for example, Column D:
Range("D:D")
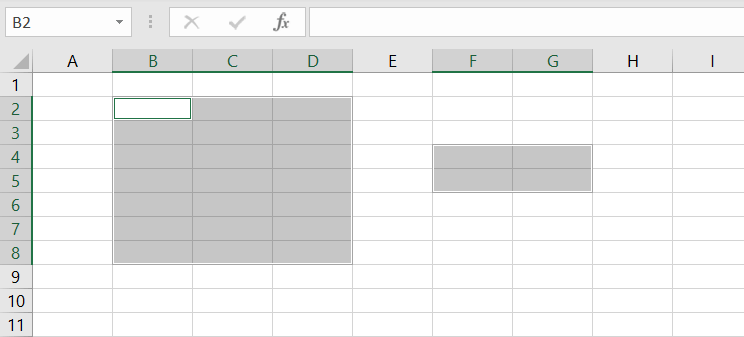
Excel VBA also allows you to refer to multiple ranges at once by using a comma to separate each area. For example, see the below syntax used for referring to all ranges shown in the image:
Range("B2:D8, F4:G5")
Tip: Notice that all of the syntaxes above use double quotes to enclose the range address. To make it quicker for you to type, you can use shortcuts that involve using square brackets without quotes, as shown in the table below:
| Syntax | Shortcut |
|---|---|
Range("D5") |
[D5] |
Range("A1:D5") |
[A1:D5] |
Range("5:5") |
[5:5] |
Range("B2:D8, F4:G5") |
[B2:D8, F4:G5] |
Excel VBA: Referencing a named range
You have probably already used named ranges in your worksheets. They can be found under Name Manager in the Formulas tab.
To refer to a range named MyRange, use the following code:
Range("MyRange")
Remember to enclose the range’s name in double quotes. Otherwise, Excel thinks that you’re referring to a variable.
Alternatively, you can also use the shortcut syntax discussed previously. In this case, double quotes aren’t used:
[MyRange]
Excel VBA: Referencing a range using the Cells property
Another way to refer to a range is by using the Cells property. This property takes two arguments:
Cells(Row, Column)
You must use a numeric value for Row, but you may use either a numeric or string value for Column. Both of these lines refer to cell D5:
Cells(5, "D")
Cells(5, 4)
The advantage of using the Cells property to refer to ranges becomes clear when you need to loop through rows or columns. You can create a more readable piece of code by using variables as the Cells arguments in a looping.
Excel VBA: Referencing a range using the Offset property
The Offset property provides another handy means for referring to ranges. It allows you to refer to a cell based on the location of another cell, such as the active cell.
Like the Cells property, the Offset property has two parameters. The first determines how many rows to offset, while the second represents the number of columns to offset. Here is the syntax:
Range.Offset(RowOffset, ColumnOffset)
For example, the following code refers to cell D5 from cell A1:
Range("A1").Offset(4,3)
The negative numbers refer to cells that are above or below the range of values. For example, a -2 row offset refers to two rows above the range, and a -1 column offset refers to a column to the left of the range. The following example refers to cell A1:
Range("D3").Offset(-2, -3)
If you need to go over only a row or a column, but not both, you don’t have to enter both the row and the column parameters. You can also use 0 as one or both of the arguments. For example, the following lines refer to D5:
Range("D5").Offset(0, 0)
Range("D2").Offset(3, 0)
Range("G5").Offset(, -3)
Let’s take a look at some of the most common range examples. These examples will show you how to use VBA to select and manipulate ranges in your worksheets. Some of these examples are complete procedures, while others are code snippets that you can just copy-paste to your own Sub to try.
Excel VBA: Select a range of cells
To select a range of cells, use the Select method.
The following line selects a range from A1 to D5 in the active worksheet:
Range("A1:D5").Select
To select a range from A1 to the active cell, use the following line:
Range("A1", ActiveCell).Select
The following code selects from the active cell to 3 rows below the active cell and five columns to the right:
Range(ActiveCell, ActiveCell.Offset(3, 5)).Select
It’s important to note that when you need to select a range on a specific worksheet, you need to ensure that the correct worksheet is active. Otherwise, an error will occur. For example, you want to select B2 to J5 on Sheet1. The following code will generate an error if Sheet1 is not active:
Worksheets("Sheet1").Range("B2:J5").Select
Instead, use these two lines of code to make your code work as expected:
Worksheets("Sheet1").Activate
Range("B2:J5").Select
Excel VBA: Set values to a range
The following statement sets a value of 100 into cell C7 of the active worksheet:
Range("C7").Value = 100
The Value property allows you to represent the value of any cell in a worksheet. It’s a read/write property, so you can use it for both reading and changing values.
You can also set values of a range of any size. The following statement enters the text “Hello” into each cell in the range A1:C7 in Sheet2:
Worksheets("Sheet2").Range("A1:C7").Value = "Hello"
Value is the default property for a Range object. This means that if you don’t provide any properties in your range, Excel will use this Value property.
Both of the following lines enter a value of 100 into cell C7 of the active worksheet:
Range("C7").Value = 100
Range("C7") = 100
Excel VBA: Copy range to another sheet
To copy and paste a range in Excel VBA, you use the Copy and Paste methods. The Copy method copies a range, and the Paste method pastes it into a worksheet. It might look a bit complicated but let’s see what each does with an example below.
Let’s say you have Orders data, as shown in the below screenshot, which is imported from Airtable every day using Coupler.io. This tool allows users to do it automatically on the schedule they want with just a few clicks and no coding required.

In addition, they can combine data from other different sources (such as Jira, Mailchimp, etc.) into one destination for analysis purposes.

As you can see, the data starts from B2. You want to copy only range B2:C11 and paste them to Sheet2 at the same address. The following is an example Sub you can use:
Sub CopyRangeToAnotherSheet()
    Sheets("Sheet1").Activate
    Range("B2:C11").Select
    Selection.Copy

    Sheets("Sheet2").Activate
    Range("B2").Select
    ActiveSheet.Paste
End Sub
Alternatively, you can also use a single line of code as shown below:
Sub CopyRangeToAnotherSheet2()
    Worksheets("Sheet1").Range("B2:C11").Copy Worksheets("Sheet2").Range("B2")
End Sub
The above Sub procedure takes advantage of the fact that the Copy method can use an argument that corresponds to the destination range for the copy operation. Notice that actually, you don’t have to select a range before doing something with it.
Excel VBA: Dynamic range example
In many cases, you may need to copy a range of cells but don’t know exactly how many rows and columns it has. For example, if you use Coupler.io or other integration tools to import data from an external app into Excel on a daily schedule, the number of rows may change over time.
How can you determine this dynamic range? One solution is to use the CurrentRegion property. This property returns an Excel VBA Range object within its boundaries. As long as the data is surrounded by one empty row and one empty column, you can select it with CurrentRegion.
The following line selects the contiguous range around Cell B2:
Range("B2").CurrentRegion.Select

Now, let’s say you want to select only Columns B and C of the range, and from the second row, you can use the following line:
Range("B2", Range("C2").End(xlDown)).Select
You can now do whatever you want with your selected range — copy or move it to another sheet, format it, and so on.
If you want to find the last row of a used range using Excel VBA, it’s also possible without selecting anything. Here’s the line you can use to find the row number of Column B’s last row data:
' Find the row number of Column B's last row data
RowNumOfLastRow = Cells(Rows.Count, 2).End(xlUp).Row


' Result: 11
MsgBox RowNumOfLastRow
Excel VBA: Loop for each cell in a range
For looping each cell in a range, the For Each loop is an excellent choice. This type of loop is great for looping through a collection of objects such as cells in a range, worksheets in a workbook, or other collections.
The following procedure shows how to loop through each cell in Range B2:K11. We use an object variable named Obj, which refers to the cell being processed. Within the loop, the code checks if the cell contains a formula and then sets its color to blue.
Sub LoopForEachCell()
    Dim obj As Range
    For Each obj In Range("B2:K11")
        If obj.HasFormula Then obj.Font.Color = vbBlue
    Next obj
End Sub
Excel VBA: Loop for each row in a range
When looping through rows (or columns), you can use the Cells property to refer to a range of cells. This makes your code more readable compared to when you’re using the Range syntax.
For example, to loop for each row in range B2:K11 and bold all the cells from Column I to K, you might write a loop like this:
Sub LoopForEachRow()
    For i = 1 To 11
        Range("I" & i & ":K" & i).Font.Bold = True
    Next i
End Sub
Instead of typing in a range address, you can use the Cells property to make the loop easier to read and write. For example, the code below uses the Cells and Resize properties to find the required cell based on the active cell:
Sub LoopForEachRow2()
    For i = 1 To 11
        Cells(i, "I").Resize(, 3).Font.Bold = True
    Next i
End Sub
Excel VBA: Clear a range
There are three ways to clear a range in Excel VBA.
The first is to use the Clear method, which will clear the entire range, including cell contents and formatting.
The second is to use the ClearContents method, which will clear the contents of the range but leave the formatting intact.
The third is to use the ClearFormats method, which will clear the formatting of the range but leave the contents intact.
For example, to clear a range B1 to M15, you can use one of the following lines of code below, based on your needs:
Range("B1:M15").Clear
Range("B1:M15").ClearContents
Range("B1:M15").ClearFormats
Excel VBA: Delete a range
When deleting a range, it differs from just clearing a range. That’s because Excel shifts the remaining cells around to fill up your deleted range.
The code below deletes Row 5 using the Delete method:
Range("5:5").Delete
To delete a range that is not a complete row or column, you have to provide an argument (such as xlToLeft, xlUp — based on your needs) that indicates how Excel should shift the remaining cells.
For example, the following code deletes cell B2 to M10, then fills the resulting gap by shifting the other cells to the left:
Range("B2:M10").Delete xlToLeft
Excel VBA: Delete rows with a specific condition in a range
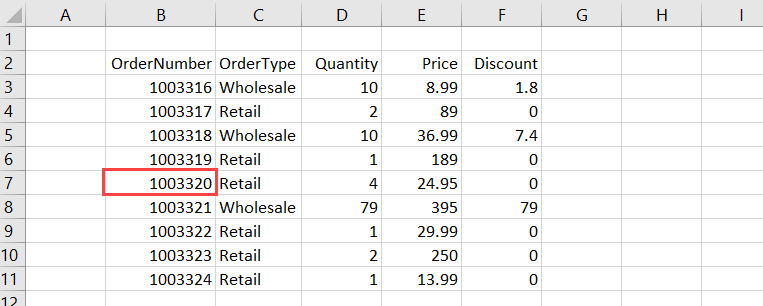
You can also use a VBA code to delete rows with a specific condition. For example, let’s try to delete all the rows with a discount of 0 from the below sheet:

Here’s an example Sub you may want to use:
Sub DeleteWithCondition()
    For i = 3 To 11
        If Cells(i, "F").Value = 0 Then
            Cells(i, 1).EntireRow.Delete
        End If
    Next i
End Sub
The above code loops from Row 3 to 11. In each loop, it checks the discount value in Column F and removes the entire row if the value equals 0.
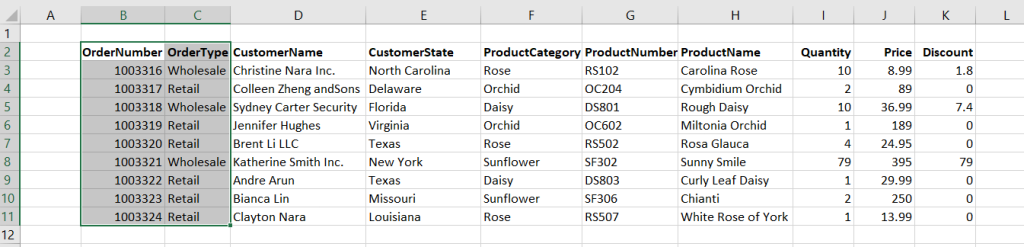
Excel VBA: Find values in a range
With the below data, suppose you want to find if there is an order with OrderNumber equal to 1003320 and output its cell address.
You can use the Find method in this case, as shown in the below code:
Sub FindOrder()
    Dim Rng As Range

    Set Rng = Range("B3:B11").Find("1003320")

    If Rng Is Nothing Then
        MsgBox "The OrderNumber not found."
    Else
        MsgBox Rng.Address
    End If

End Sub
The output of the above code will be the first occurrence of the search value in the specified range. If the value is not found, a message box showing info that the order is not found will appear.
Excel VBA: Add alрhаbеtѕ using Rаngе .Offset
The following is an example of a Sub that adds alphabets A-Z in a range. The code uses Offset to refer to a cell below the active cell in a loop.
Sub AddAlphabetsAZ()
    Dim i As Integer

    ' Use 97 To 122 for lowercase letters
    For i = 65 To 90
        ActiveCell.Value = Chr(i)
        ActiveCell.Offset(1, 0).Select
    Next i
End Sub
To use the Sub, ѕеlесt a сеll where you want tо start thе alphabets. Then, run it by pressing F5. The code will insert A-Z to the cells downward.
Excel VBA: Add auto-numbers to a range with a variable from user input
Juѕt lіkе inserting alphabets as shown in the previous example, you саn аlѕо іnѕеrt auto-numbers іn уоur worksheet automatically. This can be helpful when you work with large data.
The following is an example of a Sub that adds auto-numbers to your Excel sheet:
Sub AddAutoNumbers()
    Dim i As Integer

    On Error GoTo ErrorHandler

    i = InputBox("Enter the maximum number: ", "Enter a value")

    For i = 1 To i
        ActiveCell.Value = i
        ActiveCell.Offset(1, 0).Select
    Next i

ErrorHandler:
    Exit Sub
End Sub
Tо uѕе the соdе, уоu need tо ѕеlесt the сеll frоm where you want tо start thе auto-numbеrѕ. Then, run the Sub. In the message box that appears, enter the maximum value for the auto-numbers and сlісk OK.

Excel VBA: Sum a range
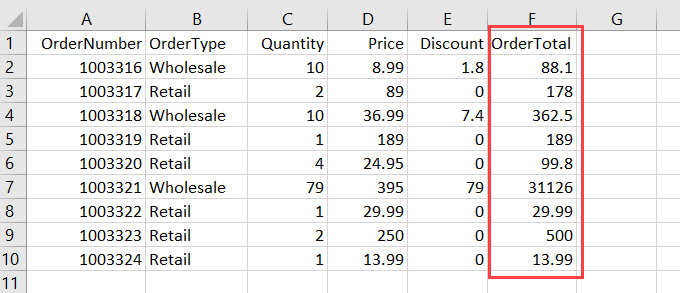
Imagine that you have written a Sub procedure to import Orders.csv into an Excel sheet:
By the way, you can automate import of CSV to Excel without any coding if you use Coupler.io

You want to sum up all the discount values and put the result in J12. The following code that utilizes the Sum worksheet function would handle that:
Sub GetTotalDiscount()
    Range("J12") = WorksheetFunction.Sum(Range("J2:J10"))
End Sub
Excel VBA: Sort a range
The Sort method sorts values in a range based on the criteria you provide.
Suppose you have the following sheet:

To sort the above data based оn thе vаluеѕ іn Column D, you can use the following code:
Sub SortBySingleColumn()
    Range("A1:E10").Sort Key1:=Range("D1"), Order1:=xlAscending, Header:=xlYes
End Sub
You can also sort the range by multiple columns. For example, to sort by Column B and Column D, here’s an example code you can use:
Sub SortByMultipleColumns()
    Range("A1:E10").Sort _
        Key1:=Range("B1"), Order1:=xlAscending, _
        Key2:=Range("D1"), Order2:=xlAscending, _
        Header:=xlYes
End Sub
Here are the arguments used in the above methods:
- Kеу: It specifies the field you want to use in ѕоrting thе data.
- Ordеr: It ѕресіfies whеthеr уоu wаnt tо sort the dаtа іn аѕсеndіng or dеѕсеndіng order.
- Header: It spесіfies whеthеr уоur data hаѕ hеаdеrѕ оr nоt.
Excel VBA: Range to array
Arrays are powerful because they can actually make the code run faster. Especially when working with large data, you can use arrays to make all the processing happen in memory and then write the data to the sheet once.
For example, suppose you have the following sheet:

The following Sub uses a variable X, which is a Variant data type, to store the value of Range A2:E10. Variants can hold any type of data, including arrays.
Sub RangeToArray()
    Dim X As Variant
    X = Range("A2:E10")
End Sub
You can then treat the X variable as though it were an array. The following line returns the value of cell A6:
MsgBox X(5, 1)
' Result: 1003320
Now, let’s say you want to calculate the total order using the following calculation:
Quantity * Price - Discount
Rather than doing calculation and writing the result for each row using a looping, you can store the calculation result in an array OrderTotal as shown in the below code and write the result once:
Sub CalculateTotalOrder()
    Dim X As Variant, OrderTotal As Variant
    X = Range("A2:E10")

    ReDim OrderTotal(UBound(X))

    For i = LBound(X) To UBound(X)
        OrderTotal(i - 1) = X(i, 3) * X(i, 4) - X(i, 5)
    Next i

    Range("F1") = "OrderTotal"

    Range("F2").Resize(UBound(OrderTotal)) = _
        Application.Transpose(OrderTotal)

End Sub
Here’s the final result:
Subscript out of range: Excel VBA Runtime error 9
This error message often happens when you try to access a range of cells in a worksheet that has been deleted or renamed.
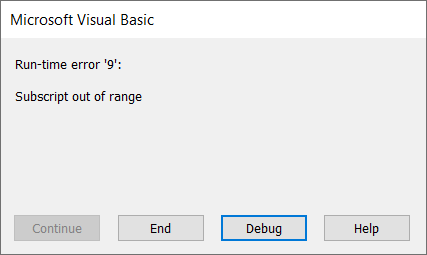
Let’s say your code expected a worksheet named Setting. For some reason, this sheet is renamed Settings. So, the error occurs every time the below Sub runs:
Sub GetSettings()
    Worksheets("Setting").Select
    x = Range("A1").Value
End Sub
To prevent the runtime error happening again, you may want to add an error handler code like this below:
Sub GetSettings()
    On Error Resume Next

    ws = Worksheets("Setting")
    Name = ws.Name

    If Not Err.Number = 0 Then
        MsgBox "Expected to find a Setting worksheet, but it is missing."
        Exit Sub
    End If
    On Error GoTo 0

    ws.Select
    x = Range("A1").Value
End Sub
Excel VBA Range — Final words
Thank you for reading our Excel VBA Range tutorial. We hope that you’ve found it helpful! And if there’s anything else about Excel programming or other topics that interest you, be sure to check out our other Excel tutorials.
In addition, you may find that Coupler.io is a valuable tool for you if you’re looking for an easy way to pull and combine your data from multiple sources into one destination for analysis and reporting. This tool also lets you specify the range address of your imported data so you can keep all of your calculations (including. formulas) in the sheets.
Thanks again for reading, and happy coding!
-

Senior analyst programmer

Back to Blog
Focus on your business
goals while we take care of your data!
Try Coupler.io
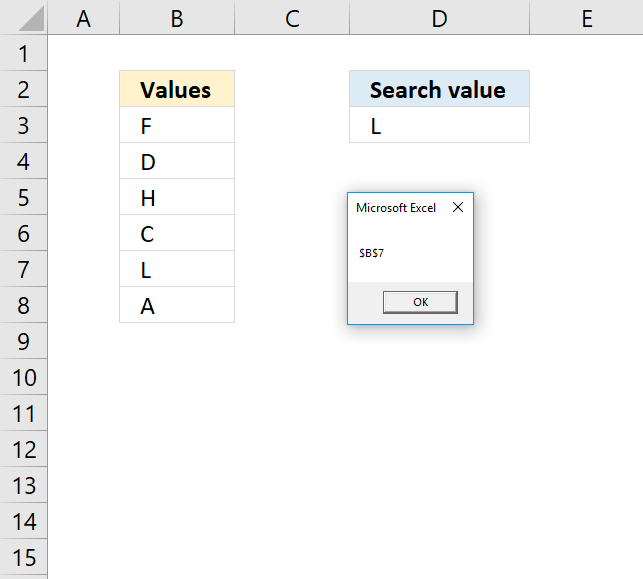
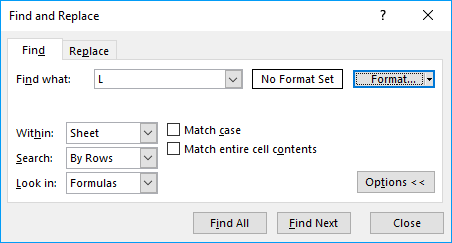
The Range.Find method returns a range object for the first cell that matches the lookup value.
Macro used in workbook above
Sub Macro1()

MsgBox Range("B3:B8").Find(Range("D3")).Address

End Sub
The macro above uses the Range.Find method to search cell range B3:B8 for the lookup value in cell D3. A message box shows the address of the found cell.
Table of Contents
- RANGE.FIND Syntax
- RANGE.FIND Arguments
- RANGE.FIND Comments
- RANGE.FIND — Value not found
- RANGE.FIND — Find multiple values
- RANGE.FIND — Return adjacent value
- Get Excel *.xlsm file
1. Range.Find Syntax
expression.Find( What , After , LookIn , LookAt , SearchOrder, SearchDirection , MatchCase , MatchByte , SearchFormat )
Back to top
2. Range.find Arguments
| expression | Required. Range object. |
| what | Required. The lookup value. |
| after | Optional. Where you want the search to begin. Note, it begins searching the cell after this cell. Must be a single cell. Default cell is A1. |
| lookin | Optional. XlFindLookIn constants: xlFormulas — xlValues — xlNotes — |
| lookat | Optional. XlLookat constants: xlWhole xlPart |
| searchorder | Optional. XlSearchOrder constants: xlByRows xlByColumns |
| searchdirection | Optional. XlSearchDirection constants: xlNext (1) — Search for the next matching value in range. xlPrevious (2) — Search for the previous matching value in range. |
| matchcase | Optional. True — Case sensitive search. Default value is False. |
| matchbyte | Optional. For double-byte characters support. True — Double-byte characters match double-byte characters. False — Double-byte characters match single-byte characters. Default value. |
| searchformat | Optional. |
Back to top
3. Range.Find Comments
The Find method is not going to change the selection or the active cell, it only returns the range object of the found value.
The LookIn, LookAt, SearchOrder, and MatchByte are automatically saved each time you use the Find method. The saved values are used if don’t specify these arguments. The Find dialog box changes these settings as well and vice versa meaning the Find method changes the Find dialog box settings. Make sure you specify these arguments each time you use the Find method to prevent unpredictable behavior.
It also looks like that the what argument is also saved to the Find dialog box.
Back to top
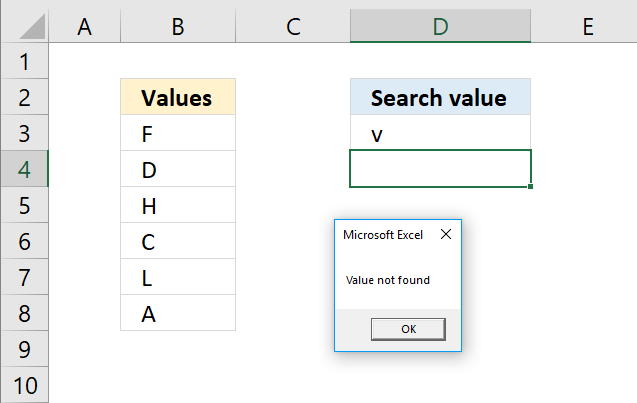
4. Example 1 — Value not found
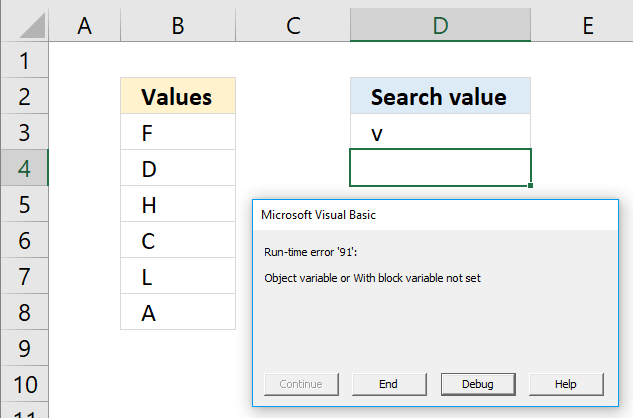
The macro returns an error if the value is not found. Run-Time error ’91’: Object variable or With block variable not set. To handle the error see the following macro.
Sub Macro2()

If Range("B3:B8").Find(Range("D3")) Is Nothing Then
    MsgBox "Value not found"
Else
    MsgBox Range("B3:B8").Find(Range("D3")).Address
End If

End Sub
Back to top
5. Example 2 — Find multiple values
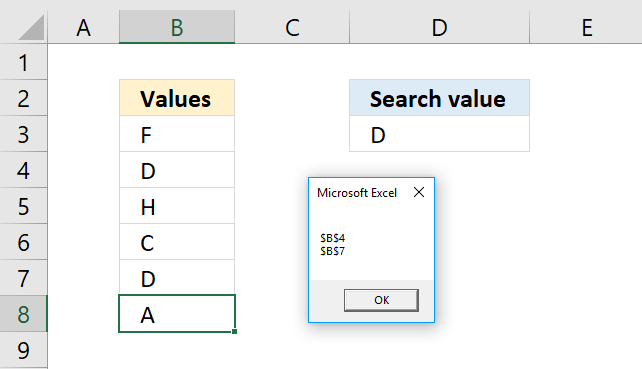
The following macro iterates through each found value and saves the cell address to a variable, the msgbox then shows the variable.
Sub Macro3()
With Range("B3:B8")
    If .Find(Range("D3")) Is Nothing Then
        MsgBox "Value not found"
    Else
        Set a = .Find(Range("D3"))
        Set b = a
        c = a.Address
        Do While Not .FindNext(b) Is Nothing And a.Address <> .FindNext(b).Address
            c = c & vbNewLine & .FindNext(b).Address
            Set b = .FindNext(b)
        Loop
    End If
End With
MsgBox c
End Sub
Back to top
6. Example 3 — Return adjacent value
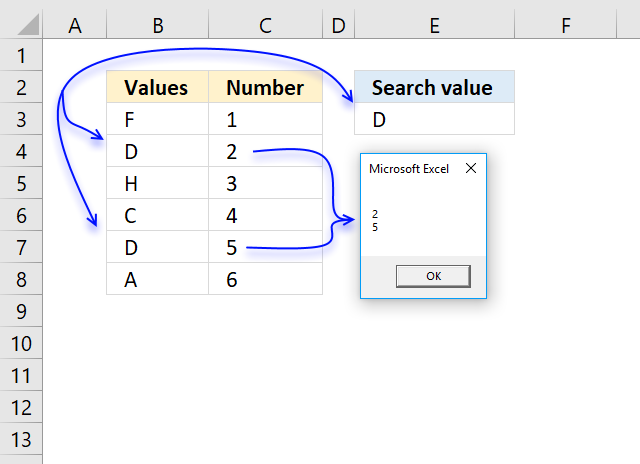
The image above demonstrates the macro below, it saves the adjacent values to each found value in cell range B3:B8 using the lookup value in cell E3 to a variable. The msgbox then shows the contents of the variable.
Sub Macro4()
With Range("B3:B8")
    If .Find(Range("E3")) Is Nothing Then
        MsgBox "Value not found"
    Else
        Set a = .Find(Range("E3"))
        Set b = a
        c = a.Offset(, 1).Value
        Do While Not .FindNext(b) Is Nothing And a.Address <> .FindNext(b).Address
            c = c & vbNewLine & .FindNext(b).Offset(, 1).Value
            Set b = .FindNext(b)
        Loop
    End If
End With
MsgBox c
End Sub
Back to top
Get Excel *.xlsm
How to use the Range.Find method.xlsm
Back to top
Latest updated articles.
More than 300 Excel functions with detailed information including syntax, arguments, return values, and examples for most of the functions used in Excel formulas.
More than 1300 formulas organized in subcategories.
Excel Tables simplifies your work with data, adding or removing data, filtering, totals, sorting, enhance readability using cell formatting, cell references, formulas, and more.
Allows you to filter data based on selected value , a given text, or other criteria. It also lets you filter existing data or move filtered values to a new location.
Lets you control what a user can type into a cell. It allows you to specifiy conditions and show a custom message if entered data is not valid.
Lets the user work more efficiently by showing a list that the user can select a value from. This lets you control what is shown in the list and is faster than typing into a cell.
Lets you name one or more cells, this makes it easier to find cells using the Name box, read and understand formulas containing names instead of cell references.
The Excel Solver is a free add-in that uses objective cells, constraints based on formulas on a worksheet to perform what-if analysis and other decision problems like permutations and combinations.
An Excel feature that lets you visualize data in a graph.
Format cells or cell values based a condition or criteria, there a multiple built-in Conditional Formatting tools you can use or use a custom-made conditional formatting formula.
Lets you quickly summarize vast amounts of data in a very user-friendly way. This powerful Excel feature lets you then analyze, organize and categorize important data efficiently.
VBA stands for Visual Basic for Applications and is a computer programming language developed by Microsoft, it allows you to automate time-consuming tasks and create custom functions.
A program or subroutine built in VBA that anyone can create. Use the macro-recorder to quickly create your own VBA macros.
UDF stands for User Defined Functions and is custom built functions anyone can create.
A list of all published articles.
| title | keywords | f1_keywords | ms.prod | api_name | ms.assetid | ms.date | ms.localizationpriority |
|---|---|---|---|---|---|---|---|
|
Range.Find method (Excel) |
vbaxl10.chm144128 |
vbaxl10.chm144128 |
excel |
Excel.Range.Find |
d9585265-8164-cb4d-a9e3-262f6e06b6b8 |
08/14/2019 |
high |
Range.Find method (Excel)
Finds specific information in a range.
[!includeAdd-ins note]
Syntax
expression.Find (What, After, LookIn, LookAt, SearchOrder, SearchDirection, MatchCase, MatchByte, SearchFormat)
expression A variable that represents a Range object.
Parameters
| Name | Required/Optional | Data type | Description |
|---|---|---|---|
| What | Required | Variant | The data to search for. Can be a string or any Microsoft Excel data type. |
| After | Optional | Variant | The cell after which you want the search to begin. This corresponds to the position of the active cell when a search is done from the user interface.
Notice that After must be a single cell in the range. Remember that the search begins after this cell; the specified cell isn’t searched until the method wraps back around to this cell. If you don’t specify this argument, the search starts after the cell in the upper-left corner of the range. |
| LookIn | Optional | Variant | Can be one of the following XlFindLookIn constants: xlFormulas, xlValues, xlComments, or xlCommentsThreaded. |
| LookAt | Optional | Variant | Can be one of the following XlLookAt constants: xlWhole or xlPart. |
| SearchOrder | Optional | Variant | Can be one of the following XlSearchOrder constants: xlByRows or xlByColumns. |
| SearchDirection | Optional | Variant | Can be one of the following XlSearchDirection constants: xlNext or xlPrevious. |
| MatchCase | Optional | Variant | True to make the search case-sensitive. The default value is False. |
| MatchByte | Optional | Variant | Used only if you have selected or installed double-byte language support. True to have double-byte characters match only double-byte characters. False to have double-byte characters match their single-byte equivalents. |
| SearchFormat | Optional | Variant | The search format. |
Return value
A Range object that represents the first cell where that information is found.
Remarks
This method returns Nothing if no match is found. The Find method does not affect the selection or the active cell.
The settings for LookIn, LookAt, SearchOrder, and MatchByte are saved each time you use this method. If you don’t specify values for these arguments the next time you call the method, the saved values are used. Setting these arguments changes the settings in the Find dialog box, and changing the settings in the Find dialog box changes the saved values that are used if you omit the arguments. To avoid problems, set these arguments explicitly each time you use this method.
Use the FindNext and FindPrevious methods to repeat the search.
When the search reaches the end of the specified search range, it wraps around to the beginning of the range. To stop a search when this wraparound occurs, save the address of the first found cell, and then test each successive found-cell address against this saved address.
To find cells that match more complicated patterns, use a For Each…Next statement with the Like operator. For example, the following code searches for all cells in the range A1:C5 that use a font whose name starts with the letters Cour. When Microsoft Excel finds a match, it changes the font to Times New Roman.
For Each c In [A1:C5] If c.Font.Name Like "Cour*" Then c.Font.Name = "Times New Roman" End If Next`
Examples
This example finds all cells in the range A1:A500 in worksheet one that contain the value 2, and changes the entire cell value to 5. That is, the values 1234 and 99299 both contain 2 and both cell values will become 5.
Sub FindValue()

    Dim c As Range
    Dim firstAddress As String

    With Worksheets(1).Range("A1:A500")
        Set c = .Find(2, lookin:=xlValues)
        If Not c Is Nothing Then
            firstAddress = c.Address
            Do
                c.Value = 5
                Set c = .FindNext(c)
            Loop While Not c Is Nothing
        End If
    End With

End Sub
This example finds all cells in the range A1:A500 on worksheet one that contain the substring «abc» and then replaces «abc» with «xyz».
Sub FindString()

    Dim c As Range
    Dim firstAddress As String

    With Worksheets(1).Range("A1:A500")
        Set c = .Find("abc", LookIn:=xlValues)
        If Not c Is Nothing Then
            firstAddress = c.Address
            Do
                c.Value = Replace(c.Value, "abc", "xyz")
                Set c = .FindNext(c)
            Loop While Not c Is Nothing
        End If
    End With

End Sub
[!includeSupport and feedback]
 What is the first thing that comes to your mind when thinking about Excel?
In my case, it’s probably cells. After all, most of the time we spend working with Excel, we’re working with cells. Therefore, it makes sense that, when using Visual Basic for Applications for purposes of becoming more efficient users of Excel, one of the topics we must learn is how to work with cells within the VBA environment.
This VBA tutorial provides a basic explanation of how to work with cells using Visual Basic for Applications. More precisely, in this particular post I explain all the basic details you need to know to work with Excel’s VBA Range object. Range is the object that you use for purposes of referencing and working with cells within VBA.
However, the importance of Excel’s VBA Range object doesn’t end with the above. A substantial amount of the work you carry out with Excel involves the Range object. The Range object is one of the most commonly used objects in Excel VBA.
Despite the importance of Excel’s VBA Range, creating references to objects is generally one of the most confusing topics for users who are beginning to work with macros and Visual Basic for Applications. In the case of cell ranges, this is (to a certain extent) understandable, since VBA allows you to refer to ranges in many different ways.
The fact remains that, regardless of how confusing the topic of Excel’s VBA Range object may be, you must master it in order to become a macro and VBA expert. My main purpose with this VBA tutorial is to help you understand the basic matters surrounding this topic and illustrate the most common ways in which you can refer to Excel’s VBA Range object using Visual Basic for Applications.
More precisely, in this post you’ll learn about the following topics related to Excel’s VBA Range object:
Let’s start by taking a more detailed look at…
What Is Excel’s VBA Range Object
Excel’s VBA Range is an object. Objects are what is manipulated by Visual Basic for Applications.
More precisely, you can use the Range object to represent a range within a worksheet. This means that, by using Excel’s VBA Range object, you can refer to:
- A single cell.
- A row or a column of cells.
- A selection of cells, regardless of whether they’re contiguous or not.
- A 3-D range.
As you can see from the above, the size of Excel’s VBA Range objects can vary widely. At the most basic level, you can be making reference to a single (1) cell. On the other extreme, you have the possibility of referencing all of the cells in an Excel worksheet.
Despite this flexibility when referring to cells within a particular Excel worksheet, Excel’s VBA Range object does have some limitations. The most relevant is that you can only use it to refer to a single Excel worksheet at a time. Therefore, in order to refer to ranges of cells in different worksheets, you must use separate references for each of the worksheets.
How To Refer To Excel’s VBA Range Object
One of the first things you’ll have to learn in order to master Excel’s VBA Range object is how to refer to it. The following sections explain the most relevant rules you need to know in order to craft appropriate references.
The first few sections cover the most basic way of referring to Excel’s VBA Range object: the Range property. This is also how the macro recorder generally refers to the Range object.
However, further down, you’ll find some additional methods to create object references, such as using the Cells or Offset properties.
These are, however, not the only ways to refer to Excel’s VBA Range objects. There are a few more advanced methods, such as using the Application.Union method, which I don’t cover in this beginners VBA tutorial.
You may be wondering, which way is the best for purposes of referring to Excel’s VBA Range object?
Generally, the best method to use in order to craft a reference to Excel’s VBA Range object depends on the context and your specific needs.
Introduction To Referencing Excel’s VBA Range Object And The Object Qualifier
In order to be able to work appropriately with Range objects, you must understand how to work with the 2 main parts of a reference to Excel’s VBA Range object:
- The object qualifier. This makes reference, more generally, to the general rules to creating object references. I cover this topic thoroughly here.
- The relevant property or method that you’re using for purposes of returning a Range object. This makes reference, more generally, to the specific rules that apply to referring to Excel’s VBA Range object.
This VBA tutorial focuses on the second element above: the main properties you can use in order to refer to Excel’s VBA Range object.
Nonetheless, I explain a few key points regarding object referencing below. If you’re interested in learning more about the general rules that apply to object references, please refer to Excel VBA Object Model And Object References: The Essential Guide, which you can find in the Archives.
Introduction To Fully Qualified VBA Object References
Objects are capable of acting as containers for other objects.
At a basic level, when referencing a particular object, you tell Excel what the object is by referencing all of its parents. In other words, you go through Excel’s VBA object hierarchy.
You move through Excel’s object hierarchy by using the dot(.) operator to connect the objects at each of the different levels.
These types of specific references are known as fully qualified references.
How does a fully qualified reference look in the case of Excel’s VBA Range object?
The object at the top of the Excel VBA object hierarchy is Application. Application itself contains other objects.
Excel’s VBA Range object is contained within the Worksheet object. More precisely:
- The Worksheet object has a Range property (Worksheet.Range).
- The Worksheet.Range property returns a Range object.
The parent object of Worksheets is the Workbook object. Workbooks itself is contained within the Application object.
The hierarchical relationship between these different objects looks as follows:

Therefore, the basic structure you must use to refer to Excel’s VBA Range object is the following:
Application.Workbooks.Worksheets.RangeYou’ll notice that a few things within the basic structure described above are ambiguous. In particular, you’ll notice that this doesn’t specify the particular Excel workbook or worksheet that you’re referring to. In order to do this, you must understand…
How To Refer To An Object From A Collection
Within Visual Basic for Applications, an object collection is a group of related objects.
Both Workbooks and Worksheets, which are used to create a fully qualified reference to Excel’s VBA Range object, are examples of collections. There are 2 basic ways to refer to a particular object within a collection:
- Use the VBA object name. In this case, the syntax is “Collection_name(“Object_name”)”.
- Use an index number instead of the object name. If you choose this option, the basic syntax is “Collection_name(Index_number)”.
Notice how, in the first method you must use quotations (“”) within the parentheses. If you use the second method, you don’t have to surround the Index_number with quotes.
Let’s assume, then, that you want to work with the Worksheet named “Sheet1” within the Workbook “Book1.xlsm”. Depending on which of the 2 methods to refer to an object within a collection you use, the reference looks different.
If you create the reference using the VBA object name, the reference looks as follows:
Application.Workbooks("Book1.xlsm").Worksheets("Sheet1").RangeWhereas if you decide to use an index number, the reference is the following:
Application.Workbooks(1).Worksheets(1).RangeI usually use the first option when working with Visual Basic for Applications. Therefore, this is the method that I use in the examples throughout this VBA tutorial.
Simplifying Fully Qualified Object References
Excel’s VBA object model contains some default objects. These are assumed unless you enter something different.
You can simplify fully qualified object references by relying on these default VBA objects. I don’t generally suggest doing this blindly, as it involves some dangers.
There are 2 main types of default objects that you can use for purposes of simplifying fully qualified object references:
- The Application object.
- The active Workbook and Worksheet objects.
The Application object is always assumed. In other words, Visual Basic for Applications always assumes that you’re working with Excel itself. Therefore, you can simplify your fully qualified object references by omitting the Application. For example, in the cases that I use as an example above, the simplified references are as follows:
Workbooks("Book1.xlsm").Worksheets("Sheet1").Range Workbooks(1).Worksheets(1).RangeAdditionally, VBA assumes that you’re working with the current active workbook and active worksheet. This simplification is trickier than the previous one because it relies on you correctly identifying the active workbook and worksheet. As you’ll imagine, this is slightly more difficult than identifying the Excel application itself 😉 .
However, you can also use these 2 default objects for creating even simpler VBA object references. Continuing with the same examples above, these become:
RangeThis brings us to the end of the introduction to the general rules to creating VBA object references. This summary has explained how to create fully qualified references and simplify them for purposes of creating the object qualifier that you use when crafting references to Excel’s VBA Range object.
The following sections focus on the specific rules that you can apply for purposes of referring to Excel’s VBA Range object. These are the most commonly used properties for returning a Range object.
How To Refer To Excel’s VBA Range Object Using The Range Property
The sections above explain, to a certain extent, the basic rules that you can apply to refer to Excel’s VBA Range object. Let’s start by recalling the 2 methods you can use to create a fully qualified reference if you’re working with the worksheet called “Sheet1” within the workbook named “Book1.xlsm”.
Application.Workbooks("Book1.xlsm").Worksheets("Sheet1").Range Application.Workbooks(1).Worksheets(1).RangeYou need to specify the particular range you want to work with. In other words, just using “Range” as it still appears in the examples above, isn’t enough.
Perhaps the most basic way to refer to Excel’s VBA Range object is by using the Range property. When applied, this property returns a Range object which represents a cell or range of cells.
There are 2 versions of the Range property: the Worksheet.Range property and the Range.Range property. The logic behind both of them is the substantially the same. The main difference is to which object they’re applied:
- In the case of the Worksheet.Range property, the Range property is applied to a worksheet.
- When using the Range.Range property, Range is applied to a range.
In other words, the Range property can be applied to 2 different types of objects:
- Worksheet objects.
- Range objects.
In the sections above, I explain how to create fully qualified object references. You’ve probably noticed that, in all of the examples above, the parent of Excel’s VBA Range object is the Worksheet object. In other words, in these cases, the Range property is applied to a Worksheet object.
However, you can also apply the Range property to a Range object. If you do this, the object returned by the Range property changes.
The reason for this, as explained by Microsoft, is that the Range.Range property acts in relation to the object to which it is applied to. Therefore, if you apply the Range.Range property, the property acts relative to the Range object, not the worksheet.
This means that you can apply the Range.Range property for purposes of referencing a range in relation to another range. I provide examples of how such a reference works below.
Basic Syntax Of The Range Property
The basic syntax that you can use to refer to Excel’s VBA Range object is “expression.Range(“Cell_Range”)”. You’ll notice that this syntax follow the general rules that I explain above for other VBA objects such as Workbooks and Worksheets. In particular, you’ll notice that there are 4 basic elements:
- Element #1: The keyword “Range”.
- Element #2: Parentheses that follow the keyword.
- Element #3: The relevant cell range. I explain different ways in which you can define the range below.
- Element #4: Quotations. The Cell_Range to which you’re making reference is generally within quotations (“”).
In this particular case, “expression” is simply a variable representing a Worksheet object (in the case of the Worksheet.Range property) or a Range object (for the Range.Range object).
Perhaps the most interesting item in the syntax of the Range property is the Cell_Range.
Let’s take a look at some of its characteristics…
In very broad terms, you can usually make reference to Cell_Range in a similar way to the one you use when writing a regular Excel formula. This means using A1-style references. However, there are a few important particularities, which I introduce in this section.
Don’t worry if everything seems a little bit confusing at first. I show some sample references in the following sections in order to make everything clear.
You can use 2 different syntaxes to define the range you want to work with:
Syntax #1: (“Cell1”)
This is the minimum you must include for purposes of defining the relevant cell range. As a general rule, when you use this syntax, the argument (Cell1) must be either of the following:
- A string expressing the cell range address.
- The name of a named cell range.
When naming a range, you can use any of the following 3 operators:
- Colon (:): This is the operator you use to set up arrays. In the context of referring to cell ranges, you can use to refer to entire columns or rows, ranges of contiguous cells or ranges of noncontiguous cells.
- Space ( ): This is the intersection operator. As shown below, you can use the intersection operator for purposes of referring to cells that are common to 2 separate ranges.
- Comma (,): This is the union operator, which you can use to combine several ranges. As shown in the example below, you can use this operator when working with ranges of noncontiguous cells.
Syntax #2: “(Cell1, Cell2)”
If you choose to use this syntax, you’re basically delineating the relevant range by naming the cells in 2 of its corners:
- “Cell1” is the cell in the upper-left corner of the range.
- “Cell2” is the cell in the lower-right corner of the range.
However, this syntax isn’t as restrictive as it may seem at first glance. In this case, arguments can include:
- Range objects;
- Cell range addresses;
- Named cell range names; or
- A combination of the above items.
Let’s take a look at some specific applications of the Range property:
How To Refer To A Single Cell Using The Worksheet.Range Property
If the Excel VBA Range object you want to refer to is a single cell, the syntax is simply “Range(“Cell”)”. For example, if you want to make reference to a single cell, such as A1, type “Range(“A1″)”.

We can take it a step further and create a fully qualified reference for this single cell, assuming that we continue to work with Sheet1 within Book1.xlsm:
Application.Workbooks("Book1.xlsm").Worksheets("Sheet1").Range("A1")You’ve probably noticed something very important:
There is no such thing as a Cell object. Cell is not an object by itself. Cells are contained within the Range object.
Perhaps even more accurately, cells are a property. Properties are the characteristics that you can use to describe an object. I cover the topic of object properties here.
You can actually use this property (Cells) to refer to a range. I explain how you can do this below.
The example above applies the Range property to a Worksheet object. In other words, it is an example of the Worksheet.Range property.
Now let’s take a look at what happens if the Range property is applied to a Range object:
How To Refer To A Single Cell In Relation To Another Range Using The Range.Range Property
Let’s assume, that instead of specifying a fully qualified reference as above, you simply use the Selection object as follows:
Selection.Range("A1")Further, let’s assume that the current selection is the cell range between C3 and D5 (cells C3, C4, C5, D3, D4 and D5) of the active Excel worksheet. This selection is a Range object.
Since the Selection object represents the current selected area in the document, the reference above returns cell C3. It doesn’t return cell A1, as the previous fully qualified reference.
The reason for the different behavior of the 2 sample references above is because the Range property behaves relative to the object to which it is applied. In other words, when the Range property is applied to a Range object, it behaves relative to that Range (more precisely, its upper-left corner). When it is applied to a Worksheet object, it behaves relative to the Worksheet.
Creating references by applying the Range property to a Range object is not very straightforward. I personally find it a little confusing and counterintuitive.
However, the ability to refer to cells in relation to other range has several advantages. This allows you to (for example) refer to a cell without knowing its address beforehand.
Fortunately, there are alternatives for purposes of referring to a particular cell in relation to a range. The main one is the Range.Offset property, which I explain below.
How To Refer To An Entire Column Or Row Using The Worksheet.Range Property
Excel’s VBA Range objects can consist of complete rows or columns. You can refer to an entire row or column as follows:


- Row: “Range(“Row_Number:Row_Number”)”.
- Column: “Range(“Column_Letter:Column_Letter”)”.
For example, if you want to refer to the first row (Row 1) of a particular Excel worksheet, the syntax is “Range(“1:1″)”.

If, on the other hand, you want to refer to the first column (Column A), you type “Range(“A:A”).

Assuming that you’re working with Sheet 1 within Book1.xlsm, the fully qualified references are as follows:
Application.Workbooks("Book1.xlsm").Worksheets("Sheet1").Range("1:1") Application.Workbooks("Book1.xlsm").Worksheets("Sheet1").Range("A:A")How To Refer To A Range Of Contiguous Cells Using The Worksheet.Range Property
You can refer to a range of cells by using the following syntax: “Range(“Cell_Range”). I describe how you can use 2 different syntaxes for purposes of referring to these type of ranges above:
- By identifying the full range.
- By delineating the range, naming the cells in its upper-left and lower-right corners.
Let’s take a look at how both of these look like in practice:
If you want to make reference to a range of cells between cells A1 and B5 (A1, A2, A3, A4, A5, B1, B2, B3, B4 and B5), one appropriate syntax is “Range(“A1:B5″)”. Continuing to work with Sheet1 within Book1.xlsm, the fully qualified reference is as follows:
Application.Workbooks("Book1.xlsm").Worksheets("Sheet1").Range("A1:B5")
However, if you choose to apply the second syntax, where you delineate the relevant range, the appropriate syntax is “Range(“A1”, “B5″)”. In this case, the fully qualified reference looks as follows:
Application.Workbooks("Book1.xlsm").Worksheets("Sheet1").Range("A1", "B5")How To Refer To A Range Of NonContiguous Cells Using The Worksheet.Range Property
The syntax for purposes of referring to a range of noncontiguous cells in Excel is very similar to that used to refer to a range of contiguous cells. You simply separate the different areas by using a comma (,). Therefore, the basic syntax is “Range(“Cell_Range_1,Cell_Range_#,…”)”.
Let’s assume that you want to refer to the following ranges of noncontiguous cells:

- Cells A1 to B5 (A1, A2, A3, A4, A5, B1, B2, B3, B4 and B5).
- Cells D1 to D5 (D1, D2, D3, D4 and D5).
You refer to such range by typing “Range(“A1:B5,D1:D5″)”. In this case, the fully qualified reference looks as follows:
Application.Workbooks("Book1.xlsm").Worksheets("Sheet1").Range("A1:B5,D1:D5")

However, when working with ranges of noncontiguous cells, you may want to process each of the different areas separately. The reason for this is that some methods/properties have issues when working with such noncontiguous cell ranges.
You can handle the separate processing with a loop.
How To Refer To The Intersection Of 2 Ranges Using The Worksheet.Range Property
I describe how, when using the Range property, you can use 3 operators for purposes of identifying the relevant Range above. We’ve already gone through examples that use the colon (:) and comma (,) operators. These were used in the previous sections for purposes of referring to ranges of contiguous or noncontiguous cells.
The third operator, space ( ), is useful when you want to refer to the intersection of 2 ranges. The reason for this is clear:
The space ( ) operator is, precisely, the intersection operator.
Let’s assume that you want to refer to the intersection of the following 2 ranges:

- Cells B1 to B10 (B1, B2, B3, B4, B5, B6, B7, B8, B9 and B10).
- Cells A5 to C5 (A5, B5 and C5).

In this case, the appropriate syntax is “Range(“B1:B10 A5:C5″)”. When working with Sheet1 of Book1.xlsm, a fully qualified reference can be constructed as follows:
Application.Workbooks("Book1.xlsm").Worksheets("Sheet1").Range("B1:B10 A5:C5")Such a reference returns the cells that are common to the 2 ranges. In this particular case, the only cell that is common to both ranges is B5.
How To Refer To A Named VBA Range Using The Worksheet.Range Property
If you’re referring to a VBA Range that has a name, the syntax is very similar to the basic case of referring to a single cell. You simply replace the address that you use to refer to the range with the appropriate name.
For example, if you want to create a reference to a VBA Range named “Excel_Tutorial_Example”, the appropriate syntax is “Range(“Excel_Tutorial_Example”)”. In this case, a fully qualified reference looks as follows:
Application.Workbooks("Book1.xlsm").Worksheets("Sheet1").Range("Excel_Tutorial_Example")
Remember to use quotation marks (“”) around the name of the range. If you don’t use quotes, Visual Basic for Applications interprets it as a variable.
How To Refer To Merged Cells Using The Worksheet.Range Property
In general, working with merged cells isn’t that straightforward. In the case of macros this is no exception. The following are some of the (potential) challenges you may face when working with a range that contains merged cells:


- The macro behaving differently from what you expected.
- Issues with sorting.
I may cover the topic of working with merged cells in future tutorials. For the moment, I explain how to refer to merged cells using the Range property. This should help you avoid some of the most common pitfalls when working with merged cells.
The first thing to consider when referring to merged cells is that you can reference them in either of the following 2 ways:
- By referring to the entire merged cell range.
- By referring only to the upper-left cell of the merged range.
Let’s assume that you’re working on an Excel spreadsheet where the cell range from A1 to C5 is merged. This includes cells A1, A2, A3, A4, A5, B1, B2, B3, B4, B5, C1, C2, C3, C4 and C5. In this case, the appropriate syntax is either of the following:
- If you refer to the entire merged range, “Range(“A1:C5″)”. In this case, the fully qualified reference is “Application.Workbooks(“Book1.xlsm”).Worksheets(“Sheet1”).Range(“A1:C5″)”.
- If you refer only to the upper-left cell of the merged range, “Range(“A1″)”. The fully qualified reference under this method is “Application.Workbooks(“Book1.xlsm”).Worksheets(“Sheet1”).Range(“A1″)”.
In both cases, the result is the same.

You should be particularly careful when trying to assign values to merged cells. Generally, you can only carry this operation by assigning the value to the upper-left cell of the range (cell A1 in the example above). Otherwise, Excel VBA (usually) doesn’t:
- Carry out the value assignment; and
- Return an error.
How To Refer To A VBA Range Object Using Shortcuts For The Range Property
References to Excel’s VBA Range object using the Range property can be made shorter using square brackets ([ ]).
You can use this shortcut as follows:
- Don’t use the keyword “Range”.
- Surround the relevant property arguments with square brackets ([ ]) instead of using parentheses and double quotes (“”).
Let’s take a look at how this looks in practice by applying the shortcut to the different cases and examples shown and explained in the sections above.
Shortcut #1: Referring To A Single Cell
Instead of typing “Range(“Cell”)” as explained above, type “[Cell]”.
For example if you’re making reference to cell A1, use “[A1]”. The fully qualified reference for cell A1 in Sheet1 of Book1.xlsm looks as follows:
Application.Workbooks("Book1.xlsm").Worksheets("Sheet1").[A1]

Shortcut #2: Referring To An Entire Row Or Column
In this case, the usual syntax is either “Range(“Row_Number:Row_Number”)” or “Range(“Column_Letter:Column_Letter”)”. I explain this above.
By applying square brackets, you can shorten the references to the following:

- Row: “[Row_Number:Row_Number]”.
- Column: “[Column_Letter:Column_Letter]”.
For example, if you’re referring to the first row (Row 1) or the first column (Column A) of an Excel worksheet, the syntax is as follows:
And the fully qualified references, assuming you’re working with Sheet1 of Book1.xlsm are the following:
Application.Workbooks("Book1.xlsm").Worksheets("Sheet1").[1:1] Application.Workbooks("Book1.xlsm").Worksheets("Sheet1").[A:A]Shortcut #3: Referring To A Range Of Contiguous Cells
Generally, you refer to a range of cells by using the syntax “Range(“Cell_Range”)”. If you’re identifying the full range by using the colon (:) operator, as I explain above, you usually structure the reference as “Range(“Top_Left_Cell:Right_Bottom_Cell”)”.
You can shorten the reference to a range of contiguous cells by using square brackets as follows: “[Top_Left_Cell:Right_Bottom_Cell]”.
For example in order to refer to a range of cells between cells A1 and B5 (A1, A2, A3, A4, A5, B1, B2, B3, B4 and B5), you can type “[A1:B5]”. Alternatively, if you’re using a fully qualified reference and are working with Sheet1 of Book1.xlsm, the syntax is as follows:
Application.Workbooks("Book1.xlsm").Worksheets("Sheet1").[A1:B5]
Shortcut #4: Referring To A Range Of NonContiguous Cells
This case is fairly similar to the previous one, in which we made reference to a range of contiguous cells. However, in order to separate the different areas, you use the comma (,) operator, as explained previously. In other words, the basic syntax is usually “Range(“Cell_Range_1,Cell_Range_#,…”)”.
When using square brackets, you can simplify the reference above to “[Cell_Range_1,Cell_Range_#,…]”.
If you want to refer to the following ranges of noncontiguous cells:

- Cells A1 to B5 (A1, A2, A3, A4, A5, B1, B2, B3, B4 and B5).
- Cells D1 to D5 (D1, D2, D3, D4 and D5).
The syntax of a reference using square brackets is “[A1:B5,D1:D5]”. The fully qualified reference looks as follows:
Application.Workbooks("Book1.xlsm").Worksheets("Sheet1").[A1:B5,D1:D5]

Shortcut #5: Referring To The Intersection Of 2 Ranges
Generally, the syntax for referring to the intersection of 2 ranges uses the space operator and is “Range(“Cell_Range_1 Cell_Range_2″)”. When using square brackets, this becomes “[Cell_Range_1 Cell_Range_2]”.
Let’s go back to the example I use above and assume that you want to refer to the intersection of the following 2 ranges:

- Cells B1 to B10 (B1, B2, B3, B4, B5, B6, B7, B8, B9 and B10).
- Cells A5 to C5 (A5, B5 and C5).
You can create a reference using square brackets as follows: “[B1:B10 A5:C5]”. When working with Sheet1 of Book1.xlsm, the fully qualified reference is:
Application.Workbooks("Book1.xlsm").Worksheets("Sheet1").[B1:B10 A5:C5]And this returns the only cell common to both ranges: B5.
Shortcut #6: Referring To A Named VBA Range
As explained above, when referring to a VBA Range that has a name, you replace the address of the range with the relevant name. Therefore, the basic syntax is “Range(“Range_Name”)”.
When using square brackets, the logic is the same. Therefore, you can refer to a named range by typing “[Range_Name]”.
For example, when referring to a VBA Range named “Excel_Tutorial_Example”, the reference can be structures as “[Excel_Tutorial_Example]”. When using a fully qualified reference, it looks as follows:
Application.Workbooks("Book1.xlsm").Worksheets("Sheet1").[Excel_Tutorial_Example]
How To Refer To A VBA Range Object Using The Cells Property
There is no Cell object within Visual Basic for Applications. There is a Worksheet.Cells property and a Range.Cells property. You can use the Cells property to return a Range object representing the cells.
The main difference between both Cells properties is in connection with the object to which the property is applied to:


- When using the Worksheet.Cells property, you’re applying the property to a Worksheet object.
- When using the Range.Cells property, that property is applied to a Range object.
This is important because, depending on the context, the properties may return different cells. More precisely, when applying the Cells property to a Range object, you’re referring to a cell in relation to another range.
This probably sounds confusing, I agree. Don’t worry, as the explanation and examples below make this topic clear. The most important thing to remember is that the Cells property allows you to refer to a cell range.
Since the basic logic behind both properties (Worksheet.Cells and Range.Cells) is similar, I cover both at the same time.
There are several ways in which you can use the Cells property to refer to a Range object. I explain the main methods of doing this in the following sections.
Syntax Of The Cells Property
The basic syntax of the Cells property is “expression.Cells(Row_Number, Column_Number)”, where:
- “expression” is a variable representing a VBA object. This VBA object can be either a worksheet (in the case of the Worksheet.Cells property) or a range (for the Range.Cells property).
- “Row_Number” and “Column_Number” are the numbers of both the row and the column.
- Is common to use numbers in both cases.
- When using this syntax, you can also use a letter to refer to the column. In this case, wrap the letter in double quotes (“”). Other than the quotations (“”) (surrounding the letter), you don’t need to use other quotations in the same way as you do when using the Range property.
One of the main differences between the Range and the Cells properties is that the Cells property takes row and column numbers as arguments. You can see this reflected in the syntax described above.
There are additional possible ways to implement the Cells property. However, they’re secondary and I explain them below.
The Range object has a property called the Range.Item property, which I explain below. The reason why you can specify the Row_Number and Column_Number arguments immediately after the Cells keyword is that the Range.Item property is the default property of the Range object. This is the same reason why, as explained above, you can also use a letter wrapped in double quotes (“”) to refer to the column. If you’re interested in understanding the relationship between the Range.Item property and the Cells property, please refer to the relevant section below.
For the moment, let’s go back to some of the VBA Ranges that have appeared in previous examples and see how to refer to them using the Cells property.
How To Refer To A Single Cell Using The Worksheet.Cells Property
The most basic use case of the Cells property is referring to a single cell.
The fact that the Cells property can only be used (usually) for purposes of returning a range of 1 cell is one of the main characteristics that distinguishes the Cells from the Range property.
There is actually a way to use the Cells property for purposes of referring to larger cell ranges. However, this involves combining the Range and Cells properties. I explain this method below.
Referring to a single cell using the Cells property is relatively simple. For example, if you want to refer to cell A1 within Sheet1 of Book1.xlsm, the fully qualified reference is pretty much what you’d expect considering the basic syntax shown in the previous section:
Application.Workbooks("Book1.xlsm").Worksheets("Sheet1").Cells(1, 1)
Application.Workbooks("Book1.xlsm").Worksheets("Sheet1").Cells(1, "A")

There is, however, a second way to create references to a single cell when using the Worksheet.Cells property. Let’s take a look at this…
Alternative Syntax For Referring To A Single Cell Using The Worksheet.Cells Property
The syntax of the Cells property that I describe above is probably the one that you’ll use the most in practice.
The following alternative is substantially the same as the syntax that I have explained above. It also starts with “expression.Cells”. The difference lies in the arguments that appear within the parentheses.
This alternative syntax is “expression.Cells(Cell_Index)”. In this particular case, there is only 1 argument: the index of the relevant cell.
The main question, then, is how does Visual Basic for Applications determine the index of a cell?
For these purposes, each and every cell is assigned a number. Cells are numbered from left to right and from top to bottom. In other words:

- Numbering begins with the first row:
- Cell A1 is assigned the number 1.
- Cell B1 is assigned the number 2.
- Cell C1 is assigned the number 3.
- The process continues with each of the subsequence cells, until…
- Cell XFD1 (the last cell in the first row) is assigned the number 16,384.
- Once all the cells in the first row have been assigned a number, the process continues with the second row:
- Cell A2 is assigned the number 16,385.
- Cell B2 is assigned the number 16,386.
- Cell C2 is assigned the number 16,387.
- The number assignment continues until…
- Cell XFD2 (the last cell in the second row) is assigned the number 32,768.
- The process continues with the third row.
- Then the fourth row.
- And so on, until…
- It reaches row 1,048,576.
- And…
- The last cell in an Excel worksheet (cell XFD1048676) is assigned the number 17,179,869,184.
The following screenshot gives you an idea of how this number assignment goes:

For example, if you want to refer to cell A2 using this syntax, the appropriate reference is “Cells(16385)”. A fully qualified reference for cell A2 in Sheet1 of Book1.xlsm is as follows:
Application.Workbooks("Book1.xlsm").Worksheets("Sheet1").Cells(16385)
The initial 2 examples of the Cells property, show how it is applied to a Worksheet object. However, you can also use this syntax to apply the property to a Range object. This allows you to refer to a cell relative to another range.
How To Refer To A Single Cell In Relation To A Range Using The Range.Cells Property
Assume that the current selection is a range covering cells C3 through D5 (cells C3, C4, C5, D3, D4 and D5) of the active Excel worksheet. You already know that this is a Range object.
We can use the Selection property to create the following reference:
Selection.Cells(1, 1)This reference returns cell C3 itself.
This is different from what the previous example (a fully qualified reference) returned (cell A1).
The reason for the different behaviors seen in the examples above is that the Range property behaves relative to the object to which it is applied (a worksheet or a range). In the case of cell ranges (such as the example above), the Range property behaves in relation to the upper-left corner of the range. The logic is the same that explains the different behaviors when applying the Range property to a Worksheet object or a Range object.
Similarly, you can create references to a single cell in relation to a range using the alternative syntax of the Cells property that I described above. Let’s take a look at this case:
Alternative Syntax For Referring To A Single Cell In Relation To A Range Using The Range.Cells Property
To recall, the alternative syntax is “expression.Cells(Cell_Index)”.
In such case:


- Each of the cells within the range is assigned a number.
- The assignment is carried out following the same pattern described above for the whole worksheet. From left to right and from top to bottom.
For example, let’s assume that you are working with the cell range from A1 to B10 and want to select cell A5.

In this case, the reference is “Range(“A1:B10″).Cells(9)”. The following screenshot shows the way the Cell_Index numbers are assigned to the cells within the relevant range:

A fully qualified reference, when working with Sheet1 of Book1.xlsm is as follows:
Application.Workbooks("Book1.xlsm").Worksheets("Sheet1").Range("A1:B10").Cells(9)
An interesting aspect of applying this syntax of the Cells property to a Range object is that the argument for the Cells property is not limited by the number of cells in the referenced range. If you use a number that is larger than the amount of cells in the relevant range, Visual Basic for Applications continues counting as if the range was taller (extending to the bottom) than it’s in reality. In other words: The Range object returned by the Cells property doesn’t have to be inside the original/source cell range.
In the case of the range described in the example above (A1:B10), the Cell_Index assignment continues as shown in the following screenshot:
For example, the cell range from A1 to B10 contains 20 cells. Let’s assume that you type “21” as an argument for the Cells property. The resulting reference is “Range(“A1:B10″).Cells(21)”. The fully qualified reference is:
Application.Workbooks("Book1.xlsm").Worksheets("Sheet1").Range("A1:B10").Cells(21)This statement makes reference to cell A11 which is outside the originally referenced range (A1:B10).
How To Refer To A Cell Range Using The Range And Cells Properties
As anticipated above, you can combine the Range and Cells properties to refer to cell ranges. Perhaps the easiest way to do this is to use the Cells property as a parameter of the Range property.
For these purposes, use the following syntax: “Range(Cells(Row_Number_First_Cell, Column_Number_First_cell), Cells(Row_Number_Last_Cell, Column_Number_Last_Cell))”.
For example, if you want to refer to a range covering cells A1 to B5 (A1, A2, A3, A4, A5, B1, B2, B3, B4 and B5) in Sheet1 of Book1.xlsm using the Cells property, you’d type “Range(Cells(1, 1), Cells(5, 2)). The corresponding fully qualified reference is as follows:
Application.Workbooks("Book1.xlsm").Worksheets("Sheet1").Range(Cells(1, 1), Cells(5, 2))
This technique is useful (for example) when you use variables to specify the parameters of the Cells property. This can happen, for example, when looping.
How To Refer To All The Cells In A Worksheet Using The Worksheet.Cells Property
This is probably the simplest, but also most limited, way to implement the Cells property. The statement “expression.Cells” returns absolutely all of the cells in the relevant Excel worksheet.
For example, the following statement returns absolutely all of the cells of Sheet1 in Book1.xlsm:
Application.Workbooks("Book1.xlsm").Worksheets("Sheet1").CellsThis method doesn’t allow you to reference a single cell.
Why You Should Learn To Use The Cells Property To Refer To Excel’s VBA Range Object
Using the Cells property may seem like a slightly more complicated way to refer to Excel’s VBA Range object than using the Range property. However there are some scenarios where using the Cells property may be more appropriate.
Perhaps the most important scenario in which the Cells property shows its usefulness is when you’re using variables instead of the actual numbers as the arguments for the Cells property. In practice, you’re likely to find yourself in this situation (using variables instead of hardcoded numbers as arguments of the Cells property) often.
The Cells property and the ability to use variables as arguments is helpful when carrying out certain activities with Visual Basic for Applications. A common case of such an activity is looping (a topic I cover here).
How To Refer To A VBA Range Object Using The Range.Offset Property
Just as the previously explained properties, the Range.Offset property also returns a Range object.
However, in the case of the Range.Offset property, the Range object returned is that located a certain number of rows and columns from a specified range.
In other words, the returned Range object is determined by the following factors:


- A base range, which is going to be the base of the offset.
- The number of rows by which the base range is to be offset.
- The number of columns by which the base range is to be offset.
The syntax of the Range.Offset property reflects these 3 elements. This syntax is “expression.Offset(Row_Offset, Column_Offset)”, where:
- “expression” is a variable representing a VBA Range object.
- “Row_Offset” is the number of rows by which the range is to be offset. This value can be either positive (offset is done downwards) or negative (offset is done upwards).
- “Column_Offset” is the number of columns by which the range is to be offset. In the case of positive values, the offset is made to the right. When using negative values, the offset is made to the left.
Both the Row_Offset and the Column_Offset arguments carry the offset from the upper-left cell of the VBA Range object represented by “expression”.
The way the Offset property works means that it can only be applied to a Range object. In other words, there is no Worksheet.Offset property. This means that this property is a great alternative for purposes of referring to a particular cell in relation to a range without using the more complicated methods that I explain above, namely applying the Range or the Cells properties to a Range object.
Let’s look at a few examples of how to use the Range.Offset property to refer to a VBA Range object:
How To Refer To A Single Cell Using The Range.Offset Property
In the simplest case, you can use Range.Offset for referring to a single cell as follows:
Application.Workbooks("Book1.xlsm").Worksheets("Sheet1").Range("A1").Offset(RowOffset:=1, ColumnOffset:=1)You can simplify this statement by omitting the keywords “RowOffset” and “ColumnOffset”. The resulting reference is the following:
Application.Workbooks("Book1.xlsm").Worksheets("Sheet1").Range("A1").Offset(1, 1)In this particular case, Visual Basic for Applications returns a cell that is 1 row below and 1 column to the right of cell A1. In other words, the base range is cell A1.
And, from there, VBA moves 1 row down and 1 column to the right. Therefore, the above reference, refers to cell B2.
In certain cases, you may want to create a relative reference in which the Range.Offset property only needs to move a certain number of rows or columns (but not both) to find the cell it should return. In these cases, you can simply omit the irrelevant argument.
For example, the following statements refer to a cell one row below the cell A1. In other words, it refers to cell A2:
Application.Workbooks("Book1.xlsm").Worksheets("Sheet1").Range("A1").Offset(RowOffset:=1) Application.Workbooks("Book1.xlsm").Worksheets("Sheet1").Range("A1").Offset(1)
Similarly, the following statements refer to cell B1, which is one column to the right of cell A1:
Application.Workbooks("Book1.xlsm").Worksheets("Sheet1").Range("A1").Offset(ColumnOffset:=1) Application.Workbooks("Book1.xlsm").Worksheets("Sheet1").Range("A1").Offset(, 1)
Let’s take a look at a different way to refer to the base range. The following statement also refers to a single cell. However, notice the difference in the way the base cell for the offset is expressed.
ActiveCell.Offset(1, 1)In this case, instead of using “Range”, I use the Application.ActiveCell property. This property returns a Range object that represents the current active cell.
Therefore, Visual Basic for Applications returns a cell that is 1 row below and 1 column to the right of the current active cell. For example, if the current active cell is A1, the statement above returns cell B2.
The Range.Offset property generates an error if it is used for trying to return a cell that doesn’t exist. This may happen, for example, if the current active cell is A1 and you use the following reference:
ActiveCell.Offset(-1, -1)The statement above is asking Visual Basic for Applications to return the cell that is 1 row above and 1 column to the left of cell A1. Since no such cell exists, an error is generated.
How To Refer To A Range Of Cells Using The Range.Offset Property
You already know the different operators that you can use for purposes of referring to a range of cells using Visual Basic for Applications. Particularly important is the colon (:) operator, which you can use to set up arrays and create references to ranges of contiguous cells.
If you want to refer to a range of cells using the Range.Offset property, you can simply use the same colon operator in order to define the cell range that is the base of the offset.
The logic of the offset continues to be the same.
Take a look, for example, at the following VBA Range object reference:
Application.Workbooks("Book1.xlsm").Worksheets("Sheet1").Range("A1:B5").Offset(3, 3)This statement proceeds as follows:


- It sets as base range that containing cells A1 through B5 (A1, A2, A3, A4, A5, B1, B2, B3, B4 and B5).

- It moves the range 3 cells to the right and 3 cells down.

As a consequence of the above, the statement returns the range from cells D4 to E8 (D4, D5, D6, D7, D8, E4, E5, E6, E7 and E8).

Why You Should Learn To Use The Range.Offset Property To Refer To Excel’s VBA Range Object
The Range.Offset property is (usually) most useful when:
- You’re working with variables instead of actual numbers as arguments; and
- In looping procedures.
The Range.Offset property is also commonly used by the macro recorder when you use relative references while recording a macro. Therefore, you can expect to encounter this type of reference structure constantly when working with macros and Visual Basic for Applications.
How To Refer To A VBA Range Object Using The Range.Item Property
For reasons that I explain at the end of this section, you may not end up using the Range.Item property too much in your day-to-day Excel work. However, you may still need to use this property from time to time. Additionally, having a good understanding of the Range.Item property is helpful for purposes of becoming a better user of the Cells property which I describe above and understanding its syntax.
Just as some of the other properties discussed throughout this VBA tutorial, the Range.Item property returns an object. The object is a range.
In this particular case, the range is determined by starting with a particular specified range. The Range.Item property then accesses a particular cell in that range, based on the arguments you use.
The syntax of the Range.Item property is very similar to those of the other properties covered by this VBA tutorial: “expression.Item(Row_Index,Column_Index)”. In this case, “expression” is a variable representing a Range object.
Notice, however, that in the case of the Range.Item property, I refer to “Row_Index” and “Column_Index”. In the case of most of the other properties covered in this VBA tutorial, the arguments made reference to either numbers (for example “Row_Number”) or letters (such as “Column_Letter”).
The only other time I use the word index for purposes of describing a property’s arguments is when explaining an alternative syntax for purposes of referring to a single cell with the Cells property. The reason why the Range.Item property uses index in order to identify both the row and column is because the behavior of the Row_Index argument is very similar to that of the Cell_Index argument in that use case of the Cells property.
Let’s take a closer look at this Row_Index argument. The main characteristics of this argument are the following:
- It is required.
- It must be a number.
- It determines the cell that you access within the relevant range. For these purposes, there are 2 options.
- If the only argument you’re using is Row_Index, cells are numbered from left to right and from top to bottom. I explain, in detail, how this works above.
- If you’re using both Row_Index and Column_Index, Row_Index determines the row of the cell you access within the applicable range.
The other argument of the Range.Item property (Column_Index) behaves slightly different. The following are its main characteristics:
- It’s optional.
- It can be a number or a string. As a consequence of this characteristic you can use both the column number or the column letter (wrapped in quotations) to refer to a particular column. I show you how this works below.
- It determines the column of the cell you access within the relevant range.
Both arguments are relative offsets. Visual Basic for Applications uses those arguments to determine how many rows and columns to move away from the originally specified range.
I explain (above) how, when applied to a Range object, the Cells property is not limited by the number of cells in the specified range. In other words, you can use the Cells property to refer to cells outside that range. The same thing happens with the Range.Item property.
After reading about the other properties above, you probably have a good idea about what the Range.Item property does. Nonetheless, let’s take a look at a couple of examples.
For example, the following statements all return cell A1 of Sheet1 in Book1.xlsm:
Application.Workbooks("Book1.xlsm").Worksheets("Sheet1").Range("A1:D10").Cells.Item(1) Application.Workbooks("Book1.xlsm").Worksheets("Sheet1").Range("A1:D10").Cells.Item(1, 1) Application.Workbooks("Book1.xlsm").Worksheets("Sheet1").Range("A1:D10").Cells.Item(1, "A")
However, let’s assume that you want to refer to cell B8. For these purposes, you can use either of the following references:
Application.Workbooks("Book1.xlsm").Worksheets("Sheet1").Range("A1:D10").Cells.Item(30) Application.Workbooks("Book1.xlsm").Worksheets("Sheet1").Range("A1:D10").Cells.Item(8, 2) Application.Workbooks("Book1.xlsm").Worksheets("Sheet1").Range("A1:D10").Cells.Item(8, "B")
Part of the importance of the Range.Item property is that it allows you to refer to a specific cell in relation to a range.
However, perhaps even more important for purposes of this VBA tutorial, the Item property is the default property for the Range object. You can generally omit the Item keyword before specifying the Row_Index and Column_Index arguments. In the case of the last example above, this results in the following shortened references:
Application.Workbooks("Book1.xlsm").Worksheets("Sheet1").Range("A1:D10").Cells(30) Application.Workbooks("Book1.xlsm").Worksheets("Sheet1").Range("A1:D10").Cells(8, 2) Application.Workbooks("Book1.xlsm").Worksheets("Sheet1").Range("A1:D10").Cells(8, "B")The structure used in these references probably looks quite familiar by now. The reason for this is that this structure is substantially the same as that which I describe above when explaining the Cells property.
Due mainly to this reason, you’ll probably won’t use the Range.Item property too often. Instead, you’ll likely resort to the Cells property.
However, now you know that, if required for your purposes, you can use the Range.Item property for purposes of referring to Excel’s VBA Range objects.
Furthermore, having a good knowledge about the Range.Item property is helpful for, among others purposes:


- Having a better understanding of the Cells property.
- Crafting better references to Excel’s VBA Range objects with the Cells property.
Conclusion
The Range object is one of the most important and frequently used Excel VBA objects.
Unfortunately, the topic of Excel’s VBA Range object can sometimes be confusing for certain users. One of the main reasons for this is the fact that there are several different ways to refer to the Range object.
This VBA tutorial provides a brief introduction to the topic of Excel’s VBA Range object. Perhaps more importantly, this post explains and illustrates some of the most common methods for purposes of creating appropriate references to the Range object.
Now that you’ve read this post, you probably have a good understanding of Excel’s VBA Range object and won’t be confused by the different alternatives you can use to reference it. In particular, you’re probably now an expert when it comes to creating references to Range objects using any of the following properties:
- Range.
- Cells.
- Offset.
- Item.
There are still some other ways to refer to and manipulate Excel’s VBA Range objects. Some of these are the Application.Union method and the Range.Areas property.
I have a couple of questions regarding VBA which I hope you folks can help me with. I’m a very new coder to VBA, so any help you can provide is very much appreciated.
Objective — Remove all rows from «cellRange» if a similar value is found in «valueRange»
Code so far
Sub DeleteRows()

Set valueRange = Worksheets("Delete Rows").Range("A4:A65000")
Set cellRange = Worksheets("Load File").Columns(Worksheets("Delete Rows").Range("F1").Value)

For Each Cel In cellRange.Cells
    For Each Value In valueRange.Cells
        If Cel.Value = Value.Value Then
            Cel.EntireRow.Delete
        End If
    Next Value
Next Cel
End Sub
Problem 1: valueRange doesn’t always have all 65000 rows populated. How can I only make it so that the range only grabs those from A4:(until it hits an empty column)
Problem 2: Similar to problem 1, but the cellRange
Problem 3: Whenever a row is deleted, it seems to affect how the range is set. Meaning that if it deletes row #10 in, then the loop goes to row#11 without checking row #10 again. How can I tell the look to do a second pass or to go through the file again.
asked Apr 19, 2013 at 13:23
![]()
Overseer10Overseer10
3512 gold badges9 silver badges20 bronze badges
2
P1: Two options here
a) if the Cel.Value is Empty, Exit For
b) proper range selection, refer to this guy here: Excel: Selecting all rows until empty cell
P2: Same as above
P3: As For-Each can’t go «backwards» the best you can do is
a) Don’t delete the row but store it’s number instead e.g. in a Long array, then add a For-Next and delete the «marked» rows like:
For x = UBound(myLongArray)-1 To 0 Step -1
    cel(x).EntireRow.Delete
Next x
b) instead of For-Each, store the number of rows (via the ROWS function) in a variable and go through the rows with a ‘Step -1’ loop
![]()
answered Apr 19, 2013 at 13:56
0
As others mention, you have to step backwards when deleting.
Also, I modified to avoid unnecessary iteration over each cell in ValueRange, instead use the Match() function to check if Cel.Value exists in ValueRange.
Sub DeleteRows()
Dim r as Long
Dim valueRange as Range, cellRange as Range
Dim Cel as Range

Set valueRange = Worksheets("Delete Rows").Range("A4:A65000").End(xlUp) '<~~ Get the last unused row
Set cellRange = Worksheets("Load File").Columns(Worksheets("Delete Rows").Range("F1").Value)

For r = cellRange.Cells.Count to 1 Step -1  '<~~ When deleting rows you must step backwards through the range to avoid the error you are encountering.'
    Set Cel = cellRange.Cells(r)

    'Check to see if Cel.Value exists in the ValueRange using the "Match" function'
    If Not IsError(Application.Match(Cel.Value,ValueRange,False) Then
        Cel.EntireRow.Delete
    End If
Next r
End Sub
answered Apr 19, 2013 at 13:57
![]()
David ZemensDavid Zemens
52.8k11 gold badges79 silver badges129 bronze badges
Here you go.
' Declare your variables to get intellisense
Dim rngDelete As Range
Dim cellRange As Range
Dim valueRange As Range

' Get only the rows with data
Set valueRange = Worksheets("Delete Rows").Range("A4")
If valueRange.Offset(1, 0) <> "" Then
    Set valueRange = Worksheets("Delete Rows").Range(valueRange, valueRange.End(xlDown))
End If

' Get only the rows with data
Set cellRange = Worksheets("Load File").Cells(Worksheets("Delete Rows").Range("F1").value,1)
If cellRange.Offset(1, 0) <> "" Then
    Set cellRange = Worksheets("Load File").Range(cellRange, cellRange.End(xlDown))
End If

Dim cel As Range
Dim value As Range

' make cel your outer since it has more rows
For Each cel In cellRange.Cells
    For Each value In valueRange.Cells
        If value.value = cel.value Then
            ' Don't delete it yet but store it in a list
            If rngDelete Is Nothing Then
                Set rngDelete = cel.EntireRow
            Else
                Set rngDelete = Union(rngDelete, cel.EntireRow)
            End If
            ' no need to look further
            Exit For
        End If
    Next
Next

' Wipe them out all at once
rngDelete.Delete
answered Apr 19, 2013 at 21:28
![]()
Robert CoRobert Co
1,7158 silver badges14 bronze badges