
Looking for text in your document? The Find pane helps you find characters, words, and phrases. If you want, you can also replace it with different text.
If you’re in Reading View, switch to Editing View by clicking Edit Document > Edit in Word Web App.

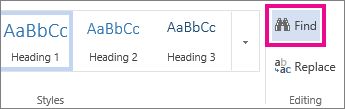
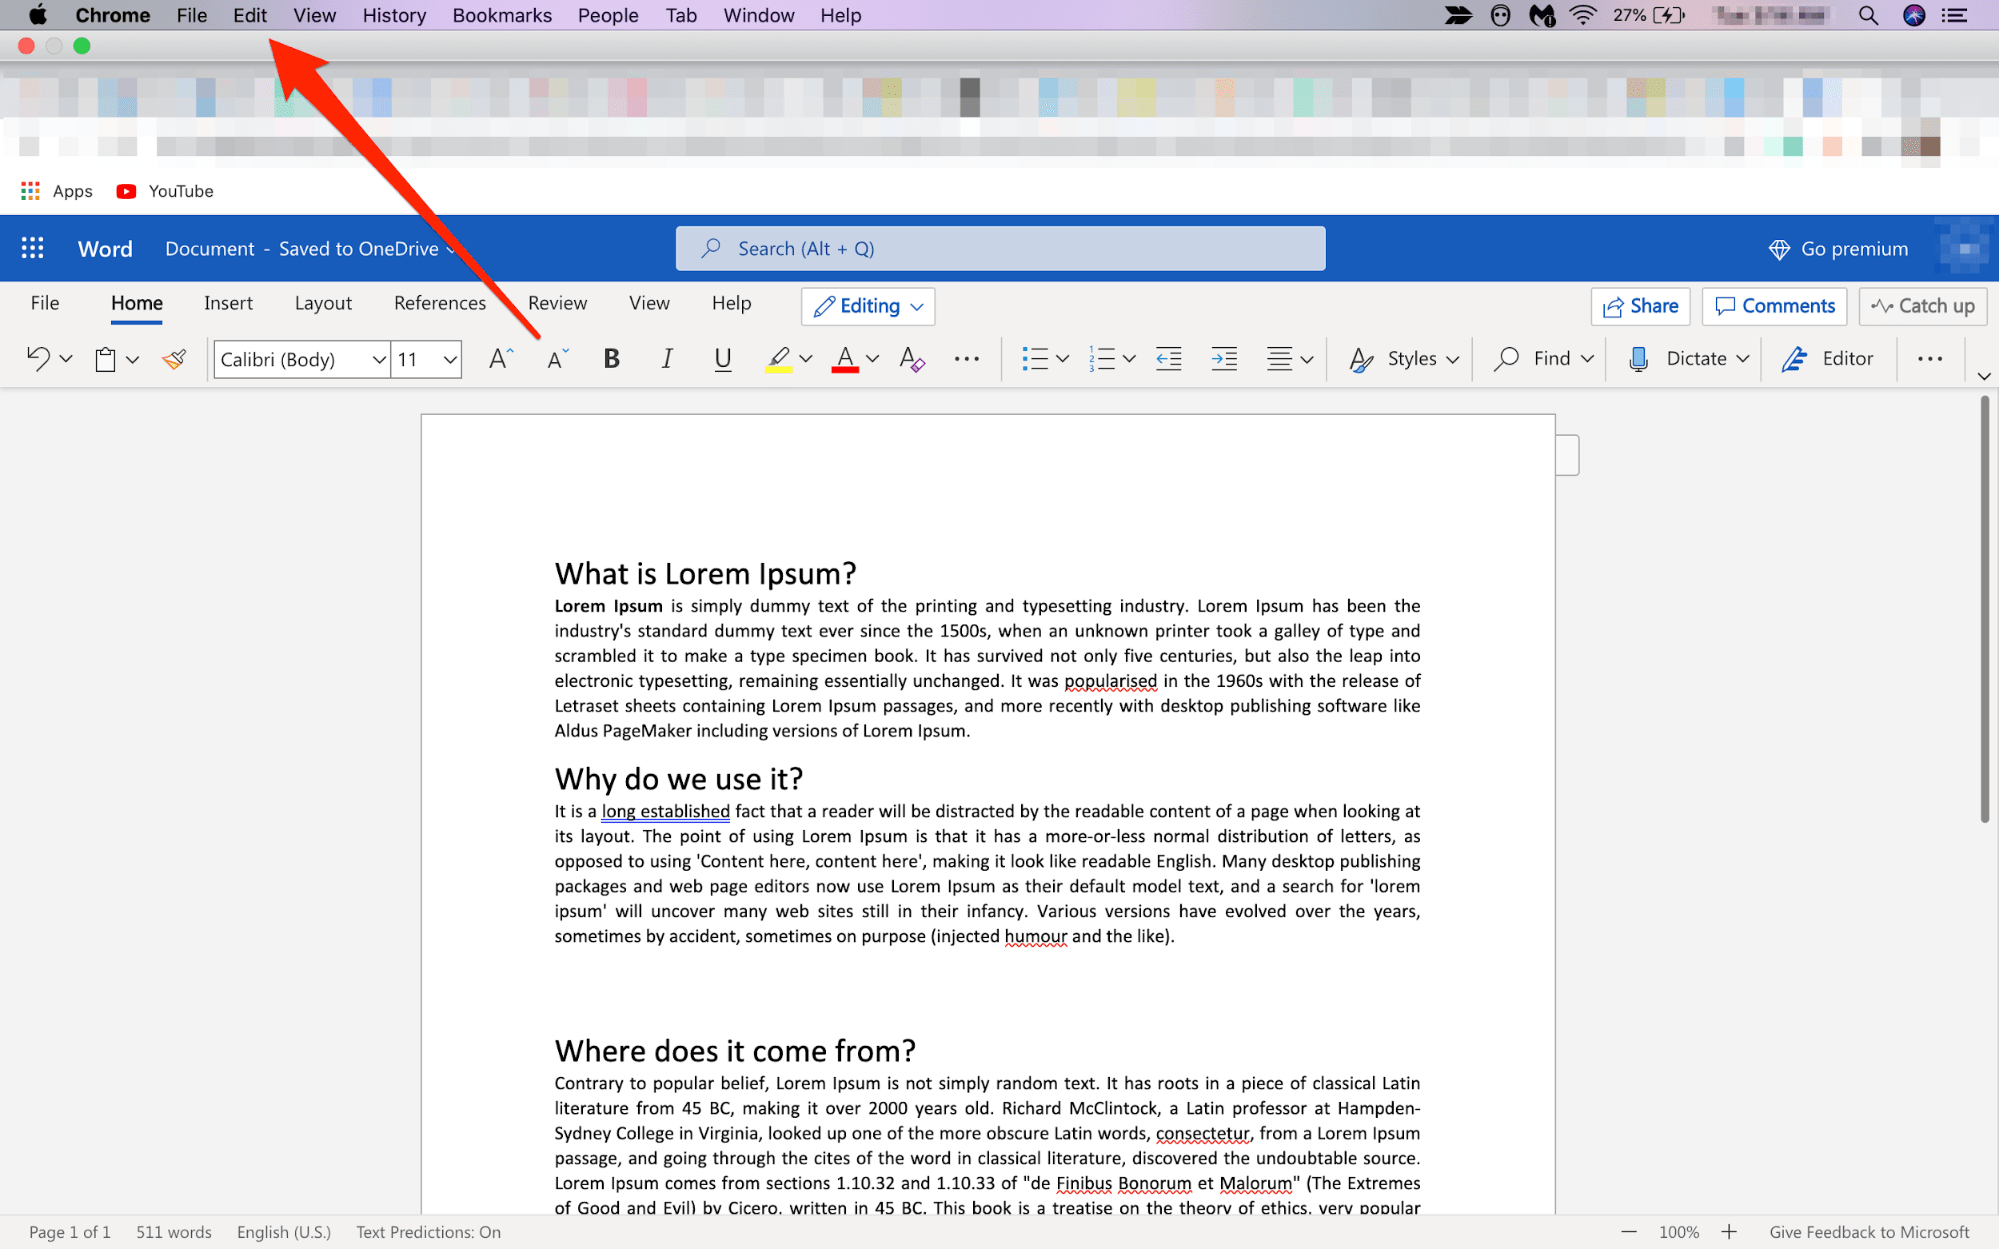
To open the Find pane from the Edit View, press Ctrl+F, or click Home > Find.
Find text by typing it in the Search the document for… box. Word Web App starts searching as soon as you start typing. To further narrow the search results, click the magnifying glass and select one or both of the search options.
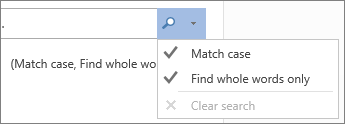
Tip: If you don’t see the magnifying glass, click the X at the end of the Search the document for… box. The magnifying glass reappears.
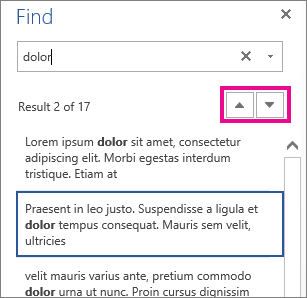
When you type in your document or make a change, Word Web App pauses the search and clears the Find pane. To see the results again, click the Next Search Result or Previous Search Result arrow.
When you’re done searching, click the X at the end of the Search the document for… box.
Need more help?
Use the word processor’s search function to locate text and more
Updated on December 15, 2020
What to Know
- Basic word search: Go to the Home tab. Select Find and enter the text for the search.
- Advanced search: Go to Home > Find. Choose the search drop-down arrow. Select Options and select your criteria.
This article explains how to search for text in Microsoft Word. The information applies to Word 2019, Word 2016, Word 2013, Word 2010, Word Online, and Word for Microsoft 365.
How to Do a Basic Word Search in MS Word
Microsoft Word includes a search function that makes it easy to search for different elements in a document, including text. Use the basic tool to look for instances of a specific word, or the advanced options to perform tasks such as replace all instances of a word with another one or search for equations.
To run a basic search for a specific word or phrase in Word:
-
Go to the Home tab and select Find, or press Ctrl+F.
In older versions of Microsoft Word, select File > File Search.
-
In the Navigation pane, enter the text you want to search for. A list of matching words displays in the Navigation pane and instances of the word are highlighted in the main document.
-
Cycle through the results in the Navigation pane in one of three ways:
- Press Enter to move to the next result.
- Select a result with the mouse.
- Select the Up and Down arrows to move to the previous or next result.
-
Make any changes or edits to the document as needed.
-
Select the Down arrow to move to the next instance of the word.
Match Case, Whole Words Only, and More
Beyond searching for every instance of a word, you can get more specific about what you want to find. For example, to find whole instances of a word and not every word that contains the letter combination or to find instances of a word that aren’t capitalized.
Here’s how to do an advanced search:
-
Select Home > Find.
-
In the Navigation pane, select the Search drop-down arrow.
-
Choose Options.
-
In the Find Options dialog box, choose the description that best fits what you’re trying to find. For example, to find instances of a word with the same capitalization, select Match case.
-
Select OK.
Use Advanced Find
Many of the choices available in the Find Options dialog box are also available in Advanced Find. Advanced Find includes the option to replace the text with something new. Based on your selection, Word replaces one instance or all instances at once. You can also replace the formatting, or change the language, paragraph, and tab settings.
Find Instances of Other Elements
Other options in the Navigation pane include searching for equations, tables, graphics, footnotes, endnotes, and comments.
Thanks for letting us know!
Get the Latest Tech News Delivered Every Day
Subscribe
To open the Find pane from the Edit View, press Ctrl+F, or click Home > Find. Find text by typing it in the Search the document for… box. Word Web App starts searching as soon as you start typing.
Contents
- 1 How do I search for a word in a word document 2010?
- 2 How do I search all of my documents for a specific word?
- 3 Where is the search box in word?
- 4 How do I insert a search button in word?
- 5 How do I search for a Word in a document in Windows 10?
- 6 Can you search multiple Word documents at once?
- 7 How do I find all Word documents in Windows 10?
- 8 How do I get a search box?
- 9 What we can search using find command?
- 10 What is the shortcut key for spell check in word?
- 11 Why is find command used in MS word?
- 12 How do I search for a text string in Windows 10?
- 13 How do I search for a specific file type in Windows 10?
- 14 How do I search for text in command prompt?
- 15 How do I search multiple documents?
- 16 How do I search for a word document without opening it?
- 17 What is the search box in Windows 10 called?
- 18 Why can’t I use the search bar in Windows 10?
- 19 Why is my search bar not working?
- 20 How do I search for a file?
Searching with the Word 2010 Navigation pane
You can also use the keyboard shortcut: Ctrl+F. Clicking the Find button or pressing Ctrl+F summons the Navigation pane. In the Find What text box, type the text you want to find. While you type, matching text is highlighted in the document.
How do I search all of my documents for a specific word?
How to Search for words within files on Windows 7
- Open windows explorer.
- Using the left hand file menu select the folder to search in.
- Find the search box in the top right hand corner of the explorer window.
- In the search box type content: followed by the word or phrase you are searching for.(eg content:yourword)
Where is the search box in word?
At the top of your Microsoft Office apps on Windows you’ll find the new Microsoft Search box. This powerful tool helps you quickly find what you’re looking for, from text to commands to help and more.
How do I insert a search button in word?
Click Customize the Quick Access Toolbar > More Commands. In the Choose commands from list, click Commands Not in the Ribbon. Find the command in the list, and then click Add.
How do I search for a Word in a document in Windows 10?
Click the Cortana or Search button or box on the Taskbar and type “indexing options.” Then, click on Indexing Options under Best match. On the Indexing Options dialog box, click Advanced. Click the File Types tab on the Advanced Options dialog box. By default, all the extensions are selected, and that’s what we want.
Can you search multiple Word documents at once?
The easiest and most convenient tool for searching text in multiple Word files is SeekFast. With this tool, you can quickly and efficiently search for a combination of words or phrases in your documents, and the results are sorted by relevance, similar to search on Google, Bing, and other search engines.
How do I find all Word documents in Windows 10?
Search File Explorer: Open File Explorer from the taskbar or right-click on the Start menu, and choose File Explorer, then select a location from the left pane to search or browse. For example, select This PC to look in all devices and drives on your computer, or select Documents to look only for files stored there.
How do I get a search box?
If your search bar is hidden and you want it to show on the taskbar, press and hold (or right-click) the taskbar and select Search > Show search box. If the above doesn’t work, try opening taskbar settings. Select Start > Settings > Personalization > Taskbar.
What we can search using find command?
You can use the find command to search for files and directories based on their permissions, type, date, ownership, size, and more. It can also be combined with other tools such as grep or sed .
What is the shortcut key for spell check in word?
F7
Open the document you want to check for spelling or grammar mistakes, and then press F7. You can also use the ribbon to start the check. Press Alt+R to open the Review tab, and then press C, 1 to select the Check Document option.
Why is find command used in MS word?
The Find command lets you enter a word. Each time you push the Enter/Return button on your keyboard or click the Find button, that word will be found and highlighted in the text on the Web page you are reading. This makes it very easy to find the keyword you are looking for without having to scan long passages.
How do I search for a text string in Windows 10?
If you’d like to always search within file contents for a specific folder, navigate to that folder in File Explorer and open the “Folder and Search Options.” On the “Search” tab, select the “Always search file names and contents” option.
How do I search for a specific file type in Windows 10?
Click Start and then go to File Explorer by expanding the Windows system folder. You can also simply type File Explorer in the Search bar. Click the View tab in File Explorer. Check File name extension box.
How do I search for text in command prompt?
How to Use the Find Command to Search in Windows
- Open the Command Prompt Window with Administrative Privileges.
- Switches and Parameters for the find Command.
- Search a Single Document for a Text String.
- Search Multiple Documents for the Same Text String.
- Count the Number of Lines in a File.
How do I search multiple documents?
Search inside multiple PDFs at once
- Open any PDF in Adobe Reader or Adobe Acrobat.
- Press Shift+Ctrl+F to open the Search panel.
- Select the All PDF Documents in option.
- Click the dropdown list arrow to show all drives.
- Type the word or phrase to search.
How do I search for a word document without opening it?
Open File Explorer (aka Windows Explorer). Navigate to the folder containing the documents. Click in the search box in the upper right corner, below the ribbon. Enter the word you want to search for, then press Enter.
What is the search box in Windows 10 called?
Cortana is getting separated from the Windows 10 search bar, with Microsoft’s assistant getting a separate spot in the taskbar. The new functionality was released today in Windows 10 Build 18317 (19H1), the latest version of Microsoft’s Insider Preview in the so-called Fast ring.
Why can’t I use the search bar in Windows 10?
One of the reasons why Windows 10 search isn’t working for you is because of a faulty Windows 10 update. If Microsoft hasn’t released a fix just yet, then one way of fixing search in Windows 10 is to uninstall the problematic update. To do this, return to the Settings app, then click ‘Update & Security’.
Why is my search bar not working?
Use the Windows Search and Indexing troubleshooter to try to fix any problems that may arise.In Windows Settings, select Update & Security > Troubleshoot. Under Find and fix other problems, select Search and Indexing. Run the troubleshooter, and select any problems that apply.
How do I search for a file?
Work
- Introduction.
- 1Choose Start→Computer.
- 2Double-click an item to open it.
- 3If the file or folder that you want is stored within another folder, double-click the folder or a series of folders until you locate it.
- 4When you find the file you want, double-click it.

Microsoft Word provides a feature that allows you to search for text within a document. You can also use advanced settings to make your search more specific, such as case matching or ignoring punctuation. Here’s how to use it.
Finding Text in a Word Doc
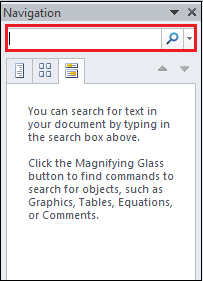
To search for text in Word, you’ll need to access the “Navigation” pane. You can do so by selecting “Find” in the “Editing” group of the “Home” tab.

An alternative method to accessing this pane is by using the Ctrl + F shortcut key on Windows or Command + F on Mac.
RELATED: How to Search for Text Inside of Any File Using Windows Search
With the “Navigation” pane open, enter the text you want to find. The number of instances that text appears throughout the document will be displayed.
You can navigate through the search results by selecting the up and down arrows located beneath the search box or by clicking directly on the result snippet in the navigation pane.
Setting Advanced Search Features
The caveat with the basic search function is that it doesn’t take into account many things such, as the case of the letters in the text. This is a problem if you’re searching a document that contains a lot of content, such as a book or thesis.
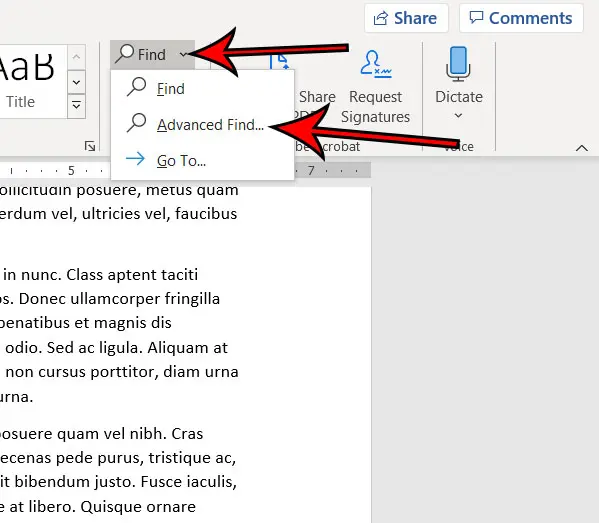
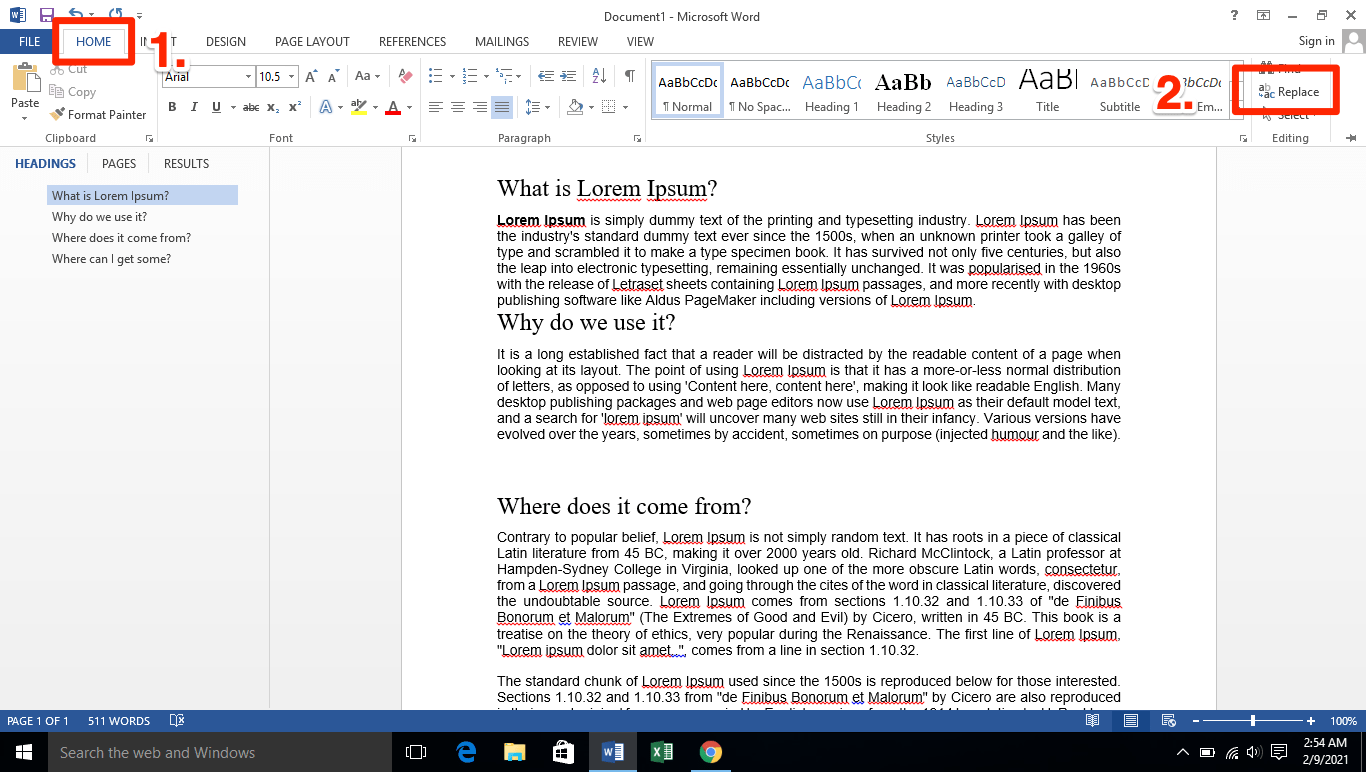
You can fine-tune these details by going to the “Editing” group of the “Home” tab, selecting the arrow next to “Find,” and selecting “Advanced Find” from the drop-down list.
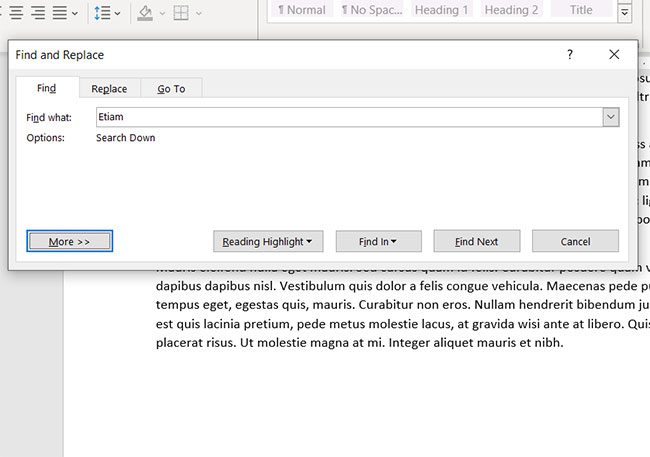
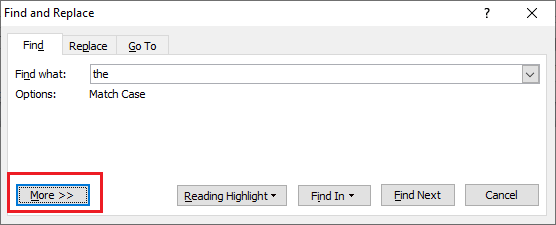
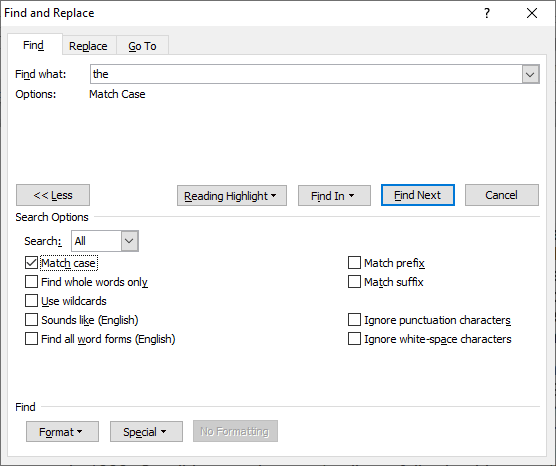
The “Find and Replace” window will appear. Select “More.”
In the “Search Options” group, check the box next to the options you want to enable.
Now, the next time you search for text in Word, the search will work with the selected advanced options.
RELATED: Microsoft Word: Document Formatting Essentials
READ NEXT
- › How to Highlight Text in Microsoft Word
- › How to Search in Google Docs
- › Why One Ultrawide Is Better Than Two Monitors
- › The Best DNS Servers for Secure Browsing
- › Google+ Will Come to a Final End on July 5, 2023
- › Universal Audio Volt 2 Review: A Workhorse Audio Interface With Vintage Charm
- › Get to Your Windows 11 Desktop: 7 Fastest Methods
- › Why the Right-Click Menu in Windows 11 Is Actually Good
How-To Geek is where you turn when you want experts to explain technology. Since we launched in 2006, our articles have been read billions of times. Want to know more?
Often when working in Microsoft Word we only need to change one or two words in the file to make it relevant to another client or project. For Example, updating a client’s name in a 30-page contract or updating the address of a company or speakers name in a briefing document.
Because scrolling through your document changing each word individually would be a tedious and time-consuming task Microsoft has built-in a hand tool called ‘Find and Replace’.
Find and Replace allows you to replace one word with another, across the entirety of your Microsoft Word Document at the click of a button.
There is no limit to how many times you can use this tool, but it does need to be done word by word, we can’t yet find and replace multiple words at once. But still, it’s a huge time saver and will guarantee you don’t miss a word that needs replacing.
In this post we will show you how to use the Find and Replace tool in Microsoft Word and leave you updating your document in seconds.
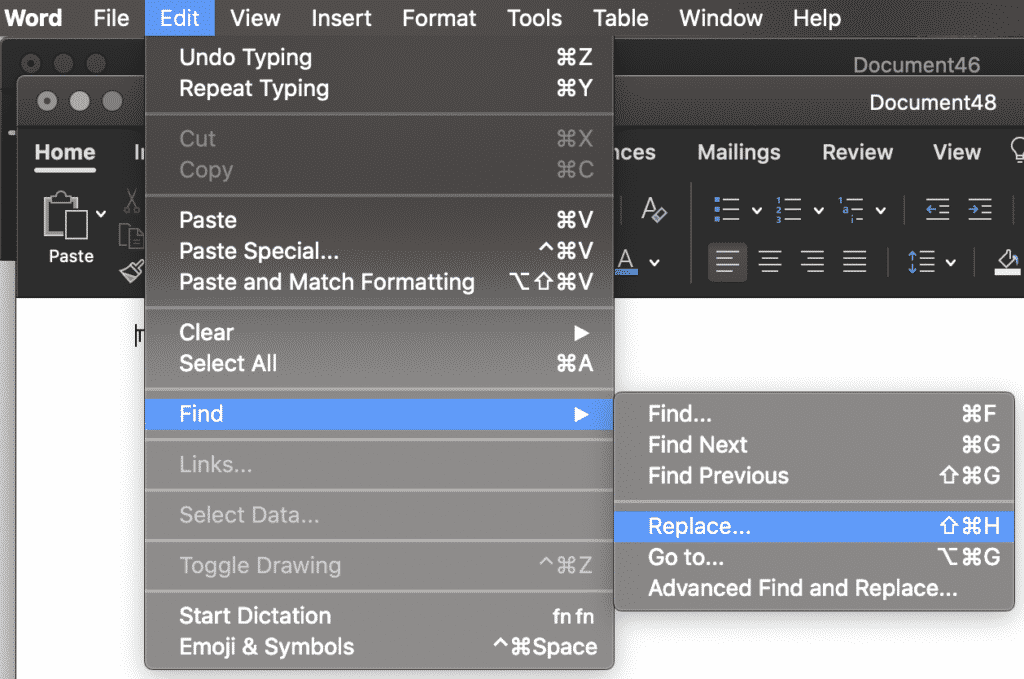
Using Microsoft Word’s Find and Replace
- Open Word
- Find and click Edit in the Home bar
- Under Edit click Find

- In the Find tab press Replace….
- This will open a navigation box on the left-hand side of your Word Document
- Type the word you wish to replace in the Find box
- Type the word you wish to replace this word with, in the second text box
- Choose Replace. To replace all instances at the same time, select Replace All.
- Press OK.
You have no successfully used Words Find and Replace feature to update your Microsoft Word Document.
Advanced Word Replacement
If your word search shows multiple options, as shown below.
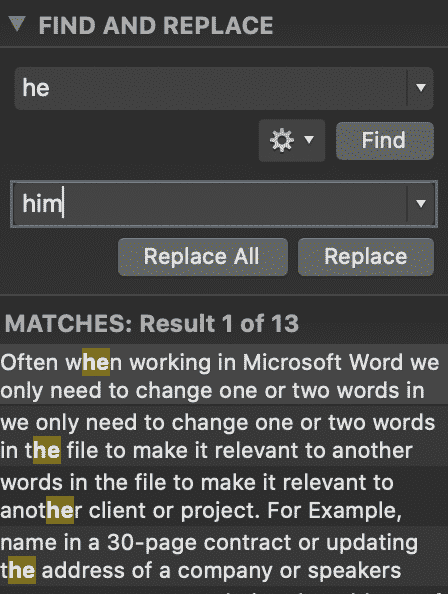
You can scroll through the highlighted words until you find the word you would like to replace. This will narrow down the word search and ensure you only replace the exact word you are looking for.

Looking for an easier solution to your collaboration frustrations?
When collaborating in Microsoft Word, your email inbox can quickly become filled with updated versions of a document being sent back and forward between colleagues.
John made an edit, sent an email ‘see updated attached’.
Then Lucy made an edit, sent an email 30minutes later ‘updated version attached’, and it goes on for days.
Sending updated versions via email is one way to know a new version is available and required your attention. But it can also clutter your inbox with internal emails, with a single line or sometimes nobody of text in the email.

The alternative is to send them via a group chat channel such as Slack or Microsoft Teams, but you should make a new channel for the document updates so that you don’t miss one, or lose it in an open channel as other conversations start happening around the document being sent.
With overflowing inboxes and your slack channel constantly telling you there are un-read messages there needs to be a solution for collaborating alone. Somewhere your updated versions can live in peace, with no other noise around them to allow you to easily review and check them at any time.
The solution is here and it comes in the form of a great new purpose-built tool called Simul Docs.
Simul was built just for Microsoft Word and for you, to help you collaborate with ease.

First and foremost, Simul will store and manage every version of your document in an easy to navigate toolbar that you can access from anywhere you have an internet connection (or offline if you do a quick download before losing your connection).
As a new version of your document is created, Simul will automatically save the file under a numerical version number that makes sense. The first version is named 0.0.1, the second 0.0.2, the third 0.0.3 and so on. Making it easy for you to keep track of how many versions have been made and which one is the most recent.

But what about any extra notes or comments the author wanted to make, ones they would usually put in the email such as ‘Tim, this is my final round of edits before we send onto client’? No worries, Simul allows you to add comments and notes to any version as well, so your team can see what is going on at all times.

Speaking of comments and notes, Simul will also track every comment, change or edit made to a version for you, without you having to remember to turn tracked changes on. That’s pretty cool, right?

So a tool that manages your version control, saves your files and stores them and tracks all of your edits and changes without you thinking about any of it, it sounds too good to be true or as though it would be difficult to use or implement. Well, don’t worry it’s not, it’s here and it is called Simul Docs and it’s so easy to use, after walking through the in-app tutorial we had it down within 3 minutes.
It’s a bit like an apple product, it just makes sense. It’s clean and simple, nothing too complicated, but with everything you need all in the one spot.
If you’re not convinced already, head over to Simul now and give their free trial a go.
Collaboration just got a whole lot easier with Simul Docs.
- When you learn how to search for a word in Microsoft Word, you will be learning how to use the Find tool. However, there is also an Advanced Find feature that lets you customize your search further, and there is a Find and Replace tool that lets you replace instances of words and phrases.
- Aside from the method below that we use to search for a word in a Word document, you can also use a keyboard shortcut to launch the Find tool. Simply press Ctrl + F on your keyboard to launch it.
- The Find tool lets you search for whole words, phrases, or even letters. You can use it to find what you are looking for in your document, regardless of how much or how little of the information you enter into the search field.
Microsoft Word’s search tools come in a couple of different varieties. The basic search lets you locate specific words or phrases in your document, while the Advanced Find tool lets you do things like match case, use wildcards, and generally find text in most of the ways that you might consider.
You can search for certain words in Microsoft Word by clicking the Home tab, selecting the Find button, then typing your search term into the “Search” field.
This will then highlight each instance of the word that appears in the document, and you can click each of the search results in the Navigation column to jump to the occurrence of that word in your document.
But if you are trying to figure out how to search for a word in Microsoft Word, then you might be struggling to locate the correct tool. Our guide below will show you how to use the search tool in your Word file.
How to Search a Word Document
- Open the Word document.
- Select the Home tab at the top of the window.
- Click the Find button in the Editing group of the ribbon.
- Enter your search term into the search box, then click a result to go to that point in the document.
Our guide continues below with additional information on how to find a word in a document, including pictures of these steps.
How to Search for a Word in a Microsoft Word Document (Guide with Pictures)
The steps in this article were performed in Microsoft Word for Office 365, but will also work in other versions of Word, such as Word 2016 or Word 2019.
As mentioned earlier, you can also open the search tool by pressing Ctrl+F on your keyboard.
Step 1: Open your document in Microsoft Word.
Step 2: Click the Home tab above the ribbon at the top of the window.
Step 3: Click the Find button in the Editing section of the ribbon.
Note that there are down arrows to the right of the Find button and the Select button in that section that you can use for other options. For example, there’s an Advanced Find option on the Find drop down menu that you can use for additional search options to locate a particular word or words in the document.

Step 4: Type your search term into the search box in the Navigation pane on the left side of the window.
Results containing your search term will appear in the column. You can then click a search result to be taken to its location in the document.
The up and down arrows under the search field will allow you to quickly move between the different results.
Additional Information on How to Search for a Word in a Microsoft Word Document
- Other applications, including Microsoft Excel, can also take advantage of the Ctrl + F keyboard shortcut for finding information.
- If you have used older versions of Microsoft Word, then you might be used to the dialog box that previously appeared when you tried to search for a word. The Navigation pane has replaced the basic search tool, but that dialog box will still appear if you select the Advanced Find option from the dropdown menu.
- The search function in MS Word also displays a magnifying glass at the right end of the search box. If you click that magnifying glass you will see a menu with additional ways to search for words or other items in the document.
- The Find and Replace dialog box also has a “Replace” tab at the top of the window. If you select that tab you will be able to enter the existing word that you want to replace, then enter the word that you want to use to replace it.
- Once the Find and Replace dialog box appears and you start using that to search through Word documents, it’s possible that you will find that to be a better way to search through an entire document and customize what Word replaces. Fortunately this is a similar search function that exists in other Microsoft office applications so you will be able to use it and its advanced options for searching while you look through spreadsheets and slideshows.
Find out how to remove page numbers in Microsoft Word if you have a document that contains page numbers that you either don’t want or don’t need.
Additional Sources

Matthew Burleigh has been writing tech tutorials since 2008. His writing has appeared on dozens of different websites and been read over 50 million times.
After receiving his Bachelor’s and Master’s degrees in Computer Science he spent several years working in IT management for small businesses. However, he now works full time writing content online and creating websites.
His main writing topics include iPhones, Microsoft Office, Google Apps, Android, and Photoshop, but he has also written about many other tech topics as well.
Read his full bio here.
Microsoft includes a search function that helps you to easily find various characters, words, and phrases in a Word document. Generally, a search option is used when we work with long Microsoft Word documents.
Note: We can apply the below methods on Word 2010, Word 2013, Word 2016, Word 2019, Word Online, and Microsoft 365 to search the words.
You can use the below mentioned steps to search a word in a Word document —
Step 1: Press the Ctrl+F key or go to Home Tab on the ribbon and click on the Find option.
Note: For the older versions of Microsoft Word, go to File -> File Search.

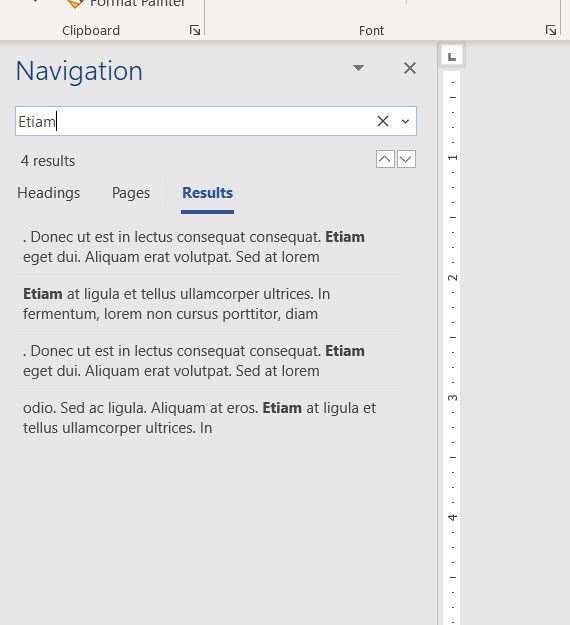
Step 2: A search Navigation pane appears on the screen. Type the word in the search box that you want to search in the document.
Step 3: The screenshot shows that the search word is highlighted in the main Word document.

Setting Advanced Search Features
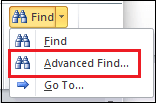
1. Go to the Home tab, click on the drop-down icon associated with the Find option.

2. Click on the Advanced Find from the drop-down menu.
3. A Find and Replace dialog box appears on the screen. Click on the More.
4. Select Options that you want to apply.
Now, when you search for a word it also highlights the Matching cases, as shown in the below screenshot.

You’ve just finished typing a presentation that’s due in about 15 minutes. But before you can celebrate your moment of victory, you realize that you’ve spelled your client‘s name wrong and have missed the double Rs in their company name multiple times throughout your document.
Cue: An aggravated scream.
The good news is that changing these small errors is an easy fix on Office 365. You can replace as many words as you want within seconds on Microsoft Word using its super helpful Find and Replace functionality.
This article will guide you through the necessary steps to help you find and replace text in MS Word.
Ready? Let’s begin.
How to Use Microsoft Word’s Find and Replace Feature
Microsoft is one of the leading companies in the world. It’s because it prioritizes its customers and comes up with innovations that can make their lives easier and more convenient.
The Find and Replace feature on MS Word is a shining example of this effort.
You can use this feature to find specific words in your file and then replace them in case there are some last-minute changes. This can even be useful when you make mistakes in the doc while typing or want to accommodate those last-minute client changes.
We’ll show you how to replace text in Microsoft Word, depending on the computer device you use.
How to Change and Replace Text in MS Word on Windows
It’s no wonder that all Windows devices have built-in Microsoft programs considering it’s a product developed by the Microsoft company themselves. If you find yourself using the word processor often for making notes or presentations, you’ll be especially thankful for the Find and Replace functionality.
Here’s a short step-by-step guide to using the feature in MS Word on Windows devices:
Step #1 Open Microsoft Word on your Windows device.
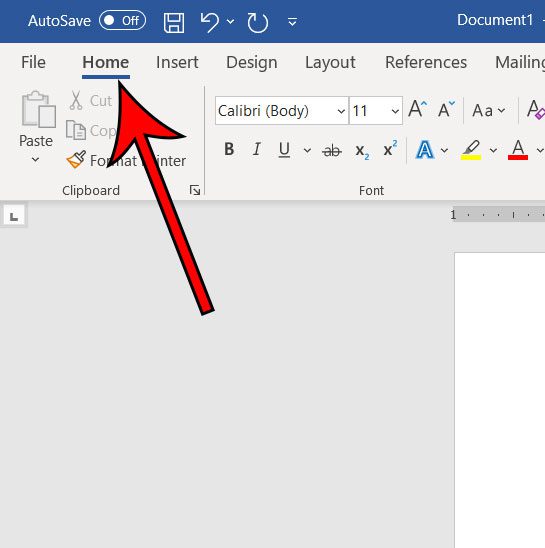
Step #2 Click on the Home tab on your top menu bar. A secondary menu will appear on your screen.
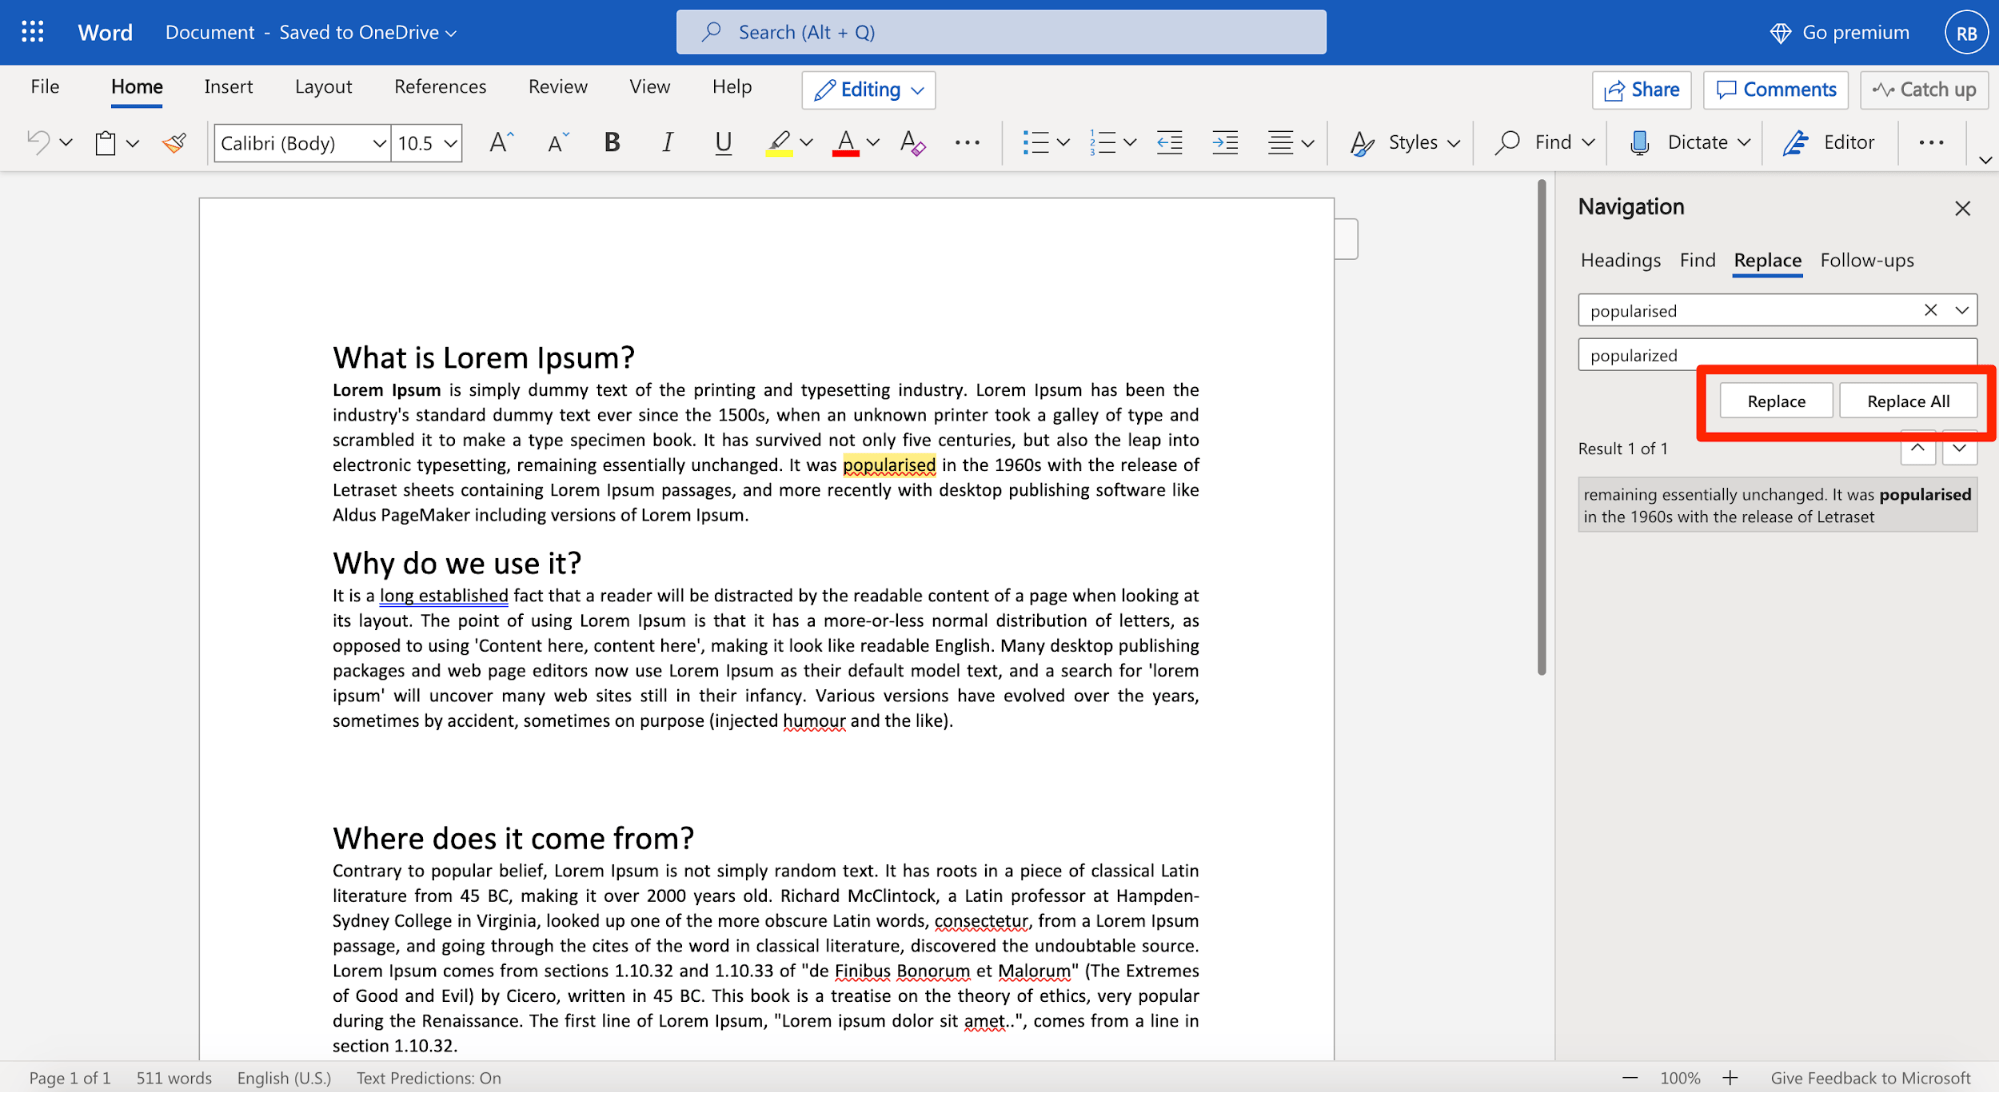
Step #3 Select the Replace option located on the top-right-hand side of your screen. Alternatively, you can also press Ctrl + H. The Find and Replace pop-up box will appear immediately.
Step #4 Type in the phrase or word you want to locate in your Word doc in the Find what field under the Find tab.
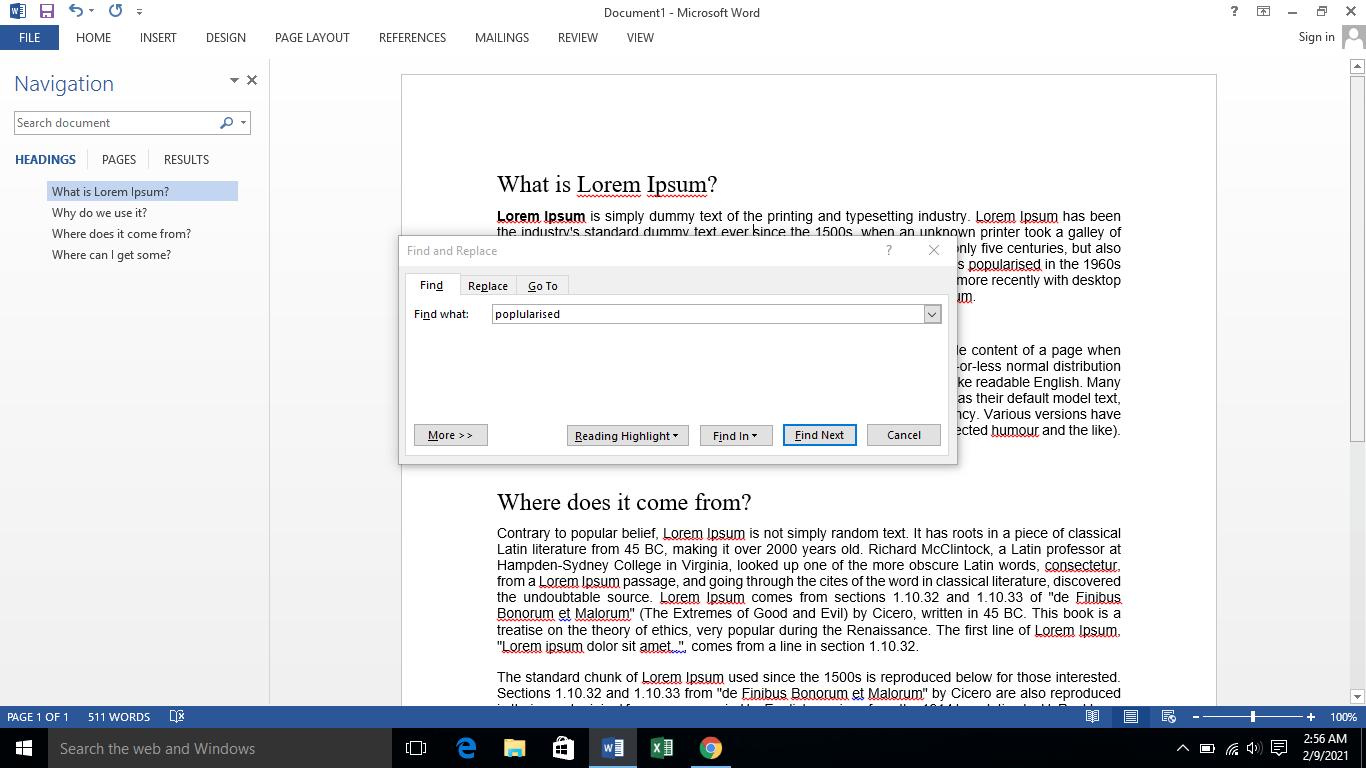
Step #5 Click on the Replace tab on the top menu bar. Type in the word you want to update in the Replace with field.
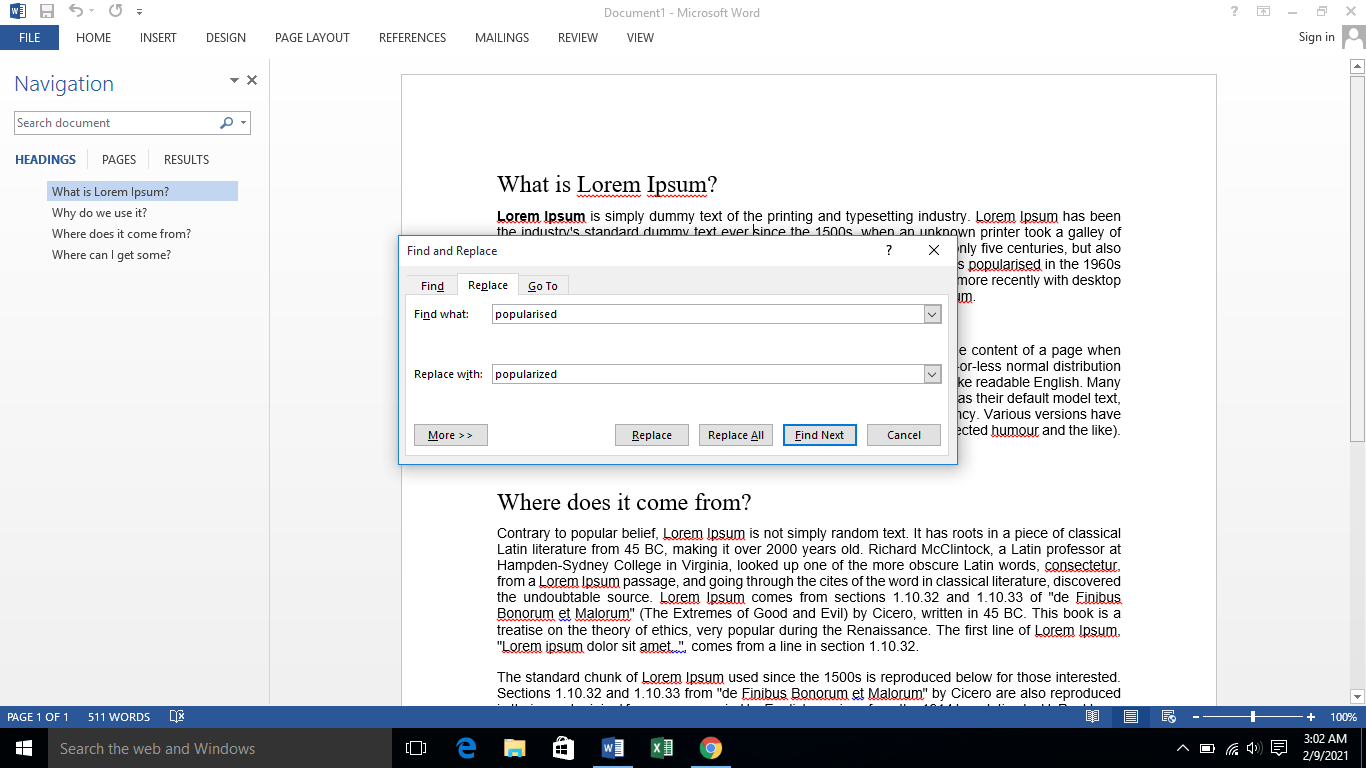
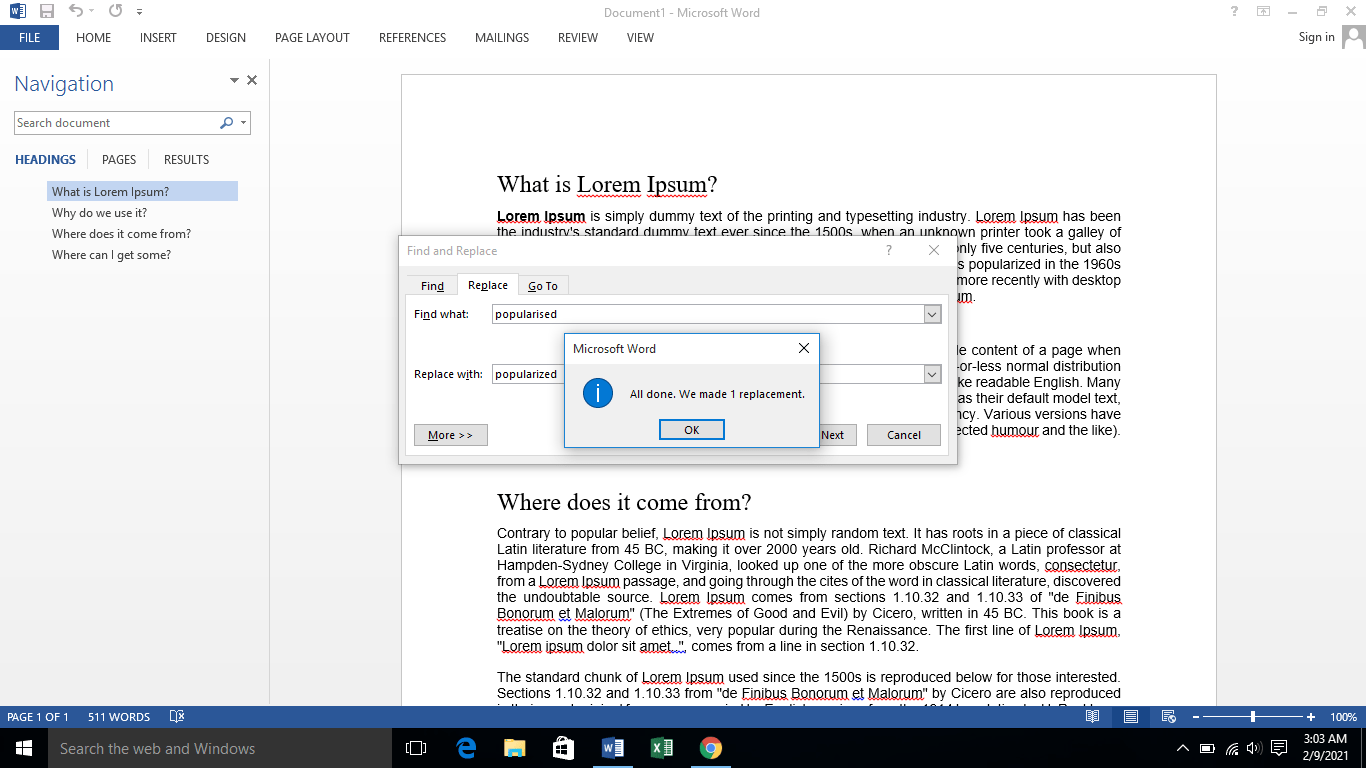
On clicking on the Replace button, the changes you want will be made one by one in the Word doc. However, if you want to update all fitting instances at once, you can click on Replace All instead.
Microsoft Word will give you a confirmation of the replacements made in your Word doc. It’ll look something like this:
How to Change and Replace Text in MS Word on Mac
Now that we’ve covered Windows, let’s see how you can use the Find and Replace feature on a MacBook. Here’s how to proceed in MS Word when you’re using an iOS device:
Step #1 Open the Microsoft Word document on your Mac.
Step #2 Take your cursor towards the top of your screen until you see your Mac’s top toolbar. Click on the Edit tab. A dropdown menu will appear.
Step #3 Click on Find from the displayed menu options. You’ll typically see a Replace… option on your screen.
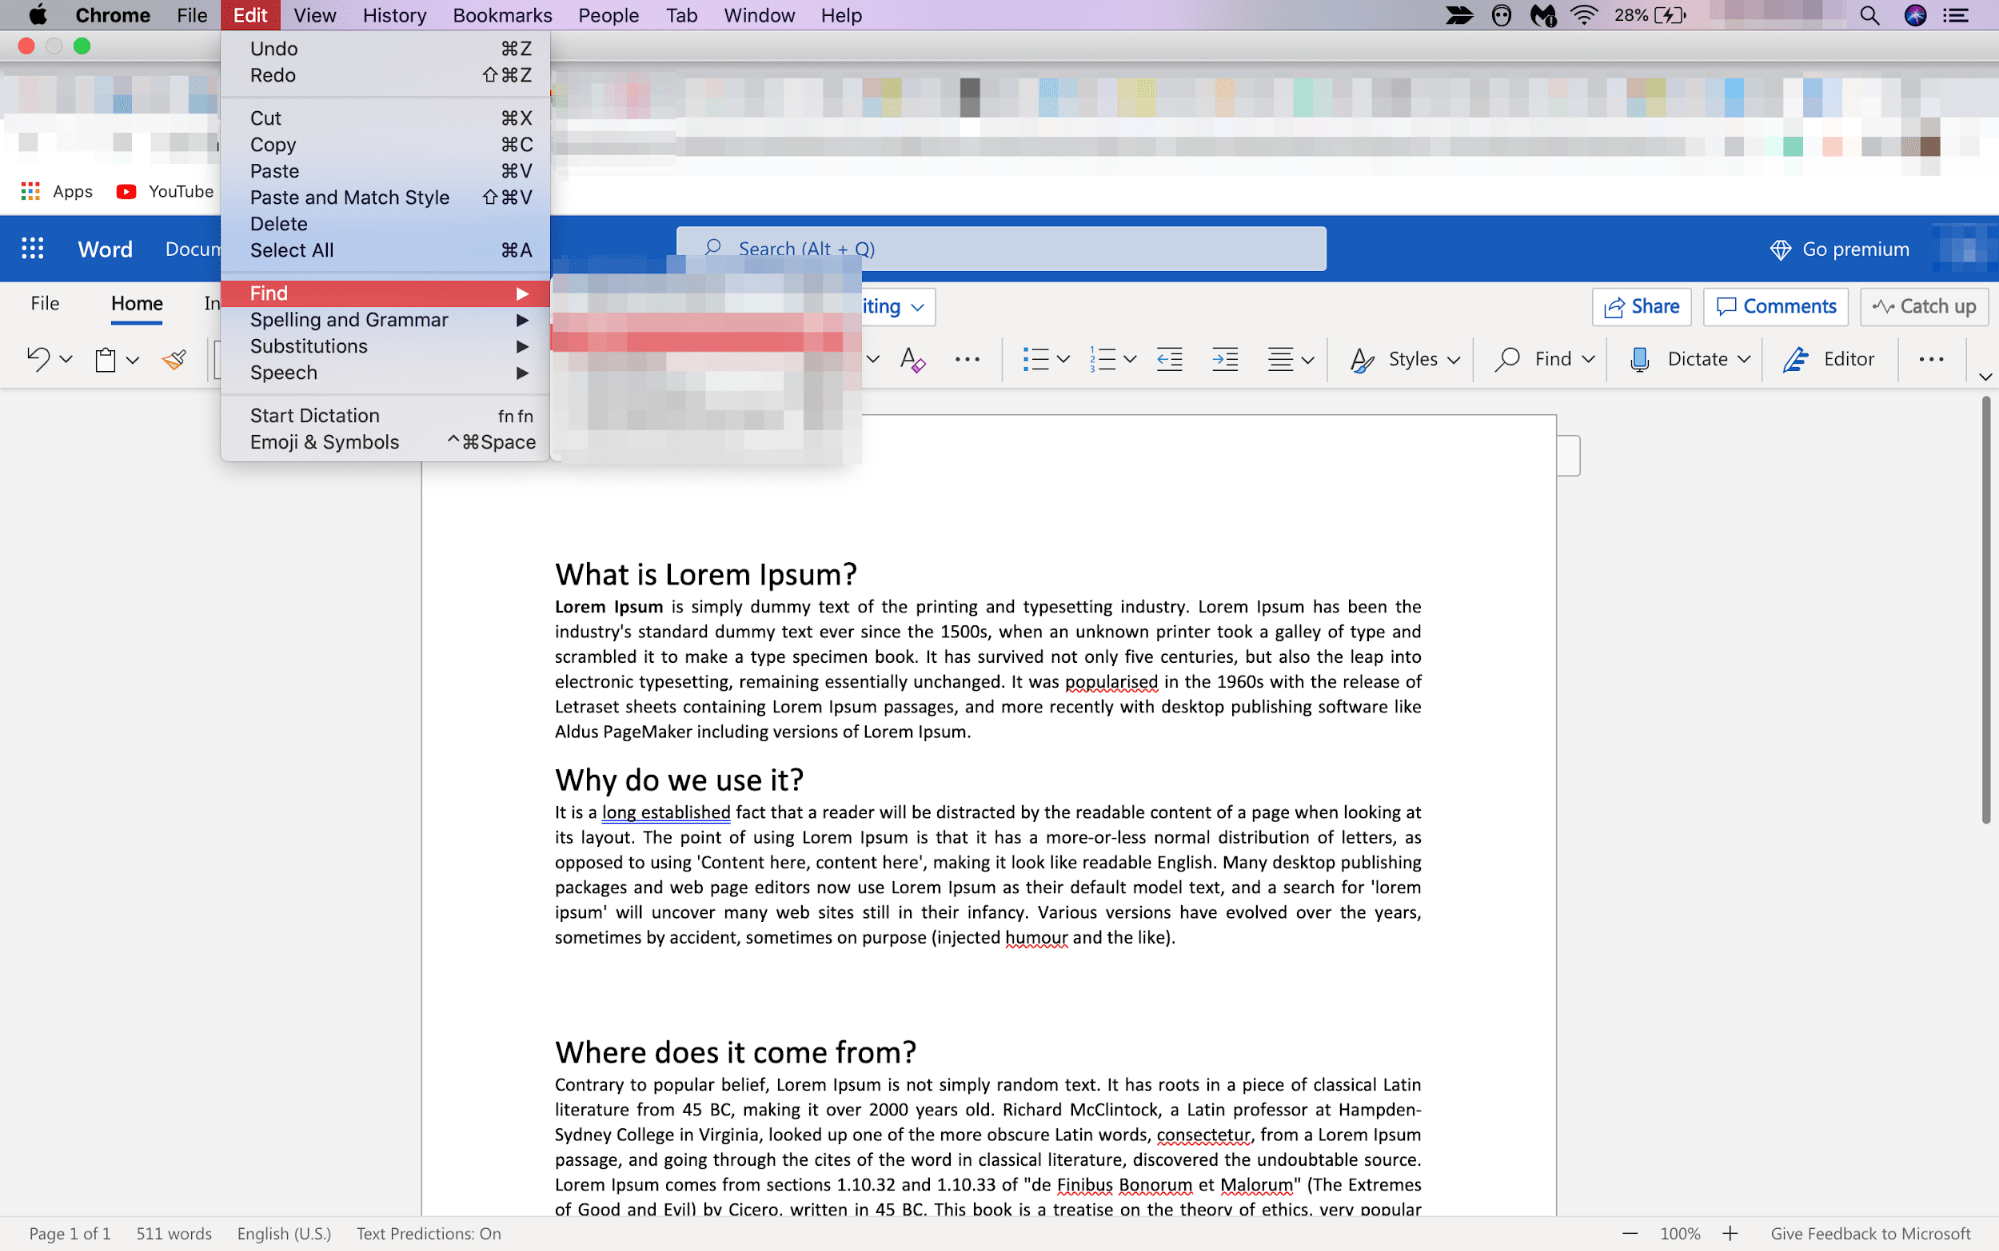
But if you don’t, simply press Shift + Command + H on your keyboard. A side navigation bar will appear on the left-hand side of your computer screen.
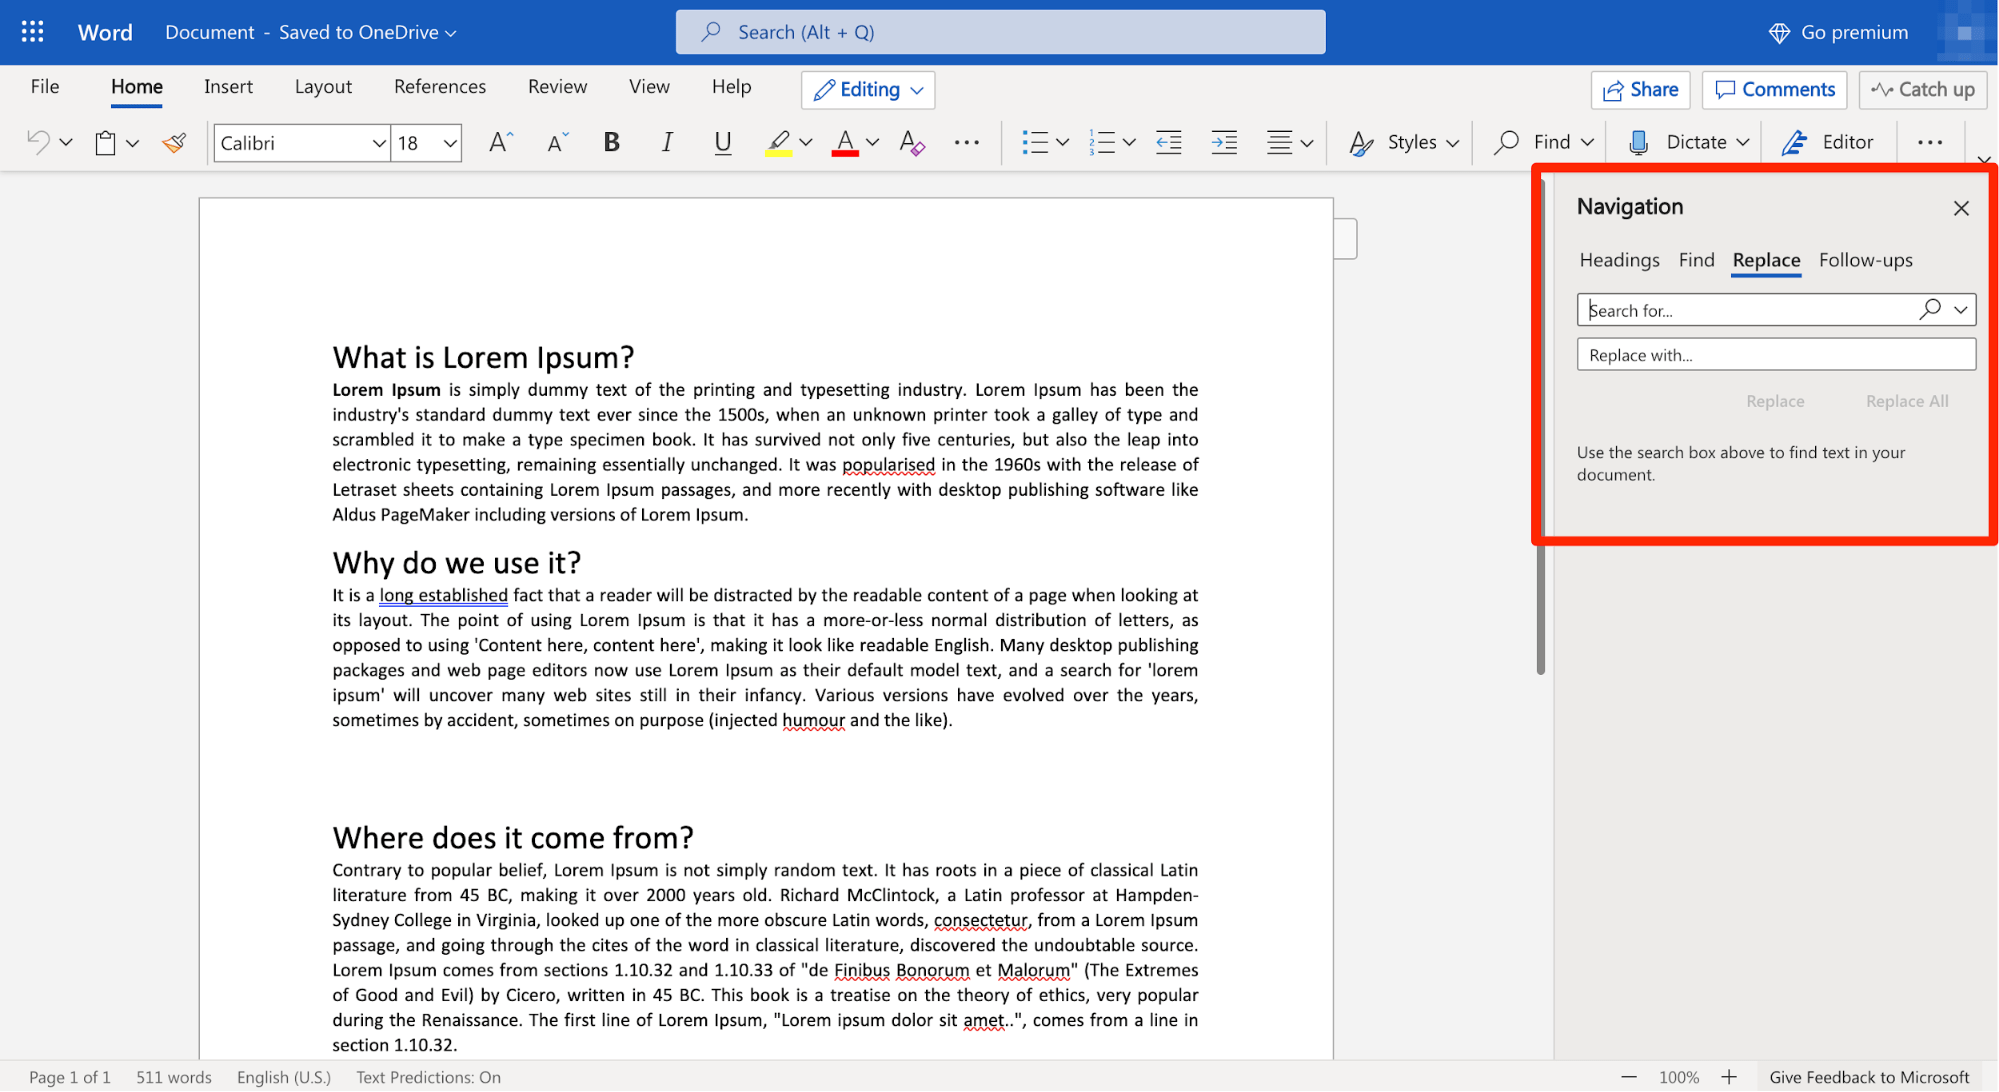
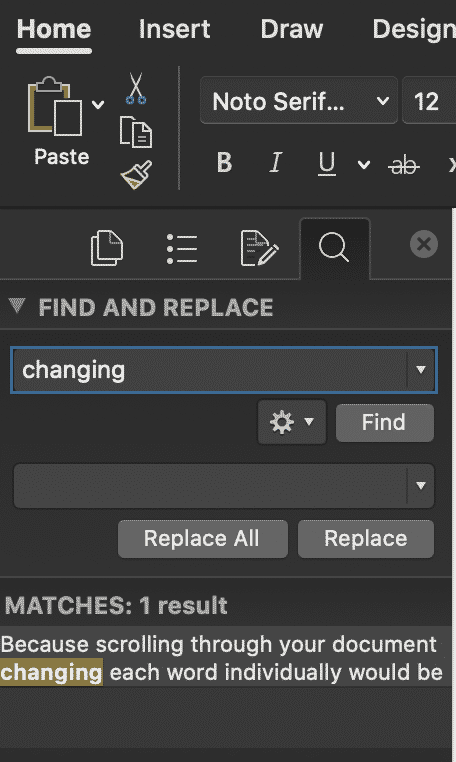
Step #4 Enter the word or phrase you want to replace in the doc in the Search for… field.
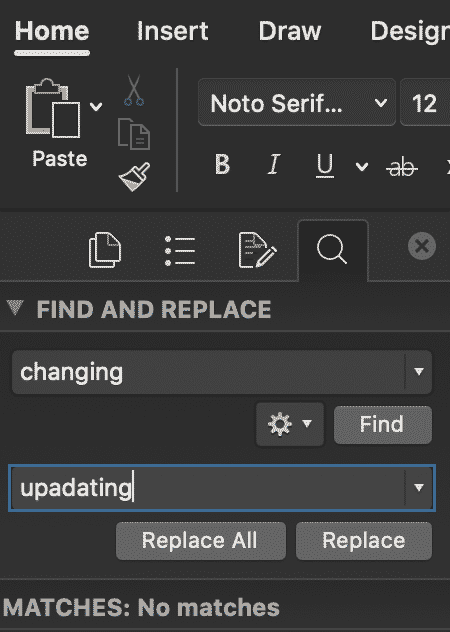
Once you’ve finished typing the incorrect word or phrase, type in the right word or phrase that you want to replace the incorrect one with in the Replace with… field.
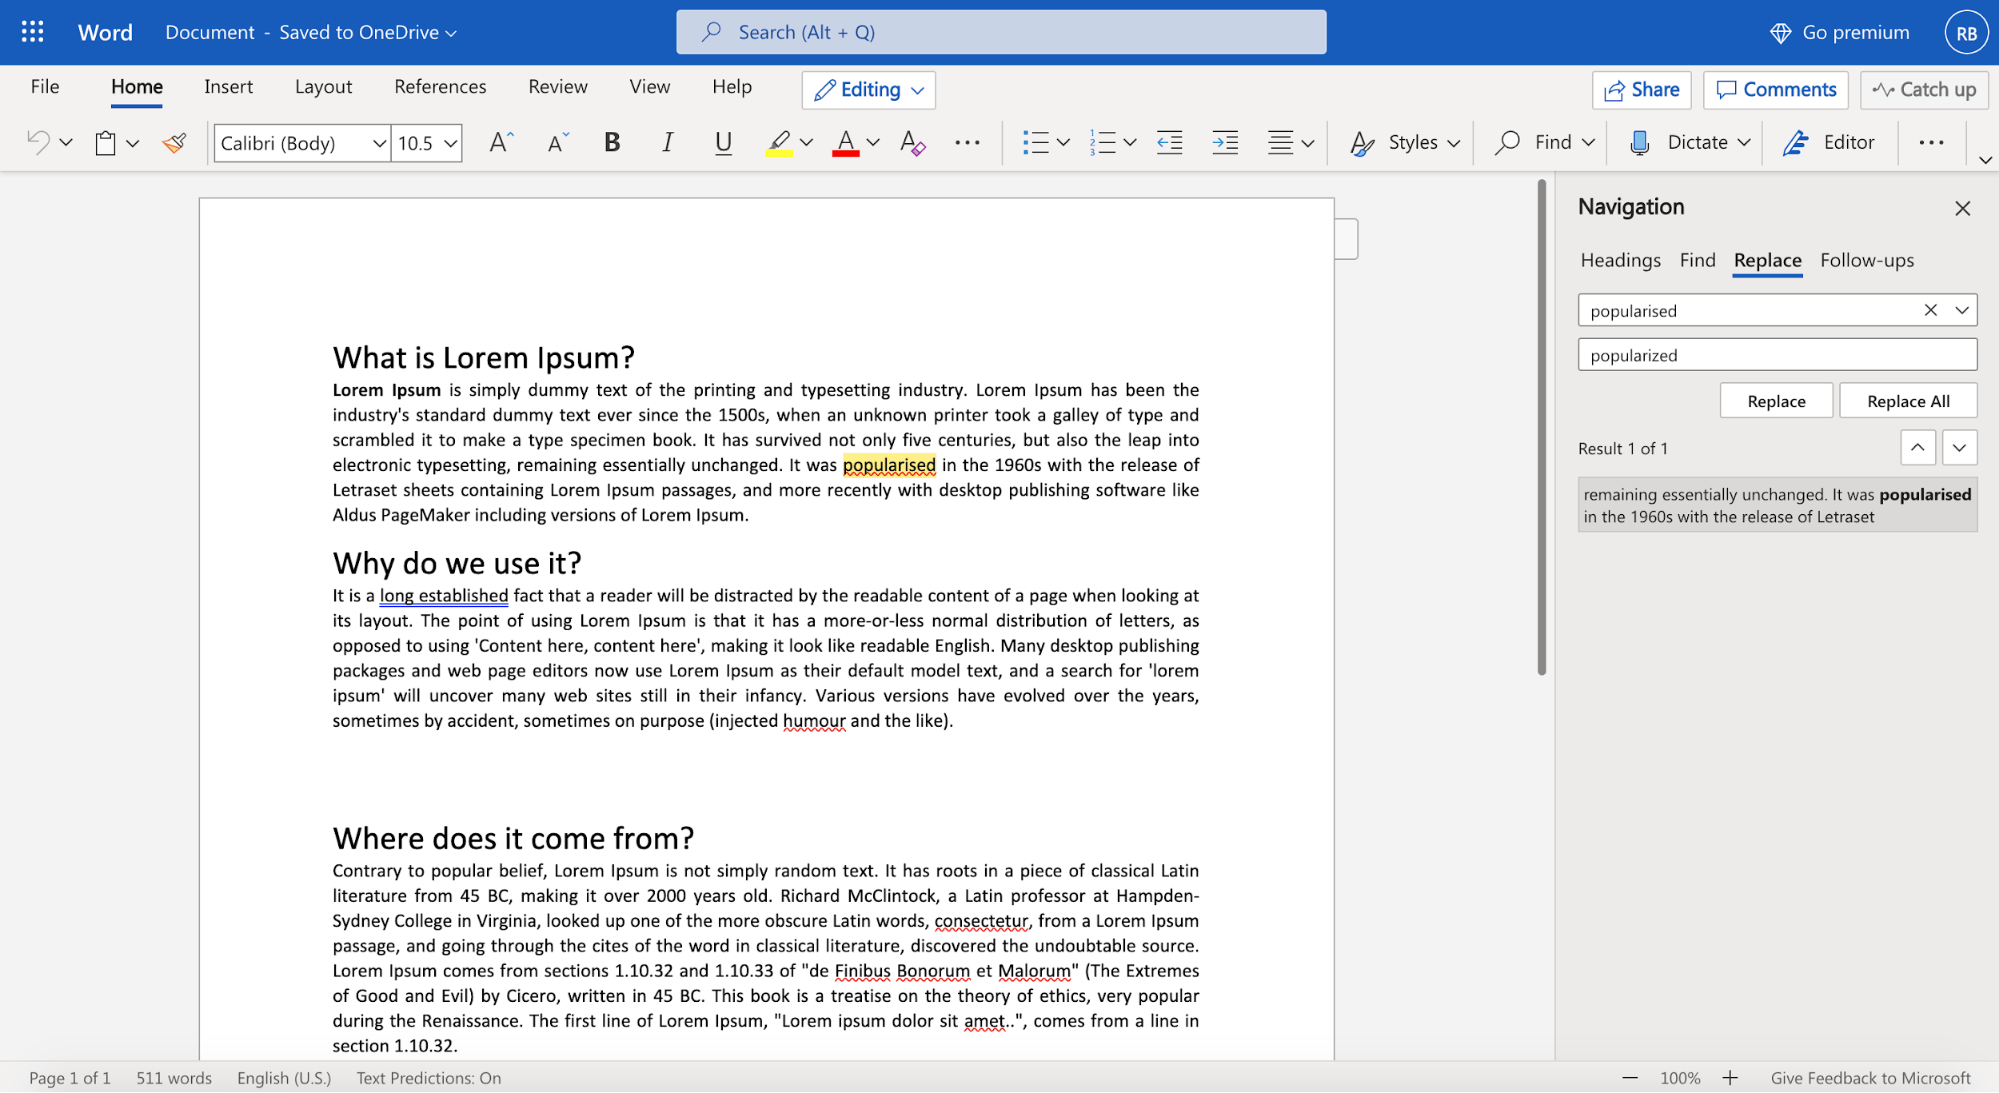
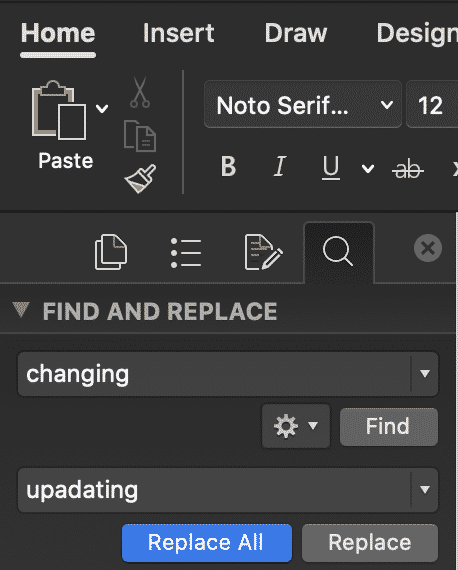
Step #5 Click on the Find tab to locate the matches. Once you’re sure the match is right and highlighting the words you want to change, select Replace. This will replace every individual match one by one.
Again, if you click on the Replace All button, all the matching words and phrases will be changed at once.
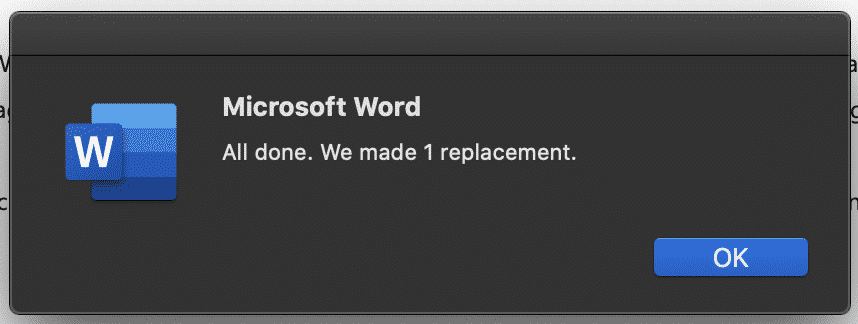
After the changes are made, you’ll see an “All Done” message just below the Replace and Replace All buttons that indicate the replacement of the intended word or phrase.
Advanced Find and Replace Features: Everything You Need to Know
You can take this whole shebang of replacing words and phrases to the next level thanks to Microsoft Word’s Advanced Find and Replace option. In other words, you can use the Advanced settings to simplify the process further and make the results even more accurate.
Follow the previously stated steps to open the Find and Replace pop-up box. On it appears on your screen, click on More.
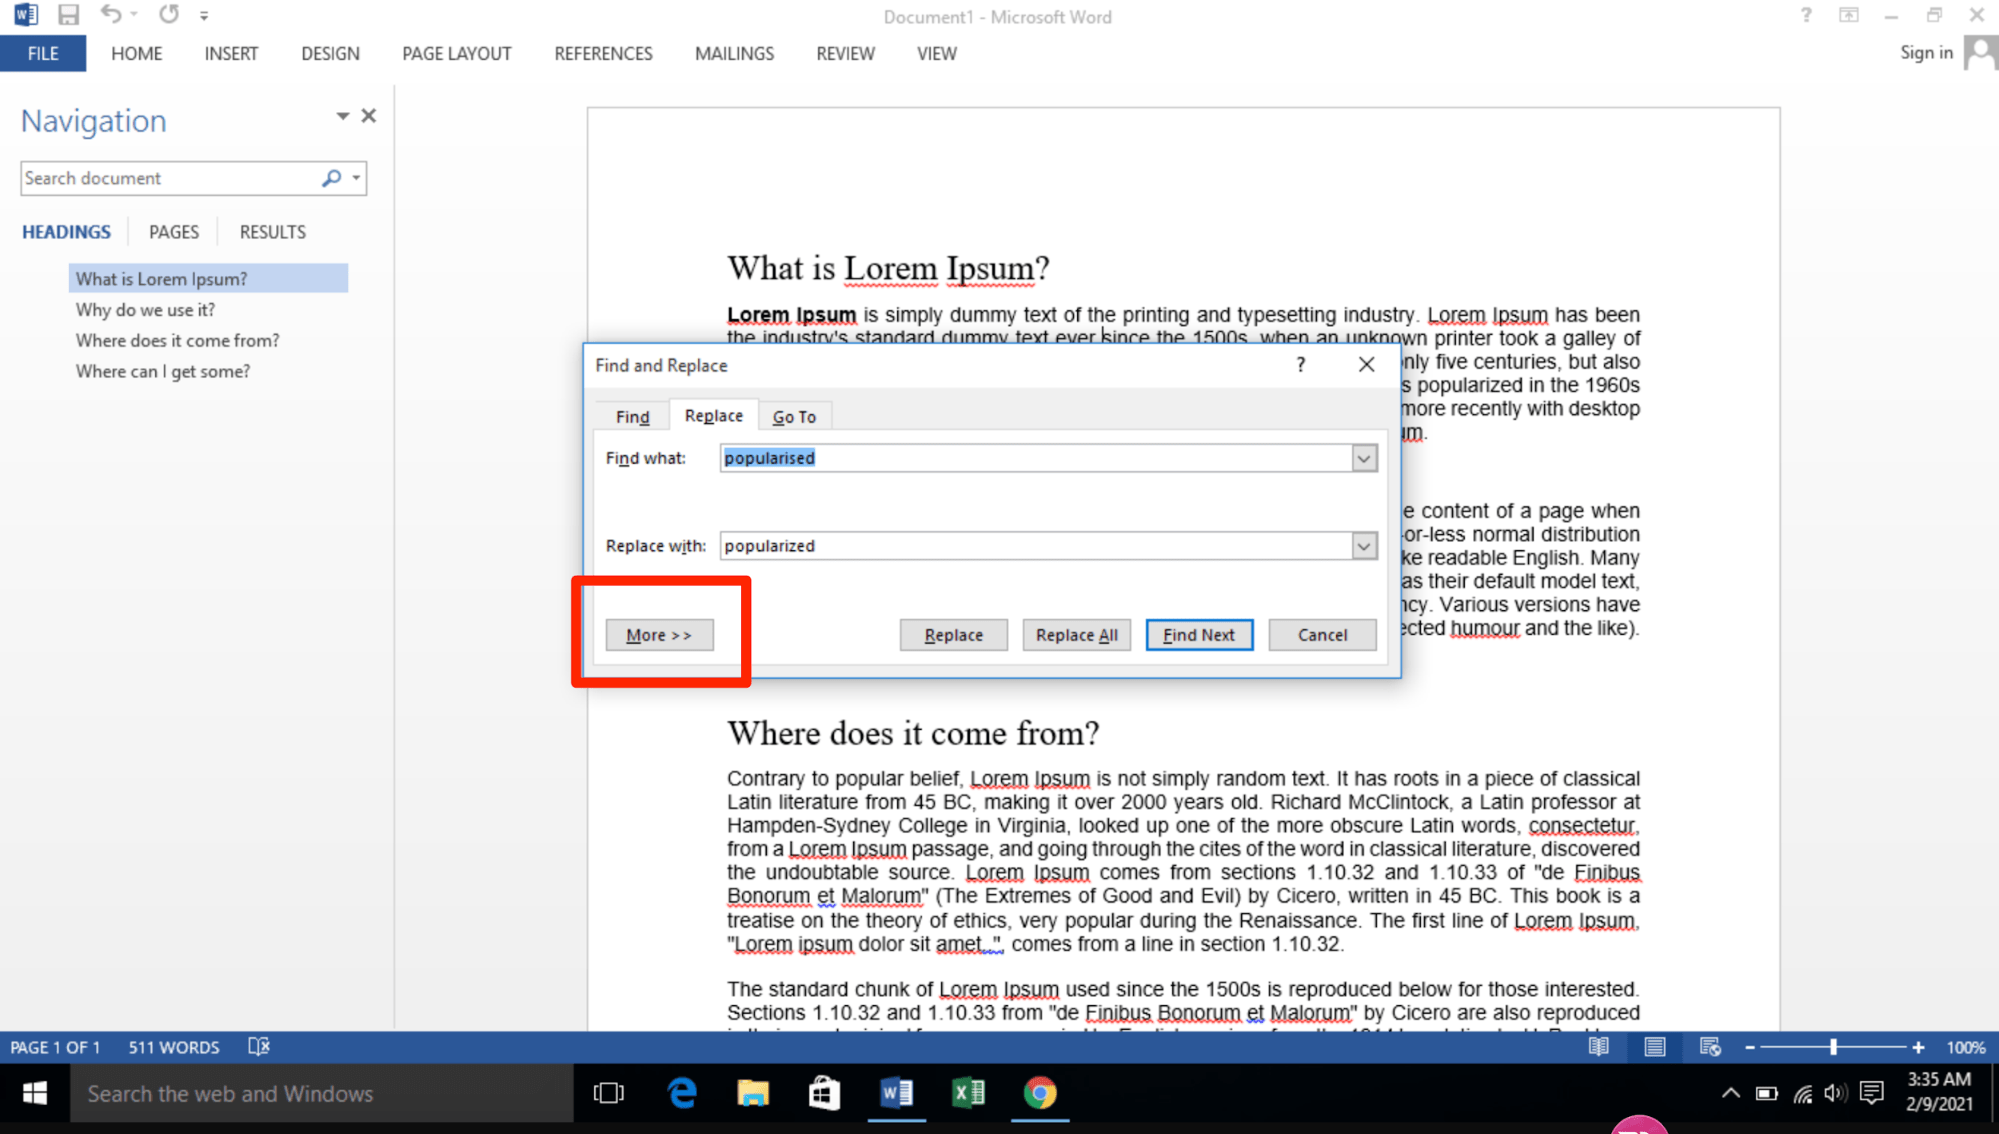
You’ll immediately see a slew of additional options like Match case, Use wildcards, Match prefix, Match suffix, and so on. Here’s how the Advanced Find and Replace settings look like:
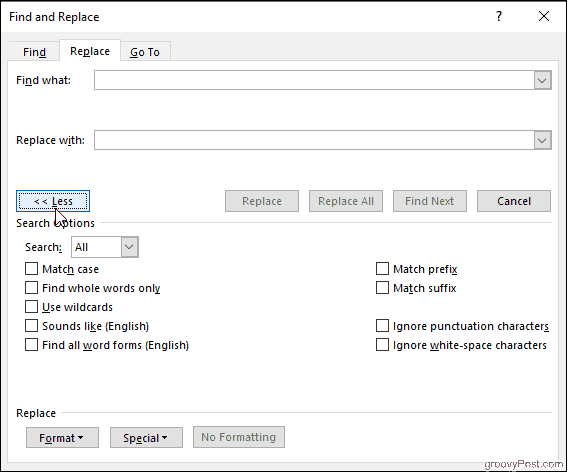
Each one of these has its own unique functions. Let’s discuss them in more detail below:
Find whole words only
If you check on the Find whole words only box, MS Word will treat your search term as an entire word and won’t look for your search term within other words.
Example: If you’re searching for the word “stand,“ the search feature won’t show you the word “standard.”
Use wildcards
Use wildcards is one of the more advanced search options that allows you to use question marks, brackets, asterisks, and other similar symbols to modify your search.
You see, a wildcat is a short string of characters – or a character – that represents multiple characters in a search.
Example: <(int)*(net)>
Sounds like (English)
As the name suggests, the Sounds like option finds similar-sounding words to your search term. This is best for finding homonyms and words that have varying spellings.
Example: This is common for words that have both UK and US variants. For instance, you can have both “colours” and “colors” on a document.
Find all word forms (English)
This option allows you to look for the word you searched for, along with other instances that are either plural or in a different tense.
Example: If you search for the word “be” after enabling the Find all word forms option, you’ll also find the words “are“ and “is“ highlighted as they are the different tense forms of “be.”
Match prefix and Match suffix
Checking off the Match prefix or Match suffix fields will limit your search to words that have the same beginning or the same ending, respectively.
Example: Suppose you enable Match prefix. When you search for the word “love,” Microsoft Word will find the words “love“ and “lovely.“ However, you won’t find the word “beloved“ highlighted in the search results as it’s a suffix of love.
Ignore punctuation characters and Ignore white-space characters
Again, this search option is self-explanatory. It tells Microsoft Word not to take up spaces, periods, hyphens, and similar attitudes into consideration.
Example: After clicking on the search options, when you type in “color block”, you’ll also see “color-block.”
When to Use the Find and Replace Feature of Microsoft Word
The whole point of the Find and Replace function in Microsoft Word is to allow MS Word users to search for target text – whether it’s a specific word, a type of formatting, or a string of wildcard characters – and replace them with whatever you want.
Typically, here’s why you should use this feature:
- When you want to maintain absolute consistency in your document
- When you want to speed up typing and formatting tasks
- When you realize last-minute mistakes and want to find and then replace your errors
- When you’re writing a document that includes words with varying spellings. For instance, if you typically follow US English, and are typing a doc according to the rules of UK English, the Find and Replace feature would be super helpful to identify and change spelling errors.
- Adding special characters to words
- editing partial words and phrases
- Correcting words that you may have misspelled in a hurry. For instance, if you type “h?t” instead of “hat” and enable Use wildcards, you’ll find it highlighted in your search.
- Eliminating extra spaces
- Changing the separator character in numerals
- Reversing currency symbols
Concluding Thoughts
As you may have realized, the Find and Replace feature of Microsoft is a lifesaver, to say the least.
It can help you save tons of time, which would otherwise have been wasted in looking for errors and then replacing them. Whether you are a student, an intern, or the CEO of a company, this is a functionality that we all can be very thankful for.
Let’s delve even deeper into the ‘Find’ function, looking specifically at a number of options that can be accessed in the Word “Find” feature (CTRL+F) by clicking its “More” button.
In a recent issue of Office for Mere Mortals we looked at how to search within a Word document. There is a lot of hidden power accompanying the relatively simple process of finding text within a document.
Advanced Find
The clever Find features are in Advanced Find. Press Ctrl + F to open the Word navigation pane, click on the pull-down menu then Advanced Find …

It’s called Advanced Find but many long-time Word users will know it as the standard Find dialog that’s been in Word for many, many years.
Click on the More … button to see a lot of power in Word’s Find.
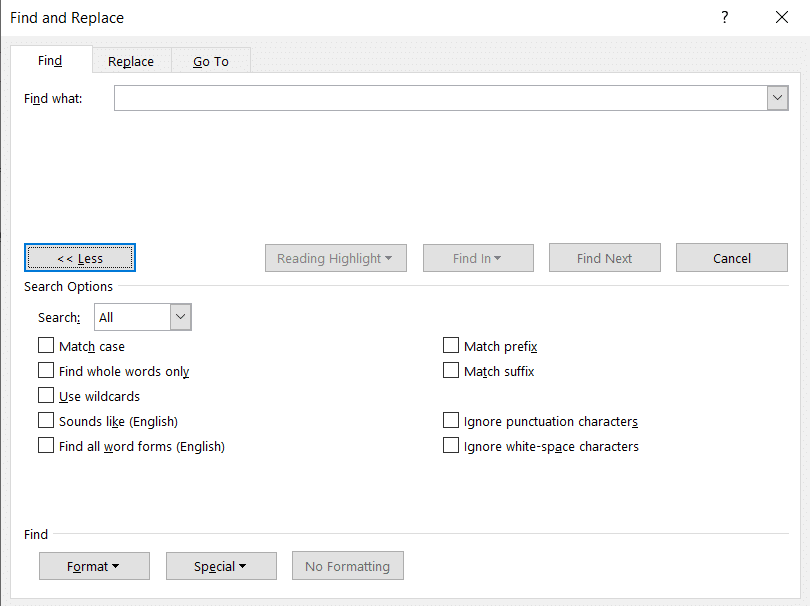
FIND WHOLE WORDS ONLY
‘Find whole words only’ is a selectable option in Word that can be accessed in the Find feature (Ctrl-F) by clicking the ‘More’ button to display more specific search features.
But what does it mean to find whole words only? Isn’t that what a normal search is meant to do? Well… yes and no. A ‘whole word’ is defined in Office as a group of characters surrounded on either side by one or more spaces or punctuation marks.
To demonstrate the difference between having the ‘Find whole words only’ option selected and not having it selected, I will use a very simple example. Feel free to try it for yourself in Microsoft Word.
Let’s pretend that you are searching for the word ‘ample’ out of the following short text: “This sample sentence is one way to demonstrate the ample finding flexibility of Office”.
There is only one instance of the word ‘ample’ within the text, searching without the ‘Find whole words only’ option would actually find 2 matches. The less obvious match comes as part of the tail-end of the second word of the text, which is ‘sample’.
To further demonstrate my point, the word ‘in’ does not appear within the sample sentence on its own using ‘Find whole words’, but would be found twice within the word “finding” with that choice off.
By selecting the ‘Find whole words only’ option, Office will omit matches to any search query that is found _within_ a word of the document. Such a search is less intensive for the program and will therefore be faster with large amounts of text.
Before you go setting this option, be forewarned that it will omit any plurals from your search results. Searching for the word ‘sport’ in the following text will not produce any matches: “Why are all the sports I want to watch on at the same time?”
USE WILDCARDS
A wildcard is a special character that you can use to represent one or more characters in a search string. Any character or set of characters can be represented by a wildcard character. It is really just another name for a “regular expression”.
With just a few special characters and the knowledge of what they represent, searching for strings that conform to a predefined grammar (or pattern) now becomes extremely easy.
The first step to using wildcards in your search terms is to select the ‘Use Wildcards’ option, which can be found in find dialog box after clicking the ‘More’ button. The ‘Match case’ and ‘Find whole words only’ check boxes are now unavailable (grayed out).
There are two ways to incorporate wildcards into your search query string. The first is to choose the particular wildcard character from a list. To do this, click the ‘Special’ pull-down menu and select the desired wildcard character from the resulting list. Then type any additional text into the ‘Find what’ box. The second way is to simply type in the wildcard character directly into the ‘Find what’ box!
The asterisk (*) is the most commonly used wildcard to search for a string of one or more characters. For example, just say you want to find all words that start with “a” and end with “m”. Then you could write “a*m” as your search term. Your results could be anything from “aim” to “antidisestablishmentarianism”.
The next most commonly used wildcard is the question mark (?), which can be used to substitute for any single character. For example, sat?n finds “satin” and “satan”.
SOUNDS LIKE… FO-NE-TIKS
The ‘Sounds like’ option is a type of search mechanism for words that may have been spelt phonetically. To make this point, searching for the word ‘phonetically’ with the ‘Sounds like’ option switched on, will find all of the words that would sound like the word ‘phonetically’ if you were to say them out aloud. As a test, I wrote down ‘fonetikalee’ in a document and searched for the word ‘phonetically’ with the ‘Sounds like’ option activated. The find feature was indeed able to determine that I was searching for the word ‘fonetikalee’.
This function may be of use for people who type up conversations between people in real-time. If someone uses a word you are not familiar with in such a situation, you don’t really have the time find out how to spell it properly. In such a situation, the common solution would be to simply type it phonetically (as it sounds) and then move on. Sometime after scribing the conversation, you may have a flash of enlightenment and realize what word the person actually said.
Instead of scrolling through pages of text to find it and change the potentially numerous incarnations of phonetic spelling, you can simply type in the correct word to the search facility with the ‘Sounds like’ option selected, and hope that your phonetic spelling was sufficient for the ‘Sounds like’ search algorithms to pick up.
FIND ALL WORD FORMS – PAST, PRESENT AND FUTURE TENSE
The ‘Find all word forms’ option has a simple, but powerful function. It acts by finding all possible tenses of the search word.
For example, if I searched for “run”, then both “run” and “ran” could be potential search results.
Similarly, searching for “talk” could have both “talk” and “talked” as potential search results.
Searching for “laugh” on the other hand, could have “laugh”, “laughed” and “laughing” as potential search results.
READER QUESTION: HOW DO YOU FIND A SPACE?
A question from an OfMM reader recently queried us how to find a space within a document. This is quite simply a case of typing a space into the ‘Find what’ text box and clicking the ‘Find Next’ button. This will find each and every space from the start to the end of the document. A useful application of this would be to insert two spaces in the “Find what” box in order to any occurrences of two consecutive spaces within a document, in order to ensure consistency of spacing between sentences.
Another way of doing this was mentioned in passing in the last OfMM newsletter in the section entitled “Strange Characters”. Selecting the ‘Special’ pull-down list in the Find dialog box will bring up a list of special search character types. The last option on this list is called ‘White-space’ and as the name suggests, can be used to find groups of white space within the search area. This is equivalent to typing /w into the ‘Find what’ text box.
THE ‘GO TO’ TAB
Another way of quickly accessing a certain area of a document, or even jumping through a document in regular increments, is to use the ‘Go To’ tab on the Find dialog box.
On this tab you can select between a number of document elements including: page, section, line, bookmark, comment, footnote, endnote, field, table, graphic, equation, object, and heading.
Then simply jump through the document For example, if the page option has been selected, you can type in the page you wish to ‘Go To’ in the ‘Enter page number’ text box. Then click the ‘Next’ button and you will be taken there.
An interesting function is to go to the heading in the document. If you have headings few and far between, then this is a useful tool. You have to make sure that your headings are formatted as a “Heading” within word, and aren’t simply bolded or formatted “Normal” text.