
| title | description | ms.date | ms.topic | f1_keywords | helpviewer_keywords | author | ms.author | manager | ms.technology | ms.workload | |||||||||||||||||||||
|---|---|---|---|---|---|---|---|---|---|---|---|---|---|---|---|---|---|---|---|---|---|---|---|---|---|---|---|---|---|---|---|
|
Find and replace text, and multi-caret selection |
Learn about the Find and Replace feature and how to use it to find and replace instances of a pattern. |
01/12/2023 |
conceptual |
|
|
TerryGLee |
tglee |
jmartens |
vs-ide-general |
multiple |
Find and replace text
[!INCLUDE Visual Studio]
You can find and replace text in the Visual Studio editor by using Find and Replace (Ctrl+F or Ctrl+H) or Find/Replace in Files (Ctrl+Shift+F or Ctrl+Shift+H). You can also find and replace some instances of a pattern by using multi-caret selection.
[!NOTE]
The content on this page applies to Visual Studio. If you’re looking for information that’s specific to Visual Studio Code—also known as VS Code—see the Find and Replace section of the Basic Editing page in the Visual Studio Code docs.
[!TIP]
In Visual Studio, if you’re renaming code symbols such as variables and methods, it’s better to refactor them than to use find-and-replace. Refactoring is intelligent and understands scope, whereas find-and-replace blindly replaces all instances.
Find-and-replace functionality is available in the editor, in certain other text-based windows such as the Find Results windows, in designer windows such as the XAML designer and Windows Forms designer, and in tool windows.
You can scope searches to the current document, the current solution, or a custom set of folders. You can also specify a set of file name extensions for multi-file searches. Customize search syntax by using .NET regular expressions.
[!TIP]
The Find/Command box is available as a toolbar control, but isn’t visible by default. To display the Find/Command box, select Add or Remove Buttons on the Standard toolbar, and then select Find.
Find and Replace control
- Press Ctrl+F as a shortcut to find a string in the current file.
- Press Ctrl+H as a shortcut to find and replace a string in the current file.
The Find and Replace control appears in the upper right corner of the code editor window. It immediately highlights every occurrence of the given search string in the current document. You can navigate from one occurrence to another by choosing the Find Next button or the Find Previous button on the search control.
::: moniker range=»vs-2022″
:::image type=»content» source=»media/vs-2022/find-and-replace-box.png» alt-text=»Screenshot of the Find and Replace dialog in the Editor in Visual Studio 2022.»:::
::: moniker-end
::: moniker range=»<=vs-2019″
:::image type=»content» source=»media/find-and-replace-box.png» alt-text=»Screenshot of the Find and Replace dialog in the Editor in Visual Studio 2019 and earlier versions.»:::
::: moniker-end
You can access replacement options by choosing the button next to the Find text box. To make one replacement at a time, choose the Replace Next button next to the Replace text box. To replace all matches, choose the Replace All button.
To change the highlight color for matches, choose the Tools menu, select Options, and then choose Environment, and select Fonts and Colors. In the Show settings for list, select Text Editor, and then in the Display items list, select Find Match Highlight.
Search tool windows
You can use the Find control in code or text windows, such as Output windows and Find Results windows, by selecting Edit > Find and Replace or pressing Ctrl+F.
A version of the Find control is also available in some tool windows. For example, you can filter the list of controls in the Toolbox window by entering text in the search box. Other tool windows that allow you to search their contents include Solution Explorer, the Properties window, and Team Explorer.
Find in Files and Replace in Files
- Press Ctrl+Shift+F as a shortcut to find a string in multiple files.
- Press Ctrl+Shift+H as a shortcut to find and replace a string in multiple files.
Find/Replace in Files works like the Find and Replace control, except that you can define a scope for your search. Not only can you search the current open file in the editor, but also all open documents, the entire solution, the current project, and selected folder sets. You can also search by file name extension. To access the Find/Replace in Files dialog box, select Find and Replace on the Edit menu (or press Ctrl+Shift+F).
::: moniker range=»>=vs-2022″
:::image type=»content» source=»media/vs-2022/find-files.png» alt-text=»Screenshot of the Find and Replace dialog box in Visual Studio 20222, with the Find in Files tab open.»:::
For more detailed information, see the Find in Files and Replace in Files pages.
::: moniker-end
::: moniker range=»vs-2019″
:::image type=»content» source=»media/find-files-vs2019.png» alt-text=»Screenshot of the Find and Replace dialog box in Visual Studio 2019, with the Find in Files tab open.»:::
For more detailed information, see the Find in Files and Replace in Files pages.
[!IMPORTANT]
If you are using Visual Studio 2019 version 16.6 or earlier, the Find and Replace dialog box might not look like it appears here. Switch to the Visual Studio 2017 version of this page for descriptions that’ll match what you see on your screen.
::: moniker-end
Find Results
When you choose Find All, a Find Results window opens and lists the matches for your search. Selecting a result in the list displays the associated file and highlights the match. If the file is not already open for editing, it is opened in a preview tab in the right side of the tab well. You can use the Find control to search through the Find Results list.
Create custom search folder sets
You can define a search scope by choosing the Choose Search Folders button (it looks like …) next to the Look in box. In the Choose Search Folders dialog box, you can specify a set of folders to search, and you can save the specification so that you can reuse it later.
[!TIP]
If you’ve mapped a remote machine’s drive to your local machine, you can specify folders to search on the remote machine.
Create custom component sets
You can define component sets as your search scope by choosing the Edit Custom Component Set button next to the Look in box. You can specify installed .NET or COM components, Visual Studio projects that are included in your solution, or any assembly or type library (.dll, .tlb, .olb, .exe, or .ocx). To search references, select the Look in references box.
Multi-caret selection
[!NOTE]
This section applies to Visual Studio on Windows. For Visual Studio for Mac, see Block selection.
Use multi-caret selection to make the same edit in two or more places at the same time. For example, you can insert the same text or modify existing text in multiple locations at the same time.
::: moniker range=»vs-2022″
In Visual Studio 2022, we improved the multi-caret copy and paste experience. Previously, pasting multiple lines into multiple carets resulted in the entire clipboard being duplicated at each caret. Now, pasting multiple lines into the same number of carets will insert each line to a respective caret.
To use multi-caret, press Alt+Shift+mouse click or Alt+Shift+. and then use Ctrl+Shift+arrow key to expand selections. Next, press Ctrl+C to copy the text in multiple selections. Use Alt+Shift+mouse click to create multiple carets for each line to paste in where you want them. Finally, press Ctrl+V to paste each line at its own caret.
:::image type=»content» source=»media/vs-2022/multi-caret-copy-paste.gif» alt-text=»An animation of the multi-caret selection action in Visual Studio.»:::
Additionally, you can use Alt+Shift+up arrow key (or down arrow key) or Alt+Shift+mouse drag to select with multiple carets. Previously, these gestures created a box selection. Now, a box selection transforms into multiple carets. This method is easier and faster than having to click in precise locations to insert individual carets.
[!TIP]
If you prefer to keep using a box selection with Alt+Shift+arrow keys and Alt+Shift+mouse drag when you expand a multi-caret selection, go to Tools > Options > Text Editor > Advanced and select Use box selection.
Commands
The following keyboard shortcuts are for actions that are specific to multi-caret selection behaviors.
| Shortcut | Action | Command |
|---|---|---|
| Alt+Shift+. | Use multi-caret | Edit.InsertNextMatchingCaret |
| Ctrl+Shift+arrow key | Expand selections | Edit.SizeControlUp, Edit.SizeControlDown, Edit.SizeControlRight, Edit.SizeControlLeft |
| Alt+Shift+up arrow key (or down arrow key) | Select multiple carets | Edit.LineUpExtendColumn, Edit.LineDownExtendColumn |
You can also access multi-caret selection from the menu bar by selecting Edit > Multiple Carets and then selecting the action you want.
:::image type=»content» source=»media/vs-2022/edit-menu-multiple-carets-find-replace.png» alt-text=»Screenshot of the Multiple Carets fly-out menu in Visual Studio 2022.»:::
::: moniker-end
::: moniker range=»<=vs-2019″
In the following screenshot, -0000 is selected in three locations; if the user presses Delete, all three selections are deleted:
![]()
To select multiple carets, click or make first text selection as usual, and then press Ctrl+Alt while you click or select text in each additional location. You can also automatically add matching text as additional selections, or select a box of text to edit identically on each line.
[!TIP]
If you’ve selected Alt as the modifier key for mouse-click in «Go to Definition» from Tools > Options > Text Editor > General, multi-caret select is disabled. For more information, see Options dialog box: Text Editor /> General.
Commands
Use the following keys and actions for multi-caret selection behaviors:
| Shortcut | Action |
|---|---|
| Ctrl+Alt + click | Add a secondary caret |
| Ctrl+Alt + double-click | Add a secondary word selection |
| Ctrl+Alt + click + drag | Add a secondary selection |
| Shift+Alt+. | Add the next matching text as a selection |
| Shift+Alt+; | Add all matching text as selections |
| Shift+Alt+, | Remove last selected occurrence |
| Shift+Alt+/ | Skip next matching occurrence |
| Alt + click | Add a box selection |
| Esc or click | Clear all selections |
Some of the commands are also available on the Edit menu, under Multiple Carets:
:::image type=»content» source=»media/edit-menu-multiple-carets-find-replace.png» alt-text=»Screenshot of the Multiple Carets fly-out menu in Visual Studio»:::
::: moniker-end
See also
- Use regular expressions in Visual Studio
- Refactor code in Visual Studio
- Block selection (Visual Studio for Mac)
I need to search all of my codebase for «Url» and replace it with «URL». If I search for Url in Visual Studio I also get all my variables with «Url» in it.
Anyone have a Regex I can use to only find Url within a quoted string e.g. «Use this Url:»?
Edit
I was looking looking for a quick and dirty way to find designer text and hard coded strings that had Url in the string and change them to URL.
asked Aug 6, 2009 at 17:03
![]()
JeffJeff
2,2003 gold badges21 silver badges38 bronze badges
3
What I really ended up needing was:
("[^"]*Url[^"]*")
And thanks to the tip from tghw who pointed out the :q shortcut in Visual Studio equates to:
(("[^"]*")|('[^']*'))
I realized I needed to use the first portion to find only the double quoated strings I was looking for.
Both this regex and a standard find with ‘Match case’ and ‘Match whole word’ yielded results with some strings I was hoping to not find but eliminated the code with ‘Url’ in it.
![]()
answered Aug 6, 2009 at 22:01
![]()
JeffJeff
2,2003 gold badges21 silver badges38 bronze badges
1
Visual Studio has a «quoted string» operator :q. If you search for :qUrl with ‘Use: Regular expressions’ and ‘Match case’ on, it should find all instances of «Url» only in strings.
Update: The above is incorrect. :q just searches for a quoted string, but you can’t put anything into it. My testing was just showing cases that looked correct, but were just coincidentally correct. I think instead, you want something like:
^(:q*.*)*(("[^"]*Url[^"]*")|('[^']*Url[^']*'))(:q*.*)*$
answered Aug 6, 2009 at 17:15
![]()
tghwtghw
25.1k13 gold badges69 silver badges96 bronze badges
2
If you just quickly want to search for a quoted string you can use the «Use Wildcards» Find Option in Visual Studio.
For example:
"*Url*"
answered Sep 28, 2009 at 10:01
![]()
Kobus SmitKobus Smit
1,7752 gold badges17 silver badges30 bronze badges
I used the following to search only «whole words» (i mean: appearing with an space before an after or immedately after or before the » ):
(("[^"]*[ ]|")Url([ ][^"]*"|"))
For example this matches «test Url» and «Url test» but don’t «testUrl».
answered May 20, 2014 at 9:59
![]()
DaniCEDaniCE
2,3921 gold badge17 silver badges27 bronze badges
«Use this (Url):», then you can replace $1 (or whatever syntax Visual Studio uses). You may need to escape the quotes, and I’m not sure if Visual Studio lets you parenthesize parts of the regex.
answered Aug 6, 2009 at 17:07
![]()
rpjohnstrpjohnst
1,60216 silver badges21 bronze badges
![]()
![]()
You can download FastFind for Visual Studio 2022 here
PureDevSoftware.FastFind22
FastFind is a Visual Studio plugin that allows you to instantly find text in any solution file. FastFind’s advanced pattern matching allows it to auto-update as you type, showing anything relevant, allowing you to jump instantly to the code.
FastFind also includes a fast jump to/from header files.
FastFind speeds up navigating around large projects.
Read more about FastFind and other PureDev Software products at www.puredevsoftware.com
KeyBindings
| Alt+S | Open FastFind |
| Alt+D | Open FastFind (docked) |
| Alt+O | Toggle C++ Source/Header |
You can change the key binding by going into the Visual Studio Tools Menu -> Options.
Select Environment -> General -> Keyboard. Type ‘FastFind’ into the ‘Show Commands Containing…»
box.». You can then assign FastFind to whatever key that you wish.
Features
Find in Solution
Start typing in the FastFind text box to find all files, solution and text in files that matches the string.
example: MyVariable
example: MyClass
example: MyComponent*
example: ::FunctionName(*,*)
example: MyFile.cpp
example: MySolution.sln
example: pretty much anything…instantly
Open Files From Disk
Start typing a file system path and auto-complete with tab
example: d:MyProjectsomefile…
Opening a solution file:
Open a solution file: start typing the name of the solution, use the up/down cursor keys to select
the solution, hit enter to open file solution.
example: MySolution.sln
example: .sln to list all solutions
Wildcards:
All searches support the wildcard character *
example: My*Variable will match all variables that start with My and end with Variable
Space wildcard:
For file searches, space acts as a wildcard.
example: My File.cpp will match all files that start with My and end with File.cpp
Logical expressions:
You can use the logical operators AND and OR and AND NOT
example: apples AND oranges will match lines that have the words apples and oranges in (in any order).
example: apples OR oranges
example: apples OR oranges AND NOT bananas
WORD operator
End your search with WORD to match only full words.
example: my_variable WORD will match my_variable but not my_variable_1
CASE operator
End your search with CASE perform a case sensitive match.
example: MyVariable CASE will match all lines that contain MyVariable (casesensitive)
IN operator
Find text in files that match the path pattern
example: SomeText IN CoreLib Finds ‘SomeText’ in all files whose path contains CoreLib, eg SolutionLibsCoreLibMyFile.cpp
example: SomeText IN .cpp Finds ‘SomeText’ in all files whose path matches the wildcard. Example: MyThing IN MyFolder*.h
NOT IN operator
Find text in files that do not match the path pattern
example: SomeText NOT IN CoreLib Finds ‘SomeText’ in all files whose path doesn’t contains CoreLib
example: SomeText NOT IN My*Lib Finds ‘SomeText’ in all files whose path does not match the wildcard *My*Lib*
DEF operator
Attempt to find a class definition
example: MyClass DEF expands «MyClass DEF» to «class MyClass AND NOT ; CASE WORD»
Keyboard Shortcuts
These can be changed in the Visual Studio Key bindings
| Alt-Shift-O | Open or Activate FastFind (modal) |
| Alt-Shift-P | Open or Activate FastFind (docked) |
| Alt-O | Toggle C++ source/header |
FastFind control keys
| Alt-Down | — Show history dropdown |
| Down | — Show history dropdown (if text box empty) |
| Alt-C | — Toggle match case |
| Alt-W | — Toggle match word |
| Ctrl-Backspace | — Delete to start of current word |
| Ctrl-Home/End | — Select first/last match |
| Tab | — auto-complete when entering path |
| Escape | — close modal FastFind window |
General Notes
The first time you open a solution it might take a while to scan all of the source files. This will only happen the first time the solution is opened.
To open the settings int he fastfind window click on the cog to the right. Click again to close.
Pressing down in the text box when it is empty will show you old searches.
FastFind automatcally adds an implicit * wildcard to the start and end of the search string (eg *MyVariable*, so there is never any need to add your own.
FastFind will only scan files whos extensions match those that are set in the settings.
If you add a new extension in the fastfind window that is not in the settings it will be automatically added to the settings and the solution will the re-scanned.
FastFind will only show solution files that have already been opened normally. When you open a solution fastfind will remember it and show it in the search results.
This is the twenty-seventh in a series of blog posts I’m doing on the VS 2010 and .NET 4 release.
Today’s blog post continues on from the Debugging Tips post I did last week, and covers some useful searching and navigation tips/tricks you can take advantage of within Visual Studio. These tips were ones that my friend Scott Cate (who has blogged dozens of great VS tips and tricks here) recently recommended to me as good tips that most developers using Visual Studio don’t seem to know about (even though most have been in the product for awhile).
Hopefully this post will help you discover them if you aren’t already taking advantage of them. They are all easy to learn, and can help save you a bunch of time.
Ctrl + i — Incremental Search
Most developers using Visual Studio are familiar with the “Find dialog” that you can launch by pressing the “Ctrl + F” key within the IDE. A surprisingly large number of developers, though, aren’t familiar with the “Incremental Search” capability within Visual Studio. This enables you to search within your current document, and enables you to do so without having to bring up a dialog.
Using Incremental Search
To enable incremental search, just type “Ctrl + i” within the editor. This will subtly change your cursor, and cause your status bar at the bottom left of the IDE to change to “Incremental search: (search term)” – you can then type the search term you are searching for and the editor will search for it from the current source location you are on (no dialog required).
Below we did an incremental search for the term “action” and VS highlighted the first usage it found within the file:

We can then press “Ctrl + i” again to find the next usage of the same term (and continue this repeatedly):

Pressing “Ctrl + Shift + i” will reverse direction on the search, and allow us to skip backwards.
You can press the “Esc” key at any point to escape out of incremental search. More details on incremental search can be found here.
F3 and Shift+F3 – Find Using Previous Search Term
One neat tip to know about incremental search is that after you press the ESC key to escape out of it, it will add the term you searched for to the find stack within the IDE. The search term you used will show up within the “find” drop-down within the VS «standard toolbar:

You can always press the F3 key within Visual Studio to repeat the last performed search at a later point. This is particularly useful for scenarios where you search for something, make a code change, and then want to continue from that point in the code. Just press F3 and you’ll repeat the last search (in this case “action”) from that new point in the document – no need to re-type it.
Pressing “Shift + F3” will do a reverse search (from the current cursor location in the editor) of the last search term used. You can easily toggle using F3/Shift+F3 to search forward and backwards within your document.
Ctrl + F3 — Find Using Current Selection
Another neat searching trick that you can use to avoid having to type your search term is to simply highlight a word (or part of a word) within the code editor, and then press “Ctrl + F3” to search for the next usage of it within the current file:

Pressing “Ctrl + F3” will search for the next instance of the text you have highlighted – allowing you to avoid having to type it:

Like before, you can use “Ctrl + Shift + F3” to perform a reverse search if you so choose, to search backwards within the document.
Ctrl + Shift + F – Find in Solution
Sometimes you want to search across your entire solution.
“Ctrl + F” will bring up the find dialog and default it to search within the current document. “Shift + Ctrl + F” will bring up the find dialog and default it to instead search across the entire solution:

Doing a search like this will bring up the “Find Results” window within the IDE and allow you to navigate to each found instance of the term:

You can double-click each item in the “Find Results” window to navigate to that instance of the search term you searched for.
One tip a lot of people don’t know about is the ability to press “F8” or “Shift + F8” to navigate to the next/previous instance of that search term in the list. This can make navigating through them much faster/easier, and avoid you having to use the mouse.
Shift + F12 — Find Usages
Most developers using Visual Studio know how to highlight a type and press F12 to “go to definition”. This will bring up the definition of a class/type, and is a useful way to navigate to where it is defined.
Many developers don’t know about “Shift + F12” – which brings up all usages of a particular type. This enables you to quickly see how a particular type is used. To take advantage of it, simply select or move the cursor onto a type and press “Shift + F12”:

This will then bring up a “Find Symbol Results” window that list all usages of this type within the current solution:

Like with the previous tip, you can use “F8” and “Shift F8” to navigate forward/backward within each item within the list.
Ctrl + Minus and Shift + Ctrl + Minus — Navigate Backward/Forward
Have you ever navigated to a different code file, looked at something, and then wanted to navigate back to where you came from? For example, you use F12 to “go to definition” and then want to return back to the code that used it?
A feature that a lot of people don’t know about in VS is the “Navigate Backwards” keystroke – “Ctrl + (minus key)”. This will navigate to the previous document/location on the navigation stack.
To see this in action, try selecting a type in Visual Studio. Below I’ve selected the “IController” interface:

Press F12 to navigate to the definition of it. This opens up a new editor window with the source of the selected type:

Now to jump back to where we came from, press “Ctrl + (minus key)” and VS will take us back to where we were:

If you want to move forward in the navigation stack (which in this case would take us back to the IController.cs file), then press the “Shift + Ctrl + (minus key)”.
Sara Ford has a good blog post that talks more about this feature, and explains the conditions when a new location is pushed onto the navigation stack.
Ctrl + Alt + (down arrow) — Navigate to an Open File
Ever have a ton of files open within the IDE, and want an easy way to navigate between them?
One useful key sequence you can use is “Ctrl + Alt + (down arrow)” – this will cause a drop-down to appear within VS that lists all open files within it:

You can use the arrow keys to select the file you want to navigate to – or better yet just start typing the file-name and Visual Studio will highlight it for you within the list. For example, above I typed “Mo” and Visual Studio highlighted “ModelBinder.cs”. Pressing the “enter” key will navigate me to that file:

This provides a nice, convenient, way to navigate between files without having to use the mouse or take your hands off the keyboard. And remember that “Ctrl + (minus)” can be used to navigate you back to where you came from.
Navigate To, View Call Hierarchy, and Highlight References Features
Visual Studio 2010 brings with it a bunch of new code navigation and searching features – including the new “Navigate To” dialog, “View Call Hierarchy” feature and Highlighted References Feature.
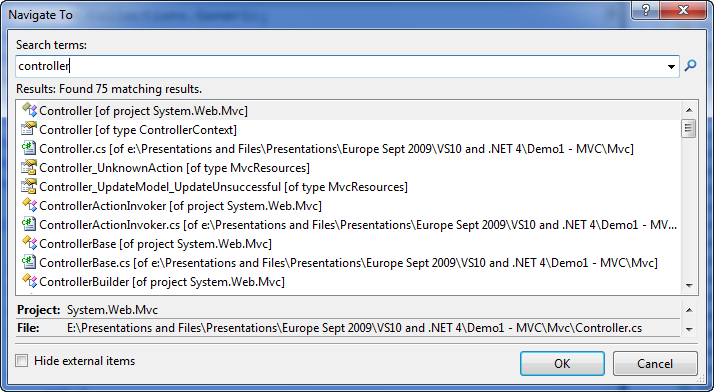
I previously blogged about these three new VS 2010 features here. If you haven’t already read this post and explored these capabilities, I highly recommend doing so – they are some great additions.
Other Editor Improvements
There are a ton of other code editor improvements in VS 2010 – many of them ones I’ve blogged about before. Here are links to a few of my previous VS 2010 editor blog posts:
- Improved C#/VB code Intellisense Support
- Improved JavaScript code Intellisense Support
- Box Selection and Multi-Line Editing Support
- ASP.NET, HTML and JavaScript Snippet Support
Also check out the other blog posts I’ve done in this VS 2010 and .NET 4 Improvements series.
Summary
Most of the above features have actually been in Visual Studio for several releases – but are ones that a surprising number of developers don’t know about. Hopefully this blog post helps provide a convenient way to get started with them if you didn’t already know they existed. If you need help remembering the keystrokes – print out a copy of the VS 2010 Keybindings Poster and keep it near your monitor.
To learn even more cool Visual Studio tips/tricks, subscribe to Scott Cate’s excellent Visual Studio Tips blog series (which is already up to 83 awesome tips and tricks). Also subscribe to Sara Ford’s blog – she has an awesome set of tips/tricks that go back years.
Hope this helps,
Scott
P.S. In addition to blogging, I am also now using Twitter for quick updates and to share links. Follow me at: twitter.com/scottgu
Hi,
I am trying to search for a string in Word Document using C#. My problem is the string I’m trying to find is not a series of characters one after the other. It has a start condition that I need to check and end condition. Anything in between is just read as it is.
eg: I will accept the following string:
(Check note: see section below)
the startwith condition is (Check note:
endwith condition is )
there can be any no of characters in between. it depends on the word doc under consideration.
I’m pasting my code, please let me know what I should do. The code below works well if I have a particular search say just the starting string. But for both matches, I can’t come up with anything.
I have also tried foreach(Word.range rng in doc4.storyranges) but i know this is wrong
Thanks
May
object File1 = SourceFile3;
object File2 = TargetFile1;
object objTrue =true;
object objFalse=false;
Word.ApplicationClass WordApp = new Microsoft.Office.Interop.Word.ApplicationClass();
//WordApp.Selection.Find.ClearFormatting();
Word.Document doc4 = WordApp.Documents.Open(ref File1, ref objMissing, ref objTrue, ref objMissing,
ref objMissing, ref objMissing, ref objMissing, ref objMissing, ref objMissing, ref objMissing,
ref objMissing, ref objMissing, ref objMissing, ref objMissing, ref objMissing, ref objMissing);
rng.Find.Text = «(Programming Note:»;
rng.Find.Forward = true;
rng.Find.Replacement.Text = «got it»;
rng.Find.Forward = true;
rng.Find.Wrap = Microsoft.Office.Interop.Word.WdFindWrap.wdFindContinue;
rng.Find.Execute(ref objMissing, ref objMissing, ref objMissing,
ref objMissing, ref objMissing, ref objMissing, ref objMissing, ref objMissing,
ref objMissing, ref objMissing, ref objMissing, ref objMissing, ref objMissing,
ref objMissing, ref objMissing);
doc4.SaveAs(ref File2, ref objSaveFormat, ref objMissing, ref objMissing, ref objMissing,
ref objMissing,ref objMissing, ref objMissing, ref objMissing, ref objMissing, ref objMissing,
ref objMissing,ref objMissing, ref objMissing, ref objMissing, ref objMissing);
//doc4.AcceptAllRevisions();
}
}
}