
I am using the following command to grep stuff in subdirs
find . | xargs grep -s 's:text'
However, this also finds stuff like <s:textfield name="sdfsf"...../>
What can I do to avoid that so it just finds stuff like <s:text name="sdfsdf"/>
OR for that matter….also finds <s:text somethingElse="lkjkj" name="lkkj"
basically s:text and name should be on same line….
![]()
shiri
7456 silver badges24 bronze badges
asked May 21, 2010 at 1:41
![]()
2
You want the -w option to specify that it’s the end of a word.
find . | xargs grep -sw 's:text'
answered May 21, 2010 at 1:47
![]()
Elle HElle H
11.7k7 gold badges39 silver badges42 bronze badges
2
Use b to match on «word boundaries», which will make your search match on whole words only.
So your grep would look something like
grep -r "bSTRINGb"
adding color and line numbers might help too
grep --color -rn "bSTRINGb"
From http://www.regular-expressions.info/wordboundaries.html:
There are three different positions that qualify as word boundaries:
- Before the first character in the string, if the first character is a
word character.- After the last character in the string, if the last
character is a word character.- Between two characters in the string,
where one is a word character and the other is not a word character.
answered Dec 3, 2015 at 19:25
![]()
cs01cs01
5,1271 gold badge29 silver badges28 bronze badges
2
You can drop the xargs command by making grep search recursively. And you normally don’t need the ‘s’ flag. Hence:
grep -wr 's:text'
answered Jul 3, 2013 at 10:33
![]()
jocteejoctee
2,4001 gold badge23 silver badges19 bronze badges
Use -w option for whole word match. Sample given below:
[binita@ubuntu ~]# a="abcd efg"
[binita@ubuntu ~]# echo $a
abcd efg
[binita@ubuntu ~]# echo $a | grep ab
abcd efg
[binita@ubuntu ~]# echo $a | grep -w  ab
[binita@ubuntu ~]# echo $a | grep -w  abcd
abcd efg
answered Dec 3, 2021 at 7:18
![]()
Binita BharatiBinita Bharati
4,9881 gold badge40 silver badges24 bronze badges
This is another way of setting the boundaries of the word, note that it doesn’t work without the quotes around it:
grep -r '<s:text>' .
answered Jun 11, 2021 at 17:14
![]()
1
If you just want to filter out the remainder text part, you can do this.
xargs grep -s 's:text '
This should find only s:text instances with a space after the last t. If you need to find s:text instances that only have a name element, either pipe your results to another grep expression, or use regex to filter only the elements you need.
answered May 21, 2010 at 1:47
![]()
Stefan KendallStefan Kendall
65.8k68 gold badges252 silver badges405 bronze badges
1
I want to be able to find and replace eat with Eat in Microsoft Word 2007. However, I don’t want to replace every occurrence of eat such as those that can be found inside other words such as great and meat.
I have tried doing this using the regular Find and Replace tool, but I get words with capital letters in the middle.
Is there a way I can just replace eat with Eat if it only exists on its own?
![]()
barlop
23k42 gold badges139 silver badges221 bronze badges
asked Nov 28, 2013 at 22:42
![]()
16
In the Find and Replace window in the Replace tab, click the More >> button to display more Search Options. After where it says Search: click the dropdown arrow and select All. Put a check mark to the left of where it says: Match case. Put another check mark to the left of where it says: Find whole words only.
In the Find what input box type eat.
In the Replace with input box type Eat.
Click the Replace All button to replace all occurrences of «eat» with «Eat».

answered Nov 29, 2013 at 2:06
![]()
karelkarel
13.3k26 gold badges44 silver badges52 bronze badges
I had troubles searching for the word «he» because I got all the «the» words. For some reason What worked in the end was clicking «match prefix» and «match suffix». «Find whole words only» didn’t work for me. I didn’t need to use the replace function.
answered May 11, 2017 at 15:21
![]()
1
When I use the grep command, all occurrences of a word are picked up, even if they are part of other words. For example, if I use grep to find occurrences of the word ‘the’ it will also highlight ‘the’ in ‘theatre’
Is there a way to adapt the grep command so that it only picks up full words, not part of words?
![]()
MikeD
8045 silver badges16 bronze badges
asked Mar 2, 2017 at 16:42
![]()
4
 -w, --word-regexp
              Select  only  those  lines  containing  matches  that form whole
              words.  The test is that the matching substring must  either  be
              at  the  beginning  of  the  line,  or  preceded  by  a non-word
              constituent character.  Similarly, it must be either at the  end
              of  the  line  or  followed by a non-word constituent character.
              Word-constituent  characters  are  letters,  digits,   and   the
              underscore.
from man grep
answered Mar 2, 2017 at 16:49
![]()
2
Also you can use this:
echo "this is the theater" |grep --color 'btheb'
For one word is the same with -w.
But if you need to search multiple patterns you can use the b, otherwise all patterns will be treated as words if -w is in use.
For example :
grep -w -e 'the' -e 'lock'
will highlight the and lock but not keylock /padlock etc.
With b you can treat each -e pattern differently.
Test it here.
![]()
GAD3R
61.8k30 gold badges128 silver badges192 bronze badges
answered Mar 2, 2017 at 17:04
![]()
George VasiliouGeorge Vasiliou
7,6733 gold badges18 silver badges41 bronze badges
You can test the presence of the beginning (resp. end) of a word with the marker < (resp. >).
Thus,
grep "<the>" << .
the cinema
a cinema
the theater
a theater
breathe
.
gives
the cinema
the theater
answered Mar 2, 2017 at 20:47
![]()
Let’s assume you’re a paralegal and you just finished typing a lengthy legal document or a contract for your client, only to discover that you misspelled your client’s name or a wrong company’s name multiple times throughout your document. And don’t have time to manually locate and replace every instance of the text. What would you do? Don’t panic – you can easily fix that with MS Word’s Find and Replace feature.
Find and Replace is one of the most useful features in Microsoft Word that can be used to find a character, a word, or phrase in a document and replace them. You can also find and replace text in a specific section of text or a whole document.
Not only can you find a particular word and replace it with another word, but you can also find text based on its formatting, using wildcards, and with matching prefix or suffix. It also allows you to find and replace text with specific formatting, non-printing characters, or special characters. In this post, you will learn how to find and replace text in MS Word.
Find Text in Microsoft Word
To start with, let’s see how to Find text in Excel using the navigational pane or the Find and Replace tool. Then we’ll explore how to use the Find and Replace tool to replace text based on different options.
Find Text
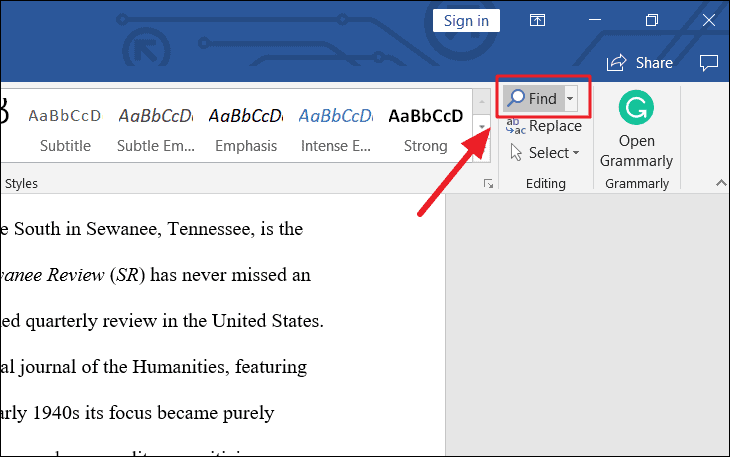
You can use the Navigation pane to search for a character, a word, or a group of words. And you can access this navigation pane from the Ribbon or by pressing a hotkey Ctrl + F.
To access, the Navigation panel (Find Command), first, open the Word in which you want to search for text. Then, go to the ‘Home’ tab, and click the ‘Find’ button from the Editing group in the Ribbon. Or you can press the shortcut keys Ctrl + F in the keyboard.
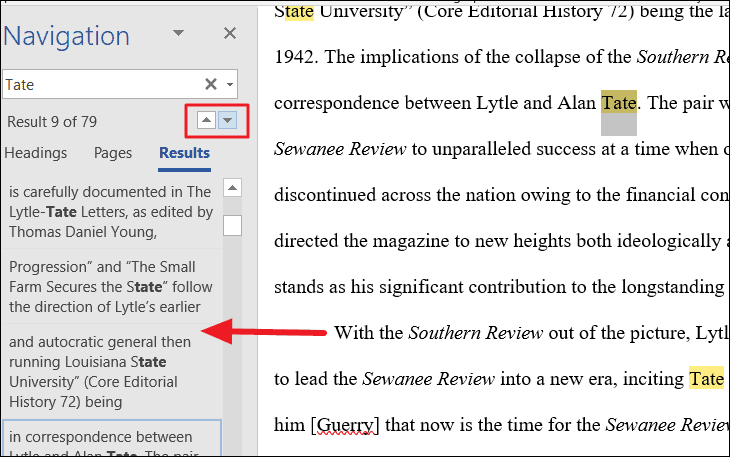
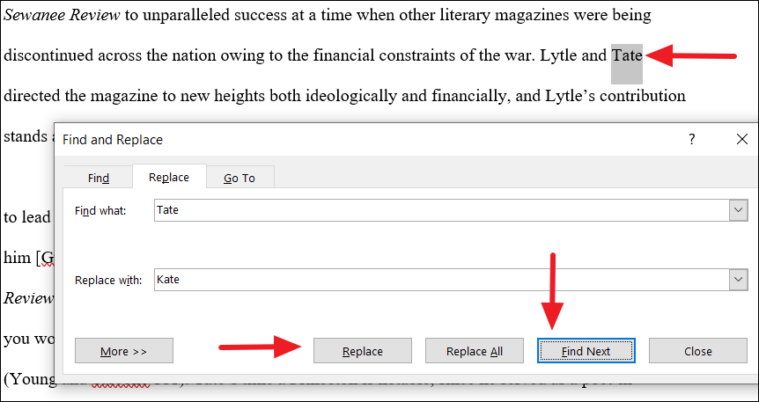
This will open up the Navigation pane on the left of the Window. Type the text or phrase you want to find in the ‘Search document’ text box in the Navigation pane and press ‘Enter’. As you type, the tool will show you all the related matches. In our example, we’ll type ‘Tate’.
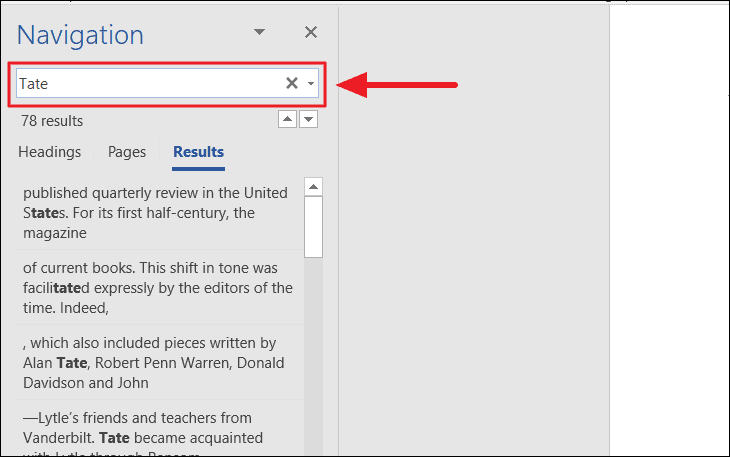
The Find command searches for all the matching text in the document and highlights them in yellow. The navigation pane shows all instances of the search word (Tate) as a preview of the results
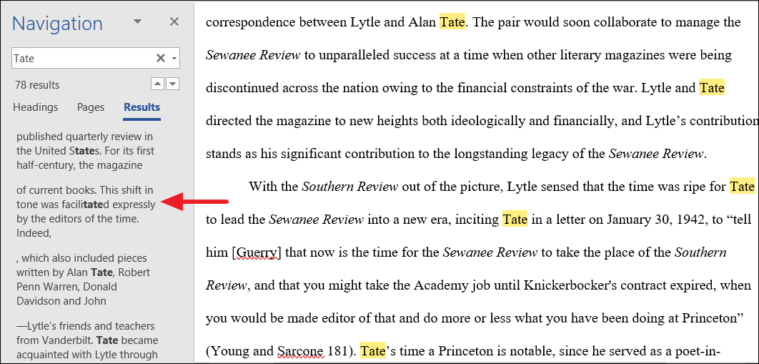
The tool not only highlights the exact words, it even highlights the partially matched words.
You can use the upward and downward arrows beside the text box to jump to the Previous or Next search result. Or you can click on one of the results below the search field to jump to it directly.
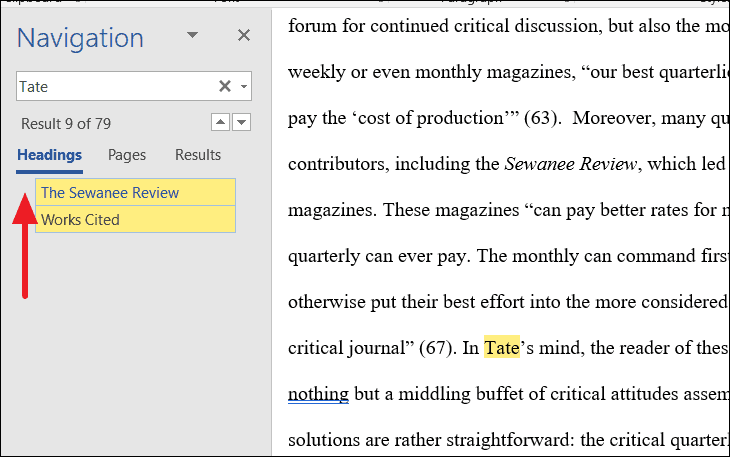
Instead of searching through an entire document for a text or phrase, you can also search a large document by headings. To do that, click the ‘Headings’ tab and select a heading in the Navigation pane to browse by headings in the document.
To search through pages in Word, click the ‘Pages’ tab in the Navigation pane and select one of the thumbnail images of all your pages that you want to see. Then, you can search for a specific text on that page.

Once you’re done editing the document, close the Navigation pane and the highlights will disappear.
Advanced Find
If you are looking for more specific words or phrases, for instance, words with a certain font or style, special characters, or only full words, you can use the Advanced Find feature to track them down. This tool lets you customize your search with various options. Here’s how:
Go to the ‘Home’ tab, click the downward arrow next to the ‘Find’ icon in the Editing group, and select ‘Advanced Find’. Or press Ctrl + H shortcut keys to open the Find and Replace tool.
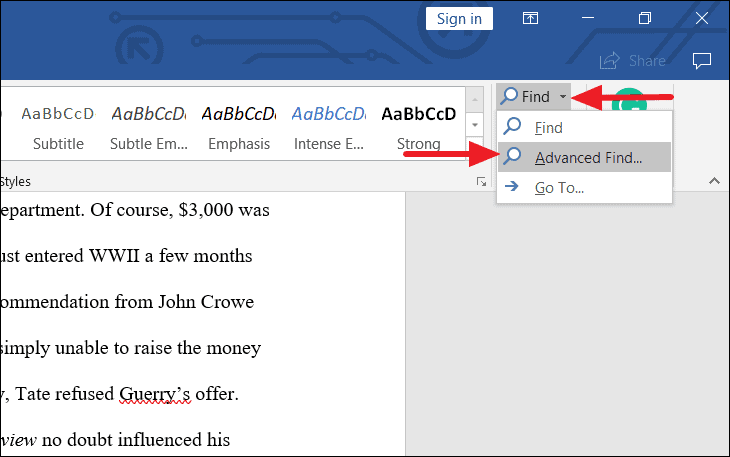
Or you can even launch the Find and Replace tool from the Navigation pane by clicking the magnifying glass icon in the Search Document text box and selecting the ‘Advanced Find’ option.

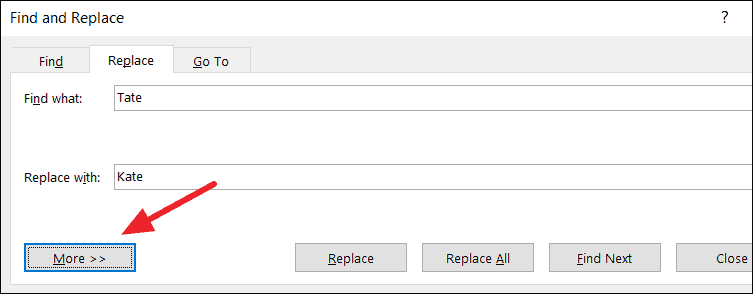
The Find and Replace dialog box will appear. Here, you can do a basic search, but if you want to customize your search with more options, Click the More >> button.

When you expand the More button, you would find more options with which you can do more advanced searches.
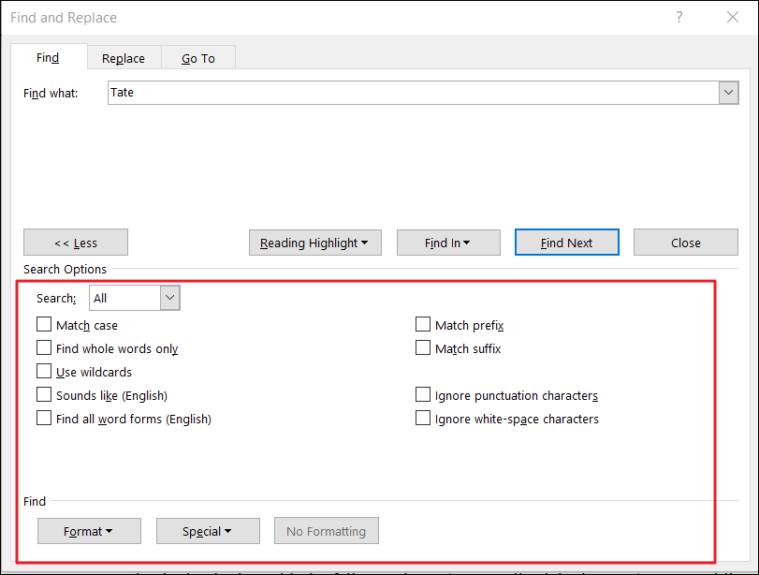
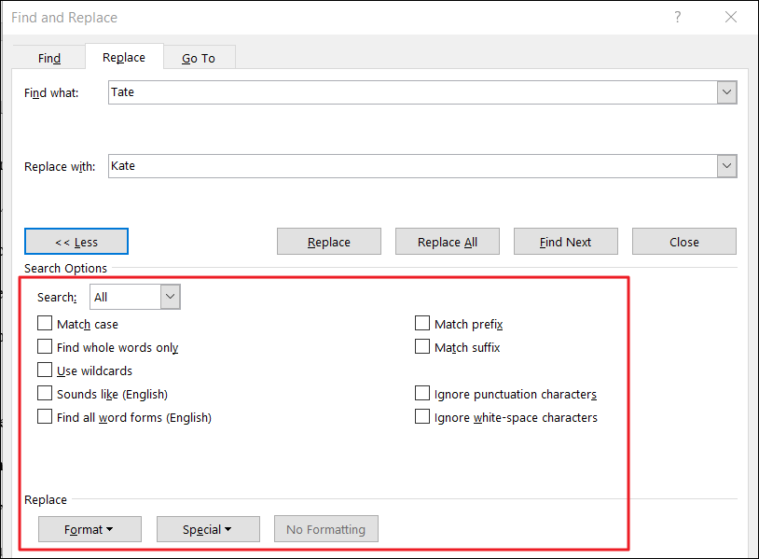
Select one or more options in the Search Options section and click ‘Find Next’ to view the result.
- Match Case: If the Match case box is checked, it searches for the text that exactly matches the uppercase and lowercase letters you type in the ‘Find what’ field.
- Find Whole Words Only: This option finds text that is not partial or part of another word, it only finds the whole words that are exactly matched.
- Use Wildcards: This option is the opposite of the ‘Find Whole Words only’ option. The wildcards you can use are single character (?) and multiple characters (*) wildcards. For example, when you are searching for “Wall*”, you’ll get Walls, Wallmart, or Wallpaper, etc.
- Sounds Like: This option finds words or phrases that sound phonetically similar such as ‘eyes’ when searching for ‘ice’ or ‘ant’ for ‘aunt’.
- Find All Word Forms: This option finds all variants of words (all verb forms). For example, when you search swim, you’ll get swim, swam, and swimming.
- Match Prefix: This searches for words with the same prefixes. For example, search for hype, and you may get hyperactive, hypersensitive, hypercritical.
- Match Suffix: This searches for words with the same suffixes. For example, search for less, and you may get endless, ageless, lawless, effortless.
- Ignore Punctuation Characters: This option lets you ignore punctuation characters in a text when searching. For instance, finding the word ‘Mrs. Jones’ when you searched for ‘Mrs Jones’.
- Ignore white-space characters: This option lets you ignore white spaces in between. For instance, finding the word ‘Days are good’ when you searched for ‘Daysaregood’.
We’ll apply few of these options and see how it works with an example.
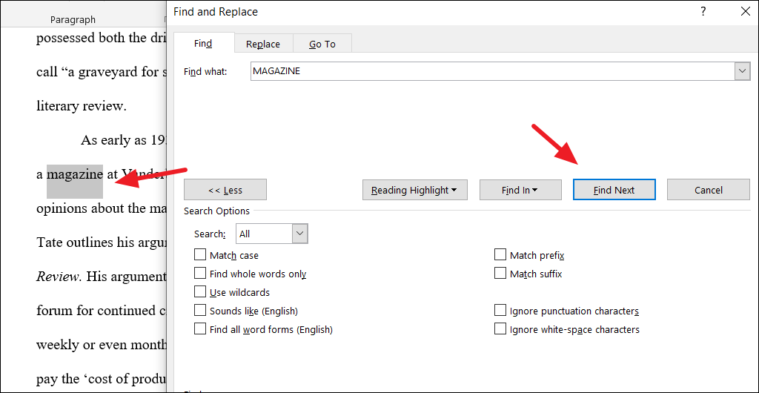
Match Case
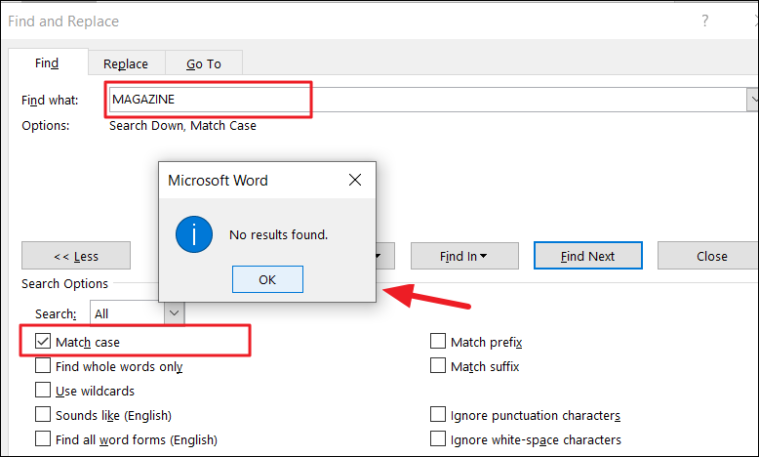
For example, let’s say we search the word ‘MAGAZINE’ in all caps without the match case option enabled. Type the word in the ‘Find what’ field and click the ‘Find Next’ button.

In the ‘Search’ drop-down under Search Options, you choose ‘Down’ to start looking from the top to bottom of the document, choose ‘down’ to start looking from the bottom to top of the document, or ‘All’ to search all over the document.
When you click ‘Find Next’, it will highlight the first instance of the word in grey. When you click ‘Find Next’ again, it will select the next instance of the word. As you click Find Next each time, it will highlight the matching word one at a time.
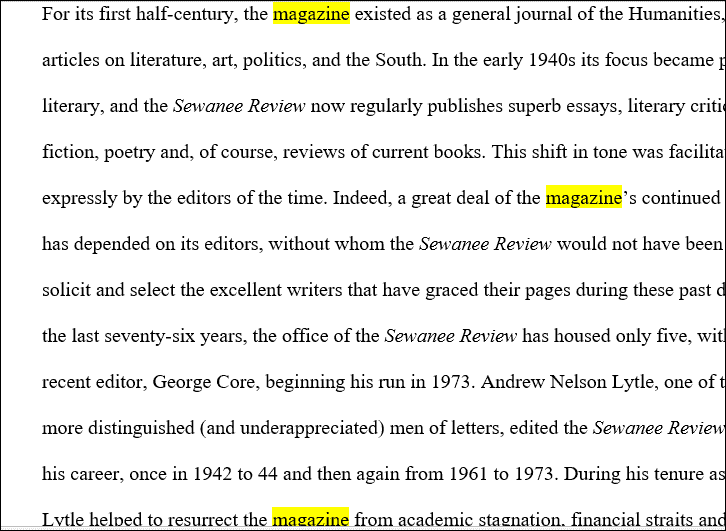
If you want to highlight all the instances of the word at once, click the ‘Reading Highlight’ button and select ‘Highlight All’.
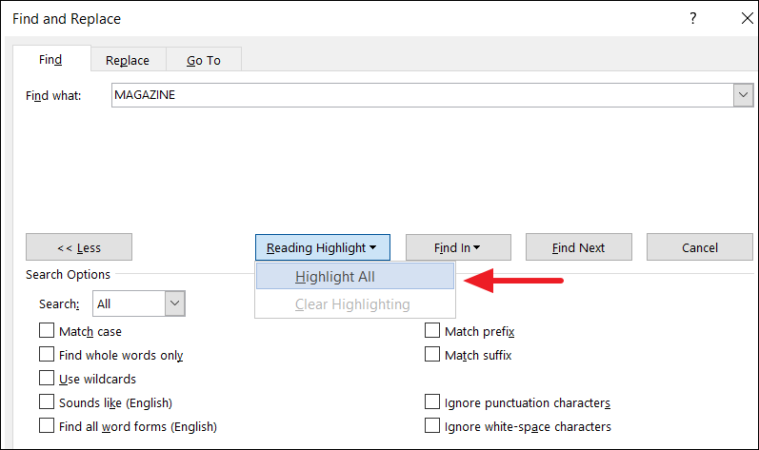
You would get several matches with the word all highlighted in yellow.
But if we searched the same word (capitalized) with match case enabled, we would get no results. Because the tool only looks for the word that exactly matches the uppercase letters we typed earlier.
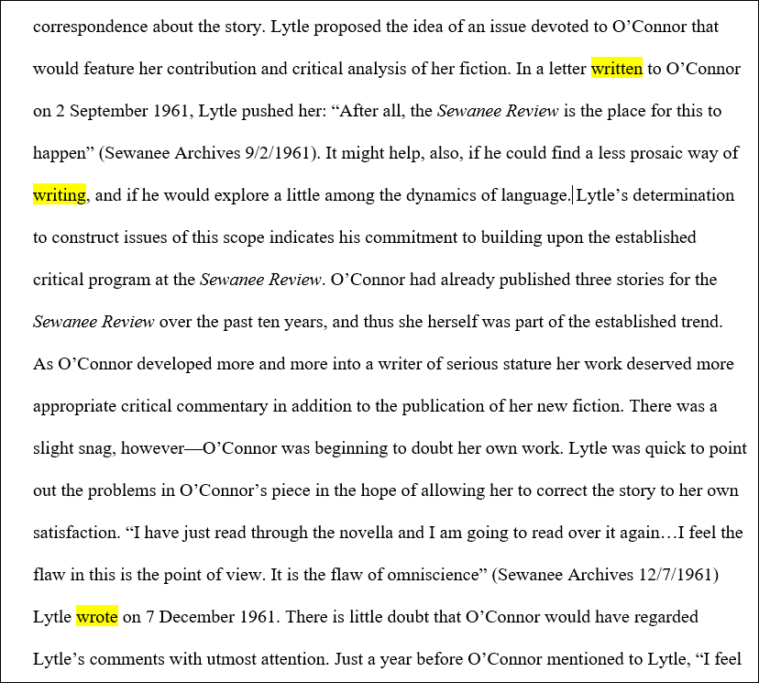
Find All Word Forms
In another example, if we searched the word ‘write’ with the ‘Find all word forms (English)’ setting enabled, we would get all variants of the word.
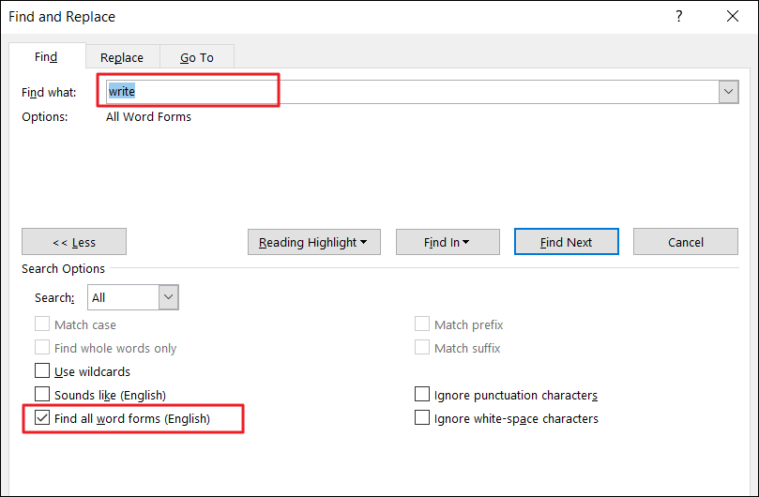
Word will find all verb forms of the word as shown below.
Advanced Find with Formatting
You can also search for certain word or phrase with specific formatting applied.
To find words with formatting, first, type the word in the ‘Find what’ box and click the ‘Format’ drop-down button at the bottom of the Find and Replace dialog box. Then choose the format in which you want to look for the word.
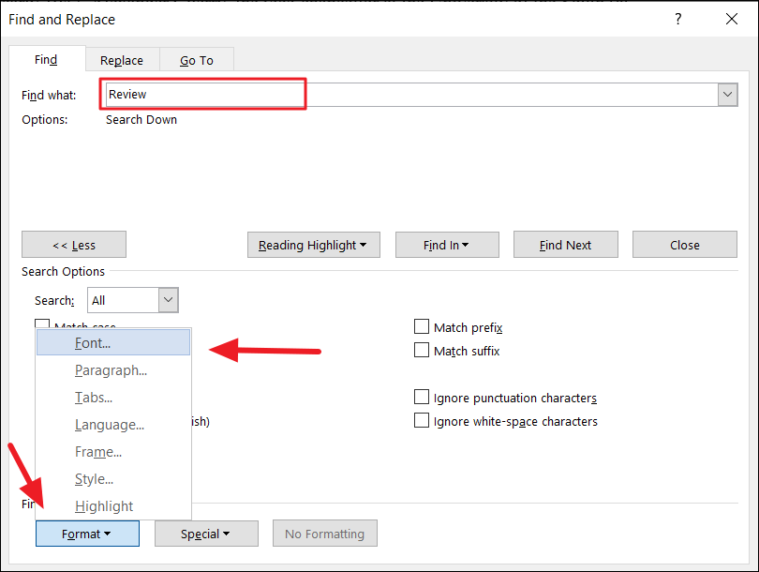
You can even find words with specific font format, paragraphs with specific alignment and format, tabs, words in a certain language, text frame, style, and highlight.
We are going to search for the word with a certain font format, so we are choosing ‘Font’. In the Find Font window, specify the format as shown below and click ‘OK’.
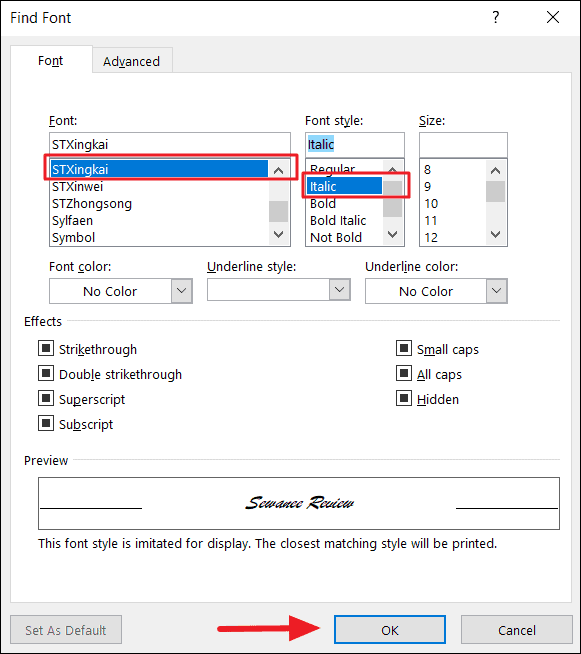
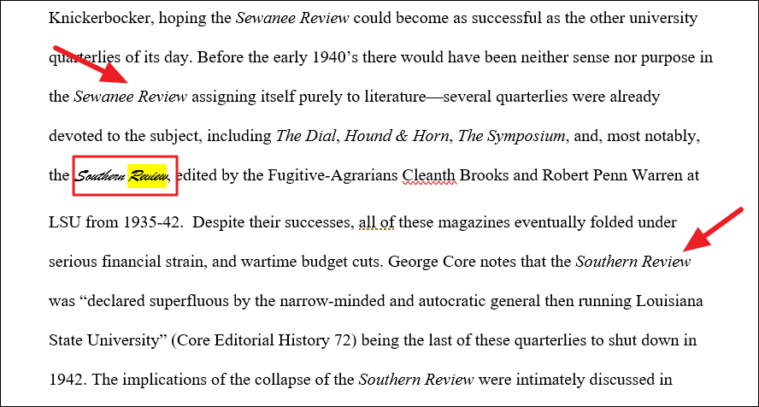
The chosen Format ‘Font: (Default) STXingkai, Italic’ will appear under the ‘Find What’ text box in the Find and Replace dialog box. Now click ‘Highlight All’ to find the matching words with that format.
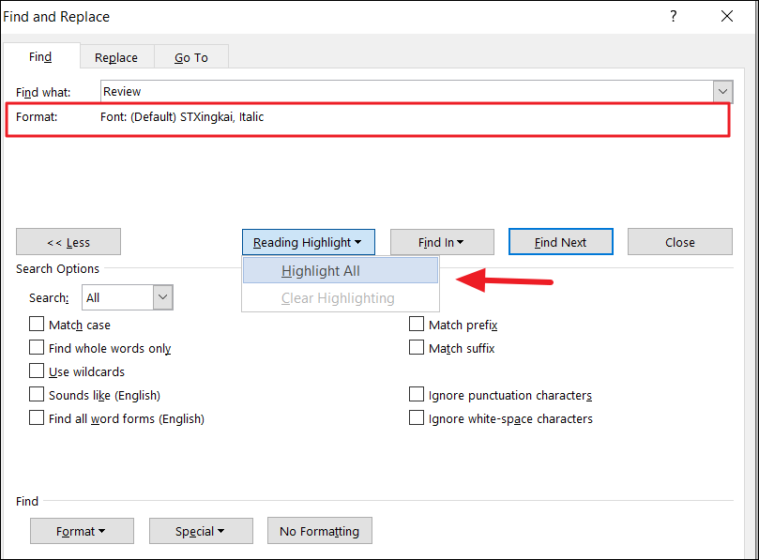
As you can see, the tool only highlights the words with that specific font format, while it doesn’t highlight the same matching word in a different font format.
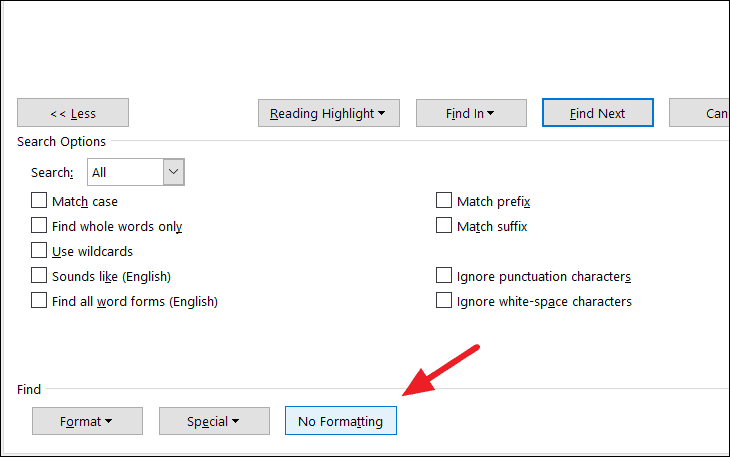
To clear the formatting for the search, click the ‘No Formatting’ button at the bottom of the Find and Replace dialog box.
Find Text with Only Formatting
You can even find texts with formatting alone. You don’t even have to type a word or phrase, you can just specify the only format of the text.
And the tool will find you all the words or phrases with the matching format.
The Find and Replace tool also lets you find non-breaking characters/special characters or words with special characters by choosing the character(s) from the ‘Special’ drop-down button at the bottom of the Find and Replace dialog box.
Find and Replace Text in MS Word
So far, you have learned how to find text and how to find text with advanced options, now let us see how to replace the found text.
The Replace function allows you to find a word or a group of words and replace it with something else or find a word based on text formatting and replace it with other text, or find a specific word and replace its formatting, or find and replace characters with other special characters or words.
Find and Replace Text
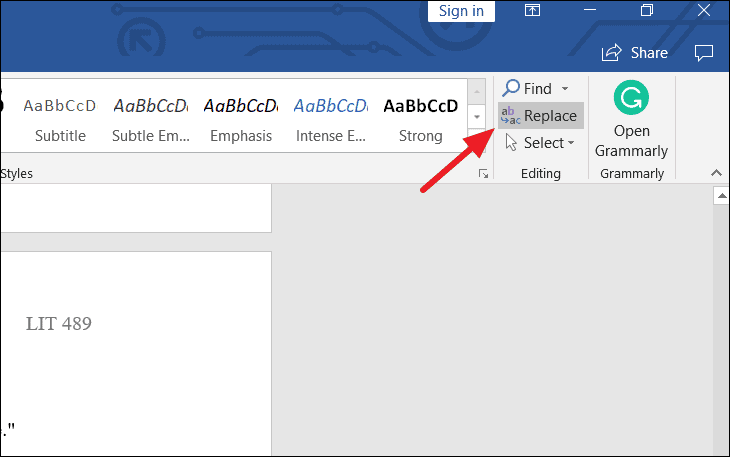
To find and replace a particular word or phrase for another, navigate to the Editing group in the ‘Home’ tab and click the ‘Replace’ command. Alternatively, you can also press the keyboard shortcut Ctrl + H.
This will open the Find and Replace dialog box. In the Find and Replace dialog box, fill out the two fields:
- Type the text you want to search for in the ‘Find what:’ field.
- Type the text you want to replace it with in the ‘Replace with:’ field.
Once you enter the necessary texts, you can either click the ‘Replace’ button to replace the text one by one or ‘Replace All’ to replace all the instances of the word at once.
Replacing all the text together may cause errors in your document if you are not cautious. For example, if you are replacing all the ‘He’ words with ‘She’, it may also replace the words Head with Shead, help with Shelp, heat with Sheat, and so on. So sometimes, it’s better to replace them one at a time.
Click the ‘Find Next’ to find the first instance of the text highlighted in gray and click ‘Find Next’ again to jump to the next instance. Review each instance and click ‘Replace’ to exchange the currently highlighted text.
You can click the title bar of the Find and Replace dialog box and drag it out the way to see the results behind it.
Once you’re done, click the ‘Close’ button to close the dialog box.
Note: If you leave the ‘Replace With’ field blank, the search text in the ‘Find What’ field will be deleted from the document.
Advanced Find and Replace Text
If you are looking to replace more specific words such as words with punctuation, capitalization, certain font or style, or even special characters, you can use the advanced search options of the Find and Replace tool.
To access the advanced options of Find and Replace, click the ‘More >>’ button at the bottom of the dialog.
Here, you have various search and replace options that you can use to narrow down your search.
As we discussed earlier in the Advanced Find section, you already know what each option under the Search Options is used for.
Select one or more options under the Search Options and click ‘Find Next’ to find the matching words or click ‘Replace’ to replace one instance at a time or click ‘Replace All’ to exchange every instance at once.
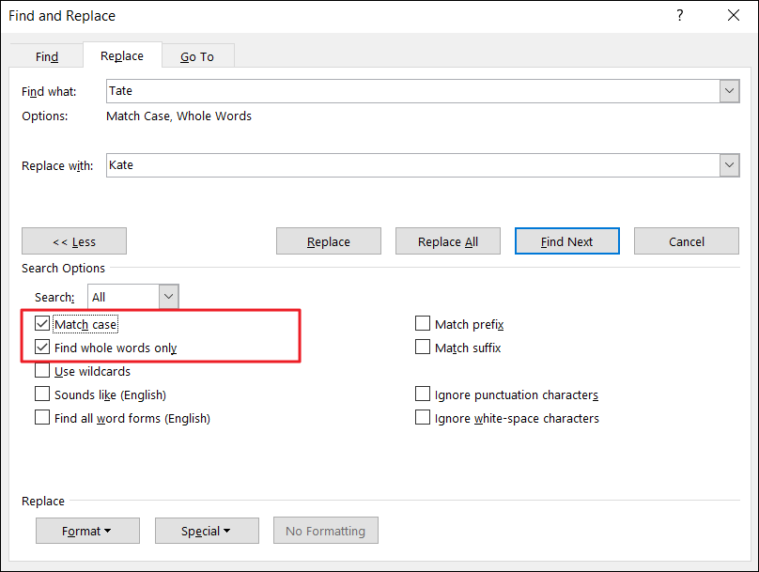
Example:
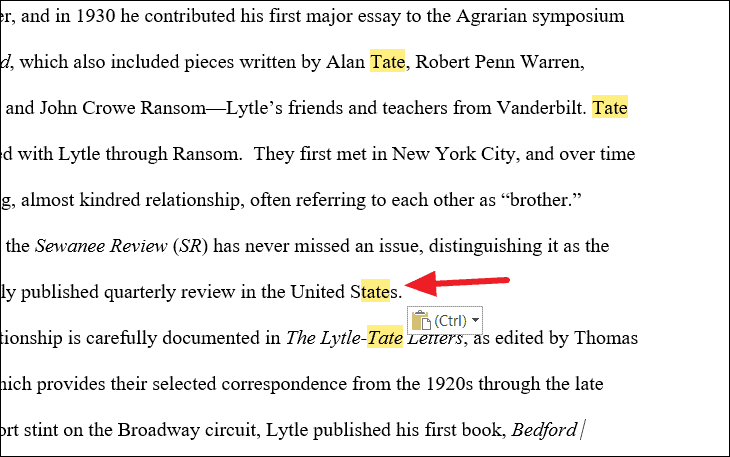
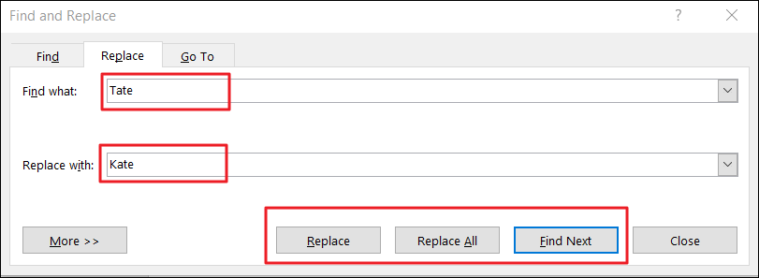
As we mentioned before, this tool finds the combinations of characters of the given word, even as part of other words.
For example, when we search for the word ‘Tate’ in the document, it finds that combination of characters even as part of other words like ‘United States’.
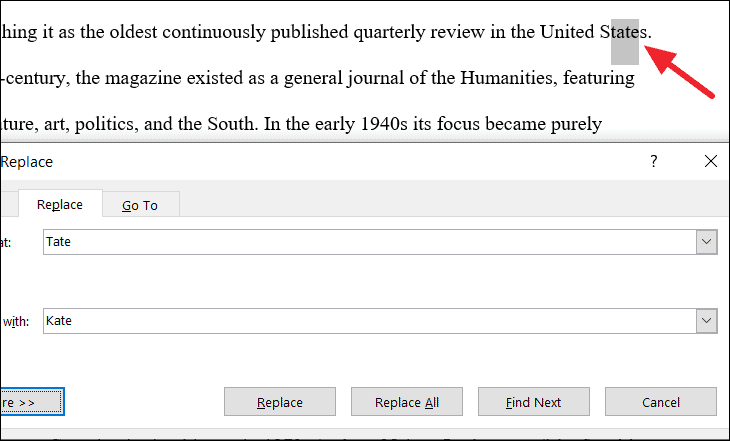
And this is not ideal when we replace these words. Also if you hundreds of matches, it would take forever to replace words one by one.
To fix this, check the ‘Find whole words only’ option, to find the words that are not partial or part of other words, it only finds whole words that are exactly matched. Here, we also checked the ‘Match case’ option to make sure it matches the exact uppercase and lowercase letters too. Then, click ‘Replace’ or ‘Replace All’ to replace the words.
You can use the rest of the above options in a similar fashion to customize your search to find specific words.
Find Text and Replace Formatting
You can also find a particular word and replace it with the same word but with specific formatting or replace it with another word with formatting.
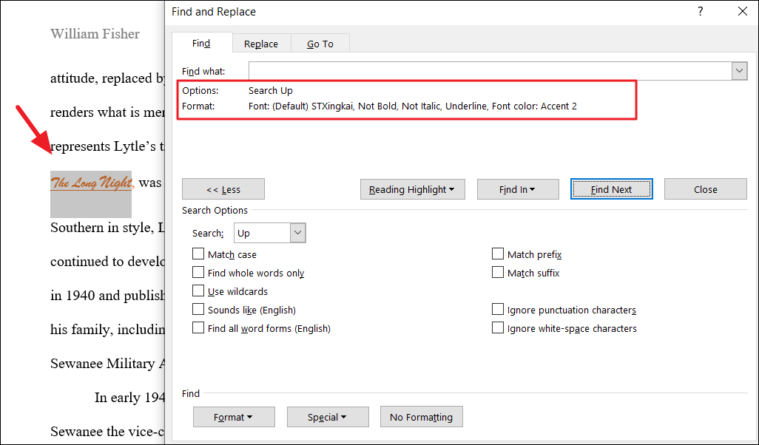
For example, we want to find and replace the whole word ‘Lytle’ with a specific font format. To replace formatting, type the word you want to find in the ‘Find what’ field and select the ‘Find whole words only’ option to search for only that whole word. Then, click the ‘Format’ button at the bottom of the dialog box and choose ‘Font’.
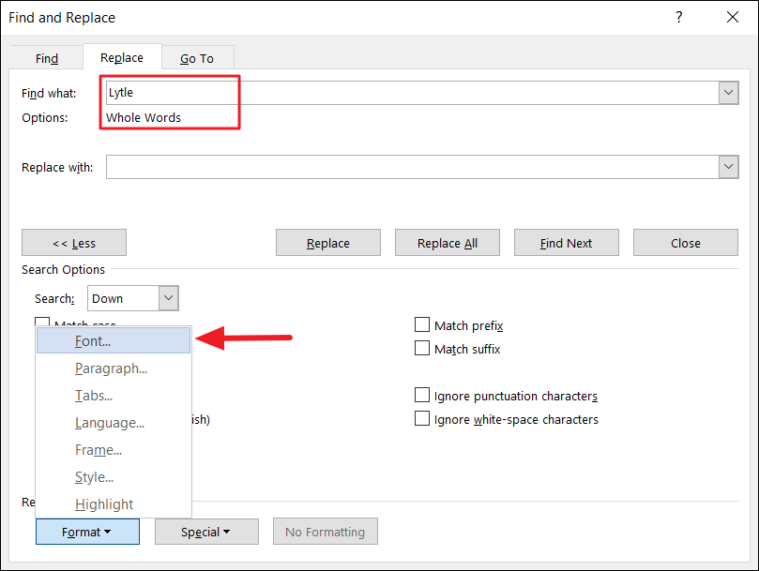
You can replace words with other formatting options such as Style, Paragraph, Frame, and so on.
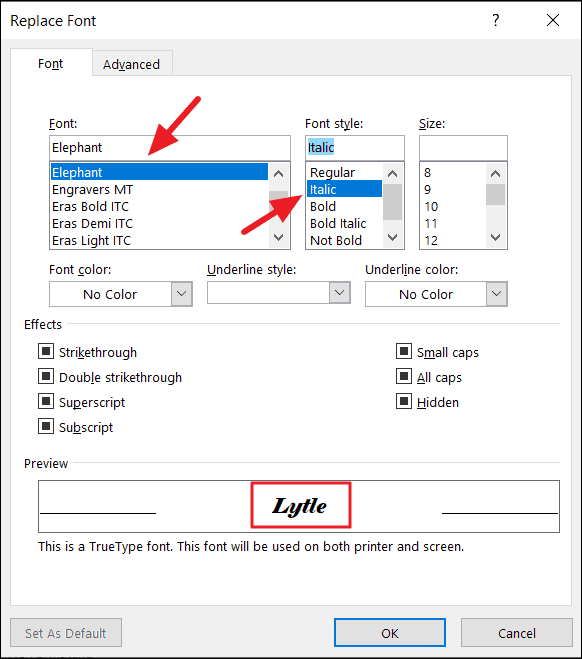
In the Replace Font dialog, choose your desired format style such as font, font style, font color, etc. In our case, we are choosing ‘Elephant’ font and ‘Italic’ style. Then, click ‘OK’ to apply.
Back in the ‘Find and Replace’ dialog box, you can see the chosen formatting is set for the ‘Replace with:’. Since we are only replacing the formatting of the word, leave the ‘Replace with:’ field blank. Then, click either the ‘Replace’ or ‘Replace All’ button to replace the formatting.
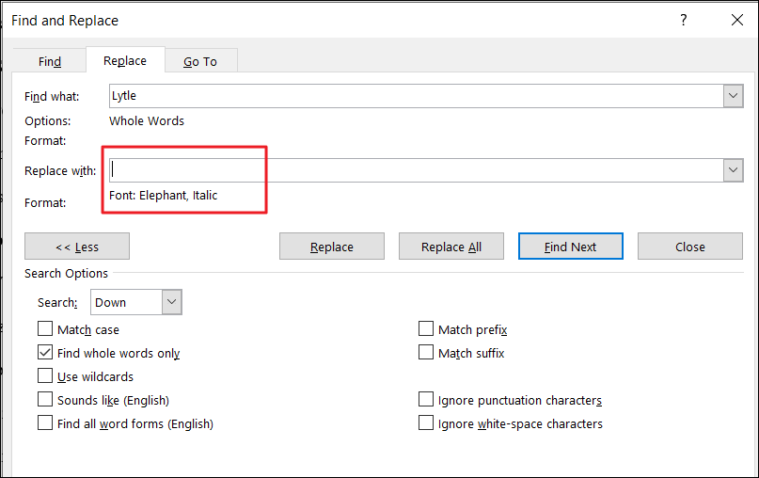
Once you click the ‘Replace All’ button a message box will appear informing you how many replacements were made (In our case, 222).
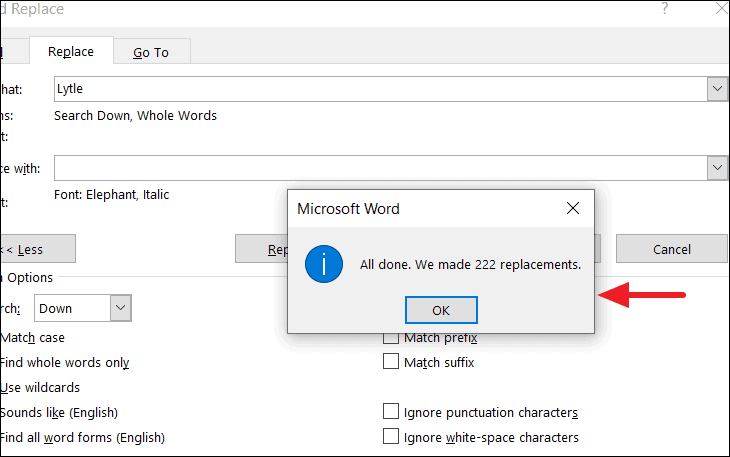
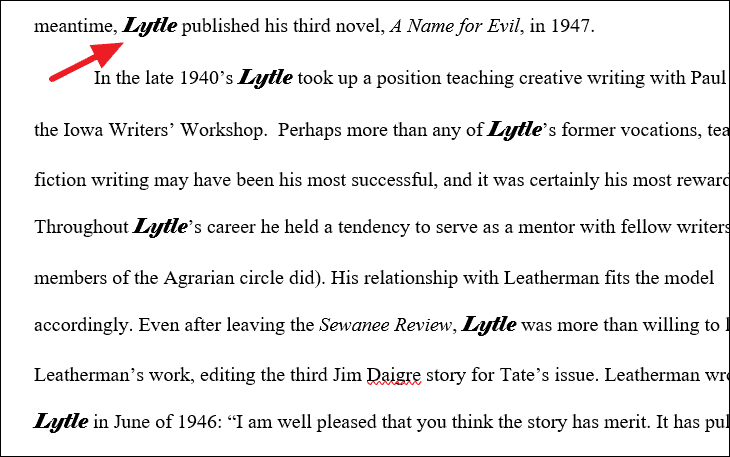
As you can see, all the instances of the word ‘Lytle’ is replaced with specified formatting.
Find Text with a Specific Formatting and Replace
If you want to find a text that has a certain formatting style and replace it with another text, without changing the formatting or with different formatting, you can do it by applying that formatting to the Find word. Here’ how you do this:
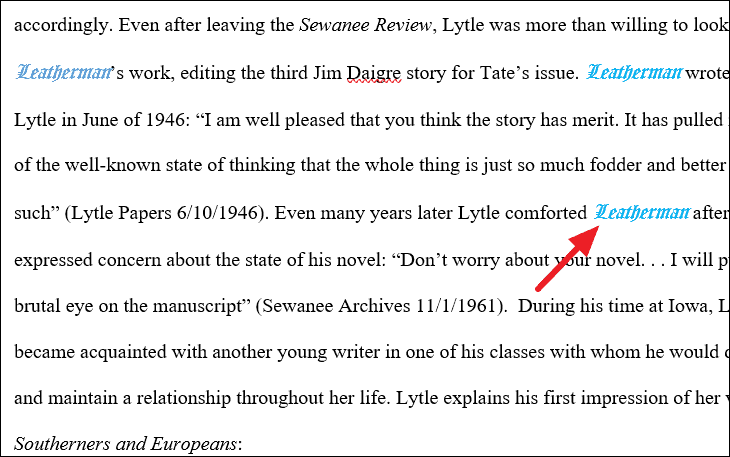
For example, we want to find and replace the text ‘Leatherman’, that has particular formatting (Font: Old English Text MT, Style: Italic, Color: Blue, Accent 5), with the text ‘Lincoln’ (without changing the formatting).
First, type the text you want to search for (in our case, Leatherman) in the ‘Find What’ field. Then, click on the ‘Format’ button and choose the options as required (Font).
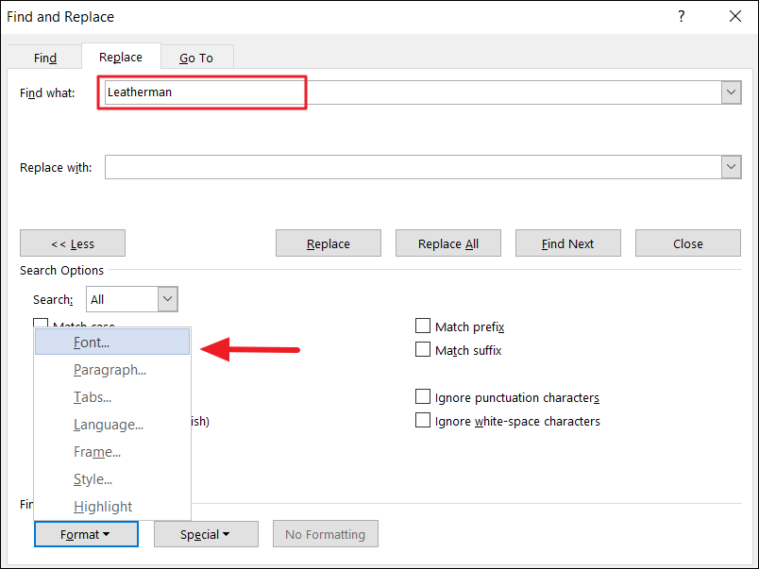
In the Find Font, dialog box, select the required formatting with which we’re going to find text. In our example, the text ‘Leatherman’ is in ‘Font: Old English Text MT, Style: Italic, and Color: Blue, Accent 5’ formatting. Once the options are selected, click ‘OK’.
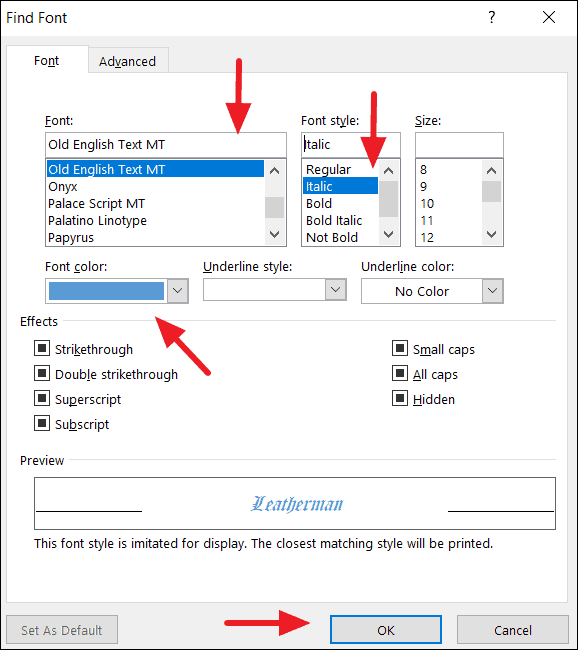
Now the selected formatting options should appear under the ‘Find What’ text field in the Find and Replace.
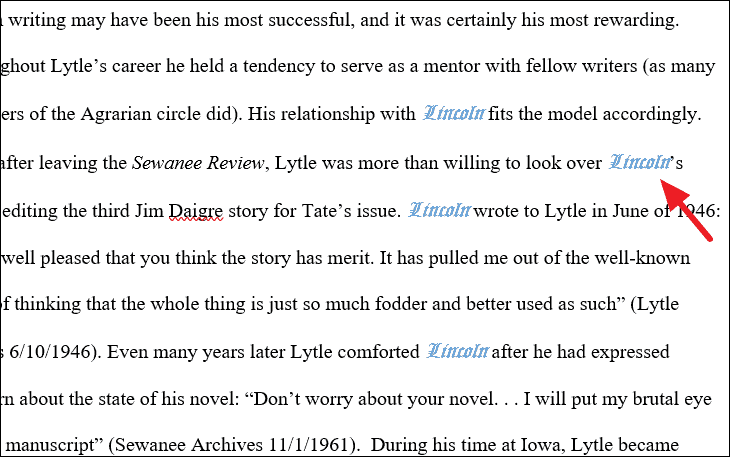
Next, type the text you want it to be replaced with (Lincon) in the ‘Replace with field:’ and click ‘Replace All’. You can also add formatting to the replacement text if you want.

Once you click ‘Replace All’, all of the instances will be replaced and a prompt will show you how many replacements were made.

As you can see all the instances of the ‘Leatherman’ with formatting is replaced by the ‘Lincoln’ without changing the formatting.
Find and Replace Special Characters/Non-Printing Characters
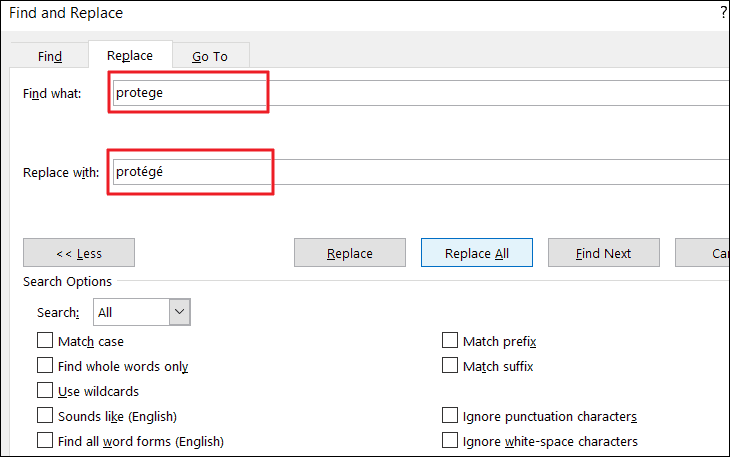
The find and replace feature can also help you find special character characters and replace them with other special characters such as ®, é, ä, or any other character listed in the Symbol dialog. You can also find and replace non-printing characters such as manual line breaks, tab characters, paragraph marks, etc. You can even replace special characters with text and vice versa.
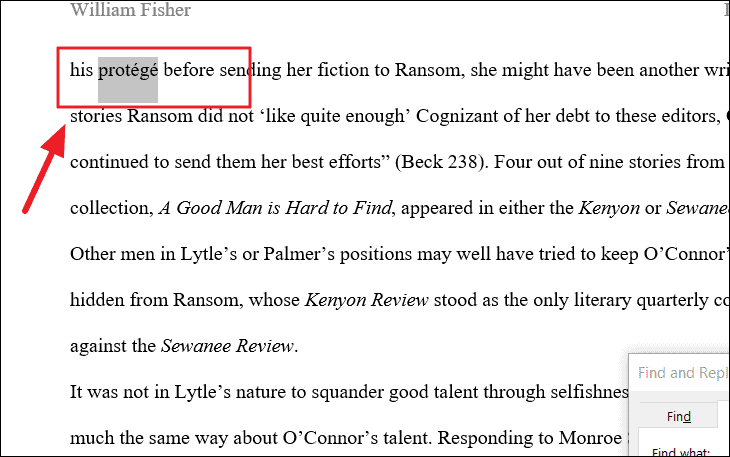
For example, if you want to find and replace the word ‘protege’ with ‘protégé’, type ‘protege’ in the Find what box and type ‘protégé’ in the ‘Replace with’ box. Then, click ‘Replace’ or ‘Replace All’ to replace them.
As you can see the found texts are replaced with replacement text with special characters.
Sometimes you want to replace manual line breaks (non-printing characters) with paragraph marks, in such cases, you need to insert respective character code in the ‘find what’ and ‘replace with’ boxes.
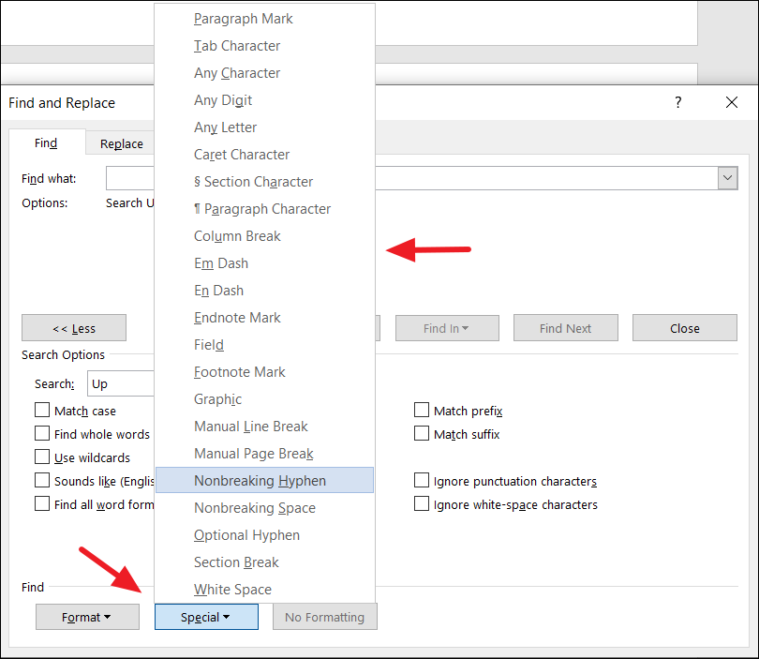
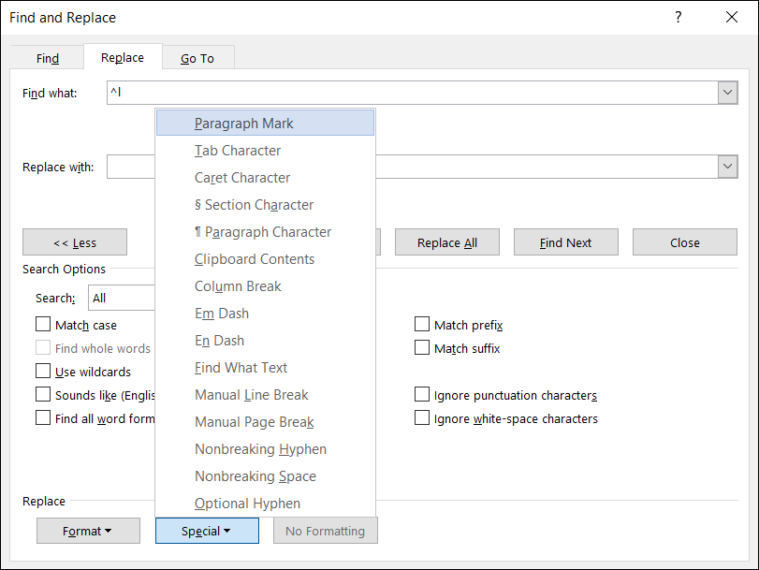
For example, we want to replace all manual line breaks in the documents with paragraph marks. The character code for a manual line break and paragraph mark is ‘^l’ and ‘^p’ respectively. You can either type the code or if you don’t know the code, use the ‘Special’ button to insert the code.
To insert non-breaking characters, first, select the text box where you want to insert. Then, click the ‘Special’ button at the bottom of the Find and Replace dialog box and select an item from the list. And the tool will automatically insert the respective character code in the text box.
In the example, we are choosing ‘Manual Line Break’ for the ‘Find what’ field.
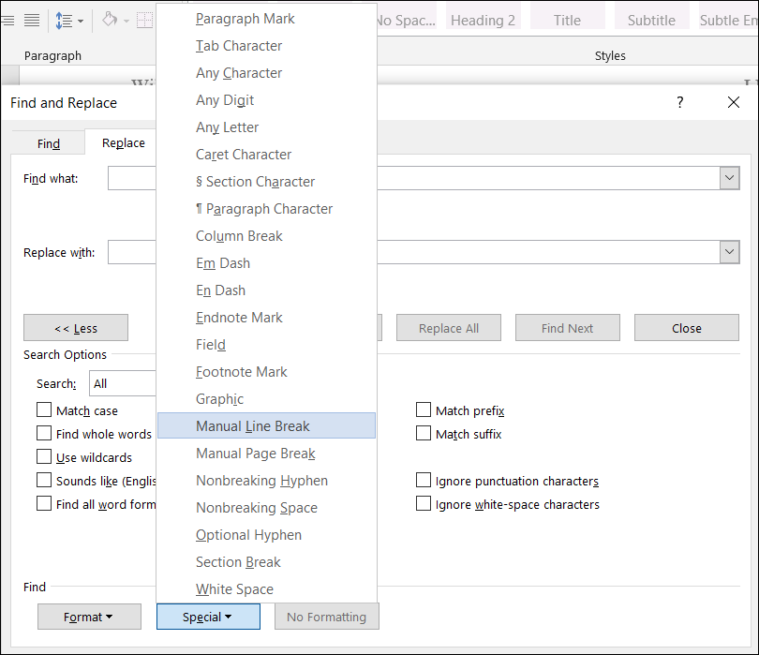
And ‘Paragraph Mark’ for the ‘Replace with’.
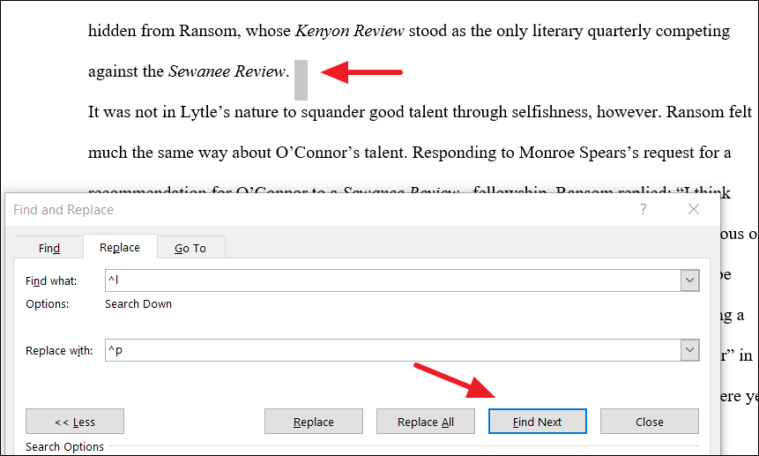
Then, click ‘Find Next’ to see where the line breaks are located. Now, click ‘Replace All’ to replace all the manual line breaks in the documents.
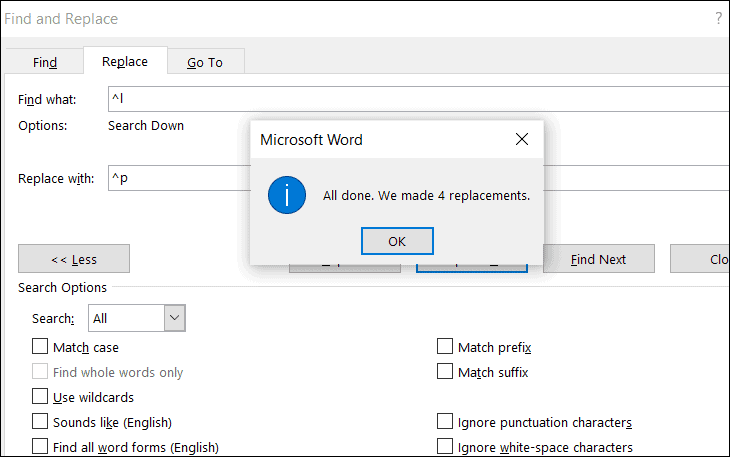
As you can see below, the manual line breaks are replaced with paragraph marks.
In the similar way, you can also replace non-breaking characters/special characters with text and vice versa.
That’s everything you need to know about finding and replacing text in Microsoft Word.
Поиск (Find)
Для начала хочется подчеркнуть, что система поиска в Word является одной из самых мощных в мире.
Десятилетия разработки, тестирования, вдумчивого отношения и постоянной обратной связи с пользователями позволили получить продукт,
обладающий незаурядными возможностями, сочетающимися с логикой и комфортом для пользователя.
Найти можно всё что угодно, так как диалог поиска практически вмещает в себя все возможности программы.
Горячая клавиша для вызова диалога — Ctrl+F.
Так БЫЛО! Потом в компанию пришел сотрудник, решивший, что 30-летняя история продукта и общепринятые (во всех программах и операционных системах) правила ему не указ.
Итогом стал вызов этой клавишей панели навигации (внутренняя команда NavPaneSearch). Все. Поиска не стало.
Как это исправить.
Доступ к этим материалам предоставляется только зарегистрированным пользователям!
Если вам всё же потребуется Панель навигации, те её включение производится через Ленту Вид⇒Отображение⇒Область навигации.
Хорошо видно, что диалог содержит три вкладки, помогающие перемещаться и изменять текст.
![]()
![]()

Доступ к этим материалам предоставляется только зарегистрированным пользователям!
Значительно расширить возможности пользователь может после нажатия кнопки Больше (More).
(Надпись на ней изменится на Меньше (Less).)
![]()
![]()
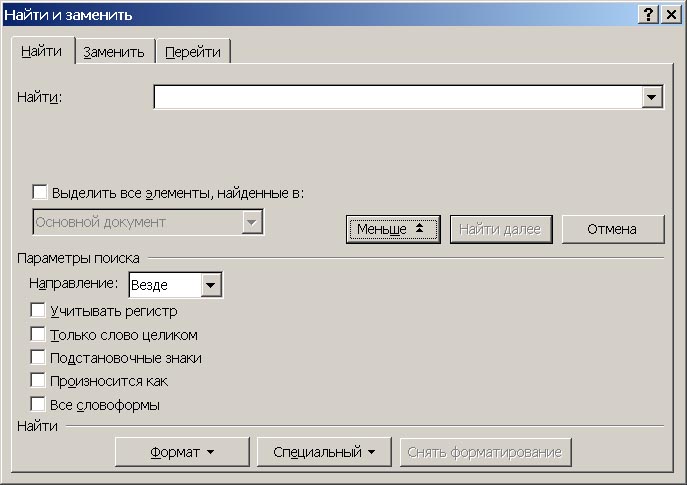
Направление поиска (Search)
- Везде (All). Программа ищет от текущей позиции курсора до конца документа, а затем, от начала документа до точки начала поиска.
- Вперед (Down). От текущей позиции курсора до конца документа, а затем переспрашивает, поискать ли в начале.
- Назад (Up). Наоборот, вверх.
Использование VBA несколько расширяет эти возможности, например, блокировкой (Stop).
Учитывать регистр (Match case). Наиболее частый случай ошибок.
Крайне удобно, когда нужно найти аббревиатуру, имя собственное или слово, написанное с заглавными буквами.
Но, многие пользователи часто забывают снять эту пометку при повторном поиске.
К сожалению, и при программировании.
Только слово целиком (Find whole word only).
Прекрасная возможность для поиска таких кратких форм, как, например, предлоги или союзы.
Подстановочные знаки (Use wildcards).
Отдельный и достаточно непростой способ поиска, используемый в особо сложных случаях.
Не входит в базовый курс обучения, хотя должен быть охарактеризован в качестве «монстрового».
Надо быть осторожным, так как включение полностью меняет логику поиска, пусть только в некоторых ситуациях!
Произносится как (Sounds like) работает только для английского языка.
Все словоформы (Find all word forms) работает только для английского языка.
Кнопка Формат (Format) переносит нас почти в полное многообразие возможностей программы по форматированию текста.
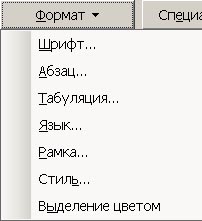
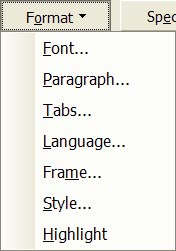
Вызвав соответствующий пункт меню, вы попадаете в стандартный диалог, где можете заказать поиск именно так оформленного фрагмента.
Следует особо отметить, что во многих случаях ищутся символы, имеющие оформление или, наоборот, не имеющие его.
Например, курсивные или без присвоения курсивного начертания.
Заметим также, что выделение цветом (фоновое) ищет просто факт, а не конкретный цвет.
Это нужно учесть в процессе разметки, если впоследствии вы хотите его искать.
Кнопка Специальный (Special) вызывает меню для поиска некоторых символов:
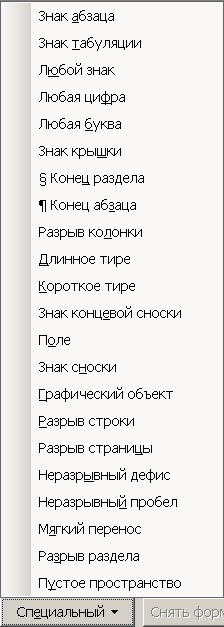
Доступ к этим материалам предоставляется только зарегистрированным пользователям!
На мой вкус на порядок проще искать минус и тире, просто введя их в поле поиска горячими клавишами.
Но указанное в таблице — вполне разумная версия альтернативы.
Обращает на себя внимание, что не все приведенные способы доступны непосредственно из диалога, а могут быть введены только вручную.
Замена (Replace)
Горячая клавиша для вызова диалога — Ctrl+H.
По сути, диалог дополняется полем для текста на замену и кнопкой Заменить всё (Replace all).
Ограничение: список спецсимволов для этого поля сокращается, так как невозможно вставить неизвестный символ (букву или цифру), как это делается при поиске.
Большинство символов, наоборот, дублируют поиск и сделаны для удобства пользователей.
Доступ к этим материалам предоставляется только зарегистрированным пользователям!
Кроме прочего, при замене важен диапазон обработки.
По умолчанию, вы обрабатываете текст в направлении «Вперед», но при достижении конца документа получите запрос о поиске от начала (до текущей позиции курсора).
Доступ к этим материалам предоставляется только зарегистрированным пользователям!
При использовании VBA вы не ограничены этими пунктами (есть дополнительные) и можете указать их явно, в том числе и запрет на выход за диапазон.
Доступ к этим материалам предоставляется только зарегистрированным пользователям!
Пока не вижу смысла разжевывать остальное очевидное, подробности можно обсудить на занятиях.
Подстановочные знаки (Wildcards)
Поскольку есть множество вопросов, которые не удастся решить без этой возможности, следует понимать логику работы функции.
Очень жаль, что приведенный ниже материал является эксклюзивным, так как озаботиться этим должна была компания Microsoft.
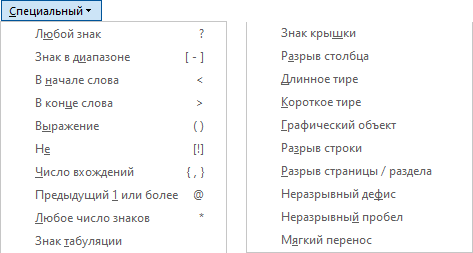
Если установить в диалоге поиска флажок «Подстановочные знаки», то нажатие на кнопку «Специальный» вызовет дополнительное меню.
Для практического использования оно малопригодно, необходимо четкое понимание назначения и синтаксиса конструкций.
Материал, доступный в Справке
почти равен нулю, примерно то же можно сказать и об остальных ресурсах Microsoft.
Доступ к этим материалам предоставляется только зарегистрированным пользователям!
Остальные пункты меню соответствуют обычному варианту поиска специальных знаков в тексте.
В случае их недопустимости будет выведено сообщение.
Примеры в данном случае — единственный способ понять, как этим пользоваться.
Таблица поясняет, какие значения будут найдены, если в поле поиска указать соответствующее регулярное выражение.
Доступ к этим материалам предоставляется только зарегистрированным пользователям!
Замена
Поле замены также имеет не слишком описанные особенности.
Доступ к этим материалам предоставляется только зарегистрированным пользователям!
Перемещение инициалов
Классика: есть литературная ссылка, но в ней инициалы расположены не там, где надо.
Здесь изложен вариант перестановки при расположении после фамилии.
Несложно сделать обратную версию.
Доступ к этим материалам предоставляется только зарегистрированным пользователям!
Очевидно, что это покроет большинство ситуаций, но не все.
Последующая проверка необходима.
Перейти (Go to)
Горячая клавиша для вызова диалога — F5.
Столь явная примитивность должна намекнуть на мощность возможности.
Она вполне видна из самого диалога.

Доступ к этим материалам предоставляется только зарегистрированным пользователям!
….