This Excel tutorial explains how to find last row using Excel worksheet formula.
Finding the last row in Excel is very important especially for creating dynamic data Range, which can be used for setting dynamic Print Area, dynamic Data Validation list, dynamic data source for Pivot Table, etc.
When you google this topic, most article talks about how to find the last row using VBA but not the non-VBA solution. In my previous post I have also detailed different ways to find the last row and last column using Excel VBA. This tutorial explains how to find the last row using worksheet formula without using VBA.
Find the last row using Worksheet Formula
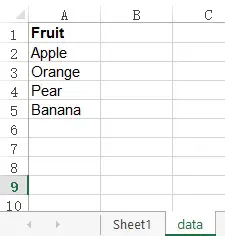
Assume that you have the below fruit list.
Find Last Row Number
The below formula looks for the last row number in column A.
=SUMPRODUCT(MAX((data!$A:$A<>"")*ROW(data!$A:$A)))
This formula returns 5
There are several solutions in the internet using COUNTA Function, COUNT Function and other formulas but they have different limitations. This one uses MAX Function and ROW Function, which is probably the best choice.
If you are just trying to use this formula without understanding the logic, you can simply replace the column number “A” with the column you want to check.
If you want to understand more, please read my previous post on the use of SUMPRODUCT Function to multiply two Array.
Find Last Row Value
The below formula looks for the last row value in column A. This formula is based on the previous one and uses INDIRECT Function to convert row number back to a Range.
=INDIRECT("A"&SUMPRODUCT(MAX((data!$A:$A<>"")*ROW(data!$A:$A))))
This formula returns Banana
Find Data Range up to last row data
The below formula select Range A1 to the last row in column A. The key of this formula is to set a data Range using OFFSET Function.
=OFFSET(data!$A$1,0,0,SUMPRODUCT(MAX((data!$A:$A<>"")*ROW(data!$A:$A))),1)
You can use this trick to create Name Range for setting dynamic Print Area, dynamic Data Validation list.
I came here looking for a way to find the last row in a non-contiguous range. Most responses here only check one column at a time so I created a few different functions to solve this problem. I will admit, though, that my .Find() implementation is essentially the same as Shai Rado’s answer.
Implementation 1 — Uses Range().Find() in reverse order
Function LastRowInRange_Find(ByVal rng As Range) As Long

    'searches range from bottom up stopping when it finds anything (*)
    Dim rngFind As Range
    Set rngFind = rng.Find( What:="*", _
                            After:=rng.Parent.Cells(rng.row, rng.Column), _
                            LookAt:=xlWhole, _
                            LookIn:=xlValues, _
                            SearchOrder:=xlByRows, _
                            SearchDirection:=xlPrevious)

    If Not rngFind Is Nothing Then
        LastRowInRange_Find = rngFind.row
    Else
        LastRowInRange_Find = rng.row
    End If

End Function
Implementation 2 — Uses Range().End(xlUp) on each column
Function LastRowInRange_xlUp(ByVal rng As Range) As Long

    Dim lastRowCurrent As Long
    Dim lastRowBest As Long

    'loop through columns in range
    Dim i As Long
    For i = rng.Column To rng.Column + rng.Columns.count - 1
        If rng.Rows.count < Rows.count Then
            lastRowCurrent = Cells(rng.row + rng.Rows.count, i).End(xlUp).row
        Else
            lastRowCurrent = Cells(rng.Rows.count, i).End(xlUp).row
        End If

        If lastRowCurrent > lastRowBest Then
            lastRowBest = lastRowCurrent
        End If
    Next i

    If lastRowBest < rng.row Then
        LastRowInRange_xlUp = rng.row
    Else
        LastRowInRange_xlUp = lastRowBest
    End If

End Function
Implementation 3 — Loops through an Array in reverse order
Function LastRowInRange_Array(ByVal rng As Range) As Long

    'store range's data as an array
    Dim rngValues As Variant
    rngValues = rng.Value2

    Dim lastRow As Long

    Dim i As Long
    Dim j As Long

    'loop through range from left to right and from bottom upwards
    For i = LBound(rngValues, 2) To UBound(rngValues, 2)                'columns
        For j = UBound(rngValues, 1) To LBound(rngValues, 1) Step -1    'rows

            'if cell is not empty
            If Len(Trim(rngValues(j, i))) > 0 Then
                If j > lastRow Then lastRow = j

                Exit For
            End If

        Next j
    Next i

    If lastRow = 0 Then
        LastRowInRange_Array = rng.row
    Else
        LastRowInRange_Array = lastRow + rng.row - 1
    End If

End Function
I have not tested which of these implementations works fastest on large sets of data, but I would imagine that the winner would be _Array since it is not looping through each cell on the sheet individually but instead loops through the data stored in memory. However, I have included all 3 for variety 
How to use
To use these functions, you drop them into your code sheet/module, specify a range as their parameter, and then they will return the «lowest» filled row within that range.
Here’s how you can use any of them to solve the initial problem that was asked:
Sub answer()

    Dim testRange As Range
    Set testRange = Range("A1:F28")

    MsgBox LastRowInRange_Find(testRange)
    MsgBox LastRowInRange_xlUp(testRange)
    MsgBox LastRowInRange_Array(testRange)

End Sub
Each of these will return 18.
Return to Excel Formulas List
Download Example Workbook
Download the example workbook
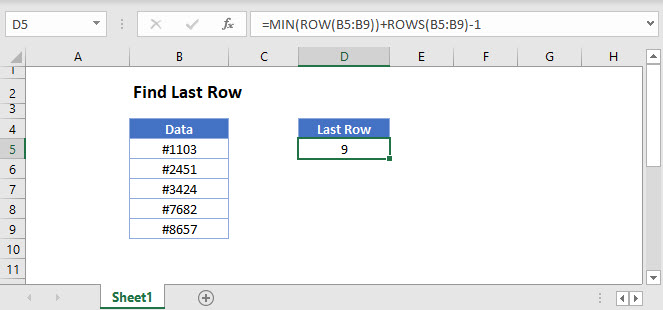
This tutorial will demonstrate how to find the number of the last row in a range in Excel and Google Sheets.
Find the Last Row of a Range
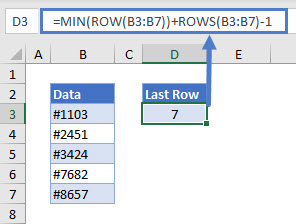
To find the last row of a range, you can use the ROW, ROWS, and MIN Functions:
=MIN(ROW(B3:B7))+ROWS(B3:B7)-1Let’s see how this formula works.
ROW with MIN Function
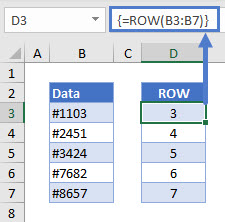
For a range with multiple rows, the ROW Function returns an array that contains all row numbers in that range.
=ROW(B3:B7)Note: If you are using Excel 2019 or earlier, to create this array formula you must press CTRL + SHIFT + ENTER to close out the formula instead of simply pressing ENTER.
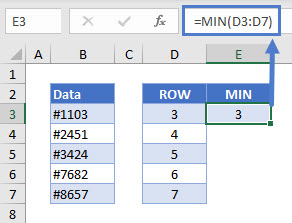
We only need the first row number and can get it with the MIN Function. The MIN Function returns the smallest of a set of numbers.
=MIN(D3:D7)Here, our range starts on Row 3.
ROWS Function
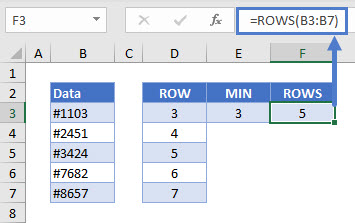
The ROWS function returns the total number of rows in a range.
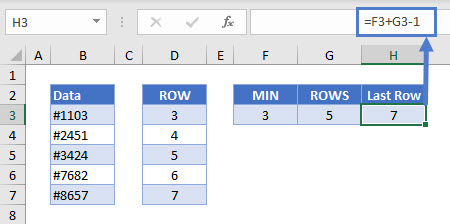
=ROWS(B3:B7)Start with the first row number, add the total number of rows, and subtract 1 to get the row number of the last cell in the range.
=E3+F3-1This is equivalent to our original formula of:
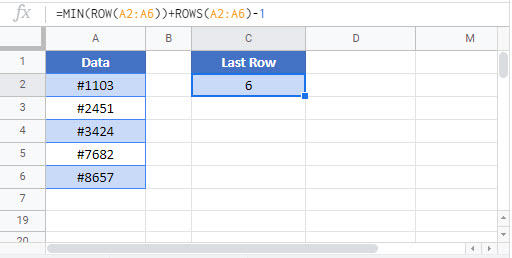
=MIN(ROW(B3:B7))+ROWS(B3:B7)-1Find Last Row in Google Sheets
These formulas work exactly the same in Google Sheets as in Excel.
This tutorial will cover multiple ways to find last row in Excel using VBA.
A common task in VBA is to find the last row of a dataset. There are many ways to do this, which may create some confusion. From my perspective atleast, the answer lies in how our data is laid out and the convenience of the technique in consideration.
We will refer to the below dataset which is in sheet: Invoice (code name: wsInv). The worksheet will be referred to using its code name. i.e. Instead of using Thisworkbook.sheets(“Invoice”), we will use wsInv.
Solution 1: Range.End
Similar to using Ctrl + Up arrow key in Excel. We will look in column A. The advantage of this approach is that, its simple, short and intuitive. But, the drawbacks are that we can only look in single columns and the last row in a column may not be representative of the entire dataset.
Never the less, this is the technique I use most often.
wsInv.Range("A" & wsInv.Rows.Count).End(xlUp).RowSolution 2: CurrentRegion
The Current Region of a data set, is the entire range of that data that is surrounded by blank rows and blanks columns. And we can determine the Current Region, by selecting any cell in that data and pressing Ctrl + A.
If your data starts from row 1, then we can just count the number of rows in the dataset and that will be equal to the last row used by that dataset in Excel.
But, if your data doesn’t start in the first row, then we need to do this the proper way. That is, by getting the row number of the last row using the index number of that row.
'If your data starts in row 1
lrow = wsInv.Range("A1").CurrentRegion.Rows.Count
'If your data doesn’t start in row 1
lrow = wsInv.Range("A2").CurrentRegion.Rows(wsInv.Range("A2").CurrentRegion.Rows.Count).Row
'We can shorten the code, by feeding the range into a range object.
Dim rng As Range
Set rng = wsInv.Range("A2").CurrentRegion
lrow = rng.Rows(rng.Rows.Count).Row
Solution 3: UsedRange
But, what if your data is separated by blank rows. Or, rather, you are not sure whether your data is separated by blank rows. We can use the Used Range property of the Worksheet object to grab the last row.
The advantage of using UsedRange is even if our data range has blank cells or blank rows or blank columns, we will still be able to locate the last used cell.
But, on the other hand, if the cell doesn’t have any values, but there is a formula or formatting in it, the UsedRange technique will still consider it as a Used Cell. Depending on what outcome you are after, this may or may not be what you want.
'If your data starts in row 1
lrow = wsInv.UsedRange.Rows.Count
'If your data doesn’t start in row 1
lrow = wsInv.UsedRange.Rows(wsInv.UsedRange.Rows.Count).row
Solution 4: SpecialCells
Excel has a menu full of options called Go To Special that allows us to select cells with special characteristics. In the Home ribbon, go to Find and Select. Then, select Go To special. We have a list of options here. Select Last Cell. Click Ok. The last used cell in our worksheet will be selected.
The advantage of using SpecialCells is even if our data range has blank cells or blank rows or blank columns, we will still be able to locate the last used cell.
And for that reason, this technique is superior to just using the Range.End property. Infact, it is similar to the Used Range property that we saw earlier except for a few subtle differences.
But, on the other hand, if the cell doesn’t have any values, but there is a formula or formatting in it, the SpecialCells technique will still consider it as a Used Cell. Depending on what outcome you are after, this may or may not be what you want.
lrow = wsInv.Range("A1").SpecialCells(xlCellTypeLastCell).rowBut, there is one issue. If you update the data and try to run Special Cells without saving the changes in the workbook, Special Cells will still determine the used range based on the previous version of data. UsedRange doesn’t face this issue, and hence, I prefer to use it over SpecialCells.
Solution 5: Find
This is the most efficient technique of find the last row. But, the code is long winded and I seldom use it unless the situation calls for it.
We can go to our Home ribbon, choose Find and Select and choose Find. Or, just go Ctrl + F. We have five options here, which we can even specify through code. And there are even more options available in VBA. And some of them, will help us find our last row.
Dim lrow As Long
lrow = wsInv.Cells.Find(What:="*", _
                After:=wsInv.Range("A1"), _
                LookIn:=xValues, _
                LookAt:=xlPart, _
                SearchOrder:=xlByRows, _
                SearchDirection:=xlPrevious, _
                MatchCase:=False _
                ).row
This technique is great in finding the last row with values, ignoring any formatting or formulas.
But, there is one issue. If there is no data, then Range.Find will throw a Run Time error. To counter that, we will need to add some error handling. If there is no data, we will skip the Find method and go to the next line of code. In this case, the last row variable will not get populated. And if it remains undefined as zero, we will return last row as row 1.
Dim lrow As Long
On Error Resume Next
lrow = wsInv.Cells.Find(What:="*", _
                After:=wsInv.Range("A1"), _
                LookIn:=xlFormulas, _
                LookAt:=xlPart, _
                SearchOrder:=xlByRows, _
                SearchDirection:=xlPrevious, _
                MatchCase:=False _
                ).row
If lrow = 0 Then
    lrow = 1
End If
Bonus Solution: Tables
Tables are awesome and I would highly recommend to use them whenever you can. And finding the last row is straightforward as well.
We’ll create a table for this example. Go to Insert ribbon and select Table or just press Ctrl T. Click ok. Go to the Table Design ribbon and give this table a name: InvoiceTable.
In VBA, table is referred to as a List Object. So, we can declare a List Object variable and assign our table to it.
If the first row of the table is the same as the first row of the Excel worksheet then we can just count the number of rows in the table, and that will be equal to the last row in the Excel worksheet.
But, what if the table doesn’t start from row 1. Then, we need to grab the row number of the last row using its index number.
Dim tblInv As ListObject
Set tblInv = wsTblInv.ListObjects("InvoiceTable")
Dim lrow As Long
'If your data starts in row 1
lrow = tblInv.Range.Rows.Count
'If your data doesn’t start in row 1
lrow = tblInv.Range.Rows(tblInv.Range.Rows.Count).rowIn VBA, when we have to find the last row, there are many different methods. The most commonly used method is the End(XLDown) method. Other methods include finding the last value using the find function in VBA, End(XLDown). The row is the easiest way to get to the last row.
Excel VBA Last Row
If writing the code is your first progress in VBA, then making the code dynamic is your next step. Excel is full of cell referencesCell reference in excel is referring the other cells to a cell to use its values or properties. For instance, if we have data in cell A2 and want to use that in cell A1, use =A2 in cell A1, and this will copy the A2 value in A1.read more. The moment we refer to the cell, it becomes fixed. If our data increases, we need to go back to the cell reference and change the references to make the result up to date.
For an example, look at the below code.
Code:
Sub Last_Row_Example1()

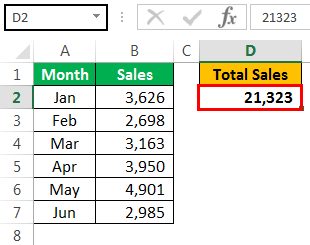
   Range("D2").Value = WorksheetFunction.Sum(Range("B2:B7"))

End Sub
The above code says in D2 cell value should be the summation of Range (“B2:B7”).
Now, we will add more values to the list.
Now, if we run the code, it will not give us the updated result. Rather, it still sticks to the old range, i.e., Range (“B2: B7”).
That is where dynamic code is very important.
Finding the last used row in the column is crucial in making the code dynamic. This article will discuss finding the last row in Excel VBA.
Table of contents
- Excel VBA Last Row
- How to Find Last Used Row in the Column?
- Method #1
- Method #2
- Method #3
- Recommended Articles
- How to Find Last Used Row in the Column?
How to Find the Last Used Row in the Column?
Below are the examples to find the last used row in Excel VBA.
You can download this VBA Last Row Template here – VBA Last Row Template
Method #1
Before we explain the code, we want you to remember how you go to the last row in the normal worksheet.
We will use the shortcut key Ctrl + down arrow.
It will take us to the last used row before any empty cell. We will also use the same VBA method to find the last row.
Step 1: Define the variable as LONG.
Code:
Sub Last_Row_Example2()

   Dim LR As Long
   'For understanding LR = Last Row
End Sub
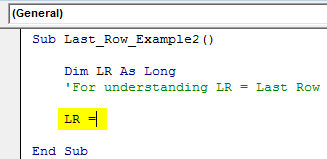
Step 2: We will assign this variable’s last used row number.
Code:
Sub Last_Row_Example2()

   Dim LR As Long
   'For understanding LR = Last Row

   LR =

End Sub
Step 3: Write the code as CELLS (Rows.Count,
Code:
Sub Last_Row_Example2()

   Dim LR As Long
   'For understanding LR = Last Row

   LR = Cells(Rows.Count,

End Sub
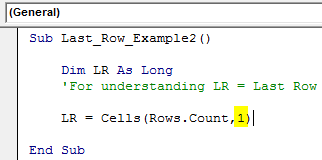
Step 4: Now, mention the column number as 1.
Code:
Sub Last_Row_Example2()

   Dim LR As Long
   'For understanding LR = Last Row
   LR = Cells(Rows.Count, 1)

End Sub
CELLS(Rows.Count, 1) means counting how many rows are in the first column.
So, the above VBA code will take us to the last row of the Excel sheet.
Step 5: If we are in the last cell of the sheet to go to the last used row, we will press the Ctrl + Up Arrow keys.
In VBA, we need to use the end key and up, i.e., End VBA xlUpVBA XLUP is a range and property method for locating the last row of a data set in an excel table. This snippet works similarly to the ctrl + down arrow shortcut commonly used in Excel worksheets.read more
Code:
Sub Last_Row_Example2()

   Dim LR As Long
   'For understanding LR = Last Row

   LR = Cells(Rows.Count, 1).End(xlUp)

End Sub
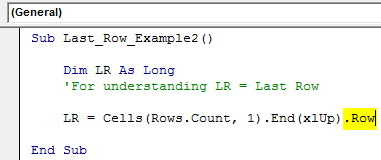
Step 6: It will take us to the last used row from the bottom. Now, we need the row number of this. So, use the property ROW to get the row number.
Code:
Sub Last_Row_Example2()

  Dim LR As Long
  'For understanding LR = Last Row

  LR = Cells(Rows.Count, 1).End(xlUp).Row

End Sub
Step 7: Now, the variable holds the last used row number. Show the value of this variable in the message box in the VBA codeVBA MsgBox function is an output function which displays the generalized message provided by the developer. This statement has no arguments and the personalized messages in this function are written under the double quotes while for the values the variable reference is provided.read more.
Code:
Sub Last_Row_Example2()

  Dim LR As Long
  'For understanding LR = Last Row

  LR = Cells(Rows.Count, 1).End(xlUp).Row

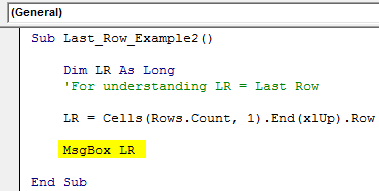
  MsgBox LR

End Sub
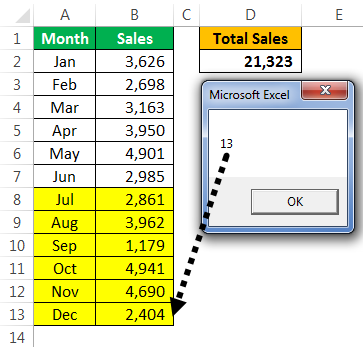
Run this code using the F5 key or manually. It will display the last used row.
Output:
The last used row in this worksheet is 13.
Now, we will delete one more line, run the code, and see the dynamism of the code.
Now, the result automatically takes the last row.
That is what the dynamic VBA last row code is.
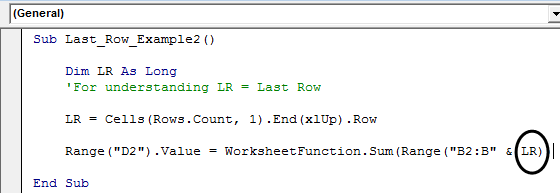
As we showed in the earlier example, change the row number from a numeric value to LR.
Code:
Sub Last_Row_Example2()

   Dim LR As Long
   'For understanding LR = Last Row

    LR = Cells(Rows.Count, 1).End(xlUp).Row

    Range("D2").Value = WorksheetFunction.Sum(Range("B2:B" & LR))

End Sub
We have removed B13 and added the variable name LR.
Now, it does not matter how many rows you add. It will automatically take the updated reference.
Method #2
We can also find the last row in VBA using the Range objectRange is a property in VBA that helps specify a particular cell, a range of cells, a row, a column, or a three-dimensional range. In the context of the Excel worksheet, the VBA range object includes a single cell or multiple cells spread across various rows and columns.read more and special VBA cells propertyCells are cells of the worksheet, and in VBA, when we refer to cells as a range property, we refer to the same cells. In VBA concepts, cells are also the same, no different from normal excel cells.read more.
Code:
Sub Last_Row_Example3()

   Dim LR As Long

   LR = Range("A:A").SpecialCells(xlCellTypeLastCell).Row

   MsgBox LR
End Sub
The code also gives you the last used row. For example, look at the below worksheet image.
If we run the code manually or use the F5 key result will be 12 because 12 is the last used row.
Output:
Now, we will delete the 12th row and see the result.
Even though we have deleted one row, it still shows the result as 12.
To make this code work, we must hit the “Save” button after every action. Then this code will return accurate results.
We have saved the workbook and now see the result.
Method #3
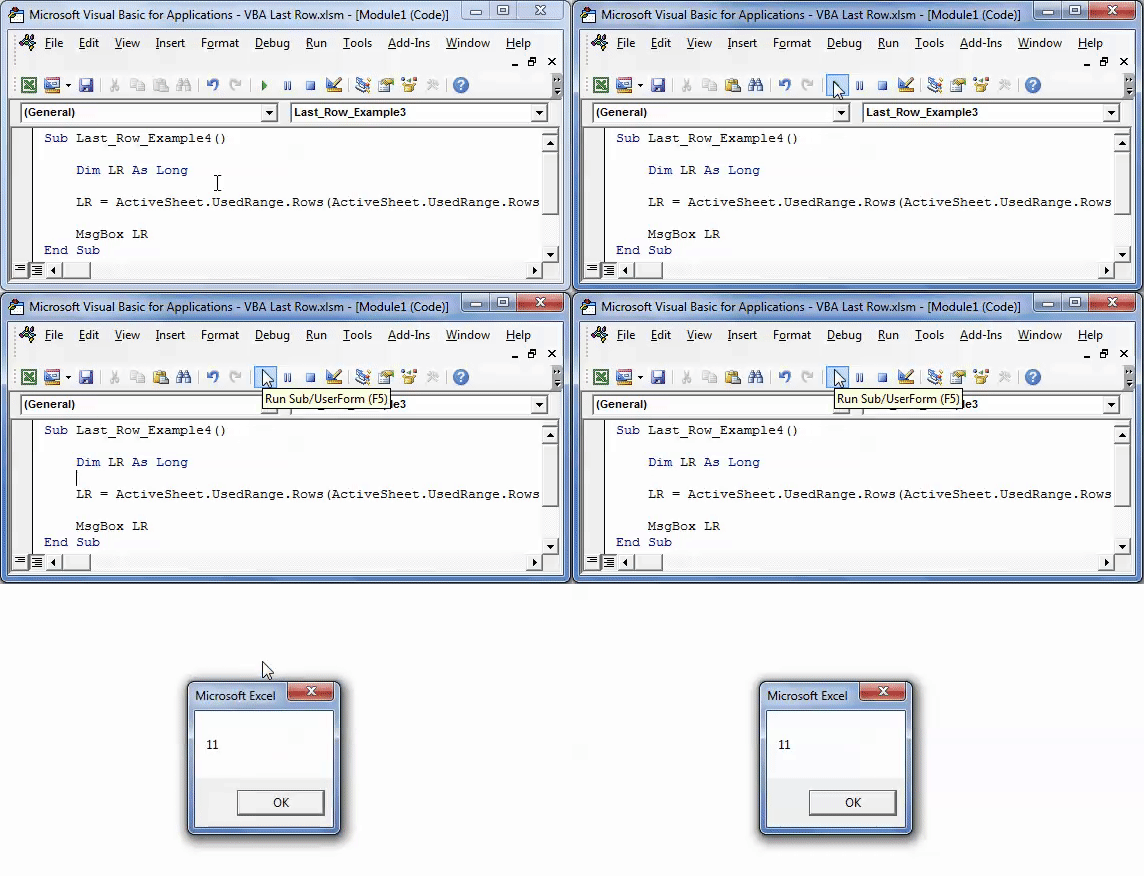
We can find the VBA last row in the used range. For example, the below code also returns the last used row.
Code:
Sub Last_Row_Example4()

   Dim LR As Long

   LR = ActiveSheet.UsedRange.Rows(ActiveSheet.UsedRange.Rows.Count).Row

   MsgBox LR
End Sub
It will also return the last used row.
Output:
Recommended Articles
This article has been a guide to VBA Last Row. Here, we learn the top 3 methods to find the last used row in a given column, along with examples and downloadable templates. Below are some useful articles related to VBA: –
- How to Record Macros in VBA Excel?
- Create VBA Loops
- ListObjects in VBA

