Written by Jane Hames
How to find images that are free to use in Microsoft Word and Google Docs
When searching for an image to insert into a Microsoft Word or a Google Docs Document, do you check the copyright? Depending on the software you are using to create your document, and the search engine being used for the search, you will get different results and options to filter by license. My preference is to use images that I know are licensed for commercial use and modification. This is mainly because I am not an expert in copyright laws, so by filtering for images that are labelled for use commercially, and are allowed to be modified, I know that I am safe. However, filtering to this lowest level of licensing does produce far fewer image results, so if you need more options it would be worth having a look at stock images which you can pay to use.
Here is a basic run down on what happens when you do an image search online and within Microsoft Word and Google Docs.
Searching for images within Microsoft Word:
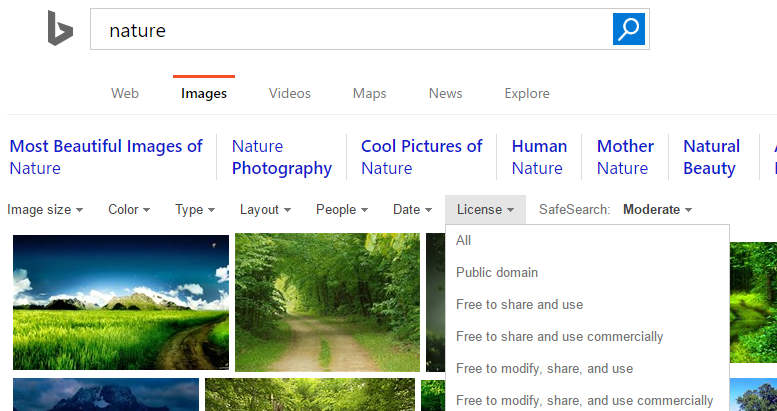
If you search using Word’s online images feature (which replaced Clip Art), you will be able to filter your search to display all image results or those with a creative commons license. The creative commons license does NOT necessarily mean that you have the right to use the image, but it does gives broad permission that you can use it within the limits of that license. This is confusing, and as a result, if I want to use the Bing image search, I do not do it within Word. Keep reading for some alternatives!
Searching for images with Bing in your browser:
To avoid the confusion of creative commons, if you search within your browser using bing images, you can choose an image without licensing constraints to insert into Word.
Searching for images within Google Docs:
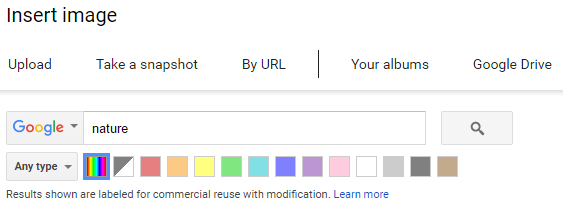
If you choose to insert an image in Google Docs and then select the search option, the results should be labelled for commercial reuse with modification. Just double check the description below the search box as shown here:
Searching for images with Google Images in your browser:
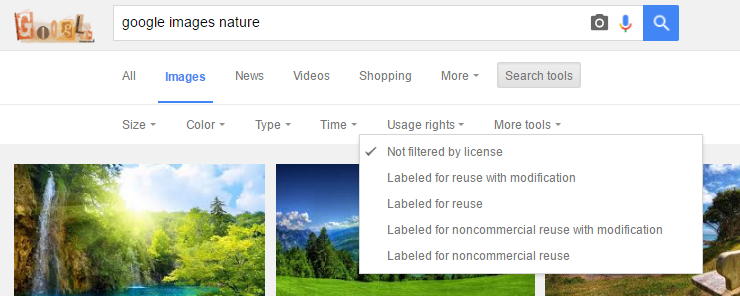
When using Google Images, ensure you change the licensing filter, as shown here:
Here are some sites which will provide more information about licensing and copyright:
http://creativecommons.org/licenses/
http://onlinehelp.microsoft.com/en-gb/bing/dn261810.aspx
https://support.google.com/websearch/answer/29508?hl=en
Here are some sites where you can pay for images:
http://www.shutterstock.com/
http://www.istockphoto.com/
Glide Training provides Google Docs and Microsoft Word training in Sussex, London and the South.
Возможности поиска картинок и других изображений
Примечание: Мы стараемся как можно оперативнее обеспечивать вас актуальными справочными материалами на вашем языке. Эта страница переведена автоматически, поэтому ее текст может содержать неточности и грамматические ошибки. Для нас важно, чтобы эта статья была вам полезна. Просим вас уделить пару секунд и сообщить, помогла ли она вам, с помощью кнопок внизу страницы. Для удобства также приводим ссылку на оригинал (на английском языке) .
При использовании области задач Картинки для поиска картинок или фотографии, результаты вы видите в разделе творческих произведений лицензии системылицензия изображений Bing.
Если вы не можете найти ничего подходящего в программе Office, попробуйте воспользоваться службой поиска изображений Bing в Интернете. Ниже приводятся нисколько советов по поиску изображений в Bing, а также полезная информация о лицензировании и правах на рисунки.
(Если вы не видите указанные ниже фильтры, скорее всего используется старая браузера. Чтобы узнать, какие браузеры с фильтры Bing, читайте в статье браузеры.)
Возможность 1. Фильтрация результатов по типу лицензии
Чтобы найти изображения, которые можно использовать, общий доступ или изменить для профессиональной или личного использования, искать изображения с помощью поиска изображений Bing, а затем Фильтрация изображений по типу лицензии.
Фильтр Bing основан на системе лицензирования Creative Commons. Как правило, с лицензиями Creative Commons предоставляется множество возможностей, например разрешения на бесплатное изменение, распространение и коммерческое использование изображений Тем не менее, вы должны самостоятельно проверять лицензионные требования для каждого рисунка. Чтобы понять, как и когда можно использовать изображение, может потребоваться найти дополнительные сведения на исходном сайте.
Возможность 2. Поиск картинок
Чтобы с помощью системы Bing найти картинки (рисованные изображения), добавьте в строку поиска слово «картинка». Примеры: картинка рамки или картинка цветка. Результаты этих запросов уже отфильтрованы в Bing по наиболее свободной категории Бесплатное изменение, распространение и использование в коммерческих целях.
Также на странице с результатами поиска вы можете выбрать для фильтра Тип значение Картинки.
Возможность 3. Поиск фотографий
Чтобы ограничить результаты фотографиями, добавьте в строку поиска слово «фотография». Примеры: фотография собаки или фотография кошки. Результаты этих запросов уже отфильтрованы в Bing по наиболее свободной категории лицензии Бесплатное изменение, распространение и использование в коммерческих целях.
Также на странице с результатами поиска вы можете выбрать для фильтра Тип значение Фотография.
Возможность 4. Другие способы фильтрации
В системе поиска изображений Bing также доступны другие фильтры: по цвету, размеру, макету и т. д. На рисунке ниже показаны параметры для поиска фотографий среднего размера.
Примечание: Обратите внимание, что при новом запросе все фильтры будут сброшены.
Поддерживаемые браузеры
Для доступа к фильтрам Bing необходимо использовать один из следующих браузеров:
Windows Internet Explorer 9 или более поздней версии
Как найти и заменить изображения в MS Word другим изображением или текстом?
Как быстро заменить изображения в MS Word другим, удалить все изображения из файла Word, заменить текст изображением, а также заменить изображения текстом?
Как удалить все изображения из документа Word?
Существует простой способ для достижения этой цели. Прежде всего откройте документ, который содержит изображения, воспользуйтесь функцией Найти и заменить, щелкнув значок на панели инструментов или нажав сочетание Ctrl + H.
Появится диалоговое окно, как на скриншоте ниже.
ВВедите «^g » (для графики) без кавычек строчными буквами в поле Найти. Поле Заменить на оставьте пустым. Нажмите Заменить все, чтобы удалить все изображения из документа.
Как заменить все изображения другим изображением в документе MS Word?
Допустим, вы хотите заменить все изображения в файле Word другим изображением.Это также очень легко сделать.
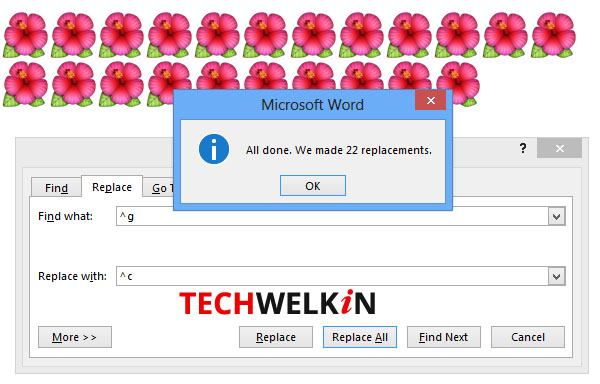
Прежде всего, выберите новое изображение, которым вы хотите заменить все изображения. Если изображение нет в вашем документе, добавьте его. Теперь скопируйте его в буфер обмена с помощью Ctrl + C. Далее в документе, где нужно заменить изображения, нажмите Ctrl + H и введите в поле Найти «^g» (для графики) строчными буквами (без кавычек). В поле Заменить на наберите «^с » опять же строчными буквами (без кавычек), как показано на скриншоте.
При нажатии Заменить все все изображения в документе будут заменены на изображение, скопированное в буфер обмена.
Как заменить текст изображением в документе MS Word?
В данном случае вы сможете заменить любой текст любым изображением. Если, например, вы хотите заменить текст Лев изображением льва, то это также можно сделать, используя функцию Найти и заменить.
Прежде всего выберите изображение, которое будет вставлено вместо указанного текста. Скопируйте его в буфер обмена, нажав Ctrl + C. Вернитесь в текстовый документ и нажмите Ctrl + H.В поле Найти введите нужный текст, в поле Заменить на введите «^с » строчными буквами (без кавычек).
Нажмите Заменить все, указанные текст будет заменен изображением, скопированным в буфер обмена.
Как заменить все изображения текстом в документы MS Word?
Допустим, необходимо заменить все изображения из документа Word определенным текстом. Как сделать это быстро?
Откройте текстовый документ, который нужно отредактировать. Нажмите Ctrl + H. В поле найти введите «^g» (для графики) строчными буквами (без кавычек), а в поле Заменить на нужный текст. См. скриншот.
Можно также применить желаемое форматирование к вставляемому тексту, нажав Больше>>.При нажатии на Заменить все все изображения в документе будут заменены указанным текстом.
Таким образом, используя перечисленные способы работы с большим количеством изображений в Word, вы облегчите себе работу и сбережете много времени.
Вставка изображений (картинок и фото) в Word
Для улучшения читабельности текстовых документов помимо форматирования текста можно добавить наглядные объекты, такие как картинки, фотографии и другие графические объекты.
Для этого в Word есть раздел Иллюстрации на вкладке Вставка в ленте инструментов.
В текстовые документы можно вставлять (или копировать) изображения с вашего компьютера или из сети «Интернет».
Панель инструментов для вставки изображений
Раздел Иллюстрации на панели Вставка
- Рисунки. Вставка изображений с вашего компьютера или с сетевого хранилища.
- Изображения из Интернета. Поиск и вставка фото и изображений из различных источников всемирной сети «Интернет». Используется поисковая система Bing.
- Фигуры. Вставка готовых геометрических фигур (круги, стрелки многоугольники, линии и т.п.)
- Вставка графического элемента из коллекции SmartArt для улучшенного визуального представления различной информации.
- Добавление диаграмм и графиков самых разных типов, включая гистограммы и круговые диаграммы.
- Быстрая вставка снимков любой прямоугольной области открытого окна.
В приложениях Microsoft Office, начиная с версии 2013, больше нет коллекций картинок, которые были в предыдущих версиях. Также больше не поддерживается добавление изображений со сканера.
Как в ворд вставить фото
Рассмотрим пример вставки изображения из файла на вашем компьютере:
- Кликните левой кнопкой мыши в текстовом документе для указания места вставки вашего изображения. Текстовый курсор будет находиться в месте клика.
- На вкладке Вставка в разделе Иллюстрации нажмите кнопку Рисунки.
- В открывшемся окне выберите папку с фотографией или рисунком. Выделите нужный файл и нажмите кнопку Вставить.
Окно вставки рисунка с компьютера
Изображение появиться в вашем документе.
Вставить изображение в документ можно просто перетащив его мышкой из папки в нужное место. Также можно использовать горячие клавиши Ctrl +C и Ctrl+V
Вставленное изображение может занять всю ширину страницы. Если необходимо сделать его меньше, то кликните по нему. Картинка станет выделена рамкой (смотрите рисунок ниже). Теперь захватив мышкой любой угол (кружок 7) изображения потяните его к центру фото.
Размещение рисунка в тексте документа
Изображение будет уменьшаться. Отпустите кнопку мыши, чтобы зафиксировать размер.
Для уменьшенного рисунка необходимо задать его положение относительно текста и страницы. Нажмите кнопку 8 и в появившемся списке параметров разметки укажите нужное положение. Также установите привязку к абзацу или к странице (переключатели 9).
Изображения из Интернета
Этот инструмент поможет вам сэкономить время на поиск подходящего изображения, с соблюдением авторских прав на использование в своем документе. Кликнув на кнопку инструмента, вы попадете в поисковое окно Bing. Вводите ключевое слова для поиска и нажимайте Enter или значок лупы.
Вставка изображения из Интернет
Изображения в поиске можно отфильтровать по четырём параметрам: размер, тип, цвет и лицензия. Выберите одно или несколько найденных картинок и нажмите кнопку Вставка.
Фильтрация по размеру происходит исходя из параметров ширины или длины картинки в пикселах:
- Маленький — изображения до 200 пикселов в любом измерении.
- Средний — от 200 до 500 пиксел.
- Большой — от 500 до 1000 пиксел.
- Очень большой — все изображения с длиной стороны более 1000 пиксел.
Фильтрация по типу:
- Фотография — любые фотографические изображения.
- Картинки — рисованные изображения или отредактированные фото.
- Рисунок линиями — не раскрашенные рисунки.
- Прозрачный — рисунки без фона.
Фильтр по цвету: здесь просто выбираете цветовую гамму для рисунков и получаете картинки с преобладанием выбранного цвета.
Геометрические фигуры и элементы схем
Раздел Фигуры в Word содержит большую библиотеку готовых графических элементов для построения новых изображений и схем.
Библиотека графических элементов
Чтобы нарисовать фигуру, выберите её из библиотеки и удерживая левую кнопку мыши растяните её на листе до нужных размеров.
Удерживайте кнопку Shift для получения правильной фигуры с соблюдением пропорциональных размеров (круг, квадрат и др.).
После создания фигуры её можно изменить. Кликните по фигуре. Она будет выделена рамкой. Круговая стрелка сверху позволяет повернуть фигуру на произвольный угол. Белые кружки (квадратики) регулируют размеры автофигуры. Некоторые фигуры могут иметь несколько вспомогательных элементов желтый кружок (ромбик в предыдущих версиях). Желтый манипулятор изменяет внешний вид графического элемента. Но и это еще не всё.
Изменение автофигуры
Кликните правой кнопкой на графическом объекте и выберите из контекстного меню команду Начать изменение узлов. В этом режиме передвигая узлы и изменяя кривизну линий в этих узлах с помощью узловых манипуляторов можно добиться большего преобразования фигуры.
Изменение формы фигуры с помощью узлов
Дополнительная информация:
- Рисуем график в Word
- Изменение рисунков в Word
- Все уроки по программе Microsoft Word
Дорогой читатель! Вы посмотрели статью до конца. Получили вы ответ на свой вопрос? Напишите в комментариях пару слов. Если ответа не нашли, укажите что искали или откройте содержание блога.
A picture is worth 1,000 words they say, but images have another use and they brighten up dull text documents. Insert photos in Word documents using the web app at OneDrive.com.
For many people only Microsoft Office installed on their computer will do, but for some people the free Word web app at onedrive.com is sufficient for their needs. If you have not tried it, you don’t know what you are missing. Word runs in a web browser at the site and it has all of the most common features of the desktop application.
You will be surprised at the range of features it has and while it cannot rival the desktop app, it has enough to create great looking Word documents. If your word processing needs are straightforward, free Word web app is fine.
In this article, let’s take a look at how to insert photos and other images into Word documents. A splash of colour can make a big difference to its looks and the impression it makes with people. To get started, go to the onedrive.com or office.com website and create a new Word document. You can do this on any computer with a web browser, Windows PC, Apple Mac or Linux.

To insert an image into a Word document, select the Insert tab and then click the down arrow below Picture. There are options to insert a picture from This Device (the computer), OneDrive, Stock Images or Bing Pictures. Select the source of the image.
Insert a picture from Stock Images
A window appears that enables you to search for free and paid stock images. Paid images have a diamond icon in the top left corner of the thumbnail image. Free images don’t. Right at the top, select Images, Cutout People or Stickers. Images are photos and illustrations, Cutout People are people with a transparent background. Stickers are cartoon-like characters and images.
Click a category button to browse the images or click in the search box and enter a keyword or two to find images. Click an image thumbnail to select it and then click the Insert button at the bottom, below the thumbnails.
Insert pictures from Bing

Select the Insert toolbar ribbon, click Picture and then Bing Pictures. Images are organized into categories and you can browse them by clicking a tile. There are too many images to browse though and it is best to enter a keyword or two into the search box at the top.
Not all photos on Bing can legally be used in your own documents because some are protected by copyright. After searching, tick the Creative Commons only box to show only images that can be used freely.
Mouse over an image thumbnail and click the three dots in the corner to see the image size, URL and title.

Click an image to select it and then click the Insert button in the bottom right corner of this window. It is added to the Word document at the current cursor position.
Insert pictures with an add-in
Microsoft Word can be extended with add-ins and this includes the Word web app at the OneDrive.com website. Add-ins can perform many functions and there are a some dedicated to making it easier to find and insert images into documents.
There are many stock photo libraries, but if you are looking for free stock photos then Pexels is a good one that is worth exploring. It contains thousands of great photos that can be used in your documents.
You could open a browser tab, go to the Pexels website, search for photos, select one and download it, switch to the Word web app tab, then upload it to your Word document using the Picture menu. However, there is a simpler way and all you need to do is add the Pexels add-in.

Select the Insert toolbar ribbon in Word web app and click the Add-ins button. In the window that appears, click the STORE link to see add-ins that can be installed into Word. Type ‘pexels’ into the search box and then click the Add button next to Pexels – Free Stock Photos.
On the Insert toolbar ribbon, click the new Open Pexels button at the tend and a panel appears on the right side of the Word document. Use the search box to find images and then click an image to insert it into the Word document at the cursor position.
Scroll through the images in the panel, perform more searches and find a great image to use in your document. Double click it to insert the image at the current cursor position.
Add image effects in Word web app
We have looked at the various ways you can easily add images to a Word document, but what can you do with it once it is on the page? There are plenty of options to add effects.
Use the Picture toolbar to apply special effects, wrap text, rotate and crop the image. Click and drag the handles, small circles at the corners and sides of the image to resize it. In the middle at the top is the rotate button. Click it and drag it to rotate the image. There is also a Rotate button with options to rotate 90 degrees and flip vertically or horizontally.

Right click an image for a menu. At the top is a toolbar with buttons for Styles, Grow, Shrink, Crop and comments. Further down the menu is a Wrap Text sub-menu. This is useful for choosing how the image appears with text, whether it should sit apart from the text whether words should wrap around it.
There is a row of image icons. Click the down arrow at the right side and a collection of image styles is displayed. Click an icon to apply that style. There are many effects and you can add borders, shadows, make rectangular picture oval, tilt images and more. Click a few of the buttons and explore the effects.
There is no excuse for dull Word documents and images can be searched on Bing, Pexels, Stock Images or OneDrive from within the Word document and inserted with a click of the mouse. It could not be easier, so brighten up your Word documents with a splash of color.
Microsoft Word во многом помогает нам во время документации или отправки тезисов для вашего проекта. Это также позволяет нам найти текст обычным способом или с помощью регулярного выражения, что позволяет легко найти и заменить любой текст. Но что, если у вас есть несколько изображений в документе Word и вы хотите заменить их на другое изображение? Предположим, например, что вы использовали изображение в качестве разделителя для глав, в которых вы использовали логотип своей компании в документе Word в разных местах и хотите заменить их все сразу другим изображением. Поиск и замена каждого изображения по отдельности может быть утомительной задачей. В этой статье я расскажу вам, как найти и заменить все изображения сразу в Word.
Найти и заменить все изображения в Word
Просто помните, что использование этого метода заменит все изображения в Word новым изображением, и это нельзя сделать для изображений выборочно. MS Word предоставляет нам возможность автоматически находить все изображения. Давайте прыгнем в шаги, чтобы сделать это.
Откройте документ Word, который вы хотите заменить. Просто посмотрите на изображения, которые вы хотите заменить.

Затем вставьте новое изображение вверху документа, который вы используете для замены других изображений.
Щелкните правой кнопкой мыши на вновь вставленном изображении и выберите « Копировать ». Это скопирует изображение в буфер обмена. Новым вы можете удалить только что вставленное изображение, так как оно нам больше не нужно.

Теперь пришло время найти и заменить все изображения в вашем документе Word на новое.
Для этого нажмите CTRL + H , что позволит вам Найти и заменить в документе Word.
Введите ^ g в текстовом поле Найти что и введите ^ c в поле Заменить на . Теперь нажмите « Заменить все », чтобы заменить все изображения в MS Word новым скопированным изображением.

Это поднимет подсказку с указанием количества замен. Нажмите « ОК » и закройте диалоговое окно «Найти и заменить».

Теперь вы увидите, что все изображения были заменены на новые. Если вы не хотите заменять какие-либо изображения, вы можете внести изменения вручную.

Как это работает?
На самом деле мы использовали известный метод find and replace . Каждое изображение в документе Word рассматривается как графика, и мы находим его с помощью ^ g и заменяем его скопированным изображением с помощью ^ c.
Надеюсь, что этот трюк Word поможет вам выполнить вашу задачу легко.
Надоело использовать маркеры по умолчанию в MS Word? Затем посмотрите, как использовать картинки в качестве маркеров в Word.
Microsoft Word can do a lot more things for you than you can actually know! Most people use MS-Word for very basic things. But at times you may face situations where you feel that MS-Word will not be able to help you and you will have to do it all manually. For example, what if you need to find and replace all the images in a Word document? Do you think MS-Word can do this? Well, yes! A reader of TechWelkin sent me a query. She said that she is a writer and is working on a large manuscript in MS-Word. She used a tiny image as a separator for various chapters and sections in the document. Now she wants to replace that image with a new one. But there are hundreds of copies of the image. So, will she have to replace each image one by one? Let’s explore the answer!
How to Find and Replace Images in MS Word
MS-Word can help in the above given scenario. There is an automatic way to find all the images in a document and then replace them all with a new image. Please note that this method will find all the images and it will replace all of them with a new one. With this method, we can not be selective about images. Here are the steps:
- Open the MS-Word document in which replacement is to be done.
- Insert the new image at the top of the document.
- Select the newly inserted image and press Ctrl + C to copy it.
- Now delete the newly inserted image.
- Press Ctrl + H to open the Find and Replace box.
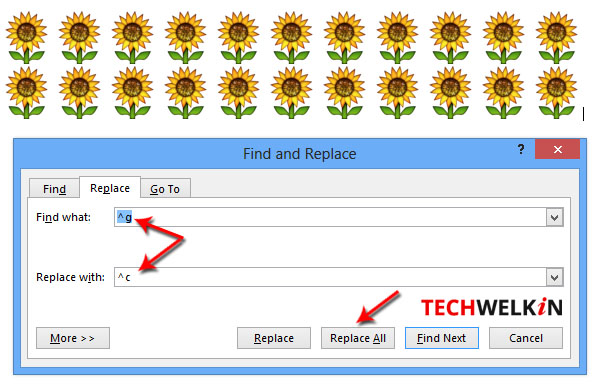
- Put ^g in the Find what box and ^c in the Replace with box
Method of finding all images and replacing them with a new one.
Now press Replace All button to see the magic!
All images have been replaced in MS Word.
You will see that all the images in the document will be replaced with the new image. Of course, the replacement operation will also replace the images that you did not want to replace. In such a case you may need to re-insert the images that were not to be replaced. This method is useful in a scenario where:
- the document contains only those images that are to be replaced
- the document contains a large number of images that need to be replaced and a smaller number of images that should not be replaced
The first scenario is straightforward. In the second scenario, you’ll be doing much less manual work by re-inserting images that were replaced as a side-effect.
The method works by replacing all graphics (denoted by ^g) with the clipboard content (denoted by ^c). Therefore, essentially, you can replace all images with anything that you can copy to clipboard.
To keep your document’s pagination intact, you should use the same size new image.
I hope this MS-Word tip was useful for you. If you have any question on this topic, please feel free to ask me through comments. I will try to assist you. Thank you for using TechWelkin.
Мммм, у меня ваш код не делает ничегошеньки, ну ничего не выводиться в MsgBox ни в 2003, ни в 2007, ни в 2010 офисах.
Добавлено через 1 минуту
Ну, собственно, не удивительно
| Visual Basic | ||
|
Может Вы чего-то перепутали?
Добавлено через 1 минуту
Вообще я не раз пытался выделить картинку и записать это на макрос, но хитрая вордовская автозапись не хочет обращаться к картинке в документе как к объекту какой-то коллекции.
Добавлено через 7 минут
Хотел исхитриться и через автозапись посмотреть как обрабатывать картинки в excel но не тут то было, в макрос данные о операциях с картинками в excel вообще не пишутся …
Добавлено через 7 минут
Вроде выгуглил что коллекция картинок называется InlineShapes, а не просто Shapes. Теперь надо научиться как-то копировать эту InlineShapes в pp да ещё и с параметрами отображения как в Word (ну чтобы картинка не была в pp за границами листа например) и теперь заодно понятно к чему это было сообщение последнее от Sasha_Smirnov
Добавлено через 35 минут
Вот я могу проходиться по всех картинках в текущем документе и при этом создавать нужное колличество листов в новом документе pp, как мне только копировать в pp эти объекты-картинки?
| Visual Basic | ||
|
Microsoft is sending its Office clip art to the digital beyond, where it shall rest in glory with Clippy, Zune, and the rest of the Redmond saints.
In other words, those wonky, yet charming images that graced countless PowerPoint presentations are in their last days. Microsoft already nixed the website where you could download Clip Art, so it may not be long before it disappears from Office entirely.
These guys won’t be around much longer.
So it’s time for a different plan. The good news is that Office already has better options for spicing up your files than relying on the dated and questionable-looking Clip Art. For example, Office’s integrated Bing Images search is solid, parsing the web for copyright-free images that you can use to bring some life to the staid world of business presentations.
That’s not the only available solution, however. Here’s a rundown of your best options for grabbing the clip art that’s still there—and learning some new strategies for better images.
Clip art search is still inside Office – for now
When you want to add an image to your file, head to the ribbon and click Insert, then Online Pictures. You’ll currently see three choices: Office.com Clip Art, Bing Images, and OneDrive.
Choose from Office clip art, Bing images, or your own OneDrive storage.
Office.com clip art still works for now, so charge ahead if that’s what you want to use. Type in your search term and then select your favorite zany image. It’ll appear directly in the file, allowing you to re-size and move it anywhere you wish.
Microsoft did not indicate when it would exactly be eliminating Office Clip Art, so it could hang around for some time—though it didn’t exactly sound like that in Microsoft’s memo. Plus, if we’re being honest, Clip Art fell out of fashion at least a decade ago. Embrace the future! Keep reading to learn about more modern alternatives. Your audience will appreciate it.
Find copyright-free images through the built-in Bing search
Bing’s Image search is your best option for finding and inserting images inside of an Office file. Sure, Bing may not be your search engine of choice but it’s actually rather good, especially at finding photos and other types of art to use.
After you type in a search term (unfortunately there isn’t an auto-suggest) and pressing Enter you’ll notice a message about copyright files.
By default all images are licensed for your use by Creative Commons.
By default, Bing presents images that are licensed through Creative Commons, meaning their owner allows anyone to use, publish, or redistribute them without a copyright claim. This may sound like legalese nonsense at first, but it’s actually pretty important, especially if you’re presenting your images or publishing a Word document as a flyer or other kind of print version.
If you use copyrighted images, you’re setting yourself up to get a nasty letter from the company or whomever holds the copyright to the images. If it’s possible that your work may see public eyes in any form, make sure you’re in the clear by sticking with licensed work.
There’s always OneDrive for your own files
If you’re all-in with Microsoft then there’s a chance you’re using OneDrive as your cloud backup service. If so, then importing your own images into Office is way easier than digging through the Windows file menu.
Any image stored in your OneDrive can be added right into your file.
Unfortunately there’s no search option after selecting OneDrive as your file source—you just need to work your way through the scroll of images or folders that you have saved in your cloud storage.
Once you’ve found the image you want you want, click on it and select Insert for it to appear in your Office document.
Use Google search instead
There’s a reason Google still has the bulk of search market share; it’s usually better than the competition at finding exactly what you’re looking for. Such is the case with finding images. You can always just fire up your browser of choice and head to Google’s image search.
There are a couple of additional tools to help you sniff out proper images to use. After conducting a search, you’ll see different sub categories with previews of other image groups. You can check any of those and see if something tickles your fancy.
Yet again you have the ability to make sure you’re not violating copyright law by restricting the search to free-to-use images. Click Search Tools and Usage Rights. There are five different types of options that vary by how you intend to use the image. Select the one appropriate for your particular case. “Labeled for reuse” means you can use it for business or commercial works, or anything else you have in mind. “Noncommercial reuse” means you can’t use the image in a work that will be sold or shown to the public in a way that will make you money.
The world’s biggest clip art collection is on the Internet.
Once you see an image you want, right-click and save it to your computer. You now have an image ready to import.
Go back into your Office project and select Pictures from the Insert tab and it will fire up the Explorer menu. Just find what you downloaded and insert it into your file.
Upload your new find from the Internet right into your Office file.
Once you’ve used Bing, OneDrive, or Google search to find pictures you’ll forget all about those zany Clip Art images. Well, some of them are hard to forget—but at least you won’t be caught using them again.
How to Find Clip Art in Word
Each version of Microsoft Word below has slightly different steps for finding and inserting clip art. Follow the instructions for the Microsoft Word version you currently use.
For Word 2016 and 2013:
- Open the Word where you would like to insert the clip art.
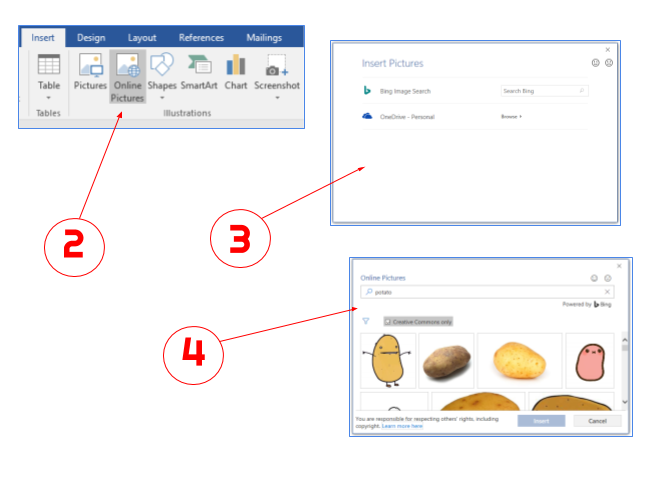
- Click the [Insert] tab > From the «Illustrations» group, click [Online Pictures]. A pop-up will appear allowing you to search Office.com or Bing.
- In one of the search boxes, type a keyword for the clip art you would like to find (e.g., potato) > press [Enter].
- From the resulting list of pictures, choose the one you would like to add > Click [Insert].
For Word 2010:
- Open the Word document where you would like to insert the clip art.
- Click the [Insert] tab > From the «Illustrations» group, click [Clip Art]. A clip art pane will open to the right of the document.
- In the «Search for» box, type a term or keyword for the clip art you would like to find (e.g., «potato») > Click [Go]. The clip art will appear in the pane below.
- To insert the clip art, place your cursor where you would like to insert the clipart in your document and click the image from the clip art pane.
For Word 2007:
- Open the Word document where you would like to insert the clip art.
- Click the [Insert] tab > From the «Illustrations» group, click [Clip Art]. A clip art pane will open to the right of the document.
- Select «Organize Clips» on the bottom of the pane.
- In the left menu, double-click «Office Collections.»
- Double-click any category that interests you.
- To insert the clip art, place your cursor where you would like to insert the clipart in your document and click the image from the clip art pane.
Keywords: clipart, use clipart, find clipart, where’s clipart in word, where’s clip art in word. using clipart, using clip art, office 2010
Share This Post
-
Facebook
-
Twitter
-
LinkedIn


