
Highlight selected text
-
Select the text that you want to highlight.
-
Go to Home and, select the arrow next to Text Highlight Color.

-
Select the color that you want.
Note: Use a light highlight color if you plan to print the document by using a monochrome palette or dot-matrix printer.

Highlight multiple parts of a document
This method is best for highlighting multiple parts of a document because the Highlight tool stays on until you decide to turn it off.
-
Go to Home and select the arrow next to Text Highlight Color.
-
Select the color that you want.
The Text Highlight Color button displays the selected color, and the mouse pointer becomes a
when you point to the area of your document that contains text.Note: Use a light highlight color if you plan to print the document by using a monochrome palette or dot-matrix printer.
-
Select the text or graphic that you want to highlight.
-
To stop highlighting, select the arrow next to Text Highlight Color
and select Stop Highlighting, or press Esc.The mouse pointer becomes a
when you point to your document.
 when you point to the area of your document that contains text.
 and select Stop Highlighting, or press Esc.
 when you point to your document.
Remove highlighting from part or all of a document
-
Select the text that you want to remove highlighting from, or press Ctrl+A to select all of the text.
-
Go to Home and select the arrow next to Text Highlight Color.
-
Select No Color.
Quickly find highlighted text
-
If you are using Word 2016 or Word 2013, select Find > Advanced Find.
If you are using Word 2010, select Find.
The Find and Replace box appears.
-
Select Format > Highlight.
If you don’t see the Format button, select More.
-
Select Find Next.
Highlight selected text
-
Select the text that you want to highlight.
-
Go to Home and select the arrow next to Text Highlight Color.
-
Select the color that you want.
Note: Use a light highlight color if you plan to print the document by using a monochrome palette or printer.
Highlight multiple parts of a document
This method is best for highlighting multiple parts of a document because the Highlight tool stays on until you decide to turn it off.
-
Go to Home and select the arrow next to Text Highlight Color.
-
Select the color that you want.
The Text Highlight Color button displays the selected color, and the mouse pointer becomes a
when you point to the area of your document that contains text.Note: Use a light-toned highlight color if you plan to print the document by using a monochrome palette or printer.
-
Select the text or graphic that you want to highlight.
-
To stop highlighting, select the arrow next to Text Highlight Color
and select Stop Highlighting, or press Esc.The mouse pointer becomes a
when you point to your document.
Remove highlighting from part or all of a document
-
Select the text that you want to remove highlighting from, or press Ctrl+A to select all of the text in the document.
-
Go to Home and select the arrow next to Text Highlight Color.
-
Select No Color.
Quickly find highlighted text
-
Select Find > Advanced Find.
The Find and Replace box appears.
-
Select Format > Highlight.
If you don’t see the Format button, select More.
-
Select Find Next.
Someone sends you a long Word document and asks you to check only the changes, which they’ve highlighted. You have limited time so you need to find those highlighted passages quickly.
Here are two ways you can quickly find highlighted text — use the one that best suits your way of working
Zoom in/out
Zoom out the view of the document and look for pages that contain highlighting, then click on a page and zoom back in again to view and edit the highlighted text.
You can go down to about 10 or 20% to see as many pages as possible without losing the ability to see the pages containing highlights.
To zoom in/out:
- Word 2003: Select View > Zoom from the menu, then select or enter the percentage zoom you want.
- Word 2007 and later: Use the zoom slider at the bottom right of the Word window.
Here’s a few pages at 20% zoom — you can see the highlighted section easily:

A highlighted section shows easily at 20% zoom
Find
The other way to find highlighted text is to use the Find function. Find is particularly handy if there’s a lot of highlighting, and you think you might miss some using the zoom function. It’s also handy for finding highlights you can’t see, such as those hiding behind empty paragraph marks or graphics. Both Word 2003 and 2007 work the same way, as do later versions of Word for Windows, such as 365:
- Press Ctrl+h to open the Find and Replace window.
- Click More.

- Click Format.
- Select Highlight.

- Highlight should be the only ‘find’ option. Click Find Next to find the next highlighted passage.


When you want certain text in your document to stand out, you can use a handy built-in tool. Here’s how to highlight text in Word.
Ever used a highlighter pen to make certain sections of text pop out to you on a page? Great for making notes, but there’s a problem—highlighting a piece of paper is final. You can’t erase the color from your paper when you’re done.
In Microsoft Word, things are a bit different. Unlike real highlighter pens, you can replicate the highlighter effect in Word, but you can find and remove your highlights.
This lets you go through and review your highlighted points using Word’s Find feature, but you can also remove any text highlights afterward. It’s easy to learn how to apply, remove, and find highlighted text in Word—here’s what you’ll need to do.
How to Highlight a Selection of Text in Word
If you plan only to highlight one portion of text using a single color, you can do this in just seconds in Word.
To highlight a section of text in Word:
- Select your text. You can do this by simply dragging through it with your cursor.
- Go to the Home tab.
- Click the arrow next to the Text Highlight Color button.
- Choose the color you want to use from the drop-down menu.

Once you choose a color from the drop-down menu, your selected text will update immediately to show a highlighted background in that color.
How to Highlight Multiple Selections of Text
If you have several portions of text you want to highlight, you can still use the highlighter tool to make your text stand out.
You don’t have to use the method above to do this, however, as there’s an easier way to select multiple text sections. Once you enable the highlighter, it will remain turned on until you turn it off, allowing you to highlight additional areas.
To highlight multiple sections of text in Word:
- Press Home on the ribbon bar.
- Select the arrow next to the Text Highlight Color button and select a color from the drop-down menu.
- Your cursor will change to show a blinking text cursor with a marker attached. Select the text you want to highlight by dragging through it with your mouse.

- Repeat this step with any other sections of text you want to highlight.
- When you’re done, press the arrow next to the Text Highlight Color button.
- Select Stop Highlighting.


You can do this when the highlighter tool is active if you want to change colors. Click the Text Highlight Color button, choose another color, and then continue to drag through your text portions to highlight them.
How to Remove a Highlight From Text
You can do this using the Text Highlight Color tool when you want to remove highlights from your text in Word. This allows you to remove highlights from specific text or your entire document.
To remove highlights from selected text in Word:
- Select the specific text you want to unhighlight or select all of the text in your document using Ctrl + A.
- Press Home on the ribbon bar.
- Press the arrow next to the Text Highlight Color button.
- Select No Color.

You don’t need to manually scroll through your document to find portions of text that you’ve highlighted. Thanks to the Find feature in Word, you can locate any highlighted text quickly.
Find Specific Highlighted Text
Maybe the highlighted text you’re looking for contains a particular word. If so, use these steps to find it:
- Go to the Home tab.
- Click the arrow next to Find, then select Advanced Find.
- When the Find and Replace window opens, enter your search term in the Find What box at the top.
- Click More on the bottom left.
- Click the Format drop-down box at the bottom below Find and select Highlight.
- Hit the Find Next button.

When you run the search, you’ll see any highlighted text that matches your search term. At this point, click Find Next to cycle through your search results, or press Cancel to close the window.

Find All Highlighted Text
To find all of the text you’ve highlighted in your Word document, repeat the steps above, but eliminate Step 2. You don’t need to use an Advanced Find here, and make sure to leave the Find What box empty.
When you click Find Next, you’ll see the first portion of highlighted text found. Continue to click Find Next to cycle through and see each additional section of the highlighted text in your document.

When no further instances are found, you’ll see a message letting you know.

Pack Away Your Highlighter
Fifteen nifty colors, a handy method for finding your highlighted text, and an easy way to remove it afterward—you can pack away your physical highlighter pen and use Word’s highlighter tool to start making notes instead.
For more, take a look at how to find and replace formatting in Word or how to clear all formatting in your Word document.
Are you interested in upcoming tutorials for Microsoft Word? Connect with us on Twitter or Facebook to stay in the loop!
![]()
What do you do when you need to read only the highlighted text in a document? Just scroll down and read the highlighted text. Yes – that works.
But you have to keep scrolling to find the next highlight. It may be one page away or 24 pages away… not very efficient!
Here is the right way.
Make sure you have a document which contains many areas highlighted.
Press ![]() to go to the beginning of the document.
to go to the beginning of the document.
Press ![]() to open the Find Replace dialog
to open the Find Replace dialog
Click on the Find tab click inside the Find What textbox and click on More button…

Click on Formatting … button to open the drop down

Choose Highlights
Click Find next button. Now first highlight will be found.
Press ![]() to get rid of the dialog
to get rid of the dialog
Now we want to move to the next highlight
Press ![]() to move to next highlight
to move to next highlight
![]() to go to previous one.
to go to previous one.
By the way, this shortcut works for anything you have just FOUND using the Find dialog.
15 year old feature. Did you know it? Did you need it?
Not discovering what you need,
in spite of having it right in front of you is called INEFFICIENCY 
I know this is far outdated as a reply, but since more users could have a similar problem, this is my partial solution.
In versions of MS Word that use the Ribbon, click on the drop-down menu of the Find icon to choose the Advanced Find.
In the new window locate the «More>>» button and at the bottom, there is a label «Find» with an option button Format. Click on it and chose «Highlight» (though I have yet to find how to set the color in this short time I had to reply).
This edited answer is a more suitable workaround for something that apparently no one could answer so far, so I decided to keep the original answer (before the line above) as a reply to a question that fits most users that end up on this page (no point complicating what doesn’t need to be complicated), and elaborate on a new one.
Taking into account on what is stated in MSDN (https://msdn.microsoft.com/en-us/vba/word-vba/articles/find-object-word) one can retrieve the following information:
The Find.Execute method does not have any regards to highlight, as in itself highlight is not a format, as the name indicates, it’s just a highlight.
The Find.Highlight property only admits the normal Boolean (True, False) and wdUndefined (ignoring highlights), and as such doesn’t allow specifying a color.
The Find.HitHighLight method applies to Outlook objects but can be used in Word to find and remove highlight (but again not to specify a specific color among several colors), for example,
ActiveDocument.Content.Find.HitHighlight FindText:="text to find"
With the previous statements one can indeed find it impossible (or at least to me) to find different colors without a complex macro that compares each character to the default color of highlight (which I’m sure not going to make…) or editing the file code (which is a good solution, in my view, so kudos for the user that posted it, but as the user stated a cumbersome answer to most users of Word). In my opinion, there’s a more suitable and easy workaround using the far easier to use Advanced Find with the Style option.
For that you have to use a Style with Shading instead of the highlight (or combining both).
So using my previous instructions, besides the Highlight option,
you can also use the Style option to search for a previous added style(s) with the same color(s) you want to find, or if you prefer a shading color and a highlight of the word for a more complete and narrowed search.
How highlight in Word works
Learn how to highlight in Word, how to remove highlight / unhighlight in Word, find and replace highlight, etc.
In Word, you can highlight text on the screen much like you can highlight text on paper using a highlighter. In this article, you will find general information about how highlight in Word works. The basic information about highlight applies to both the built-in highlight functionality and the functionality of the DocTools HighlightManager add-in.
There is no difference between highlight added using the DocTools HighlightManager add-in and using the built-in highlight functionality in Word. The difference is that DocTools HighlightManager add-in makes the work much faster and more flexible.
15 available highlight colors
Word offers 15 highlight colors. For years, Word users have asked for more colors or the option to customize highlight colors, but so far with no luck.

Figure 1. Word highlight colors and their names.
Many of the 15 highlight colors available are too dark to use in most cases – for example, you can’t read black text on any of the darkest highlight colors.
Personally, I use yellow, bright green, turquoise and, in a few cases, red. The colors are rather glaring but I find they are the only ones that work.
Even if the Gray 25% is light enough to read the text, I don’t use it since it is impossible to distinguish it from selected text and from fields with field shading turned on.
In addition to the 15 highlight colors, there is a No Color which removes highlight.
Back to Table of Contents
How to show or hide highlight on screen and in print
- Highlight is neither font formatting nor paragraph formatting
- Highlight in Word documents is placed in its own layer that you can either show or hide
Even if it may look so, highlight in Word is not applied as font formatting or paragraph formatting like e.g. color shading. If you check the formatting of highlighted text, you will not see the highlight listed anywhere.
The display of highlight is managed via an option in Word:
- To show highlight both on the screen and in print, turn ON File > Options > Display > Show highlighter marks. See Figure 2 below.
- To hide highlight both on the screen and in print, turn OFF File > Options > Display > Show highlighter marks. See Figure 2 below.
Note that the Show highlighter marks setting is a global Word setting. It applies to all documents.
When you turn off Show highlighter marks, any highlight in documents will only be hidden, not removed. As soon as you turn on the setting, the highlight will appear again, if any. The highlight will also be visible if the document is opened on another computer with the setting turned on.
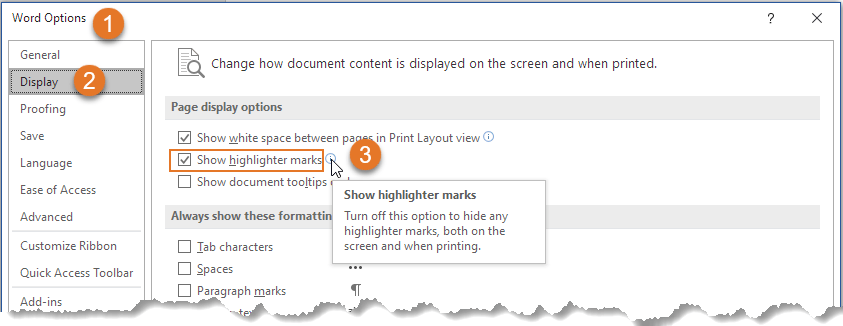
Figure 2. To show highlight on the screen and in print, turn on Show highlighter marks.
When you select a highlight color using the built-in functionality of Word, that color will be set as the default highlight color, i.e. the same color will be applied the next time you click the Text Highlight Color icon in the Home tab of the Ribbon or in the Mini Toolbar.
As opposed to the built-in functionality, the selection of a specific highlight color using the Apply Highlight command in the DocTools HighlightManager add-in will not affect your next highlight operation. The add-in lets you apply any highlight color with a click.
How to print without highlight
As explained above, you can turn highlight on and off, without removing the highlight from the document.
To print without highlight but keep the highlight in the document:
- Turn off display of highlight as explained above (see Figure 2).
- Print.
- Turn highlight on again, if you want.
In the DocTools HighlightManager add-in, you will find a command for quickly turning on and off the display of highlight instead of digging deep into the Word Options dialog box.
Highlight and track changes
Changing highlight in a document is not registered by track changes. Even if track changes is on, Word will not regard a highlight change as a revision.
The difference between highlight color and shading color
You should be aware of the difference between highlight and shading.
As mentioned above, the number of highlight colors is limited. On the other hand, you can apply any color of your choice via the Shading tools in Word. This may make users want to use shading instead of highlight in order to get access to more colors. However, the two types of coloring work in totally different ways.
As explained above, highlight in Word is neither font formatting nor paragraph formatting. The highlight lives in its own layer in Word and can be turned on or off for all content. The same is not possible with shading.
If you apply a shading color to content using a color from one of the Shading tools in Word or via the Borders and Shading dialog box, that color is applied as formatting of text, paragraphs, table cells or entire tables.
This means that the shading is applied as a characteristic or an attribute of the text, paragraph, table cell or table itself.
You can’t turn on and off shading for an entire document as you can with highlight. You can easily select all and set the shading to No Color. However, once you have removed the shading, you can’t easily apply it again if spread across the entire document. This means that it may not necessarily be a good idea to use shading as a substitute for highlight.
Highlight is often used as a temporary marking of content, e.g. during the editing process. Shading may more often be used as permanent formatting that is meant to remain in the finished document.
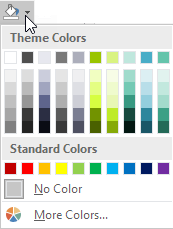
Figure 3. A color selected from a Shading palette is either font, paragraph, or table formatting.
A shading color you apply via a Shading palette or via the Borders and Shading dialog box is applied as one of the following types of formatting depending on the conditions and what you select:
- Font formatting applied to text
- Paragraph formatting applied to entire paragraph(s)
- Table cell formatting applied to entire table cell(s)
- Table formatting applied to entire table(s)
Back to Table of Contents
How to highlight in Word using the built-in functionality
You can apply highlight in different ways using the built-in functionality in Word. See METHODs 1-4 below. When you apply highlight to selected text in Word using the built-in methods described below, Word doesn’t retain the selection but collapses the selection so the insertion point is placed after the selection afterwards. Since you may often want to apply e.g. formatting to the same selection immediately after applying highlight, this is not always practical.
The DocTools HighlightManager add-in lets you decide whether or not to keep the selection after highlighting text. It can help you save time.
METHOD 1 – How to highlight selected text via the Ribbon
- Select the text to be highlighted.
- Select Home tab > click the arrow in Text Highlight Color icon and click the desired highlight color. The currently selected color works as the default highlight color and is shown in the icon. If you want to apply that color, you can just click the icon. (To remove highlight, select No Color).

Figure 4. The Text Highlight Color options in the Home tab in the Ribbon.
Back to Table of Contents
What is the default highlight color in Word?
The default highlight color in Word is the highlight color currently shown in the Text Highlight Color icon.
When you click one of the 15 colors or No Color, that color becomes the default highlight color.
The default highlight color will automatically be used by Word for the next highlight unless you select another color.
The DocTools HighlightManager add-in lets you use any highlight color without changing the default highlight color.
METHOD 2 – How to highlight selected text via the Mini Toolbar
If you have the Mini Toolbar enabled, you can also apply highlight via that toolbar:
- Select the text to be highlighted.
- In the Mini Toolbar that appears when you have selected text, click the arrow in the Text Highlight Color icon and click the desired highlight color. The currently selected color works as the default highlight color and is shown in the icon. If you want to apply that color, you can just click the icon. (To remove highlight, select No Color).
The highlight tools in the Mini Toolbar are identical to the ones on the Home tab in the Ribbon.
The Mini Toolbar only appears when you have selected text and if, at the same time, the option File > Options > General > Show Mini Toolbar on selection is turned on. See Figure 5 below.
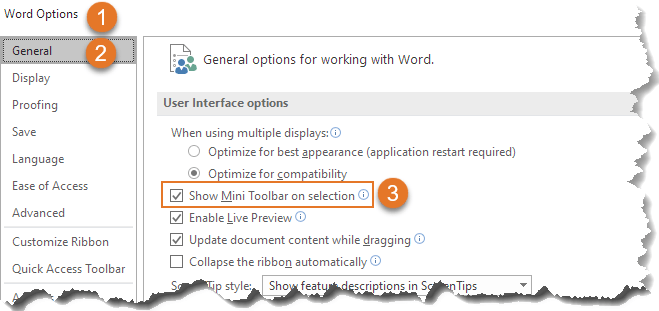
Figure 5 The Mini Toolbar is only shown if the Show Mini Toolbar on selection option is turned on.
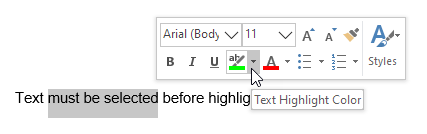
Figure 6. The Text Highlight Color options in the Mini Toolbar are the same as in the Home tab of the Ribbon.
METHOD 3 – How to highlight using a shortcut
Word has a default shortcut assigned to highlight:
- Alt+Ctrl+H
You can both apply highlight and remove highlight using the Alt-Ctrl-H shortcut. Note that this shortcut only works with the currently selected default highlight color so you still have to first make sure the desired color has been selected, either via the Home tab or the Mini Toolbar.
As opposed to how the Alt-Ctrl+H shortcut works, the DocTools HighlightManager add-in lets you assign shortcuts to each individual highlight color – customizable shortcuts have been assigned to the most useful highlight colors beforehand so they are ready for use at once. This means that the add-in makes it possible to apply any highlight color simply by pressing a keyboard shortcut without first switching color.
How the Alt+Ctrl+H shortcut works
You must select text before pressing the Alt+Ctrl+H shortcut. What happens when you press the shortcut depends on the situation. See the examples below:

Figure 7. No highlight applied to the selection beforehand.
EXAMPLE 1
If the selected text is not highlighted beforehand, Alt+Ctrl+H applies the highlight color that is currently selected as the default highlight color in Home tab > Text Highlight Color.
NOTE: If the currently selected default color is No Color, no highlight will be applied even if you press the shortcut.

Figure 8. Entire selection highlighted beforehand.
EXAMPLE 2
If the entire selected text is already highlighted (same color or mixed colors), Alt+Ctrl+H removes the highlight. This means that it works as a toggle: It adds or removes highlight depending of the selection.

Figure 9. The selected text is partly highlighted beforehand.
EXAMPLE 3
If the selected text is partly highlighted, i.e. some of the text is highlighted and other is not, Alt+Ctrl+H applies the highlight color that is currently selected as the default highlight color in Home tab > Text Highlight Color.
NOTE: If the currently selected default color is No Color, Alt+Ctrl+H removes highlight from the selection.
Back to Table of Contents
METHOD 4 – How to highlight without first selecting text
If you click the Text Highlight Color icon on the Home tab or in the Mini Toolbar without first selecting text, the cursor changes to the icon shown below (enlarged here). You can then highlight text by dragging across the text that is to be highlighted.
NOTE: If you drag across text that is already highlighted, the highlight will be removed.

Figure 10. Highlighter icon
To exit the highlighter mode, do one of the following:
Press the Escape key OR
Click the Text Highlight Color icon on the Home tab or in the Mini Toolbar OR
Select Stop Highlighting from the Text Highlight Color tools on the Home tab or in the Mini Toolbar.
Note that the DocTools HighlightManager add-in lets you apply any highlight color to a paragraph without first selecting the entire paragraph – you only need to press a shortcut.
How to unhighlight in Word
Unhighlight is the same as removing highlight. See below.
How to stop highlighting in Word
If you click inside text that is highlighted and start typing, the new text you type will inherit the highlighting from the existing text. If you want to stop highlighting text when you type the new text, you can for example do as follows – all carried out via the keyboard:
- Type the first new character, then press and hold the Shift key and press the Left Arrow key to select the typed character.
- Press Alt+Ctrl+H to unhighlight the selected character you just typed.
- Press the Right Arrow key once to move after the typed character (or you can just delete the character when finished typing in step 3).
- Then continue to type the new text.
Getting rid of highlight may be referred to as either removing highlight or unhighlight. You may also think of it as how to remove highlighted text in word even if you want to keep the text and only make the highlighting go away.
To get rid of highlight in Word – or unhighlight – you can follow the steps described for applying highlight using METHOD 1, METHOD 2, METHOD 3 or METHOD 4 above but with the difference, that you select No Color instead of one of the 15 colors.
The DocTools HighlightManager add-in provides tools that let you quickly remove highlight either from the selection or from all paragraph(s) that are fully or partly included in the selection. This means that you don’t need to spend time on first selecting the entire paragraphs to remove highlight.
How to remove highlight from a paragraph number or bullet
If you are working with Word documents with automatic numbering, you may have struggled with how to unhighlight a number in Word. The same may be true for bullets in bulleted paragraphs.
Paragraph marks and trailing spaces (spaces at the end of a paragraph) never show highlight. However, they may be highlighted – but you can’t see it.
If only the number or bullet of a paragraph is highlighted, it is because the paragraph mark of that paragraph is highlighted.
To remove highlight from a number or from a bullet, select the paragraph mark and remove the highlight. You can also select the entire paragraph or the last part of the paragraph as long as you make sure the paragraph mark is included in the selection. Then the highlight will disappear from the number/bullet. See the illustration below.
TIP: Turn on formatting marks (Ctrl+Shift+8) so you can see the paragraph marks and other non-printing characters. Paragraph marks look like this: 

Figure 11. To remove highlight from a number or bullet, select the paragraph mark and unhighlight it.
The DocTools HighlightManager add-in provides a tool that lets you quickly remove highlight from numbered or bulleted paragraphs. You only need to click a button to remove highlight from any bullet or number in the selection or in the entire document.
Back to Table of Contents
How to remove light yellow highlight that does not disappear when selecting No Color
You may experience that you open a document in which some areas are highlighted with a light or pale yellow color (see figure 12 below). The color differs from the bright yellow color in the highlight color palette. If you try to remove the light, yellow highlight by selecting No Color from the highlight palette, nothing happens.
Such pale, yellow highlight is most likely a result of the document being protected. The yellow color is used to show which areas of the document you can edit. You can turn off the highlight but it will be turned on again if you close and reopen the document. As opposed to normal highlight colors, the light, yellow color does not print. It is shown on the screen only.
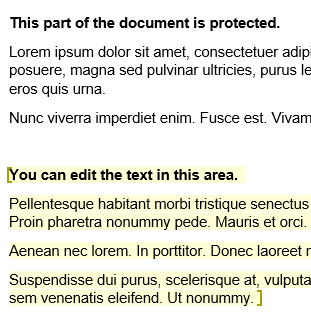
Figure 12. Example of light, yellow highlight that shows which areas you can edit in a protected document.
To remove the light yellow highlight:
- In the Ribbon, select Review tab > Restrict Editing.
- In the Restrict Editing pane that opens, turn off Highlight the regions I can edit. See figure 13 below.
You can also open the Restrict Editing pane from the Developer tab > Restrict Editing.

Figure 13. To remove the light, yellow highlight, turn off Highlight the regions I can edit.
Back to Table of Contents
How to replace highlight colors in a document
You can use Find in Word to search for highlight. You can also use Find and Replace to e.g. search for highlight and remove it or to apply highlight to a search string – or to replace one highlight color with another. See the examples below about how you can use Find and Find and Replace in relation to highlight.
How to find highlight
As you will learn below, the built-in functionality of Word does not let you search for a specific highlight color. As opposed to that, the DocTools HighlightManager add-in lets you find any specific highlight color.
Word does not let you search for specific highlight colors.
If two or more paragraphs in succession are highlighted, Word will not find them as one instance of highlight. Word interprets each paragraph as one instance of highlighting. This means that Word finds highlight in one paragraph at a time.
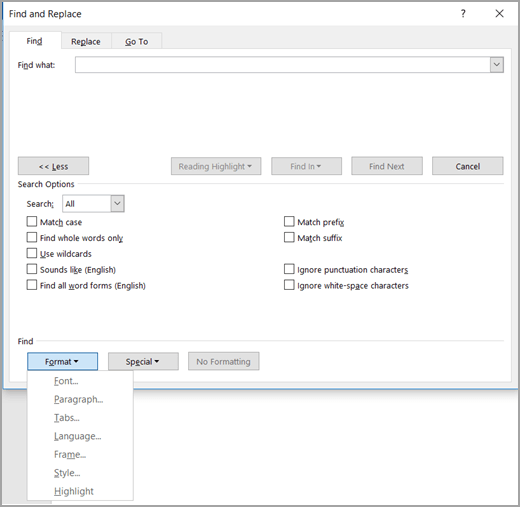
To find highlight in Word using the Find and Replace dialog box:
- Press Ctrl+H to open the Find and Replace dialog box. If you only want to find highlight, you can use the Find tab in the dialog box. If you want to replace highlight, make sure the Replace tab is selected.
- To find highlight, make sure the insertion point is in the Find what field.
- To expand the dialog box so all options are shown, click the More button.
- Select Format (bottom of dialog box) > Highlight. The word «Highlight» will now be shown below the Find what field. See Figure 15 below.
- If you want to find highlight no matter the text, leave the Find what field empty, otherwise enter the relevant text.
- Add other search criteria as needed and use the buttons in the dialog box to find and/or replace.
TIP: You can find both Highlight and Not highlight
If you select Highlight from the Format menu in the Find and Replace dialog box twice, the text below the Find what or Replace with field changes from Highlight to Not highlight. See Figure 15 below.
This means that you can search for and replace with both highlight and no highlight.
If you select Format > Highlight a third time, Not highlight is cleared.
To clear all Format criteria from the Find what or Replace with field, click in the relevant field, then click the No Formatting button. Alternatively, press Ctrl+Spacebar to clear the formatting.
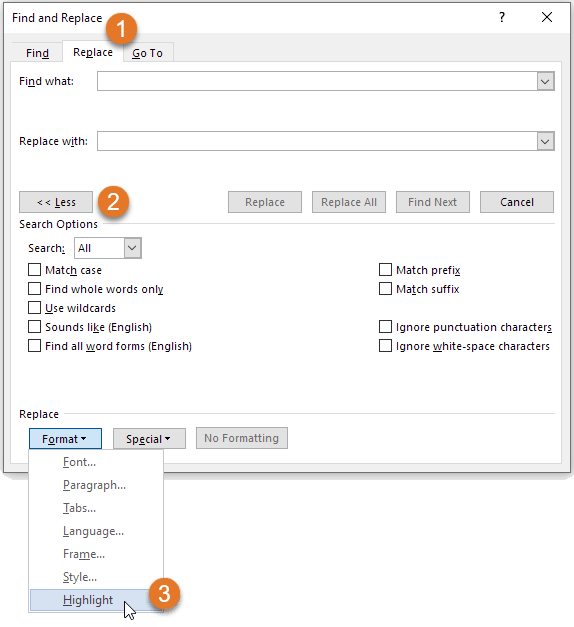
Figure 14. The Find and Replace dialog box lets you search for or replace with Highlight.

Figure 15. Example: You can search for Highlight and replace with Not Highlight.
How to replace one highlight color with another
You may sometimes want to change highlight color in Word.
You can use the Find and Replace command to replace one highlight color with another. To do this:
- Select the new highlight color you want as the default highlight color (via the Text Highlight Color in the Home tab or the Mini Toolbar).
- Press Ctrl+H to open the Find and Replace dialog box.
- In both Find what and Replace with, add Highlight (see How to find highlight above for help. Leave the text fields empty unless you want to search for specific text and/or replace with other text.
- If you want to replace any highlight, no matter the color, with the new color, click Replace All. If you only want to replace a specific color, use the Find Next button and click Replace only if relevant – repeat Find Next.
As opposed to the built-in functionality in Word, the DocTools HighlightManager add-in lets you find any specific highlight color and replace it with any other highlight color, leaving all other colors unchanged.
The DocTools HighlightManager add-in also has a Find command that finds the next highlight in the document without you needing to set up the search in the Find or Find and Replace dialog box.
Back to Table of Contents
How to copy only the highlighted text to another document
The built-in functionality of Word does not have a special feature for copying only highlighted text.
You could save a copy of the document and use Find and Replace to delete all text that is not highlighted. To do that:
- Press Ctrl+H to open the Find and Replace dialog box.
- Click in the Find what field and select Format > Highlight twice until the text Not highlight is shown below the field. Leave the field empty.
- In the Replace with field, type ^p in the field.
The ^p replaces the found non-highlighted text with a paragraph mark. This will split the remaining highlighted text in paragraphs. Otherwise, the result could be that many highlighted instances end in one paragraph. - Click Replace All.
The result may not always be useful since all the highlighted text remains with context.
The DocTools HighlightManager add-in includes a command for extracting highlight to a new document. Using that command, you can quickly create a document that includes the highlight, incl. metadata about each found instance.
Troubleshooting highlight
PROBLEM 1 – Highlight it is not visible on the screen
If you apply a highlight color to selected text and no color appears, the problem is likely to be one of the following:
- You have selected No Color instead of a color.
- The selection if of a type that can’t be highlighted.
- The Show highlighter marks setting is turned OFF. See how to turn on highlight marks.
PROBLEM 2 – Why can’t I remove highlighting in Word?
If you try to remove highlight using the methods described above and if that doesn’t remove the color, the reason may be that the color is not applied using highlight.
See PROBLEM 4 below for further details about how to get rid of other types of colors than highlight.
PROBLEM 3 – How to remove yellow highlight in Word?
A yellow background color on text in Word may not always be highlight. If you try to remove highlight using the methods described above and if that doesn’t remove the yellow color, the reason may be that the color is not applied using highlight.
See PROBLEM 4 below for further details about how to get rid of other types of colors than highlight.
PROBLEM 4 – The color doesn’t disappear when I attempt to remove highlight
What to do if you can’t remove highlighting in word? The reason may be that what looks like highlighting isn’t highlighting at all but another type of coloring.
If you select text that seems to be highlighted and try to remove the highlight and if this does not make the color go away, the reason may be that it is not highlight but one of the following:
- The color is a warm yellow highlight color added by the Find feature
- The color is color shading
- The color is light yellow and is showing which areas you can edit in a protected document
- The color is light gray field shading making it possible to distinguish fields from normal text
- The color is light gray Form Field shading making it possible to see where to fill in fields
See below for help on how to remove the five types of color.
How to remove yellow highlight added by the Find feature
If you use the Find feature in the Navigation Pane, Word highlights all occurrences that match your search criteria. You can, for example, remove the highlight by pressing the Escape key once.
How to remove color shading
- Selected the text from which you want to remove the color shading.
- Select Home tab > Paragraph group > Shading menu > No Color.
Note that shading can be applied to part of a paragraph, entire paragraphs, table cells, or entire tables. However, selecting No Color from the Paragraph group can remove shading from any of the types.
How to remove the light yellow color from a protected document
See how you remove light yellow highlight from a protected document above.
How to remove gray field shading
In documents with fields, I recommend having field shading set to always be displayed. The shading is visible on the screen only and does not print (more information about field shading). However, you can turn off field shading or set it to be displayed only on field(s) that are selected:
- Select File > Options > Advanced.
- In the Show document content group, select Field shading > Never or When selected.
- Click OK.

Figure 16. Example of a field with fields shading.
I strongly recommend having field shading shown always. If you can’t distinguish fields from other content, you risk making manual changes inside fields. The result will be that such changes are gone when you update fields.
How to remove gray Form Field shading
Word documents that are created as forms that are to be filled in by users may be created using a special type of fields: Form Fields. In newer versions of Word, forms that use Form Fields are referred to as Legacy Forms since Word now also lets you create forms using content controls.
If you see gray shading that can’t be removed using any of the methods above, Form Fields may be in use. You can quickly find out by pressing Alt+F9 to show field codes. If the areas with the gray shading now appear as { FORMTEXT }, { FORMCHECKBOX }, or { FORMDROPDOWN }, Form Fields are in use.

Figure 17. Example of Form Field without and with Form Field shading and example of Form Field showing field code.
It is practical to have Form Field shading turned on since it makes it easy to see where to fill in data. However, you can turn the Form Field shading off:
- On the Developer tab > Controls group, click Legacy Tools.
- Click the Form Field Shading icon to turn off the shading of Form Fields.
If you can’t see the Developer tab, see How to show the Developer tab in Word.
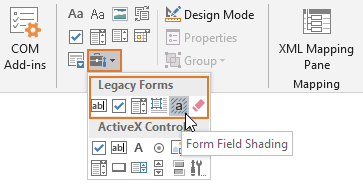
Figure 18. Form Field shading can be turned on and off via Developer tab > Controls group > Legacy Tools.
Back to Table of Contents
PROBLEM 5 – No highlight is applied when I press Alt+Ctrl+H
As explained above, Alt+Ctrl+H is the default shortcut assigned to highlight. If you press Alt+Ctrl+H and nothing happens, the problem is likely to be one of the following:
- You have not selected any text or the selection if of a type that can’t be highlighted.
- The currently selected highlight color in Home tab > Text Highlight Color is No Color,
Back to Table of Contents
PROBLEM 6 – How to customize highlight color in Word?
The quick answer is: You can’t create custom highlight colors in Word. The colors are restricted to the 15 colors shown in Figure 4 above.
You might use color shading instead of highlight. When it comes to color shading, you can define any color you want. However, highlighting and color shading are very different as explained above.
Back to Table of Contents
How to apply or remove highlight via macros (VBA)
Below, you will find small examples of macro code related to highlight. If you record a macro in Word to find out what code to use for highlighting, the result is macro code that also changes the default highlight color to the color you apply. As you will see in the code samples below, you can apply or remove highlight via VBA without changing the default color.
EXAMPLE 1: Apply yellow highlight to the selection without changing the default highlight color that is shown in the Text Highlight Color icon:
Selection.Range.HighlightColorIndex = wdYellow
EXAMPLE 2: Remove highlight from the selection without changing the default highlight color that is shown in the Text Highlight Color icon:
Selection.Range.HighlightColorIndex = wdNoHighlight
EXAMPLE 3: Select bright green as the default highlight color that will be shown in the Text Highlight Color icon:
Options.DefaultHighlightColorIndex = wdBrightGreen
Back to Table of Contents

Generate complete documents in seconds from re-usable text or graphics
Manage comments in Word fast and easy – review comments, extract comments to Word or Excel, etc.
Simplify and speed up the management of cross-references even in your most complex documents
Manage and repeat data in Word fast and easy with custom document properties and DocProperty fields
Extract insertions, deletions and comments from any Word document, incl. context and headings
Apply any highlight color or remove highlight in Word with a single click – customizable shortcuts
Browse pages, sections, headings, tables, graphics, etc. and find text in Word with a single click
Check safety-critical procedure documents for human factor issues in minutes – improve quality and help prevent errors
Create screen tips in Word fast and easy – with up to 2040 characters
Highlight can be useful in many Word documents, not least during the editing process. This article has explained how highlight in Word works. You have learnt how to highlight, how to remove highlight / unhighlight, how to solve different problems with highlight, etc. I hope this article helps you work more efficiently with highlight in Word.

When you want certain text in your document to stand out, you can use a handy built-in tool. Here’s how to highlight text in Word.
Ever used a highlighter pen to make certain sections of text pop out to you on a page? Great for making notes, but there’s a problem—highlighting a piece of paper is final. You can’t erase the color from your paper when you’re done.
In Microsoft Word, things are a bit different. You can replicate the highlighter effect in Word, but you can find and remove your highlights, unlike real highlighter pens.
This lets you go through and review your highlighted points using Word’s Find feature, but you can also remove any text highlights afterward. It’s easy to learn how to apply, remove, and find highlighted text in Word— here’s what you’ll need to do.
How to Highlight a Selection of Text in Word
If you plan only to highlight one portion of text using a single color, you can do this in just seconds in Word.
To highlight a section of text in Word:
- Select your text. You can do this by simply dragging through it with your cursor.
- Go to the Home tab.
- Click the arrow next to the Text Highlight Color button.
- Choose the color you want to use from the drop-down menu.

Once you choose a color from the drop-down menu, your selected text will update immediately to show a highlighted background in that color.
How to Highlight Multiple Selections of Text
If you have several portions of text you want to highlight, you can still use the highlighter tool to make your text stand out.
You don’t have to use the method above to do this, however, as there’s an easier way to select multiple sections of text. Once you enable the highlighter, it will remain turned on until you turn it off, allowing you to highlight additional areas.
To highlight multiple sections of text in Word:
- Press Home on the ribbon bar.
- Select the arrow next to the Text Highlight Color button and select a color from the drop-down menu.
- Your cursor will change to show a blinking text cursor with a marker attached. Select the text you want to highlight by dragging through it with your mouse.
- Repeat this step with any other sections of text you want to highlight.
- When you’re done, press the arrow next to the Text Highlight Color button.
- Select Stop Highlighting.


If you want to change colors, you can do this when the highlighter tool is active. Click the Text Highlight Color button, choose another color, and then continue to drag through your text portions to highlight them.
How to Remove a Highlight From Text
You can do this using the Text Highlight Color tool when you want to remove highlights from your text in Word. This allows you to remove highlights from specific text or your entire document.
To remove highlights from selected text in Word:
- Select the specific text you want to unhighlight or select all of the text in your document using Ctrl + A.
- Press Home on the ribbon bar.
- Press the arrow next to the Text Highlight Color button.
- Select No Color.

You don’t need to manually scroll through your document to find portions of text that you’ve highlighted. Thanks to the Find feature in Word, you can locate any highlighted text in no time.
Find Specific Highlighted Text
Maybe the highlighted text you’re looking for contains a particular word. If so, use these steps to find it:
- Go to the Home tab.
- Click the arrow next to Find, then select Advanced Find.
- When the Find and Replace window opens, enter your search term in the Find What box at the top.
- Click More on the bottom left.
- Click the Format drop-down box at the bottom below Find and select Highlight.
- Hit the Find Next button.

When you run the search, you’ll see any highlighted text that matches your search term. At this point, click Find Next to cycle through your search results, or press Cancel to close the window.

Find All Highlighted Text
To find all of the text you’ve highlighted in your Word document, repeat the steps above, but eliminate Step 2. You don’t need to use an Advanced Find here, and make sure to leave the Find What box empty.
When you click Find Next, you’ll see the first portion of highlighted text found. Continue to click Find Next to cycle through and see each additional section of highlighted text in your document.

When no further instances are found, you’ll see a message letting you know.

Pack Away Your Highlighter
Fifteen nifty colors, a handy method for finding your highlighted text, and an easy way to remove it afterward—you can pack away your physical highlighter pen and use Word’s highlighter tool to start making notes instead.
For more, take a look at how to find and replace formatting in Word or how to clear all formatting in your Word document.
Are you interested in upcoming tutorials for Microsoft Word? Connect with us on Twitter or Facebook to stay in the loop!
To totally unlock this section you need to Log-in
Login
Someone sends you a long Word document and asks you to check only the changes, which they’ve highlighted. You have limited time so you need to find those highlighted passages quickly.
Here are two ways you can quickly find highlighted text — use the one that best suits your way of working.
Zoom in/out
Zoom out the view of the document and look for pages that contain highlighting, then click on a page and zoom back in again to view and edit the highlighted text.
You can go down to about 10 or 20% to see as many pages as possible without losing the ability to see the pages containing highlights.
To zoom in/out:
Word 2003: Select View > Zoom from the menu, then select or enter the percentage zoom you want.
Word 2007: Use the zoom slider at the bottom right of the Word window.
Here’s a few pages at 20% zoom — you can see the highlighted section easily:
The other way to find highlighted text is to use the Find function. Find is particularly handy if there’s a lot of highlighting, and you think you might miss some using the zoom function. It’s also handy for finding highlights you can’t see, such as those hiding behind empty paragraph marks or graphics. Both Word 2003 and Word 2007 work the same way:
- Press Ctrl+F to open the Find and Replace window.
- Click More.
Click Format and then select Highlight.
Highlight should be the only «find» option. Click Find Next to find the next highlighted passage.
|
|
|


If you want to emphasize important text within a Microsoft Word document so that it’s not overlooked by the reader, you can use Word’s highlighting tool. You can also search for highlighted text within the document. Here’s how.
Highlight Text in a Word Document
You can easily highlight specific text in Microsoft Word. To do so, open a Word document that contains the text you want to highlight. You’ll need to select the text by clicking and dragging your cursor over the text.
Once you select the text, a pop-up menu will appear above the selected text. Click the down arrow next to the “Text Highlight Color” icon to display a drop-down menu with several colors to choose from. You can also find this option in the “Font” group of the “Home” tab.

Click the highlight color to apply it to the text. Light color highlights print better with monochrome palettes and printers.
You can also consecutively highlight text in multiple parts of a document. To do this, select your highlight color from the “Font” group of the “Home” tab before selecting the text you want to highlight.
After you select the highlight color, your cursor will become a highlighter. You can now continually highlight text throughout the document.
Press the “Esc” key on your keyboard to exit highlight mode.
RELATED: How to Highlight Text in Your PowerPoint Presentation
Remove Highlighting From Text in a Word Document
You can also remove the highlighting from text in a Microsoft Word document. To do this, click and drag your mouse over the highlighted text to select it. If your Word document contains a lot of highlighted text and you want to remove all of the highlights, you can press Ctrl+A to select all of the text in the document.
Next, click the “Text Highlight Color” icon in the “Font” group of the “Home” tab and then select “No Color” from the drop-down menu.
The highlight is now removed from the text.
Search for Highlighted Text in a Word Document
If your Microsoft Word document is long and you want to quickly find highlighted text, you can use the advanced search function.
Open your Word document that contains the highlighted text and select the down arrow next to “Find” in the “Editing” group of the “Home” tab. Next, click “Advanced Find” in the drop-down menu.
The “Find and Replace” window will appear. In the “Find” tab, select the “More” option.
In the “Find” section, select the “Format” option. Next, click “Highlight” in the drop-down menu.
You can now find each instance of highlighted text by clicking the “Find Next” button.
Highlighted text, when used properly, allows the reader to quickly grab important information from your Microsoft Word document without having to read the text in its entirety. Be mindful of the text you highlight within your content.
READ NEXT
- › How to Check the Word Count in Microsoft Word
- › 5 Ways to Underline in Microsoft Word
- › How to Highlight Text in Google Docs
- › How to Count Characters in Word
- › How to Circle Text in Microsoft Word
- › How to Change the Highlight Color in Adobe Acrobat Reader
- › How to Adjust and Change Discord Fonts
- › HoloLens Now Has Windows 11 and Incredible 3D Ink Features
How-To Geek is where you turn when you want experts to explain technology. Since we launched in 2006, our articles have been read billions of times. Want to know more?
In this article, we would like to show you 2 handy methods to extract highlighted texts from your Word document.
Every so often, we are likely to highlight texts with colors when navigating through document. All these pieces of texts may scatter around the whole article but they definitely deserve our attention. Therefore, we can just export and arrange them in another document for quick review next time, saving us from scrolling mouse wheel over and over again.
Method 1: Utilize the “Advanced Find” Feature
- First off, click “Home” tab then click the upside-down button behind “Find”.
- Next choose “Advanced Find” to open the “Find and Replace” dialog box.

- In the box, put cursor inside the “Find what” text box and then click “More”.
- Then click “Format” button and choose “Highlight”.

- Next click “Find In” tab and choose “Main Document”.


Now you will see all highlight texts are in selection now, just as below:
You can copy and paste them to a new document then.
Method 2: Use Word VBA
As shown in our sample, it’s not unusual to have multiple texts in different highlighting colors. Now let’s talk about the way to get all contents in the same highlighting color first.
- First and foremost, press “Alt+ F11” to open VBA editor.
- Then click “Normal”.
- And click “Insert”.
- Next choose “Module”.

- Double click on the new module to bring out the coding space.
- Now paste the following codes there:

Sub ExtractHighlightedTextsInSameColor()
  Dim objDoc As Document, objDocAdd As Document
  Dim objRange As Range

  Set objDoc = ActiveDocument
  Set objDocAdd = Documents.Add
  objDoc.Activate

  With Selection
    .HomeKey Unit:=wdStory
     With Selection.Find
       .Highlight = True
       Do While .Execute
         If Selection.Range.HighlightColorIndex = wdYellow Then
           Set objRange = Selection.Range
           objDocAdd.Range.InsertAfter objRange & vbCr
           Selection.Collapse wdCollapseEnd
         End If
       Loop
     End With
  End With
End Sub
- Then click “Run” button.


You will have a new document with all highlighted texts in it.
Then there is another macro which shall enable you to collect all highlighted texts of the same color from multi-document. What you need to do is to organize them all in one folder and take the above steps, but replace the macro with this one:
Sub ExtractHighlightedTextsInSameColorFromMultiDoc()
  Dim objDoc As Document, objDocAdd As Document
  Dim strFile As String, strFolder As String
  Dim objRange As Range

  '  Initialization
  strFolder = "C:UsersPublicDocumentsNew folder"
  strFile = Dir(strFolder & "*.docx", vbNormal)

  Set objDocAdd = Documents.Add

  '  Precess each file in the file folder.
  While strFile <> ""
  Set objDoc = Documents.Open(FileName:=strFolder & strFile)

  With Selection
    .HomeKey Unit:=wdStory
    With Selection.Find
      .Highlight = True
      Do While .Execute
        If Selection.Range.HighlightColorIndex = wdYellow Then
          Set objRange = Selection.Range
          objDocAdd.Range.InsertAfter objRange & vbCr
          Selection.Collapse wdCollapseEnd
        End If
      Loop
    End With
  End With

  objDoc.Close
  strFile = Dir()
  Wend
End Sub
Notes:
- First as you can see, the 2 macros extract all texts in yellow. You can certainly replace the code “wdYellow” with other colors. Here is the link you can visit: https://docs.microsoft.com/en-us/previous-versions/office/developer/office-2003/aa172829(v=office.11)
- Secondly, if you want to collect all highlighted texts in different colors, you just need to delete the “If Selection.Range.HighlightColorIndex = wdYellow Then” and “End If” lines.
- Thirdly, in code line “strFolder = “C:UsersPublicDocumentsNew folder” in second macro, replace the path string path with that of the folder you have. And don’t forget to add “” at the end.
Backup is never too late
In a word, we have put so much emphasis on backup that most of you should know how important it is now. As such, we can still fail to back up on a regular basis. And the truth is, without backup, the only option left once doc corruption happens is to get a data retrieving tool.
Author Introduction:
Vera Chen is a data recovery expert in DataNumen, Inc., which is the world leader in data recovery technologies, including xlsx repair and pdf repair software products. For more information visit www.datanumen.com