
This article is for people with visual or cognitive impairments who use a screen reader program such as Microsoft’s Narrator, JAWS, or NVDA with Microsoft 365 products. This article is part of the Microsoft 365 screen reader support content set where you can find more accessibility information on our apps. For general help, visit Microsoft Support home.
Use Word with your keyboard and a screen reader to track, show, and list the changes in your document. We’ve tested it with Narrator, JAWS, and NVDA, but it might work with other screen readers as long as they follow common accessibility standards and techniques. You’ll also learn how to accept or reject tracked changes.
 Need instructions on how to track changes or accept tracked changes in a Word document, but not using a screen reader? See Track changes in Word or Accept tracked changes.
Notes:
-
New Microsoft 365 features are released gradually to Microsoft 365 subscribers, so your app might not have these features yet. To learn how you can get new features faster, join the Office Insider program.
-
To learn more about screen readers, go to How screen readers work with Microsoft 365.
-
When using a screen reader, you’ll use that screen reader’s modifier key, sometimes along with other related keys, to navigate and interact within the app and execute commands. In our documentation this will sometimes be indicated by «SR key.»
In this topic
-
Turn on Track Changes
-
Choose how to show changes (revisions)
-
Check and navigate the tracked changes
-
Show all changes in the Reviewing pane
-
Show all changes in the JAWS Virtual Viewer
-
Show all changes in the JAWS Revisions window
-
Read the tracked changes inline
-
Navigate the changes one by one
-
Move to the details of formatting changes with Narrator
-
-
Remove tracked changes
-
Accept a single tracked change
-
Reject a single tracked change
-
Accept or reject all tracked changes
-
-
Keep Track Changes turned on
-
Turn off Track Changes
Turn on Track Changes
When you turn on Track Changes, Word marks up and shows any changes that anyone makes to your document. You can turn this feature on using either a direct keyboard shortcut, or the ribbon.
-
To turn on Track Changes, do one of the following:
-
To use the direct shortcut, press Ctrl+Shift+E.
-
To use the ribbon, press Alt+R, G, G.
-
Choose how to show changes (revisions)
You can choose how to show the tracked changes in your document.
-
Press Alt+R, T, D. The markup menu is expanded, and you hear the name of the currently selected markup.
-
In the markup list, press the Up or Down arrow keys until you hear the name of the option you want. The following options are available:
-
Simple Markup is the default option, and indicates where the changes are with a vertical line in the document margin. Your screen reader announces that there’s a change at the beginning of a changed paragraph.
-
No Markup hides markup to show what the incorporated changes will look like. This option does not delete the changes.
Tip: To show the markup again, choose Simple Markup or All Markup.
-
All Markup shows all edits with different colors of text and lines. This option is the recommended markup. Your screen reader announces the change and change type where the change happened.
If formatting has been changed, JAWS also reads the details of the change. With Narrator, you need to move to the margin notes or Reviewing Pane to hear the details. For instructions, go to Move to the details of formatting changes with Narrator or Show all changes in the Reviewing Pane.
-
Original shows the document in its original form.
To select and apply an option, press Enter.
-
-
To select which changes are tracked, press Alt+R, T, M. The Show Markup menu is expanded. Press the Down arrow key until you hear the option you want, and then press Enter.
Repeat this step for all the markup types you’d like to select.
Check and navigate the tracked changes
You have several options to check and navigate the tracked changes in a document. You can simply let your screen reader read the document announcing the changes. If the document is long or there are many tracked changes, you might want to use the listing options that Word or the screen reader offers for an overview of the changes. Alternatively, you can navigate through the document change by change.
Show all changes in the Reviewing Pane
-
Press Alt+R+T, P. The Reviewing Pane menu is expanded.
-
Do one of the following:
-
To display the pane horizontally, press H.
-
To display the pane vertically, press V.
-
-
To browse the changes in the pane, press the Up or Down arrow key.
-
When you are done working with the Reviewing Pane, to close it, press Alt+R+T, P, and then press Enter.
Show all changes in the JAWS Virtual Viewer
-
Press the Windows logo key+Semicolon (;). The Items to Display in Virtual Viewer dialog box opens.
-
Press the Down arrow key until you hear «Revisions,» and then press Enter. The Virtual Viewer opens and you hear the total number of revisions in the document.
-
Press the Tab key to browse the list of revisions. JAWS reads the change and its details.
-
When on a change, press Enter to jump into the document body.
Show all changes in the JAWS Revisions window
-
Press Shift+SR key+R. The Revisions window opens.
-
Press the Down arrow key to browse the list of changes.
-
When on a change, press Enter to jump into the document body.
Read the tracked changes inline
The way your screen reader announces the changes and change types when reading through the document depends on the selected markup and the screen reader you’re using.
For instructions on how to use a screen reader to read a Word document, go to Read a document.
Tip: With JAWS, you can open the speech history if you want to check what JAWS has been saying. At any point, press the SR key+Spacebar, followed by H. To browse the speech history, press the Up or Down arrow key.
Navigate the changes one by one
You can use keyboard shortcuts to move through the tracked changes one by one.
-
To go to the next change in the document, press Alt+R, H, 1.
-
To go to the previous change in the document, press Alt+R, F.
Move to the details of formatting changes with Narrator
You can navigate from the document editing area to the margin to check the details of a tracked formatting change.
-
Select the All Markup option as instructed in Choose how to show changes (revisions).
-
Let your screen reader read the body text until it announces a formatting change. Then press the SR key+A.
-
The focus moves to the margin and Narrator announces the change detail. To return back to the body text, press the Left arrow key.
Remove tracked changes
The only way you can remove tracked changes permanently in a document is to accept or reject them.
Accept a single tracked change
You can accept single changes in the document body, Reviewing Pane, or margin notes.
-
Navigate to the tracked change you want to remove.
-
To accept the change, do one of the following:
-
Press Shift+F10. The context menu opens. Press E. The change is accepted, and the focus returns to the body text.
-
Press Alt+R, A, 2. You hear: “Accept and Move to Next.” Then press Enter. The change is accepted, and the focus moves to the next change.
-
Reject a single tracked change
You can reject single changes in the document body, Reviewing Pane, or margin notes.
-
Navigate to the tracked change you want to remove.
-
To reject the change, do one of the following:
-
Press Shift+F10. The context menu opens. Press R. The change is rejected, and the focus returns to the body text.
-
To reject the change, press Alt+R, J. You hear: “Reject and Move to Next.” Then press Enter. The current change is rejected, and the focus moves to the next change.
-
Accept or reject all tracked changes
-
To accept all tracked changes, press Alt+R, A, 2, L.
-
To reject all tracked changes, press Alt+R, J, L.
Keep Track Changes turned on
To prevent someone else from turning off Track Changes, turn on Lock Tracking and add a password. When Tracked Changes is locked, anyone opening your document can view the changes but they can’t turn off the feature, and they can’t accept or reject changes.
-
Press Alt+R, G, L. You hear: “Lock Tracking.”
-
Choose and type a password, and press the Tab key. You hear: “Re-enter to confirm.” Type your password again, and then press Enter.
Turn off Lock Tracking
-
Press Alt+R, G, L. You hear: «Unlock Tracking window, password.”
-
Type your password and press Enter.
Turn off Track Changes
When you turn Track Changes off, Word stops marking up new changes. All changes that were already tracked remain marked up in the document, until you remove them. You can turn this feature off using either a direct keyboard shortcut or the ribbon.
-
To turn off Track Changes, on the keyboard, press Ctrl+Shift+E.
-
To use the ribbon to turn off Track Changes, on the keyboard, press Alt+R, G, G.
See also
Use a screen reader to add, read, and delete comments in Word
Use a screen reader to check spelling and grammar in Word
Keyboard shortcuts in Word
Basic tasks using a screen reader with Word
Set up your device to work with accessibility in Microsoft 365
Use a screen reader to explore and navigate Word
What’s new in Microsoft 365: Release notes for Current Channel
Use Word for Mac with your keyboard and VoiceOver, the built-in macOS screen reader, to see who’s been making changes to your document, manage tracked changes, and delete comments in your Word for Mac document.
Need instructions on how to track changes or accept tracked changes in a Word document, but not using a screen reader? See Track changes in Word or Accept or reject tracked changes in Word.
Notes:
-
New Microsoft 365 features are released gradually to Microsoft 365 subscribers, so your app might not have these features yet. To learn how you can get new features faster, join the Office Insider program.
-
This topic assumes that you are using the built-in macOS screen reader, VoiceOver. To learn more about using VoiceOver, go to VoiceOver Getting Started Guide.
-
For the best reading and editing experience, we recommend using the Print Layout View and the All Markup option.
In this topic
-
Turn Track Changes on and off
-
Show changes (revisions) in a document
-
Navigate to tracked changes
-
Remove tracked changes
-
Keep Track Changes turned on
Turn Track Changes on and off
When you turn on Track Changes, Word for Mac marks up and shows any changes that anyone makes to your document. You can turn this feature on using a direct keyboard shortcut.
To toggle Track Changes on and off, in the document text area, press Command+Shift+E.
Show changes (revisions) in a document
You can choose how you’d like to show the tracked changes in your document.
-
Press F6 until you hear the currently selected tab. If you’re already on the Review tab, proceed to step 3.
-
Press the Tab key or Shift+Tab until you hear «Review tab,» and then press Control+Option+Spacebar. You hear: «Review tab, selected.»
-
Press the Tab key until you hear the current markup, followed by «Display for review, pop up button.»
-
To expand the markup menu, press Control+Option+Spacebar.
A list with the following four view options opens:
-
Simple Markup is the default option, and indicates where the changes are with a red line in the document margin.
-
No Markup hides markup to show what the incorporated changes will look like. This option does not delete the changes.
Note: To see the markup again, choose Simple Markup or All Markup.
-
All Markup shows additions in the body text with different colors, and deletions and format changes in the comments pane. This option is the recommended markup and best supported by screen readers.
-
Original shows the document in its original form.
-
-
Press the Up or Down arrow keys until you hear the option you’d like to select, and then press Control+Option+Spacebar. You hear the selected markup, followed by «Display for review.»
-
To choose the type of markup you’d like to see, press the Tab key until you hear “Markup options, menu button,” and then press Control+Option+Spacebar.
A list with the following options opens:
-
Comments
-
Ink
-
Insertions and Deletions
-
Formatting
-
Track Moves From/To
-
Balloons
-
Reviewers
-
-
In the list, press the Up or Down keys until you hear the name of the option you’d like to choose. Then press Control+Option+Spacebar. Repeat this step for all the markup types you’d like to select or unselect.
Navigate to tracked changes
When Track Changes is on, Word marks up the body text or the comments pane in your document. VoiceOver announces the changes and the change types when reading through the text.
-
Underline and color are used for insertions in the body text. You hear «Insertion change» when navigating by the beginning and end of a tracked change.
-
Word marks deletions in the comments pane. VoiceOver announces the deleted word.
-
If the formatting has been changed, you hear: «Format change.” To hear details about the formatting changes, you need to navigate to the margin of your document.
Note: Make sure you’ve selected the All Markup option as instructed in Show changes (revisions) in a document.
Use the Next and Previous buttons
-
To navigate through all tracked changes in your document one by one, navigate to the Review tab as instructed in Show changes (revisions) in a document.
-
Press the Tab key until you hear «Previous button, previous» or «Next button, next,» and then press Control+Option+Spacebar. Repeat this step until you’ve gone through the changes.
Use the Comments pane
-
To move through deletions and formatting changes logged in the Comments pane, in the editing area, press Control+Option+Right arrow key. The focus moves to the comments pane.
-
To move in the list, press Control+Option+Up or Down arrow key.
Use the Reviewing pane
-
To navigate to the Reviewing pane, press Control+Option+M. You hear: «Menu bar, Apple.»
-
Press the Right arrow key until you hear «View,» and then press Control+Option+Spacebar.
-
Press the Down arrow key until you hear «Sidebar,» and the press Control+Option+Spacebar.
-
Press the Down arrow key until you hear «Reviewing,» and then press Control+Option+Spacebar.
-
Press the Tab key until you hear: «Summary.» To listen to the overview of the changes, press the Right arrow key. You hear the total number of changes and the number of insertions, deletions, moves, formatting changes, and comments.
-
To move from the summary to the change details, press VO+Shift+Up arrow key. You hear: «Out of reviewing pane group.»
-
Press the Down arrow key once, and then press Control+Option+Shift+Down arrow key. VoiceOver reads the change details line by line.
-
To close the Reviewing pane, press Control+Option+Shift+Up arrow key. Press the Up arrow key until you hear: «Thumbnails pane.» Press the Right arrow key until you hear «Close button,» and then press Control+Option+Spacebar.
Remove tracked changes
The only way you can remove tracked changes permanently in a document is to accept or reject them.
Accept or reject a single tracked change
-
Navigate to the tracked change you’d like to remove as instructed in Navigate to tracked changes.
-
Navigate to the Review tab as instructed in Show changes (revisions) in a document.
-
Do one of the following:
-
To accept the change, press the Tab key until you hear “Accept menu button,» and then press Control+Option+Shift+M. Press the Tab key until you hear «Accept and move to next” and press Control+Option+Spacebar. The change is accepted, and the focus moves to the next change in your document.
-
To reject the change, press the Tab key until you hear «Reject menu button,» and then press Control+Option+Shift+M. Press the Tab key until you hear “Reject and move to next” and press Control+Option+Spacebar. The change is rejected, and the focus moves to the next change in your document.
-
Accept or reject all tracked changes
-
Navigate to the Review tab as instructed in Show changes (revisions) in a document.
-
Do one of the following:
-
To accept all tracked changes, press the Tab key until you hear “Accept menu button,» and then press Control+Option+Shift+M. Press the Tab key until you hear «Accept all changes» and press Control+Option+Spacebar.
-
To reject all tracked changes, press the Tab key until you hear “Reject menu button,» and then press Control+Option+Shift+M. Press the Tab key until you hear «Reject all changes» and press Control+Option+Spacebar.
-
Keep Track Changes turned on
To prevent someone else from turning off Track Changes, you can lock the feature. You can also add a password for further protection. When Tracked Changes is locked, anyone opening your document can view the changes but they can’t turn off the feature, and they can’t accept or reject changes.
-
Navigate to the Review tab as instructed in Show changes (revisions) in a document. Press the Tab key until you hear «Protect Document, unchecked checkbox» and press Control+Option+Spacebar. The Password Protect dialog box opens.
-
Press the Tab key until you hear «Protect document for,» and then press Control+Option+Spacebar.
-
Press the Tab key until you hear «Tracked changes, radio button» and press Control+Option+Spacebar.
-
To set a password, press the Tab key until you hear «Protection secure, edit text.» Type a password and press the Tab key.
-
In the confirmation dialog box, type the password again, and press the Tab key until you hear: «OK default button.» Press Control+Option+Spacebar.
-
Press the Tab key until you hear «OK, default button» and press Control+Option+Spacebar.
Turn off Track Changes locking
-
In the Password Protect dialog box, press the Tab key until you hear «Protect document for,» and then press Control+Option+Spacebar.
-
Type the password and press the Tab key until you hear «OK default button» and press Control+Option+Spacebar.
-
Press the Tab key until you hear «OK default button,» and then press Control+Option+Spacebar.
See also
Use a screen reader to share a document in Word
Keyboard shortcuts in Word
Basic tasks using a screen reader with Word
Set up your device to work with accessibility in Microsoft 365
Use a screen reader to explore and navigate Word
What’s new in Microsoft 365: Release notes for Current Channel
Use VoiceOver, the built-in iOS screen reader, to switch Track Changes on or off in your Word for iOS document. Find the existing changes in the document, and then accept or reject them. Lock Track Changes on so others cannot switch it off.
Notes:
-
New Microsoft 365 features are released gradually to Microsoft 365 subscribers, so your app might not have these features yet. To learn how you can get new features faster, join the Office Insider program.
-
This topic assumes that you are using the built-in iOS screen reader, VoiceOver. To learn more about using VoiceOver, visit Apple accessibility.
-
To learn more about screen readers, go to How screen readers work with Microsoft 365.
In this topic
-
Turn Track Changes on and off
-
Navigate to tracked changes
-
Accept or reject changes
-
Keep Track Changes turned on
Turn Track Changes on and off
When you turn Track Changes on, all changes made to your Word document are tracked and shown.
-
Open the document in Word. Swipe right until you hear «Show ribbon, button,» and double-tap the screen.
-
You hear the currently selected tab, such as: «Home, tab.» To change to the Review tab, double-tap the screen and swipe right or left until you hear «Review, tab,» and double-tap the screen.
-
Swipe right repeatedly until you hear «Track Changes, off, button» (if Track Changes is currently off) or «Selected, Track Changes, on, button» (if Track Changes is currently on), and double-tap the screen to turn on or off.
-
To close the tab and return to the document, swipe left repeatedly until you hear «Hide ribbon, button,» and double-tap the screen.
Navigate to tracked changes
Use the Review tab in the Print Layout view to navigate the tracked changes and comments in your Word document.
-
Make sure the document is open in the Print Layout view in Word.
To change to the Print Layout view, swipe right until you hear «Print Layout, button,» and double-tap the screen. If you hear «Mobile View, button,» you’re already in the Print Layout view.
-
Swipe right or left until you hear «Show ribbon, button,» and double-tap the screen.
-
You hear the currently selected tab, such as: «Home, tab.» If needed, double-tap the screen and swipe right or left until you hear «Review, tab,» and double-tap the screen.
-
To navigate to changes in the document, swipe right repeatedly until you hear «Next change, button» or «Previous change, button,» and double-tap the screen.
-
To hear the change or comment, swipe right repeatedly until you hear the person who’s made the change and the changed text or comment.
-
To move to the next change, swipe left until you hear «Next change, button,» and double-tap the screen. To hear the change or comment, swipe right until you hear it. To move back to the Next change button, swipe left.
Accept or reject changes
You can check and accept or reject the changes in a Word document one by one or select to accept or reject all of them at once.
-
Navigate to the change you want to accept or reject as instructed in Navigate to tracked changes.
-
Swipe left repeatedly until you hear «Accept, button» or «Reject, button,» and double-tap the screen.
-
The Accept or Reject menu opens. To hear the available options, swipe right. When you hear the option you want to select, double-tap the screen.
Keep Track Changes turned on
To prevent someone else from turning off Track Changes in your document, you can select to block other authors. Others opening your document can still view it but they can’t turn off Track Changes, or accept or reject changes.
-
Open the document in Word. Swipe right until you hear «Show ribbon, button,» and double-tap the screen.
-
You hear the currently selected tab, such as: «Home, tab.» To change to the Review tab, double-tap the screen and swipe right or left until you hear «Review, tab,» and double-tap the screen.
-
Swipe right repeatedly until you hear «Block other authors, button,» and double-tap the screen.
-
The Block Authors menu opens. Swipe right until you hear «Block other authors, button,» and double-tap the screen.
See also
Use a screen reader to share a document in Word
Keyboard shortcuts in Word
Basic tasks using a screen reader with Word
Set up your device to work with accessibility in Microsoft 365
Use a screen reader to explore and navigate Word
What’s new in Microsoft 365: Release notes for Current Channel
Use TalkBack, the built-in Android screen reader, to switch Track Changes on or off in your Word for Android document. Find the existing changes in the document, and then accept or reject them.
Notes:
-
New Microsoft 365 features are released gradually to Microsoft 365 subscribers, so your app might not have these features yet. To learn how you can get new features faster, join the Office Insider program.
-
This topic assumes that you are using the built-in Android screen reader, TalkBack. To learn more about using TalkBack, go to Android accessibility.
In this topic
-
Turn Track Changes on and off
-
Navigate to tracked changes
-
Accept or reject changes
Turn Track Changes on and off
When you turn Track Changes on, all changes made to your Word document are tracked.
-
Open the document in Word. Swipe right until you hear «Not checked, more options, switch,» and double-tap the screen.
-
You hear the currently selected tab, such as: «Tab menu, Home, selected.» To change to the Review tab, double-tap the screen and swipe right or left until you hear «Review, tab,» and double-tap the screen.
-
Swipe right repeatedly until you hear «Track Changes, not checked, switch» (if Track Changes is currently off) or «Track Changes, checked, switch» (if Track Changes is currently on), and double-tap the screen to turn on or off.
-
To close the tab and return to the document, swipe left repeatedly until you hear «Checked, more options, switch,» and double-tap the screen.
Navigate to tracked changes
Use the Review tab to navigate the tracked changes in your Word document.
-
Swipe right or left until you hear «Not checked, more options, switch,» and double-tap the screen.
-
You hear the currently selected tab, such as: «Tab menu, Home, selected.» To change to the Review tab, double-tap the screen and swipe right or left until you hear «Review, tab,» and double-tap the screen.
-
To navigate to the changes in the document, swipe right repeatedly until you hear «Next change, button» or «Previous change, button,» and double-tap the screen. You hear the changed text.
-
The focus remains on the Next change or Previous change button. To cycle through the changes, just double-tap the screen.
Accept or reject changes
You can check and accept or reject the changes in a Word document one by one or select to accept or reject all of them at once.
-
Navigate to the change you want to accept or reject as instructed in Navigate to tracked changes.
-
Swipe left repeatedly until you hear «Accept, menu» or «Reject, menu,» and double-tap the screen.
-
The Accept or Reject menu opens. To hear the available options, swipe right. When you hear the option you want to select, double-tap the screen.
See also
Use a screen reader to share a document in Word
Keyboard shortcuts in Word
Basic tasks using a screen reader with Word
Set up your device to work with accessibility in Microsoft 365
Use a screen reader to explore and navigate Word
What’s new in Microsoft 365: Release notes for Current Channel
Use Word for the web with your keyboard and a screen reader to see who’s been making changes to your document and manage tracked changes. We have tested it with Narrator in Microsoft Edge, JAWS in Chrome, and NVDA in Firefox, but it might work with other screen readers and web browsers as long as they follow common accessibility standards and techniques.
Notes:
-
If you use Narrator with the Windows 10 Fall Creators Update, you have to turn off scan mode in order to edit documents, spreadsheets, or presentations with Microsoft 365 for the web. For more information, refer to Turn off virtual or browse mode in screen readers in Windows 10 Fall Creators Update.
-
New Microsoft 365 features are released gradually to Microsoft 365 subscribers, so your app might not have these features yet. To learn how you can get new features faster, join the Office Insider program.
-
To learn more about screen readers, go to How screen readers work with Microsoft 365.
-
When you use Word for the web with a screen reader, switch to the full screen mode. Press F11 to toggle the full screen mode on and off.
-
When you use Word for the web, we recommend that you use Microsoft Edge as your web browser. Because Word for the web runs in your web browser, the keyboard shortcuts are different from those in the desktop program. For example, you’ll use Ctrl+F6 instead of F6 for jumping in and out of the commands. Also, common shortcuts like F1 (Help) and Ctrl+O (Open) apply to the web browser – not Word for the web.
-
If the Xbox Game Bar app is running on your device, opening the Review tab in Word for the web with the shortcut Alt+Windows logo key+R can cause unintentional activation of the screen recording feature in the app. To prevent this, close the Xbox Game Bar app.
In this topic
-
Turn on Track Changes
-
Navigate the tracked changes
-
Remove tracked changes
-
Turn off Track Changes
Turn on Track Changes
When you turn on Track Changes, Word marks up and shows any changes that either you or everyone makes to your document.
-
To turn on Track Changes, do one of the following:
-
To enable tracking changes for everyone, press Alt+Windows logo key+R, G, F.
-
To enable tracking changes for just yourself, press Alt+Windows logo key+R, G, J.
-
Navigate the tracked changes
-
To navigate the tracked changes in a document, do one of the following:
-
To navigate to the next tracked change, press Alt+Windows logo key+R, H.
-
To navigate to the previous tracked change, press Alt+Windows logo key+R, J.
-
Remove tracked changes
The only way you can remove tracked changes permanently in a document is to accept or reject them.
-
Navigate to the change you wish to accept or reject, as described in Navigate the tracked changes.
-
Do one of the following:
-
To accept the change, press Alt+Windows logo key+R, A, 2.
-
To reject the change, press Alt+Windows logo key+R, J.
The focus moves to the next tracked change.
-
Turn off Track Changes
When you turn Track Changes off, Word stops marking up new changes. All changes that were already tracked, remain marked up in the document until you remove them.
To turn off Tracked Changes, press Alt+Windows logo key+R, G, O.
See also
Use a screen reader to insert and change text in Word
Use a screen reader to check spelling and grammar in Word
Keyboard shortcuts in Word
Basic tasks using a screen reader with Word
Use a screen reader to explore and navigate Word
What’s new in Microsoft 365: Release notes for Current Channel
Technical support for customers with disabilities
Microsoft wants to provide the best possible experience for all our customers. If you have a disability or questions related to accessibility, please contact the Microsoft Disability Answer Desk for technical assistance. The Disability Answer Desk support team is trained in using many popular assistive technologies and can offer assistance in English, Spanish, French, and American Sign Language. Please go to the Microsoft Disability Answer Desk site to find out the contact details for your region.
If you are a government, commercial, or enterprise user, please contact the enterprise Disability Answer Desk.
When collaborating on a Microsoft Word Document the easiest way to keep an eye on all of the edits being made is by tracking your changes.
Tracked Changes is an easy to use built-in tool that allows you to do exactly what it sounds like; track any edits or changes that are made to the original text in a word document.
If you aren’t sure how to turn on your tracked changes in word, we wrote a post about this last week. Click here for a refresher.
Now that you have tracked changes in your word document, how do you view them all?
Sometimes they are hidden, which does make it easier for you to read the document without the red strikethroughs and edits. But when it comes time to reviewing all of the changes or understanding where edits were made, viewing all tracked changes is the way to go.
In this post, we will take you through how to view tracked changes at the click of a button.
Viewing all tracked changes in Microsoft Word
- Open your word document
- Click Review in the tool bar
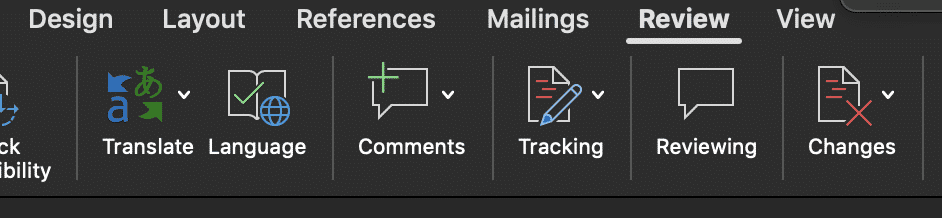
- Find and click Tracking
- In the Tracking drop-down click Display for Review
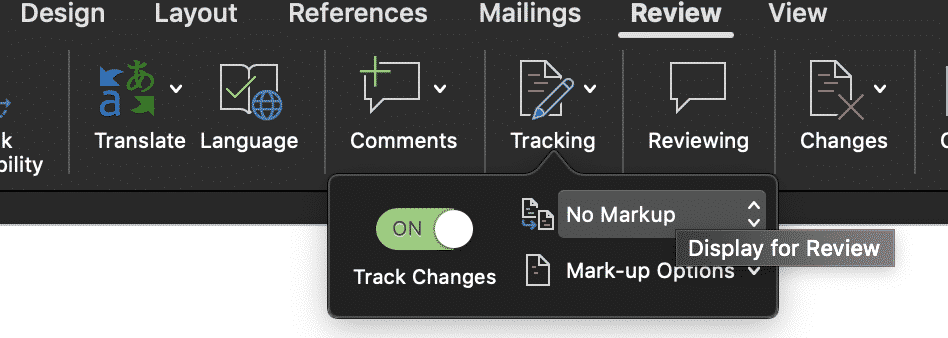
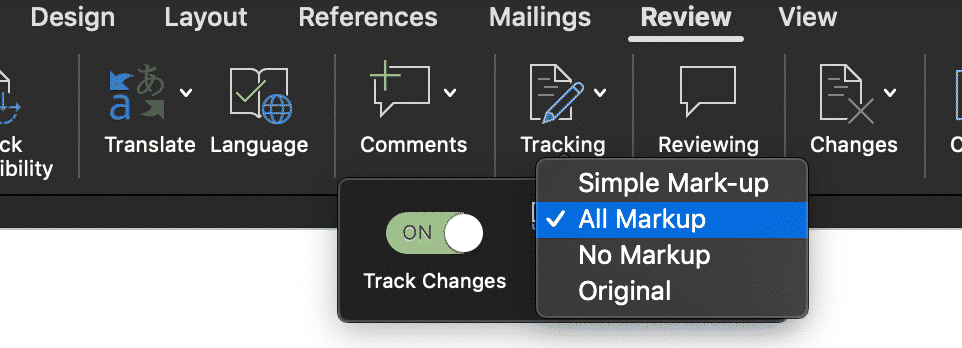
- Under Display for Review, you will be given four options
- Simple Mark-up
- All Markup
- No Markup
- Original
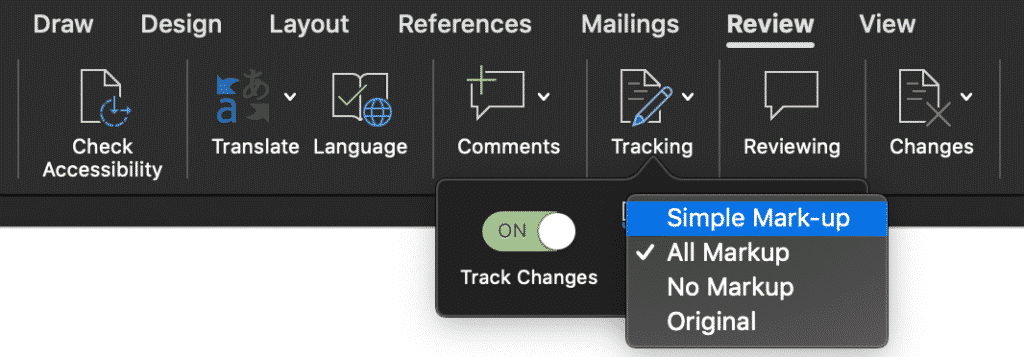
- Select All Markup
You have no successfully made all tracked changes visable.
Microsoft Word – Simple Mark-up vs All Markup, what is the difference?
With so many of us now using Microsoft word to track changes and collaborate on documents. Microsoft has built in more than one option for us to view these changes, depending on what your desired outcome is.
So what is the difference between Simple Markups and All Markups? And if No Markups does just that, then what is Original?
Here is a quick explanation of each feature’s function:
- Simple Markup displays the markups with a red line in the page margin where a change has been made.
- All Markup shows all edits, using strikethrough formatting.
- No Markup shows you how the changes will look in the document.
- Original shows you the original document, pre any makeups.
Need a better way to collaborate on a Microsoft Word Document?
It’s a frustration we all know too well. When you are working on the 15th version of the same document, accepting and rejecting comments and changes. Knowing in the back of your mind that this won’t even be the last round of edits.
With all of these edits, come multiple versions of the same document. The shared drive now looks like a shemozzle with Version6_JMsEDITS_v8_final1 the most recent final but defiantly not the last.
While two colleagues unknowingly open the latest version at the same time, make their edits and press save. Now you’re left with two separate versions of the same document and no way to merge them together without manually making the changes yourself.
This happens too often.
And to too many of us.
Luckily, enough of us screamed help and the tech gods have listened. There are now some pretty cool purpose-built tools out there to help us solve all of our collaborating problems. Companies such as Simul Docs.
Simul Docs works seamlessly with Microsoft Word and allows you to upload and edit your word document without having to worry about version control or merging two versions together if they had been opened and changed at the same time. Simul will fix all of this for you, at the click of the button.
Most of the time Simul will just fix the problem without you even asking because we all have the same issues, and Simul knows that when you open the document and make changes you will want them tracked – you don’t have to remember to turn them on, Simul Docs will automatically track them for you.
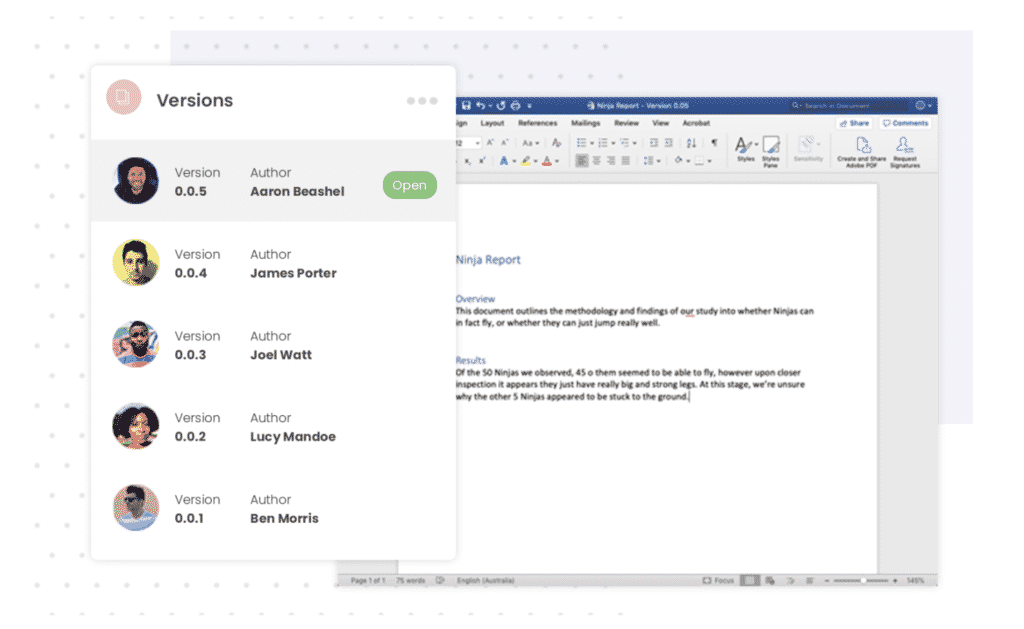
Simul also knows that when you start making changes to the document you are going to want it saved as a new version, allowing you to refer back to old changes at any time and avoid saving over anyone else’s edits. It also does that for you, automatically.
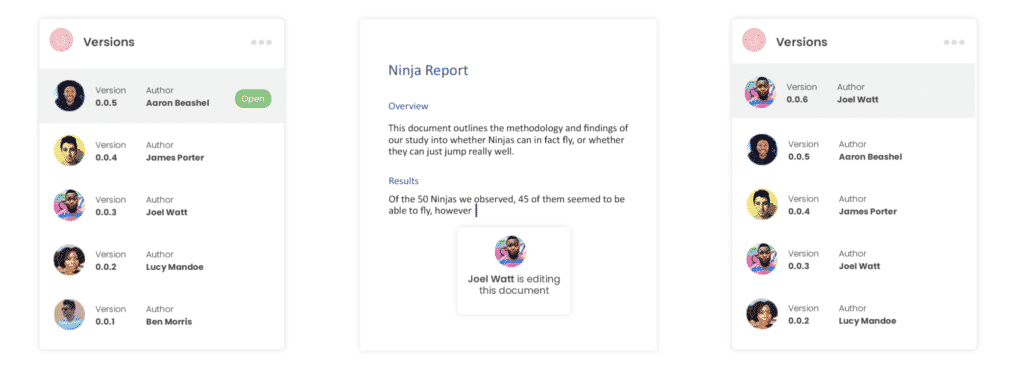
Now without sounding too smug, Simul will also keep a neat list of all versions saved for you. So now even your shared drive is feeling less confused as well.
So if you are tired of managing a messy shared drive and struggle with version control, a tool such as Simul Docs is quite literally, made for you.
Give it a try, your shared drive will thank you.
Learn what Track Changes is, how to track changes in Word, how to remove tracked changes in Word, and much more.
Track Changes in Word is a powerful feature that makes it possible to mark changes that are made to a document. The feature includes several tools you can use to control which types of changes to track, how to display the tracked changes, and finally how to accept or remove the tracked changes.
Word has included Track Changes functionality for decades. Microsoft has changed the Track Changes features in Word 2013 and later versions compared to earlier versions.
This article covers the Track Changes feature as it works in Word 2013, Word 2016, Word 2019, Word 2021, and Word for Microsoft 365.
If you are using an older version of Word, see Shauna Kelly’s article about Track changes, covering Word 2010 and earlier versions.
Word refers to both tracked changes and comments that are added using Word’s comment feature as revisions. Some of tools discussed in this article are also used in relation to comments. I have covered the Word comment feature in detail in the article How comments in Word work. Please refer to that article for help on comments in Word.
Below, you will find a Table of Contents showing all headings in the article. Click a heading to go to the section in question. When you scroll down, a Go to Info About list will appear to the left, showing the main headings. These headings also work as hyperlinks that let you quickly go to the relevant content.
What is Track Changes in Word?
Track Changes in Word lets you keep track of the changes that are made to a document. This is useful in the editing process of a document and when you ask others for feedback.
Track Changes can be used to keep track of changes no matter whether only you or several people work on a document. Tracked changes can be displayed in a number of different ways in Word. You can also entirely hide the changes. All the different display options are explained later in this article.
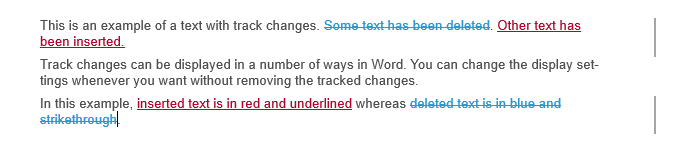
Figure 1. Example of text with tracked changes. In this example, inserted text is in red and underlined whereas deleted text is in blue and strikethrough.
You don’t need to accept all changes. You can select to either accept or reject the individual changes. You can also accept or reject all changes in one operation.
Track Changes need to be turned on for Word to mark the changes. If you email a document to somebody else for feedback, the other person can turn on Track Changes before editing the document. When the document is returned to you, you can see which changes have been made.
Don’t worry if Track Changes has not been turned on during editing. Word has a compare feature that lets you compare two versions of a document and show the differences as tracked changes. This means that you can quickly generate a copy showing all the differences between two versions of a document. For more details, see How to find the differences between two versions of a document below.
Where is track changes in Word?
The track changes tools are found on the Review tab in the Ribbon:

Figure 2. The Track Changes tools in Word are found on the Review tab in the Ribbon. The tools are marked by a colored frame here.
Terminology used in Word in relation to Track Changes
In the different commands related to Track Changes in Word, you will find a number of terms in use. It can be a bit confusing since some of the terms mean the same. Terms with the same meaning seem to be used more or less randomly. See the list below:
|
Terms |
What the terms mean |
|
Tracked changes Changes Markup Revisions |
The changes that have been marked by the Track Changes feature Note that the terms markup and revisions in most cases also cover comments inserted using Word’s comment feature |
|
Author Reviewer |
A person who has edited/made changes to a document |
|
Balloons |
Tracked changes or comments shown in the margin of a document |
|
Accept |
Incorporates a tracked change in the document, as if it belonged to the original document. |
|
Reject |
Removes (or deletes) a tracked change from the document, as if it had not been made |
|
Display Show |
The way Word visually presents the tracked changes on the screen |
In other language versions of Word than English, the confusion may be even worse since the translations may not be consistent. For example, I have found examples in Danish versions of Word where even more terms have been introduced due to inconsistent or incorrect translation.
Is Track Changes the same as redlining in Word?
You may see the terms redline, redlining, blackline, or blacklining used instead of Track Changes. I have found a number of definitions of these terms and the definitions do not say precisely the same.
Redline or redlining seems to be used in the same meaning as Track Changes. The terms indicate that red ink is used to mark changes in a document.
Blackline, blacklining, or legal blacklining seems to be used primarily if changes are marked in a separate document, showing the differences between two versions of a document, i.e. without making any changes in the source documents. You can create such document using Word’s Compare or Combine features. See How to find the differences between two versions of a document and How to create a new document that combines tracked changes from different authors while keeping existing tracked changes below.
Basic concepts – what you should know before you start using Track Changes
The are some basic concepts you should be aware of before you start using Track Changes. If you have never used Track Changes before, it can be a little confusing – but once you learn how it works, it is very powerful.
There are four steps to tracking changes
Tell Word to track changes.
If you want to track the changes you make to a document, you must first turn on Track Changes.
As long as Track Changes is turned on, information about the changes you make is registered in the document. If you turn off Track Changes, Word will stop registering new changes you make. You can turn on or of Track Changes whenever you want.
Even if Track Changes is turned off at the moment, a Word document can contain tracked changes from earlier.
Tell Word to display tracked changes.
Even if a document contains tracked changes, you may not see it. The display of tracked changes can be turned on so the changes are visible or turned off so the changes are hidden.
Even if you hide the tracked changes, they are still in the document until they are accepted or rejected.
Tell Word how to display tracked changes.
Word has a number of options you can use to control how the tracked changes are displayed.
The display options let you determine both which types of changes you see and in which way you see them.
Tell Word to accept or reject the changes.
Tracked changes in a document will remain in the document until they are accepted or rejected. That is the only way to remove them.
How to enable track changes in Word
As explained above, you must turn on Track Changes to tell Word to track all the changes you make in your document.
How to turn on Track Changes in Word
You can use different methods to turn on Track Changes to start tracking your changes.
All methods work as toggles that alternately turns Track Changes on and off. This means that you can use the same methods to turn off Track Changes.
IMPORTANT
Turning Track Changes on or off doesn’t affect whether you can see the tracked changes. See How to display tracked changes in Word below.
METHOD 1 – Use keyboard shortcut
Press Ctrl+Shift+E to turn on Track Changes.
The shortcut works as a toggle. If already turned on, the shortcut turns off Track Changes. Note that this shortcut works in all versions of Word.
This is the fastest method.
METHOD 2 – Click Track Changes icon on the Review tab
To turn on Track Changes, select the Review tab and click the Track Changes icon.
The icon works as a toggle. If you click the icon again, you turn off Track Changes.
If you click the text below the icon, a menu appears from where you can select Track Changes to turn it on.
You can see on the color of the Track Changes icon whether it is turned on or off. The icon is highlighted when Track Changes is on.
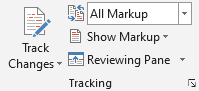
Figure 3A. Track changes is disabled: Track Changes is off.
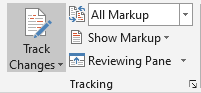
Figure 3B. Track changes is enabled: Track Changes is on (the icon is highlighted).
METHOD 3 – Use the Quick Access Toolbar (QAT)
TIP
You can add Track Changes to the Quick Access Toolbar (QAT) for easy access. The QAT is always visible. This also makes if easy to see whether Track Changes is on or off.
To add the icon to the toolbar, right-click the Track Changes icon on the Review tab and select Add to Quick Access Toolbar.
![]()
Figure 4. Track Changes has been added to the Quick Access Toolbar (QAT) for easy access. Here marked by a colored frame. The icon is highlighted when Track Changes is on.
METHOD 4 – Use the Status Bar
On the Status Bar (in the bottom of the Word window), click the text Track Changes.
The text in the Status Bar works as a toggle. If you click it again, you turn off Track Changes.

Figure 5. Turn on Track Changes via the Status Bar. The text “Off” or “On” tells whether Track Changes is currently off or on.
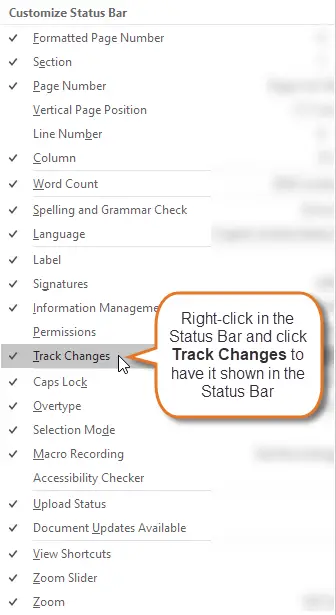
If you can’t see Track Changes, right-click in the Status Bar and select Track Changes from the Customize Status Bar menu that appears.
Figure 6. If Track Changes is not shown in the Status Bar, right-click in the Status Bar and select Track Changes from the Customize Status Bar.
How to stop tracking changes in Word
As explained above, you enable track changes by turning on Track Changes. To stop tracking changes so that Word no longer marks new edits you make, you must turn off Track Changes. Read on below.
How to turn off track changes in Word
You can turn off Track Changes using the same methods as you can use for turning it on. See How to turn on Track Changes in Word above.
IMPORTANT
Turning Track Changes on or off doesn’t affect whether you can see the tracked changes. See How to display tracked changes in Word below.
What is Track Changes Cards and how to get rid of them
Track Changes Cards are pop-up windows that may appear in Word for Microsoft 365 when you click in a change. I have written a separate article about those cards and how you can disable them using my free Word add-in DocTools StopSpellingPopUp. See the article How to disable Track Changes Cards in Word for details.
How to find out whether Track Changes is on or off
Note that tracked changes may not be visible in your document even if Track Changes is on. Tracked changes are only visible if you have set Word to display the changes. See How to display tracked changes in Word below.
IMPORTANT
Turning Track Changes on or off doesn’t affect whether you can see the tracked changes. See How to display tracked changes in Word below.
METHOD 1 – Look at the Status Bar
Look at the Status Bar at the bottom of the screen. Changes are currently being tracked if you see Track Changes: On in the Status Bar.
See METHOD 4 – Use the Status Bar above if you can’t see the text Tracked Changes: On or Tracked Changes: Off in the Status Bar.
METHOD 2 – Look at the Review tab in the Ribbon
If the Track Changes icon in the Review tab in the Ribbon is highlighted, Track Changes is on. See Figure 3 above.
METHOD 3 – Look at the Quick Access Toolbar (QAT)
This method is only relevant if you have added the Track Changes icon to the QAT. See METHOD 3 – Use the Quick Access Toolbar (QAT) above. If the Track Changes icon in the QAT is highlighted, Track Changes is on.
Displaying or hiding tracked changes
How to display tracked changes in Word
Word has a number of options that influence how tracked changes are displayed. All the options can be accessed from the Tracking group on the Review tab in the Ribbon. Below, you can learn how the individual options work.
The different options influence each other. It can be rather difficult to get an overview of all the relations. The result is determined by the combination of your settings in:
- the Display for Review menu (see Figure 7 below)
- the Show Markup menu (you can see the menu in Figure 14 below.)
- the Advanced Track Changes Options dialog box (see Figure 22 below)
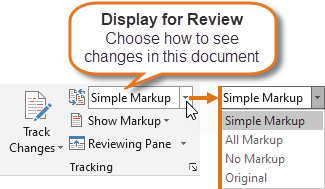
Figure 7. The Display for Review menu includes four display options that determine how tracked changes are shown. See the descriptions of the options below.
|
Display option |
How are tracked changes displayed |
|
Simple Markup |
Red vertical lines in the margin show where changes are found. See Example 1 – Simple Markup display below. In the Advanced Track Changes Options dialog box > Markup section > Changed lines, you can determine how and where the red, vertical lines are shown. TIP: You can click a red line in the margin to switch to All Markup display. |
|
All Markup |
Shows all changes with different colors and lines. The red lines from Simple Markup display turns into gray lines. The exact display depends on your settings in the Show Markup menu and in the Advanced Track Changes Options dialog box.
For an illustration of the Advanced Track Changes Options dialog box, see Figure 22 below. See Example 2 – All Markup display + Show Revisions in Balloons and Example 3 – All Markup display + Show All Revisions Inline below.. TIP: You can click a gray line in the margin to switch to Simple Markup display. |
|
No Markup |
Shows the document as if you had accepted all the tracked changes. This means that the document will look as if all the changes had been there always. Note that the tracked changes are still there – they are just hidden. |
|
Original |
Shows the document as if you had rejected all the tracked changes. This means that the document will look as it did before any of the changes were added. Note that the tracked changes are still there – they are just hidden. |
Summary of the facts from above:
- To see tracked changes, you must select either Simple Markup or All Markup from Display for Review menu.
- In addition, you must make sure that a check mark is shown in the Show Markup menu for the types of tracked changes you want to see: Comments (not handled in this article), Insertions and Deletions, and/or Formatting.
- In the Advanced Track Changes Options dialog box, set up how you want to see the tracked changes.
Example 1 – Simple Markup display

Figure 8. Example of Simple Markup. Note the red lines in the right margin. The lines show where edits are made. You can have the lines shown in the left margin instead, if you want. You can click a red line in the margin to switch to All Markup display.
In Simple Markup display, any comments will appear as small comment icons in the margin.
Example 2 – All Markup display + Show Revisions in Balloons

Figure 9. Example of All Markup in combination with Show Markup > Balloons > Show All Revisions Inline. Note the gray lines in the right margin. The lines appear in the same places as the red lines in Figure 8 above. You can click a gray line in the margin to switch to Simple Markup display.
Example 3 – All Markup display + Show All Revisions Inline

Figure 10. Example of All Markup in combination with Show Markup > Balloons > Show All Revisions Inline. Note the gray lines in the right margin. The lines appear in the same places as the red lines in Figure 8 above. You can click a gray line in the margin to switch to Simple Markup display.
IMPORTANT
Even if you have selected All Markup, you may not see all changes. You can define which types of changes you want to see.
How to hide tracked changes in Word without removing the changes
When working with tracked changes in a document, you may sometimes want to see the document without displaying the changes. You can hide tracked changes while keeping the tracked changes in the document.
If Track Changes is turned on, Word will continue to track the changes but just not show them as long as you are hiding tracked changes.
METHOD 1 – Select Review tab > Display for Review > No Markup
If you select Review tab > Display for Review > No Markup, Word will display your document as if you had accepted all the tracked changes in the document.
It hides the tracked changes but does not remove them. If another user opens the document, that user can easily display the changes.
METHOD 2 – Select Review tab > Display for Review > Original
If you select Review tab > Display for Review > Original, Word will display your document as if you had rejected all the tracked changes in the document.
It hides the tracked changes but does not remove them. If another user opens the document, that user can easily display the changes.
How to remove tracked changes in Word
As explained above, tracked changes remain in the document until they are accepted or rejected. Below, you will learn how to remove tracked changes individually or remove all tracked changes entirely from a Word document.
How to accept or reject a single tracked change
METHOD 1 – Use the right-click menu
To accept a tracked change, right-click in the change and select Accept Insertion or Accept Deletion or Accept Format Change.
To reject a tracked change, right-click in the change and select Reject Insertion or Reject Deletion or Reject Format Change.
The menu that appears when you right-click depends on the context. There are situations where the Accept or Reject commands are not available in the right-click menu. For example, that is most often the case if you right-click in text marked as a spelling error. In that case, use one of the other methods.
METHOD 2 – Click the Accept or Reject icon in the Review tab in the Ribbon
Click within the change, then click Accept or Reject in the Review tab in the Ribbon.
If you have selected text that includes more than one tracked change, all changes in the selection will be accepted or rejected.
METHOD 3 – Use the Accept or Reject menu in the Review tab in the Ribbon
To accept a change and automatically move to the next change, select Review tab > Accept > Accept and Move to Next. See Figure 11 below.
To accept a change without moving to the next, select Review tab > Accept > Accept This change. See Figure 11 below. Use this method if you want to be able to see the result before Word moves on to the next change.
To reject a change and automatically move to the next change, select Review tab > Reject > Reject and Move to Next.
To reject a change without moving to the next, select Review tab > Reject > Reject Change. Use this method if you want to be able to see the result before Word moves on to the next change.
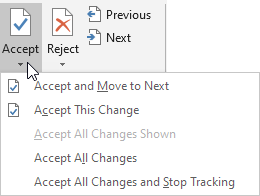
Figure 11. The menu that is displayed if you click the arrow below Accept in the Review tab. A corresponding menu is found when you click Reject.
How to accept or reject all tracked changes in a Word document at once
To accept all tracked changes in the document in one operation, select Review tab > Accept > Accept All Changes. If you want to turn off Track Changes at the same time, select Review tab > Accept > Accept All Changes and Stop Tracking. See Figure 11 above.
To reject (delete) all tracked changes in the document in one operation, select Review tab > Reject > Reject All Changes. If you want to turn off Track Changes at the same time, select Review tab > Reject > Reject All Changes and Stop Tracking.
Formatting changes – how of get rid of them and stop marking formatting changes
In many cases, you may only be interested in keeping track of content changes in the form of insertions and deletions. Changes to formatting, such as style changes or applying bold font, may be irrelevant.
Read on below to learn how to accept existing formatting changes and stop marking new formatting changes you make.
How to accept formatting changes and keep all other tracked changes
- Select Review tab > Tracking group > Show Markup and make sure to set check marks as follows:
Comments: Not checked
Insertions and Deletions: Not checked
Formatting: CheckedOnly Formatting must have a check mark.
- Select Review tab > Show Markup > Specific People and make sure All Reviewers is selected.
- Select Review tab > Changes group > Accept menu > Accept All Changes Shown.
Since only formatting changes were shown, only formatting changes will be accepted. - Select Review tab > Tracking group > Show Markup and turn on Comments and/or Insertions and Deletions again to show those types of changes when Track Changes is on.
See below if you want to stop tracking new formatting changes you make.
How to stop tracking formatting changes
When Track Changes is on, the types of changes that are tracked depend on your current settings in the Advanced Track Changes Options dialog box.
To stop tracking formatting changes:
- Open the Advanced Track Changes Options dialog box. See How to open the Advanced Track Changes Options dialog box below.
- Make sure to turn off the Track formatting check box.
- Click OK.
Note that the setting of the Track Formatting check box is document-specific. Turning on or off that setting does not influence other documents.
Turning off Track Formatting will not remove existing formatting changes that have been marked. You must accept those changes to get rid of them. See How to accept formatting changes and keep all other tracked changes above.
How to copy text with tracked changes
When copying and pasting text with tracked changed, the method to use depends on the result you want. See below.
In the following, I have used these terms:
- Source document: the document you copy from
- Target document: the document into which you paste
How to copy text to another document WITHOUT copying the track changes
- In the source document, turn ON
Track Changes (ensure that the Status Bar shows Track Changes: On). - In the target document, turn OFF
Track Changes (ensure that the Status Bar shows Track Changes: Off). - Now copy and paste.
How to copy text to another document WITH the tracked changes
- In the source document, turn OFF Track Changes (ensure that the Status Bar shows Track Changes: Off).
- In the target document, turn OFF Track Changes (ensure that the Status Bar shows Track Changes: Off).
- Now copy and paste.
Tracked changes and printing
How to print a document with tracked changes
If your document includes tracked changes, you can print it so the printout shows the tracked changes.
- Select File > Print.
- Under Settings, click the first button (shows Print All Pages or another text depending on your latest print settings).
- Select Print Markup in the menu that appears. See Figure 12 below.
- Make other selections as appropriate. Then click Print.

Figure 12. Select Print Markup to have the document printed with tracked changes. You can see the result in the preview that is shown in the window.
Note that my Word Add-in DocTools ExtractChanges Pro lets you extract tracked changes from Word documents incl. full context. If the primary goal of printing is to get an overview of the tracked changes in their context, the extracts you can make using this add-in gives a better overview of the tracked changes than the result you get by printing a document with Print Markup turned on, as described above. You can print such extract document if you want.
How to print a document without tracked changes
Even if your document includes tracked changes, you can print it so that the tracked changes are hidden in the printout. The document will print as if the changes had been accepted.
- Select File > Print.
- Under Settings, click the first button (shows Print All Pages or another text depending on your latest print settings).
- Make sure that Print Markup in the menu that appears does not have a check mark. See Figure 12 above.
- Make other selections as appropriate. Then click Print.
How to print a list of the tracked changes in a Word document
If your document includes tracked changes, you can print a list of tracked changes using Word’s built-in functionality:
- Select File > Print.
- Under Settings, click the first button (shows Print All Pages or another text depending on your latest print settings).
- Select List of Markup in the menu that appears. You can see List of Markup in Figure 12 above.
- Make other selections as appropriate. Then click Print.
The printout will include all the tracked changes, incl. formatting changes. You will see page number, date, and time for each change plus the change itself.
TIP: The free Word add-in DocTools ExtractData lets you automatically export all insertions and deletions in a document to a new document. The exported data is set up in a table. For each insertion and deletion, you will find the page number, line number, type of change, the revised text, author name and revision date.
The advanced Word add-in DocTools ExtractChanges Pro lets you export insertions, deletions and comments in full context, including headings and subheadings. In addition, the add-in includes several other features.
Printouts made from extract documents you create with ExtractData or ExtractChanges Pro do not include formatting changes. However, the extract documents include more details about each insertion and deletion and provides a better overview than the built-in feature.
Multiple authors and Track Changes
How to see who made the changes in a document in case of more than one author
Word use two terms for the people who make track changes to a document: author and reviewer.
METHOD 1 – Hover the mouse over the tracked change to see author name and more
If you have selected Display for Review > All Markup, Word displays a small screen tip, showing the change, the author name, and the date and time the change was made.
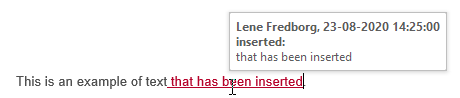
Figure 13. Example of screen tip shown when hovering the mouse over a tracked change.
If no screen tip is shown:
- Check that Review tab > Display for Review > All Markup is selected.
- Check that screen tips are set to be shown. To show screen tips on hover, turn on File > Options > Display > Show document tooltips on hover.
METHOD 2 – Show revisions in balloons
Works in Print Layout view and Web Layout view only.
Make sure that Review tab > Display for Review > All Markup is selected. Select Show Markup > Balloons > Show Revisions in Balloons. Then you will se information about each change in the balloon area.
If too many changes are found to show all information, you must click a change to see the details about that change.
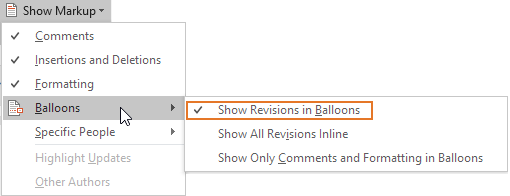
Figure 14. The Show Markup menu with the Balloons menu displayed. The Highlight Updates and Other Authors commands are usually disabled unless for shared documents.
METHOD 3 – Show the Reviewing Pane
Works in all views except Read Mode. Also works even if tracked changes are hidden.
No matter how tracked changes are displayed, you can show the Reviewing Pane to see information about each tracked change. You can turn the Reviewing Pane on and off via Review tab > Reviewing Pane. Select Reviewing Pane Vertical or Reviewing Pane Horizontal as desired.
Colors and Track Changes
How to display tracked changes with the same colors no matter who made the changes
To use the same colors for each author’s changes:
- Open the Advanced Track Changes Options dialog box (see How to open the Advanced Track Changes Options dialog box below).
- In all color boxes, make sure to select a named color instead of By Author. For example, to see all insertions as Red, click the Color field next to Insertions and select Red.
- Click OK.
How to display each author’s changes in a different color
To display each author’s changes in a different color:
- Open the Advanced Track Changes Options dialog box (see How to open the Advanced Track Changes Options dialog box below).
- In all color boxes, select By Author.
- Click OK.
The Advanced Track Changes Options dialog box offers the colors shown below.

Figure 15. The lists of colors you can select from in the color fields in the Advanced Track Changes Options dialog box.
The By Author color icon is sometimes two-colored, red and blue.
When using the By Author setting, one could think that Word would use the colors found in the lists above. However, that is not the case.
I created a macro to change the user name 100 times and for each user name insert the text User# with tracked changes in a document. I found the following:
- If By Author is selected, Word seems to use the 20 different colors illustrated below for markup types that offer the left-most list of colors illustrated above.
- However, if you have already previously added tracked changes using other settings in any document in that Word session (i.e. since you started Word), the allocation of colors seems to be random.
- The 20 different colors used are not the same as the colors found in the left-most color list above.

Figure 16. Word seems to use 20 different colors if By Author is selected. This illustration is part of the result of adding text using 100 different user names. User no. 21, 22, etc. are allocated the same colors as User no. 01, 02, etc. However, if other color settings have been used in the same Word session, the allocation of colors seems to be random.
Read on below for more details about colors and tracked changes.
How to define which color to use for each author – you can’t
If you have selected to apply color By Author as explained above, you may think you can determine which colors to use. The answer to this is: You can’t. Word allocates the colors.
As explained and illustrated above in How to display each author’s changes in a different color above, Word seems to use a total of 20 colors for different authors. If more than 20 authors are involved, the colors are reused for other authors. However, as explained above, the color allocation sometimes seems random.
Do tracked changes made by a specific author always appear with the same color?
As explained in How to display each author’s changes in a different color above, Word allocates colors to tracked changes if you have selected to color By Author.
You can’t be sure that two different users see the same colors in the same document. Also, you can’t be sure that you see the same colors each time you open the same document yourself.
How to make sure that other users see tracked changes in the same way as you do
It is the individual users’ settings of track changes options that determine how they see track changes.
You can’t control their settings unless by using e.g. a macro (programming) to force the options to be set in a specific way. It would also be possible for an IT department in a company to force specific track changes settings via Group Policy.
Track Changes and author names
Word use two terms for the people who make track changes to a document: author and reviewer.
Where does the author name shown in tracked changes come from?
The name shown in tracked changes you make is determined by the current user name set up on your computer. You can change the user name and initials. This will influence new tracked changes you add. Read on to lean how.
How to change the name shown in new tracked changes you make
As explained above, the name shown in tracked changes you make is determined by the current user name set up on your computer. You can change the user name and initials from two places – they both lead to the same dialog box:
- Select File > Options > General. Enter values in the User Name and Initials fields. Click OK.
- Open the Track Changes Options dialog box (see Figure 21 below) Click the Change User Name button. Enter values in the User Name and Initials fields. Click OK.
IMPORTANT
The changed name will apply to new tracked changes you make. Existing tracked changes will remain unchanged.
The change of user name applies to all Office applications (Word, Excel, PowerPoint, etc.)
How to change the user name in existing tracked changes
Once you have made tracked changes, there is no built-in method in Word to change the author name to another name.
However, Word lets you remove personal information from a document. This will set the name of all comments and tracked changes to “Author”. For details, see my article about how comments in Word works.
The DocTools ExtractChanges Pro add-in (from version 6.0) includes a command, Change Author & Date, that lets you change the name in existing tracked changes and comments. In addition, the command lets you remove or change the date of the tracked changes and comments. You can select whether the name and/or date changes are to be applied to all tracked changes and comments or only tracked changes and comments added by a specific author. The changes are made in copy of the document so that the original document remains unchanged.
TIP: If you want to remove the name from tracked changes and comments, you can type e.g. a non-breaking space (Ctrl+Shift+Spacebar), a hyphen or an En dash as both the author name and initials in the Change Author & Date dialog box in DocTools ExtractChanges Pro.
How to remove the name from existing tracked changes
As explained above, Word has no built-in method to change the author name of existing tracked changes except from using the tools to remove personal information.
My add-in DocTools ExtractChanges Pro has a tool that lets you remove or change the name of existing tracked changes and comments. See the information above.
How to display only the tracked changes made by specific authors
Remember that tracked changes are also called revisions – authors are also called reviewers.
To display only tracked changes made by specific authors:
- Select Review tab > Show Markup > Reviewers > select or deselect the reviewers (authors) as desired. Only tracked changes added by reviewers with a check mark will be shown.
Compare or combine Word documents
Word lets you compare two documents to find the differences between the documents no matter whether the individual documents include tracked changes. Word also lets you combine – or merge – documents and, at the same time, preserve all tracked changes and comments from the individual documents. Read on the learn how.
How to find the differences between two versions of a document
You can use Word’s Compare feature to find the differences between two versions of a document and mark the differences as tracked changes. This is also referred to a legal blackline.
You can use the feature no matter whether the documents already contain tracked changes.
The result of the compare is the same as if you had made all the changes. Your current user name will be shown as the author name on all changes.
compare two documents to find the differences between the documents
If one or both of versions you select to compare already includes tracked changes, Word will treat those changes as if they had been accepted.
If you want to preserve the changes made by individual authors so you can see who made the changes, you can instead use Word’s Combine command. See How to create a new document that combines tracked changes from different authors while keeping existing tracked changes below.
To compare two documents:
- Select Review tab > Compare > Compare to open the Compare Documents dialog box. If you can’t see all options in the dialog box, click the More >> button. See Figure 17 below.
- In the Compare Documents dialog box, select the original document and the revised document either from the two lists or by using the browse buttons besides the lists.
- Below Comparison settings, turn on check boxes as desired to specify which types of changes you want to be marked in addition to insertions and deletions, if any.
- Below Show changes, select whether to show changes at character level or word level. See the examples in Figure 18 below.
- Below Show changes in, select in which document to show the changes. The default is New document which I recommend in most situations. Then Word creates a new document with the changes, without making any changes in the existing documents.
- Click OK to execute the compare.
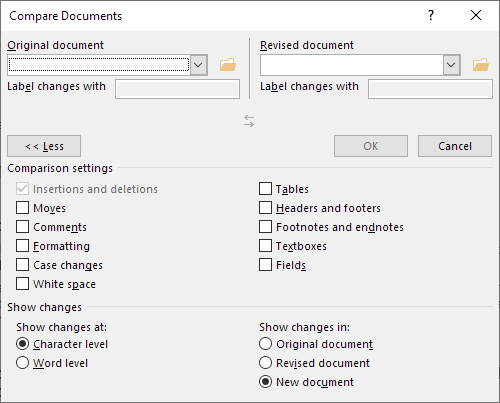
Figure 17. The Compare Documents dialog box with all options shown.
The illustration below shows the difference between selecting Character level and Word level in step 4 above.
- Character level will show changes in individual words by marking as few inserted or deleted characters as possible.
- Word level will show changes in individual words by marking the original word as deleted and the revised word as inserted.

Figure 18. Example of the difference between selecting Character level and Word level in step 4 above.
TIP: The DocTools ExtractChanges Pro add-in lets you – in one operation – compare two versions of a document and extract all changes and comments from the compared version. The DocTools ExtractChanges Pro add-in also lets you do that with multiple documents at a time. You can batch compare one document with several other versions of the same document and extract the changes and comments. Or you can batch compare documents by pairs and extract the changes and comments.
How to merge track changes from two or more documents into one document
If two or more authors have added tracked changes and comments to two or more separate copies of a document, you may want to combine those tracked changes and comments in one document and still preserve the information about who made which change and when.
Word’s Combine feature can be used for that – follow the steps below. However, it only lets you combine two documents at a time. If you want to combine more than two documents, you need to repeat the procedure steps as described in Step 8 below.
To combine two versions of a document and retain existing tracked changes:
- Select Review tab > Compare > Combine to open the Combine Documents dialog box. If you can’t see all options in the dialog box, click the More >> button. See Figure 19 below.
- In the Compare Documents dialog box, select the original document and the revised document either from the two lists or by using the browse buttons besides the lists.
- When you have selected documents, the name defined as your user name will automatically be inserted in the Label unmarked changes with fields. Change the name, if you want. The name will be used to mark any differences between the two document what are not already marked as tracked changes.
- Below Comparison settings, turn on check boxes as desired to specify which types of changes you want to be marked in addition to insertions and deletions, if any.
- Below Show changes, select whether to show changes at character level or word level. See the examples in Figure 18 above.
- Below Show changes in, select in which document to show the changes. The default is New document which I recommend in most situations. Then Word creates a new document with the changes, without making any changes in the existing documents.
- Click OK to execute the combination of tracked changes.
- If you want to combine more documents, repeat Steps 1-7 above. As the original document, you must each time select the combined result from the last Combine operation and as the revised document you must select another edited document. Repeat until you have combined all the edited documents in one document that includes all tracked changes and comments from all the documents.
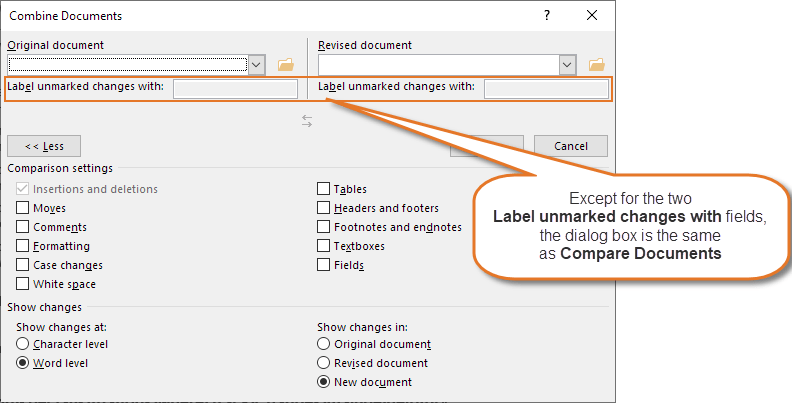
Figure 19. The Combine Documents dialog box. It is almost identical to the Compare Documents dialog box.
About the Advanced Track Changes Options dialog box
To manage the detailed setting for the display of tracked changes, you must use the Advanced Track Changes Options dialog box.
NOTE
Track Moves and Track formatting are document-specific settings that are saved in the document. All other options in the Advanced Track Changes Options dialog box apply to all Word documents.
A new Word document you create will inherit the settings of Track Moves and Track Formatting from the template.
How to open the Advanced Track Changes Options dialog box
To open the Advanced Track Changes Options dialog box:
- Select the Review tab in the Ribbon.
- Click the dialog box launcher in the Tracking group. See Figure 20 below.
This opens the Track Changes Options dialog box. - Click the Advanced Options button to open the Advanced Track Changes Options dialog box. See Figure 22 below.
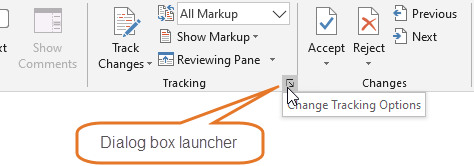
Figure 20. On the Review tab, click the dialog box launcher in the Tracking group to open the Track Changes Options dialog box.
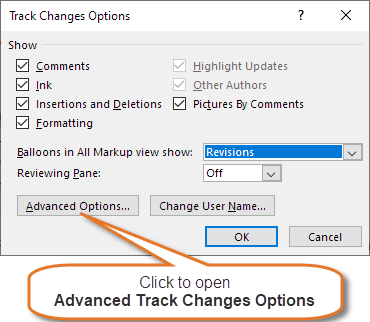
Figure 21. The Track Changes Options dialog box that opens when you click the dialog box launcher in the Tracking group on the Review tab.
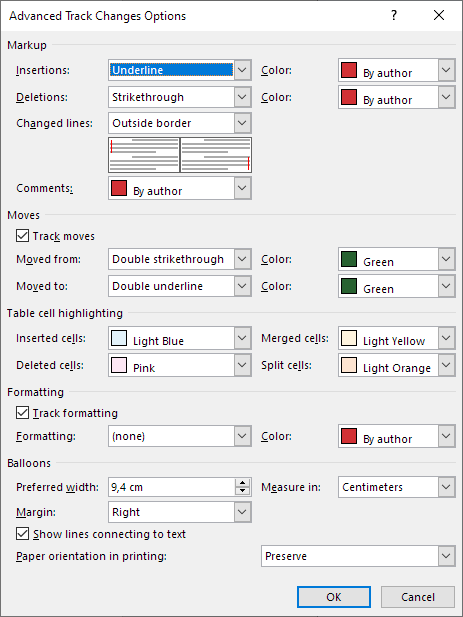
Figure 22. The Advanced Track Changes Options dialog box, here shown with the default settings. All options except Comments and Show lines connecting to text are related to the display of tracked changes. See the descriptions below for details about the options.
Overview of all options in the Advanced Track Changes Options dialog box
These general rules apply to Advanced Track Changes Options:
- You can set a specific type of markup out of function by selecting (none) from the related field.
- The settings only come into play when tracked changes are shown.
- Only the Track Moves and Track Formatting options are document-specific. All the other options apply to all Word documents.
For information about the color options (all fields with a color box), see the explanation and illustration in How to display each author’s changes in a different color above.
TIP
For an easy way to revert the settings in the Advanced Track Changes Options dialog box, you can use the ready-to-use macro found on my Word Macros & Tips website.
The table below shows information about all the options in the Advanced Track Changes Options dialog box. Where two options belong together, they are listed side by side with a +sign between.
|
Option |
Default setting |
What it does |
|
GROUP: Markup |
||
|
Insertions + Color |
Underline + By author |
Defines the formatting and color applied to insertions. If you select (none), no formatting is applied. |
|
Deletions + Color |
Strikethrough + By author |
Defines the formatting and color applied to deletions. If you select (none), no formatting is applied. |
|
Changed lines |
Outside border |
Shows vertical bars in the margin where lines with changes are found in the document. The icon below the option shows the result of the currently selected setting. The vertical bars are red in Simple Markup view and gray in All Markup view. You can switch between the displays by clicking a red/gray bar. If Page Setup > Different odd and even is turned on, Outside border shows the lines in the left side of even pages and right side of odd pages. Otherwise, it shows the lines in the left side. If you select (none), no vertical bars are shown. |
|
Comments |
By author |
Defines the color applied to the text that was commented on (the comment scope) and to other comment marks. |
|
GROUP: Moves |
||
|
Track moves |
Turned on |
When turned on, content you cut and paste will be marked. Document-specific option. |
|
Moved from |
Double strikethrough |
Defines how cut text is formatted when you paste it elsewhere. If you select (none), no formatting is applied. |
|
Moved to |
Double underline |
Defines how pasted text that was cut from elsewhere in the document is formatted. If you select (none), no formatting is applied. |
|
GROUP: Table cell highlighting |
||
|
Inserted cells |
Light blue |
Defines the color of new tables cells you insert. If you select (none), no formatting is applied. |
|
Deleted cells |
Pink |
Defines the color of deleted tables cells. If you select (none), no formatting is applied. |
|
Merged cells |
Light yellow |
Defines the color of cells that have been merged from multiple cells. If you select (none), no formatting is applied. |
|
Split cells |
Light orange |
Defines the color of table cells that have been split. If you select (none), no formatting is applied. |
|
GROUP: Formatting |
||
|
Track formatting |
Turned on |
When turned on, changes to formatting will be marked. Document-specific option. Examples of formatting changes: Apply bold, underline, color, change font, change font size. |
|
Formatting + Color |
(none) + By author |
Defines the formatting and color applied to formatting changes. It seems counter-intuitive to mark formatting changes with further formatting – this may conflict. It seems most relevant to keep the default, (none). |
|
GROUP: Balloons |
||
|
Preferred width |
Inches: 3.7″ |
Default depends on the default unit of measurement. Defines the width of the balloons area. Seems to be measured from the vertical bars showing changed lines and to the edge of the paper, provided the vertical bars are in the same side of the page as the balloons area. |
|
Margin |
Right |
Defines whether balloons are shown in the left or right side of the page. |
|
Show lines connecting to text |
Turned on |
Defines whether comments are connected to the texts that was commented on (the comment scope). |
|
Paper orientation in printing |
Preserve |
Defines the paper orientation in print when printing with tracked changes. Auto adjusts orientation based on content. Preserve keeps the actual orientation of pages. Force landscape prints all pages as landscape when printing with tracked changes. |
Special tips about tracking changes
Tips on special situations where Track Changes may be helpful
Normally, it is relevant to track changes in the reviewing process of a document or when asking others for feedback on a document. For example, tracked changes are used a lot in relation to contract work.
It may also be useful to turn on Track Changes in other situations. For example, you may turn on Track Changes before you make a big change to your document. If you don’t like the result, you can quickly reject the changes.
How to get access to the Accept or Reject Changes dialog box from older versions of Word
Long ago, in Word 2000 and earlier versions, Word had a dialog box that worked well as the control center for accepting or rejecting changes. See the illustration below:
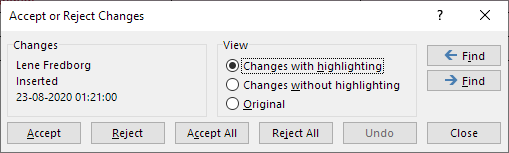
Figure 23. It is still possible to access the old Accept or Reject Changes dialog box. You can assign a keyboard shortcut to the command and/or you can add it to the Quick Access Toolbar (QAT).
The dialog box still works but you can’t access it by default. However, you can easily assign a shortcut to the command or add it to the Quick Access Toolbar (QAT). Follow the instructions below:
- To assign a keyboard shortcut to the Accept or Reject Changes command, follow the general instructions in the Microsoft article Customize keyboard shortcuts. In step 4 in the procedure, select All Commands, in step 5, select ToolsReviewRevisions.
- To add the Accept or Reject Changes to the Quick Access Toolbar (QAT), follow the general instructions in the Microsoft article Customize the Quick Access Toolbar. See the section “Add a command to the Quick Access Toolbar that isn’t on the ribbon”. Select All Commands in the left-most list. The command to find in the list is:
Accept/Reject Changes (ReviewAcceptOrRejectChangeDialog)
About the View options in the Accept or Reject Changes dialog box:
- Changes with highlighting corresponds to selecting Display for review > All Markup.
- Changes without highlighting corresponds to showing Display for review > No Markup.
- Original corresponds to showing Display for review > Original.
- If Display for review > Simple Markup is selected when you open the dialog box, click View option no. 2 or 3 and then click back to option no. 1 to have All Markup displayed.
Balloon settings are found in two places – how are they related?
Some the Track Changes commands and options can be rather confusing. Some are found in more that one place and identical options are not always named identically. This is the case for the Balloons options.
You can set Balloons options in two different places:
- In Review tab > Show Markup > Balloons menu
- In the Track Changes Options dialog box
To open the dialog box, click the dialog box launcher in Review tab > Tracking group. See Figure 20 above.
See the illustrations below:
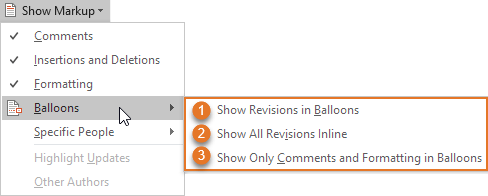
Figure 24. The options marked no. 1, 2, and 3 in the Show Markup > Balloons menu are the same as the options marked no. 1, 2, and 3 in the Track Changes Options dialog box in Figure 25 below.
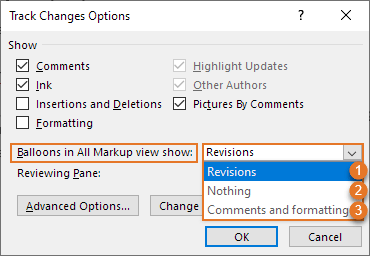
Figure 25. The options marked no. 1, 2, and 3 in the Balloons in All Markup view show list in the Track Changes Options dialog box are the same as the options marked no. 1, 2, and 3 in the Show Markup > Balloons menu in Figure 24 above.
If you select one of the options marked no. 1, 2, and 3 in Figure 24, the corresponding option marked no. 1, 2, or 3 in Figure 25 will automatically be selected and vice versa.
Security issues in relation to Track Changes
Make sure that you don’t email or publish Word documents that include tracked changes (or comments) that are not meant to be seen by others.
You can reduce the risk of revealing tracked changes unintentionally if you take the precautions described below.
How to avoid sending Word documents to others with tracked changes that should not be shared
There are many examples out there about Word documents that have been distributed to others or published with tracked changes that were indeed not meant to be seen be others.
IMPORTANT
Be careful not to distribute Word documents containing tracked changes unless the receiver needs to see the changes.
It is the Track Changes settings on the individual Word user’s computer that determine how that user sees tracked changes. Your own settings only apply to what you see on your computer.
Remember that tracked changes remain in the document until they are accepted or rejected. Even if you hide tracked changes, they are still in the document. This means that they can easily be turned on by another user who opens your document.
To make sure that you are automatically warned before printing, saving, or sending a Word document to somebody else:
- Select File > Options > Trust Center.
- Click the Trust Center Settings button to open the Trust Center dialog box.
- Click Privacy Options.
- Turn on the options:
Warn before printing, saving, or sending a file that contains tracked changes or comments
Make hidden markup visible when opening or saving - Click OK to close the dialog boxes.
See Figure 26A below. When these options are on, you are warned so you can take your precautions before you continue.
If you save often (which I recommend), you may not want to turn on the option Warn before printing, saving, or sending a file that contains tracked changes or comments since a message will open, warning you each time you save a document that includes tracked changes or comment (see Figure 26B below). You may find that too annoying.
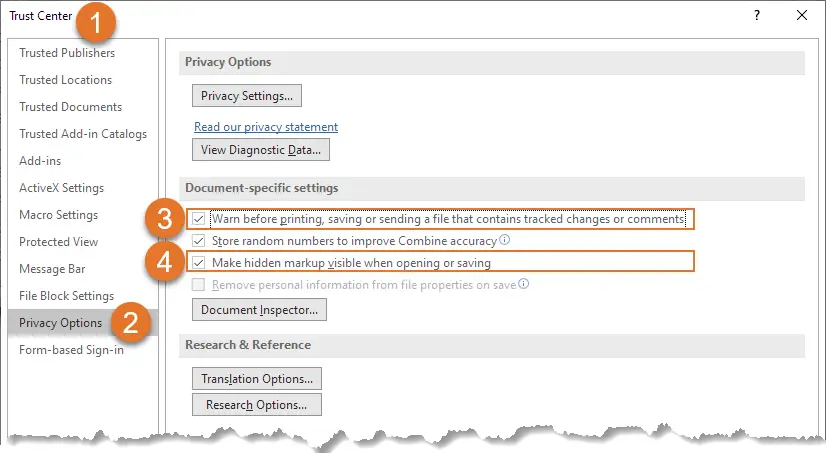
Figure 26A. Trust Center settings that can help you avoid problems with tracked changes that are distributed to others unintentionally. See also Figure 26B below.

Figure 26B. The warning that appears when saving if Warn before printing, saving, or sending a file that contains tracked changes or comments is turned on. The text in the message varies depending on the types of revisions found in the document.
How to lock tracking so Track Changes can’t be turned off
Word lets you lock Track Changes so it can’t be turned off. This way, you can make sure that the document will be shown with tracked changes and that users can’t accept or reject existing changes. User’s can only add new changes.
To lock tracking, select Review tab > click the arrow below the Track Changes icon > select Lock Tracking > enter a password > Click OK.
The Lock Tracking icon is highlighted when tracking is locked.
To unlock tracking, select the Lock Tracking command again > enter the password > click OK.
Other operations and commands, in addition to Track Changes, Accept, and Reject, may be unavailable or disabled in a document when tracking is locked.
How to find out whether there are tracked changes in your document
METHOD 1 – Try to click Previous or Next on the Review tab
To easily find out whether there are any tracked changes (or comments – another type of revision) in your document, select the Review tab and click Previous or Next in the Changes group. The message below is shown if no comments or tracked changes are found in the document.
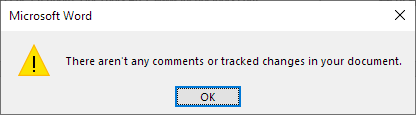
Figure 27. This message is shown if you click Previous or Next and if no comments or tracked changes are found in the document.
If revisions are found, Word will instead move to the previous or next revision.
METHOD 2 – Use Document Inspector
Note that this method may remove more data from your document than you like and it is not always totally clear what Word does.
If you use the tools on the Review tab with care and are aware of the importance of accepting or rejecting changes before you distribute documents to people who shouldn’t see the changes, you should be safe.
Personally, I never use Document Inspector to remove information.
- Select File > Info > Inspect Document > Check for Issues > Inspect Document.
- In the Document Inspector dialog box, make sure the option Comments, Revisions, and Versions is selected.
- Click Inspect.
- If comments and/or tracked changes are found, a dialog box lets you click Remove All. If you do so, Word will accept all tracked changes and remove all comments.
Note that Word doesn’t tell but “Remove All” means “Accept” in relation to tracked changes.
- Click Close.
For more details, see the Microsoft article Remove hidden data and personal information by inspecting documents, presentations, or workbooks.
How to make sure that Word always displays tracked changes when you open a document
To make sure that Word always displays tracked changes when you open a document, turn on the Trust Center setting Make hidden markup visible when opening or saving. For details, see How to avoid sending Word documents to others with tracked changes that should not be shared above.
IMPORTANT
The fact that traced changes are shown doesn’t mean that Word tracks changes when you start editing the document. To do that, you must make sure to turn on Track Changes.
How to make sure that Word warns you before emailing a document that contains tracked changes
To make sure that Word shows a warning if you attempt to email a document with tracked changes, turn on the Trust Center setting Warn before printing, saving, or sending a file that contains tracked changes or comments. For details, see How to avoid sending Word documents to others with tracked changes that should not be shared above.
I want to send my document outside the company – I want to leave tracked changes in the document, but I don’t want anyone to see who made the tracked changes or when they were made – how can I do that?
To neutralize tracked changes both as regards author names and time information, you can use the Document Inspector.
NOTE
This method may have undesired side-effects. See the CAUTIONS below.
- Select File > Info > Inspect Document > Check for Issues > Inspect Document.
- In the Document Inspector dialog box, make sure the following option is selected:
Document Properties and Personal Information
(You can leave other options checked as well – the first step will not make any changes to the document but only inspect it). - Click Inspect.
- A new dialog opens. A Remove All button is shown next to Document Properties and Personal Information. If you click the Remove All button, the name “Author” will be assigned to all tracked changes in the active document instead of the current author name(s). In addition, date and time will be removed from tracked changes.
- Click Close.
CAUTION 1
The Remove All button for Document Properties and Personal Information turns ON the Trust Center option Remove personal information from file properties on save for the document.
This means that the removal of name and properties will continue to take place also each time you save the document. That is most likely not what you want. To prevent this setting from being saved in the document, select File > Info again and click the text Allow this information to be saved in your file (shown below Inspect Document) to turn off the setting – the text you clicked disappears and the setting has now been turned off (not very intuitive, in my opinion…).
You can also turn off the setting via Trust Center: Select File > Options > Trust Center > Trust Center Settings > Privacy Options and remove the check mark from Remove personal information from file properties on save.
CAUTION 2
The Remove All button also removes all custom document properties and clears all data from built-in properties. If you have DocProperty fields in the document, they will show errors unless you have locked or unlinked the fields first.
For more details about the Document Inspector, see the Microsoft article Remove hidden data and personal information by inspecting documents, presentations, or workbooks.
What other kinds of hidden information might be saved in my Word document?
Your Word documents might contain various kinds of hidden information that could compromise your security or reveal information that you don’t want to share. The term metadata (that is, data about the data) is used to refer to this kind of information.
For details about how to reduce or remove different types of metadata from your documents, see the Microsoft article Remove hidden data and personal information by inspecting documents, presentations, or workbooks.
Troubleshooting in relation to Track Changes
PROBLEM 1 – I have turned on Track Changes but I don’t see any changes
- CHECK 1 – Make sure that you have selected either Simple Markup or All Markup in the Display for Review menu on the Review tab in the Ribbon.
If you still can’t see any changes:
- CHECK 2 – Make sure at least one of the following options in the Show Markup menu is checked: Insertions and Deletions, Formatting.
If you still can’t see any changes:
- CHECK 3 – Open the Advanced Track Changes Options dialog box and check the settings. If a setting is set to (none), that setting is put out of action.
If you still can’t see any changes:
- CHECK 4 – The reason may be that the document contains no tracked changes. To easily find out, click Previous or Next in the Changes group on the Review tab. The message below is shown if you click Previous or Next and if no comments or tracked changes are found in the document.
Figure 28. This message is shown when you click Previous or Next if there are no comments or tracked changes in the document.
PROBLEM 2 – I have turned on balloons but no balloons are shown
Make sure that you have selected All Markup in the Display for Review menu on the Review tab in the Ribbon. Balloons are only shown in All Markup view.
Also, Balloons can only be shown in Print Layout view and Web Layout view.
TIP
You can switch from Simple Markup to All Markup display by clicking a red vertical line in the margin.
PROBLEM 3 – No screen tips are shown when I hover the mouse over a tracked change
- Check that Review tab > Display for Review > All Markup is selected.
- Check that screen tips are set to be shown. To show screen tips on hover, turn on File > Options > Display > Show document tooltips on hover.
PROBLEM 4 – Why are Accept All Changes Shown and Reject All Changes Shown disabled?
In the Accept and Reject menus, the commands Accept All Changes Shown and Reject All Changes Shown are disabled if comments and all types of tracked changes by all people are already selected to be shown. The commands are only enabled if not all comments and tracked changes are selected to be shown.
If, for example, you turn off display of Formatting changes, the commands will be enabled. The commands will also be enabled if Review tab > Show Markup > Specific People isn’t set to All Reviewers.
PROBLEM 5 – I want to define which color to use for each author – how can I do that?
You can’t define which color is used for which author. Word allocates the colors. See How to define which color to use for each author – you can’t above.
PROBLEM 6 – Other users don’t see the same colors used for the individual authors as I do – how can we be sure to see the same colors?
You can’t define which color is used for which author. Word allocates the colors. See How to define which color to use for each author – you can’t above.
PROBLEM 7 – When I use Track Changes, many fields appear as both deleted and inserted – how do I fix that?
A Word document can include many types of fields. Fields include instruction to Word about which content to show. Examples of fields are tables of contents (TOC), numbers in captions, DocProperty fields that show values of custom document properties.
If tracked changes are shown, and if the All Markup display option is selected, you may see many fields twice, both as deleted and inserted. This happens for fields whose results are affected by tracked changes. This influences the layout and it may look confusing. However, Word will fix the fields as soon as you accept or reject the changes and update fields (Ctrl+A to select all, F9 to update fields).
PROBLEM 8 – When I use Track Changes, the automatic numbering of headings and lists look wrong – how do I fix that?
If you view tracked changes inline and if you have added or deleted numbered items, Word will show changes to all numbers that are affected by the changes. This may influence the layout and it may look confusing. However, Word will fix the numbering as soon as you accept or reject the changes. See the example below.
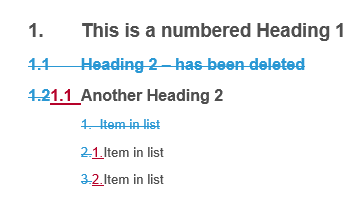
Figure 29. Example of automatic numbering with tracked changes.
PROBLEM 9 – When I open a document, Word automatically shows tracked changes – why?
Word automatically opens with tracked changes displayed if the Trust Center setting Make hidden markup visible when opening or saving is turned on. See How to avoid sending Word documents to others with tracked changes that should not be shared above.
You may turn off the setting. However, having it turned on helps you avoid security issues.
PROBLEM 10 – How can I determine how other users see tracked changes when I share my documents?
It is the Track Changes settings on the individual Word user’s computer that determine how that user sees tracked changes. Your own settings only apply to what you see on your computer.
For more details, see How to make sure that other users see tracked changes in the same way as you do above.
PROBLEM 11 – The Track Changes, Accept, and Reject commands are disabled – how can I fix that?
The problem is most likely that track changes has been locked with a password. Only users who know the password can unlock tracking. See How to lock tracking so Track Changes can’t be turned off above.
PROBLEM 12 – How to get rid of track changes in Word?
To get rid of track changes in Word, you need to remove the changes by accepting or rejecting them. See How to remove tracked changes in Word above.
PROBLEM 13 – I can’t change the user name – how to fix that?
If you can’t change the user name as described in How to change the name shown in new tracked changes you make above, the problem is most likely that your IT department has locked the user name via Group Policy. You may contact the relevant people to find out whether you will be allowed to change the name.
PROBLEM 14 – The author names of tracked changes and comments keep changing to “Author” – why does this happen and how to fix it?
If you use Word’s Inspect Document feature to remove Document Properties and Personal Information from a document, Word remembers this in that specific document by automatically turning ON the Trust Center option Remove personal information from file properties on save for that document.
As long as the Remove personal information from file properties on save option is turned ON, Word will continue to run the removal procedure each time you save the document. As a result, the author name (and date) of every tracked change and comment in the document will change to «Author» each time you save.
To prevent Word from changing the author name to «Author», you must turn OFF the Remove personal information from file properties on save option. Note that any tracked change and comment that has already been changed to show «Author» will not be changed back to show the original author name, but Word will stop changing the author name of new tracked changes and comments. To turn off the option, use one of the following two methods:
METHOD 1: Stop changing to «Author» via File > Inspect Document
Select File > Info > click the text Allow this information to be saved in your file (shown below Inspect Document) to turn off the setting – the text you clicked disappears and the setting has now been turned off (as also mentioned in “CAUTION 1” above, this is not very intuitive). See the illustration below.

Figure 30. How to turn off Remove personal information from file properties on save via Inspect Document. To close the Backstage view, press the Esc key or click the circled arrow in the top-left corner of the window.
METHOD 2: Stop changing to «Author» via Trust Center > Privacy Options
Select File > Options > Trust Center > Trust Center Settings > Privacy Options and remove the check mark from Remove personal information from file properties on save. See the illustration below.

Figure 31. How to turn off Remove personal information from file properties on save via Trust Center.
PROBLEM 15 – How to merge Word documents with comments and track changes?
If different authors have added tracked changed and comments in separate copies of a Word document, you may want to merge all those documents into one document. You can do that using Word’s Combine feature as explained in this step-by-step-procedure.
PROBLEM 16 – The Advanced Track Changes Options dialog box is smaller than normal and is missing the group headings – how to fix that?
I experienced some time ago that the Advanced Track Changes Options dialog box looked too small. I found out that it was missing the headings that are normally used to group the options.
The dialog box has a lot of options. For any user who is not familiar with all the options, the missing group headings would make it really difficult or impossible to find out what the individual options refer to.
The problem with the missing headings in the dialog box seemed to appear randomly. Sometimes the headings were there, sometimes not.
I reported the problem to Microsoft. The answer from Microsoft, after some troubleshooting, was that this specific dialog box has a minimum vertical resolution requirement. This means that the headings will not be shown if the screen resolution is below a certain level.
Even if my screen resolution was more than sufficient to allow the headings to be shown, they sometimes were not shown. I found out that zooming up in Word was what made the headings in the dialog box disappear even if zooming has nothing to do with the size of the dialog box or the screen resolution. Zooming above a certain percentage (131 % on one monitor, 151 % on another monitor) made the headings in the dialog box disappear. Microsoft is not going to fix this problem.
If you run into the problem with disappearing headings in the Advanced Track Changes Options dialog box, the solution is the following:
- Close the Advanced Track Changes Options dialog box.
- Zoom down in Word.
- Open the Advanced Track Changes Options dialog box again.
- If the headings still don’t appear, repeat the steps above.
The illustration below shows how the dialog box looks when the group headings are missing:

Figure 32. The Advanced Track Changes Options dialog box is missing headings due to too high zoom in Word. The headings Markup, Moves, Table cell highlighting, Formatting, and Balloons are missing here. You can compare it to Figure 22 above.
Acknowledgment
Thanks to Shauna Kelly who wrote an article about Track changes, covering Word 2010 and earlier versions. Shauna’s article has been visited by thousands of Word users. It is still visited many times a day. However, since that article was written and last revised when Word 2010 was the newest version of Word, it does not cover all the changes that have been made to the features since then.
This article is written in recognition of Shauna Kelly’s work. It covers all the areas that Shauna covered in her article, however updated to match newer versions of Word. This article also covers all the new and changed Track Changes features added after Word 2010.
Related information
My Word Add-ins DocTools ExtractData and DocTools ExtractChanges Pro both let you extract tracked changes from Word documents. See a comparison of the two add-ins.
For detailed information about how comments in Word work, see my article How comments in Word work.
For a ready-to-use macro to revert the settings in the Advanced Track Changes Options dialog box to default plus several VBA code snippets for handling track changes, see this article on my Word Macros & Tips website.
This article has explained how Track Changes in Word works. I hope this article helps you in your future work with tracked changes in Word.
This tutorial shows how to use Track Changes in Microsoft Word. Track Changes helps us edit documents by tracking insertions, deletions, replacements, and format changes. Word calls these edits markups.
This tutorial also includes an overview of Word’s new Modern comment tool.
We will cover twelve topics:
- How to Turn Track Changes On and Off
- How to Show and Hide Track Changes
- How to Delete Text with Track Changes
- How to Insert Text with Track Changes
- How to Replace Text with Track Changes
- How to Change Formatting with Track Changes
- How to Accept or Reject Track Changes
- How to Insert Comments
- How to Reply to Comments
- How to Resolve Comments
- How to Delete Comments
- How to Open and Close the Reviewing Pane
Watch all the steps shown here in real time!
Explore more than 200 writing-related software tutorials on my YouTube channel.
Let’s dive in…
How to Turn Track Changes On and Off
- Select the Review tab in the ribbon.

- Select the Track Changes button in the Tracking group. The button will appear darker than the rest of the ribbon when Track Changes is turned on.

- Select the Track Changes button (see figure 2) again to turn off tracking.
How to Show and Hide Track Changes
You can control how comments and edits appear by using the Display for Review and Show Markup menus in the Tracking group in the ribbon.
- Select the Display for Review drop-down menu to choose how edits and comments are displayed. The options are (A) Simple Markup, (B) All Markup, (C) No Markup, and (D) Original.

(A) Simple Markup displays the edited version of the document without visible in-line edits. However, edits are indicated by a vertical line in the left margin.
For example, if you delete a sentence, that sentence won’t appear on screen. Instead, a vertical line will appear in the left margin showing that a change was made in that location.
If you want to see the edit, select the vertical line to switch to All Markup.

Comments will be visible on the right side of the screen when in Simple Markup.
(B) All Markup displays all edits and comments.
A vertical line, like the one shown in Simple Markup (see figure 4), will appear on the left side of the screen indicating that a change was made in that location.
Select that line to switch to Simple Markup.
(C) No Markup displays the edited version of the document without any visible edits or comments.
(D) Original displays the original version of the document without any edits or comments.
- Select the Show Markup drop-down menu to choose what features Track Changes displays. (Note that this menu is called Markup Options in Word for Mac.)
I recommend showing markups for Insertions and Deletions and Formatting as well as choosing Show Only Formatting in Balloons so that your insertions and deletions will appear in the text and formatting changes will appear next to the text.

Be default, comments will appear in balloons on the right side of the text.
Important note: The remaining sections show Track Changes in the All Markup view.
How to Delete Text with Track Changes
- Select the text you want to delete.
- Select the Delete key on your keyboard. The deleted text will appear with a strikethrough in the All Markup view.

How to Insert Text with Track Changes
- Place your cursor where you want to insert new text.
- Type the new text. The insertion will appear with an underline in the All Markup view.

How to Replace Text with Track Changes
- Select the text you want to replace.
- Type the replacement text. The original text will appear with a strikethrough, and the replacement text will appear with an underline in the All Markup view.

How to Change Formatting with Track Changes
Formatting includes the font style, font size, font color, italics, bold font, underlining, superscripting and subscripting, indentations, alignment, and margins.
- Select the text you want to reformat.
- Change the format. Track Changes will automatically display the change with your other markup if you have selected formatting in the Show Markup section of the Tracking group.

How to Accept or Reject Track Changes
Edits created with Track Changes must be accepted before they become part of your document. You can accept or reject edits individually or all at once.
Accept or Reject Edits Individually
- Click on or select the insertion, deletion, or replacement text.
- Select the Accept or Reject button in the Changes group.

Pro Tip: Use the Previous and Next buttons to navigate through all the edits in the document.

Accept or Reject All Edits
Unless you are very confident in your reviewers’ expertise, I strongly caution against accepting or rejecting all edits without first checking the accuracy of each one.
- Select the Accept or Reject menu arrow in the Changes group.
- Select your preferred option: Accept/Reject All Changes or Accept/Reject All Changes and Stop Tracking.

This section covers the basics of using comments in Word. For a more in-depth look, please see my previous tutorial “How to Use Comments in Microsoft Word (Modern Comments).”
You can use the Comment tool with Track Changes turned on or turned off.
- Place your cursor near the text you want to comment on or select the text.
- Select the Review tab in the ribbon (see figure 1).
- Select the New Comment button in the Comments group.

- Type your comment into the comment text box on the right side of the screen.
If you are part of an organization, you may be able to @ mention other users in your comments.
- Select the Post button or type the keyboard shortcut Ctrl + Enter (PC) or Command + Return (Mac) to post the comment.

- If you need to edit your comment, select the Edit button (PC users see figure 15; Mac users see figure 16).


- Type your reply into the Reply text box in the other person’s comment.
- Select the Post button or type the keyboard shortcut Ctrl + Enter (PC) or Command + Return (Mac) to post the reply.

You can mark a comment as “Resolved” to tell other people (or remind yourself) that an issue has been taken care of. However, you can also reopen a resolved comment, thereby turning it back to a regular comment.
- Select the three-dot menu in the comment.
- Select Resolve thread from the drop-down menu.

The comment will no longer be visible in the contextual view on the right side of the screen.
How to Reopen Resolved Comments
- Select the Review tab (see figure 1).
- Select the Show Comments menu arrow.
- Select List from the drop-down menu.

- Select the Reopen button in the comment.

Here are two ways to delete comments.
Method 1: Select the three-dot menu in the comment and then select Delete thread from the drop-down menu.

Method 2: Place your cursor in the comment or the text connected to the comment and then select the Delete menu arrow in the Review tab.
From there, choose Delete to delete the current comment, or Delete All Comments Shown, Delete All Comments in Document, or Delete All Resolved Comments (PC only).

How to Open and Close the Reviewing Pane
The Reviewing Pane (labeled Revisions) shows all the comments and edits selected in the Show Markup drop-down menu in the Tracking group in the ribbon, along with the total number of those comments and markups in the document.
The Reviewing Pane isn’t necessary for using Track Changes, but it can be helpful when you need to find a specific edit or want to see how many edits or comments are in the document.
- Select the Review tab (see figure 1).
- Select the Reviewing Pane button in the Tracking group.
The Reviewing Pane will appear, normally on the left side of your screen.

- Reselect the Reviewing Pane button to close the Reviewing Pane.
Related Resources
How to Copy and Paste Text with Comments and Track Changes in Word
How to Remove User Names from Existing Track Changes in Microsoft Word
How to Change Your User Name for Track Changes in Microsoft Word
How to Stop Microsoft Word from Calling You “Author” in Track Changes
How to Change the Color of Track Changes in Microsoft Word
Updated January 16, 2023

If you collaborate with team members on projects, the Track Changes feature in Word 2016 is essential, and now more powerful. Here’s how it works.
If you collaborate with team members on projects or mark up contracts with redlines, tracking changes in Microsoft Word can be a lifesaver! Track Changes is a built-in feature in Microsoft Word which truly brings sanity to the process. Even if you are not working on complex projects such as acquisitions, mergers, contracts, or authoring a best seller – Track Changes can be just as useful for small group projects, such as school assignments.
Since we last covered this feature in Microsoft Word 2010, significant improvements make Track Changes even more powerful. With the availability of Office Online, users can perform real-time collaboration on a document, which is one of the exciting new features we look at in this article.
Enable and Use Track Changes in Word 2016
Step 1: Starting Content
You will need to start with some content within the document you are collaborating on. A different user is writing this part of the document. I wrote the first paragraph.

Step 2: Enable Track Changes
To start tracking changes, go to the Review tab and click Track Changes in the Tracking group (you can also press CTRL + SHIFT + E.)
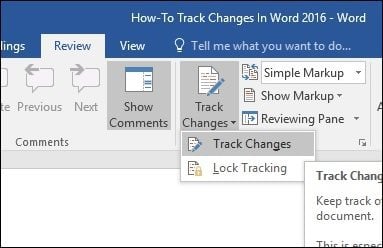
When Track Changes is enabled, you will see a balloon for each author on the screen’s right-hand side.
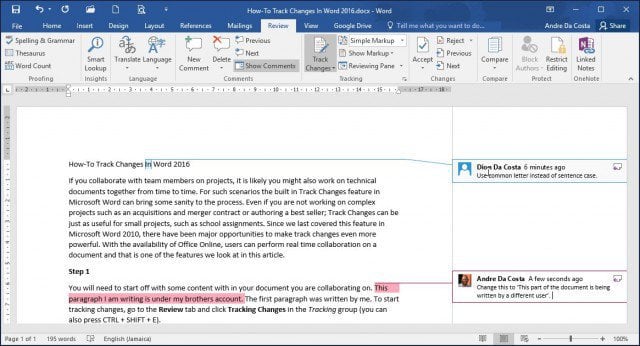
Step 3: Editing
Track Changes in Word uses color coordination to avoid confusion. The first author is blue, and the second is red. When additional authors make edits, they will also be assigned a unique color.

When edits are made to the document, a vertical line appears next to the paragraph to indicate the changes that have been made to the document. Notice the first paragraph does not have this because Track Changes was not enabled until further into the document. When you click the Show Track Changes bar, it immediately activates a highlight of all the edits made to the document and their commentary. If you keep it enabled and make edits, you will see the changes in real-time as you type and delete.
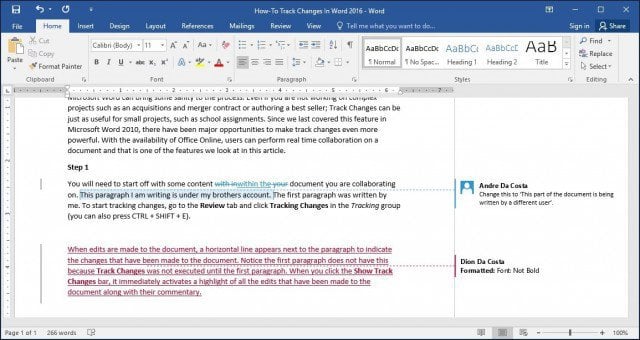
Step 4: Comments, Balloons & Additional Editing Tools
If you want to add a comment on a word or paragraph, highlight it, select the Review tab and click New Comment in the Comments group. Your comments will then appear on the right side of the document when the document is finalized; you can turn them off.
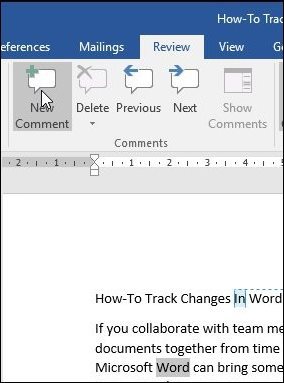
One of the things you’ll notice when you apply special formattings such as Bold, Italic, or Underline, a comment is automatically added to the track changes called Formatted.

You can also customize how you want balloons to appear on the document. For instance, if you want to see all the revisions added to the document by each author, click the Review tab > Show Markup menu > Balloons > Show revisions in balloons.
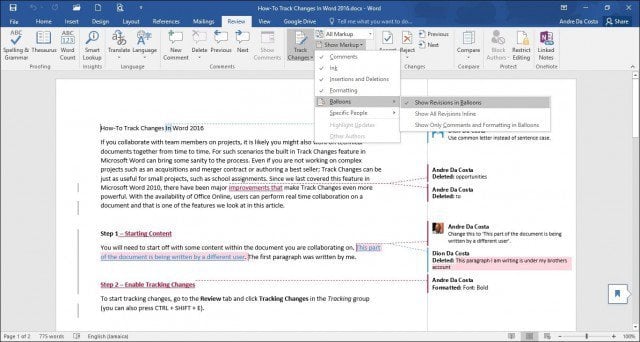
Revisions
The Reviewing Pane (Review > Reviewing pane) lets you review all edits by each author, which you can view vertically or horizontally on the screen. You can click a word or paragraph in the Revisions pane, and it will automatically navigate to that part of the document.

Step 5: Accept or Reject Changes made to document
If you agree with the changes that have been made to the document, you can Accept or Reject them. Click the Show Track Changes bar to highlight changes made by the other author, then go to the Review tab, click the Accept button to confirm.

You’ll now notice the changes are applied immediately.

Step 6: Compare Or Combine Documents
Another handy feature authors can take advantage of is the ability to version track a document. For instance, if two authors fork the same documents into two copies and continue working on them separately, they can later compare the two versions and combine them. As long as they are similar in structure, you can combine them to create a final document.
To compare and combine changes, select the Review tab, click Compare, select the original document in the field box, select the revised version, and then click OK.

Microsoft Word will then present a three-pane view of the document showing the main screen as the final document with combined content and the original and alternate copies in a mini window pane. When you scroll through, you can compare the changes. This is preferably done on a screen with enough screen resolution.

When you are ready to combine the documents into a final copy, go back to the Review tab, click Compare, then click Combine, select the original document in the field box, select the revised version, and then click OK.

You will then see the combined document along with the changes made by other authors in another color.

Integration with Office Online
One of the killer features of Google Apps has been its real-time collaboration tools. Microsoft has finally caught up thanks to its Office Online suite, which features a web-based version of Word. A new feature in Word 2016 is sharing and viewing who is working on your document. To do that, click the Share button and save the document to your OneDrive folder.
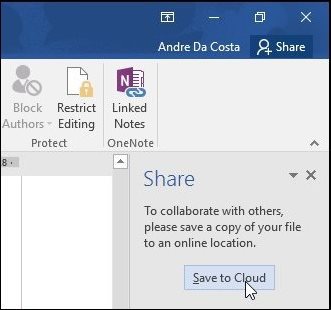
The Share pane will then reveal additional options, with the ability to invite persons to edit the document with different restrictions. You will also notice the Block Authors and Restrict options are now enabled within the Protect group. If you use Microsoft 365 (formerly O365) in an enterprise setting, you can invite authors to collaborate.

For this article, I will use the Get a sharing link to email to additional authors I would like to collaborate with on the document.

When you or the other author load Word Online and make changes, other persons collaborating on the document will be notified in real-time.
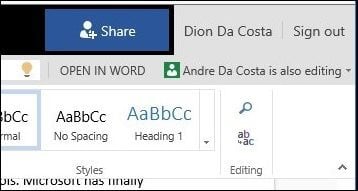
Here you can see saved edits made by the other author are color-coded in a blue highlight.

When an author is no longer editing the document, you will be notified within Word 2016.
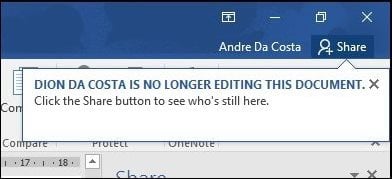
As you can see, Track Changes is even more powerful with its real-time collaboration features. Whether you are working on projects big or small, Word 2016 can make it easy to keep everyone on the same page. Color coordination, sharing, real-time editing, and cloud integration with OneDrive add up to a compelling experience.
![]()