
Use Find and Replace to Change Formatting in Microsoft Word Documents
by Avantix Learning Team | Updated May 13, 2022
Applies to: Microsoft® Word® 2013, 2016, 2019, 2021 or 365 (Windows)
You can find and replace formatting in Word by searching for specific formatting, such as bold or italic, and changing it to other formats. You or even search for text with specific formatting and change the text and the formats. With Find and Replace, you can search for and change both character and paragraph formatting.
You may want to use Find and Replace in the following scenarios:
- You want to remove character formatting throughout your document such as every instance of bold. Character formatting includes any formatting in the Font group on the Home tab in the Ribbon or in the Font dialog box.
- You want to change every instance of one font and change it to another font.
- You want to find every instance of blue and change it to green.
- You want to format specific text with consistent formatting. For example, you want to format every instance of your company name in bold and blue.
- You want to find and change paragraph formatting. For example, for every paragraph that is aligned to the right with single line spacing, you’d like to align to the left and change the line spacing.
Note: The better way to handle global formatting changes is to use styles but if you haven’t used styles, Find and Replace provides a fast way to make changes throughout your document. You can even use Find and Replace to change styles.
Recommended article: How to Find and Replace in Word (and Use Wildcards)
Do you want to learn more about Microsoft Word? Check out our virtual classroom or in-person Word courses >
Note: Screenshots in this article are from Word 365 but are similar in previous versions of Word.
The Replace command appears on the Home tab in the Ribbon in the Editing group:

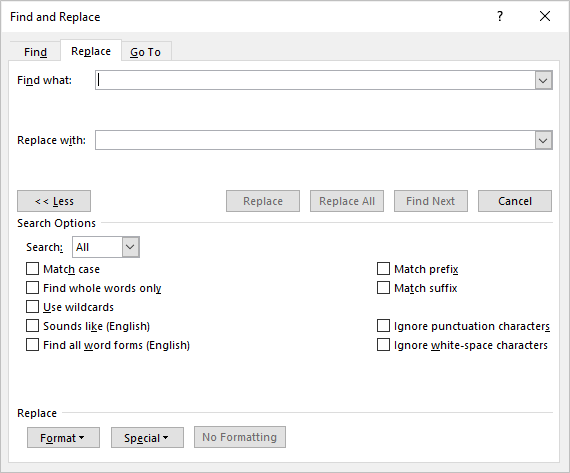
If you want to perform advanced Find and Replace tasks, you will need to display the expanded Find and Replace dialog box by clicking More:
When you run through a Find and Replace task, if you’re not satisfied with the results after you close the dialog box, press Ctrl + Z to undo and try it again.
Find and Replace character formatting
If you want to search for character formatting only, such as bold or italic, you can use Find and Replace.
If you want to find and replace specific character formatting (such as replacing italic with bold), you may have to run through the find and replace process more than once.
To find and replace character formatting in a Word document:
- Position the cursor at the beginning of the document.
- Click the Home tab in the Ribbon.
- In the Editing group, click Replace to display the Replace dialog box. Alternatively, press Ctrl + H to display the Replace dialog box.
- Click More if necessary to display the expanded Find and Replace options.
- Click in the Find what box.
- Click Format at the bottom of the dialog box. A drop-down menu appears.
- Select Font. A dialog box appears.
- Select the format(s) you want to find (such as Italic in the Font Style area).
- Click OK.
- Click in the Replace with box.
- Click Format and then select Font.
- Select the format you want to use as a replacement (such as Bold in the Font Style area).
- Click OK.
- Click Find Next and then click Replace for each occurrence or click Replace All. If you are trying to replace italic with bold, this would add bold and keep the italic.
- If you now want to remove the italic, ensure Italic appears below Find What.
- Click in the Replace with box.
- Click the arrow beside Format and then select Font.
- In the Font Style area, click No Italic.
- Click OK.
- Click Find Next and then click Replace for each occurrence or click Replace All.
- Click Close.
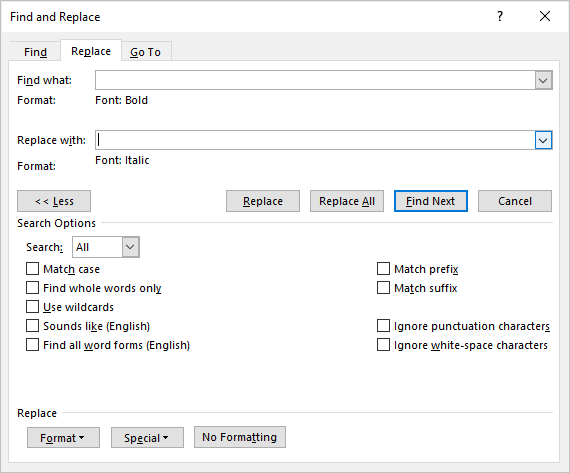
In the following example, the Find and Replace dialog box is used to find text in bold and would add italic:
If you want to find and replace a font, that should require only one find and replace task. If you want to find and remove a font color, you can find a font color (such as blue) and replace it with a font color of Automatic.
Remove character formatting using Find and Replace
To remove character formatting using Find and Replace in a Word document:
Position the cursor at the beginning of the document.
- Click the Home tab in the Ribbon.
- In the Editing group, click Replace to display the Replace dialog box. Alternatively, press Ctrl + H to display the Replace dialog box.
- Click More if necessary to display the expanded Find and Replace options.
- Click in the Find what box.
- Click Format at the bottom of the dialog box. A drop-down menu appears.
- Select Font. A dialog box appears.
- Select the format(s) you want to find.
- Click OK.
- Click in the Replace with box.
- Click Format and select Font.
- Select Regular in the Font Style area and turn off any other formatting.
- Click OK.
- Click Find Next and then click Replace for each occurrence or click Replace All.
- Click Close.
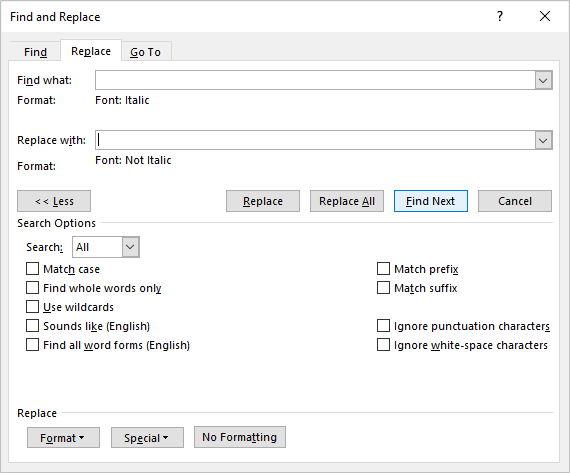
In the following example, Find and Replace is used to find text formatted in italic and remove it:
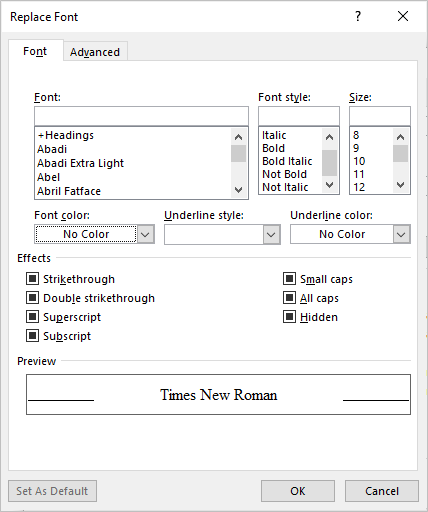
The Replace Font dialog box includes options like Not Bold, Not Italic and Regular to remove formatting (the filled check boxes that appear are left as is):
Clear Find and Replace formatting from previous searches
If you have performed a previous find and replace with formatting, you’ll want to remove those options if you want to perform another search.
To remove previous formatting in the Find and Replace dialog box:
- Click the Home tab in the Ribbon.
- In the Editing group, click Replace to display the Replace dialog box. Alternatively, press Ctrl + H to display the Replace dialog box.
- Click More if necessary to display the expanded Find and Replace options.
- Click in the Find What box.
- Click No Formatting at the bottom of dialog box.
- Click in the Replace With box.
- Click No Formatting at the bottom of dialog box.
- Continue with your next Find and Replace task.
Find and Replace paragraph formatting
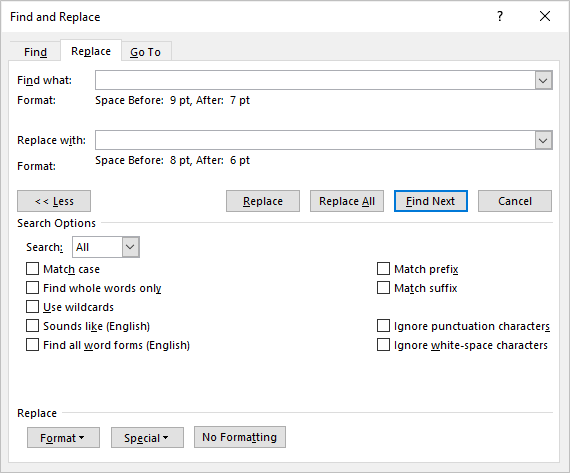
You can also use Find and Replace to change paragraph formatting. For example, you may want to find every instance of a paragraph with a space before of 9 pt and a space after of 7 pt and change it to a space before of 8 pt and a space after of 6 pt. As mentioned above, this type of formatting can be included in styles.
To change paragraph formatting using Find and Replace in a Word document:
- Position the cursor at the beginning of the document.
- Click the Home tab in the Ribbon.
- In the Editing group, click Replace to display the Replace dialog box. Alternatively, press Ctrl + H to display the Replace dialog box.
- Click More if necessary to display the expanded Find and Replace options.
- Click in the Find what box.
- Click Format at the bottom of the dialog box. A drop-down menu appears.
- Select Paragraph. A dialog box appears.
- Select the format(s) you want to find. You can also enter specific amounts in this dialog box (such as 9 pt before). Paragraph formatting includes alignment, indents, line spacing and space before and after.
- Click OK.
- Click in the Replace with box.
- Click Format and then select Paragraph.
- Select the format(s) you want to use as replacements. You can also enter specific amounts in this dialog box (such as 8 pt before).
- Click OK.
- Click Find Next and then click Replace for each occurrence or click Replace All.
- Click Close.
In the example below, Find and Replace will search for any paragraphs with a space before of 9 and a space after of 7 and then replace it with a space before of 8 and space after of 6.
Find and Replace Text with Formatting
You can also enter text in the Find what and Replace with boxes if you want to find text with specific formatting and replace it.
Subscribe to get more articles like this one
Did you find this article helpful? If you would like to receive new articles, JOIN our email list.
More resources
How to Add Page Numbers in Word (Step by Step)
How to View Document Statistics in Microsoft Word
How to Update All Figure Numbers in Microsoft Word
How to Check Word Count in Microsoft Word (4 Ways)
How to Superscript or Subscript in Word (with Shortcuts)
Related courses
Microsoft Word: Intermediate / Advanced
Microsoft Word: Designing Dynamic Word Documents Using Fields
Microsoft Word: Long Documents Master Class
Microsoft Word: Accessible Word Documents
Microsoft Excel: Intermediate / Advanced
Microsoft PowerPoint: Intermediate / Advanced
VIEW MORE COURSES >
Our instructor-led courses are delivered in virtual classroom format or at our downtown Toronto location at 18 King Street East, Suite 1400, Toronto, Ontario, Canada (some in-person classroom courses may also be delivered at an alternate downtown Toronto location). Contact us at info@avantixlearning.ca if you’d like to arrange custom instructor-led virtual classroom or onsite training on a date that’s convenient for you.
Copyright 2023 Avantix® Learning
Microsoft, the Microsoft logo, Microsoft Office and related Microsoft applications and logos are registered trademarks of Microsoft Corporation in Canada, US and other countries. All other trademarks are the property of the registered owners.
Avantix Learning |18 King Street East, Suite 1400, Toronto, Ontario, Canada M5C 1C4 | Contact us at info@avantixlearning.ca
I’ve written a long document and just read the branding guidelines that says the ‘e’ at the start of a word needs to be italicized, e.g. eBahgum, the e is italics and Bahgum isn’t. I’ve written this loads of times in my doc so want to do a find and replace just to change the e to italics.
![]()
asked Nov 1, 2011 at 13:44
![]()
You can do this in two Replaces:
-
ctrl+h to bring up the
Find and Replacedialog -
Enter
eBahgumin theFind what:text box -
Place the cursor in the
Replace with:text box -
Click the
Morebutton -
Click the
Formatbutton and selectFont... -
Set
Font style:toItalicand click OK
-
Click
Replace All— all instances ofeBahgumwill now be in italics -
Change
Find what:toBahgum -
Place the cursor in the
Replace with:text box -
Click the
Formatbutton and selectFont... -
Set
Font style:toRegularand click OK -
Click
Replace Allagain


All instances of Bahgum will now be normal again, leaving the e in italics
answered Nov 1, 2011 at 14:12
![]()
ShevekShevek
16.5k7 gold badges46 silver badges75 bronze badges
1
 This tutorial shows how to find and replace font formatting in Microsoft Word. Font formatting includes style (i.e., italics or bold font), color, size, and underlining.
First, we will find and replace font formatting in the whole document. Then, we will find and replace font formatting applied to specific text. We will close with two important tips for finding and replacing font formatting.
Table of Contents:
- How to Find and Replace Font Formatting in the Whole Document
- How to Find and Replace Font Formatting Applied to Specific Text
- Two Tips for Finding and Replacing Font Formatting
Watch all the steps shown here in real time!
Explore more than 200 writing-related software tutorials on my YouTube channel.
The images below are from Word for Microsoft 365. These steps also apply to Word 2021, Word 2019, and Word 2016.
Are you on a Mac? Please see “How to Find and Replace Font Formatting in Word for Mac.”
How to Find and Replace Font Formatting in the Whole Document
For this example, we will replace all bold text with regular text. Please modify these steps according to your own needs.
- Select the Home tab in the ribbon.

- Select Replace in the Editing group.

- Insert your cursor into the Find what text box in the Find and Replace dialog box.

- Select the More button.

- Select All in the Search menu.

- Select the Format button.

- Select Font from the drop-down menu.

- Select Bold (or another option) from the Font Style menu in the Find Font dialog box.

- Select the OK button.

The words Font: Bold should appear under the Find what text box.

- Insert your cursor into the Replace with text box.

- Select the Format button (see figure 6).
- Select Font from the drop-down menu (see figure 7).
- Select Regular (or another option) from the Font Style menu in the Replace Font dialog box.

- Select the OK button.

The words Font: Not Bold, Not Italic should appear under the Replace with text box.

- Select the Replace All button to make all the replacements at once. Or, select the Find Next and Replace buttons to make one replacement at a time.

- If you selected Replace All, select OK in the dialog box telling you how many replacements were made.

- Select the Close button.

The font formatting should be replaced in your document.
How to Find and Replace Formatting Applied to Specific Text
For this example, we will find specific text formatted in red and replace that same text with green formatting. Please modify these steps according to your own needs.
- Select the Home tab in the ribbon (see figure 1).
- Select Replace in the Editing group (see figure 2).
- Type the text you want to find into the Find what text box.

- Select the More button (see figure 4).
- Select All in the Search menu (see figure 5).
- Select the Format button (see figure 6).
- Select Font from the drop-down menu (see figure 7).
- Select red (or other formatting) from the Font color menu in the Find Font dialog box.

- Select the OK button (see figure 9).
The words Font color: Red should appear under the Find what text box.

- Type the same text (or different text if desired) into the Replace with text box.

- Select the Format button (see figure 6).
- Select Font from the drop-down menu (see figure 7).
- Select green (or another formatting) from the Font color menu in the Replace Font dialog box.

- Select the OK button (see figure 13).
The words Font color: Green should appear under the Replace with text box.

- Select the Replace All button to make all the replacements at once. Or, use the Find Next and Replace buttons to make one replacement at a time (see figure 15).
- If you selected Replace All, select OK in the dialog box telling you how many replacements were made (see figure 16).
- Select the Close button to close the Find and Replace dialog box (see figure 17).
The font formatting should be replace for the specific text in your document.
Two Tips for Finding and Replacing Font Formatting
Finding and replacing font formatting can be messy. Here are two tips to consider before your next formatting session.
Tip 1: Use the No Formatting Button to Clear Formatting
When you add formatting to the Find and Replace dialog box, Word will normally keep that selection in the dialog box until you close the software. If you want to clear previously selected formatting from the Find and Replace dialog box before closing the software, place your cursor in the affected text box (Find what or Replace with) and then select the No Formatting button.

Tip 2: Experiment with Multiple Replacement Sequences
Occasionally, the formatting options entered into the Replace with text box don’t replace the options in the Find what text box; instead, they are added to the options in the Find what text box. When this occurs, experiment with multiple replacement sequences to reach the formatting you need.
For example, if you put the bold format into the Find what text box and put the italic format into the Replace with text box, Word won’t replace the bold text with italic text as you might expect. Instead, it will add italics to the bold words. But you can still remove the bold format if you do a second replacement sequence, this time replacing the bold format with the Not Bold format option.
Related Resources
How to Use the Format Painter in Microsoft Word (PC & Mac)
How to Find and Replace Special Characters in Microsoft Word
Updated December 03, 2022
Using the Find and Replace tool in Microsoft work is easy, when you are just replacing one word with another (post on how to do so here).
Replacing formatting in Word is one of the trickiest things you’ll come across. You may have been asked to change all of the underlined words to italics, or remove all strikethroughs, by doing so you risk scrambling all of your documents formatting at once.

Before you start scrolling through your Word Document and manually updating the formatting, the Find and Replace tool is there to make this easier, and it does. You just need to follow the right steps and be clear on exactly what you are wanting to change.
In this post, we will show you how to use the Find and Replace tool to update fonts, for example from italic to underlined and how to update paragraphs, for example from indented paragraphs to aligned left.
Using Find and Replace to update Character formatting
- Open Word
- Click Edit
- Press Find in the drop-down
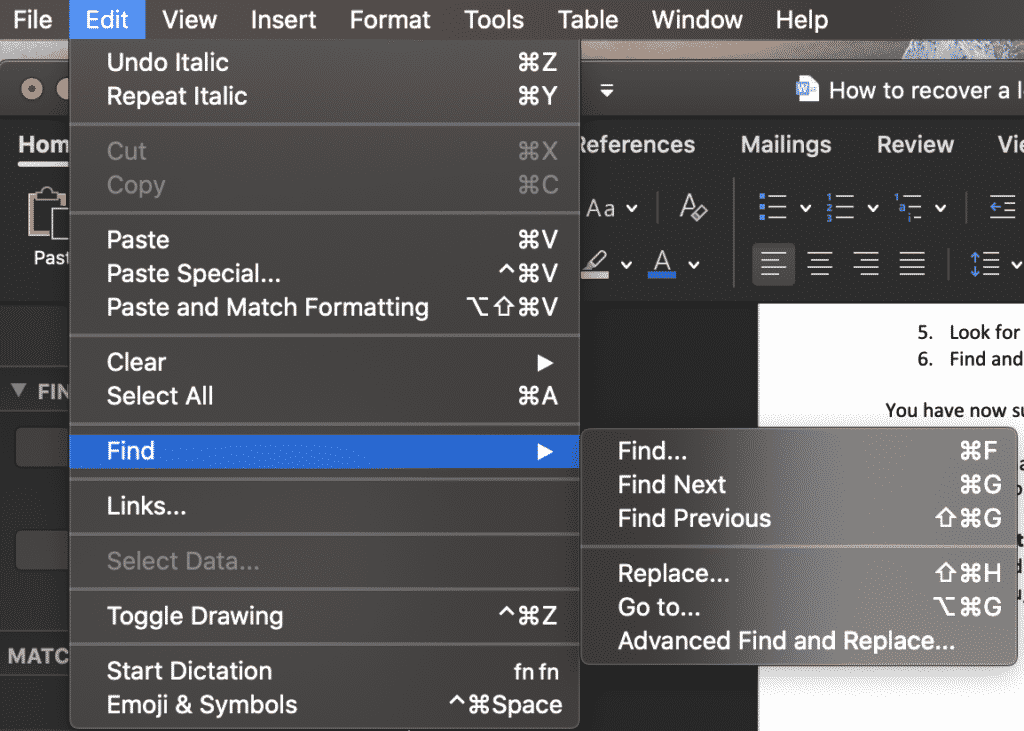
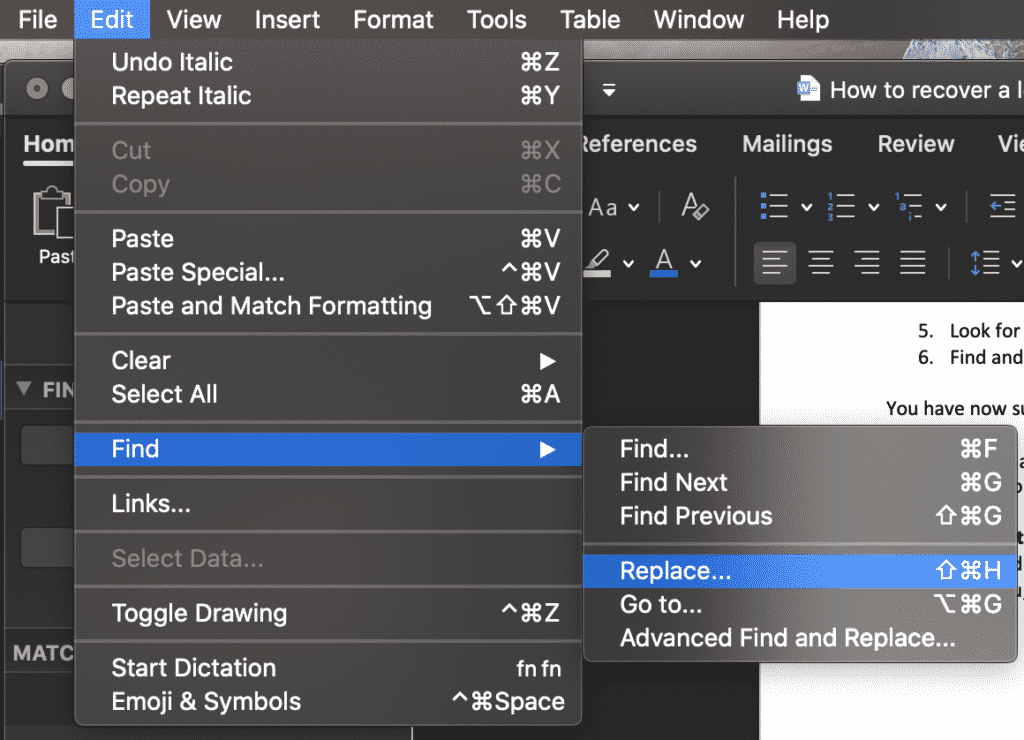
- Click Replace…
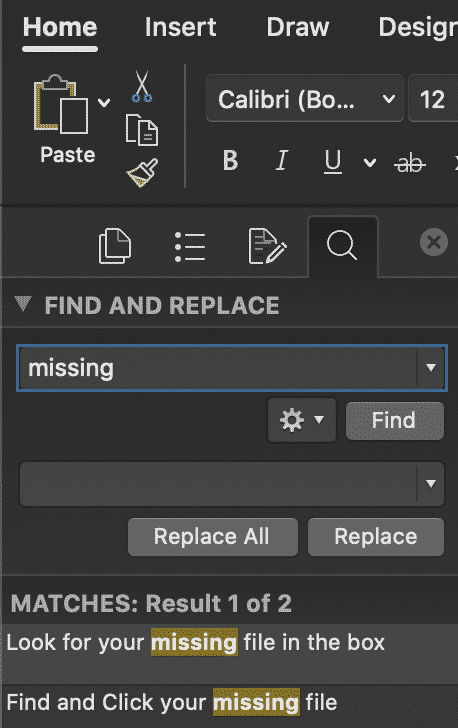
- Type the word (without formatting) in the Find Box.
- We are using the word Missing in Bold as our example here
- Click the Advanced Options dropdown
- Press Advanced Find & Replace
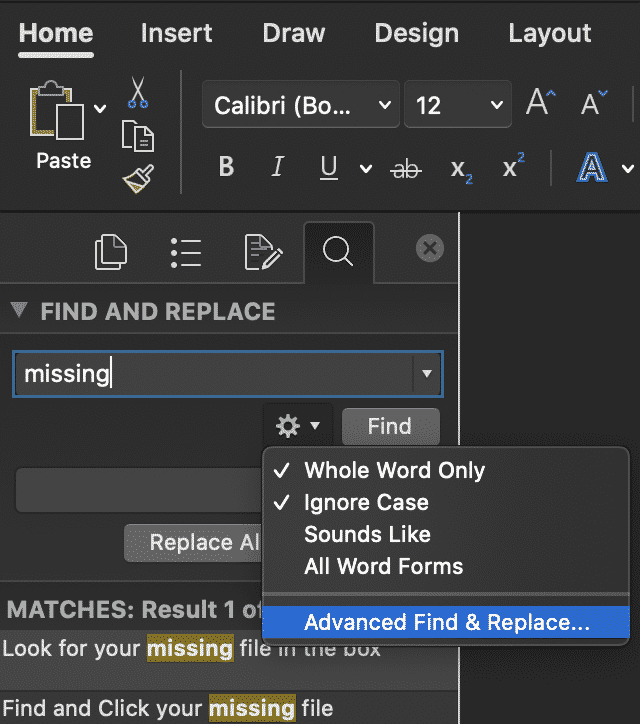
- Under the Advanced Options find and click Font, to search for a word in a specific font. E.g Bold, Italic, Strikethrough

- Within the Font pop-up box, select the font of the words you want to replace. Our example here is Bold.
- Press OK
- The Advanced Options pop up box will now re-appear with Bold font selected. Type the replacement word in the Replace with Box
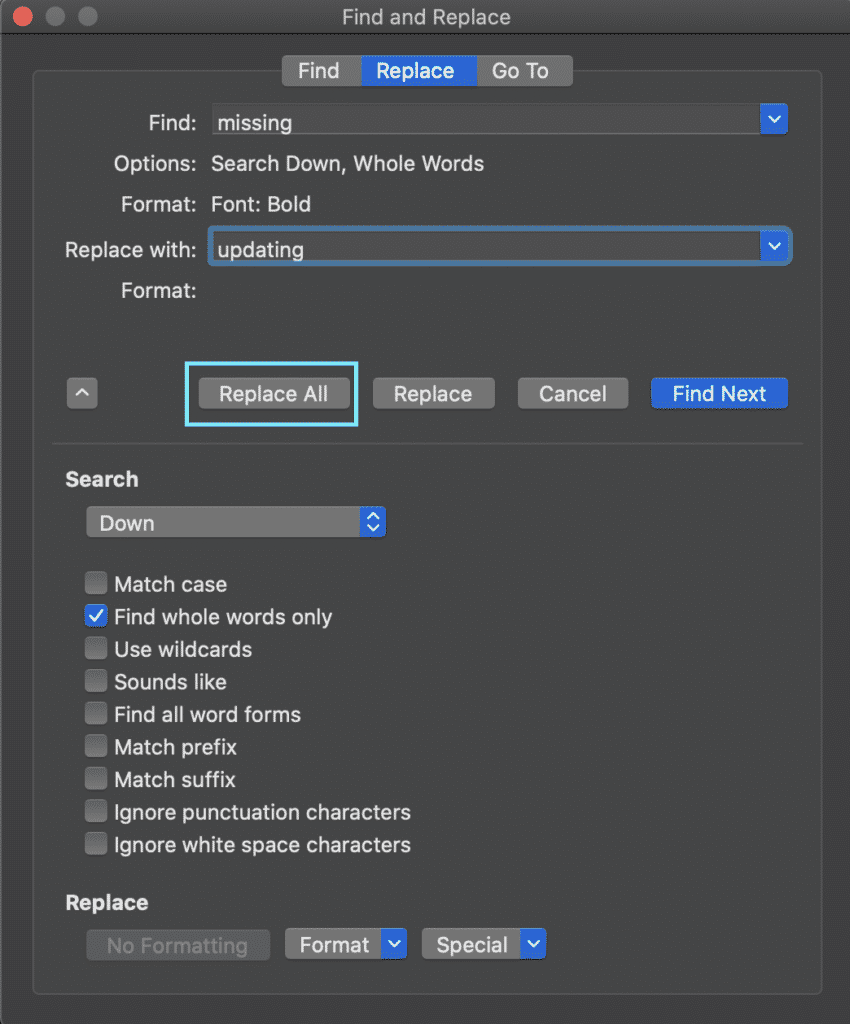
- Press Replace All
You have now successfully replaced your word, in the desired format only with another word, or an alternative format.
Using Find and Replace to update Paragraphs and Alignment
- Open Word
- Click Edit
- Press Find in the drop-down
- Click Replace…
- Click the Advanced Options dropdown
- Press Advanced Find & Replace
- Under the Advanced Options find and click the Format tab. In this example, we are updating the paragraphing in our document

- The Find Paragraph pop up window will open. In this window, select the paragraphing or spacing you wish to find.
- In this example, we are looking to find all 5.67ch inside and outside indentation.
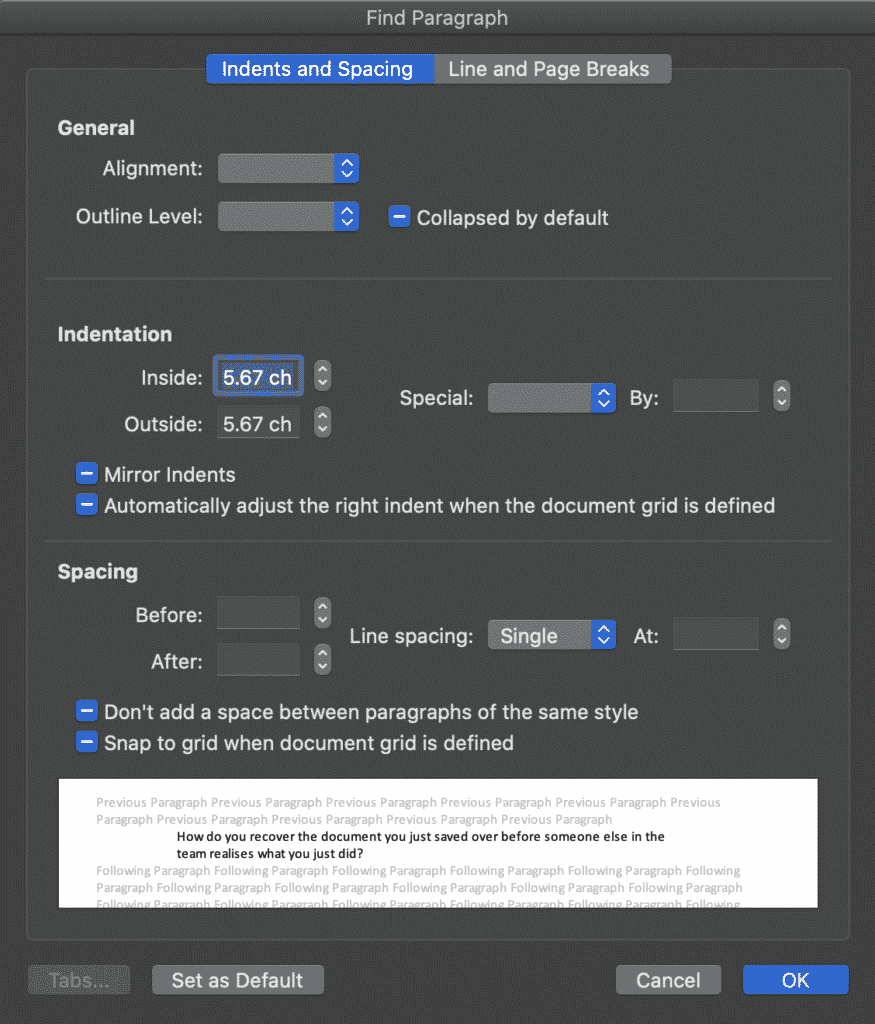
- Press OK
- Press Replace
- Select the paragraph or spacing you wish to replace the selected paragraphing with.
- In this example, we are wanting to take the indentation back to 0 inside and 0 outside.
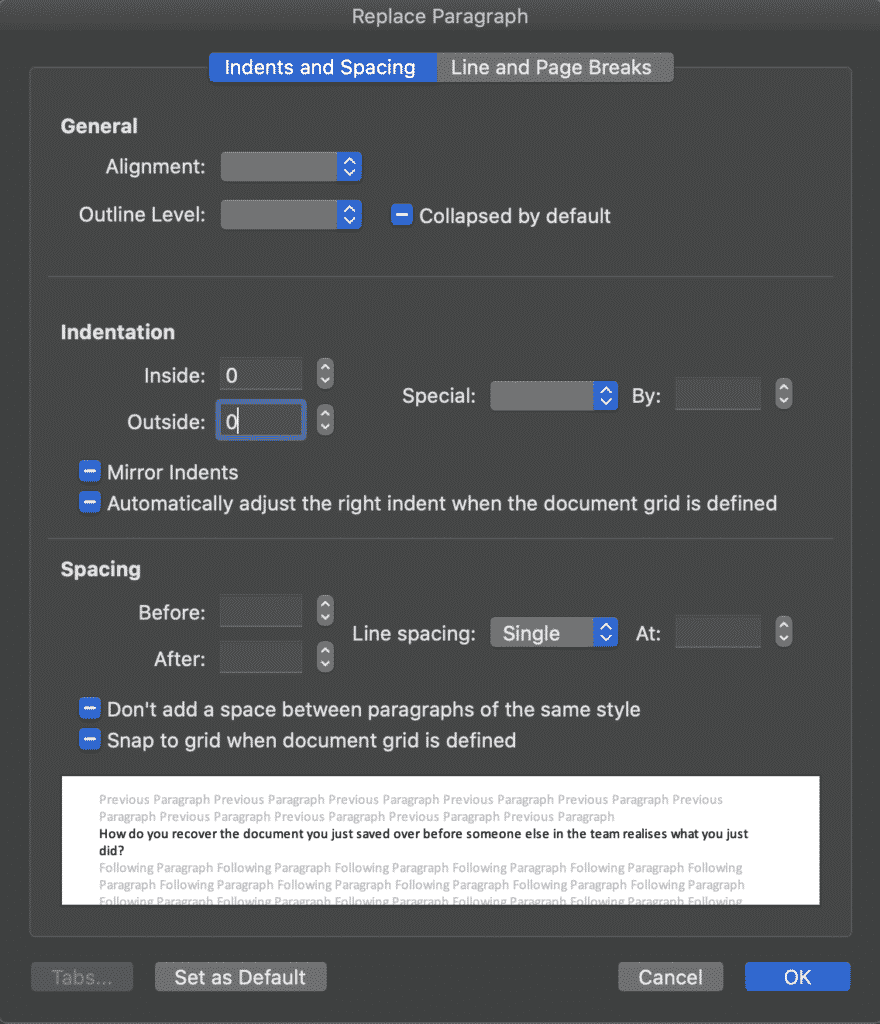
- Press OK
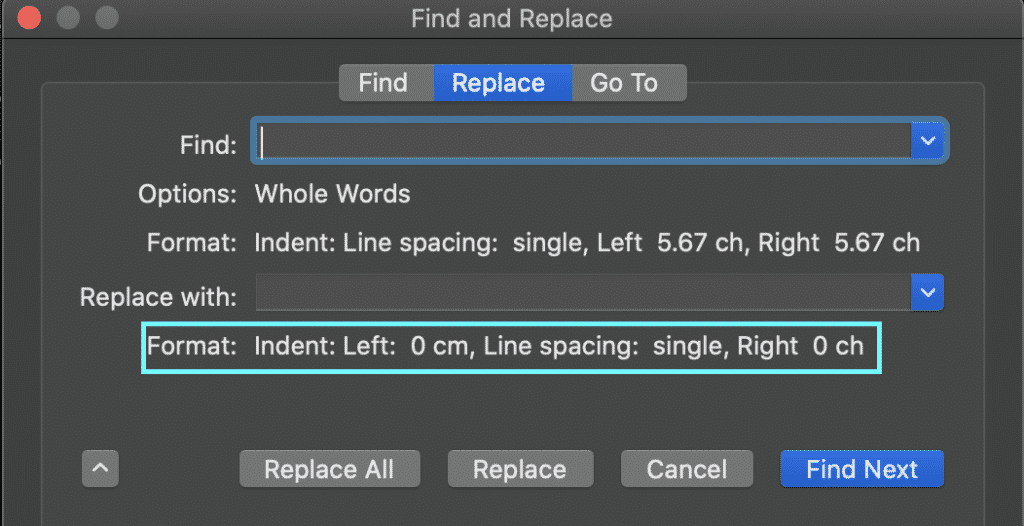
- Press Replace All

You have now successfully updated the paragraphing, alignment or indentation throughout your Microsoft Word Document.
Searching for a better way to work together in Microsoft Word Documents?
When working with a number of people in the same Word document you can quickly find yourself siphoning through old versions to compute who made what changes where and when.
Unless you each have a dedicated ‘edit’ day or time slot, you may also end up accidentally working on the same Word document, at the same time. Leaving you with two versions of the same file and the torturous task of merging them together without wasting 2 hours of precious billable hours.

Before you scroll any further we’d like to introduce you to the solution you have been searching for, meet Simul Docs.
Simul Docs was built to make your life easier.
To make working together on a Word Document seamless and pain free.
Simul Docs manages version control for you, version control means they will not only save each new document automatically once an edit is made (no minor feat, with this feature alone you’ll never accidentally save over another author’s document again) but Simul gives each document a version number, relevant to when it was last edited.
This makes it easy to see which document is the most recent file and when it was last edited.

To add a cherry on top of this already sweet tool, Simul also puts the author’s name next to the saved document so you know at a glance when it was saved, how old it is AND who created it. It sounds like a lot but for Simul its a breeze and its what they love doing – making your collaborating life a whole lot easier.

Now without sounding too smug, Simul also has a whole heap of other cool features that might help your team collaborate better.
Think tracked changes, they are automatically turned on, every single new change is tracked and saved. You quite literally will never miss an edit again. Amazing!
Then Simul makes merging as easy as the click of a button.

If two team members are working simultaneously on the document, Simul has your back. Simul will allow the changes to be made, save each version as a new document and let you know there are two new updates for your review. Upon review, you can accept or decline each author’s changes and press ‘merge’. Done. Documents merged!
Simul really does make collaborating easy and it’s a tool that will save you time and frustration.
All special terms in a Word document I worked on were surrounded by straight double quote marks. I wanted to remove the quote marks and italicise the term. For example, I wanted “term” to become term.
This was a relatively easy task using wildcards in Word’s find and replace, but there are a couple of ‘gotchas’—it won’t catch anything in curly (smart) quotes or inside single quote marks (straight or curly), or if there’s US-style punctuation (e.g. period, comma) at the end, such as “term.” I’ve added alternatives to deal with these situations. It also won’t catch more than one word inside the quote marks, and I don’t have an easy solution for that.
In ALL cases below:
- you must have Use wildcards checked in the advanced Find and Replace dialog box
- for the italics, when you’re in the Replace field, select Format > Font> and choose Italic
- all the double and single straight quotes here DO NOT display correctly, so DO NOT copy/paste from here—instead, type the quote marks in directly from your keyboard
Case 1: Double straight quotes
- Find: (“)(<*>)(“)
- Replace: 2
For those preferring to use ACSII codes, a double straight quote mark is ^034.
Case 2: Single straight quotes
- Find: (‘)(<*>)(‘)
- Replace: 2
For those preferring to use ACSII codes, a single straight quote mark is ^039.
Note: This may not work—if it doesn’t, try (‘)(*)(‘) as the Find, but be careful when replacing as a single quote mark is also used as an apostrophe. DO NOT do Replace All.
Case 3: Double curly quotes
- Find: (“)(<*>)(”)
- Replace: 2
For those preferring to use ACSII codes, an opening double curly quote mark is ^0147 and a closing one is ^0148.
NOTE: It’s easier to copy a curly quote from the main Word document and paste it into the Find. Don’t forget to copy an opening one for the left part of the Find string, and a closing quote for the right part.
Case 4: Single curly quotes
- Find: (‘)(<*>)(’)
- Replace: 2
For those preferring to use ACSII codes, an opening single straight quote mark is ^0145, and a closing single straight quote mark is ^0146.
Note: This may not work—if it doesn’t, try (‘)(*)(‘) as the Find, but be careful when replacing as a single quote mark is also used as an apostrophe. DO NOT do Replace All.
NOTE: It’s easier to copy a curly quote from the main Word document and paste it into the Find. Don’t forget to copy an opening one for the left part of the Find string, and a closing quote for the right part.
Case 5: Period or comma inside the closing quote mark
Use the relevant Find from any of the above, depending on the style of quote marks you’re looking for, and add an extra command ([,.]) to find the comma or period too. For straight double quotes, you’d change it to:
- Find: (“)(<*>)([,.])(“)
- Replace: 23
If you want to keep the punctuation, then you need to add 3 to the Replace. If you don’t want to keep the punctuation, then just leave it as 2. Again, don’t forget to set the Replace to italic font. The end result will be an italicised word with its trailling punctuation also in italics.
If don’t want the punctuation in italics, then you’ll need to run another find/replace using wildcards to change the punctuation back to normal text:
- Find: ([,.]) (this time, set the Find to italics using Format > Font > Italic)
- Replace: 1 (for this one, set the Replace to NOT use italics using Format > Font > Regular)