
Use the word processor’s search function to locate text and more
Updated on December 15, 2020
What to Know
- Basic word search: Go to the Home tab. Select Find and enter the text for the search.
- Advanced search: Go to Home > Find. Choose the search drop-down arrow. Select Options and select your criteria.
This article explains how to search for text in Microsoft Word. The information applies to Word 2019, Word 2016, Word 2013, Word 2010, Word Online, and Word for Microsoft 365.
How to Do a Basic Word Search in MS Word
Microsoft Word includes a search function that makes it easy to search for different elements in a document, including text. Use the basic tool to look for instances of a specific word, or the advanced options to perform tasks such as replace all instances of a word with another one or search for equations.
To run a basic search for a specific word or phrase in Word:
-
Go to the Home tab and select Find, or press Ctrl+F.
In older versions of Microsoft Word, select File > File Search.
-
In the Navigation pane, enter the text you want to search for. A list of matching words displays in the Navigation pane and instances of the word are highlighted in the main document.
-
Cycle through the results in the Navigation pane in one of three ways:
- Press Enter to move to the next result.
- Select a result with the mouse.
- Select the Up and Down arrows to move to the previous or next result.
-
Make any changes or edits to the document as needed.
-
Select the Down arrow to move to the next instance of the word.
Match Case, Whole Words Only, and More
Beyond searching for every instance of a word, you can get more specific about what you want to find. For example, to find whole instances of a word and not every word that contains the letter combination or to find instances of a word that aren’t capitalized.
Here’s how to do an advanced search:
-
Select Home > Find.
-
In the Navigation pane, select the Search drop-down arrow.
-
Choose Options.
-
In the Find Options dialog box, choose the description that best fits what you’re trying to find. For example, to find instances of a word with the same capitalization, select Match case.
-
Select OK.
Use Advanced Find
Many of the choices available in the Find Options dialog box are also available in Advanced Find. Advanced Find includes the option to replace the text with something new. Based on your selection, Word replaces one instance or all instances at once. You can also replace the formatting, or change the language, paragraph, and tab settings.
Find Instances of Other Elements
Other options in the Navigation pane include searching for equations, tables, graphics, footnotes, endnotes, and comments.
Thanks for letting us know!
Get the Latest Tech News Delivered Every Day
Subscribe
I would like a macro or method to find and replace instance of a word in a large word document with a hyperlink who’s display text is the same as the original word.
Example:
I would search for ‘project’ and replace all instances with a hyperlink www.example.com with the display text remaining ‘project’.
I have found many macros that are tantalisingly close but not quite what I need. For example, a macro from this site
How to programmatically edit all hyperlinks in a Word document?
..will change all the hyperlink addresses in a document and their display text. I thought I could change all the instances of ‘project’ to a hyperlink using inbuilt find and replace, then use that macro to change the display text. However, the inbuilt find and replace function does not create hyperlinks, you have to move the cursor to the unlinked text and press space/enter to activate it. That’s not viable in a large document.
To be really persnickety, it would be amazing if it only changed normal body text rather than all text, so I could leave headings and headers unchanged. I imagine this is possible by using the inbuilt find and replace to replace only normal text, then a macro to add the hyperlinks, perhaps.
Find and replace text

-
Go to Home > Replace.
-
Enter the word or phrase you want to replace in Find what.
-
Enter your new text in Replace with.
-
Choose Replace All to change all occurrences of the word or phrase. Or, select Find Next until you find the one you want to update, and then choose Replace.
-
To specify only upper or lowercase in your search, select More > Match case. There are several other ways to search in this menu.
For other options, see Find and replace text
Find and replace basic text
In the upper-right corner of the document, in the search box  , type the word or phrase that you want to find, and Word will highlight all instances of the word or phrase throughout the document.
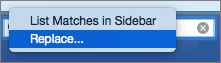
To replace found text:
-
Select the magnifying glass, and then select Replace.

-
In the Replace With box, type the replacement text.
-
Select Replace All or Replace.
Tips:
-
You can also open the basic Find and Replace pane with the keyboard shortcut CONTROL + H.
-
When you replace text, it’s a good idea to select Replace instead of Replace All. That way you can review each item before replacing it.
-
You can find text with special formatting, such as bold or highlight, by using the Format menu.
-
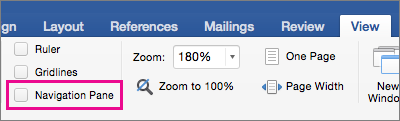
Select View > Navigation Pane.
-
In the Navigation Pane, select the magnifying glass.
-
Select Settings
, and then select Advanced Find & Replace.
Notes:
-
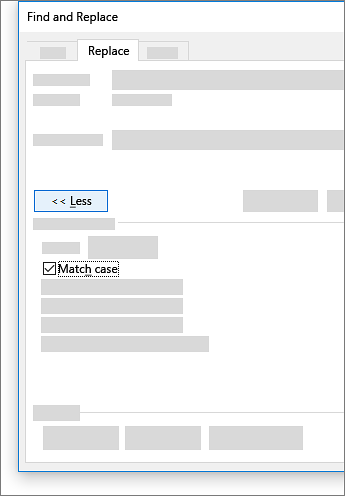
Select the arrow at the bottom of the Find and Replace dialog box to show all options.
-
-
-
On the Format menu, select the option that you want.
If a second dialog box opens, select the options that you want, and then select OK.
-
In the Find and Replace dialog box, select Find Next or Find All.
 , and then select Advanced Find & Replace.
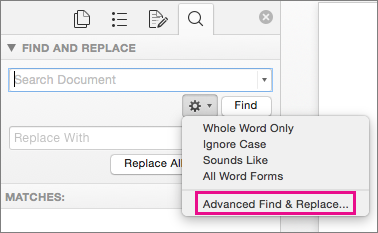
You can find and replace text with special formatting, such as bold or highlight, by using the Format menu.
-
Select View > Navigation Pane.
-
In the Navigation Pane, select the magnifying glass.
-
Select Settings
, and then select Advanced Find & Replace.
-
At the top of the dialog box, select Replace.
Notes:
-
Select the arrow at the bottom of the Find and Replace dialog box to show all options.
-
-
-
On the Find what box, type the text that you want to find.
-
On the Format menu, select the formatting that you want to find.
If a second dialog box opens, select the options that you want, and then select OK.
-
Select in the box next to Replace with.
-
On the Format menu, select the replacement formatting. If a second dialog box appears, select the formats that you want, and then select OK.
-
Select Replace, Replace All, or Find Next.
-
Select View > Navigation Pane.
-
In the Navigation Pane, select the magnifying glass.
-
Select Settings
, and then select Advanced Find & Replace.
Notes:
-
Select the arrow at the bottom of the Find and Replace dialog box to show all options.
-
-
-
On the Special menu, select the special character that you want to find.
-
Select Find Next.

-
Select View > Navigation Pane.
-
In the Navigation Pane, select the magnifying glass.
-
Select Settings
, and then select Advanced Find & Replace.
Notes:
-
Select the arrow at the bottom of the Find and Replace dialog box to show all options.
-
-
-
At the top of the Find and Replace dialog box, select Replace and then select in the Find What box, but don’t type anything there. Later, when you select a special character, Word will automatically put the character code in the box for you.
Note: Select the arrow at the bottom of the Find and Replace dialog box to show all options.
-
On the Special menu, select the special character that you want to find.
-
Select in the Replace with box.
-
On the Special menu, select the special character that you want to use as a replacement.
-
Select Replace or Find Next.
-
Select View > Navigation Pane.
-
In the Navigation Pane, select the magnifying glass.
-
Select Settings
, and then select Advanced Find & Replace.
-
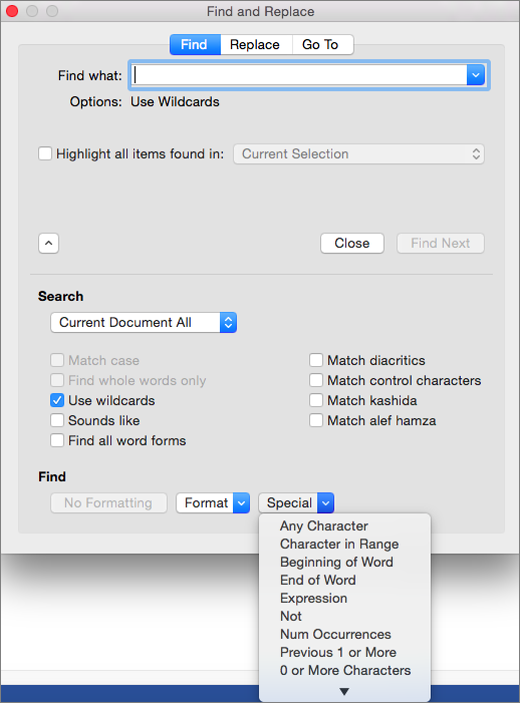
Select the Use wildcards check box.
If you don’t see the Use wildcards check box, select
. -
Select the Special menu, select a wildcard character, and then type any additional text in the Find what box.
-
Select Find Next.
Tips:
-
To cancel a search in progress, press
+ PERIOD. -
You can also enter a wildcard character directly in the Find what box instead of selecting an item from the Special pop-up menu.
-
To search for a character that’s defined as a wildcard character, type a backslash () before the character. For example, type ? to find a question mark.
-
You can use parentheses to group the wildcard characters and text and to indicate the order of evaluation. For example, search for <(pre)*(ed)> to find «presorted» and «prevented.»
-
You can search for an expression and use the n wildcard character to replace the search string with the rearranged expression. For example, type (Newman) (Belinda) in the Find what box and 2 1 in the Replace with box. Word will find «Newman Belinda» and replace it with «Belinda Newman.»
-
-
To replace found text:
-
Select the Replace tab, and then select the Replace with box.
-
Select Special, select a wildcard character, and then type any additional text in the Replace with box.
-
Select Replace All, Replace, or Find Next.
Tip: When you replace text, it’s a good idea to select Replace instead of Replace All. That way you can confirm each replacement to make sure that it’s correct.
-
 .
.
 + PERIOD.
You can refine a search by using any of the following wildcard characters.
|
To find |
Use this |
For example |
|---|---|---|
|
Any single character |
? |
s?t finds «sat» and «set.» |
|
Any string of characters |
* |
s*d finds «sad» and «started.» |
|
One of the specified characters |
[ ] |
w[io]n finds «win» and «won.» |
|
Any single character in this range |
[-] |
[r-t]ight finds «right» and «sight» and «tight.» Ranges must be in ascending order. |
|
Any single character except the characters inside the brackets |
[!] |
m[!a]st finds «mist» and «most» but not «mast.» |
|
Any single character except characters in the range inside the brackets |
[!x-z] |
t[!a-m]ck finds «tock» and «tuck» but not «tack» or «tick.» Ranges must be in ascending order. |
|
Exactly n occurrences of a character or expression |
{ n} |
fe{2}d finds «feed» but not «fed.» |
|
At least n occurrences of a character or expression |
{ n,} |
fe{1,}d finds «fed» and «feed.» |
|
A range of occurrences of a character or expression |
{ n, n} |
10{1,3} finds «10,» «100,» and «1000.» |
|
One or more occurrences of a character or expression |
@ |
lo@t finds «lot» and «loot.» |
|
The beginning of a word |
< |
<(inter) finds «interesting» and «intercept» but not «splintered.» |
|
The end of a word |
> |
(in)> finds «in» and «within,» but not «interesting.» |
Word for the web lets you find and replace basic text. You can match case or fine whole words only. For more varied options, open your document in Word for the desktop.
Need more help?

on
January 28, 2010, 1:16 AM PST
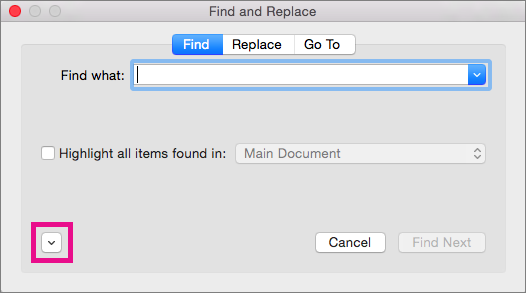
Use Word’s Find feature to highlight all occurrences of a word or phrase
Word’s Find feature locates text, but you can also use it to highlight all occurrences of a word or phrase in a document.
Most of us use Word’s Find feature to locate specific text, often so we can change it. You might not know that you can use this feature to highlight all the occurrences of a specific word for phrase for the entire document at the same time. For instance, I often use this feature when creating an index. I don’t want to change anything, I just want to know the location of each indexed word or phrase.
You can use Find to highlight all the occurrences of a specific word or phrase as follows:
-
Choose Find from the Edit menu or press [Ctrl]+F. In Word 2007, Find is in the Editing group on the Home tab.
-
On the Find tab, enter the word or phrase into the Find What control.
-
Check the Highlight All Items Found In option (shown below). You can narrow the search by choosing a section from the option’s drop-down list, but most of the time Main Document is adequate. In Word 2007, choose Highlight All from the Reading Highlight drop-down list. Narrow the search using the Find In control.

-
Click Find All and click Close.

Word will select the word or phrase throughout the document (or section). At this point, you might want to mark the selections in some way. For instance, you might click the Highlight button on the Formatting toolbar. It just depends on how you plan to use the selected text.
This trick can come in handy during a meeting or presentation when someone asks for more details, future plans, and so on. If you can tune in on a specific word or phrase, you can quickly find key points.
It’s worth noting that Word can help you automate the indexing process. If you’d like to learn more about indexing, search Word’s Help file for Create an Index. Because this process enters special codes into the document, I seldom use it.
-
Software
Required
I want to find all occurrences of a single text in a MS Word document, make each occurence a hyperlink and change the generic hyperlink style to one of my chosing.
What I have
As I have no idea on how to achieve the above requirement as a whole, I started on a part of it, namely finding a single instance and adapting it.
So, I recorded a macro, that resulted in the following code. That code I adapted so that the sub could take parameters for the hyperlinkText and the hyperlink subaddress:
Sub AutoDetectHyperlinksForText(hyperlinkText As String, subaddress As String, style As String)
    Selection.Find.ClearFormatting
    With Selection.Find
        .Text = hyperlinkText
        .Replacement.Text = ""
        .Forward = True
        .Wrap = wdFindContinue
        .Format = False
        .MatchCase = False
        .MatchWholeWord = False
        .MatchWildcards = False
        .MatchSoundsLike = False
        .MatchAllWordForms = False
    End With
    Selection.Find.Execute
    ActiveDocument.Hyperlinks.Add Anchor:=Selection.Range, Address:="", _
        subaddress:=subaddress, ScreenTip:="", TextToDisplay:= _
        hyperlinkText
    Selection.MoveLeft Unit:=wdWord, Count:=1, Extend:=wdExtend
    Selection.Style = ActiveDocument.Styles(style)
End Sub
With this it is easy to Call the sub for multiple word instances, such as:
Call AutoDetectHyperlinksForText("broadcasts", "_broadcastService", "Subtle Emphasis")
Question
How can I adapt this macro so that it checks the entire document?
Bonus question
Is there a way to modify the above script so that I can store my selection, and remove the need for the .MoveLeft?
In pseudocode that would be something like this:
Dim mySelect as Selection
mySelect = Selection.Find.Execute
ActiveDocument.Hyperlinks.Add Anchor:=mySelect.Range, Address:="", _
    subaddress:=subaddress, ScreenTip:="", TextToDisplay:= _
    hyperlinkText
mySelect.Style = ActiveDocument.Styles("Subtle Emphasis")
Find and Replace Text and Numbers in Word
by Avantix Learning Team | Updated March 7, 2022
Applies to: Microsoft® Word® 2013, 2016, 2019, 2021 or 365 (Windows)
You can find and replace in Word using the Find and Replace dialog box as well as the Navigation Pane. If you use the dialog box, you can find and replace text and numbers and use wildcards for more advanced find and replace tasks. Wildcards are useful when you are not able to find an exact match. You can display the Find and Replace dialog box using a keyboard shortcut or the Home tab in the Ribbon.
Recommended article: How to Quickly Remove Hard Returns in Word Documents
Do you want to learn more about Microsoft Word? Check out our virtual classroom or in-person Word courses >
Note: Screenshots in this article are from Word 365 but are similar in previous versions of Word.
The Replace command appears on the Home tab in the Ribbon in the Editing group:

Using the Find and Replace dialog box to replace words or characters (and match case)
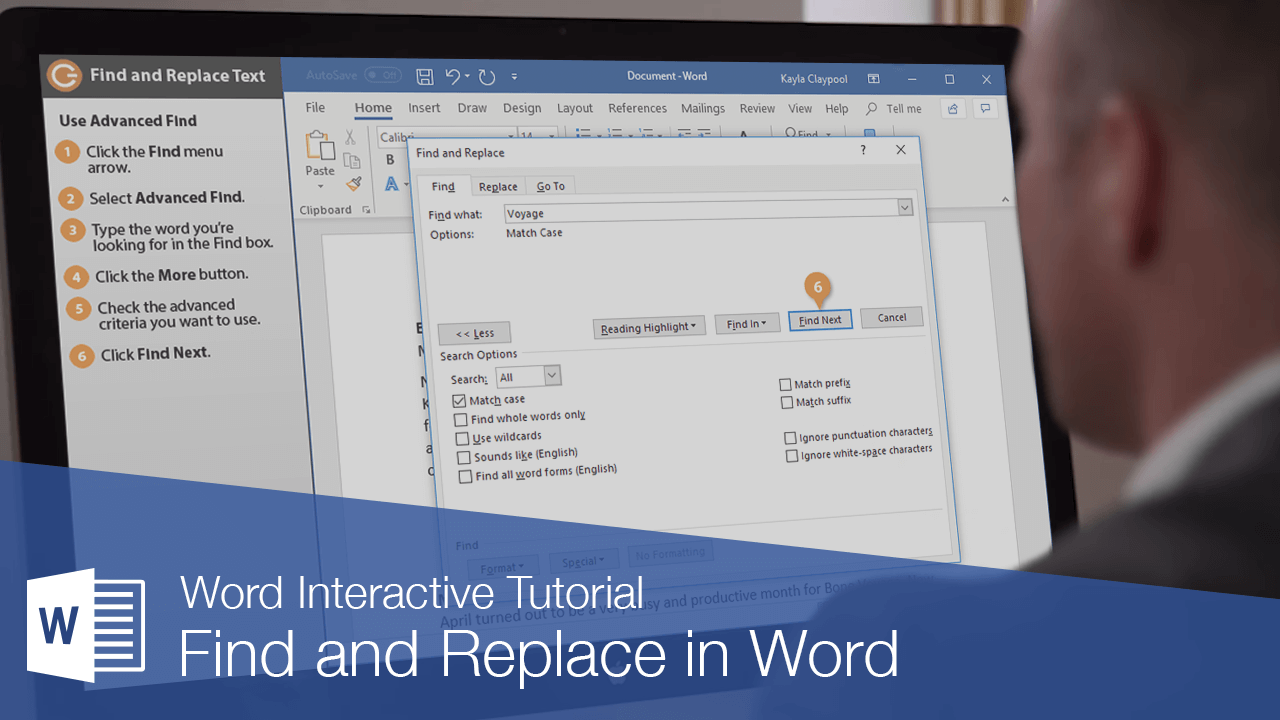
You can perform simple find and replace tasks using the Replace dialog box in its collapsed state. To access more advanced options, you will need to click More in the Replace dialog box to expand it.
To use the Find and Replace dialog box to find and replace text in Word (words or characters) and match case if needed:
- Click the Home tab in the Ribbon.
- In the Editing group, click Replace to display the Replace dialog box. Alternatively, press Ctrl + H if you prefer to use a keyboard shortcut to open the Replace dialog box.
- Enter the text you want to find in the Find What box. You can specify whether Word should locate only matches with the exact capitalization by clicking More and then selecting or checking Match case.
- Enter the text you want to replace in the Replace box.
- Click Find Next and then click Replace for each occurrence or click Replace All.
- Click Close.
In the following example, the Replace dialog box has been expanded to display other options including Match case:

Finding and replacing using wildcards
To use wildcards, you will need to use the Find and Replace dialog box and expand it to display more options. You can then select the option to Use wildcards. A wildcard can replace one or more characters in a string of text or numbers. The most common wildcard is the asterisk (*).
It’s important to note that wildcard searches are case sensitive. Also, Word uses «lazy» pattern matching so it will stop matching as soon as possible. This means that you could enter part of a word and find that part without using wildcards.
To find and replace text using wildcards in Word:
- Position the cursor at the location in the document where you want to start finding and replacing. If you want to start at the beginning of the document, you can press Ctrl + Home.
- Click the Home tab in the Ribbon.
- In the Editing group, click Replace. Alternatively, press Ctrl + H. A dialog box appears.
- Select More to expand the dialog box.
- Click in the Find What box.
- Select or check the Use wildcards checkbox.
- Enter the text and wildcard(s) you want to use. For example, enter s*l to find any text starting with s and ending with l.
- Click in the Replace with box.
- Enter the text you want to use to replace the text in the Find what box.
- Click Find Next to find the first instance of the characters you want to find.
- Click Replace or Replace All. If you click Replace, Word will select the next matching characters in the Find what box. If you click Replace All, Word will display a dialog box with the number of replacements. In this case, click OK.
- If necessary, click Replace again. Repeat for each instance.
- Click Close to close the dialog box.
In the following example, b*s has been entered in the Find what box to find any word starting with starting with b and ending with s:

If you want to undo a Replace or Replace All action, close the dialog box and press Ctrl + Z.
Using common wildcards
The most common wildcards you can use in the Find and Replace dialog box are the asterisk (*) to find multiple characters and the question mark (?) to find a single character.
For example:
b*l will find ball and barrel (a character followed any characters and ending with a specific character)
h?ll will find hill and hall (a character followed by any single character and then followed by 2 characters)
Using wildcards to find one or more instances of the same character
You can also use @ as a wildcard to find one or more instances of the same character.
For example:
catchal@ will find catchal or catchall
Using wildcards for alternate characters and ranges
You can also use wildcards to find alternate characters or ranges of characters. These are entered in square brackets [ ] and may be combined with other wildcards.
[ ] can be used to find each of a set of characters
[ – ] can be used to find each of a set of characters in a range
You can use any character or series of characters in a range within the square brackets (including the space character). Characters are processed in alphanumeric order from lowest to highest.
For example:
[abc] will find any of the letters a, b, or c
[G] will find the upper case letter G
[A-Z] will find any upper case letter
[0-9] will find any single number
[13579] will find any odd number
[0-9A-z] will find any number or letter
f[ai]n will find each of the characters in square brackets such as fan or fin
[b-f]at will find each of a range of characters such as bat, cat, and fat
Using wildcards to omit characters
If you want to omit specific characters, you can use an exclamation mark (!) combined with square brackets.
For example:
[!f]ast will find last and past but not fast
Using wildcards to find the beginning or end of a word
You can use the less than symbol (<) to find the beginning of a word and the greater than symbol (>) to find the end of a word. These wildcards are combined with characters in round brackets or parentheses.
For example,
<(watch) will find watching or watchman
(all)> will find wall or stall
These wildcards can be problematic if you are using a wildcard and you want to find > or < as characters in the document. If this is the case, enter a backslash () in front of the character so that it is not treated as a wildcard.
For example,
<*> will find <h1> or <h2>
Using wildcards to find instances of a character
You can use curly brackets { } to specify the number of instances of a character. These brackets can be combined with a comma to specify the number of instances. Counting can be used with individual characters or with sets of characters.
{n} is used to find the number of instances of a character
{n,} is used to find at least n instances of a character
{n,m} is used to find between n and m instances of a character
For example:
^p{2} will find two consecutive paragraph marks or hard returns (^p is a special character for a paragraph mark in Word)
{3} will find three spaces (there is a space entered before the first curly bracket)
30{2,} will find at least 2 instances of the preceding character such as 3000 or 30000
30{3,4} will find between 3 and 4 instances of the preceding character such as 30000 or 300000 not 300
These last wildcards are particularly useful if you are finding and replacing numbers in Word.
The Find and Replace dialog box offers more functionality as well. For example, you can also Find and Replace Formatting in Word.
Subscribe to get more articles like this one
Did you find this article helpful? If you would like to receive new articles, join our email list.
More resources
How to Add Page Numbers in Word (Step by Step)
How to View Document Statistics in Microsoft Word
How to Update All Figure Numbers in Microsoft Word
How to Check Word Count in Microsoft Word (4 Ways)
How to Superscript or Subscript in Word (with Shortcuts)
Related courses
Microsoft Word: Intermediate / Advanced
Microsoft Word: Designing Dynamic Word Documents Using Fields
Microsoft Word: Long Documents Master Class
Microsoft Word: Accessible Word Documents
Microsoft Excel: Intermediate / Advanced
Microsoft PowerPoint: Intermediate / Advanced
VIEW MORE COURSES >
Our instructor-led courses are delivered in virtual classroom format or at our downtown Toronto location at 18 King Street East, Suite 1400, Toronto, Ontario, Canada (some in-person classroom courses may also be delivered at an alternate downtown Toronto location). Contact us at info@avantixlearning.ca if you’d like to arrange custom instructor-led virtual classroom or onsite training on a date that’s convenient for you.
Copyright 2023 Avantix® Learning
Microsoft, the Microsoft logo, Microsoft Office and related Microsoft applications and logos are registered trademarks of Microsoft Corporation in Canada, US and other countries. All other trademarks are the property of the registered owners.
Avantix Learning |18 King Street East, Suite 1400, Toronto, Ontario, Canada M5C 1C4 | Contact us at info@avantixlearning.ca
Don’t waste time scanning through your document to find text and replace it with something new. The find and replace commands can do this for you with just a few clicks of your mouse.
Find Text
You can use the Navigation pane to search for specific words or phrases in a document.
- Click Find on the Home tab.
- Click in the Search document box in the Navigation pane and type the text you want to find.

- Click a search result to jump to it in the document.
- Click Close when you’re finished.
The Navigation pane appears on the left, displaying the Results view.
Press Ctrl + F.
The search runs automatically. Results are highlighted in the document, and the Navigation pane lists all instances of the word.
You can use the arrows under the search box to jump to the Previous or Next search result.
The Navigation pane closes.
Advanced Find
To search your documents for more specific items, such as certain capitalization or only whole words, use Advanced Find.
- Click Find button list arrow.
- Select Advanced Find.
- Type the word you’re looking for in the Find box.
By default, the Find and Replace dialog box only shows the basics—a search field. There are more options available if you expand the dialog box.
- Click the More button.
- Check the advanced criteria you want to use.
You can choose to exactly match the case or only search for whole words. You can also use wildcards, or ignore punctuation and spacing.
- Click Find Next.
Word navigates to and selects the next instance that fits the additional criteria.
- Click Close when you’re done.
The Find and Replace dialog box opens.
The advanced options here let you set some options on how to conduct the search.
The Find and Replace dialog box closes.
Replace Text
If you’ve spelled something incorrectly in multiple places, Word can fix them all with just a few steps.
- Click Replace on the Home tab.
- Type the word you need to replace in the Find what text field.
- Type the word you need to replace in the Replace with text field.
- Select a replacement option.
- Replace: Replaces the first instance of the word. Keep clicking to fix them one at a time.
- Replace All: Fixes all instances of the word at once.
- Click OK.
- Click Close when you’re done.
The Find and Replace dialog box opens to the Replace tab.
Once all the instances of the word have been replaced, a dialog box will pop up to let you know it’s complete.
The Find and Replace dialog box closes.

FREE Quick Reference
Click to Download
Free to distribute with our compliments; we hope you will consider our paid training.
Let’s assume you’re a paralegal and you just finished typing a lengthy legal document or a contract for your client, only to discover that you misspelled your client’s name or a wrong company’s name multiple times throughout your document. And don’t have time to manually locate and replace every instance of the text. What would you do? Don’t panic – you can easily fix that with MS Word’s Find and Replace feature.
Find and Replace is one of the most useful features in Microsoft Word that can be used to find a character, a word, or phrase in a document and replace them. You can also find and replace text in a specific section of text or a whole document.
Not only can you find a particular word and replace it with another word, but you can also find text based on its formatting, using wildcards, and with matching prefix or suffix. It also allows you to find and replace text with specific formatting, non-printing characters, or special characters. In this post, you will learn how to find and replace text in MS Word.
Find Text in Microsoft Word
To start with, let’s see how to Find text in Excel using the navigational pane or the Find and Replace tool. Then we’ll explore how to use the Find and Replace tool to replace text based on different options.
Find Text
You can use the Navigation pane to search for a character, a word, or a group of words. And you can access this navigation pane from the Ribbon or by pressing a hotkey Ctrl + F.
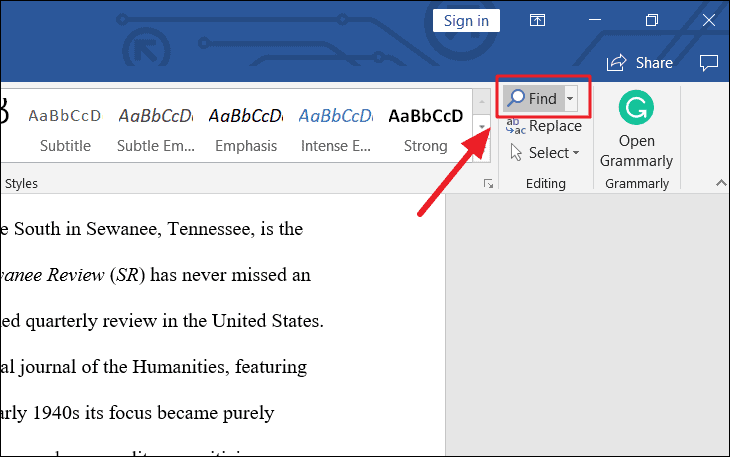
To access, the Navigation panel (Find Command), first, open the Word in which you want to search for text. Then, go to the ‘Home’ tab, and click the ‘Find’ button from the Editing group in the Ribbon. Or you can press the shortcut keys Ctrl + F in the keyboard.
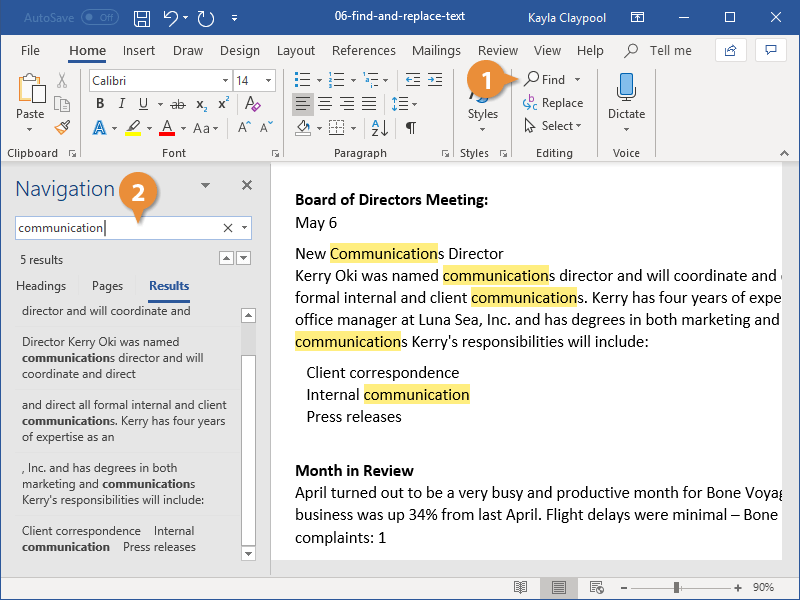
This will open up the Navigation pane on the left of the Window. Type the text or phrase you want to find in the ‘Search document’ text box in the Navigation pane and press ‘Enter’. As you type, the tool will show you all the related matches. In our example, we’ll type ‘Tate’.
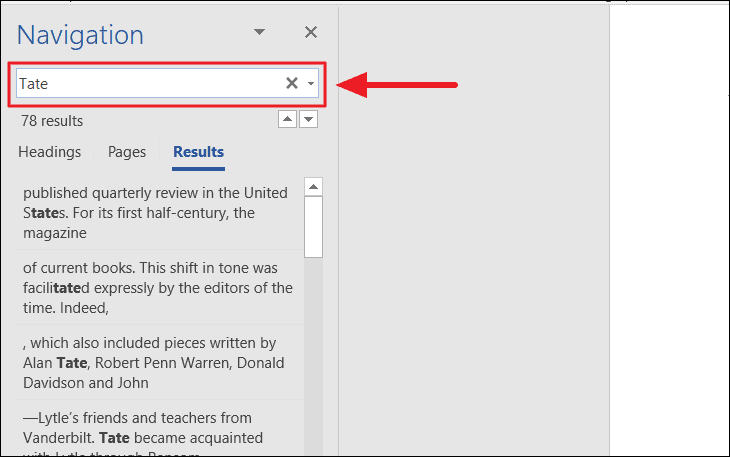
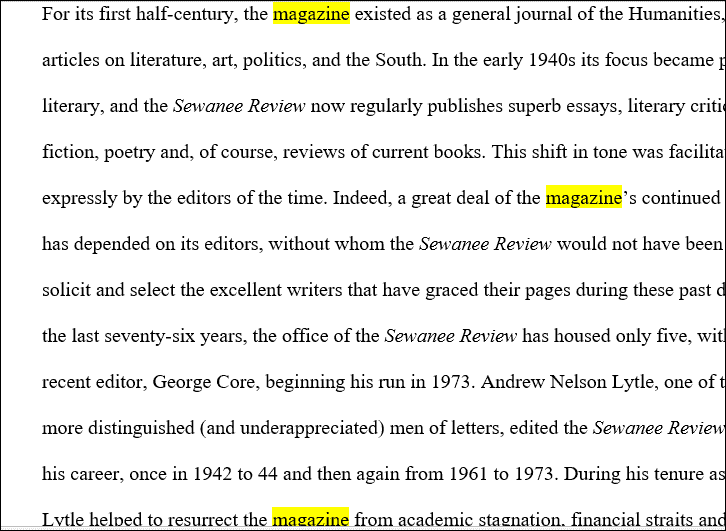
The Find command searches for all the matching text in the document and highlights them in yellow. The navigation pane shows all instances of the search word (Tate) as a preview of the results
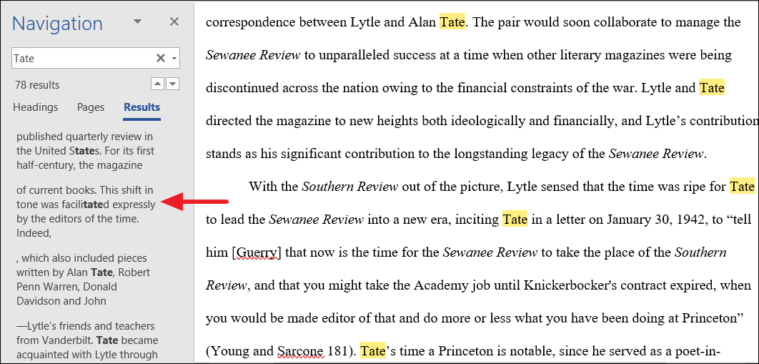
The tool not only highlights the exact words, it even highlights the partially matched words.
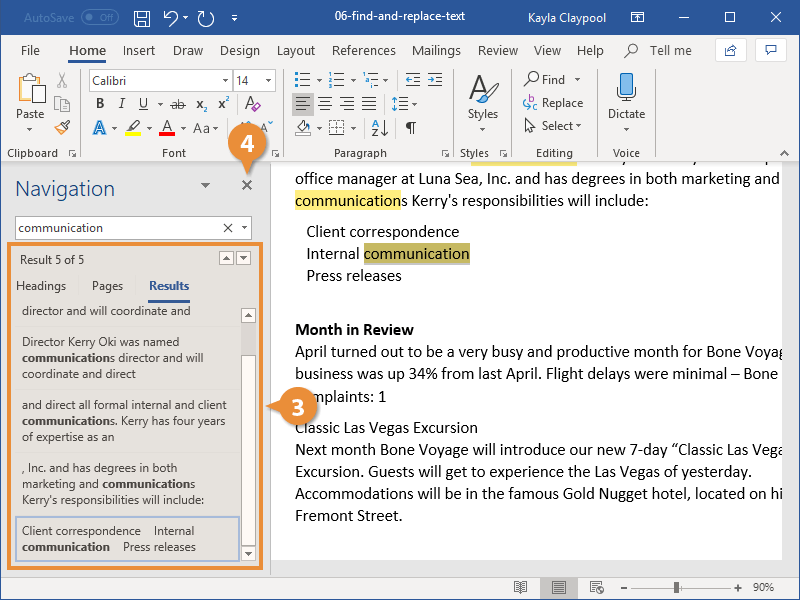
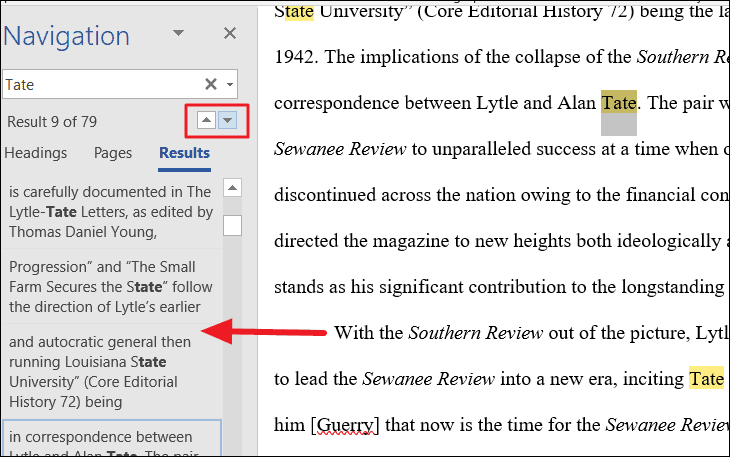
You can use the upward and downward arrows beside the text box to jump to the Previous or Next search result. Or you can click on one of the results below the search field to jump to it directly.
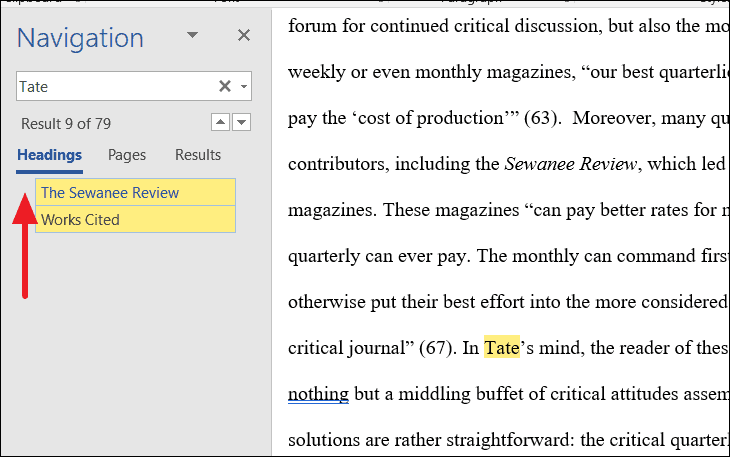
Instead of searching through an entire document for a text or phrase, you can also search a large document by headings. To do that, click the ‘Headings’ tab and select a heading in the Navigation pane to browse by headings in the document.
To search through pages in Word, click the ‘Pages’ tab in the Navigation pane and select one of the thumbnail images of all your pages that you want to see. Then, you can search for a specific text on that page.

Once you’re done editing the document, close the Navigation pane and the highlights will disappear.
Advanced Find
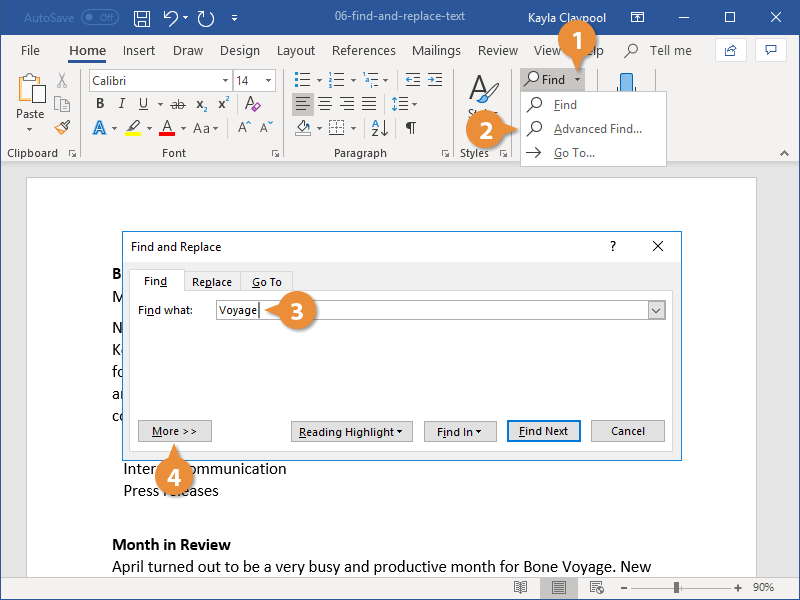
If you are looking for more specific words or phrases, for instance, words with a certain font or style, special characters, or only full words, you can use the Advanced Find feature to track them down. This tool lets you customize your search with various options. Here’s how:
Go to the ‘Home’ tab, click the downward arrow next to the ‘Find’ icon in the Editing group, and select ‘Advanced Find’. Or press Ctrl + H shortcut keys to open the Find and Replace tool.
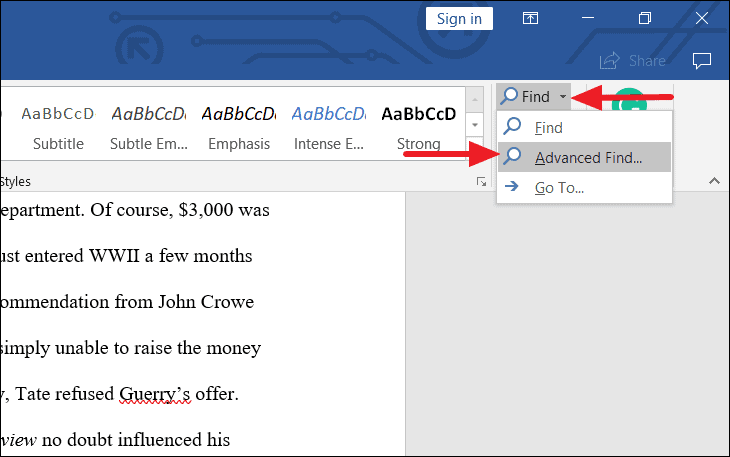
Or you can even launch the Find and Replace tool from the Navigation pane by clicking the magnifying glass icon in the Search Document text box and selecting the ‘Advanced Find’ option.

The Find and Replace dialog box will appear. Here, you can do a basic search, but if you want to customize your search with more options, Click the More >> button.

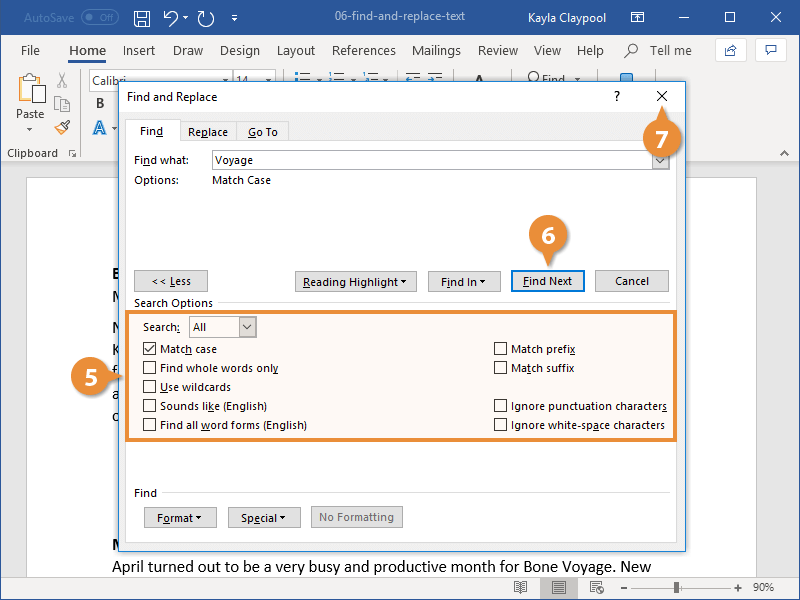
When you expand the More button, you would find more options with which you can do more advanced searches.
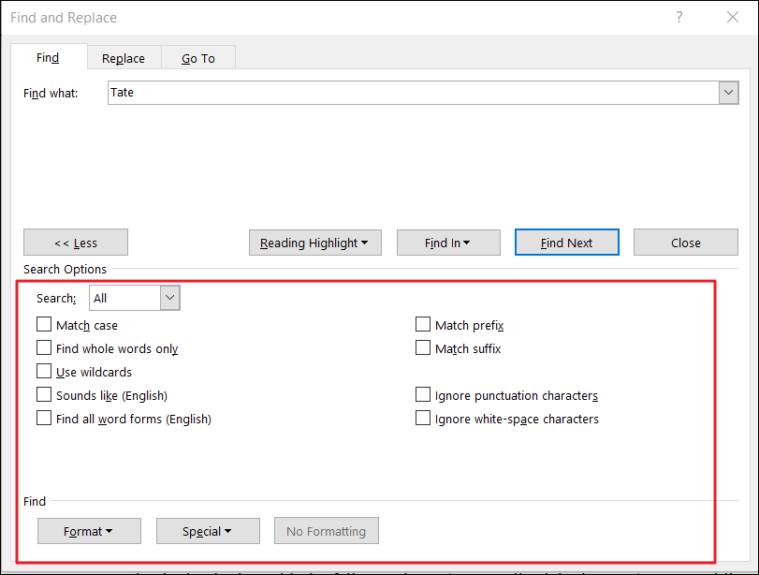
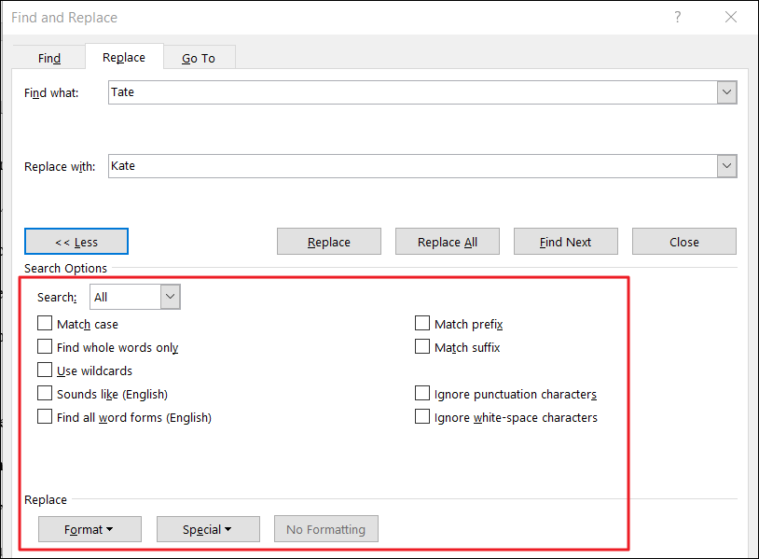
Select one or more options in the Search Options section and click ‘Find Next’ to view the result.
- Match Case: If the Match case box is checked, it searches for the text that exactly matches the uppercase and lowercase letters you type in the ‘Find what’ field.
- Find Whole Words Only: This option finds text that is not partial or part of another word, it only finds the whole words that are exactly matched.
- Use Wildcards: This option is the opposite of the ‘Find Whole Words only’ option. The wildcards you can use are single character (?) and multiple characters (*) wildcards. For example, when you are searching for “Wall*”, you’ll get Walls, Wallmart, or Wallpaper, etc.
- Sounds Like: This option finds words or phrases that sound phonetically similar such as ‘eyes’ when searching for ‘ice’ or ‘ant’ for ‘aunt’.
- Find All Word Forms: This option finds all variants of words (all verb forms). For example, when you search swim, you’ll get swim, swam, and swimming.
- Match Prefix: This searches for words with the same prefixes. For example, search for hype, and you may get hyperactive, hypersensitive, hypercritical.
- Match Suffix: This searches for words with the same suffixes. For example, search for less, and you may get endless, ageless, lawless, effortless.
- Ignore Punctuation Characters: This option lets you ignore punctuation characters in a text when searching. For instance, finding the word ‘Mrs. Jones’ when you searched for ‘Mrs Jones’.
- Ignore white-space characters: This option lets you ignore white spaces in between. For instance, finding the word ‘Days are good’ when you searched for ‘Daysaregood’.
We’ll apply few of these options and see how it works with an example.
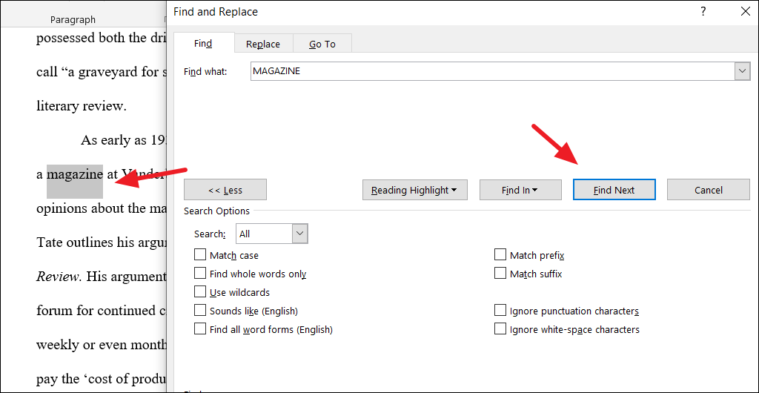
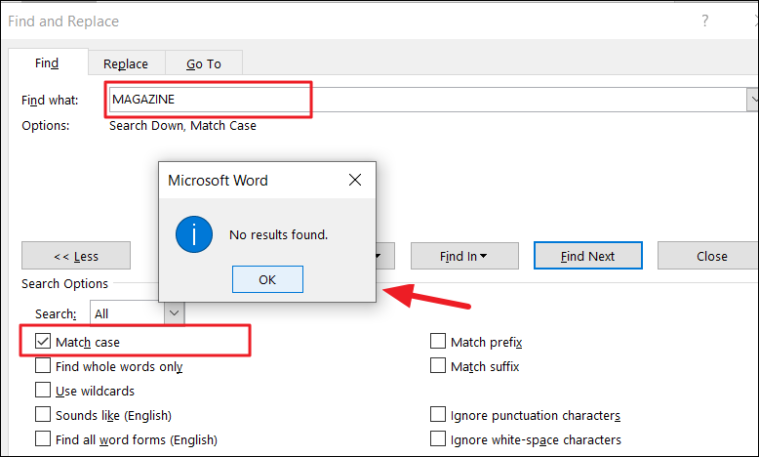
Match Case
For example, let’s say we search the word ‘MAGAZINE’ in all caps without the match case option enabled. Type the word in the ‘Find what’ field and click the ‘Find Next’ button.

In the ‘Search’ drop-down under Search Options, you choose ‘Down’ to start looking from the top to bottom of the document, choose ‘down’ to start looking from the bottom to top of the document, or ‘All’ to search all over the document.
When you click ‘Find Next’, it will highlight the first instance of the word in grey. When you click ‘Find Next’ again, it will select the next instance of the word. As you click Find Next each time, it will highlight the matching word one at a time.
If you want to highlight all the instances of the word at once, click the ‘Reading Highlight’ button and select ‘Highlight All’.
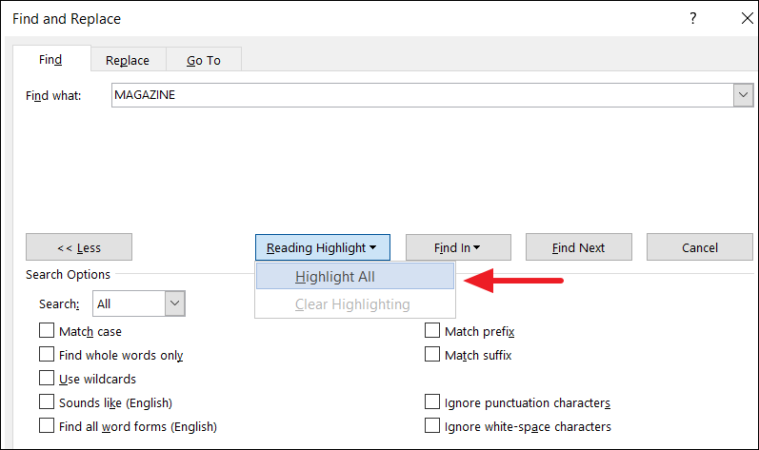
You would get several matches with the word all highlighted in yellow.
But if we searched the same word (capitalized) with match case enabled, we would get no results. Because the tool only looks for the word that exactly matches the uppercase letters we typed earlier.
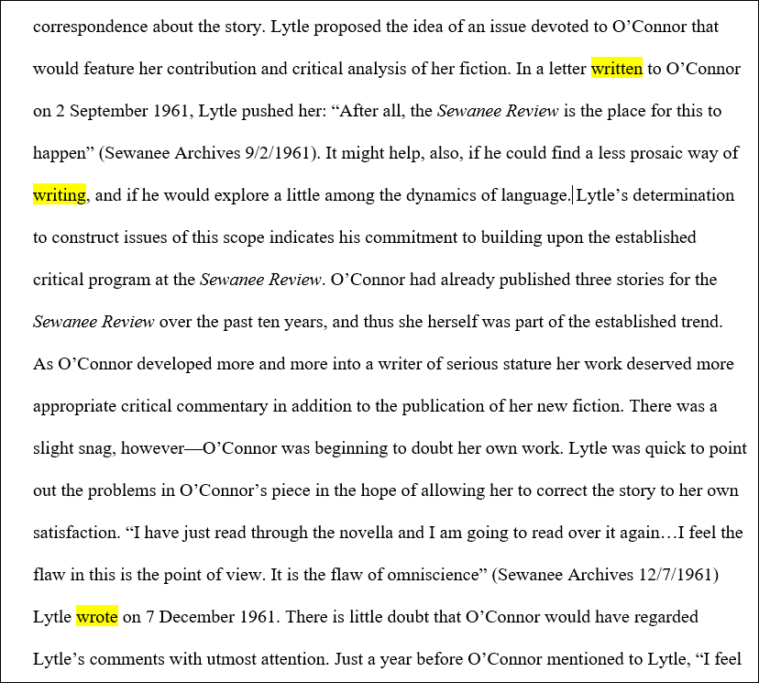
Find All Word Forms
In another example, if we searched the word ‘write’ with the ‘Find all word forms (English)’ setting enabled, we would get all variants of the word.
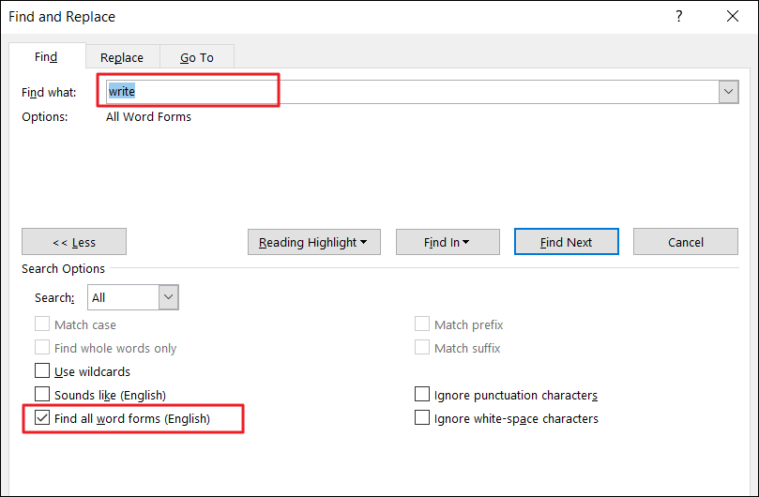
Word will find all verb forms of the word as shown below.
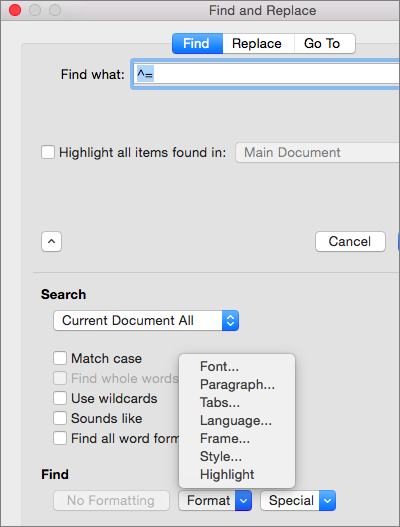
Advanced Find with Formatting
You can also search for certain word or phrase with specific formatting applied.
To find words with formatting, first, type the word in the ‘Find what’ box and click the ‘Format’ drop-down button at the bottom of the Find and Replace dialog box. Then choose the format in which you want to look for the word.
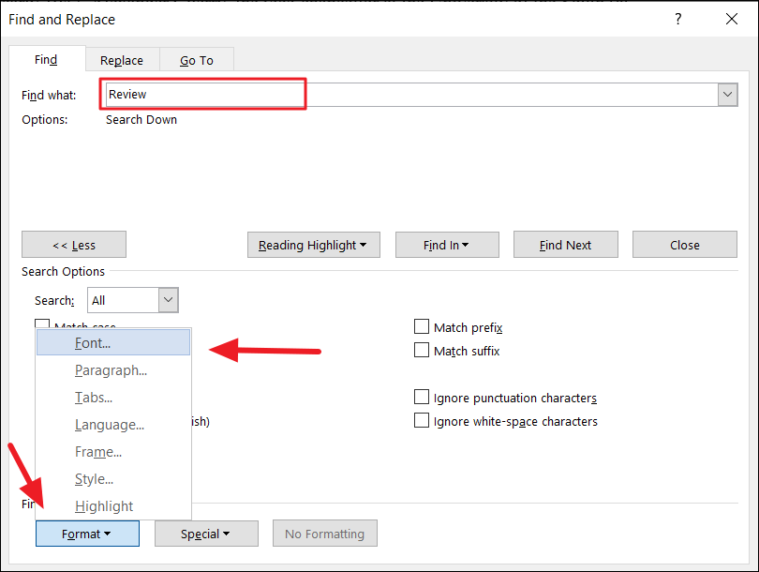
You can even find words with specific font format, paragraphs with specific alignment and format, tabs, words in a certain language, text frame, style, and highlight.
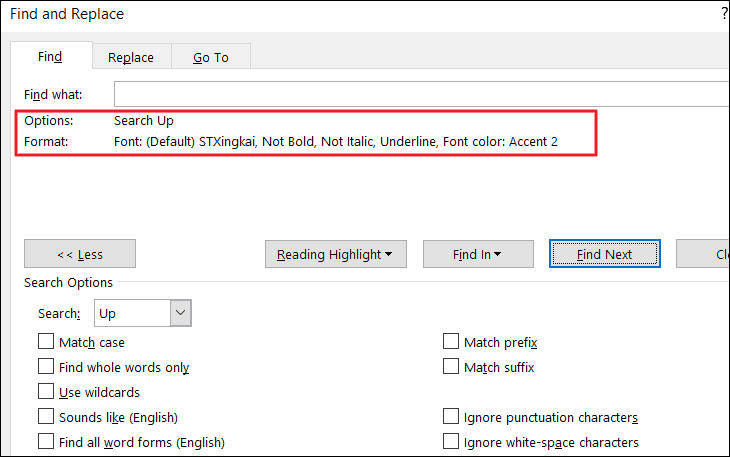
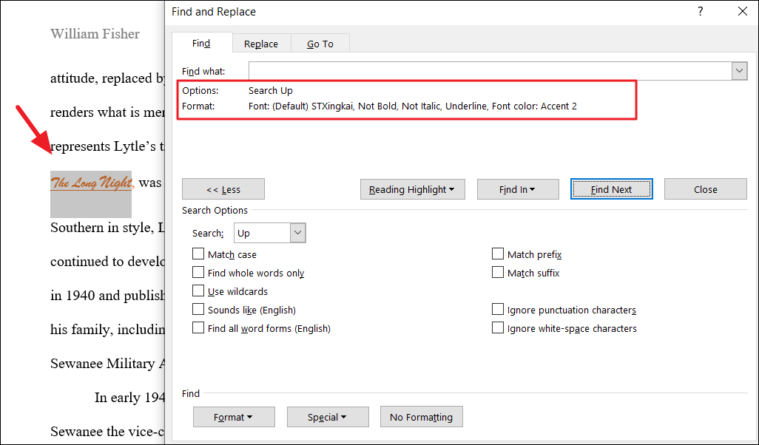
We are going to search for the word with a certain font format, so we are choosing ‘Font’. In the Find Font window, specify the format as shown below and click ‘OK’.
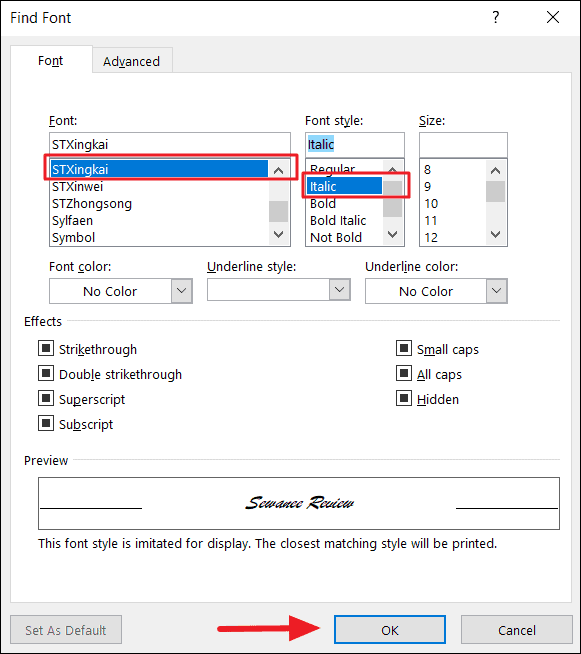
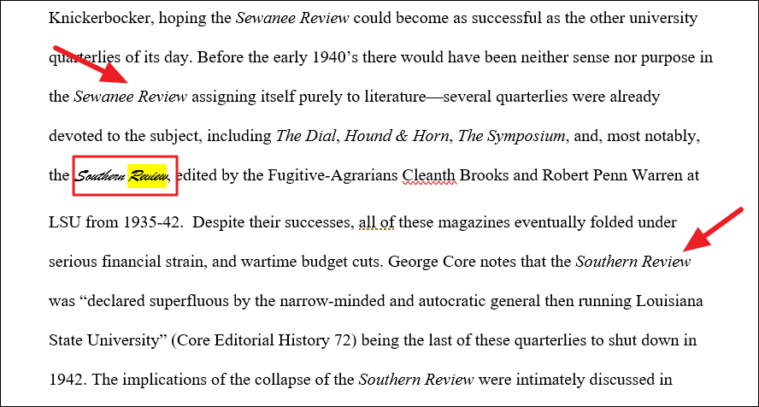
The chosen Format ‘Font: (Default) STXingkai, Italic’ will appear under the ‘Find What’ text box in the Find and Replace dialog box. Now click ‘Highlight All’ to find the matching words with that format.
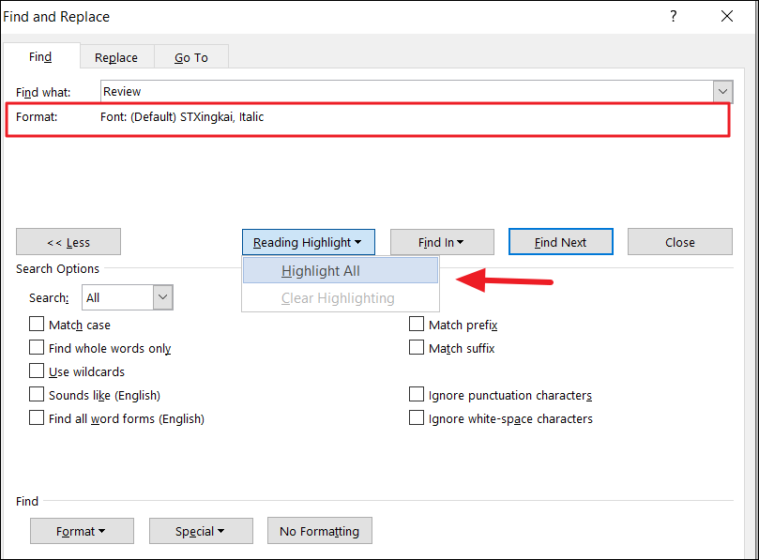
As you can see, the tool only highlights the words with that specific font format, while it doesn’t highlight the same matching word in a different font format.
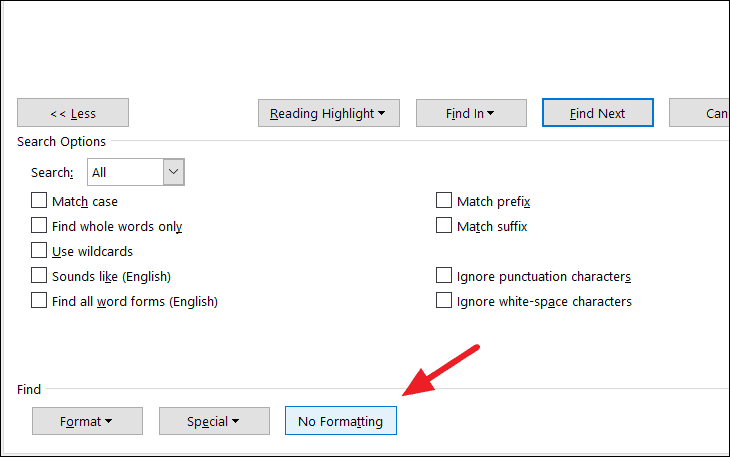
To clear the formatting for the search, click the ‘No Formatting’ button at the bottom of the Find and Replace dialog box.
Find Text with Only Formatting
You can even find texts with formatting alone. You don’t even have to type a word or phrase, you can just specify the only format of the text.
And the tool will find you all the words or phrases with the matching format.
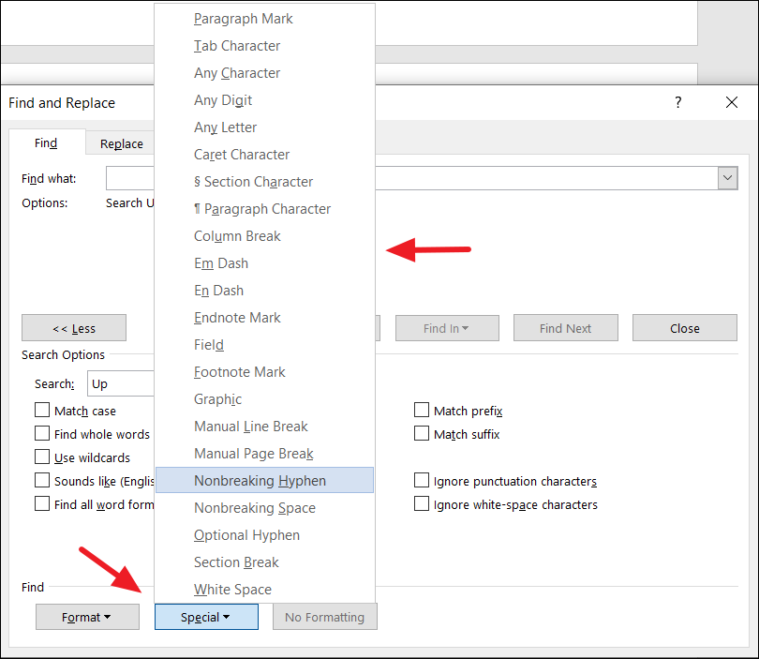
The Find and Replace tool also lets you find non-breaking characters/special characters or words with special characters by choosing the character(s) from the ‘Special’ drop-down button at the bottom of the Find and Replace dialog box.
Find and Replace Text in MS Word
So far, you have learned how to find text and how to find text with advanced options, now let us see how to replace the found text.
The Replace function allows you to find a word or a group of words and replace it with something else or find a word based on text formatting and replace it with other text, or find a specific word and replace its formatting, or find and replace characters with other special characters or words.
Find and Replace Text
To find and replace a particular word or phrase for another, navigate to the Editing group in the ‘Home’ tab and click the ‘Replace’ command. Alternatively, you can also press the keyboard shortcut Ctrl + H.
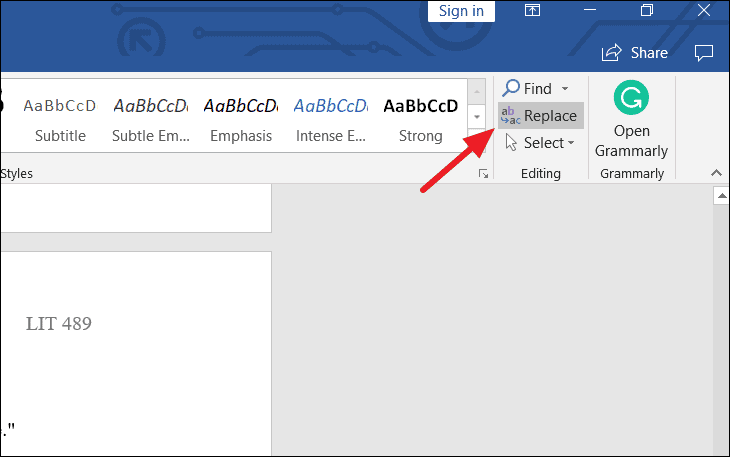
This will open the Find and Replace dialog box. In the Find and Replace dialog box, fill out the two fields:
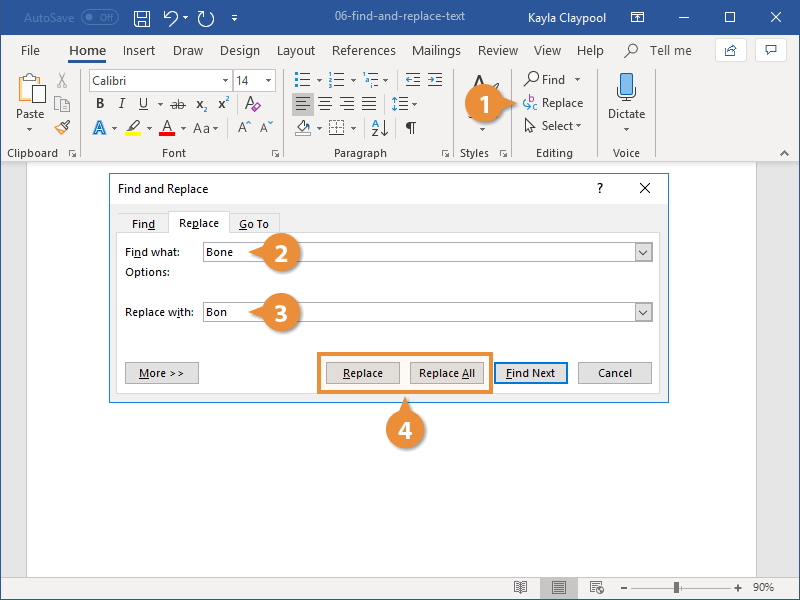
- Type the text you want to search for in the ‘Find what:’ field.
- Type the text you want to replace it with in the ‘Replace with:’ field.
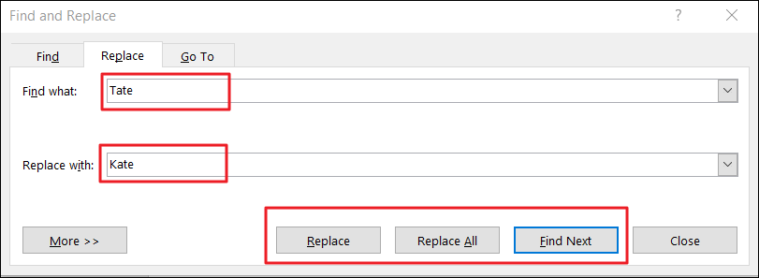
Once you enter the necessary texts, you can either click the ‘Replace’ button to replace the text one by one or ‘Replace All’ to replace all the instances of the word at once.
Replacing all the text together may cause errors in your document if you are not cautious. For example, if you are replacing all the ‘He’ words with ‘She’, it may also replace the words Head with Shead, help with Shelp, heat with Sheat, and so on. So sometimes, it’s better to replace them one at a time.
Click the ‘Find Next’ to find the first instance of the text highlighted in gray and click ‘Find Next’ again to jump to the next instance. Review each instance and click ‘Replace’ to exchange the currently highlighted text.
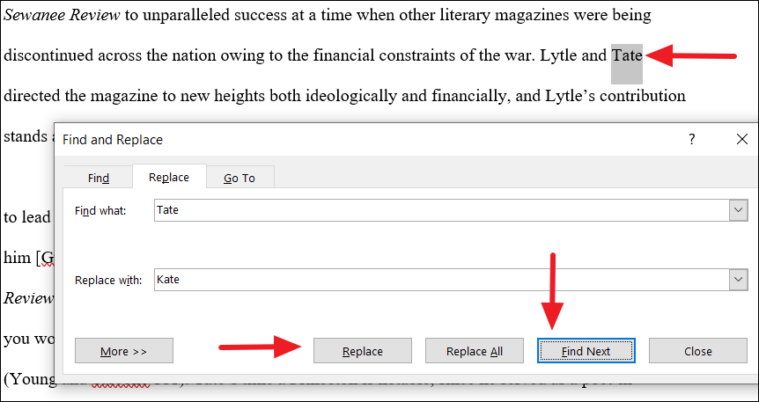
You can click the title bar of the Find and Replace dialog box and drag it out the way to see the results behind it.
Once you’re done, click the ‘Close’ button to close the dialog box.
Note: If you leave the ‘Replace With’ field blank, the search text in the ‘Find What’ field will be deleted from the document.
Advanced Find and Replace Text
If you are looking to replace more specific words such as words with punctuation, capitalization, certain font or style, or even special characters, you can use the advanced search options of the Find and Replace tool.
To access the advanced options of Find and Replace, click the ‘More >>’ button at the bottom of the dialog.
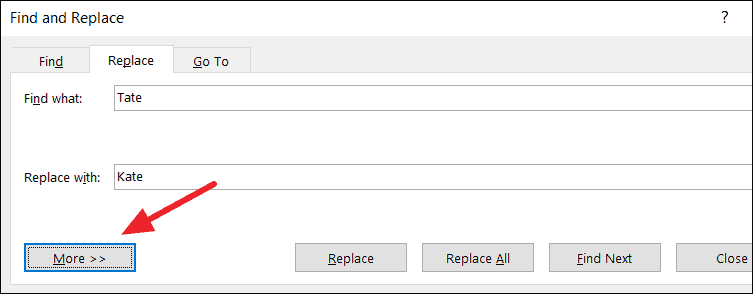
Here, you have various search and replace options that you can use to narrow down your search.
As we discussed earlier in the Advanced Find section, you already know what each option under the Search Options is used for.
Select one or more options under the Search Options and click ‘Find Next’ to find the matching words or click ‘Replace’ to replace one instance at a time or click ‘Replace All’ to exchange every instance at once.
Example:
As we mentioned before, this tool finds the combinations of characters of the given word, even as part of other words.
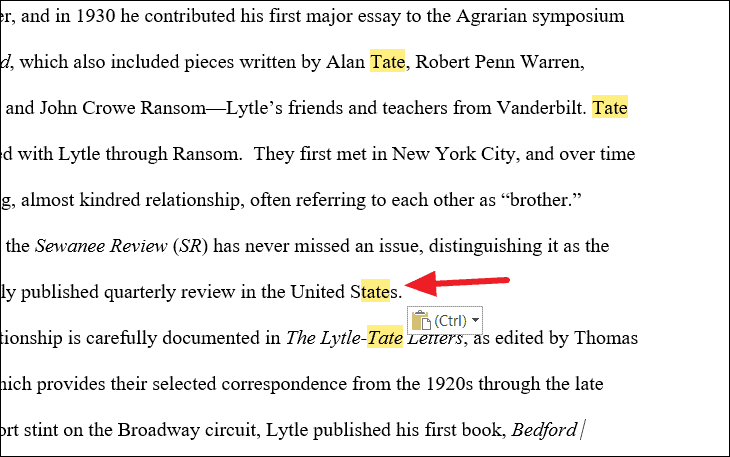
For example, when we search for the word ‘Tate’ in the document, it finds that combination of characters even as part of other words like ‘United States’.
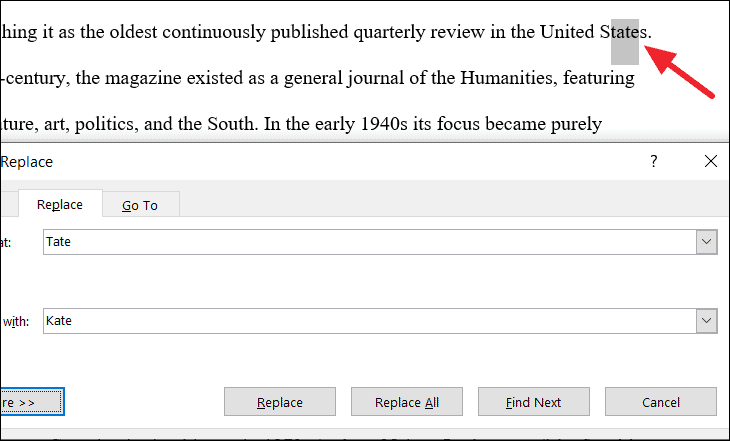
And this is not ideal when we replace these words. Also if you hundreds of matches, it would take forever to replace words one by one.
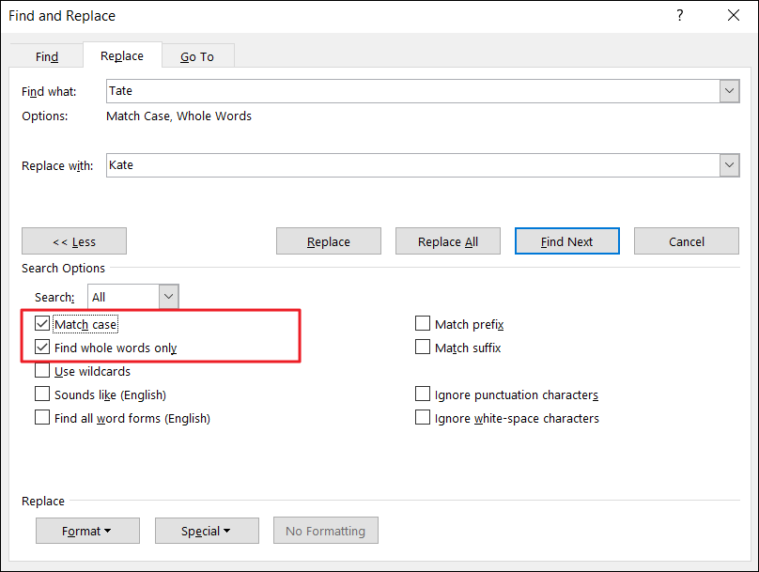
To fix this, check the ‘Find whole words only’ option, to find the words that are not partial or part of other words, it only finds whole words that are exactly matched. Here, we also checked the ‘Match case’ option to make sure it matches the exact uppercase and lowercase letters too. Then, click ‘Replace’ or ‘Replace All’ to replace the words.
You can use the rest of the above options in a similar fashion to customize your search to find specific words.
Find Text and Replace Formatting
You can also find a particular word and replace it with the same word but with specific formatting or replace it with another word with formatting.
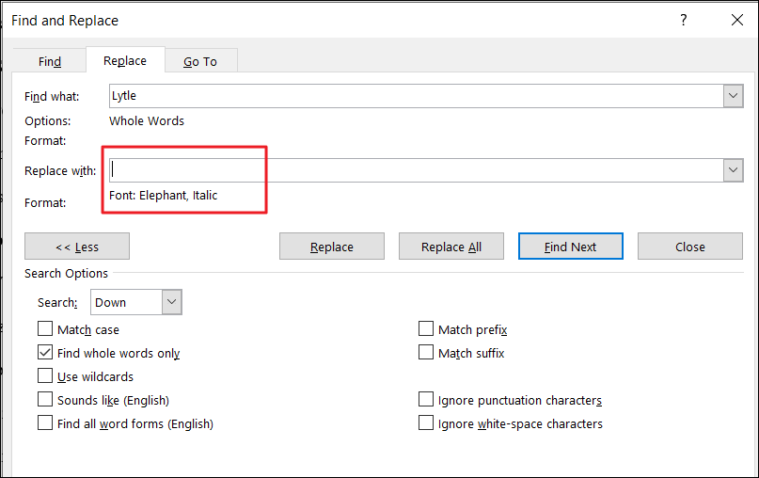
For example, we want to find and replace the whole word ‘Lytle’ with a specific font format. To replace formatting, type the word you want to find in the ‘Find what’ field and select the ‘Find whole words only’ option to search for only that whole word. Then, click the ‘Format’ button at the bottom of the dialog box and choose ‘Font’.
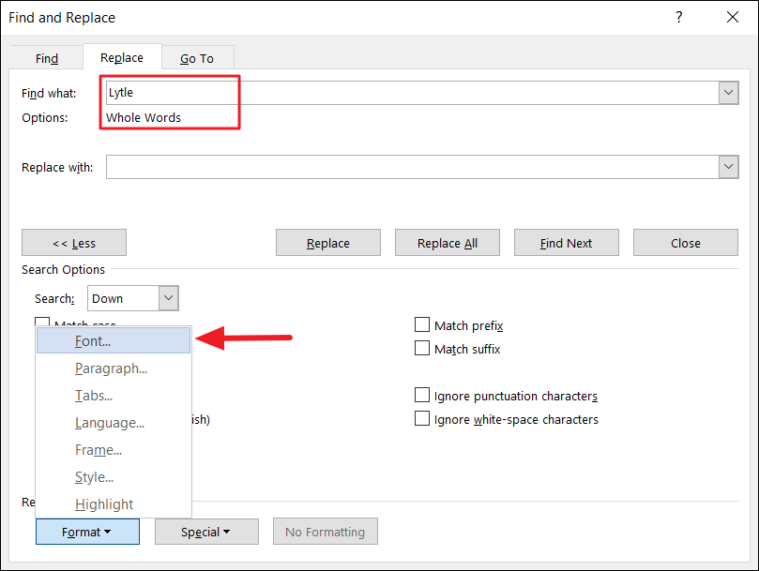
You can replace words with other formatting options such as Style, Paragraph, Frame, and so on.
In the Replace Font dialog, choose your desired format style such as font, font style, font color, etc. In our case, we are choosing ‘Elephant’ font and ‘Italic’ style. Then, click ‘OK’ to apply.
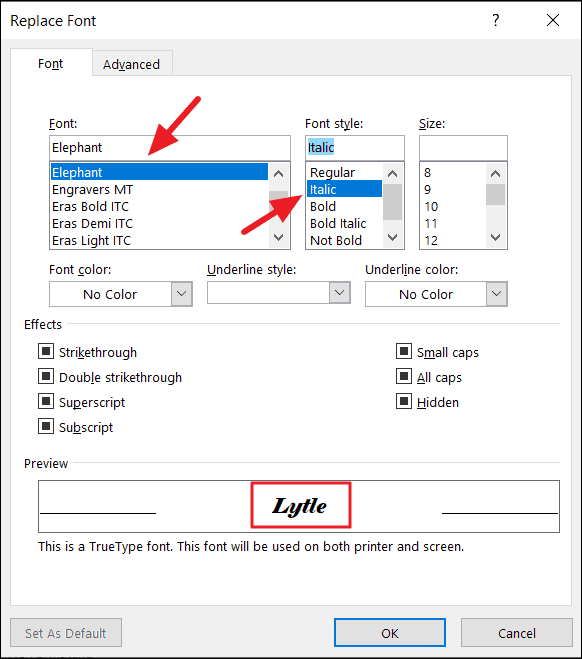
Back in the ‘Find and Replace’ dialog box, you can see the chosen formatting is set for the ‘Replace with:’. Since we are only replacing the formatting of the word, leave the ‘Replace with:’ field blank. Then, click either the ‘Replace’ or ‘Replace All’ button to replace the formatting.
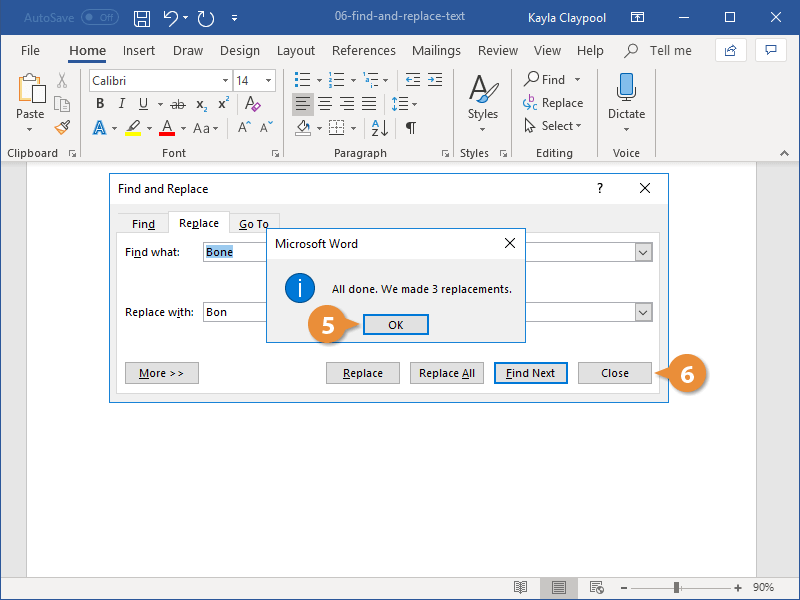
Once you click the ‘Replace All’ button a message box will appear informing you how many replacements were made (In our case, 222).
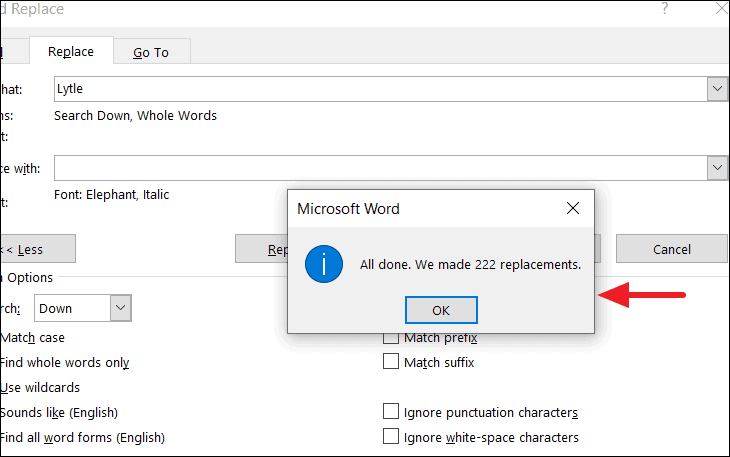
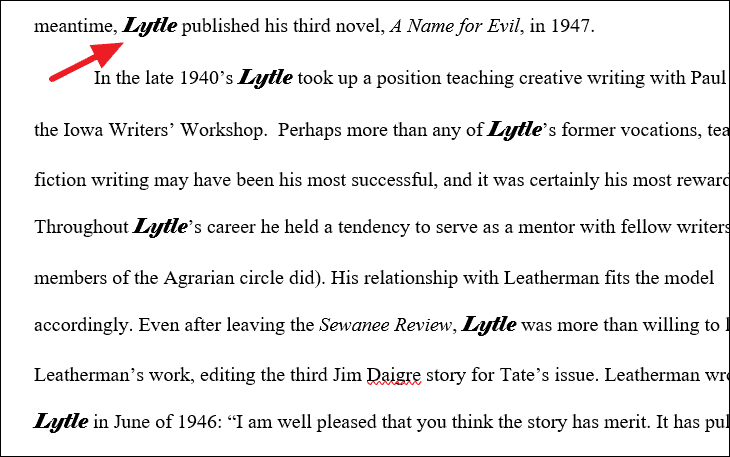
As you can see, all the instances of the word ‘Lytle’ is replaced with specified formatting.
Find Text with a Specific Formatting and Replace
If you want to find a text that has a certain formatting style and replace it with another text, without changing the formatting or with different formatting, you can do it by applying that formatting to the Find word. Here’ how you do this:
For example, we want to find and replace the text ‘Leatherman’, that has particular formatting (Font: Old English Text MT, Style: Italic, Color: Blue, Accent 5), with the text ‘Lincoln’ (without changing the formatting).
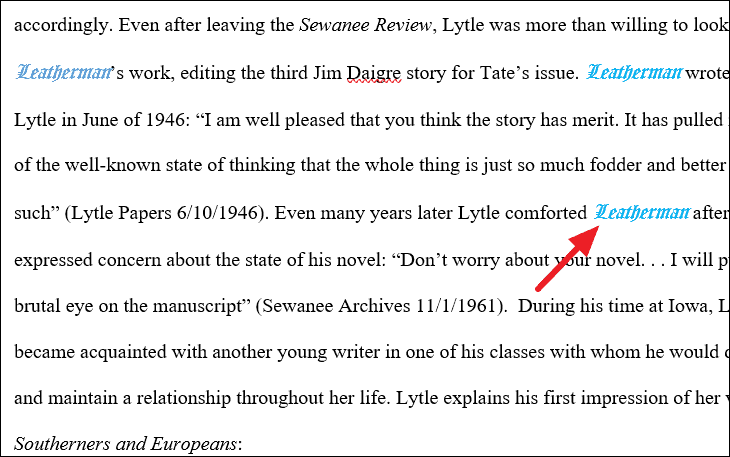
First, type the text you want to search for (in our case, Leatherman) in the ‘Find What’ field. Then, click on the ‘Format’ button and choose the options as required (Font).
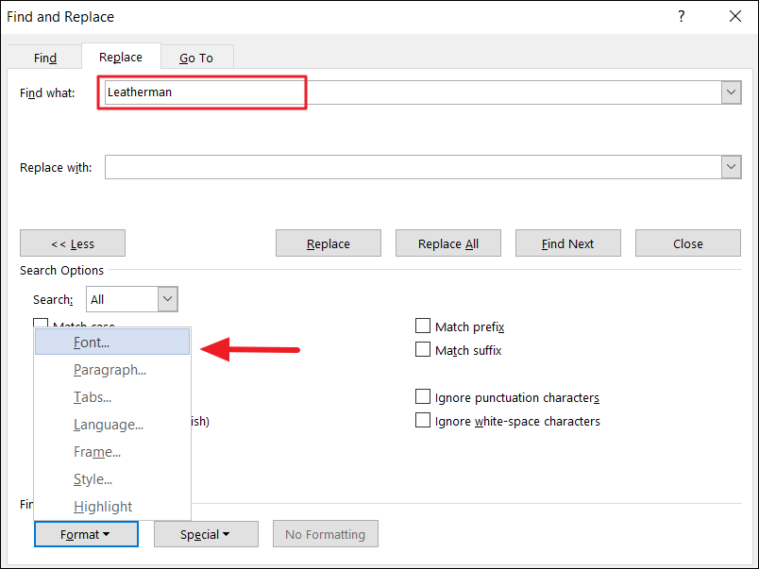
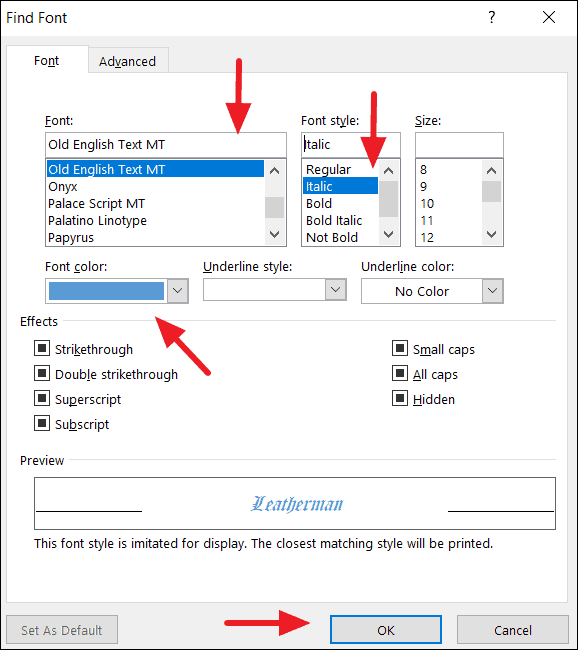
In the Find Font, dialog box, select the required formatting with which we’re going to find text. In our example, the text ‘Leatherman’ is in ‘Font: Old English Text MT, Style: Italic, and Color: Blue, Accent 5’ formatting. Once the options are selected, click ‘OK’.
Now the selected formatting options should appear under the ‘Find What’ text field in the Find and Replace.
Next, type the text you want it to be replaced with (Lincon) in the ‘Replace with field:’ and click ‘Replace All’. You can also add formatting to the replacement text if you want.

Once you click ‘Replace All’, all of the instances will be replaced and a prompt will show you how many replacements were made.

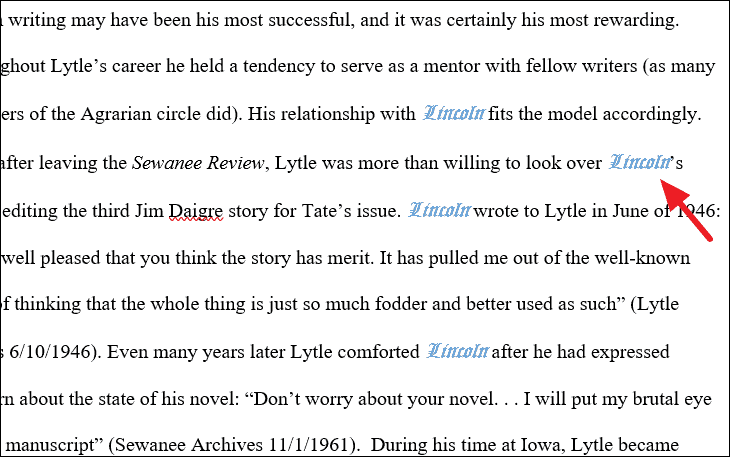
As you can see all the instances of the ‘Leatherman’ with formatting is replaced by the ‘Lincoln’ without changing the formatting.
Find and Replace Special Characters/Non-Printing Characters
The find and replace feature can also help you find special character characters and replace them with other special characters such as ®, é, ä, or any other character listed in the Symbol dialog. You can also find and replace non-printing characters such as manual line breaks, tab characters, paragraph marks, etc. You can even replace special characters with text and vice versa.
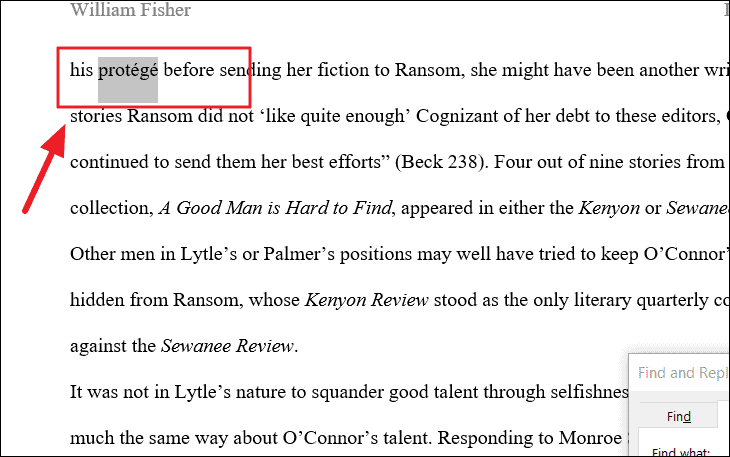
For example, if you want to find and replace the word ‘protege’ with ‘protégé’, type ‘protege’ in the Find what box and type ‘protégé’ in the ‘Replace with’ box. Then, click ‘Replace’ or ‘Replace All’ to replace them.
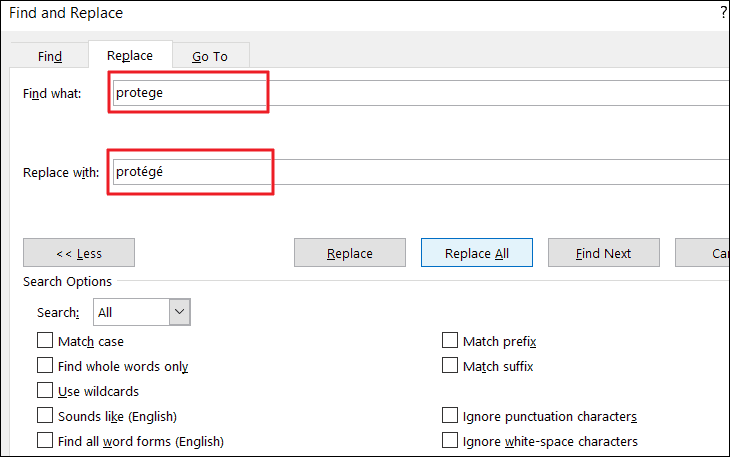
As you can see the found texts are replaced with replacement text with special characters.
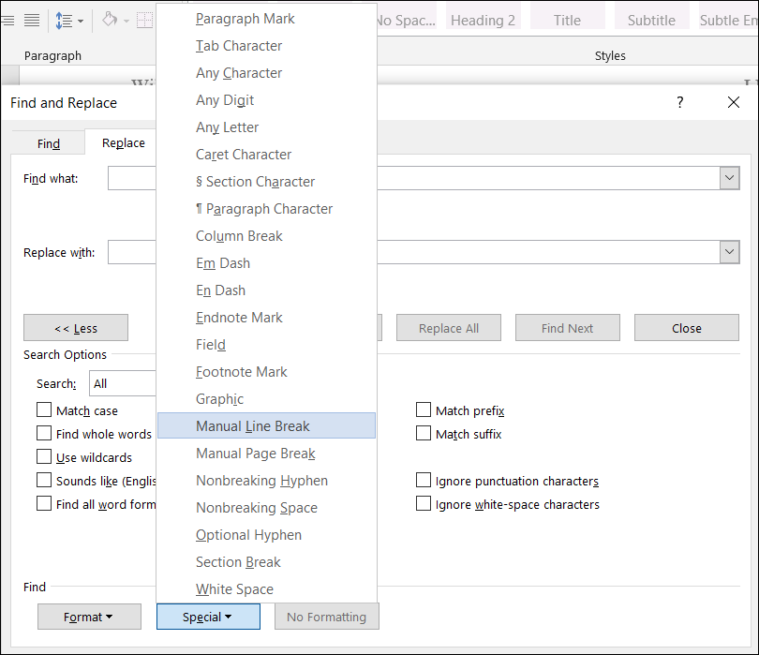
Sometimes you want to replace manual line breaks (non-printing characters) with paragraph marks, in such cases, you need to insert respective character code in the ‘find what’ and ‘replace with’ boxes.
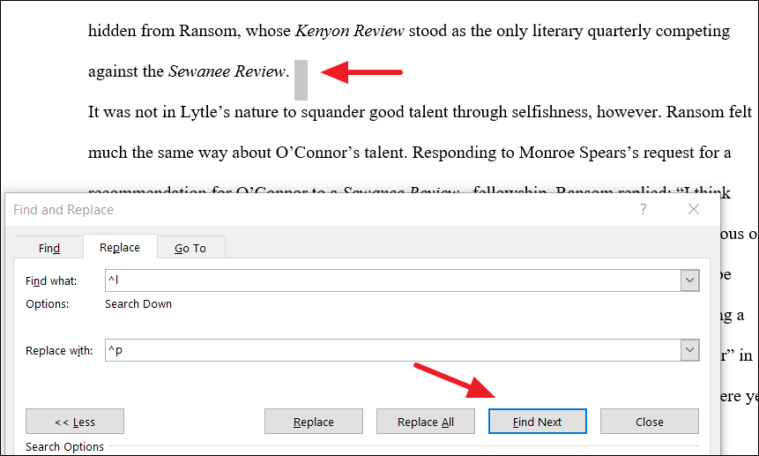
For example, we want to replace all manual line breaks in the documents with paragraph marks. The character code for a manual line break and paragraph mark is ‘^l’ and ‘^p’ respectively. You can either type the code or if you don’t know the code, use the ‘Special’ button to insert the code.
To insert non-breaking characters, first, select the text box where you want to insert. Then, click the ‘Special’ button at the bottom of the Find and Replace dialog box and select an item from the list. And the tool will automatically insert the respective character code in the text box.
In the example, we are choosing ‘Manual Line Break’ for the ‘Find what’ field.
And ‘Paragraph Mark’ for the ‘Replace with’.
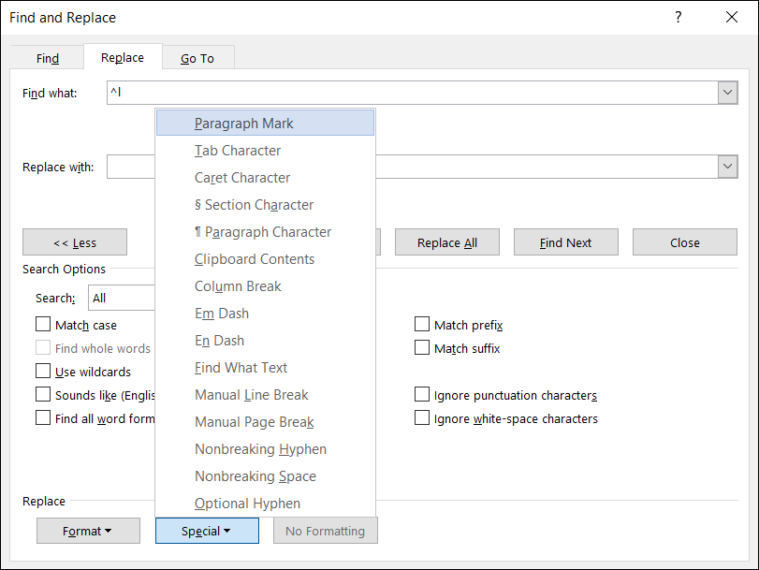
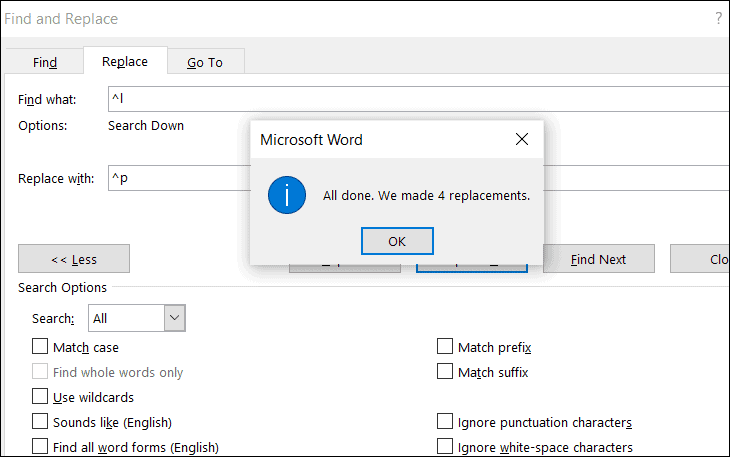
Then, click ‘Find Next’ to see where the line breaks are located. Now, click ‘Replace All’ to replace all the manual line breaks in the documents.
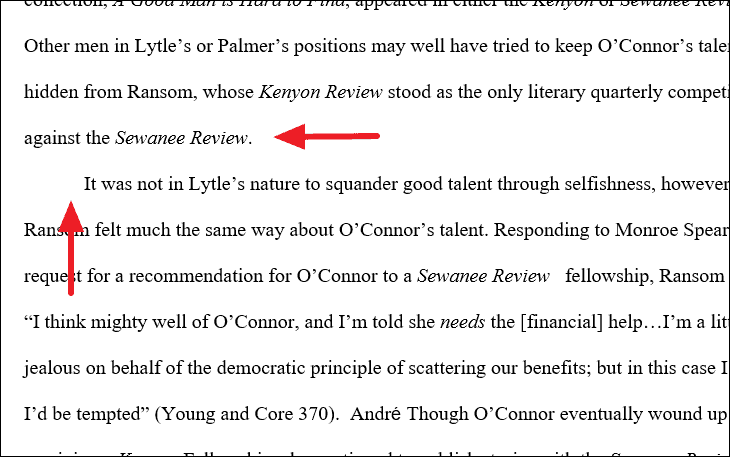
As you can see below, the manual line breaks are replaced with paragraph marks.
In the similar way, you can also replace non-breaking characters/special characters with text and vice versa.
That’s everything you need to know about finding and replacing text in Microsoft Word.