
SharePoint Server Subscription Edition SharePoint Server 2019 SharePoint Server 2016 SharePoint Server 2013 SharePoint Server 2013 Enterprise SharePoint in Microsoft 365 SharePoint Foundation 2010 SharePoint Server 2010 SharePoint in Microsoft 365 Small Business Windows SharePoint Services 3.0 More…Less
Finds one text string (find_text) within another text string (within_text), and returns the number of the starting position of find_text, from the first character of within_text. You can also use SEARCH to find one text string within another, but unlike SEARCH, FIND is case sensitive and doesn’t allow wildcard characters.
Syntax
FIND(find_text,within_text,start_num)
Find_text is the text you want to find.
Within_text is the text containing the text you want to find.
Start_num specifies the character at which to start the search. The first character in within_text is character number 1. If you omit start_num, it is assumed to be 1.
You can also use start_num to skip a specified number of characters. For example, suppose you are working with the text string «AYF0093.YoungMensApparel». To find the number of the first «Y» in the descriptive part of the text string, set start_num equal to 8 so that the serial-number portion of the text is not searched. FIND begins with character 8, finds find_text at the next character, and returns the number 9. FIND always returns the number of characters from the start of within_text, counting the characters you skip if start_num is greater than 1.
Remarks
-
If find_text is «» (empty text), FIND matches the first character in the search string (that is, the character numbered start_num or 1).
-
Find_text cannot contain any wildcard characters.
-
If find_text does not appear in within_text, FIND returns the #VALUE! error value.
-
If start_num is not greater than zero, FIND returns the #VALUE! error value.
-
If start_num is greater than the length of within_text, FIND returns the #VALUE! error value.
Example set 1
|
Formula |
Description (Result) |
|---|---|
|
=FIND(«M»,»Miriam McGovern») |
Position of the first «M» in the string (1) |
|
=FIND(«m»,»Miriam McGovern») |
Position of the first «m» in the string (6) |
|
=FIND(«M»,»Miriam McGovern»,3) |
Position of the first «M» in the string, starting with the third character (8) |
Example set 2
|
Col1 |
Formula |
Description (Result) |
|---|---|---|
|
Ceramic Insulators #124-TD45-87 |
=MID([Col1],1,FIND(» #»,[Col1],1)-1) |
Extracts text from position 1 to the position of » #» in the string (Ceramic Insulators) |
|
Copper Coils #12-671-6772 |
=MID([Col1],1,FIND(» #»,[Col1],1)-1) |
Extracts text from position 1 to the position of » #» in the string (Copper Coils) |
|
Variable Resistors #116010 |
=MID([Col1],1,FIND(» #»,[Col1],1)-1) |
Extracts text from position 1 to the position of » #» in the string (Variable Resistors) |
Need more help?
Use the word processor’s search function to locate text and more
Updated on December 15, 2020
What to Know
- Basic word search: Go to the Home tab. Select Find and enter the text for the search.
- Advanced search: Go to Home > Find. Choose the search drop-down arrow. Select Options and select your criteria.
This article explains how to search for text in Microsoft Word. The information applies to Word 2019, Word 2016, Word 2013, Word 2010, Word Online, and Word for Microsoft 365.
How to Do a Basic Word Search in MS Word
Microsoft Word includes a search function that makes it easy to search for different elements in a document, including text. Use the basic tool to look for instances of a specific word, or the advanced options to perform tasks such as replace all instances of a word with another one or search for equations.
To run a basic search for a specific word or phrase in Word:
-
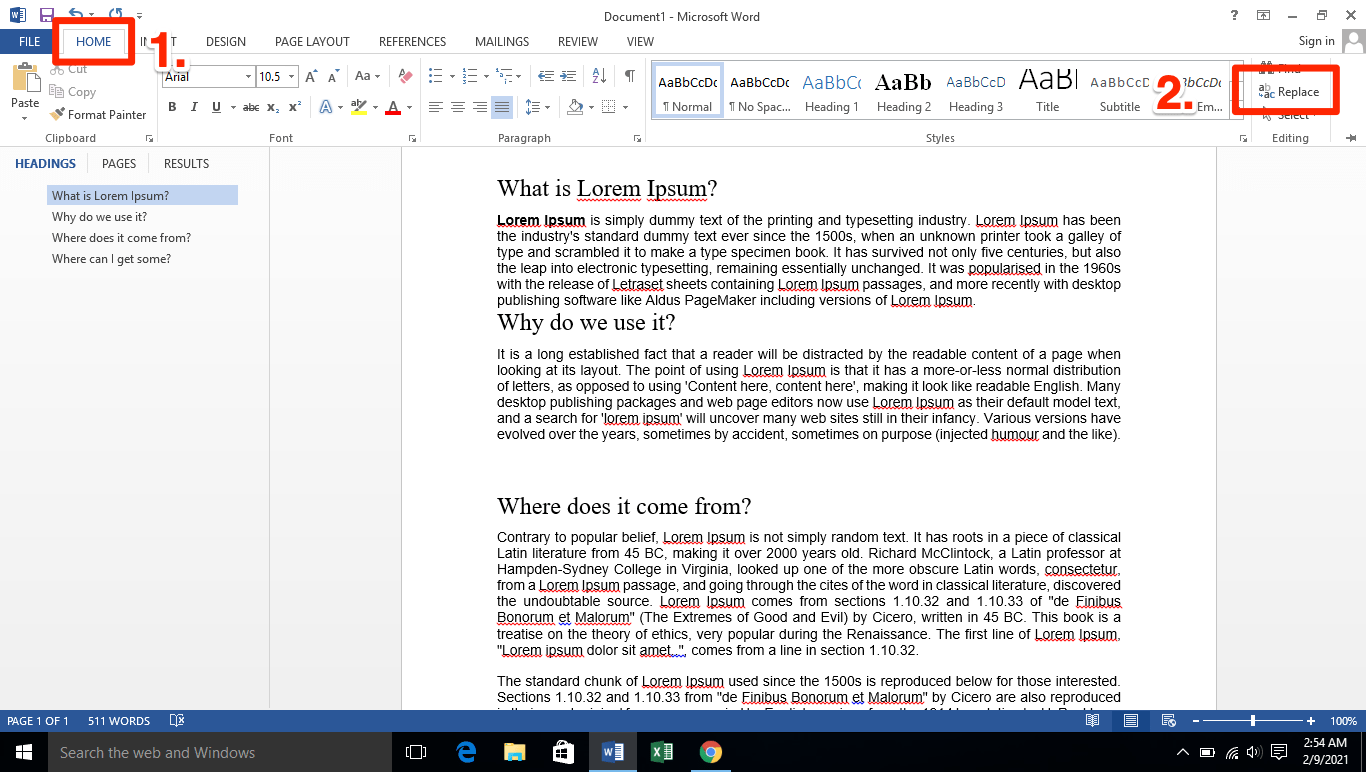
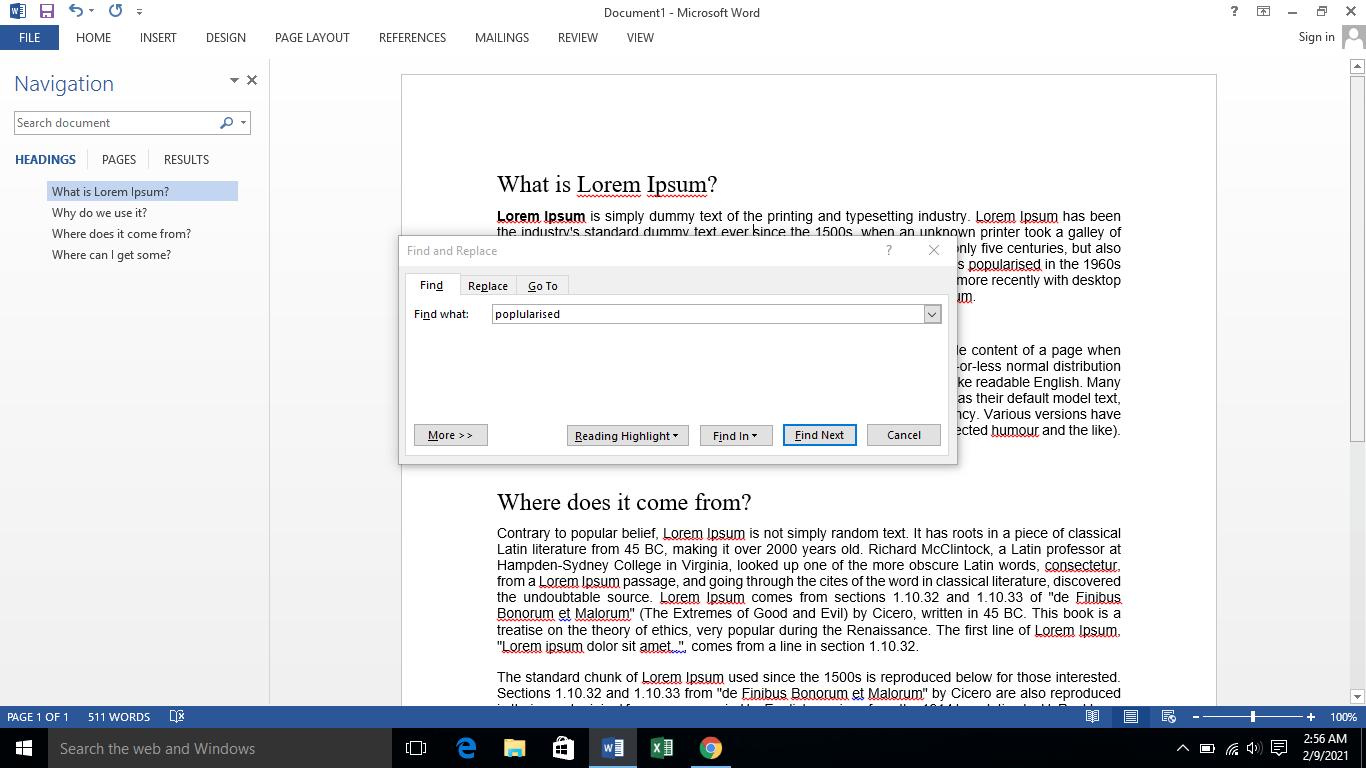
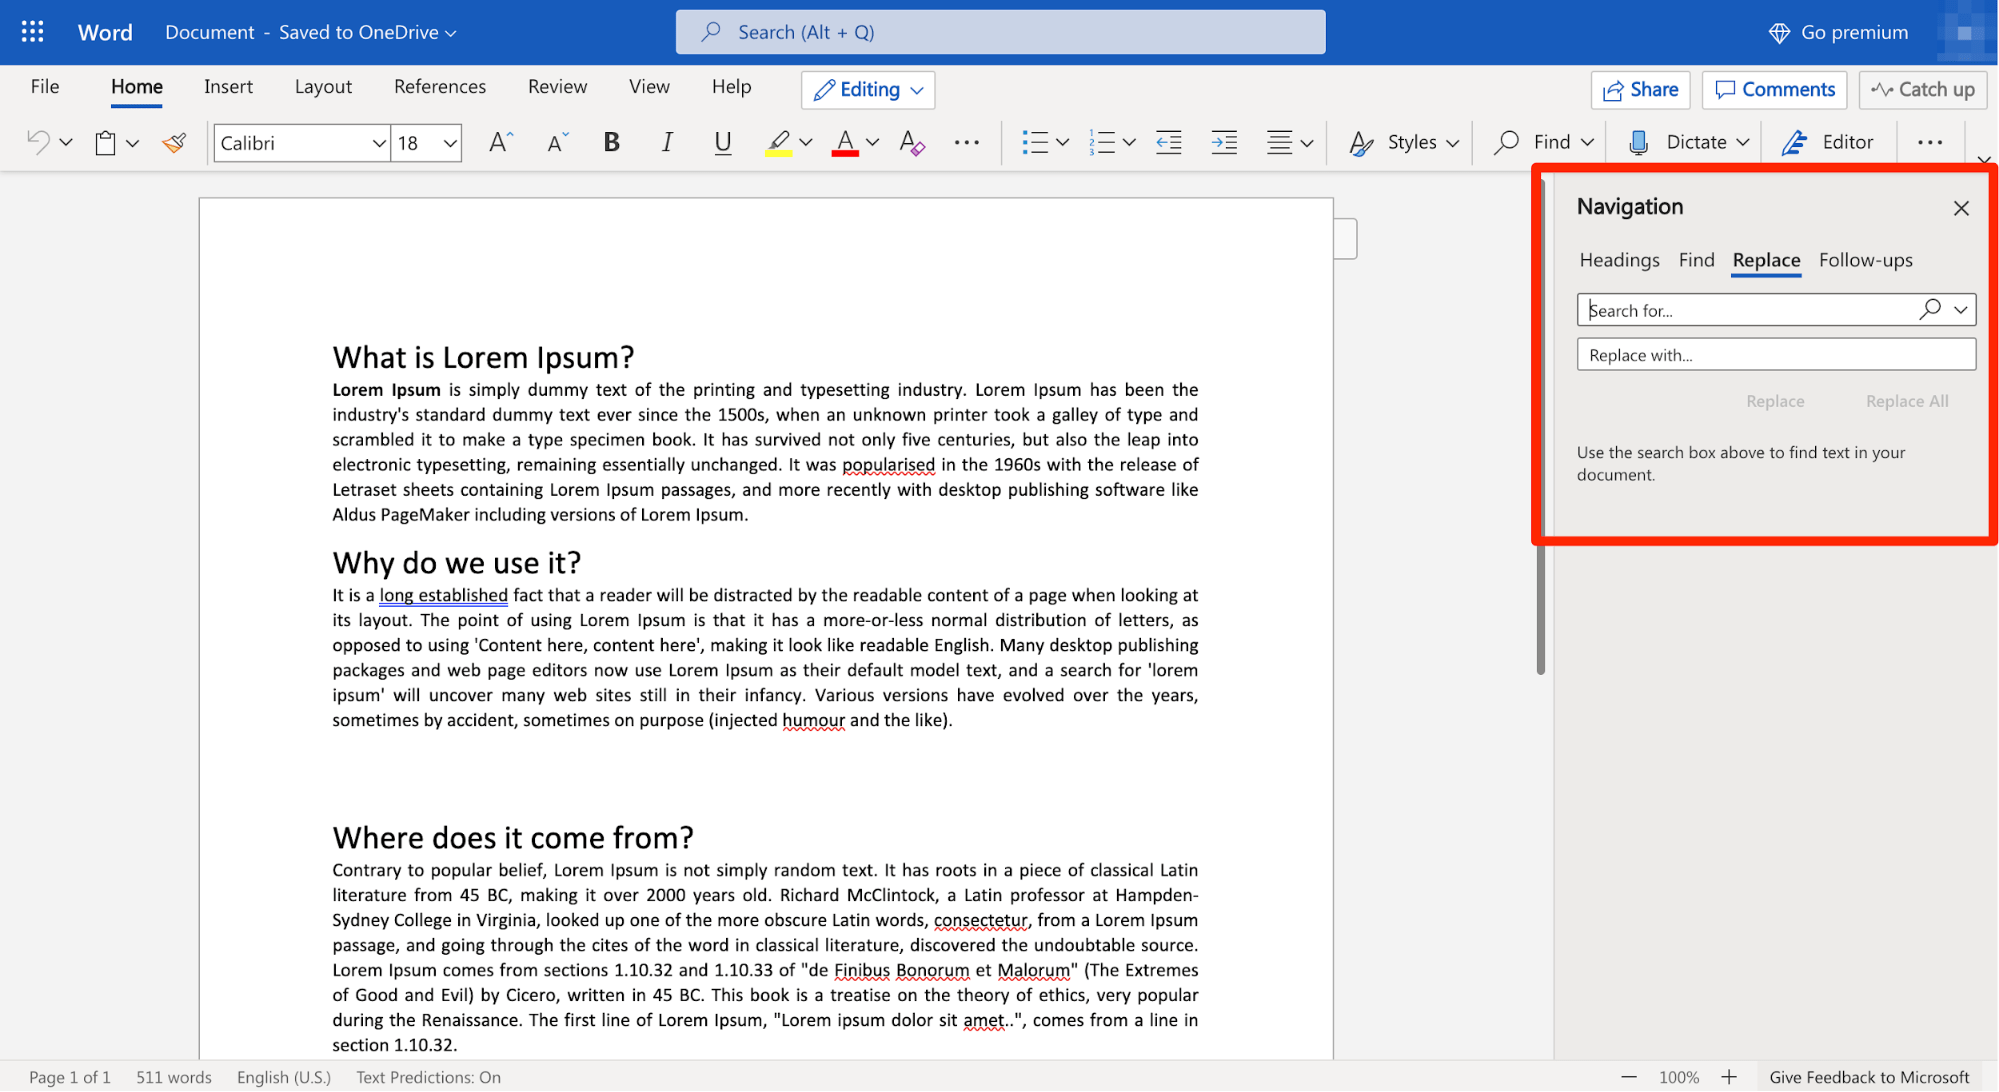
Go to the Home tab and select Find, or press Ctrl+F.
In older versions of Microsoft Word, select File > File Search.
-
In the Navigation pane, enter the text you want to search for. A list of matching words displays in the Navigation pane and instances of the word are highlighted in the main document.
-
Cycle through the results in the Navigation pane in one of three ways:
- Press Enter to move to the next result.
- Select a result with the mouse.
- Select the Up and Down arrows to move to the previous or next result.
-
Make any changes or edits to the document as needed.
-
Select the Down arrow to move to the next instance of the word.
Match Case, Whole Words Only, and More
Beyond searching for every instance of a word, you can get more specific about what you want to find. For example, to find whole instances of a word and not every word that contains the letter combination or to find instances of a word that aren’t capitalized.
Here’s how to do an advanced search:
-
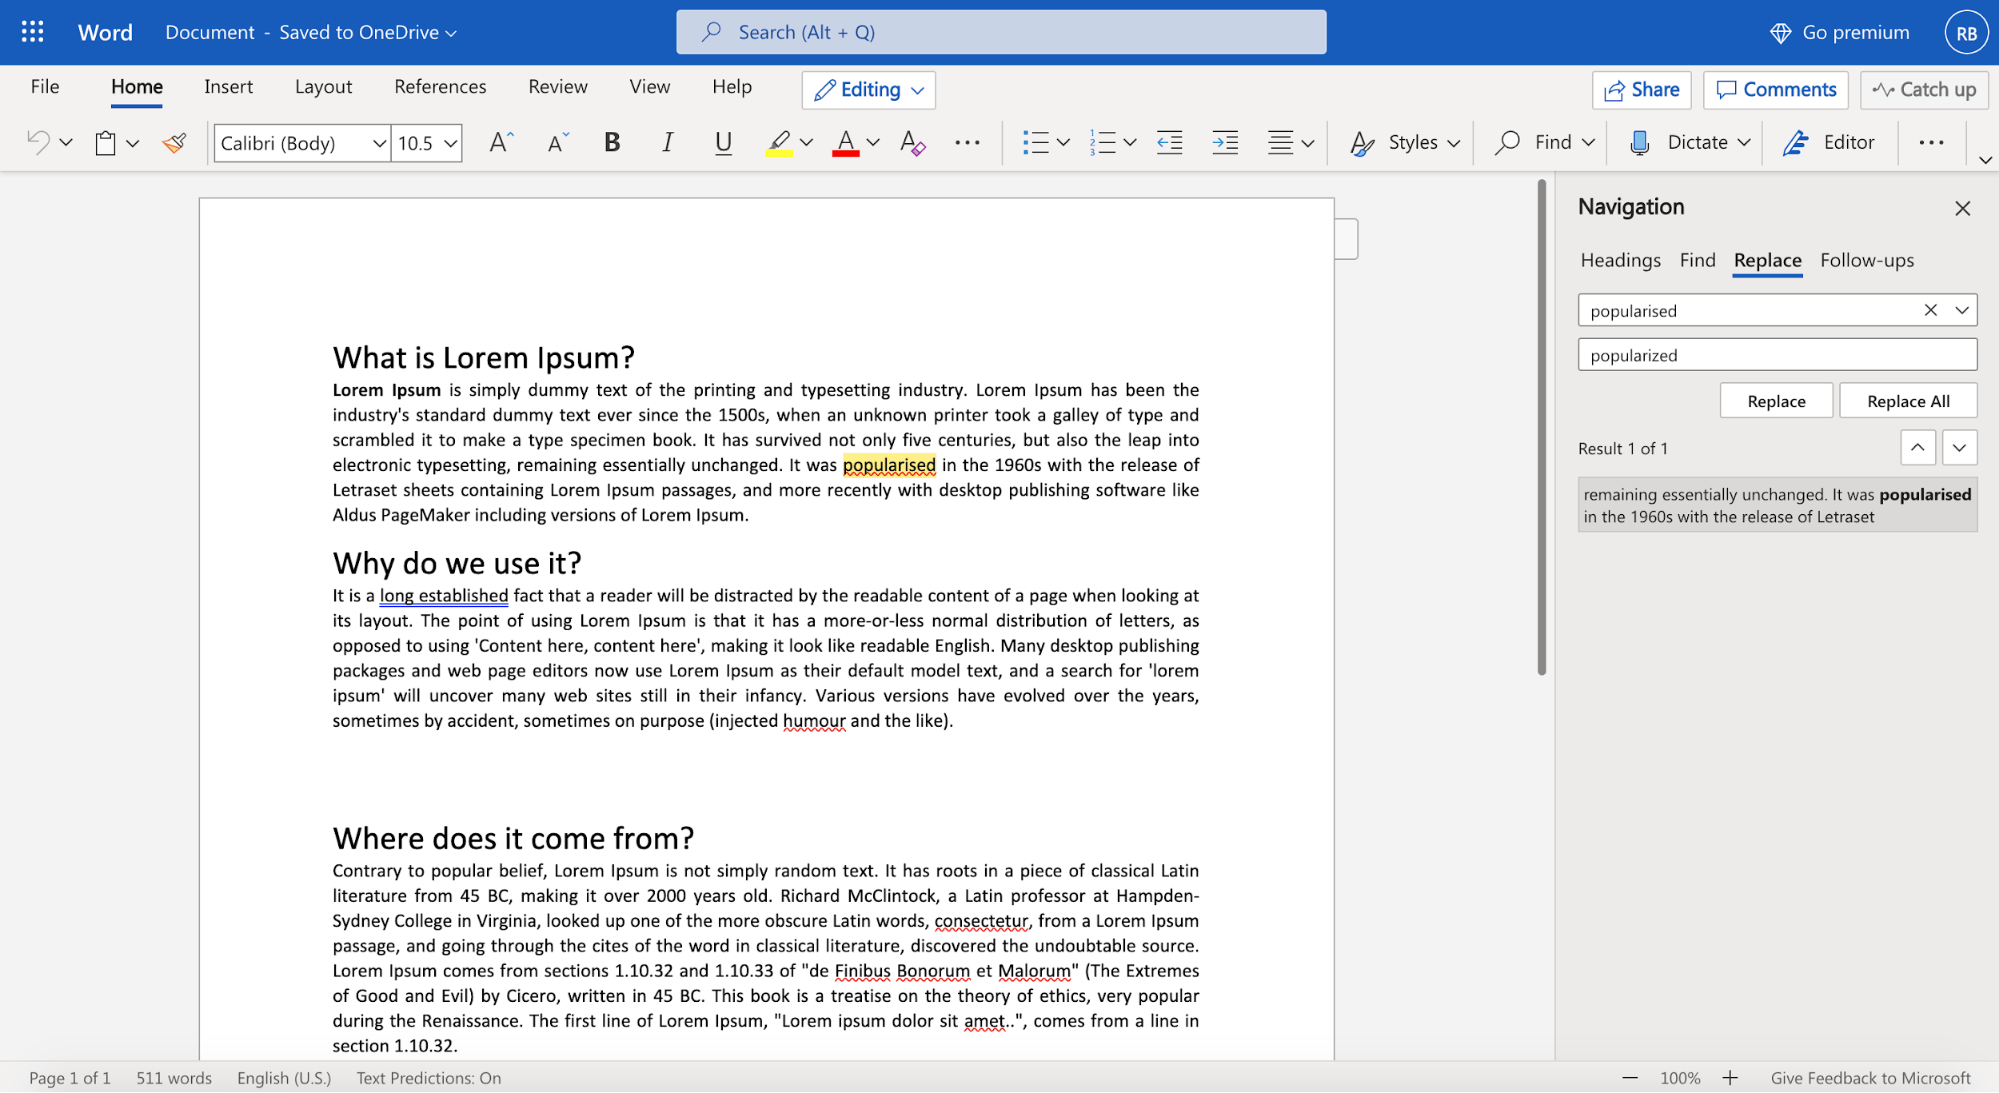
Select Home > Find.
-
In the Navigation pane, select the Search drop-down arrow.
-
Choose Options.
-
In the Find Options dialog box, choose the description that best fits what you’re trying to find. For example, to find instances of a word with the same capitalization, select Match case.
-
Select OK.
Use Advanced Find
Many of the choices available in the Find Options dialog box are also available in Advanced Find. Advanced Find includes the option to replace the text with something new. Based on your selection, Word replaces one instance or all instances at once. You can also replace the formatting, or change the language, paragraph, and tab settings.
Find Instances of Other Elements
Other options in the Navigation pane include searching for equations, tables, graphics, footnotes, endnotes, and comments.
Thanks for letting us know!
Get the Latest Tech News Delivered Every Day
Subscribe
This is the first of three articles about the useful Find and Replace functions in Word. It covers Word 2007, Word 2010 and Word 2013 in detail, although once you’ve got past the first hurdle, they all work in exactly the same way. This article tells you why you might want to use Find and Replace, how to locate them, and basics of how to use them. Subsequent articles look in more detail at how to find specific words and phrases, and even symbols and formatting.
Why would I use Find and Replace?
The Find function in Word is very useful if you need to locate all of the places where you’ve used a particular word or phrase. I use it to check that I’ve kept things consistent. I might look for every instance of the word “Find” in an article on Find and Replace, for example, to check …
- Have I always used it with a capital letter or sometimes with a lower-case initial letter?
- Have I always typed Find and Replace, or sometimes Find & Replace?
- Have I used find, finding, etc. too many times around the word Find, making the piece look clumsy?
I also use Find and Replace if I have decided that I want to change something throughout the text, for example:
- I’ve used “low fat” and “low-fat” inconsistently and want to change all instances to low-fat
- A client wants me to eliminate double spaces after full stops. I Find ” ” and replace it with ” “
- I’ve misheard an album title in a transcription and want to go back and find the incorrect version and replace it with the correct one
So, that’s why we use it – how do we use Find and Replace?
How do I access Find and Replace in Word 2007?
You can access the Find and Replace dialogue box in Word 2007 by going to the Home tab and clicking on the arrow to the right of Find at the right-hand end of the menu bar:

Word 2007 also uses the simple Ctrl-F keyboard shortcut to bring up the Find and Replace dialogue box (this also works in Word 2003).

Once you’ve brought up the dialogue box, type in the text you want to search for and press Enter or the Find Next button.
How do I access Find and Replace in Word 2010?
In Word 2010, you can access find and replace using the Home tab and the Find option at the right (note Advanced Find option):

If you just choose Find, you’ll get the sidebar shown below, if you choose Advanced Find, you’ll jump straight to the dialogue box.
Pressing Ctrl-F will bring up a sidebar with a simple search option. This seems very odd if you’re used to Word 2003 and Word 2007, as you are left wondering where the familiar dialogue box is, but it’s actually very useful, as you can see at a glance how many times your word is used and where in the text it can be found, and the word searched for (in this case localisation) is highlighted in the text:

If you want to access the more advanced Find and Replace dialogue box that you’re used to from Word 2007, you need to either choose Advanced Find from the Home tab Find area, or click on the arrow to the right of the magnifying glass in the side panel. If you do that, you’ll get a drop-down menu which includes Advanced Find.

Whichever option you choose, you will then be confronted with the familiar Find and Replace dialogue box:

Once you’ve brought up the dialogue box, type in the text you want to search for and press Enter or the Find Next button.
How do I access Find and Replace in Word 2013?
This works pretty well exactly the same as in Word 2010, just with fewer colours and less handy yellow highlighting (I’m sure you can add that back in and I’ll write about that when I find out how to do it). So, you can either access Find and Replace using the Home tab, Find area, and dropping down the arrow at the right to choose Find or Advanced Find:

If you just choose Find, you’ll get the sidebar shown below, if you choose Advanced Find, you’ll jump straight to the dialogue box.
Or press Ctrl-F to access that useful sidebar that will surprise you if you’re accustomed to Word 2003/2007 … which will show you all instances of any word you search for in the whole document and highlight them (in yellow!):

Then, to reach the dialogue box, click the arrow to the right of the magnifying glass and choose Advanced Find:

And there’s your familiar dialogue box:

Once you’ve brought up the dialogue box, type in the text you want to search for and press Enter or the Find Next button.
Are there more options for Find?
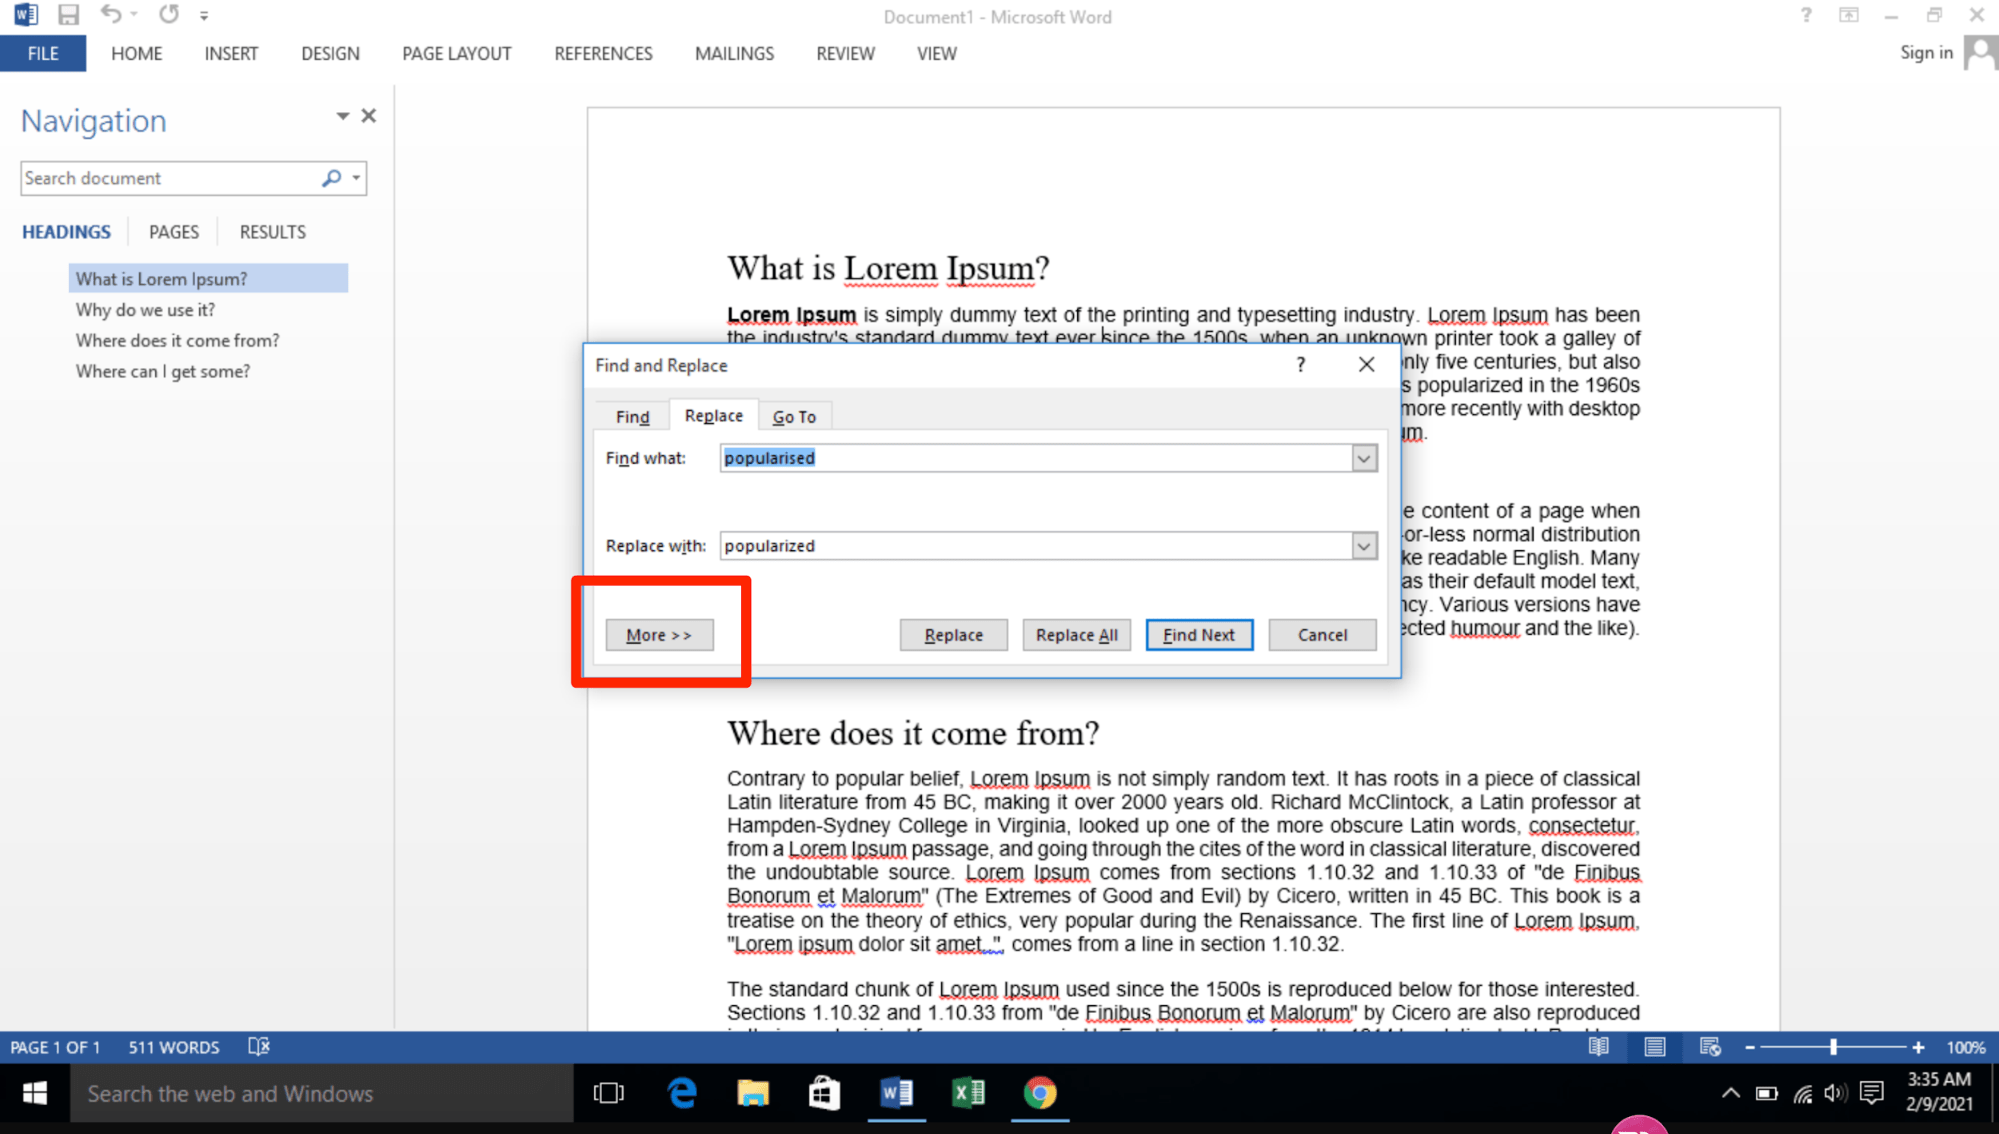
You can access more options for Finding specific text by pressing the More button in the dialogue box:

This will give you lots more options for refining your search. Some are quite obvious, but I’m going to write about all of them in depth in another post.

How do I replace text in Word 2007 / Word 2010 / Word 2013
(Note: all screenshots are from Word 2010, however this works exactly the same for all versions of Word back to Word 2003 and up to Word 2013 (at least)).
To Replace text, you need to go to the second tab along in the Find and Replace dialogue box, marked Replace. You will then be given an extra space to fill in the text you want to replace your found text with. In this case, I’m finding “localisation” and replacing it with “localization”:

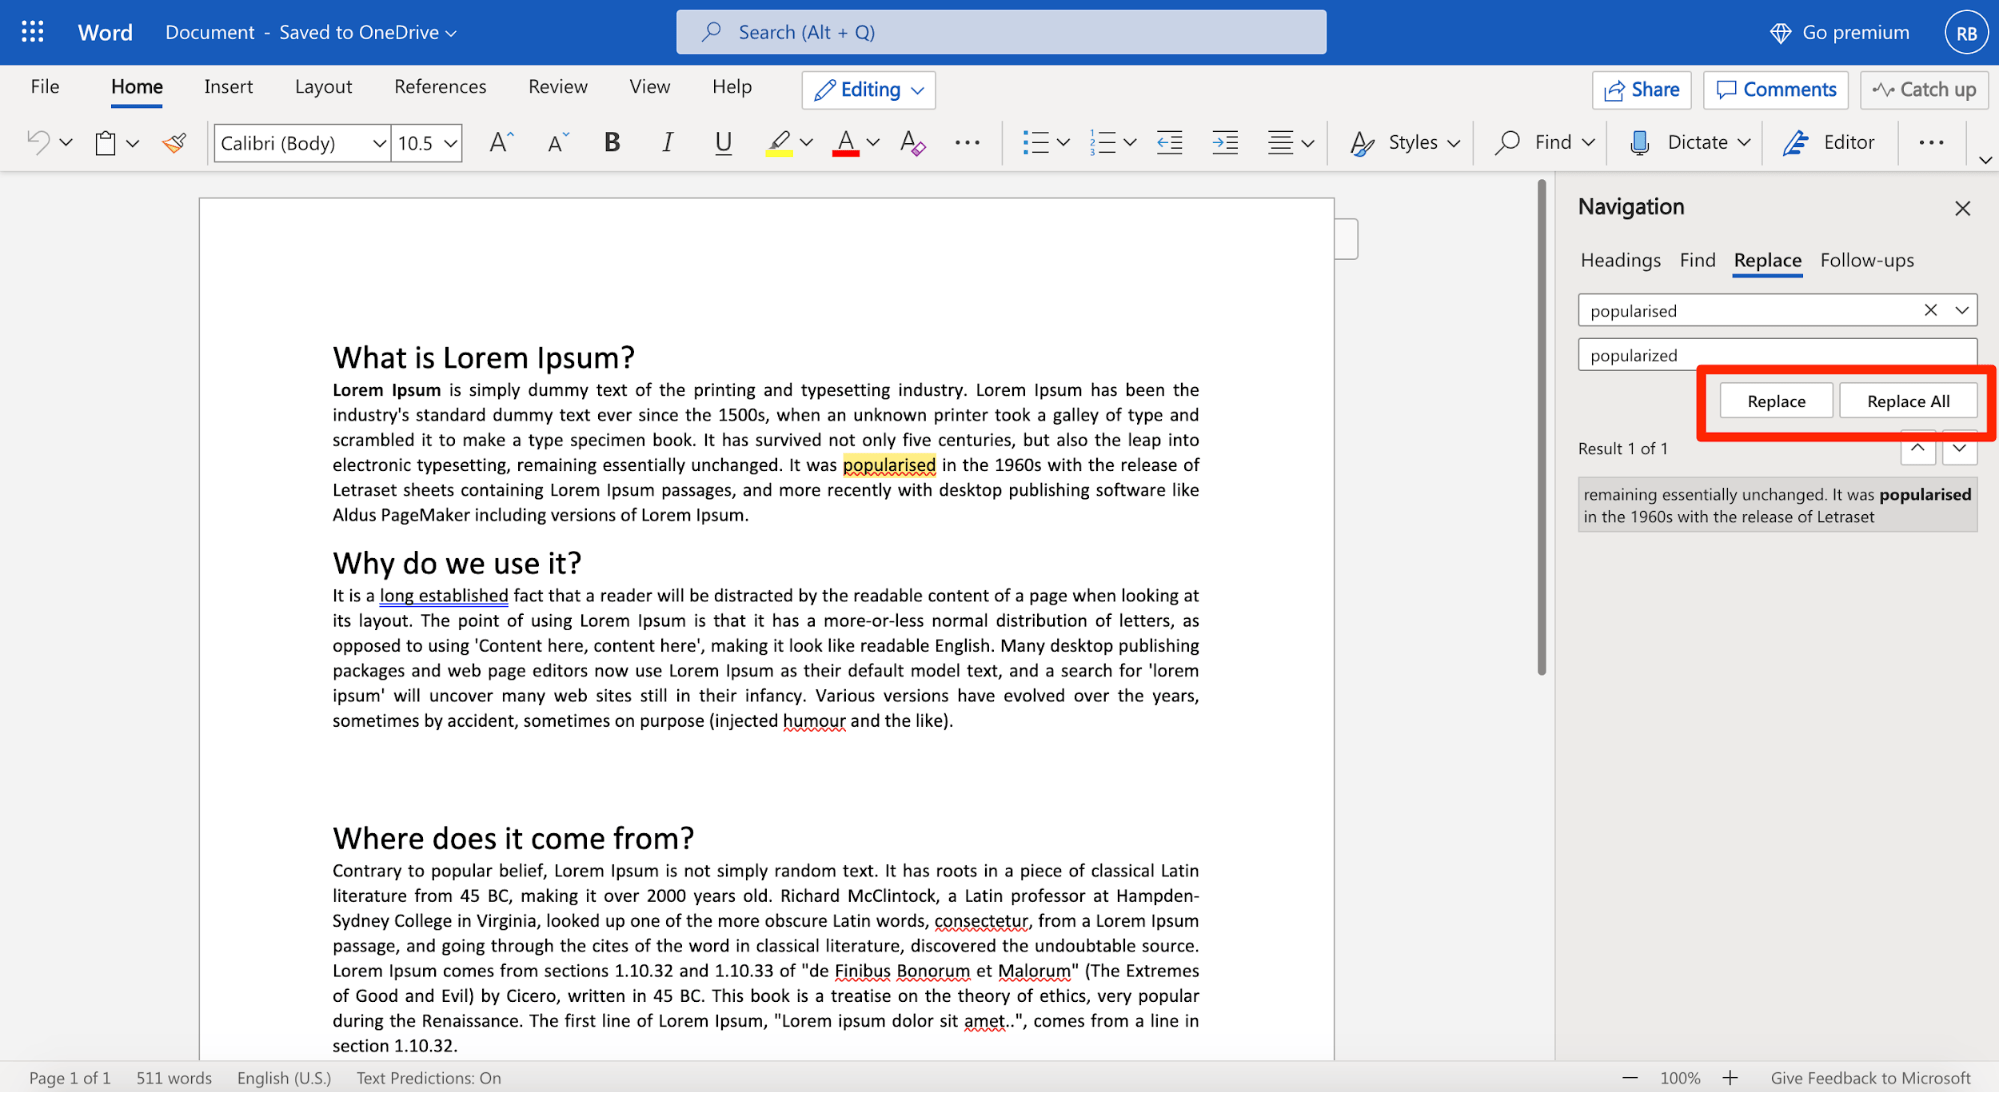
At this point you have a choice: hitting Find Next (to find the next instance of the word) and then Replace (to replace it with your new word) for each individual occurrence, or going wild and pressing Replace All (which will automatically replace every occurrence of the word you’ve found with the one you’re replacing it with),

I would always recommend using Find Next – Replace unless you absolutely know that you are not going to be replacing something you don’t mean to replace. Even replacing a double space with a single might play havoc if the person who wrote the document has used spaces to format tables (even if they shouldn’t do that, some still do). And consider this:
“John” means “toilet” in American English. So I might do a search and replace to Find John and replace it with toilet. But what if there’s a character or just someone mentioned called John Bloggs. Or, soon to be, Toilet Bloggs. It’s so easy for this to happen …
So, be careful with your Find and Replace and you’ll be fine!
———-
This article has covered the basics of Find and Replace. Next time, we have a look at the options you can use and using wildcards, and I will also look at finding and replacing formatting …
If you’ve enjoyed this article or found it useful, please comment, or hit one of the share buttons you can see below this article. Thank you!
This is part of my series on how to avoid time-consuming “short cuts” and use Word in the right way to maximise your time and improve the look of your documents.
Please note, these hints work with versions of Microsoft Word currently in use – Word 2007, Word 2010 and Word 2013 all for PC. Mac compatible versions of Word should have similar options. Always save a copy of your document before manipulating it. I bear no responsibility for any pickles you might get yourself into!
Find all the short cuts here …
Related posts on this blog:
Advanced Find and Wildcards
![]()
Download Article
![]()
Download Article
This wikiHow teaches you how to use Microsoft Word’s «Find and Replace» feature to look up words in your document, as well as how to replace instances of a word with another word.
-

1
Open a Microsoft Word document. Either double-click a Word document, or open Word and then select the document from the list of recently opened documents if applicable.
-
2
Place your cursor at the beginning of the document. Click to the left of the first word in your document to place the cursor there. «Find and Replace» will only search for words after the cursor.
- If you only want to search for words in a specific section of text (rather than the whole document), highlight that section instead.
Advertisement
-
3
Click the Home tab. It’s in the upper-left section of the Word ribbon, which is the blue strip at the top of the window.
-
4
Click Find. This option is on the far-right side of the toolbar in the «Editing» section. Doing so will open a search bar on the left side of the window.
-
5
Type in a word you wish to find and press ↵ Enter. This will highlight instances of the word you searched for in the document.
-
6
Click ▼ or ▲. These arrows are below the right side of the search bar. Clicking these arrows will jump to the next (or previous) instance of your word.
- You can also click one of the results in the middle of the sidebar.
-
7
Click
. It’s on the far-right side of the search bar. Doing so prompts a drop-down menu.
-
8
Click Replace. This option is in the drop-down menu. Doing so opens the Find and Replace window.
-
9
Type a word into the «Replace with» field. This field is near the bottom of the Find and Replace window. You should use a word you with which you intend to replace the «Find what» word.
-
10
Click Replace all. It’s at the bottom of the Find and Replace window. This will replace each instance of the word you typed into «Find what» with the word you typed into the «Replace» field.
- For example, entering «Banana» in the «Find what» field and then entering «Plantain» in the «Replace with» field and clicking Replace all would replace the word «banana» with «plantain» in your whole paper (or the selected section).
- If you would rather replace some, but not all, instances of a word, you can click Replace instead to go word-by-word. You may need to click the beginning of the paper again before doing so.


Advertisement
-
1
Open a Microsoft Word document. Either double-click a Word document, or open Word and then select the document from the list of recently opened documents if applicable.
-
2
Place your cursor at the beginning of the document. Click to the left of the first word in your document to place the cursor there. «Find and Replace» will only search for words after the cursor.
- If you only want to search for words in a specific section of text (rather than the whole document), highlight that section instead.
-
3
Click the Home tab. It’s on the far-left side of the Microsoft Word ribbon, which is the blue strip at the top of the Word window.
-
4
Click the search bar. It’s on the far-right side of the Microsoft Word ribbon.
-
5
Type in a word you wish to find and press ⏎ Return. This will highlight instances of the word you searched for in the document.
-
6
Click ► or ◄. These arrows are on the right side of the search bar. This will cycle through the different areas of your paper in which your typed word appears.
-
7
Click
. It’s to the right of the magnifying glass icon that’s on the left side of the search bar. Doing so prompts a drop-down menu.
-
8
Click Replace. This option is in the drop-down menu. Clicking Replace opens a left-hand sidebar.
-
9
Type a word into the «Replace With» field. It’s near the top of the FIND AND REPLACE sidebar. You should use a word you with which you intend to replace the searched word.
-
10
Click Replace All. It’s below the «Replace With» field. This will replace each instance of the word you searched for with the word you typed into the «Replace» field.
- For example, if your searched word was «spumoni» and you meant to write «neopolitan», typing «neopolitan» into «Replace With» and click Replace All would remove «spumoni» from the paper and replace it with «neopolitan».
- If you would rather replace some, but not all, instances of a word, you can click Replace instead to go word-by-word. You may need to click the beginning of the paper again before doing so.


Advertisement
Add New Question
-
Question
How do I clear the «Find and Replace» box when I am finished?

You can get there by pressing the «ctrl+alt» button on the keyboard. Remove the box by clicking the «x» or «close» button on the upper right corner of the box.
-
Question
What are some uses for find and replace?
Say, for example, you are writing a document and reference a character by the name of Ann, only to find out that Ann’s name is actually spelled «Anne». Now, instead of tediously going through the entire document, finding each instance of «Ann» and changing it to «Anne» (with the possibility of missing an instance, leaving you with an inconsistent document), you can simply find all instances of «Ann» and replace with «Anne» and it will delete all cases of «Ann» and insert «Anne» in its place. The find and replace also goes beyond simple characters such as above, as it can apply to miscalculated numerical values.
Ask a Question
200 characters left
Include your email address to get a message when this question is answered.
Submit
Advertisement
Video
-
In addition to text, you can use the Find and Replace dialog to search for and replace formatting and special characters.
-
You can bring up the Find and Replace section by press Ctrl+H (PC) or ⌘ Command+H (Mac).
-
If your document is lengthy, the find and replace search may take a while. You can cancel the search at any time by pressing the «ESC» key on your keyboard.
Thanks for submitting a tip for review!
Advertisement
-
Always save your work before using Find and Replace in case you accidentally mess up your document.
Advertisement
About This Article
Thanks to all authors for creating a page that has been read 296,635 times.
Is this article up to date?
You’ve just finished typing a presentation that’s due in about 15 minutes. But before you can celebrate your moment of victory, you realize that you’ve spelled your client‘s name wrong and have missed the double Rs in their company name multiple times throughout your document.
Cue: An aggravated scream.
The good news is that changing these small errors is an easy fix on Office 365. You can replace as many words as you want within seconds on Microsoft Word using its super helpful Find and Replace functionality.
This article will guide you through the necessary steps to help you find and replace text in MS Word.
Ready? Let’s begin.
How to Use Microsoft Word’s Find and Replace Feature
Microsoft is one of the leading companies in the world. It’s because it prioritizes its customers and comes up with innovations that can make their lives easier and more convenient.
The Find and Replace feature on MS Word is a shining example of this effort.
You can use this feature to find specific words in your file and then replace them in case there are some last-minute changes. This can even be useful when you make mistakes in the doc while typing or want to accommodate those last-minute client changes.
We’ll show you how to replace text in Microsoft Word, depending on the computer device you use.
How to Change and Replace Text in MS Word on Windows
It’s no wonder that all Windows devices have built-in Microsoft programs considering it’s a product developed by the Microsoft company themselves. If you find yourself using the word processor often for making notes or presentations, you’ll be especially thankful for the Find and Replace functionality.
Here’s a short step-by-step guide to using the feature in MS Word on Windows devices:
Step #1 Open Microsoft Word on your Windows device.
Step #2 Click on the Home tab on your top menu bar. A secondary menu will appear on your screen.
Step #3 Select the Replace option located on the top-right-hand side of your screen. Alternatively, you can also press Ctrl + H. The Find and Replace pop-up box will appear immediately.
Step #4 Type in the phrase or word you want to locate in your Word doc in the Find what field under the Find tab.
Step #5 Click on the Replace tab on the top menu bar. Type in the word you want to update in the Replace with field.
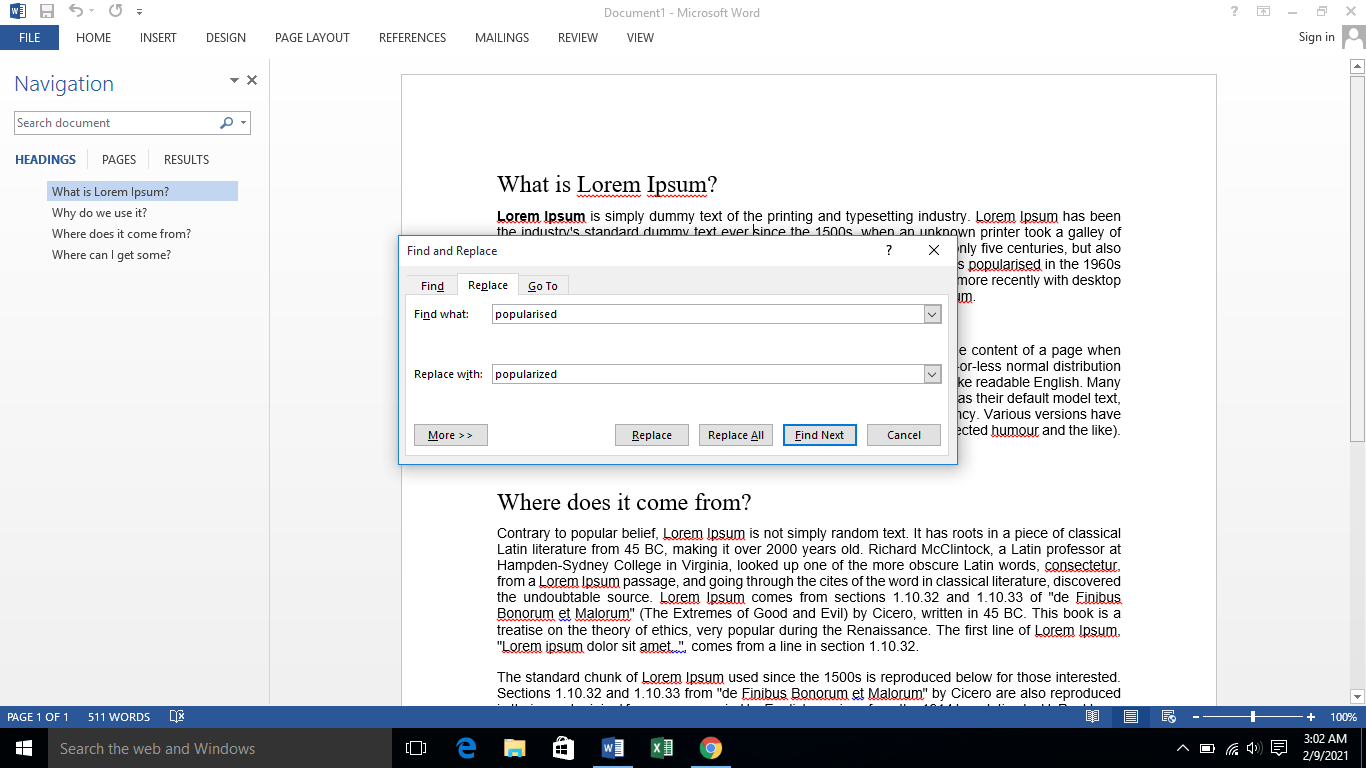
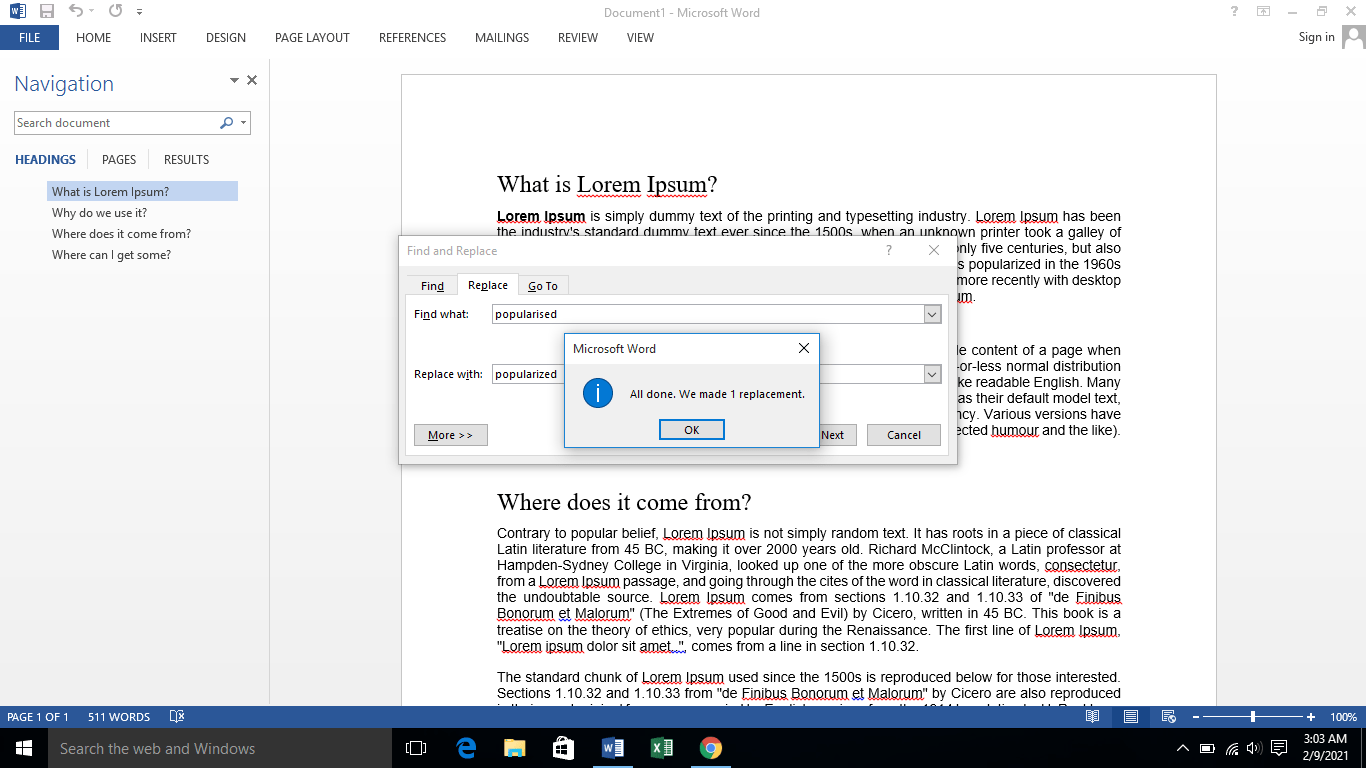
On clicking on the Replace button, the changes you want will be made one by one in the Word doc. However, if you want to update all fitting instances at once, you can click on Replace All instead.
Microsoft Word will give you a confirmation of the replacements made in your Word doc. It’ll look something like this:
How to Change and Replace Text in MS Word on Mac
Now that we’ve covered Windows, let’s see how you can use the Find and Replace feature on a MacBook. Here’s how to proceed in MS Word when you’re using an iOS device:
Step #1 Open the Microsoft Word document on your Mac.
Step #2 Take your cursor towards the top of your screen until you see your Mac’s top toolbar. Click on the Edit tab. A dropdown menu will appear.
Step #3 Click on Find from the displayed menu options. You’ll typically see a Replace… option on your screen.
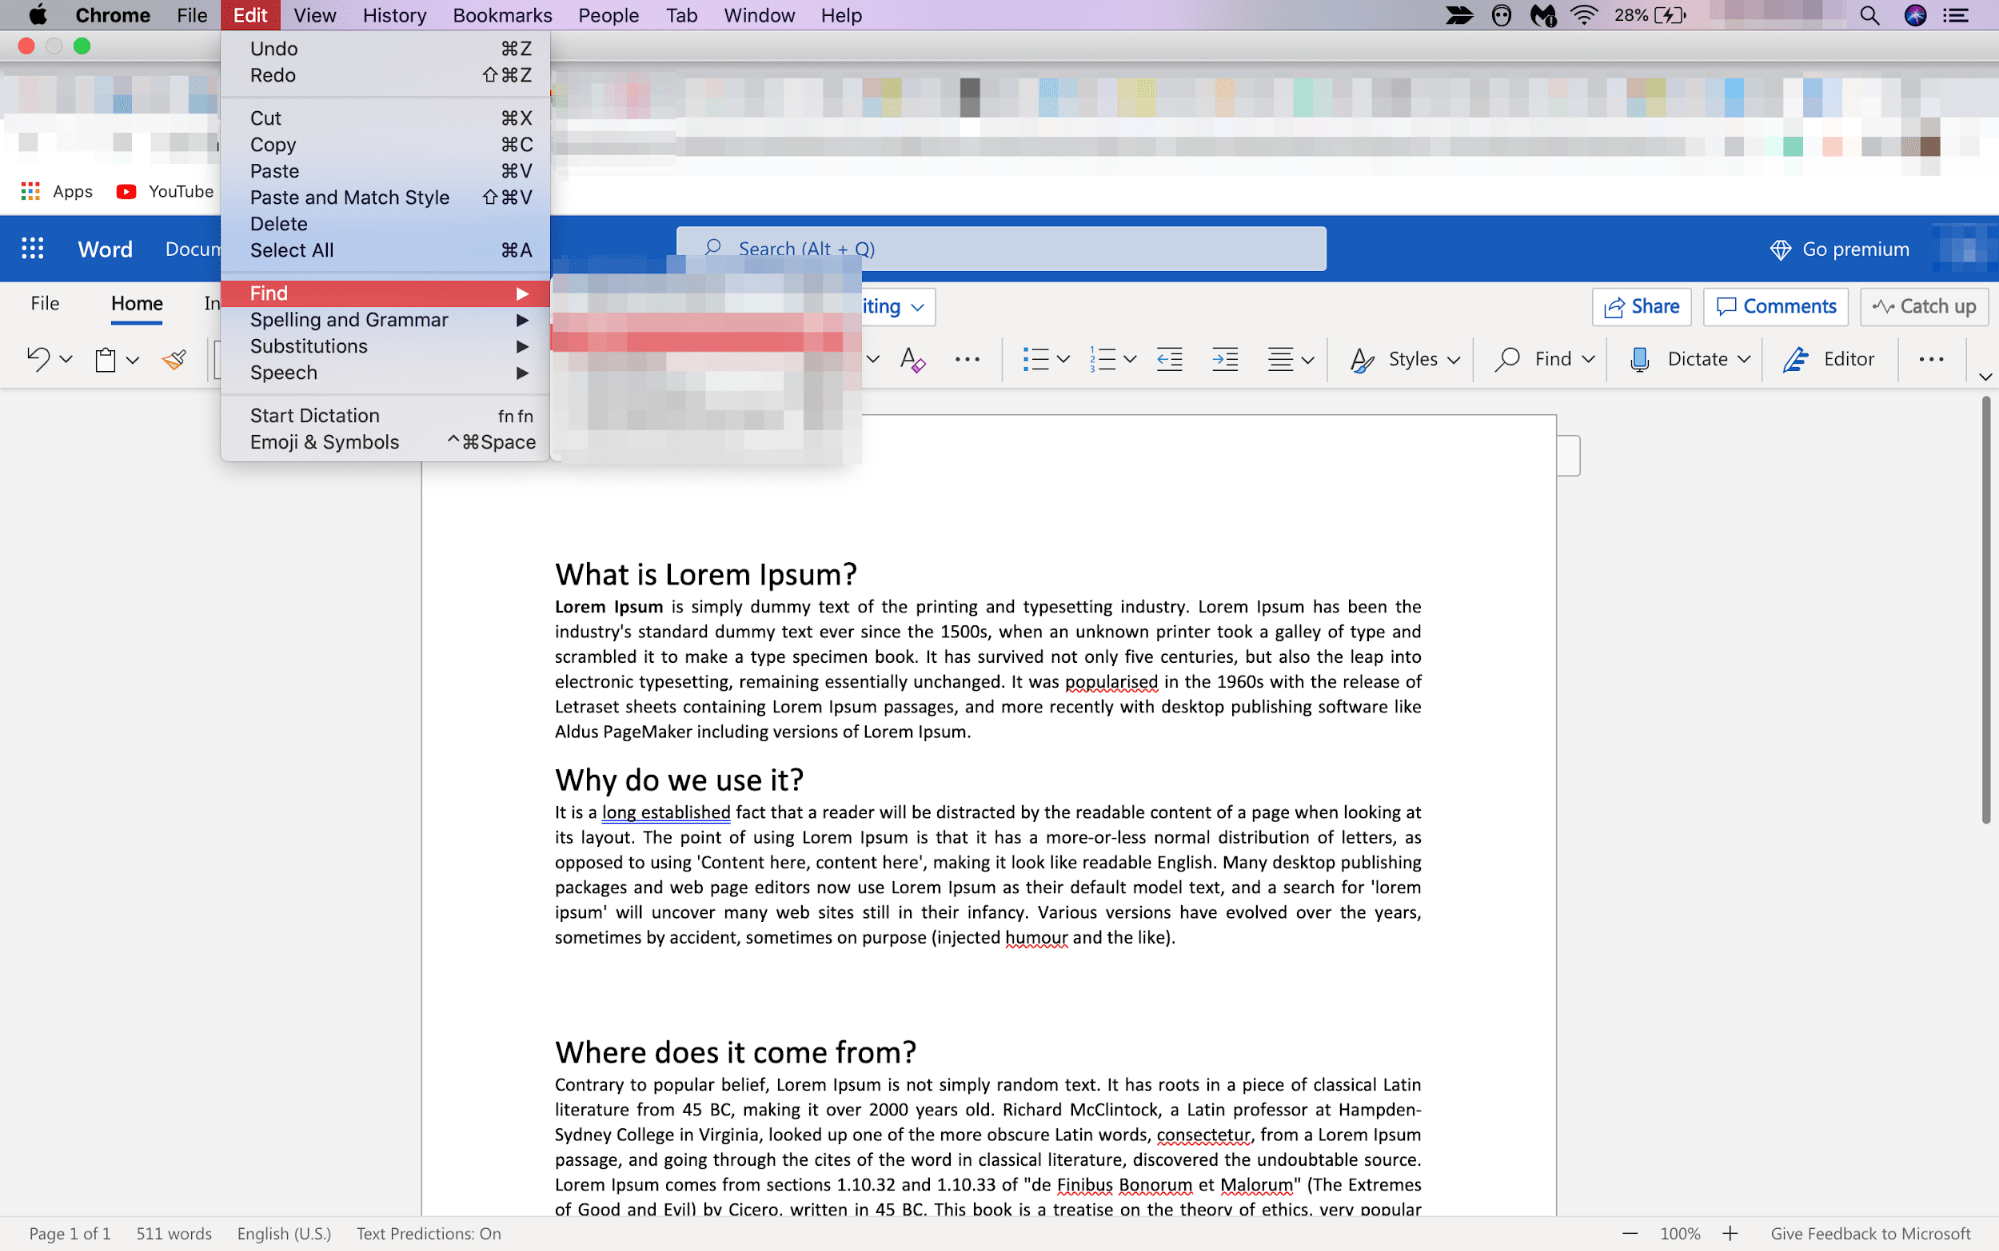
But if you don’t, simply press Shift + Command + H on your keyboard. A side navigation bar will appear on the left-hand side of your computer screen.
Step #4 Enter the word or phrase you want to replace in the doc in the Search for… field.
Once you’ve finished typing the incorrect word or phrase, type in the right word or phrase that you want to replace the incorrect one with in the Replace with… field.
Step #5 Click on the Find tab to locate the matches. Once you’re sure the match is right and highlighting the words you want to change, select Replace. This will replace every individual match one by one.
Again, if you click on the Replace All button, all the matching words and phrases will be changed at once.
After the changes are made, you’ll see an “All Done” message just below the Replace and Replace All buttons that indicate the replacement of the intended word or phrase.
Advanced Find and Replace Features: Everything You Need to Know
You can take this whole shebang of replacing words and phrases to the next level thanks to Microsoft Word’s Advanced Find and Replace option. In other words, you can use the Advanced settings to simplify the process further and make the results even more accurate.
Follow the previously stated steps to open the Find and Replace pop-up box. On it appears on your screen, click on More.
You’ll immediately see a slew of additional options like Match case, Use wildcards, Match prefix, Match suffix, and so on. Here’s how the Advanced Find and Replace settings look like:
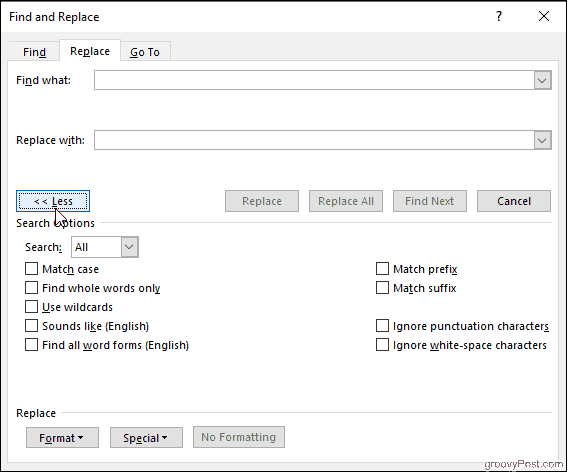
Each one of these has its own unique functions. Let’s discuss them in more detail below:
Find whole words only
If you check on the Find whole words only box, MS Word will treat your search term as an entire word and won’t look for your search term within other words.
Example: If you’re searching for the word “stand,“ the search feature won’t show you the word “standard.”
Use wildcards
Use wildcards is one of the more advanced search options that allows you to use question marks, brackets, asterisks, and other similar symbols to modify your search.
You see, a wildcat is a short string of characters – or a character – that represents multiple characters in a search.
Example: <(int)*(net)>
Sounds like (English)
As the name suggests, the Sounds like option finds similar-sounding words to your search term. This is best for finding homonyms and words that have varying spellings.
Example: This is common for words that have both UK and US variants. For instance, you can have both “colours” and “colors” on a document.
Find all word forms (English)
This option allows you to look for the word you searched for, along with other instances that are either plural or in a different tense.
Example: If you search for the word “be” after enabling the Find all word forms option, you’ll also find the words “are“ and “is“ highlighted as they are the different tense forms of “be.”
Match prefix and Match suffix
Checking off the Match prefix or Match suffix fields will limit your search to words that have the same beginning or the same ending, respectively.
Example: Suppose you enable Match prefix. When you search for the word “love,” Microsoft Word will find the words “love“ and “lovely.“ However, you won’t find the word “beloved“ highlighted in the search results as it’s a suffix of love.
Ignore punctuation characters and Ignore white-space characters
Again, this search option is self-explanatory. It tells Microsoft Word not to take up spaces, periods, hyphens, and similar attitudes into consideration.
Example: After clicking on the search options, when you type in “color block”, you’ll also see “color-block.”
When to Use the Find and Replace Feature of Microsoft Word
The whole point of the Find and Replace function in Microsoft Word is to allow MS Word users to search for target text – whether it’s a specific word, a type of formatting, or a string of wildcard characters – and replace them with whatever you want.
Typically, here’s why you should use this feature:
- When you want to maintain absolute consistency in your document
- When you want to speed up typing and formatting tasks
- When you realize last-minute mistakes and want to find and then replace your errors
- When you’re writing a document that includes words with varying spellings. For instance, if you typically follow US English, and are typing a doc according to the rules of UK English, the Find and Replace feature would be super helpful to identify and change spelling errors.
- Adding special characters to words
- editing partial words and phrases
- Correcting words that you may have misspelled in a hurry. For instance, if you type “h?t” instead of “hat” and enable Use wildcards, you’ll find it highlighted in your search.
- Eliminating extra spaces
- Changing the separator character in numerals
- Reversing currency symbols
Concluding Thoughts
As you may have realized, the Find and Replace feature of Microsoft is a lifesaver, to say the least.
It can help you save tons of time, which would otherwise have been wasted in looking for errors and then replacing them. Whether you are a student, an intern, or the CEO of a company, this is a functionality that we all can be very thankful for.