
Use Find and Replace to Change Formatting in Microsoft Word Documents
by Avantix Learning Team | Updated May 13, 2022
Applies to: Microsoft® Word® 2013, 2016, 2019, 2021 or 365 (Windows)
You can find and replace formatting in Word by searching for specific formatting, such as bold or italic, and changing it to other formats. You or even search for text with specific formatting and change the text and the formats. With Find and Replace, you can search for and change both character and paragraph formatting.
You may want to use Find and Replace in the following scenarios:
- You want to remove character formatting throughout your document such as every instance of bold. Character formatting includes any formatting in the Font group on the Home tab in the Ribbon or in the Font dialog box.
- You want to change every instance of one font and change it to another font.
- You want to find every instance of blue and change it to green.
- You want to format specific text with consistent formatting. For example, you want to format every instance of your company name in bold and blue.
- You want to find and change paragraph formatting. For example, for every paragraph that is aligned to the right with single line spacing, you’d like to align to the left and change the line spacing.
Note: The better way to handle global formatting changes is to use styles but if you haven’t used styles, Find and Replace provides a fast way to make changes throughout your document. You can even use Find and Replace to change styles.
Recommended article: How to Find and Replace in Word (and Use Wildcards)
Do you want to learn more about Microsoft Word? Check out our virtual classroom or in-person Word courses >
Note: Screenshots in this article are from Word 365 but are similar in previous versions of Word.
The Replace command appears on the Home tab in the Ribbon in the Editing group:

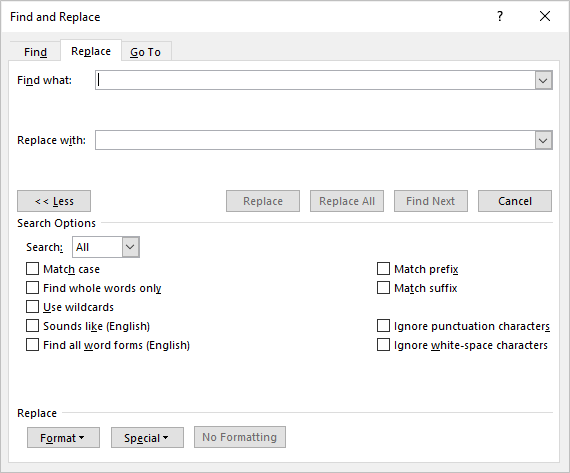
If you want to perform advanced Find and Replace tasks, you will need to display the expanded Find and Replace dialog box by clicking More:
When you run through a Find and Replace task, if you’re not satisfied with the results after you close the dialog box, press Ctrl + Z to undo and try it again.
Find and Replace character formatting
If you want to search for character formatting only, such as bold or italic, you can use Find and Replace.
If you want to find and replace specific character formatting (such as replacing italic with bold), you may have to run through the find and replace process more than once.
To find and replace character formatting in a Word document:
- Position the cursor at the beginning of the document.
- Click the Home tab in the Ribbon.
- In the Editing group, click Replace to display the Replace dialog box. Alternatively, press Ctrl + H to display the Replace dialog box.
- Click More if necessary to display the expanded Find and Replace options.
- Click in the Find what box.
- Click Format at the bottom of the dialog box. A drop-down menu appears.
- Select Font. A dialog box appears.
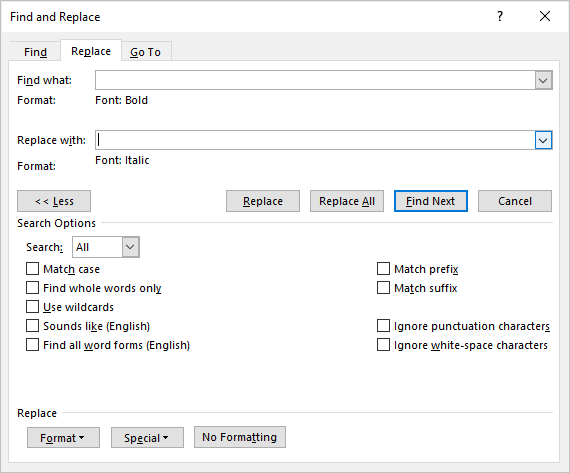
- Select the format(s) you want to find (such as Italic in the Font Style area).
- Click OK.
- Click in the Replace with box.
- Click Format and then select Font.
- Select the format you want to use as a replacement (such as Bold in the Font Style area).
- Click OK.
- Click Find Next and then click Replace for each occurrence or click Replace All. If you are trying to replace italic with bold, this would add bold and keep the italic.
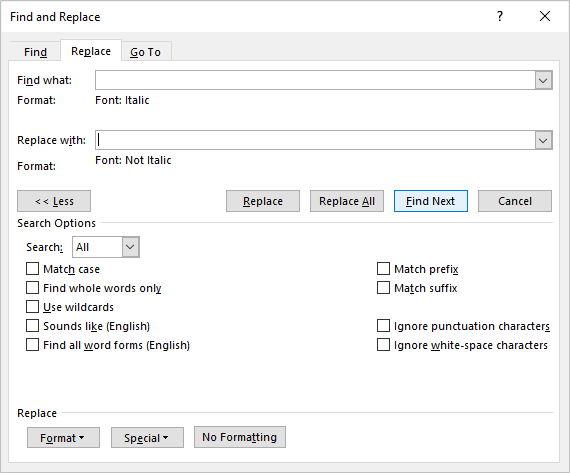
- If you now want to remove the italic, ensure Italic appears below Find What.
- Click in the Replace with box.
- Click the arrow beside Format and then select Font.
- In the Font Style area, click No Italic.
- Click OK.
- Click Find Next and then click Replace for each occurrence or click Replace All.
- Click Close.
In the following example, the Find and Replace dialog box is used to find text in bold and would add italic:
If you want to find and replace a font, that should require only one find and replace task. If you want to find and remove a font color, you can find a font color (such as blue) and replace it with a font color of Automatic.
Remove character formatting using Find and Replace
To remove character formatting using Find and Replace in a Word document:
Position the cursor at the beginning of the document.
- Click the Home tab in the Ribbon.
- In the Editing group, click Replace to display the Replace dialog box. Alternatively, press Ctrl + H to display the Replace dialog box.
- Click More if necessary to display the expanded Find and Replace options.
- Click in the Find what box.
- Click Format at the bottom of the dialog box. A drop-down menu appears.
- Select Font. A dialog box appears.
- Select the format(s) you want to find.
- Click OK.
- Click in the Replace with box.
- Click Format and select Font.
- Select Regular in the Font Style area and turn off any other formatting.
- Click OK.
- Click Find Next and then click Replace for each occurrence or click Replace All.
- Click Close.
In the following example, Find and Replace is used to find text formatted in italic and remove it:
The Replace Font dialog box includes options like Not Bold, Not Italic and Regular to remove formatting (the filled check boxes that appear are left as is):
Clear Find and Replace formatting from previous searches
If you have performed a previous find and replace with formatting, you’ll want to remove those options if you want to perform another search.
To remove previous formatting in the Find and Replace dialog box:
- Click the Home tab in the Ribbon.
- In the Editing group, click Replace to display the Replace dialog box. Alternatively, press Ctrl + H to display the Replace dialog box.
- Click More if necessary to display the expanded Find and Replace options.
- Click in the Find What box.
- Click No Formatting at the bottom of dialog box.
- Click in the Replace With box.
- Click No Formatting at the bottom of dialog box.
- Continue with your next Find and Replace task.
Find and Replace paragraph formatting
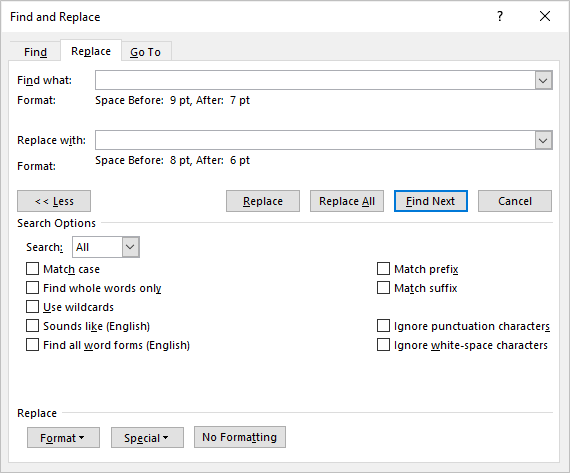
You can also use Find and Replace to change paragraph formatting. For example, you may want to find every instance of a paragraph with a space before of 9 pt and a space after of 7 pt and change it to a space before of 8 pt and a space after of 6 pt. As mentioned above, this type of formatting can be included in styles.
To change paragraph formatting using Find and Replace in a Word document:
- Position the cursor at the beginning of the document.
- Click the Home tab in the Ribbon.
- In the Editing group, click Replace to display the Replace dialog box. Alternatively, press Ctrl + H to display the Replace dialog box.
- Click More if necessary to display the expanded Find and Replace options.
- Click in the Find what box.
- Click Format at the bottom of the dialog box. A drop-down menu appears.
- Select Paragraph. A dialog box appears.
- Select the format(s) you want to find. You can also enter specific amounts in this dialog box (such as 9 pt before). Paragraph formatting includes alignment, indents, line spacing and space before and after.
- Click OK.
- Click in the Replace with box.
- Click Format and then select Paragraph.
- Select the format(s) you want to use as replacements. You can also enter specific amounts in this dialog box (such as 8 pt before).
- Click OK.
- Click Find Next and then click Replace for each occurrence or click Replace All.
- Click Close.
In the example below, Find and Replace will search for any paragraphs with a space before of 9 and a space after of 7 and then replace it with a space before of 8 and space after of 6.
Find and Replace Text with Formatting
You can also enter text in the Find what and Replace with boxes if you want to find text with specific formatting and replace it.
Subscribe to get more articles like this one
Did you find this article helpful? If you would like to receive new articles, JOIN our email list.
More resources
How to Add Page Numbers in Word (Step by Step)
How to View Document Statistics in Microsoft Word
How to Update All Figure Numbers in Microsoft Word
How to Check Word Count in Microsoft Word (4 Ways)
How to Superscript or Subscript in Word (with Shortcuts)
Related courses
Microsoft Word: Intermediate / Advanced
Microsoft Word: Designing Dynamic Word Documents Using Fields
Microsoft Word: Long Documents Master Class
Microsoft Word: Accessible Word Documents
Microsoft Excel: Intermediate / Advanced
Microsoft PowerPoint: Intermediate / Advanced
VIEW MORE COURSES >
Our instructor-led courses are delivered in virtual classroom format or at our downtown Toronto location at 18 King Street East, Suite 1400, Toronto, Ontario, Canada (some in-person classroom courses may also be delivered at an alternate downtown Toronto location). Contact us at info@avantixlearning.ca if you’d like to arrange custom instructor-led virtual classroom or onsite training on a date that’s convenient for you.
Copyright 2023 Avantix® Learning
Microsoft, the Microsoft logo, Microsoft Office and related Microsoft applications and logos are registered trademarks of Microsoft Corporation in Canada, US and other countries. All other trademarks are the property of the registered owners.
Avantix Learning |18 King Street East, Suite 1400, Toronto, Ontario, Canada M5C 1C4 | Contact us at info@avantixlearning.ca
 This tutorial shows how to find and replace font formatting in Microsoft Word. Font formatting includes style (i.e., italics or bold font), color, size, and underlining.
First, we will find and replace font formatting in the whole document. Then, we will find and replace font formatting applied to specific text. We will close with two important tips for finding and replacing font formatting.
Table of Contents:
- How to Find and Replace Font Formatting in the Whole Document
- How to Find and Replace Font Formatting Applied to Specific Text
- Two Tips for Finding and Replacing Font Formatting
Watch all the steps shown here in real time!
Explore more than 200 writing-related software tutorials on my YouTube channel.
The images below are from Word for Microsoft 365. These steps also apply to Word 2021, Word 2019, and Word 2016.
Are you on a Mac? Please see “How to Find and Replace Font Formatting in Word for Mac.”
How to Find and Replace Font Formatting in the Whole Document
For this example, we will replace all bold text with regular text. Please modify these steps according to your own needs.
- Select the Home tab in the ribbon.

- Select Replace in the Editing group.

- Insert your cursor into the Find what text box in the Find and Replace dialog box.

- Select the More button.

- Select All in the Search menu.

- Select the Format button.

- Select Font from the drop-down menu.

- Select Bold (or another option) from the Font Style menu in the Find Font dialog box.

- Select the OK button.

The words Font: Bold should appear under the Find what text box.

- Insert your cursor into the Replace with text box.

- Select the Format button (see figure 6).
- Select Font from the drop-down menu (see figure 7).
- Select Regular (or another option) from the Font Style menu in the Replace Font dialog box.

- Select the OK button.

The words Font: Not Bold, Not Italic should appear under the Replace with text box.

- Select the Replace All button to make all the replacements at once. Or, select the Find Next and Replace buttons to make one replacement at a time.

- If you selected Replace All, select OK in the dialog box telling you how many replacements were made.

- Select the Close button.

The font formatting should be replaced in your document.
How to Find and Replace Formatting Applied to Specific Text
For this example, we will find specific text formatted in red and replace that same text with green formatting. Please modify these steps according to your own needs.
- Select the Home tab in the ribbon (see figure 1).
- Select Replace in the Editing group (see figure 2).
- Type the text you want to find into the Find what text box.

- Select the More button (see figure 4).
- Select All in the Search menu (see figure 5).
- Select the Format button (see figure 6).
- Select Font from the drop-down menu (see figure 7).
- Select red (or other formatting) from the Font color menu in the Find Font dialog box.

- Select the OK button (see figure 9).
The words Font color: Red should appear under the Find what text box.

- Type the same text (or different text if desired) into the Replace with text box.

- Select the Format button (see figure 6).
- Select Font from the drop-down menu (see figure 7).
- Select green (or another formatting) from the Font color menu in the Replace Font dialog box.

- Select the OK button (see figure 13).
The words Font color: Green should appear under the Replace with text box.

- Select the Replace All button to make all the replacements at once. Or, use the Find Next and Replace buttons to make one replacement at a time (see figure 15).
- If you selected Replace All, select OK in the dialog box telling you how many replacements were made (see figure 16).
- Select the Close button to close the Find and Replace dialog box (see figure 17).
The font formatting should be replace for the specific text in your document.
Two Tips for Finding and Replacing Font Formatting
Finding and replacing font formatting can be messy. Here are two tips to consider before your next formatting session.
Tip 1: Use the No Formatting Button to Clear Formatting
When you add formatting to the Find and Replace dialog box, Word will normally keep that selection in the dialog box until you close the software. If you want to clear previously selected formatting from the Find and Replace dialog box before closing the software, place your cursor in the affected text box (Find what or Replace with) and then select the No Formatting button.

Tip 2: Experiment with Multiple Replacement Sequences
Occasionally, the formatting options entered into the Replace with text box don’t replace the options in the Find what text box; instead, they are added to the options in the Find what text box. When this occurs, experiment with multiple replacement sequences to reach the formatting you need.
For example, if you put the bold format into the Find what text box and put the italic format into the Replace with text box, Word won’t replace the bold text with italic text as you might expect. Instead, it will add italics to the bold words. But you can still remove the bold format if you do a second replacement sequence, this time replacing the bold format with the Not Bold format option.
Related Resources
How to Use the Format Painter in Microsoft Word (PC & Mac)
How to Find and Replace Special Characters in Microsoft Word
Updated December 03, 2022
Hi the following code extracts all instances of bold text from the active Word document and copies it to a newly created Word document.
Can anyone please help me to adjust the code to perform the same task on all open Word documents into the newly created Word document.
Any help is very much appreciated.
Sub A__GrabTheBolds()
On Error GoTo cleanUp
Application.ScreenUpdating = False
     Dim ThisDoc As Document
     Dim ThatDoc As Document
     Dim r As Range
     Set ThisDoc = ActiveDocument
     Set r = ThisDoc.Range
     Set ThatDoc = Documents.Add

     With r
         With .Find
             .Text = ""
             .Format = True
             .Font.Bold = True
         End With
         Do While .Find.Execute(Forward:=True) = True
            'If r.HighlightColorIndex = wdDarkYellow Then 'highlightcols(7)
            If r.Bold Then
               ThatDoc.Range.Characters.Last.FormattedText = .FormattedText
               ThatDoc.Range.InsertParagraphAfter
               .Collapse 0
            End If
          Loop
     End With
cleanUp:
Application.ScreenUpdating = True
Set ThatDoc = Nothing
Set ThisDoc = Nothing
End Sub
![]()
BigBen
43.9k6 gold badges27 silver badges40 bronze badges
asked Nov 15, 2021 at 14:39
![]()
You can use the Documents-collection which returns all open documents:
Sub A__GrabTheBolds()
On Error GoTo cleanUp
Application.ScreenUpdating = False
     Dim ThisDoc As Document
     Dim ThatDoc As Document
     Dim r As Range

     Set ThatDoc = Documents.Add

     'iterate over all open word documents
     'For Each ThisDoc In Application.Documents

      'handle documents in the order they were opened
      'reverse order of documents collection
      'loop until second to last as last one is ThatDoc


      Dim i As Long

      Dim FileNames As String, fFound As Boolean
      Dim fWritten As Boolean

      For i = Application.Documents.Count To 2 Step -1
        Set ThisDoc = Application.Documents(i)

        'Don't check document where the code runs
        If Not ThisDoc Is ThisDocument Then


            Set r = ThisDoc.Range

            With r
                With .Find
                    .Text = ""
                    .Format = True
                    .Font.Bold = True
                End With

                Do While .Find.Execute(Forward:=True) = True

                    '<-- remove this part if not needed

                    'add filename if the first bold range
                    If fWritten = False Then
                        ThatDoc.Content.InsertAfter vbCrLf & vbCrLf & ThisDoc.Name & vbCrLf
                    End If
                    'remove this part if not needed -->

                    fWritten = True

                   'If r.HighlightColorIndex = wdDarkYellow Then 'highlightcols(7)
                   If r.Bold Then
                      ThatDoc.Range.Characters.Last.FormattedText = .FormattedText
                      ThatDoc.Range.InsertParagraphAfter
                      .Collapse 0
                   End If
                 Loop

            End With

            'add filename to list only if bold has been found
            If fWritten = True Then
                FileNames = FileNames & vbCrLf & ThisDoc.Name
                fWritten = False
            End If
        End If
    Next

'Add list of filenames to the end of ThatDoc
With ThatDoc.Content
    .InsertParagraphAfter
    .InsertAfter FileNames
End With

cleanUp:
Application.ScreenUpdating = True
Set ThatDoc = Nothing
Set ThisDoc = Nothing
End Sub
answered Nov 15, 2021 at 15:39
![]()
IkeIke
7,8904 gold badges11 silver badges29 bronze badges
9
![]()
level 1
Ive used this to delete everything that was a certain color, it might work here.
Duplicate the documents. Use ‘find and replace’ do not enter any text in the actual search box, but select the advance formatting box and select unformatted text. Replace with nothing. This you should have a doc that only has the bolded text left.
Seems like there must be a better way though.
level 2
Hmm I spent about half an hour on this this morning but couldn’t get it to work. I’ll look at it again when I’m home tonight. This might work, just I don’t have it down yet.
level 1
…what version of Office are you using?
VB.net
Sub FormatWords()
   Selection.Find.ClearFormatting
   Selection.Find.Replacement.ClearFormatting
   With Selection.Find
        .Text = "Topic:"
        .Replacement.Text = ""
        .Replacement.Font.Bold = True
        .Replacement.Font.Italic = False
        .Forward = True
        .Wrap = wdFindContinue
        .MatchWholeWord = False
   End With
   Selection.Find.Execute Replace:=wdReplaceAll
End Sub
The above code will find all «Topic:» and make the word bold as Topic:, I want to search for and select the entire line that starts with «Topic:» and make it bold.
IE: Topic: This needs to be done today….
But what I want
Topic: This needs to be done today….
Can anyone provide some input on this?
Thanks
-
Question
-
User226132172 posted
Hi,
May I know how to find bold size words in word document,Plase give reply to me ASAP.
Answers
-
User1651948865 posted
Refer this site….
http://stackoverflow.com/questions/5879880/replace-bold-text-in-ms-word-2007-with-btext-b-using-c-net
-
Marked as answer by
Anonymous
Thursday, October 7, 2021 12:00 AM
-
Marked as answer by
-
-
Marked as answer by
Anonymous
Thursday, October 7, 2021 12:00 AM
-
Marked as answer by
All replies
-
User1651948865 posted
Refer this site….
http://stackoverflow.com/questions/5879880/replace-bold-text-in-ms-word-2007-with-btext-b-using-c-net
-
Marked as answer by
Anonymous
Thursday, October 7, 2021 12:00 AM
-
Marked as answer by
-
-
Marked as answer by
Anonymous
Thursday, October 7, 2021 12:00 AM
-
Marked as answer by
-
User-1630302068 posted
Look for Runs that are bolded