
Word for Microsoft 365 Word for Microsoft 365 for Mac Word 2021 Word 2021 for Mac Word 2019 Word 2019 for Mac Word 2016 Word 2016 for Mac Word 2013 Word 2010 Word for Mac 2011 More…Less
To create a form in Word that others can fill out, start with a template or document and add content controls. Content controls include things like check boxes, text boxes, date pickers, and drop-down lists. If you’re familiar with databases, these content controls can even be linked to data.
Show the Developer tab
If the developer tab isn’t displayed in the ribbon, see Show the Developer tab.
Open a template or a blank document on which to base the form
To save time, start with a form template or start from scratch with a blank template.
-
Go to File > New.
-
In Search online templates, type Forms or the type of form you want and press ENTER.
-
Choose a form template, and then select Create or Download.
-
Go to File > New.
-
Select Blank document.
Add content to the form
Go to Developer, and then choose the controls that you want to add to the document or form. To remove a content control, select the control and press Delete. You can set properties on controls once inserted.
Note: You can print a form that was created using content controls, but the boxes around the content controls will not print.
In a rich text content control, users can format text as bold or italic, and they can type multiple paragraphs. If you want to limit what users add, insert the plain text content control.
-
Click or tap where you want to insert the control.
-
Select Developer > Rich Text Content Control
 or Plain Text Content Control .
 or Plain Text Content Control
  .
.To set specific properties on the control, see Set or change properties for content controls.
A picture control is often used for templates, but you can also add a picture control to a form.
-
Click or tap where you want to insert the control.
-
Select Developer > Picture Content Control
.
 .
.To set specific properties on the control, see Set or change properties for content controls.
Use building block controls when you want people to choose a specific block of text. For example, building block controls are helpful when you need to add different boilerplate text depending on the contract’s specific requirements. You can create rich text content controls for each version of the boilerplate text, and then you can use a building block control as the container for the rich text content controls.
-
Click or tap where you want to insert the control.
-
Go to DeveloperBuilding Block Gallery Content Control
(or Building Block Content Control). -
Select Developer and content controls for the building block.
 (or Building Block Content Control).
-
Click or tap where you want to insert the control.
To set specific properties on the control, see Set or change properties for content controls.
In a combo box, users can select from a list of choices that you provide or they can type in their own information. In a drop-down list, users can only select from the list of choices.
-
Go to Developer > Combo Box Content Control
or Drop-Down List Content Control . -
Select the content control, and then select Properties.
-
To create a list of choices, select Add under Drop-Down List Properties.
-
Type a choice in Display Name, such as Yes, No, or Maybe.
Repeat this step until all of the choices are in the drop-down list.
-
Fill in any other properties that you want.
Note: If you select the Contents cannot be edited check box, users won’t be able to click a choice.
 or Drop-Down List Content Control
  .
.-
Click or tap where you want to insert the date picker control.
-
Select Developer > Date Picker Content Control
.
 .
.To set specific properties on the control, see Set or change properties for content controls.
-
Click or tap where you want to insert the check box control.
-
Select Developer > Check Box Content Control
.
 .
.To set specific properties on the control, see Set or change properties for content controls.
Legacy form controls are for compatibility with older versions of Word and consist of legacy form and Active X controls.
-
Click or tap where you want to insert a legacy control.
-
Go to Developer > Legacy Forms
drop-down. -
Select the Legacy Form control or Active X Control that you want to include.
 drop-down.
Set or change properties for content controls
Each content control has properties that you can set or change. For example, the Date Picker control offers options for the format you want to use to display the date.
-
Select the content control that you want to change.
-
Go to Developer > Properties.
-
Change the properties that you want.

Add protection to a form
If you want to limit how much others can edit or format a form, use the Restrict Editing command:
-
Open the form that you want to lock or protect.
-
Select Developer > Restrict Editing.
-
After selecting restrictions, select Yes, Start Enforcing Protection.


Advanced Tip:
If you want to protect only parts of the document, separate the document into sections and only protect the sections you want.
To do this, choose Select Sections in the Restrict Editing panel. For more info on sections, see Insert a section break.

Show the Developer tab
If the developer tab isn’t displayed in the ribbon, see Show the Developer tab.
Open a template or use a blank document
To create a form in Word that others can fill out, start with a template or document and add content controls. Content controls include things like check boxes, text boxes, and drop-down lists. If you’re familiar with databases, these content controls can even be linked to data.
-
Go to File > New from Template.
-
In Search, type form.
-
Double-click the template you want to use.
-
Select File > Save As, and pick a location to save the form.
-
In Save As, type a file name and then select Save.

-
Go to File > New Document.
-
Go to File > Save As.
-
In Save As, type a file name and then select Save.

Add content to the form
Go to Developer, and then choose the controls that you want to add to the document or form. To remove a content control, select the control and press Delete. You can set Options on controls once inserted. From Options, you can add entry and exit macros to run when users interact with the controls, as well as list items for combo boxes, .
-
In the document, click or tap where you want to add a content control.
-
On Developer, select Text Box, Check Box, or Combo Box.
-
To set specific properties for the control, select Options, and set .
-
Repeat steps 1 through 3 for each control that you want to add.

Options let you set common settings, as well as control specific settings. Select a control and then select Options to set up or make changes.
-
Set common properties.
-
Select Macro to Run on lets you choose a recorded or custom macro to run on Entry or Exit from the field.
-
Bookmark Set a unique name or bookmark for each control.
-
Calculate on exit This forces Word to run or refresh any calculations, such as total price when the user exits the field.
-
Add Help Text Give hints or instructions for each field.
-
OK Saves settings and exits the panel.
-
Cancel Forgets changes and exits the panel.
-
-
Set specific properties for a Text box
-
Type Select form Regular text, Number, Date, Current Date, Current Time, or Calculation.
-
Default text sets optional instructional text that’s displayed in the text box before the user types in the field. Set Text box enabled to allow the user to enter text into the field.
-
Maximum length sets the length of text that a user can enter. The default is Unlimited.
-
Text format can set whether text automatically formats to Uppercase, Lowercase, First capital, or Title case.
-
Text box enabled Lets the user enter text into a field. If there is default text, user text replaces it.
-
-
Set specific properties for a Check box.
-
Default Value Choose between Not checked or checked as default.
-
Checkbox size Set a size Exactly or Auto to change size as needed.
-
Check box enabled Lets the user check or clear the text box.
-
-
Set specific properties for a Combo box
-
Drop-down item Type in strings for the list box items. Press + or Enter to add an item to the list.
-
Items in drop-down list Shows your current list. Select an item and use the up or down arrows to change the order, Press — to remove a selected item.
-
Drop-down enabled Lets the user open the combo box and make selections.
-
-
Go to Developer > Protect Form.
Note: To unprotect the form and continue editing, select Protect Form again.
-
Save and close the form.

If you want, you can test the form before you distribute it.
-
Protect the form.
-
Reopen the form, fill it out as the user would, and then save a copy.
Show the Developer tab
-
On the right side of the ribbon, select
, and then select Ribbon Preferences. -
Under Customize, select Developer .
 , and then select Ribbon Preferences.
Open a template or a document on which to base the form
You can start with a blank document and create your own form. Or, to save time, you can start with a form template.
-
Go to File > New from Template.
-
In the left pane, expand Online Templates, and then select Forms.
-
Double-click the form template that you want to use.
Add content controls to the form
-
In the document, click where you want to add the control.
-
On the Developer tab, under Form Controls, select Text Box, Check Box, or Combo Box.
-
To set specific properties for the control, select Options, and then configure the properties that you want.
Note: To create a list of drop-down items in a combo box, select the combo box placeholder, click Options, and then add the items that you want to appear in the drop-down list.
-
Repeat steps 1 through 3 for each control that you want to add.
Add instructional text (optional)
Instructional text (for example, «Type First Name») in a text box can make your form easier to use. By default, no text appears in a text box, but you can add it.
-
Select the text box control that you want to add instructional text to.
-
On the Developer tab, under Form Controls, select Options.
-
In Default Text, type the instructional text.
-
Make sure that Fill-in enabled is selected, and then select OK.
Protect the form
-
On the Developer tab, under Form Controls, select Protect Form.
Note: To unprotect the form and continue editing, click Protect Form again.
-
Save and close the form.
Test the form (optional)
If you want, you can test the form before you distribute it.
-
Protect the form.
-
Reopen the form, fill it out as the user would, and then save a copy.
Creating fillable forms isn’t available in Word for the web.
You can create the form with the desktop version of Word with the instructions in Create a fillable form.
When you save the document and reopen it in Word for the web, you’ll see the changes you made.
Need more help?
To create a form in Word that others can fill out, start with a template or document and add content controls.
…
Start with a form template
- Go to File > New.
- In Search online templates, type Forms or the type of form you want and press ENTER.
- Choose a form template, and then select Create or Download.
subsequently, What is the easiest way to create a form? Part 1. How to Create a Form in Word
- Step 1: Display the “Developer” Section. Go into the “File” tab; then click “Options.” …
- Step 2: Create a Form Template. …
- Step 3: Add Content to This Form. …
- Step 4: Set Properties for Content Controls. …
- Step 5: Include Instructional Text to Your Form. …
- Step 6: Include Protection to Your Form.
What is the best program to create a form? The 8 best online form builder apps
- Google Forms for quickly creating powerful forms for free.
- Microsoft Forms for collecting and analyzing form results in Excel.
- Jotform for building a form from a template.
- Formstack for advanced analytics and regulated industries.
- Typeform for conversational data collection.
Is Word or Excel better for forms?
Word is especially useful if the form is to be filled in by multiple users who don’t have access to the PC on which the data might be stored or if you don’t plan to add the data to a database or worksheet.
What is the best Microsoft program to create a form?
- Outlook.
- Skype.
- Microsoft Teams.
- Microsoft Edge.
How can I create a free form online?
Get insights quickly, with Google Forms
- Create an online form as easily as creating a document. …
- Send polished surveys and forms. …
- Analyze responses with automatic summaries. …
- Create and respond to surveys from anywhere.
How to create fillable PDF files:
- Open Acrobat: Click on the “Tools” tab and select “Prepare Form.”
- Select a file or scan a document: Acrobat will automatically analyze your document and add form fields.
- Add new form fields: Use the top toolbar and adjust the layout using tools in the right pane.
- Save your fillable PDF:
How do I create a free Google form?
Create a new form
- Choose an option: From forms.google.com, click Blank or choose a template. …
- Name your form: In the top-left corner, click Untitled form or the template form name and enter a new name.
- (Optional) Do any of the following actions: Add a description: Under the form name, add your text.
How do I create a form letter in Word?
Procedure
- Start by opening a Microsoft Word.
- From the Tools menu select Mail Merge.
- Click on the Create button listed under Main Document.
- Select Form Letters from the drop down menu.
- In the dialog box that appears select Active Window to start the form letter in the new document.
How do I create a PDF form in Word?
How to create an editable PDF from a Word document
- Open Word and locate the document. Open Microsoft Word and find the document you want to make into an editable PDF. …
- Prepare the document in Word. …
- Select Adobe PDF. …
- Create the form. …
- Make your form editable. …
- Edit and save your PDF form.
How do you create a fillable form in Word?
Tech Tip: How to Create Fillable Forms in Microsoft Word
- Enable Developer Tab. Open Microsoft Word, then go to the File Tab > Options > Customize Ribbon > check the Developer Tab in the right column > Click OK.
- Insert a Control. …
- Edit Filler Text. …
- Design Mode button again to exit the mode.
- Customize Content Controls.
How do I fill in a fillable form in Word?
Click on the Protect document icon/button, a new inspector/sidebar should appear on the right side of the screen. In the inspector/sidebar, in the 2. section, check Allow only this type of editing in the document, then choose Filling in forms in the drop down list immediately below.
Join our Business Guide Community and share you ideas today !
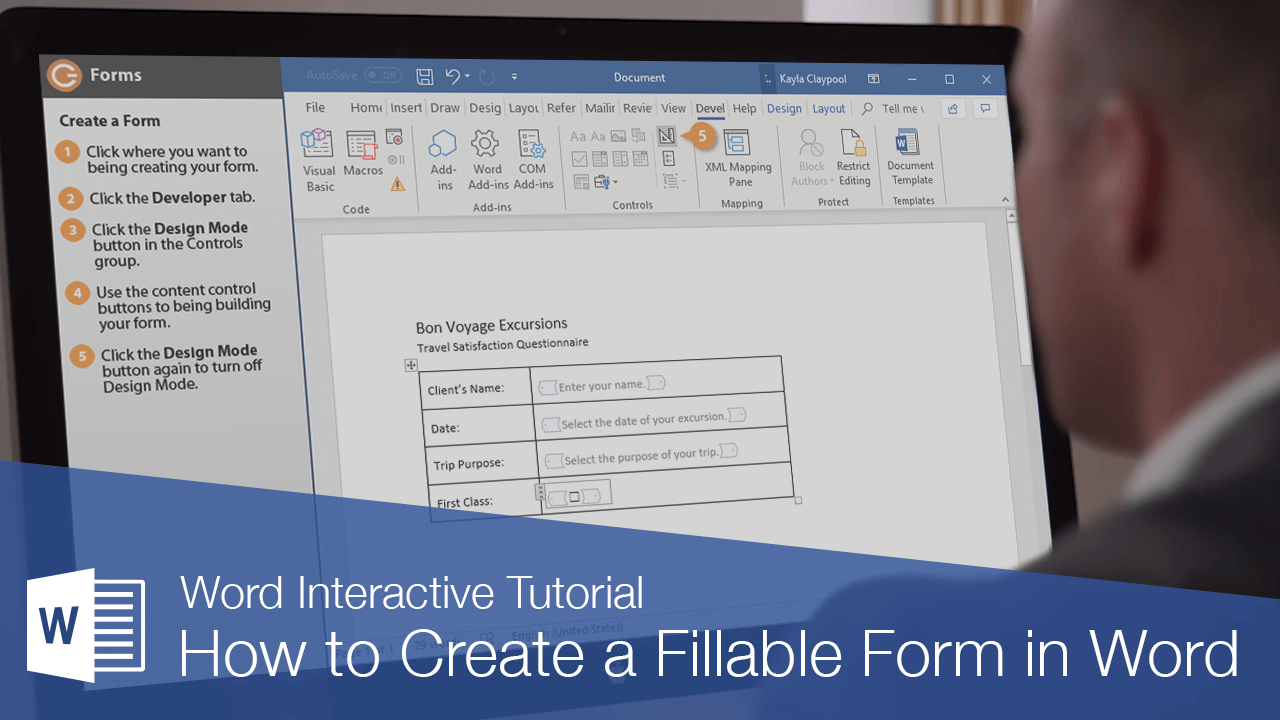
You can use Word to create interactive digital forms that other people can fill out on their computers before printing or sending them back to you. It takes a little preparation but keeps you from having to decipher messy handwriting! Some of the tools you will use when creating a form include:
- Templates: Forms are normally saved as templates so that they can be used again and again.
- Content controls: The areas where users input information in a form.
- Tables: Tables are often used in forms to align text and form fields, and to create borders and boxes.
- Protection: Users can complete the form fields without being able to change the form’s text and/or design.
Show the Developer Tab
Before you can create a form, you’ll need to turn on the Developer tab to get access to the advanced tools.
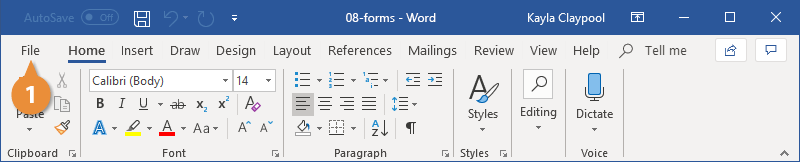
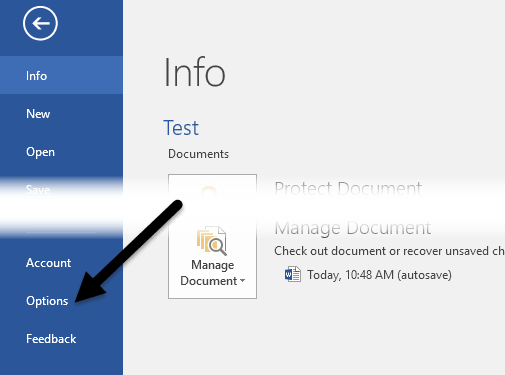
- Click the File tab.

- Select Options.

The Word Options window opens.
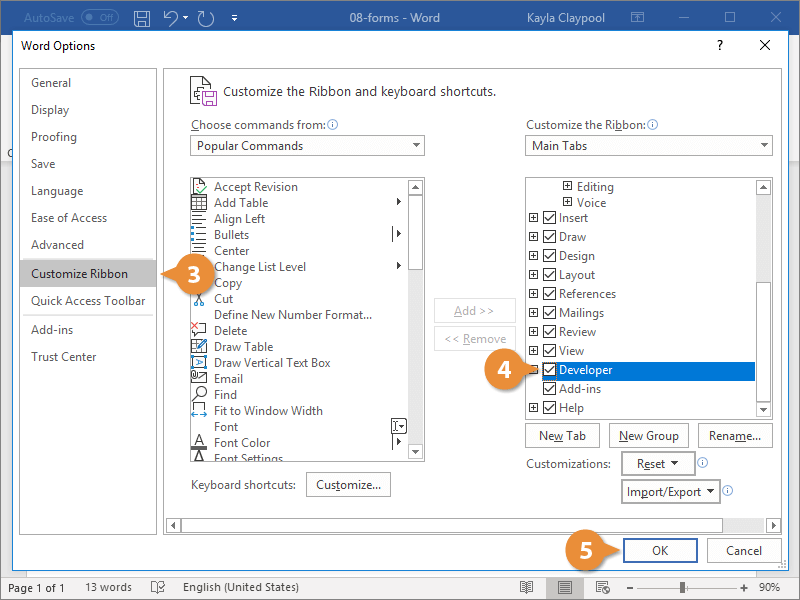
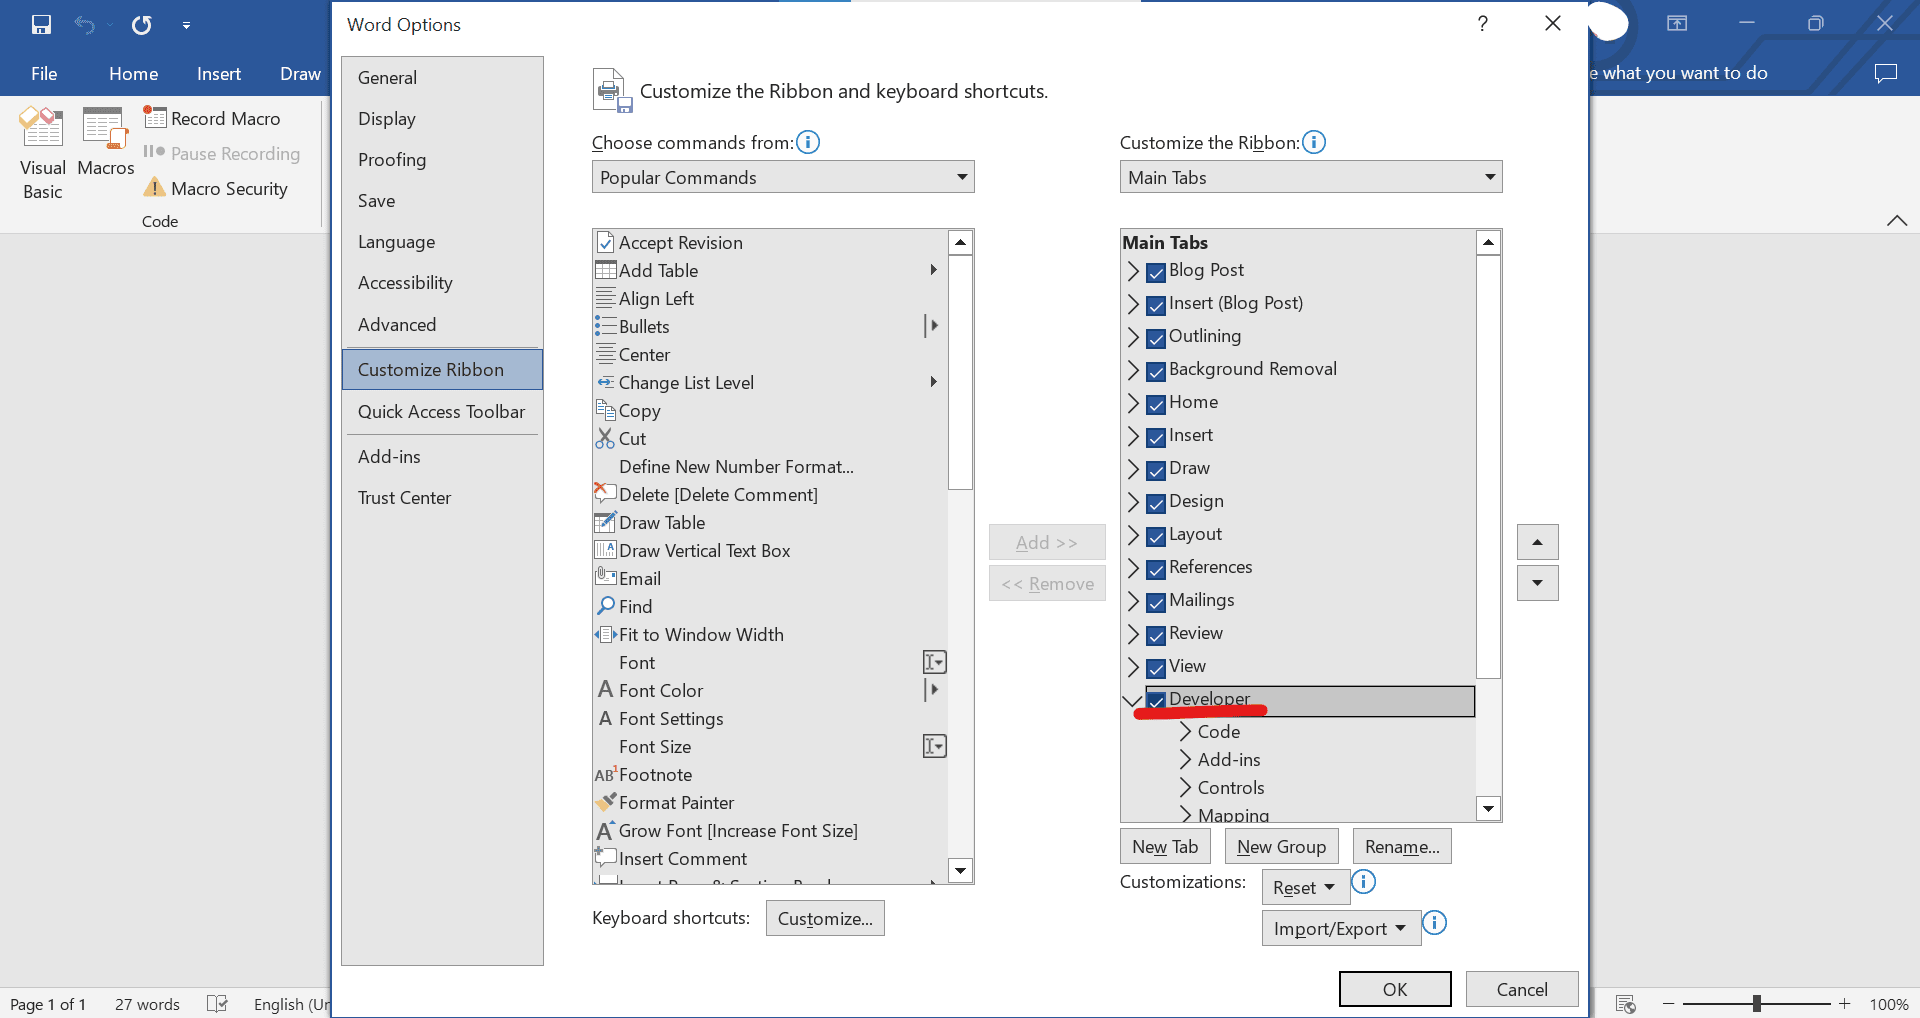
- Click the Customize Ribbon tab on the left.
The column on the right controls which ribbon tabs are enabled.
- Check the Developer check box.
- Click OK.
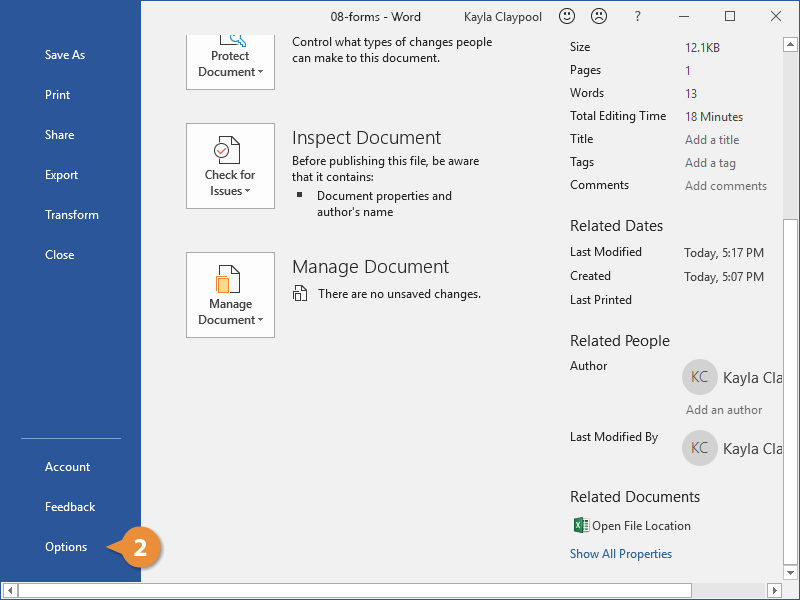
The Developer tab now appears on the ribbon. In addition to advanced tools for macro recording, add-ins, and document protection, we now have access to form controls.
Create a Form
Once you’ve enabled the Developer tab, and created the layout and structure of the form, you can start adding form fields to your document with Content Controls.
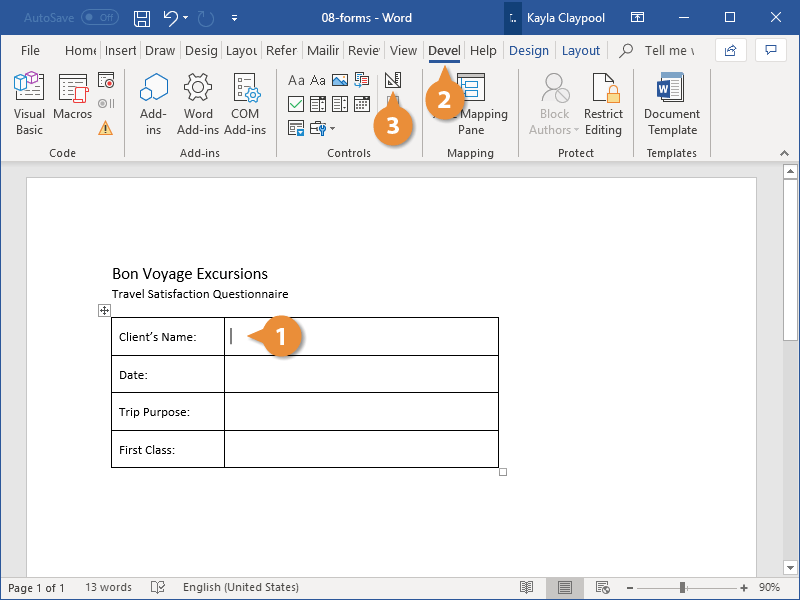
- Place the text cursor where you want to insert the form field.
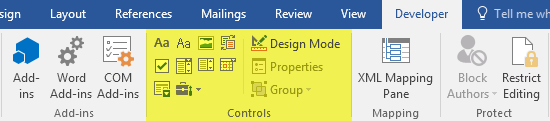
- Click the Developer tab on the ribbon.
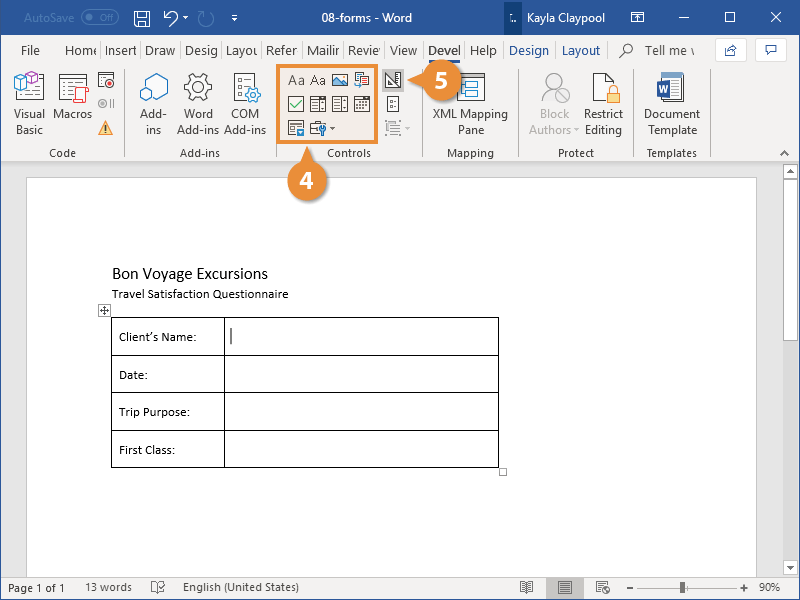
The Controls group contains the different kinds of content controls you can add to a form, as well as the toggle button for Design Mode.
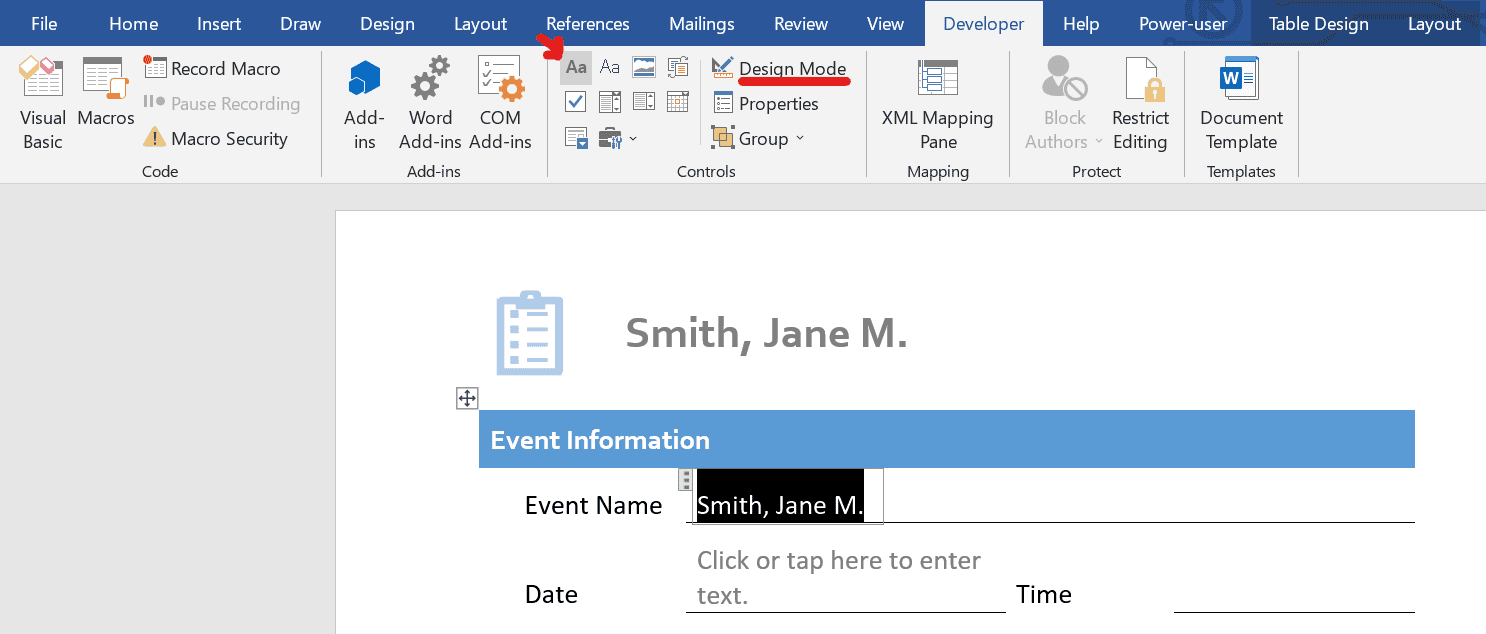
- Click the Design Mode button in the controls group.
While Design Mode is active, controls you insert won’t be active, so clicking a check box to move it around won’t also check it. You can also customize placeholder text for some controls.
- Click a Content Control buttons to insert the selected type of control.
The content control is inserted.
Select a form field and click the Properties button on the ribbon to edit a control’s options. Depending on the type of control you’ve inserted, you can change its appearance, set up the options in a list, or lock the control once edited.
- When you’re done, click the Design Mode button again to exit Design Mode.
You leave Design Mode, and the content controls that you’ve inserted can now be used.
Types of Form Controls
There are many different types of form controls you can add to a form that will allow people to add different types of responses.
Finalize a Form
When you’re ready to distribute a form so others can fill it out, you can restrict the form so that content controls cannot be removed or changed by those filling it out.
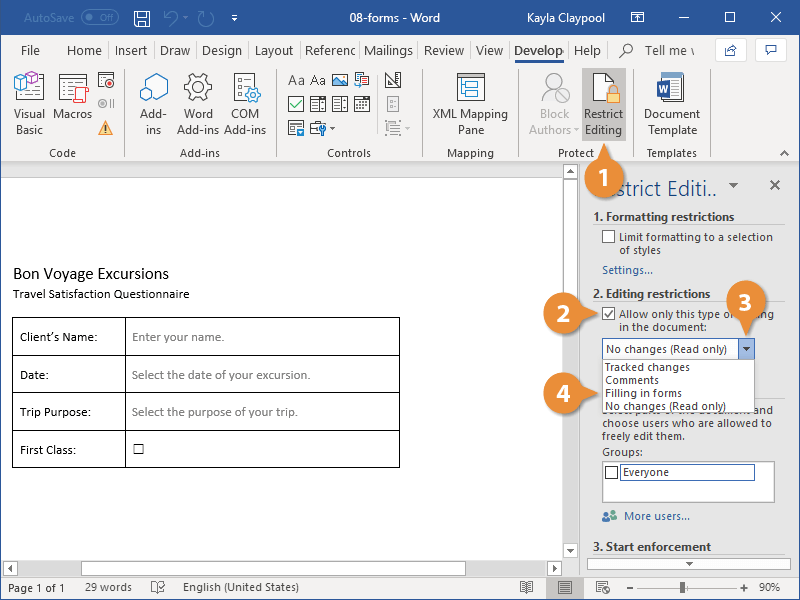
- Click the Restrict Editing button on the Developer tab.
The Restrict Editing pane appears on the right.
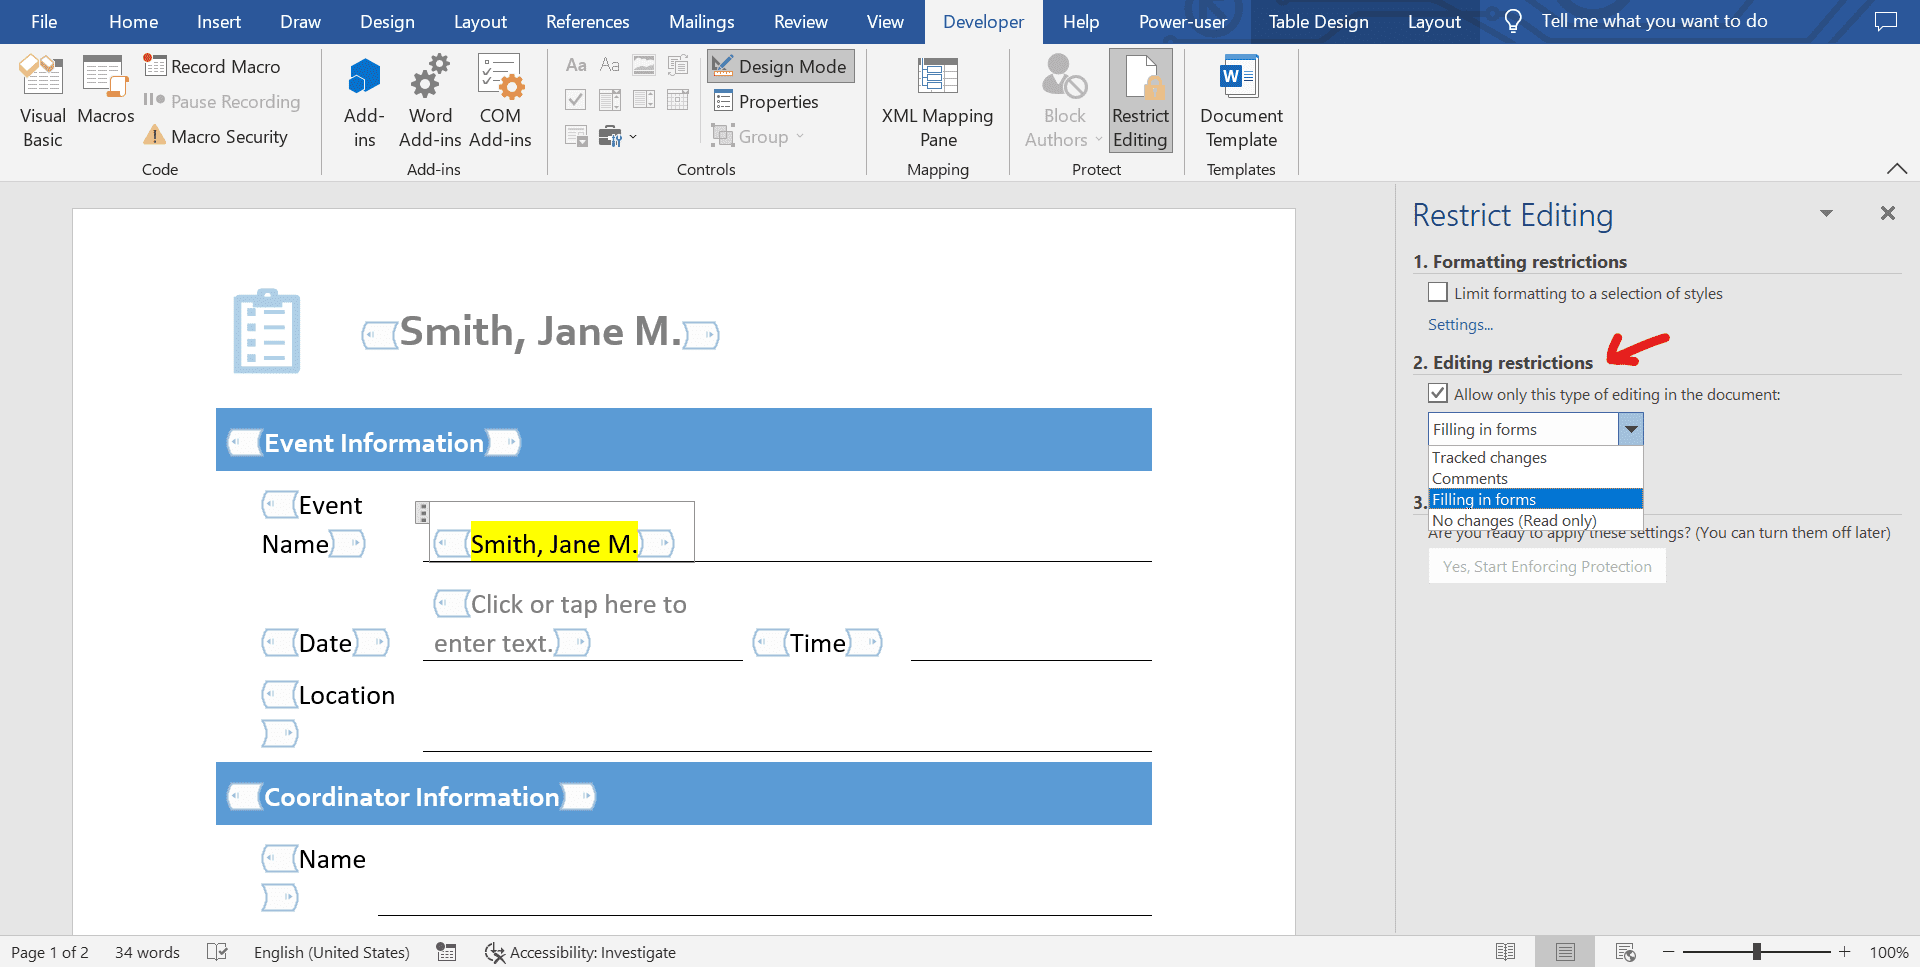
- Check the Editing restrictions check box.
- Click the Editing restriction list arrow.
- Select Filling in forms.
When this option is enabled, the only change that anyone else can make to this document is the filling in of form fields. They won’t be able to move, delete, or edit the fields themselves until protection is turned off.
- Click the Yes, Start Enforcing Protection button.
A password is not required to start enforcing protection, but you can add one if you’d like to prevent just anyone from turning this protection off.
- Enter a password (optional), then click OK.
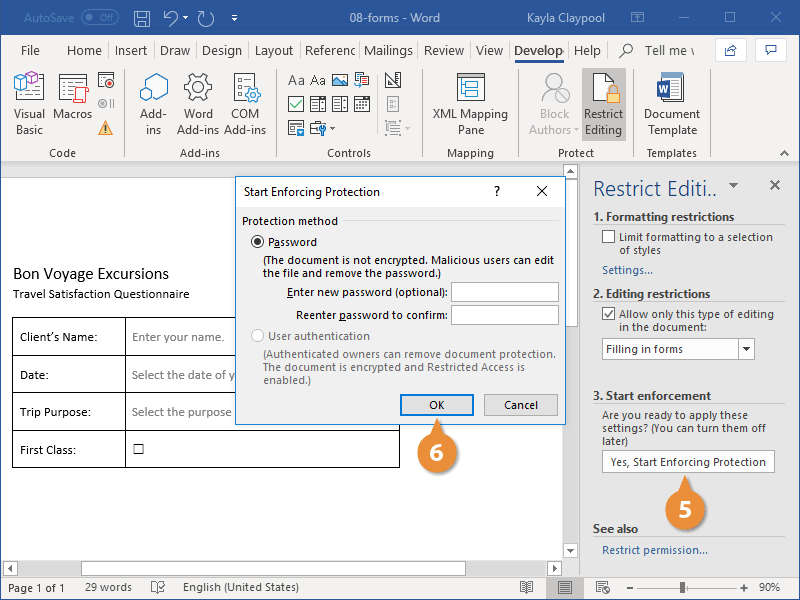
The document is now restricted, and anyone you send it to will only be able to fill in the forms.

FREE Quick Reference
Click to Download
Free to distribute with our compliments; we hope you will consider our paid training.
Creating a fillable form in Microsoft Word offers numerous advantages. Digital forms allow you to gather data quickly and securely. Plus, you don’t have to waste time printing a copy for each respondent or signatory.
How can you make this happen?
If you’re only familiar with creating standard Word documents, this post is for you. The steps below will teach you how to create fillable forms in Word so others can complete them quickly.
1. Add the Developer Tab
Open Microsoft Word and go to File. From there, go to More > Options and select Customize Ribbon. The column on the right should display a list of all the enabled tabs. Scroll down the list and click on the checkbox next to Developer. Click OK.
You should see the Developer tab on the ribbon bar. Clicking on it will give you access to various add-ins and content controls. The latter refers to the elements you can add to create a fillable document in Word, like:
- Rich text
- Plain text
- Picture
- Building block gallery
- Combo box
- Drop-down list
- Date
- Checkbox
- Group
2. Switch to Design Mode
Go to the Developer tab and click Design Mode in the controls group. Enabling this mode allows you to create forms as you please. For starters, you can type the label first (e.g., name, address, phone number), then place your mouse cursor where you want the field to appear.
3. Insert a Control
Insert the control you want. It should appear as a form field. To modify it, you either highlight the form field using your mouse or double-click any of the blue placeholders.
Go to the controls group and click Properties. To customize your form field’s appearance, go to the Content Control Properties window and change the default settings. Click OK.
4. Edit the Placeholder Text
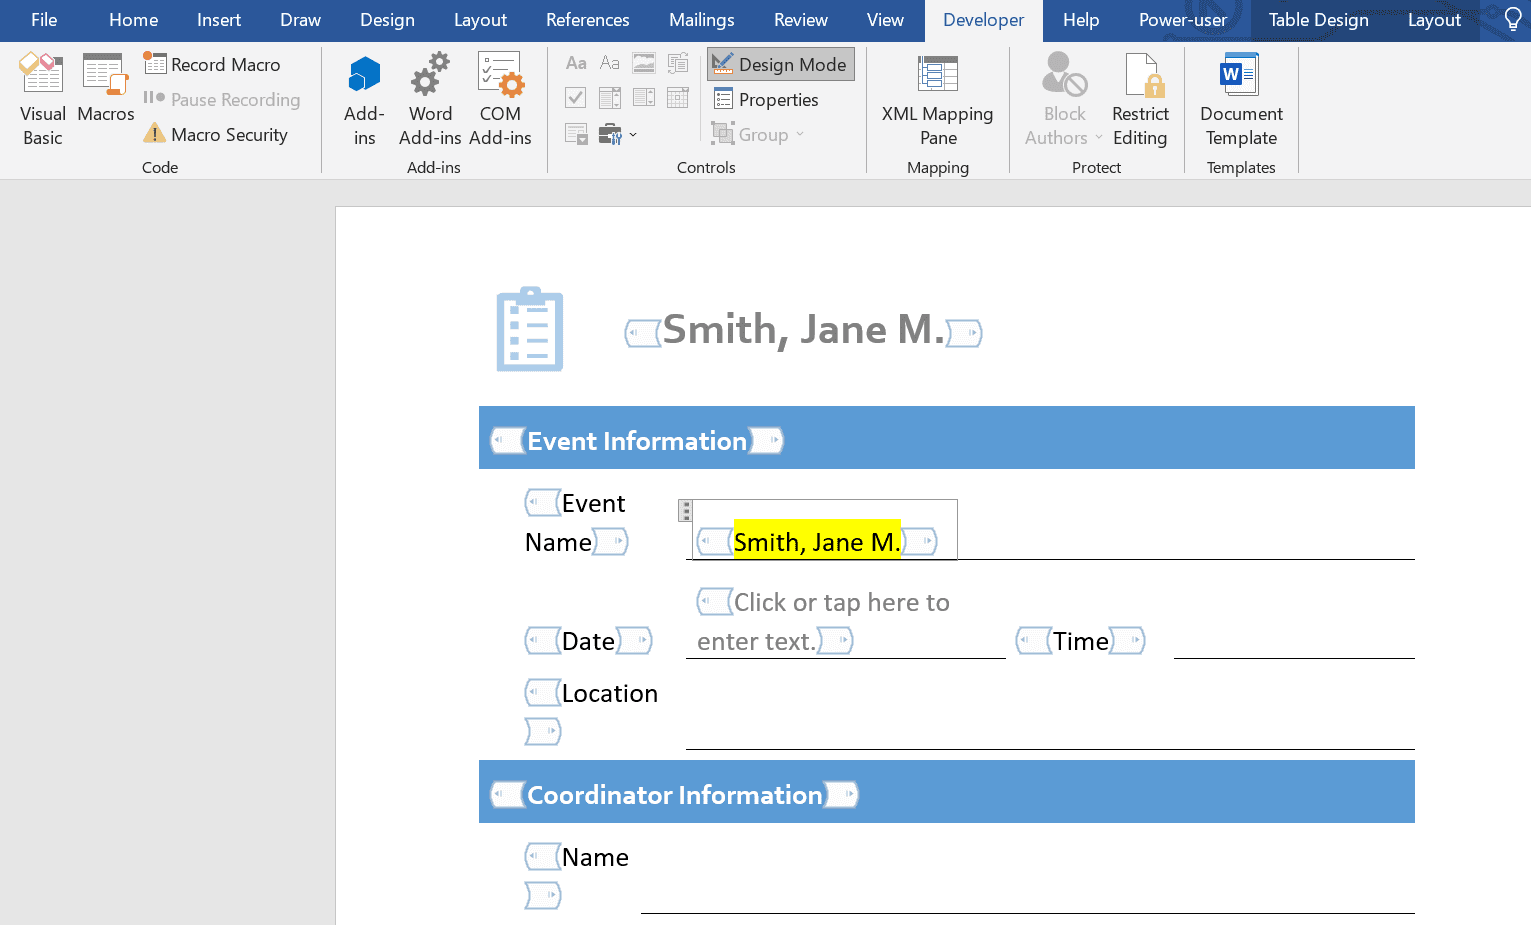
While optional, you can set your desired filler or placeholder text by typing inside the form field. You can also use placeholder texts to display hints in the text area. For example, if you’d like users to enter their names in the reverse format, you can use the filler text to write a sample entry like Doe, John Jr., or Smith, Jane M.
5. Preview Your Changes
After creating all the entries for your fillable form, click the Design Mode button again to turn it off. You should now be able to preview your document and see if you’ve missed anything. If you want to make additional changes, simply switch back to Design Mode to apply the necessary fixes.
Repeat steps 2 to 5 until you achieve the form layout that you want.
6. Enable Restrict Editing
Before asking others to fill out your form, you should ensure that it doesn’t allow editing from unauthorized users. To do this, you must enable Restrict Editing by clicking its button under the Developer tab.
In the Restrict Editing pane, check the box below Editing Restrictions, then select Filling in forms from the drop-down menu. Confirm your selection by clicking the “Yes, Start Enforcing Protection” button.
While a password for restricting editing isn’t required, you’re also free to add one if you like.
Save your changes by clicking File > Save or Save As. That’s it. You’re now ready to share the fillable Word form you created via email or direct message. The process is no different from sharing a standard Word document.
Fill: An Effortless Way to Sign Forms Online
Creating fillable forms in Word is easy. But what if you don’t have access to this MS Office application? You’re better off finding an equally functional alternative that doesn’t require any complicated setup or software installation.
Look no further than Fill.
To create a fillable online form using the Fill app, you need to:
- Log in or sign up for an account at fillhq.com.
- Open your web dashboard and go to Tools > Online Forms.
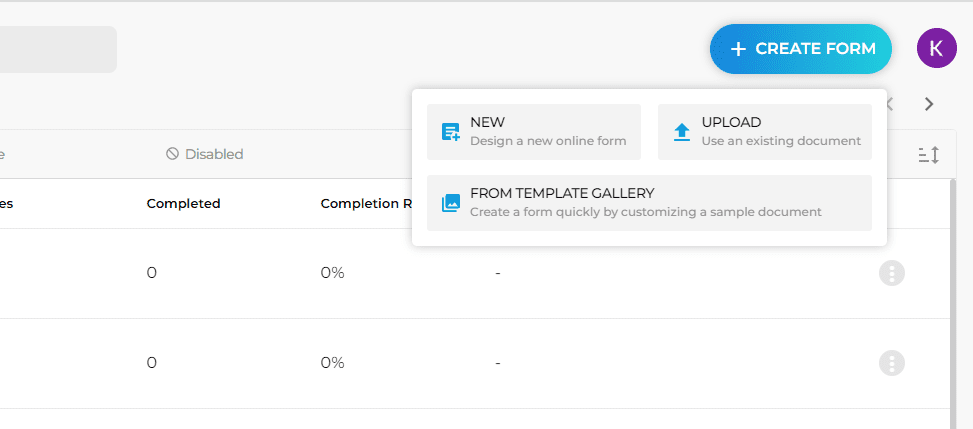
- Click Create Form and select your desired option. You can create a form using a template or design one from scratch. Another method is to upload an existing Word document and use that as the basis for creating an online form.

- Using the options shown in the left panel, add the fields to be filled out by your respondents. Use the drag tool to position them in specific parts of your document.

- Add at least one signature field. You may customize the filler texts as well as the form labels.
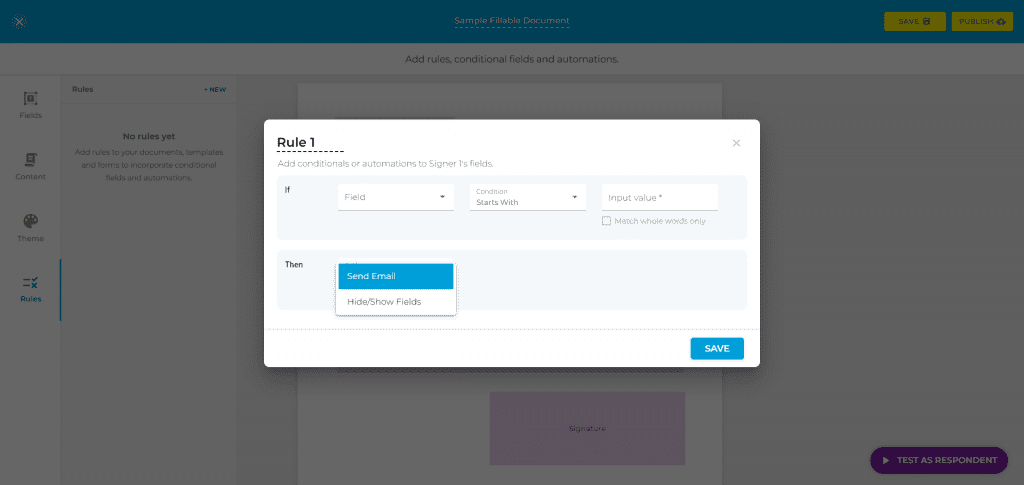
- If you wish to add conditional fields, click Rules and select New. Set your preferred rules and actions. Click Save.
- Once you’re done creating your fillable document, click Publish.
- To share your published form, hover over it and click Copy Link. You can share the online form URL via email, chat, and other third-party platforms.
- Monitor your forms and get notified via email and in-app as soon as you receive a response. You can also track your form progress using analytics and audit logs.


That’s it.
Once you know how to create fillable forms in Word, it’ll be easier to acquire specific information from your existing customers and target clients. You can also streamline your data collection process while eliminating the need for repetitive manual workflows.
As for Fill, it’s more than just an alternative for creating fillable documents. Our app can help you sign your forms legally and on time. It also offers a more efficient way to collect data since you don’t have to collate all the responses manually. It provides a fully automated process for organizing user responses, so all you need to do is analyze.
If you want to explore more of Fill’s features, start with a free account or upgrade to a Pro plan with a 30-day money-back guarantee.
Did you know that you can create forms in Word that people can fill out? When you hear about fillable forms, it is almost always related to Adobe and PDF documents because that’s the most popular format.
However, Word is also quite a powerful tool and you can use it to quickly create forms that you can either print or send via email, etc. If you need to create a survey that will go out to many people and you want all the responses tallied for your automatically, it might be best to use Google Docs to create the survey.
In this article, I’ll show you how to create a form with text boxes, check boxes, a date picker and a list box. You can also make your forms a lot better looking if you use tables to organize everything.
Enable Developer Tab
By default, you can’t create forms in Word unless you enable the Developer tab in the ribbon. Since it’s not used by a lot of people, Microsoft disabled it by default. To enable the tab, click on File and then Options.
On the left-hand side, click on Customize Ribbon and then check the Developer box in the right-hand list box.
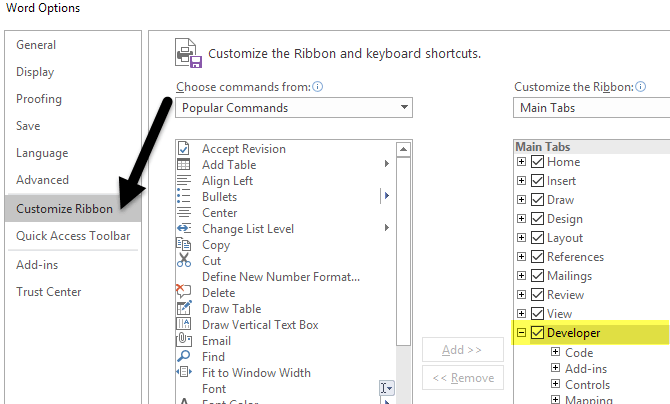
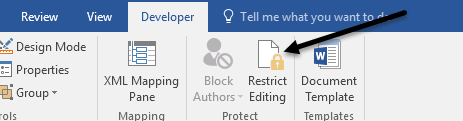
Click OK and click on the tab in the ribbon. The section we are most interested in is Controls.
Creating a Form in Word
The Controls section has about eight different controls that can be added to your Word document: Rich Text, Plain-Text, Picture, Building Block Gallery, Checkbox, Combo Box, Drop-Down List, and Date Picker.
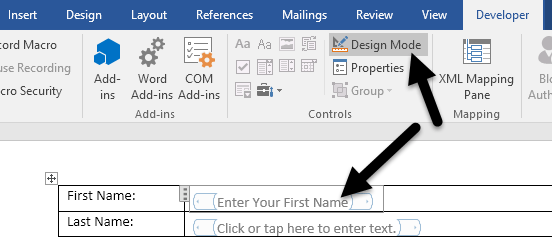
To insert a control, just click on it and it will appear wherever your cursor was located. In my example below, I created a table and added two plain-text boxes for first name and last name.

By default, each control has its own filler text. For a plain text control, it is Click or tap here to enter text. You can edit this text for any control by clicking on the Design Mode button that is to the right of the control icons.
You’ll see some blue placeholders appear on the left and right of any controls you have added to your document. Select the text and change it to whatever you like. Click on the Design Mode button again to exit the mode.
Next, click on your newly added control so that it is highlighted and then click on Properties, which is directly below the Design Mode button. Each control will have a standard set of options with custom options at the bottom based on what type of control it is.
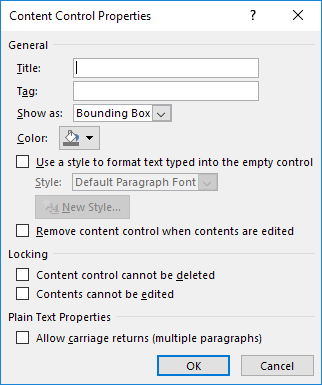
Here you can give the control a title, change the color, style the text and specify whether or not the control can be edited or deleted. At the very bottom are the control specific options, which for the case of a plain text control, is whether you want to allow multiple lines or not. That last option is useful if you need someone to type in a paragraph of text.
So what’s the difference between a plain-text control and a rich text control? Well, not much. In a rich text control, you can change the font/color settings for each word individually, whereas the plain-text control will apply the formatting to all the text. You would think the plain-text control would not allow bold, font changes or color changes, but it does.
Next, I went ahead and added a drop down list control to my form. You’ll see it says Choose an item and that’s it. In order to add items to the list, you have to click on Properties.
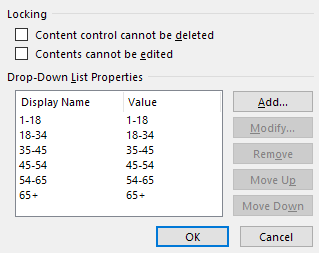
Click the Add button and then type in a name for your choice. By default, the Display Name and Value will be the same, but you can change it if you like. There really is no reason to change the value unless you are writing Word macros and refer to the controls in code.
Once you have added all your choices, go ahead and click OK and you’ll now be able to select the options from the drop-down list.
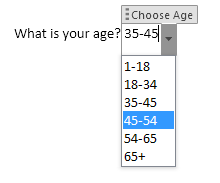
The only difference between the dropdown list control and the combo box control is that the latter allows the user to enter their own value if they please. In the dropdown list, you have to choose from one of choices in the list. In the combo box, you can either choose from the list or type in your own value.
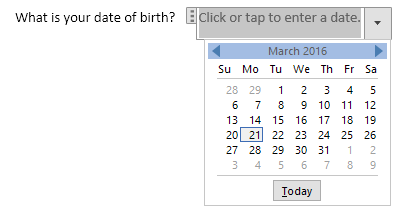
The date picker control works just like any date picker you have probably used on airline booking sites, etc. When you click on it, a calendar appears and you can simply click on the date to select it.
If you click on the Properties button, you’ll see that there are quite a few options for the date picker control.
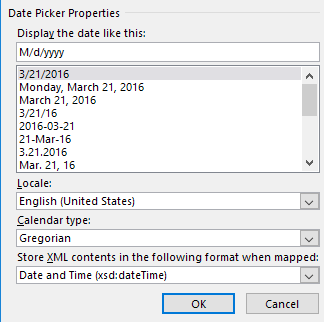
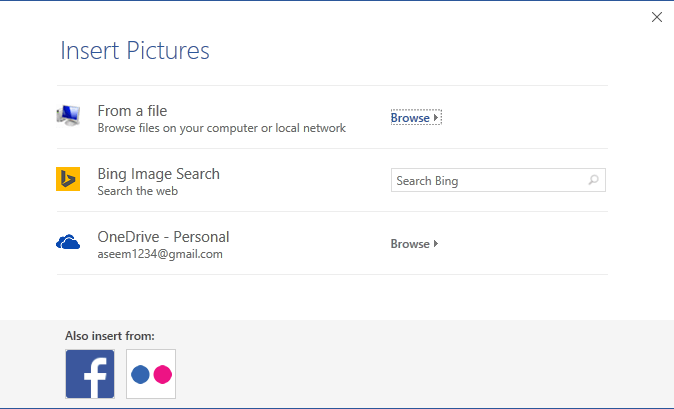
You can choose a different format to display the date and choose a different calendar type. The picture control is another nice option that will allow users to insert a picture easily.
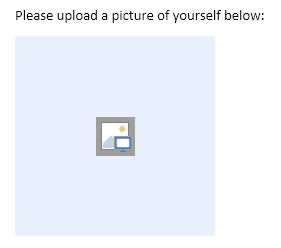
When the user clicks on the image, a dialog will appear where they can choose a picture from their computer, from Bing image search or from OneDrive. They also have options for Facebook and Flickr.
Now let’s add a few checkboxes to our document. Note that when you add a checkbox and try to type text into it, it will tell you that the selection is locked. I believe this is by design. You have to click next to the checkbox and then type in your text.

Lastly, you can insert a building block control, which lets you pick content from Quick Parts and AutoText. If you don’t know what I’m talking about, check out my post on how to use AutoText and Quick Parts in Word. In my example, I added some quotes to a custom AutoText and then linked the control to it via the Properties dialog.

Once you have all the controls in your document the way you want, it might be a good idea to protect the document so that user can only fill out the form fields and that’s it. To do this, click on Restrict Editing on the Developer tab.
In the pane that shows up on the right, click on the dropdown under Editing restrictions and choose Filling in forms. Make sure to check the Allow only this type of editing in the document box.

Click Yes, Start Enforcing Protection and then enter a password if you like. Now only the form fields will be editable and everything else locked/protected. The user can easily use the TAB key to move between the different form fields.
Overall, Word isn’t the greatest tool for making forms, but it’s decent and probably more than enough for most people. If you have any questions, feel free to comment. Enjoy!