
Excel for Microsoft 365 Word for Microsoft 365 Outlook for Microsoft 365 PowerPoint for Microsoft 365 Project Online Desktop Client Publisher for Microsoft 365 Excel 2021 Word 2021 Outlook 2021 PowerPoint 2021 Project Professional 2021 Project Standard 2021 Publisher 2021 Excel 2019 Word 2019 Outlook 2019 PowerPoint 2019 Project Professional 2019 Project Standard 2019 Publisher 2019 Excel 2016 Word 2016 Outlook 2016 PowerPoint 2016 Project Professional 2016 Project Standard 2016 Publisher 2016 Excel 2013 Word 2013 Outlook 2013 PowerPoint 2013 Project Professional 2013 Project Standard 2013 Publisher 2013 Word 2010 More…Less
In a text box or shape, you can quickly change the color of text, the inside (fill) color, or the color of the border.
Let’s select the shape—the Drawing Tools appear in the ribbon, with the Format tab active.
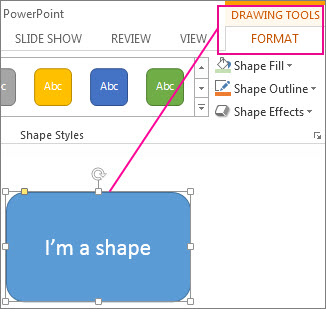
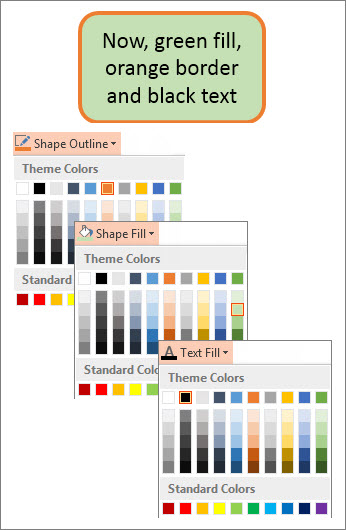
Here’s the same shape after we changed the border to orange, the fill to a light green, and the text to black. We used the Shape Outline, Shape Fill, and Text Fill commands, available on the Format tab under Drawing Tools.
Although the changes we’ll make below are shown in Microsoft PowerPoint, they work the same way in Excel, Word, Outlook, and Project.
Change the text color
-
Select the shape or text box border. When you do that, the Drawing Tools appear.
To change multiple shapes or text boxes, click the first shape or text box, and then press and hold Ctrl while you click the other shapes or text boxes.
-
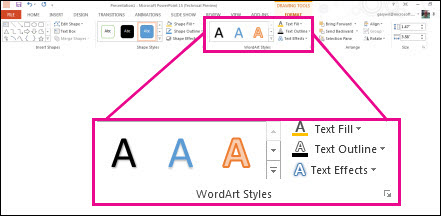
On the Drawing Tools Format tab, click Text Fill and, under Theme Colors, pick the color you want.
Note: The Text Fill and Text Outline menus might not be active until you start typing in your shape.

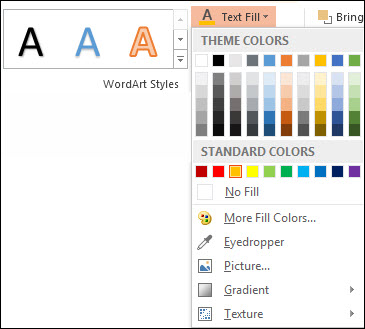
To change the text to a color that isn’t in the theme colors
-
Select the shape or text box.
-
On the Drawing Tools Format tab, click Text Fill > More Fill Colors.
-
In the Colors box, either click the color you want on the Standard tab, or mix your own color on the Custom tab. Custom colors and colors on the Standard tab aren’t updated if you later change the document theme.
-
Change the inside (fill) color
-
Select the shape or text box to change. When you do that, the Drawing Tools appear.
To change multiple shapes or text boxes, click the first shape or text box, and then press and hold Ctrl while you click the other shapes or text boxes.
-
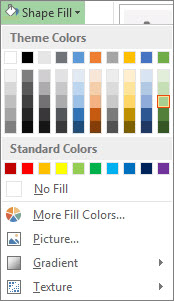
Click Shape Fill, and under Theme Colors, pick the color you want.
To change the fill color to a color that isn’t in the theme colors
-
Select the shape or text box.
-
On the Drawing Tools Format tab, click Shape Fill > More Fill Colors.
-
In the Colors box, either click the color you want on the Standard tab, or mix your own color on the Custom tab. Custom colors and colors on the Standard tab aren’t updated if you later change the document theme.
-

Change the border color
-
Select the shape or text box border. When you do that, the Drawing Tools appear.
If you want to change multiple shapes or text boxes, click the first shape or text box, and then press and hold Ctrl while you click the other shapes or text boxes.
-
On the Drawing Tools Format tab, click Shape Outline and, under Theme Colors, pick the color you want.
To change the border to a color that isn’t in the theme colors
-
Select the shape or text box.
-
On the Drawing Tools Format tab, click Shape Outline, and then click More Outline Colors.
-
In the Colors box, either click the color that you want on the Standard tab, or mix your own color on the Custom tab. Custom colors and colors on the Standard tab aren’t updated if you later change the document theme.
-

Tip: In PowerPoint, you can also change the border color by clicking Shape Outline (on the Home tab, in the Drawing group).
See Also
Remove or change the border on a text box or shape
Add a fill or effect to a shape
Change the font color (text color)
Change the background or color in Word
Change a message background in Outlook
Change the background color of your slides in PowerPoint
Insert WordArt
Add shapes
Need more help?
Want more options?
Explore subscription benefits, browse training courses, learn how to secure your device, and more.
Communities help you ask and answer questions, give feedback, and hear from experts with rich knowledge.
You can change the look of a shape or text box by changing its fill or by adding effects to it, such as shadows, glows, reflections, soft edges, bevels, and three-dimensional (3-D) rotations.
A fill is a color, pattern, texture, picture, or gradient applied to the interior of a shape. A gradient is a gradual progression of colors and shades, usually from one color to another color, or from one shade to another shade of the same color.

Changing the fill color of a shape affects only the inside or front of the shape. If you add an effect to a shape, such as a shadow, and want a different color for that effect, you must change the color of the shadow separately from the fill color.
A 3-D effect adds depth to a shape. You can add a built-in combination of 3-D effects to your shape, or you can add individual effects. You can add combinations of individual effects to your shape in these programs: Excel, Outlook, Word, and PowerPoint.
Add a fill or effect
To add a fill or effect, click your shape, click Format, click the arrow next to Shape Fill or Shape Effects, and select a color, gradient, texture, or effect.
-
Click the shape that you want to fill. To add the same fill to multiple shapes, click the first shape, and then press and hold Ctrl while you click the other shapes.
-
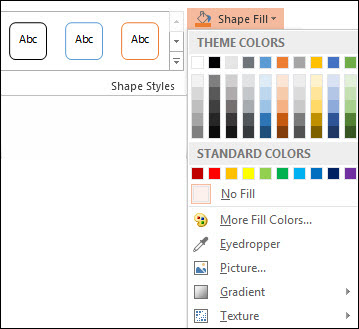
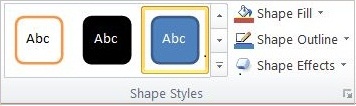
On the Format tab, in the Shape Styles group, click the arrow next to Shape Fill.
-
Do one of the following:
-
To add or change a fill color, click the color you want.
-
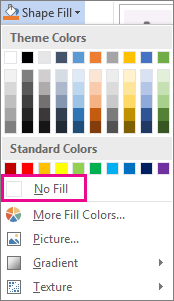
To choose no color, click No Fill.
-
To use a color that isn’t one of the theme colors, click More Fill Colors, and then either click the color that you want on the Standard tab, or mix your own color on the Custom tab. Custom colors and colors on the Standard tab do not update if you later change the document theme.
-
To adjust the transparency of the shape, click More Fill Colors. At the bottom of the Colors dialog box, move the Transparency slider, or enter a number in the box next to the slider. You can vary the percentage of transparency from 0% (fully opaque, the default setting) to 100% (fully transparent).
-
To add or change a fill picture, click Picture, locate the folder that contains the picture that you want to use, click the picture file, and then click Insert.
-
To add or change a fill gradient, point to Gradient, and then click the gradient variation that you want. To customize the gradient, click More Gradients, and then choose the options that you want.
-
To add or change a fill texture, point to Texture, and then click the texture that you want. To customize the texture, click More Textures, and then choose the options that you want.
-
Top of page
For more information about adding a fill or effect, select an item from the drop-down list:
-
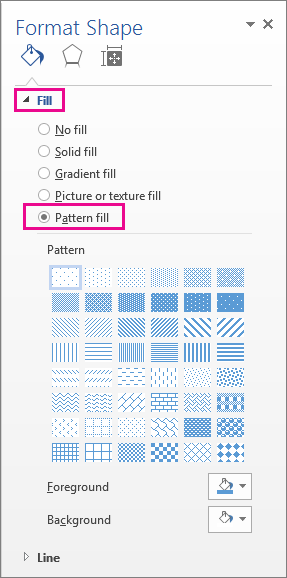
Right-click the shape that you want to add a pattern fill to and select Format Shape.
-
In the Format Shape pane, click Fill, and then click Pattern Fill.
-
Select a pattern, and if you like, click the arrows next to Foreground and Background and select a color combination.
Top of page
You can add a variety of effects to your text boxes and shapes, such as beveled edges or reflections.
-
Click the shape that you want to add an effect to. To add the same effect to multiple shapes, click the first shape, and then press and hold Ctrl while you click the other shapes.
-
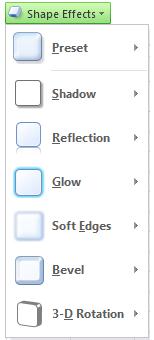
On the Format tab, in the Shape Styles group, click Shape Effects, and select an option from the list.
-
To add or change a built-in combination of effects, point to Preset, and then click the effect that you want.
To customize the built-in effect, click 3-D Options, and then choose the options that you want.
-
To add or change a shadow, point to Shadow, and then click the shadow that you want.
To customize the shadow, click Shadow Options, and then choose the options that you want.
-
To add or change a reflection, point to Reflection, and then click the reflection variation that you want.
To customize the reflection, click Reflection Options, and then choose the options that you want.
-
To add or change a glow, point to Glow, and then click the glow variation that you want.
To customize the glow, click Glow Options, and then choose the options that you want.
-
To add or change a soft edge, point to Soft Edges, and then click the size and color of the edge that you want.
To customize the soft edges, click Soft Edges Options, and then choose the options that you want.
-
To add or change an edge, point to Bevel, and then click the bevel that you want.
To customize the bevel, click 3-D Options, and then choose the options that you want.
-
To add or change a 3-D rotation, point to 3-D Rotation, and then click the rotation that you want.
To customize the rotation, click 3-D Rotation Options, and then choose the options that you want.
Notes:
-
To create a custom effect by adding multiple individual effects, repeat step two above.
-
If you add a 3-D effect, such as a bevel, to the shape and then add a soft edge, you will not see any visual change to the shape because the 3-D effect takes precedence. However, if you delete the 3-D effect, the soft edge effect will be visible.
-
-
Top of page
-
Click the shape that you want to delete a fill from. To delete the same fill from multiple shapes, click the first shape, and then press and hold Ctrl while you click the other shapes.
-
On the Format tab, in the Shape Styles group, click the arrow next to Shape Fill, and then click No Fill.
Top of page
-
Click the shape that you want to delete the effect from. To delete the same effect from multiple shapes, click the first shape, and then press and hold Ctrl while you click the other shapes.
-
On the Format tab, in the Shape Styles group, click Shape Effects, and then do one of the following.
-
To delete a built-in combination of effects from the shape, point to Preset, and then click No Presets.
Note: When you click No Presets, you do not remove any shadow effects that have been applied to your shape. To remove shadows on a shape, follow the step below.
-
To delete a shadow, point to Shadow, and then click No Shadow.
-
To delete a reflection, point to Reflection, and then click No Reflection.
-
To delete a glow, point to Glow, and then click No Glow.
-
To delete soft edges, point to Soft Edges, and then click No Soft Edges.
-
To delete an edge, point to Bevel, and then click No Bevel.
-
To delete 3-D rotation, point to 3-D Rotation, and then click No Rotation.
-
Note: If you have added multiple individual effects, repeat step two above to delete all the effects.
Top of page
See also
-
To add a shape, see Add shapes.
-
To learn about other shapes with effects, see Insert WordArt or Learn more about SmartArt graphics.
-
To change the look of a picture, see Apply an artistic effect to a picture.
-
To change the look of a text box, see Change the colors in a text box or shape.
-
To change the border around a text box or shape, see Remove or change the border on a text box or shape.
-
To create a moving effect in PowerPoint, see Animate text or objects.
Add or change a shape fill
-
Click the shape that you want to add a fill to.
To add the same fill to multiple shapes, click the first shape, and then press and hold CTRL while you click the other shapes.
-
Under Drawing Tools, on the Format tab, in the Shape Styles group, click the arrow next to Shape Fill, and then do one of the following:
If you do not see the Drawing Tools or Format tabs, make sure that you have selected the shape. You might have to double-click the shape to open the Format tab.
-
To add or change a fill color, click the color that you want, or to choose no color, click No Fill.
To change to a color that is not in the theme colors, click More Fill Colors, and then either click the color that you want on the Standard tab, or mix your own color on the Custom tab. Custom colors and colors on the Standard tab do not update if you later change the document theme.
Tip: You can also adjust the transparency of the shape by clicking More Fill Colors. At the bottom of the Colors dialog box, move the Transparency slider, or enter a number in the box next to the slider. You can vary the percentage of transparency from 0% (fully opaque, the default setting) to 100% (fully transparent).
-
To add or change a fill picture, click Picture, locate the folder that contains the picture that you want to use, click the picture file, and then click Insert.
-
To add or change a fill gradient, point to Gradient, and then click the gradient variation that you want.
To customize the gradient, click More Gradients, and then choose the options that you want.
-
To add or change a fill texture, point to Texture, and then click the texture that you want.
To customize the texture, click More Textures, and then choose the options that you want.
-

Top of page
For more information about adding a fill or effect, select an item from the drop-down list.
-
Right-click the shape that you want to add a pattern fill to and select Format Shape.
-
In the Format Shape dialog box, click the Fill tab.
-
In the Fill pane, select Pattern fill and then select a pattern, foreground color, and background color for your pattern fill.
Top of page
-
Click the shape that you want to add an effect to.
To add the same effect to multiple shapes, click the first shape, and then press and hold CTRL while you click the other shapes.
-
Under Drawing Tools, on the Format tab, in the Shape Styles group, click Shape Effects, and then do one of the following:
If you do not see the Drawing Tools or Format tabs, make sure that you have selected the shape. You might have to double-click the shape to open the Format tab.
-
To add or change a built-in combination of effects, point to Preset, and then click the effect that you want.
To customize the built-in effect, click 3-D Options, and then choose the options that you want.
-
To add or change a shadow, point to Shadow, and then click the shadow that you want.
To customize the shadow, click Shadow Options, and then choose the options that you want.
-
To add or change a reflection, point to Reflection, and then click the reflection variation that you want.
To customize the reflection, click Reflection Options, and then choose the options that you want.
-
To add or change a glow, point to Glow, and then click the glow variation that you want.
To customize the glow, click Glow Options, and then choose the options that you want.
-
To add or change a soft edge, point to Soft Edges, and then click the size and color of the edge that you want.
To customize the soft edges, click Soft Edges Options, and then choose the options that you want.
-
To add or change an edge, point to Bevel, and then click the bevel that you want.
To customize the bevel, click 3-D Options, and then choose the options that you want.
-
To add or change a 3-D rotation, point to 3-D Rotation, and then click the rotation that you want.
To customize the rotation, click 3-D Rotation Options, and then choose the options that you want.
Notes:
-
To create a custom effect by adding multiple individual effects, repeat step two above.
-
If you add a 3-D effect, such as a bevel, to the shape and then add a soft edge, you will not see any visual change to the shape because the 3-D effect takes precedence. However, if you delete the 3-D effect, the soft edge effect will be visible.
-
-
Top of page
-
Click the shape that you want to delete a fill from.
To delete the same fill from multiple shapes, click the first shape, and then press and hold CTRL while you click the other shapes.
-
Under Drawing Tools, on the Format tab, in the Shapes Styles group, click the arrow next to Shape Fill, and then click No Fill.
If you do not see the Drawing Tools or Format tabs, make sure that you have selected the shape. You might have to double-click the shape to open the Format tab.
Top of page
-
Click the shape that you want to delete the effect from.
To delete the same effect from multiple shapes, click the first shape, and then press and hold CTRL while you click the other shapes.
-
Under Drawing Tools, on the Format tab, in the Shape Styles group, click Shape Effects, and then do one of the following:
If you do not see the Drawing Tools or Format tabs, make sure that you have selected the shape. You might have to double-click the shape to open the Format tab.
-
To delete a built-in combination of effects from the shape, point to Preset, and then click No Presets.
Note: When you click No Presets, you do not remove any shadow effects that have been applied to your shape. To remove shadows on a shape, follow the step below.
-
To delete a shadow from the shape, point to Shadow, and then click No Shadow.
-
To delete a reflection from the shape, point to Reflection, and then click No Reflection.
-
To delete a glow from the shape, point to Glow, and then click No Glow.
-
To delete soft edges from the shape, point to Soft Edges, and then click No Soft Edges.
-
To delete an edge from the shape, point to Bevel, and then click No Bevel.
-
To delete 3-D rotation from the shape, point to 3-D Rotation, and then click No Rotation.
-
Note: If you have added multiple individual effects, repeat step two above to delete all the effects.
Top of page
Add or change a fill
Select a Microsoft Office application from the drop-down list.
-
Click the shape or text box that you want to add a fill to.
To add the same fill to multiple shapes or text boxes, click the first one, and then press and hold SHIFT while you click the others.
-
Under Drawing Tools, on the Format tab, in the Shape Styles group, click Shape Fill, and then do one of the following:
-
To add or change a fill color, click the color that you want, or to choose no color, click No Fill.
To change to a color that is not in the theme colors, click More Fill Colors, and then either click the color that you want on the Standard tab, or mix your own color on the Custom tab. Custom colors and colors on the Standard tab do not update if you later change the document theme.
You can also adjust the transparency of the fill by clicking More Fill Colors. At the bottom of the Colors dialog box, move the Transparency slider, or enter a number in the box next to the slider. You can vary the percentage of transparency from 0% (fully opaque, the default setting) to 100% (fully transparent).
-
To add or change a fill picture, click Picture, locate and click the picture that you want to use, and then click Insert.
-
To add or change a fill gradient, point to Gradient, and then click the gradient variation that you want.
To customize the gradient, click More Gradients, and then choose the options that you want.
-
To add or change a fill texture, point to Texture, and then click the texture that you want.
To customize the texture, click More Textures, and then choose the options that you want.
-

Top of page
-
Click the shape or text box that you want to add a fill to.
To add the same fill to multiple shapes or text boxes, click the first one, and then press and hold SHIFT while you click the others.
-
Under Drawing Tools or Text Box Tools, on the Format tab, in the Shape Styles or Text Box Styles group, click Shape Fill, and then do one of the following:
-
To add or change a fill color, click the color that you want, or to choose no color, click No Fill.
To change to a color that is not in the theme colors, click More Fill Colors, and then either click the color that you want on the Standard tab, or mix your own color on the Custom tab. Custom colors and colors on the Standard tab do not update if you later change the document theme.
You can also adjust the transparency by clicking More Fill Colors. At the bottom of the Colors dialog box, move the Transparency slider, or enter a number in the box next to the slider. You can vary the percentage of transparency from 0% (fully opaque, the default setting) to 100% (fully transparent).
-
To add or change a fill picture, click Picture, locate the folder that contains the picture that you want to use, click the picture file, and then click Insert.
-
To add or change a fill gradient, point to Gradient, and then click the gradient variation that you want.
To customize the gradient, click More Gradients, and then choose the options that you want.
-
To add or change a fill texture, point to Texture, and then click the texture that you want.
To customize the texture, click More Textures, and then choose the options that you want.
-
To add or change a pattern, click Pattern, and then click the options that you want.
-

Top of page
-
Click the shape or text box that you want to add a fill to.
To add the same fill to multiple shapes or text boxes, click the first one, and then press and hold SHIFT while you click the others.
-
Under Drawing Tools, on the Format tab, in the Shape Styles group, click Shape Fill, and then do one of the following:
-
To add or change a fill color, click the color that you want, or to choose no color, click No Fill.
To change to a color that is not in the theme colors, click More Fill Colors, and then either click the color that you want on the Standard tab, or mix your own color on the Custom tab. Custom colors and colors on the Standard tab do not update if you later change the document theme.
You can also adjust the transparency of the fill by clicking More Fill Colors. At the bottom of the Colors dialog box, move the Transparency slider, or enter a number in the box next to the slider. You can vary the percentage of transparency from 0% (fully opaque, the default setting) to 100% (fully transparent).
-
To add or change a fill picture, click Picture, locate and click the picture that you want to use, and then click Insert.
-
To add or change a fill gradient, point to Gradient, and then click the gradient variation that you want.
To customize the gradient, click More Gradients, and then choose the options that you want.
-
To add or change a fill texture, point to Texture, and then click the texture that you want.
To customize the texture, click More Textures, and then choose the options that you want.
-
Top of page
-
Click the shape or text box that you want to add a fill to.
To add the same fill to multiple shapes or text boxes, click the first one, and then press and hold SHIFT while you click the others.
-
Under Drawing Tools or Text Box Tools, on the Format tab, in the Shape Styles or Text Box Styles group, click Shape Fill, and then do one of the following:
-
To add or change a fill color, click the color that you want, or to choose no color, click No Fill.
To change to a color that is not in the theme colors, click More Fill Colors, and then either click the color that you want on the Standard tab, or mix your own color on the Custom tab. Custom colors and colors on the Standard tab do not update if you later change the document theme.
You can also adjust the transparency by clicking More Fill Colors. At the bottom of the Colors dialog box, move the Transparency slider, or enter a number in the box next to the slider. You can vary the percentage of transparency from 0% (fully opaque, the default setting) to 100% (fully transparent).
-
To add or change a fill picture, click Picture, locate the folder that contains the picture that you want to use, click the picture file, and then click Insert.
-
To add or change a fill gradient, point to Gradient, and then click the gradient variation that you want.
To customize the gradient, click More Gradients, and then choose the options that you want.
-
To add or change a fill texture, point to Texture, and then click the texture that you want.
To customize the texture, click More Textures, and then choose the options that you want.
-
To add or change a pattern, click Pattern, and then click the options that you want.
-
Top of page
Add or change an effect
Select a Microsoft Office application from the drop-down list.
-
Click the shape or text box that you want to add an effect to.
To add the same effect to multiple shapes or text boxes, click the first one, and then press and hold SHIFT while you click the others.
-
Under Drawing Tools, on the Format tab, in the Shape Styles group, click Shape Effects, and then do one of the following:
-
To add or change a built-in combination of effects, point to Preset, and then click the effect that you want.
To customize the built-in effect, click 3-D Options, and then choose the options that you want.
-
To add or change a shadow, point to Shadow, and then click the shadow that you want.
To customize the shadow, click Shadow Options, and then choose the options that you want.
-
To add or change a reflection, point to Reflection, and then click the reflection variation that you want.
-
To add or change a glow, point to Glow, and then click the glow variation that you want.
To customize the glow colors, click More Glow Colors, and then choose the color that you want. To change to a color that is not in the theme colors, click More Colors, and then either click the color that you want on the Standard tab, or mix your own color on the Custom tab. Custom colors and colors on the Standard tab do not update if you later change the document theme.
-
To add or change a soft edge, point to Soft Edges, and then click the size of the edge that you want.
-
To add or change an edge, point to Bevel, and then click the bevel that you want.
To customize the bevel, click 3-D Options, and then choose the options that you want.
-
To add or change a 3-D rotation, point to 3-D Rotation, and then click the rotation that you want.
To customize the rotation, click 3-D Rotation Options, and then choose the options that you want.
Notes:
-
To create a custom effect by adding multiple individual effects, repeat step two above.
-
If you add a 3-D effect, such as a bevel or 3-D rotation, and then add a soft edge, you will not see any change to the shape or text box because the 3-D effect takes precedence. However, if you delete the 3-D effect, the soft edge effect is visible.
-
-
Top of page
-
Click the shape or text box that you want to add an effect to.
To add the same effect to multiple shapes or text boxes, click the first one, and then press and hold SHIFT while you click the others.
-
Under Drawing Tools or Text Box Tools, on the Format tab, in the Shape Styles or Text Box Styles group, click Shape Fill, and then do one of the following:
-
To add or change a shadow, in the Shadow Effects group, click Shadow Effects, and then choose the shadow that you want.
To customize the shadow color, point to Shadow Color, and then click the color that you want.
To change to a color that is not in the theme colors, click More Shadow Colors, and then either click the color that you want on the Standard tab, or mix your own color on the Custom tab. Custom colors and colors on the Standard tab do not update if you later change the document theme.
-
To add or change a 3-D effect, in the 3-D Effects group, click 3-D Effects, and then choose the options that you want.
-
Top of page
-
Click the shape or text box that you want to add an effect to.
To add the same effect to multiple shapes or text boxes, click the first one, and then press and hold SHIFT while you click the others.
-
Under Drawing Tools, on the Format tab, in the Shape Styles group, click Shape Effects, and then do one of the following:
-
To add or change a built-in combination of effects, point to Preset, and then click the effect that you want.
To customize the built-in effect, click 3-D Options, and then choose the options that you want.
-
To add or change a shadow, point to Shadow, and then click the shadow that you want.
To customize the shadow, click Shadow Options, and then choose the options that you want.
-
To add or change a reflection, point to Reflection, and then click the reflection variation that you want.
-
To add or change a glow, point to Glow, and then click the glow variation that you want.
To customize the glow colors, click More Glow Colors, and then choose the color that you want. To change to a color that is not in the theme colors, click More Colors, and then either click the color that you want on the Standard tab, or mix your own color on the Custom tab. Custom colors and colors on the Standard tab do not update if you later change the document theme.
-
To add or change a soft edge, point to Soft Edges, and then click the size of the edge that you want.
-
To add or change an edge, point to Bevel, and then click the bevel that you want.
To customize the bevel, click 3-D Options, and then choose the options that you want.
-
To add or change a 3-D rotation, point to 3-D Rotation, and then click the rotation that you want.
To customize the rotation, click 3-D Rotation Options, and then choose the options that you want.
Notes:
-
To create a custom effect by adding multiple individual effects, repeat step two above.
-
If you add a 3-D effect, such as a bevel or 3-D rotation, and then add a soft edge, you will not see any change to the shape or text box because the 3-D effect takes precedence. However, if you delete the 3-D effect, the soft edge effect is visible.
-
-
Top of page
-
Click the shape or text box that you want to add an effect to.
To add the same effect to multiple shapes or text boxes, click the first one, and then press and hold SHIFT while you click the others.
-
Under Drawing Tools or Text Box Tools, on the Format tab, in the Shape Styles or Text Box Styles group, click Shape Fill, and then do one of the following:
-
To add or change a shadow, in the Shadow Effects group, click Shadow Effects, and then choose the shadow that you want.
To customize the shadow color, point to Shadow Color, and then click the color that you want.
To change to a color that is not in the theme colors, click More Shadow Colors, and then either click the color that you want on the Standard tab, or mix your own color on the Custom tab. Custom colors and colors on the Standard tab do not update if you later change the document theme.
-
To add or change a 3-D effect, in the 3-D Effects group, click 3-D Effects, and then choose the options that you want.
-
Top of page
Delete a fill
Select a Microsoft Office application from the drop-down list.
-
Click the shape or text box that you want to delete a fill from.
To delete the same fill from multiple shapes or text boxes, click the first one, and then press and hold SHIFT while you click the others.
-
Under Drawing Tools, on the Format tab, in the Shape Styles group, click Shape Fill, and then click No Fill.
Top of page
-
Click the shape or text box that you want to delete a fill from.
To delete the same fill from multiple shapes or text boxes, click the first one, and then press and hold SHIFT while you click the others.
-
Under Drawing Tools or Text Box Tools, on the Format tab, in the Shape Styles or Text Box Styles group, click Shape Fill, and then click No Fill.

Top of page
-
Click the shape or text box that you want to delete a fill from.
To delete the same fill from multiple shapes or text boxes, click the first one, and then press and hold SHIFT while you click the others.
-
Under Drawing Tools, on the Format tab, in the Shape Styles group, click Shape Fill, and then click No Fill.
Top of page
-
Click the shape or text box that you want to delete a fill from.
To delete the same fill from multiple shapes or text boxes, click the first one, and then press and hold SHIFT while you click the others.
-
Under Drawing Tools or Text Box Tools, on the Format tab, in the Shape Styles or Text Box Styles group, click Shape Fill, and then click No Fill.
Top of page
Delete an effect
Select a Microsoft Office application from the drop-down list.
-
Click the shape or text box that you want to delete the effect from.
To delete the same effect from multiple shapes or text boxes, click the first one, and then press and hold SHIFT while you click the others.
-
Under Drawing Tools, on the Format tab, in the Shape Styles group, click Shape Effects, and then do one of the following:
-
To delete a built-in combination of effects, point to Preset, and then click No Presets.
-
To delete a shadow, point to Shadow, and then click No Shadow.
-
To delete a reflection, point to Reflection, and then click No Reflection.
-
To delete a glow, point to Glow, and then click No Glow.
-
To delete soft edges, point to Soft Edges, and then click No Soft Edges.
-
To delete an edge, point to Bevel, and then click No Bevel.
-
To delete 3-D rotation, point to 3-D Rotation, and then click No Rotation.
-
To delete multiple individual effects, repeat step two above.
Top of page
-
Click the shape or text box that you want to delete the effect from.
To delete the same effect from multiple shapes or text boxes, click the first one, and then press and hold SHIFT while you click the others.
-
Under Drawing Tools or Text Box Tools, on the Format tab, do one of the following:
-
To delete a shadow, in the Shadow Effects group, click Shadow Effects, and then click No Shadow Effect.
-
To delete a 3-D effect, in the 3-D Effects group, click 3-D Effects, and then click No 3-D Effect.
-
Note: If you do not see the Drawing Tools, Text Box Tools, or Format tabs, make sure that you clicked the shape or text box.
Top of page
-
Click the shape or text box that you want to delete the effect from.
To delete the same effect from multiple shapes or text boxes, click the first one, and then press and hold SHIFT while you click the others.
-
Under Drawing Tools, on the Format tab, in the Shape Styles group, click Shape Effects, and then do one of the following:
-
To delete a built-in combination of effects, point to Preset, and then click No Presets.
-
To delete a shadow, point to Shadow, and then click No Shadow.
-
To delete a reflection, point to Reflection, and then click No Reflection.
-
To delete a glow, point to Glow, and then click No Glow.
-
To delete soft edges, point to Soft Edges, and then click No Soft Edges.
-
To delete an edge, point to Bevel, and then click No Bevel.
-
To delete 3-D rotation, point to 3-D Rotation, and then click No Rotation.
-
To delete multiple individual effects, repeat step two above.
Top of page
-
Click the shape or text box that you want to delete the effect from.
To delete the same effect from multiple shapes or text boxes, click the first one, and then press and hold SHIFT while you click the others.
-
Under Drawing Tools or Text Box Tools, on the Format tab, do one of the following:
-
To delete a shadow, in the Shadow Effects group, click Shadow Effects, and then click No Shadow Effect.
-
To delete a 3-D effect, in the 3-D Effects group, click 3-D Effects, and then click No 3-D Effect.
-
Note: If you do not see the Drawing Tools, Text Box Tools, or Format tabs, make sure that you clicked the shape or text box.
Top of page
Click Shape Fill, and under Theme Colors, pick the color you want. Select the shape or text box. On the Drawing Tools Format tab, click Shape Fill > More Fill Colors. In the Colors box, either click the color you want on the Standard tab, or mix your own color on the Custom tab.
Just so, How do you add a fill in on word?
Creating Fillable Forms Using Microsoft Word
- Enable Developer Tab. Open Microsoft Word, then go to the File Tab > Options > Customize Ribbon > check the Developer Tab in the right column > Click OK.
- Insert a Control. …
- Edit Filler Text. …
- Design Mode button again to exit the mode.
- Customize Content Controls.
Besides, Can you fill in Word? Fill Forms in Word
Click the “File” menu’s “Open” command, then navigate to and click the document containing the form you need to fill in. Click the dialog’s “Open” button to load the form.
Does Word have a fill tool? Select the drawing object you want to fill. Click on the down-arrow next to the Fill Color tool on the Drawing toolbar. Word displays a color menu.
Subsequently, How do you apply text effects in Word?
Add an effect to text
- Select the text that you want to add an effect to.
- On the Home tab, in the Font group, click Text Effect.
- Click the effect that you want. For more choices, point to Outline, Shadow, Reflection, or Glow, and then click the effect that you want to add.
How do I fill a shape with text in Word?
Right-click the shape that contains the text that does not fit. On the shortcut menu, click Format AutoShape. In the Format AutoShape dialog, click the Text Box tab. Under Text autofitting, select the option you want.
What is text effect in Word?
In addition to formatting changes we previously discussed in Fonts, you can also apply effects to text with the Text Effects option. This was known as WordArt in previous versions of Word. You can add shadows, bevels, reflections, and much more. The Text Effects button is in the Font group of the ribbon.
What are text effects?
Text Effects and Typography in Microsoft word means applying special formats to the content such as an Outline, Shadow, Reflection or Glow is known as the Text Effects. Similarly, changing the Styles, Ligatures, and Stylistics Sets of the numbers is called Typography settings.
How do you engrave text in Word 2016?
To engrave text, follow these steps:
- Choose the text you want to engrave.
- Make sure the Home tab of the ribbon is displayed.
- Click the small icon at the bottom-right of the Font group. Word displays the Font dialog box. (See Figure 2.)
- Make sure the Engrave check box is selected.
- Click on OK.
Where is shape fill in Word?
Click Insert > Illustrations > Shapes. Choose any shape you like and draw it on the page (click and drag). Here, I drew a basic rectangle. To change the shape’s fill, ensure that it is selected and then in the Drawing Tools contextual tab, click Shape Styles > Shape Fill.
How do you create a text box in Word?
Add a text box
- Go to Insert > Text Box, and then select Draw Text Box.
- Click or tap in the document, and drag to draw the text box the size that you want.
- To add text to a text box, select inside the text box, and then type or paste text. Notes:
How do I insert picture into Word document?
How to Insert and Crop Pictures in Word
- Click in your document where you want to insert your picture.
- Click the Insert tab.
- Click Pictures button.
- Navigate to the picture you want to insert and select it.
- Click Insert button.
What is text fill?
Fill refers to the interior of a WordArt or character. Notes: When you change options in this dialog box, the changes are immediately applied to your WordArt or text, making it easy to see the effects of the changes in your WordArt or text without closing the dialog box.
How do you send a text with effects?
To manually add effects to your iMessage, open the Messages app and type your text. Then “long-press” (press and hold for a second or so) on the blue arrow that you usually tap to send a message. This brings up your special effect options. These are divided into two categories: bubble and screen effects.
What is Font command?
The FONT command is used to identify the fonts that are to be specified with the following commands: Traditional. PRINTLINE, FIELD, and TRCREF commands. Record Layout. LAYOUT and FIELD commands.
How is engraving done?
Engraving is an intaglio printmaking process in which lines are cut into a metal plate in order to hold the ink. In engraving, the plate can be made of copper or zinc. The metal plate is first polished to remove all scratches and imperfections from the surface so that only the intentional lines will be printed.
How do you emboss text in Word?
To emboss text, follow these steps:
- Choose the text you want to emboss.
- Choose Font from the Format menu. Word displays the Font dialog box. (See Figure 1.)
- Make sure the Emboss check box is selected.
- Click on OK.
What do you put on engraving?
If you want to engrave memorial jewelry to honor your loved one, then check out these engraving ideas.
- We Were Together. I Forgot the Rest.
- Remembered With Love.
- She Walked in Beauty.
- Forever In My Heart.
- We’ll Always Remember You.
- You’ll Always Be in Our Hearts.
How do I apply a fill?
- Right-click the shape that you want to add a pattern fill to and select Format Shape.
- In the Format Shape dialog box, click the Fill tab.
- In the Fill pane, select Pattern fill and then select a pattern, foreground color, and background color for your pattern fill.
How do I insert text in Word without the box?
Remove the border
- Select the text box or shape. If you want to change multiple text boxes or shapes, click the first text box or shape, and then press and hold Ctrl while you click the other text boxes or shapes.
- On the Format tab, click Shape Outline, and then click No Outline.
How do I insert a small box in a Word document?
Just position your cursor in the document where you want a check box, switch to the “Developer” tab, and then click the “Check Box Content Control” button. You should see a check box appear wherever you placed your cursor.
How do I insert a picture in Word without moving text?
To insert an image into Word without moving any text is to
set the image’s default wrapping to no wrapping before entering it into the document
.
…
- Insert the photo.
- Right click the photo.
- Format the picture to “WRAP” the text.
How do I put text and Pictures side by side in Word?
Choose “Behind Text” or “In Front of Text” if you aren’t concerned with images and text overlapping each other. Click the second image and repeat the process of changing the way text interacts with the image. Click and drag down the top-right corner of each image until both images will fit side by side on the page.
How do I fill a text with text?
- Reference 1
- Reference 2
- Reference 3
- Reference 4
- Reference 5
How to insert a shape in a Word document?
To insert a shape
- On the ribbon menu, under the tab Insert, within the group illustrations, click icon Shapes. A drop-down list appears with various shapes.
- Click a shape, the mouse cursor changes to a ‘+’ sign.
- Draw the shape in your document.
- Resize the shape by dragging the resize handles.
To add/remove fill color and outline color of a shape
- Select the shape in the document.
- Click tab Format under Drawing Tools.
- Within group Shape Styles, click icon Shape Fill and then
- Select a fill color from the palette.
- Click ‘No Fill’ to remove fill color.
- Within group Shape Styles, click Shape Outline, and then
- Select an outline color for the shape.
- Click ‘No Outline’ to remove the outline color of the shape.
How add text to a shape in Word
- Select a shape and right-click.
- From the right-click menu, select option Add Text.
How to change a shape?
- Select the shape in the document.
- Click tab Format under Drawing Tools from the ribbon menu.
- Within group Insert Shape, click Edit Shape.
- From the drop-down list, select option Edit Shape.
- Select a new shape.
How to group shapes in a document
- On the ribbon menu, under the tab Insert, within the group illustrations, click Shapes.
- Press and hold the keys CTRL or SHIFT or CTRL+SHIFT and click the shapes one by one.
- Right-click and click Group and the click Group from the sub menu.
How to rotate a shape
- Select the shape.
- Click tab Format under Drawing Tools from the ribbon menu.
- Within the group Arrange, click Rotate.
- From the drop-down menu, select any of the options or click ‘More Rotation Option’.
- In the Layout dialog box, under the tab Size, enter the angle of rotation.
- Click OK.
How to rotate text inside a shape
- Select text inside a shape.
- Click tab Format under Drawing Tools from the ribbon menu.
- Within the group Text, click Text Direction.
- Select an option from the drop-down list.
About me

About wordknowhowhttp://wordknowhow.comThis blog site was started to help people with Microsoft Word. I use Word a lot at work, and I understand that some features are difficult to use. There were no simplified instructions online to help me use these features. It is for this reason that this site exists; to make your life easier with Word.
Feel free to post your comments, queries, suggestions, etc. I will do my best to help you!
![]()
Download Article
![]()
Download Article
There is virtually no limit to what can be created using the Auto Shape feature in Microsoft Word. The feature provides a wide variety of geometric shapes that are useful in creating graphic objects, including lines, block arrows, banners, call-outs, equation shapes, symbols and many others. Additionally, a number of pre-formatted effects can be applied to enhance an Auto Shape, such as 3-D, shadow effects, gradient fills and transparencies. This article provides instructions on several ways to use the Microsoft Word Auto Shape feature.
-
1
Explore the Auto Shapes menu. Click the Insert tab on the menu bar, and click on the Shapes button located in the Illustrations menu on the formatting toolbar. Take note of the different Auto Shapes now visible in the pull-down menu.
-
2
Insert an Auto Shape into the document. Select a basic shape for the purposes of this tutorial. Simply click on any shape to begin the insertion process. The Auto Shapes menu will close automatically and the mouse-pointer will be replaced by a thin cross-hair. Click and drag anywhere in the document to insert the auto shape. The chosen shape has been inserted into the document.


Advertisement
-
1
Change the size of an Auto Shape once inserted. Click and drag on any corner of an Auto Shape to make it larger or smaller. The size of the Auto Shape has been adjusted.
-
2
Change the shape of an Auto Shape once inserted. To switch to a different Auto Shape, select the object, click the format tab on the menu bar and click the Edit Shape button, located in the Insert Shapes menu on the formatting toolbar. Select «Change Shape» from the pull-down menu to open the Auto Shapes menu, and make an alternate choice from the menu options. A new Auto Shape has been chosen.
-
3
Move the Auto Shape to a different location in the document. Click and drag anywhere along the edge of the object to move it to a different location within the document. The Auto Shape has been a repositioned within the document.


Advertisement
-
1
Select a fill color for the object. Click the Shape Fill button to fill the object with a solid color. The theme color palette will open. Select a color from the theme color palette or select the «More Fill Colors» option from the pull-down menu to create a custom color. The Colors dialogue box will open.
- Click and drag the cross hair on the right to adjust the hue of the custom color. Move the slider on the right side of the dialogue box up and down to adjust the brightness level of the custom color. Click OK to close the Color dialogue box. The fill color for the Auto Shape has been selected.
-
2
Select a style for the object. Confirm that the object is selected and click the Format tab on the menu bar. Take note of the available options provided in the Shape Styles menu, located on the formatting toolbar. Click on the down pointing arrow in the Shape Styles menu to open the Theme Fills menu.
- Choose a style from among the menu options. A preset style for the Auto Shape has been chosen.


Advertisement
-
1
Adjust the style of the object’s outline. Confirm that the object is selected and click the format tab on the menu bar. Click the Shape Outline button, located in the Shape Styles menu on the formatting toolbar. Select the «More lines» option from the pull-down submenu. The Format Shape dialogue box will open.
- Adjust the compound type, dash type, cap type or join type of the outline as desired and click OK to exit the dialogue box. The outline for the Auto Shape has been chosen.
-
2
Adjust the width of the object’s outline. Confirm that the object is selected and click the format tab on the menu bar. Click the Shape Outline button, located in the Shape Styles menu on the formatting toolbar. Change the thickness of the outline by selecting the «Weight» option from the Shape Outline pull-down menu. The Line Weight sub-menu will open.
- Choose a thickness from the options available or select the «More lines» option from the pull-down submenu. The outline’s width has been selected.
-
3
Adjust the color of the object’s outline. Confirm that the object is selected and click the format tab on the menu bar. Click the Shape Outline button, located in the Shape Styles menu on the formatting toolbar.
- Select a color from the color palette that appears in the pull-down menu, or click on the «More Colors» option to open the Colors dialogue box and create a custom color. A color has been chosen for the Auto Shape’s outline.


Advertisement
-
1
Apply preset effects to the object. Confirm that the object is selected and click the Effects button, located in the Illustrations menu on the formatting toolbar. Take note of the different effect presets visible in the pull-down menu. Open the sub-menus for each preset effect category by rolling the mouse-pointer over each category title.
- Browse through the options for each category and click on an effect to apply it to the Auto Shape. Change the selected effect by clicking on a different effect option under 1 of the effect categories. A preset effect has been selected.

-
1
Add text to the object. Right click the Auto Shape and select «Add text» from the pull-down menu. A cursor will appear in the center of the object. Type the desired text and click enter. To change the text formatting, select the text and choose from the available text formatting options on the Home tab.
- Choose a pre-formatted style from the Styles menu; change the alignment, spacing or indentation from the paragraph menu; and adjust the font, color, size or effects from the Font menu, located in the Home formatting toolbar. Text has been added to the Auto Shape.

Advertisement
Add New Question
-
Question
Can I put a picture in autoshape?

Yes, you may fill the autoshape with a picture.
-
Question
How do you delete a shape?
Select the shape and right-click; select the «delete» option. If you don’t see it, you can cut the image using the same steps.
-
Question
How do I add bullets to a list in an autoshape?
Right click in the autoshape to add text (unfortunately it adds a rectangle and does not follow the autoshape outline). Click on the bullet icon — done.
See more answers
Ask a Question
200 characters left
Include your email address to get a message when this question is answered.
Submit
Advertisement
Video
Thanks for submitting a tip for review!
About This Article
Thanks to all authors for creating a page that has been read 132,803 times.
Is this article up to date?
With Microsoft Word drawings, users are able to convey complex concepts through illustrations. Whether you are an artist or not, Word’s drawing features are quite simple to use, making it easy for users to add intriguing visuals to supplement the text in your Word document. You have the option to choose between two types of drawing tools: pen tools (optimal for text markup) and shapes (optimal for simple drawings).
In this step-by-step guide, you will learn about these two different approaches to drawing in Word.
- How to draw in Word using shapes
- How to draw in Word using pen tools
How to draw in Word using shapes
1. Use lines to draw on a Word document
- Open your Word document. Place your cursor where you would like to start your Word drawing and click.
- Click the “Insert” tab, then select the down caret on the “Shapes” button to open shape options.
![]()
Click the “Insert” tab, then select the down caret on the “Shapes” button. Source: All screenshots taken are from author’s account.
- Hover over the icons in the drop down menu to reveal their labels. Then, from the “Lines” section of the “Shapes” drop down menu, select either the second to last (freeform) icon or the last (scribble) icon.
- Click the Word document to place either the freeform or scribble, and begin drawing.

Select “Freeform” or “Scribble” from the “Lines” section of the “Shapes” menu. Source: Screenshot
- Once the shape is placed, locate the “Shape Format” bar for additional shape formatting options.

Navigate to the “Shape Format” bar for more shape options. Source: Screenshot
2. Adjust shape and outline fill to customize drawing color
To change the fill color of a shape, click the “Shape Fill” button. Select no fill, a standard color, a theme color, or a custom color to fill in your Word drawing. You may also choose a gradient fill, texture fill, or a picture.

Use the “Shape Fill” panel to customize the color of drawings. Source: Screenshot
3. Use shape effects to customize drawing appearance
Click the 3D box icon underneath the “Shape Effect” panel to apply dimension to your drawing. Select your drawing, and then click your desired shape effect to apply the effect.

Use the “Shape Effect” panel to customize the look of your drawing. Source: Screenshot
4. Adjust your drawing by editing points
Select the “Edit Shape” button, and click “Edit Points”. Use your cursor to manually adjust the placement of pixels on your drawing.

Select the “Edit Shape” button then click “Edit Points.” Source: Screenshot
How to draw in Word using pen tools
You may notice that drawing with shapes in Word can be difficult, especially when attempting to mark up a document. In situations like this, make use of the pen tools in Microsoft Word to create art instead of drawing with shapes. Pen tools offer a variety of digital pens, highlighters, and pencils for illustrations such as document markups that require a more delicate brush stroke.
- Click on the “Draw” tab to open the pen tools.

Select the “Draw” tab to access pen tools. Source: Screenshot
- Right click any of the pen icons, then click “Modify Tool” to modify pen tool settings.
![]()
Right click the pen icon, then select “Modify Tool”. Source: Screenshot
- Change the size, color, and effect of the pen tool by clicking any of the given options.

Change the size, color, and effect of the pen tool using the “Modify Tools” panel. Source: Screenshot
- Click the green “+” icon to select the desired drawing tool. Pick from a pen, highlighter, or pencil tool.

Click the green “+” button to add a new drawing tool. Source: Screenshot
Adjust your drawing using the eraser tool
Under the “Draw” tab, click the eraser tool. Select your desired eraser size from the drop down menu, then drag the eraser over the drawing you would like to remove.

Select an eraser from the drop down menu. Source: Screenshot
Benefits of drawing in Word
When creating lengthy reports, including visuals helps keep your audience engaged with the material you are presenting. With Microsoft Word, creators no longer need to use multiple forms of software to create stimulating illustrations to help convey complex information.
Word offers drawing features that allow users to create freeform drawings, use shapes to create complex illustrations, and even scribble directly on the Word document itself.
For tablet users, instead of using your mouse to draw in Word, you can use your finger as a cursor to form shapes or guide the pen tool to create captivating illustrations, which is optimal for on-the-go document creation.
Next steps
The scribble tool can be difficult when using Microsoft Word to draw on a desktop. Thankfully, Word offers a variety of premade shapes that can be utilized to create illustrations.
For additional information regarding software that aids in document creation, take a look at document generation software.