
Create a list of sequential dates
You can quickly create a list of dates, in sequential order, by using the Fill Handle  or the Fill command.

Use the Fill Handle
-
Select the cell that contains the first date. Drag the fill handle across the adjacent cells that you want to fill with sequential dates.
-
Select the fill handle
 at the lower-right corner of the cell, hold down, and drag to fill the rest of the series. Fill handles can be dragged up, down, or across a spreadsheet.
 -

Use the Fill command
-
Select the cell with the first date. Then select the range of cells you want to fill.
-
Select Fill > Series > Date unit. Select the unit you want to use.
Tip: You can sort dates much like any other data. By default, dates are sorted from the earliest date to the latest date.
Need more help?
You can always ask an expert in the Excel Tech Community or get support in the Answers community.
See Also
Fill data automatically in worksheet cells
Use AutoFill and Flash Fill
Need more help?
Want more options?
Explore subscription benefits, browse training courses, learn how to secure your device, and more.
Communities help you ask and answer questions, give feedback, and hear from experts with rich knowledge.
![]()
Written by Allen Wyatt (last updated March 15, 2021)
This tip applies to Word 2007, 2010, 2013, and 2016
Denis frequently uses tables in his documents. In those tables, he has a need to add a series of sequential numbers to the cells in the first column. Denis wonders if there is a way to pick a starting number in a cell and then have Word add the sequential numbers for all the cells under that starting number.
There are a couple of ways you could go about this. One way is to use Word’s built-in numbering, in this manner:
- Insert your table as you normally would.
- Select the cells in the table that you want to have numbered.
- Display the Home tab of the ribbon.
- Click the Numbering tab, in the Paragraph group. Word adds numbering, automatically, to the selected cells.
If you want to modify the starting number for the cells, right-click the number in the first cell and then choose Set Numbering Value from the resulting Context menu. Word displays the Set Numbering Value dialog box. (See Figure 1.)
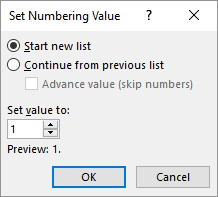
Figure 1. The Set Numbering Value dialog box.
Enter the value you want to start with, and when you click OK, Word updates the numbers in the cells. You’ll also note that if you insert any rows in the middle of your numbered sequence, Word automatically adds a number to that inserted row.
Noting this behavior, you might appreciate a simple variation on the above process that works well when you are inserting a brand new table:
- Insert a single-row table.
- Add the automatic number to the desired column and change its starting value, if desired. (In other words, follow the steps above for the single cell in the row.)
- When entering data in the table and you get to the last column, press Tab and Word inserts a new row that is automatically numbered.
Another powerful way to add your numbering is to use the SEQ field. Follow these general steps:
- Insert the insertion point at the place in the table where you want the first number.
- Press Ctrl+F9 to insert an empty set of field braces.
- Inside the field braces, type SEQ followed by a space, then a name you want used for this particular sequence, then another space, then r, then the number you want the sequence to start with. Here’s an example of how the field code would appear if you wanted to start counting with the number 4:
- With the insertion point still within field code, press Shift+F9. Your number should appear.
- Repeat steps 2 through 4 for each of the other cells where you want a number, but make sure you leave off the r switch in these others.
{ SEQ table1 r4 }
Finally, if you prefer to use a macro to insert numbers in a sequence of cells, you could use one similar to this:
Sub AddNumbersToTable()
    Dim RowNum As Long
    Dim ColNum As Long
    Dim iStartNum As Integer
    Dim J As Integer

    If Selection.Information(wdWithInTable) Then
        RowNum = Selection.Cells(1).RowIndex
        ColNum = Selection.Cells(1).ColumnIndex

        iStartNum = Val(Selection.Cells(1).Range.Text)
        If iStartNum <> 0 Then
            iStartNum = iStartNum + 1

            For J = RowNum + 1 To ActiveDocument.Tables(1).Rows.Count
                ActiveDocument.Tables(1).Cell(J, ColNum).Range.Text = iStartNum
                iStartNum = iStartNum + 1
            Next
        Else
            MsgBox "Cell doesn't contain a non-zero starting number."
            Exit Sub
        End If
    Else
        MsgBox "Not in table"
    End If
End Sub
To use the macro, just put a starting sequence value into a cell of the table and leave the insertion point in that cell. When you then run the macro, all the cells under that starting cell are filled with sequential values. (Anything previously in those cells is deleted.)
If you would like to know how to use the macros described on this page (or on any other page on the WordTips sites), I’ve prepared a special page that includes helpful information. Click here to open that special page in a new browser tab.
WordTips is your source for cost-effective Microsoft Word training.
(Microsoft Word is the most popular word processing software in the world.)
This tip (89) applies to Microsoft Word 2007, 2010, 2013, and 2016.
Author Bio
With more than 50 non-fiction books and numerous magazine articles to his credit, Allen Wyatt is an internationally recognized author. He is president of Sharon Parq Associates, a computer and publishing services company. Learn more about Allen…
MORE FROM ALLEN
Checking Up On Numbers
When do you use digits in your prose and when do you spell out the numbers? Why not let Word help you make the decision? …
Discover More
Inserting the Total Number of Pages in Your Document
Word keeps track of many statistics for each of your documents. One statistic is the total number of pages in the printed …
Discover More
Precision and Number Display
Do you need to work with very precise numbers in your worksheets? If you do, then it is imperative you understand …
Discover More
Научиться заполнять серийные номера в столбце таблицы MS Word. Серийный номер в формате Microsoft Word может быть автозаполнение с помощью опции маркированного списка так же, как MS Excel.
Мы все используем одно или другое программное обеспечение для обработки текстов, чтобы писать и редактировать документы. MS-Word от Microsoft является одним из наиболее популярных программ обработки текстов в мире. И это очень мощный слишком -Возможно даже самый мощный среди сверстников.
На днях я работал с документом, который был длинный стол с более чем 200 строк. Я хотел бы добавить столбец слева от этой таблицы и вставьте серийные номера строк.
Существует способ , чтобы заполнить столбец с последовательными номерами в MS Excel, но нет подобный способ доступен для таблиц MS-Word. Итак, я лениво начал вводить серийные номера один за другим вручную , но тогда я думал , что должен быть способ сделать это крошечное задачу в более эффективной манере.
Примечание: Эта статья является частью Microsoft Word Советы и хитрости для повышения производительности

Наши советы по MS-Word сделать вашу жизнь проще и увеличить производительность на рабочем месте.
В конце концов я нашел более эффективный способ! И это оказалось очень простым и интуитивно понятным тоже! Вот как вы можете сделать это на щелчок мыши и сэкономить время для кофе-брейк!
Прежде всего, для серийных номеров, если вам нужен новый столбец таблицы затем вставьте его.
Выберите столбец таблицы, которая должна быть заполнена серийными номерами. Колонка может быть выбрана позиция курсора мыши по верхнему краю столбца и нажмите кнопку (как показано на изображении ниже)

Выбор столбца таблицы в MS-Word
После того , как столбец выбран, просто нажмите на кнопку пронумерованные пули.
И точно так же, как по волшебству, весь столбец будет автоматически заполнять с аккуратным серийными номерами. Вместо того чтобы создать маркированный список, опция будет заполнять последовательные номера в столбце таблицы. Теперь вы можете наслаждаться кофе-брейк!
Примечание: С помощью описанного выше способа, вы можете также заполнить столбец с другими стилями нумерованных пуль. Например: а, Ь, С или I, II, III и т.д.
Я надеюсь, что вам понравился этот совет. Пожалуйста, дайте мне знать, если у вас есть какие-либо вопросы по этой теме. Благодарим Вас за использование TechWelkin.
Why manually fill a cell with values when Excel can do the work for you?
The Fill series instantly covers the selected cells with values based on various factors and improves efficiency. However, sometimes people face problems with the fill series, and it fails to work correctly.
But don’t worry because here, I will provide the reasons and tested solutions for the fill series not working problem.
So, let’s begin.
How to Fix Excel Series Not Functioning in Excel
Users must enable the fill handle tool to make the fill series function in Microsoft Excel. Additionally, you must choose automatic calculation, reapply the fill series in filtered data, select sufficient information, and unprotect the sheet to make the fill series function.
The following passage describes how to resolve the issue with the fill series within a minute.
Here are the methods to fix fill series not functioning in Microsoft Excel:
1. Enable Fill Handle
When you hover the mouse pointer on a cell, it changes to a fill handle tool icon. But, if the mouse pointer doesn’t change, the fill handle option is disabled from the settings.
Consider following the instruction below to enable the fill handle option in Microsoft Excel.
Here’s how you can enable the fill handle tool in Excel:
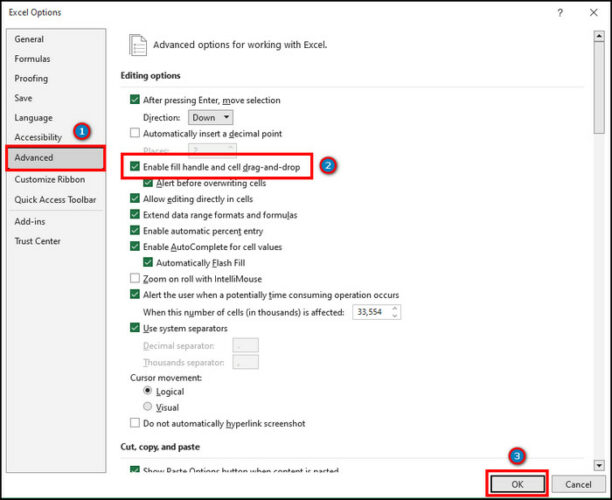
- Open Microsoft Excel and click on File.
- Navigate to Options.
- Click on Advanced.
- Check the box beside Enable fill handle and cell-drag-and-drop.
- Press on OK.

Hover over the cells and see if the mouse pointer changes to the fill handle tool icon. Drag to check the AutoFill is working properly.
2. Select Automatic Calculation
There are two types of calculation options in Excel—automatic and manual.
Mainly, people use the fill series to calculate automatically. But, if you set the calculation mode to manual, the AutoFill will only copy the dragged cell and won’t provide the expected result.
In this instance, you need to change the calculation mode to automatic by following the steps below.
Read the process below to select the automatic calculation options in MS Excel:
- Go to the Formula tab from the ribbon.
- Press on Calculation Options.
- Choose Automatic.

- Click on the cell and drag the fill handle tool.
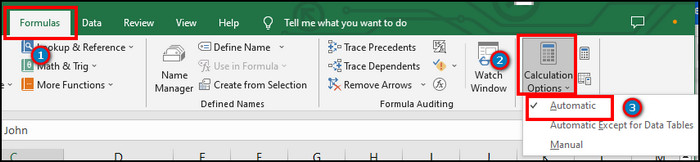
After switching to automatic, the fill series will automatically provide desired results to every cell. It’s beneficial when you add a total row in Excel and need to calculate quickly.
3. Fix Filtered Data Table
The filtered data hides the unselected data from the sheet and doesn’t count the hidden information in the fill series.
But, when you remove the filtered data and unhide the rows or columns, a blank cell appears in the fill series and makes it incomplete. 
To complete the series, you need to apply the fill series again in your desired rows/columns.
Here is the procedure to reapply the fill series in the filtered data table in Excel:
- Select the cell which contains the formula.
- Drag the fill handle tool.


It will fill the space in the series with the correct calculation, and the previous calculation will remain unchanged.
4. Select Enough Values
Fill series is an intelligent tool that can determine a pattern and fill out the series. However, it fails to detect the structure and can’t execute the correct series if you don’t provide sufficient values.
Read the instructions below carefully to learn how to provide enough information to the AutoFill option.
Follow the steps below to provide sufficient values to the Excel fill series:
- Type your expected values next to the last number.
- Select the two values.
- Drag the fill handle tool.

The AutoFill option will detect the pattern using the first two values and execute it to calculate the following numbers.
The pattern only works with a series of values. If you want to fill the series with words or names, you can use flash fill to combine names in MS Excel.
5. Unprotect Excel Sheet
Protected sheets restrict the unauthorized user from modifying or changing the values in a Microsoft Excel sheet. It will hinder you from moving rows and columns in Excel and using fill series in the datasheet.
If you’ve added a password in the Excel sheet, you’ll see the fill series as grayed out. Follow the procedures below to unprotect the sheet and use the fill handle tool.
Here is the way to unprotect the Excel sheet:
- Navigate to the Review tab.
- Press on the Unprotect Sheet.
- Enter your password and click on OK.

- Select the cell and drag the fill handle tool.
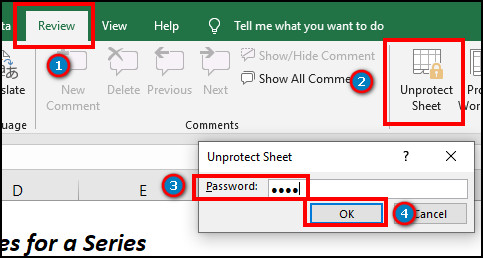
The fill series will execute correctly in the unprotected sheet and complete with accurate data.
If you are wondering about the reason which causes the fill series not to function, consider reading the following passage.
Why is the Fill Series Not Working in Microsoft Excel?
The fill series isn’t working in Microsoft Excel because the fill handle tool is disabled from the options. Also, the fill series won’t function if you use manual calculation mode, filter the data table, provide insufficient information, and use password protection.
Read the passage below to learn about the causes in detail.
Here are the reasons behind the fill series not working in Excel:
Disabled Fill Handle Tool
The fill handle tool stays enabled by default in Excel. However, if you’ve disabled the option before, the fill series won’t work in the Excel cell.
Using Manual Calculation
Microsoft Excel uses two calculation methods for a formula, automatic and manual. The automatic calculation mode computes the data and provides the result instantly.
But, the manual mode gives results only when you request the answer by pressing F9. If you are using the manual calculation mode, the fill series won’t work automatically.
Filtered Data Table Issue
The filtered Excel sheet shows the data you’ve selected to show and hides the other information. Applying the fill series in filtered data doesn’t count the hidden values in the fill handle tool.
As a result, when you unhide the information or clear the sort & filter option, the fill series doesn’t work correctly and shows a blank space in the list.
Insufficient Information
Fill series is an advanced feature of Excel that can detect different calculation patterns and provide results.
But, if you don’t give enough values or information in the fill series, it will only copy the selected cell and won’t function properly.
Protected Excel Sheet
A protected spreadsheet hinders the user from making changes or executing fill series in a row or column. If your sheet is password protected, the fill series will show a warning and won’t function.
The above reason will help to identify the reason behind your issue and quicken the resolution process.
Frequently Asked Questions
How do I enable fill series in Excel?
To enable the fill series in Microsoft Excel, go to File > Options > Advanced > Editing options > check the Enable fill handle and cell-drag-and-drop option.
Why is the fill series grayed out in Excel?
The fill series is grayed out in Excel because the sheet protection is enabled. You need to disable it to make modify.
How to use fill series in Microsoft Excel?
To use the fill series in the Excel sheet, select the cell and drag the fill handle tool. It will automatically fill the cells with result.
Conclusion
The Excel fill series or AutoFill option is vital for completing the cells automatically. But, it can be problematic if it doesn’t work during a crucial moment.
In this article, I’ve provided quick and straightforward methods to fix the fill series option.
If you find this article helpful, don’t forget to share it in the comment box below.
Cheers!
Fill Series is a helpful feature in Excel that improves efficiency in creating spreadsheets. It allows instant filling of values in selected cells based on the intervals, type, units and step values specified by the user. This article will assist all levels of Excel users in using the Fill Series in filling in numbers and dates.
 Figure 1. Final result: How to Fill Series
Fill Series can be done by using the fill handle or by using the Fill > Series options in Home tab.
What is the fill handle?
The fill handle is located at the lower right corner of any selected cell. When we hover the mouse over the bottom right corner of the cell, the cursor shows a plus sign, which is the fill handle.
 Figure 2. Fill Handle tool
The fill handle is a tool that enables us to copy values, dates or formulas down a column or across a row by simply dragging the fill handle, and without the use of any function.
How to use fill handle?
In order to use the fill handle tool, we simply click and drag it up/down or left/right to copy the values or contents of the selected cells to the new cells. When there are values directly to the left of the selected cell, we can double click the fill handle to initiate copying of the values along the entire column.
Fill Series
In order to launch the Fill Series dialog box, we click the Home tab > Fill > Series
 Figure 3. Fill Series option in Home tab
The Series dialog box will appear.
 Figure 4. Series dialog box
Fill Series examples
Prepare our data
Suppose we have the following data where column C contains the initial values. We want to fill columns D to G by applying the parameters given in column B.
 Figure 5. Sample data for Fill Series
Fill Series by 1
We want to create a Fill Series with an initial value of 1, and succeeding values incremented by 1
- Select cells C3 to G3
- Click Home tab > Fill > Series
- Tick Rows, Linear with Step value “1”
As a result, D3:G3 will be filled with numbers 2, 3, 4 and 5, which shows a numeric series of interval 1.
 Figure 6. Output: Fill Series by 1
Linear Series by 100
We want to create a linear series with an initial value of 1, and succeeding values incremented by 100
- Select cells C4 to G4
- Click Home tab > Fill > Series
- Tick Rows, Linear with Step value “100”
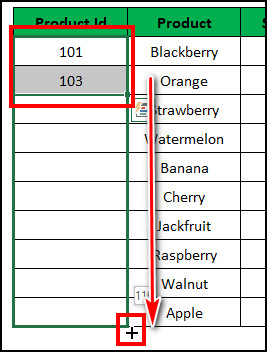
As a result, D4:G4 will be filled with numbers 101, 201, 301 and 401, which shows a linear series of interval 100.
 Figure 7. Output: Linear Series by 100
Growth Series by 100
We want to create a growth series with an initial value of 1, and succeeding values with a power of 100
- Select cells C5 to G5
- Click Home tab > Fill > Series
- Tick Rows, Growth with Step value “100”
As a result, D5:G5 will be filled with numbers 100, 10,000, 1,000,000 and 100,000,000, which shows a growth series raised to the power of 100.
 Figure 8. Output: Growth Series by 100
Date Series by Day
We want to create a date series with an initial value of 01/05/2009 and succeeding dates with a step value of 1 day
- Select cells C6 to G6
- Click Home tab > Fill > Series
- Tick Rows, Date, Day with Step value “1”
As a result, D6:G6 will be filled with dates having an interval of one day.
 Figure 9. Output: Date Series by Day
Date Series by Weekday
- Select cells C7 to G7
- Click Home tab > Fill > Series
- Tick Rows, Date, Weekday with Step value “1”
As a result, D7:G7 will be filled with dates having an interval of one weekday. Notice that the dates 04/05/2019 and 05/05/2019 are skipped because these dates fall on weekends.
 Figure 10. Output: Date Series by Weekday
Date Series by Month and Year
- Follow the same procedure but tick Month or Year in the Date unit.
Below table shows all cells filled up through the Fill Series feature.
 Figure 11. Output: Fill Series
Instant Connection to an Excel Expert
Most of the time, the problem you will need to solve will be more complex than a simple application of a formula or function. If you want to save hours of research and frustration, try our live Excelchat service! Our Excel Experts are available 24/7 to answer any Excel question you may have. We guarantee a connection within 30 seconds and a customized solution within 20 minutes.
In Excel, there is 3 different ways to create your series of number or date
- The fill-handle
- The fill menu
- SEQUENCE function
Fill series of numbers
If you want to create a series of numbers quickly, the trick is simple
- Write the first value
- Write the second value
- Select the 2 cells
- Use the fill handle to extend the selection

Excel will extend the selection according to the step between the 2 numbers.
Look at this video to see how it works with positives, negatives, and decimal numbers.
Fill series for thousands of data
But if you have to create an extensive list of numbers, using the fill handle is useless because it takes too much time 😤
It’s better to use the tool Home > Fill > Series

In the dialog box, you fill these parameters
- Select the cell containing the starting value
- Select the orientation (here columns because you want the result in the same column)
- Indicate the step (by default it’s 1)
- Indicate the last value to reach

And the result is a list of values starting from 1 to 5000 with a step of 2 😀👍

Fill a series with SEQUENCE
If you work with Excel 365, Excel Online, or Excel 2021, you can use the SEQUENCE function to create your series of number
=SEQUENCE(number of rows, number of columns, starting value, step)
For instance, to create a series from 0 to 50 with a step of 5, you write the following formula
=SEQUENCE(10, ,0,5)

Then, to convert the result of your formula to value, you must perform a copy-paste value
Create a series of dates
If you want to create a series of dates, the 3 same techniques (fill handle, tool Fill series, and SEQUENCE) can be used. But also Excel respects the number of days in a month.
For example, you can easily create a series of weeks with a step of 7 days

And the same technique can be used with the months.
- You write the 2 first months
- You select the 2 cells
- Expand the selection
