
You can export data from your Access database to a Microsoft Word document by using the Export — RTF File Wizard. This article explains how to use the Export — RTF File Wizard and how to save your export settings as a specification for later reuse.
In this article
-
Exporting data to Word: the basics
-
Export data to Word
-
Understand how Access exports objects to Word
-
What else should I know?
Exporting data to Word: the basics
You can export a table, query, form, or report to Microsoft Word. When you export an object by using the Export — RTF File Wizard, Access creates a copy of the object’s data in a Microsoft Word Rich Text Format file (*.rtf). For tables, queries, and forms, the visible fields and records appear as a table in the Word document. When you export a report, the wizard exports the report data and layout — it tries to make the Word document resemble the report as closely as possible.
-
Start the operation from Access To export data from Access to Word, you need to work in Access. There is no functionality in Word that can import data from an Access database. You also cannot save an Access database or table as a Word document by using the Save As command in Access.
-
Objects you can export You can export a table, query, form, or report. You can also export only the records selected in a view. You cannot export macros and modules. When you export a form or datasheet that contains subforms or subdatasheets, only the main form or datasheet is exported. You need to repeat the export operation for each subform and subdatasheet that you want to view in Word. Conversely, when you export a report, subforms and subreports that are included in the report are exported, along with the main report.
-
Outcome of the operation The Export — RTF File Wizard always exports formatted data. This means that only the fields and records that are visible in an object or view are exported along with the display format settings. Columns and records that are hidden, due to filter settings, are not exported. For a report, the layout of the report is also preserved when it is exported.
-
Merging with an existing document When you export from Access to a Word document, the data is always exported into a new Word file. If you want the data to be inserted into an existing Word document, you must first export it from Access into a new Word document, and then copy the data from the new Word document and paste it into the existing document. Alternatively, you can copy rows directly from an Access table, query, form, or report, and then paste them into your existing document.
Export data to Word
The process of exporting data to a Word document follows these broad steps:
-
Prepare your source data for the export. As part of this step, you make sure that your data does not contain errors, and you decide whether to export some or all of the data in your source table.
-
Run the Export — RTF File Wizard.
-
Optionally save your settings as an export specification for later reuse.
The steps in the following sections explain how to perform each task.
Prepare for the export
-
Open the source Access database.
-
In the Navigation Pane, select the object that contains the data you want to export.
You can export a table, query, form, or report.
-
Review the source data to ensure that it does not contain error indicators (green triangles) or error values, such as #Num.
Ensure that you have resolved any errors before you export the data to Word. Otherwise, you will find that such values are replaced with a null value.
-
If the destination Word document exists and is open, close it before you continue. The wizard prompts you before overwriting the document.
Note: You cannot append data to an existing Word document.
-
In the Access database, if you want to export only a portion of a table, query, or form, open the object and select just the records you want.
Export the data
-
On the External Data tab, in the Export group, click Word.
-
The Export — RTF File export wizard opens.

Note: The Export commands are available only when a database is open.
-
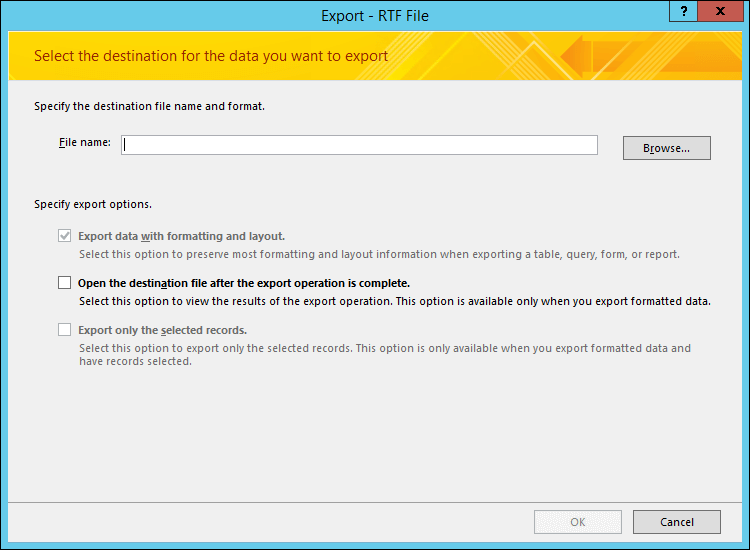
In the Export — RTF File wizard, specify the name of the destination file.
-
The wizard always exports formatted data. If you want to view the Word document after the export operation is complete, select the Open the destination file after the export operation is complete check box.
-
If you selected the records that you want to export before you started the export operation, you can select the Export only the selected records check box. However, if you want to export all the records in the view, leave the check box cleared.
Note: This check box appears unavailable (dimmed) if no records are selected.
-
Click OK.
-
If the destination document exists, you are prompted to click Yes to overwrite the file. Click No to change the name of the destination file, and then click OK again.
Access exports the data and opens the destination document in Word, depending on the export options you specified in the wizard. Access also displays the status of the operation on the final page of the wizard.
Understand how Access exports objects to Word
The following table describes how Access exports various objects and values to Word. This can help you determine what is going wrong if the export operation is not working the way you expect.
|
Item |
Export considerations |
|
Field names |
When you export a table, a query, or a form, the field names are placed in the first row of the table in the Word document. When you export a report, the placement of the field names in the Word document varies with the report layout. |
|
Multivalued fields |
A field in Access that supports multiple values is exported to a single column in Word. The values are separated by commas (,). |
|
Pictures, objects, and attachments |
All graphical elements — logos, data in OLE object fields, and attachments that are part of the source data — are not exported. |
|
Graphs |
Microsoft Graph objects are not exported. |
|
Expressions |
Expressions are not exported to the Word document. Only the results of the expressions are exported. |
|
Subforms and subdatasheets |
When you export a form or datasheet, only the main form or datasheet is exported. You must repeat the export operation for each subform and subdatasheet. |
What else should I know?
-
For information on how to save the details of your export into a specification that you can reuse later, see the article Save the details of an import or export operation as a specification.
-
For information on how to run saved export specifications, see the article Run a saved import or export operation.
-
For information on how to schedule specifications to run at specific times, see the article Schedule an import or export operation.
-
For information on how to change a specification name, delete specifications, or update the names of source files in specifications, see the article Manage Data Tasks.
Top of Page
- Remove From My Forums
-
Question
-
Hi — i have a form called ‘formpo’ that allows users to enter information that we use for purchase orders such as date, order value, supplier name, purchase description, etc etc. when the user has filled in the information on the form i would like them to be able to click a button on the form screen that will take the values from the form and insert them into a specific word document, and have the values entered into a specific place on the word template. There is a lot of stuff out there but its not the best and its mainly about mailmerging it which i dont want to have to do because its a right pain in the proverbial behind. Has anyone done this before?
Many thanks,
Rhys.
Answers
-
Assuming you have a word template, put a bookmark (in Word) where you want to add data from Access. The bookmarks can be named, (I think I’m right there) and then you can get to them from VBA behind the Access form.
Good luck, Vic
Всем привет, сегодня поговорим о выгрузки данных из Access в такие приложения как Word и Excel. Но не о стандартном способе, который есть в Access (связь с Office), а о способе, который позволяет выгружать данные в заданный шаблон как в Word, так и в Excel.
Другими словами это нужно тогда когда создать отчеты в Access по шаблону, который уже существует, например, в Word, невозможно или слишком трудоемко или как Вы знаете, может получаться просто коряво или самый распространенный вариант это когда много текста, который в отчете Access не так хорошо форматируется как в Word, а данных не так много, но необходимо автоматизировать, например это какие-то договора, заявления и так далее. Использование слияния из самого Word-а не очень удобно, поэтому я расскажу сегодня, как можно заполнять такие шаблоны напрямую из Access, путем нажатия на одну кнопку. Также как и необходимость выгрузки в шаблон Word, существует и необходимость выгрузки в шаблон Excel, и этот способ мы тоже сегодня рассмотрим.
Начнем с Word.
Вся разработка делится на две части это:
• Настройка шаблона Word;
• Настройка выгрузки данных в шаблон.
Суть настройки шаблона заключается в том, что необходимо проставить необходимые поля в тех местах шаблона, где нужно выводить то или иное поле. Это делается с помощью полей формы.
Открываем шаблон Word, для начала добавим необходимую панель инструментов, для этого нажимаем вид->панель инструментов и ставим галочку «формы». Теперь у вас отобразилась панель инструментом «Формы» все, что осталось сделать это встать на то место где необходимо добавить нужное поле и на панели выбрать «Текстовое поле». После в том месте у Вас появится серая область, которая свидетельствует о том, что поле добавлено. Теперь необходимо задать имя этого поля, для того чтобы потом из access вставлять в него значения (стандартное названия не очень удобное). Для этого щелкните правой кнопкой мы по полю и нажмите «Свойства». В поле закладка напишите желаемое имя этого поля, я в примере назвал его MyTestPole
Создайте столько полей, сколько Вам нужно.
Ну и настройка шаблона закончена, только единственное сделайте этот шаблон только для чтения, а то пользователь возьмет, сформирует документ и сохранит его, и шаблон тем самым потеряется, а если сделать только для чтения, то у него такой возможности не будет только сохранять через «Сохранить как».
Переходим к более интересной задачи это к реализации самой выгрузки из Access в этот шаблон.
Примечание! Я использую Access в связке с MS Sql 2008 поэтому и данные буду брать от туда.
Допустим у Вас есть форма, сделайте на ней кнопку (я назвал ее testbutton) и в событие нажатие кнопки вставьте следующий код:
Private Sub testbutton_Click()
‘Объявляем переменные
Dim FileDialog As FileDialog
Dim rsd As ADODB.Recordset
Dim strSQL As String
Dim WordApOb As Object
Dim WordOb As Object
Dim path As String
Set rsd = New ADODB.Recordset
‘запрос к базе данных для получения необходимых данных
strSQL = «select * from dbo.table where KOD = » & Me.kod & «»
rsd.open strSQL, CurrentProject.Connection
‘Выбираем шаблон
Set FileDialog = Application.FileDialog(msoFileDialogOpen)
‘убираем множественный выбор, он нам не нужен
FileDialog.AllowMultiSelect = False
‘очистим и установим фильтры
FileDialog.Filters.Clear
FileDialog.Filters.add «Word», «*.doc»
‘установим фильтр по умолчанию
FileDialog.FilterIndex = 1
‘проверяем, что сделал user если выбрал шаблон, то начинаем работу
If FileDialog.Show = False Then
‘Если нет то выходим
Set dlgFile = Nothing
Exit Sub
End If
‘получаем путь к файлу
path = Trim(FileDialog.SelectedItems(1))
‘Очистим переменную
Set FileDialog = Nothing
If path <> «» Then
‘Будем отслеживать ошибки
On Error GoTo Err_testbutton_Click
‘Создаем объект Word
Set WordOb = CreateObject(«Word.document»)
‘Задаем нашему документу значение из шаблона
Set WordOb = GetObject(path)
‘Задаем значение объекту word.Application
Set WordApOb = WordOb.Parent
‘делаем приложение word видимым
WordApOb.Visible = True
‘ищем наше поле в шаблоне
WordOb.Bookmarks(«mytestpole»).Select
‘задаем ему новое значение из нашего Recordset
WordApOb.Selection.TypeText Text:=Nz(rsd.Fields(«field»).Value, » «)
‘и так далее по всем полям
‘в конце перейдем на начало нашего документа
WordApOb.Selection.Goto wdGoToFirst
‘и активируем его
WordApOb.Activate
‘Очистим переменные
Set WordOb = Nothing
Set WordApOb = Nothing
Exit_testbutton_Click:
Exit Sub
Err_testbutton_Click:
MsgBox Err.Description
‘в случае ошибки будем делать следующие
‘закроем word без сохранения
WordOb.Close (wddonotsavechanges)
WordApOb.Quit
‘и также очистим переменные
Set WordOb = Nothing
Set WordApOb = Nothing
Resume Exit_testbutton_Click
End If
End Sub
Код прокомментирован, поэтому сложностей возникнуть не должно. Здесь весь смысл сводится к созданию объекта word.document и word.application, конечно же. А после мы уже работаем с нашими объектами, т.е. заполняем их.
Теперь перейдем к Excel.
В шаблоне Excel уже ненужно создавать поля как в Word, так как здесь мы уже будем ориентироваться по адресам ячеек.
Существует несколько способов, как заполнять Excel шаблон, я опишу два, первый это тогда когда Вам просто необходимо проставить несколько полей, т.е. в источнике данных будет всего одна строка с несколькими полями и второй это когда строк будет уже несколько, причем Вы не знаете, сколько именно (в зависимости от каких то условий), но в шаблоне по умолчанию отведено для этого все пару строк, поэтому мы будем нужные нам строки добавлять, для того чтобы наши данные не накладывалась на строки ниже (допустим там примечание, подпись руководителя и т.д.). И совет, я здесь для примера использую всего один источник данных, а вы, если Вам необходимо заполнить шапку, примечание и некое количество строк (т.е. область данных) то для этих задач используйте несколько источников (Recordset).
There are plenty of ways to print Access data without getting into VBA. The usual method is to just create a report from the Access database window. You can also use the Microsoft Word Mail Merge Wizard to print form letters, envelopes, labels, and catalogs from any Access table or query. There’s no VBA involved in any of that. Just learn to use Word’s Mail Merge feature, and you’re on your way.
Yet a third approach would be to create a general Word template that contains bookmarks (placeholders) for data to be filled in later. Then, use VBA in Access to replace the bookmarks with data from an Access table. This is particularly handy when you want to be able to click a button on a form in Access to print one Microsoft Word form letter.
Creating the Word template
The first step to merging data from Access into a Word document is to create a Word document template (DOT file). Start with any blank Word document and type your form letter (or whatever you wish) as you normally would in Word. You can use any and all Word features — fonts, pictures, tables, WordArt, whatever.
Wherever you want VBA to insert data from an Access table, create a Word bookmark. A bookmark (in Word) is just a placeholder. Bookmarks are usually hidden, so before you add any bookmarks to the document, choose ToolsO Options from the Word menu bar. In Word’s Options dialog box that opens, click the View tab, select Bookmarks, and then click OK.
You can insert bookmarks however you wish. Here’s how I usually do it:
1. Move the cursor to where you want VBA to insert data from Access.
2. Type a short, simple name for the bookmark.
The name cannot contain spaces nor punctuation, and it must start with a letter.
3. Select (double-click) the name you just typed and then press Ctrl+C to copy it.
4. Choose InsertOBookmark from the Word menu bar.
5. Press Ctrl+V to paste the typed name as the bookmark name.
6. Click the Add button.
You’ll need to go through those steps for each item of data that you want VBA to insert later. In the example shown in Figure 14-7, I add three bookmarks to the document. Note that the square brackets around each bookmark’s name are visible because the Show Bookmarks option is on. I didn’t type any of those square brackets.
The bookmark names in the sample document template get data from Access and VBA as follows:
1 TodaysDate: VBA will replace this bookmark with the current date.
1 AddressLines: VBA will replace this line with as many lines as necessary to show the recipient’s address.
1 Salutation: VBA will replace this with the customer’s first name or just Sirs if the first name is Null (empty) in the record being printed.
When you finish typing your document and all your bookmarks are in place, follow these steps to save the document as a Word template:
1. Choose FileOSave As from Word’s menu bar.
2. From the Save As Type option at the bottom of the Save As dialog box, choose Document Template (*.dot).
3. Use the Save In drop-down list to navigate to the folder in which you want to store the document template.
Your best bet would be to put it in the same folder as your database MDB file, but you can use any folder you wish — provided that you know the full path to the document. For example, if you put the Word template in your Shared Documents folder, the path to that document is C:Documents and SettingsAll UsersDocuments.
4. Name the document (but don’t change the .dot extension) and click the Save button.
I name my document template WordFormLetter.dot, but you can name yours however you wish.
5. Close Microsoft Word.
So that takes care of the Word document. The rest of the action takes place in Access and VBA.
Bookmarks
Figure 14-7:
Word document template with bookmarks to later accept Access data.
WordFormLetter.dot (Read
Only) — Microsoft Word
File Edit View insert
Normal + Arial I t Arial Narrow
(format lools Table Window Help Type a question for help tsfflnraii^Elir — © _
— 12 — B I D m m m ■ t= — =E :E it □ — S — A — .
File Edit View insert
Normal + Arial I t Arial Narrow
(format lools Table Window Help Type a question for help tsfflnraii^Elir — © _
— 12 — B I D m m m ■ t= — =E :E it □ — S — A — .
|
1234-Arbitrary Highway Randomville, CA 98765 |
|
|
TodaysDate — AddressUneE Dear Salutation — The main body of th Each Item In the squ shown inside the bre Customers table. |
e letter starts here, and can contain any text, fonts, and pictures you want, are brackets above is a bookmark, defined in this document with the name ckets. Access will replace each bookmark with data from a record in its |
At 1,4″ Ln 5 Col 11 PEC TRK EXT OVR English (U,5 Q3C
At 1,4″ Ln 5 Col 11 PEC TRK EXT OVR English (U,5 Q3C
Creating the Access form
For this example, I create a simple form that’s bound to a table named Customers, with the usual name and address fields that you’d expect to find in such a table. Figure 14-8 shows a sample form in Form view. The controls that are relevant to the form letter start at the one containing the name Tori. Starting at that field, and reading down and to the right, the names of the controls are:
FirstName
LastName
Company
Address1
Address2
City
State
In the VBA code to follow, you’ll see them referred to with square brackets — [FirstName], [LastName], [Company], and so forth. The e-mail address control, near the bottom, isn’t really relevant to the topic at hand. The dropdown list near the top of the control provides the user with a means of choosing a customer. The Merge to Word Letter button is named MergeBttn.
Figure 14-8:
Create a form to display one customer’s name and address at a time.
Figure 14-8:
Create a form to display one customer’s name and address at a time.

To use the form, a person chooses a name from the Choose a Customer combo box and then clicks the Merge to Word Letter button. That button executes VBA code to open the document template, replaces each bookmark with data from the current record in the form, prints the document, and then closes Word.
Writing the merge code
For this example, I place the code in the form shown in Figure 14-8 by attaching it to the MergeBttn control’s On Click event. The VBA code is shown in its entirety in Listing 14-2.
Listing 14-2: Merge Code
Private Sub MergeBttn_Click()
‘Declare variables for storing strings (text). Dim AddyLineVar, SalutationVar As String
‘Start building AddyLineVar, by dealing with blank ‘LastName and Company fields (allowed in this table). If IsNull([LastName]) Then AddyLineVar = [Company] ‘Just set SalutationVar to generic «Sirs». SalutationVar = «Sirs» Else
AddyLineVar = [FirstName] + » » + [LastName]
‘If the Company isn’t blank, tack that on after name.
If Not IsNull([Company]) Then
AddyLineVar = AddyLineVar + vbCrLf + [Company] End If
‘Salutation will be customer’s first name. SalutationVar = [FirstName] End If
‘Add line break and Addressl
AddyLineVar = AddyLineVar + vbCrLf + [Addressl]
‘If Address2 isn’t null, add line break and Address2 If Not IsNull([Address2]) Then
AddyLineVar = AddyLineVar + vbCrLf + [Address2] End If
‘Tack on line break then City, State Zip. AddyLineVar = AddyLineVar + vbCrLf + [City] + «, » AddyLineVar = AddyLineVar + [State] + » » + [ZIP]
‘Declare an instance of Microsoft Word. Dim Wrd As New Word.Application
Set Wrd = CreateObject(«Word.Application»)
‘Specify the path and name to the Word document. Dim MergeDoc As String
MergeDoc = Application.CurrentProject.Path MergeDoc = MergeDoc + «WordFormLetter.dot»
‘Open the document template, make it visible. Wrd.Documents.Add MergeDoc Wrd.Visible = True
‘Replace each bookmark with current data. With Wrd.ActiveDocument.Bookmarks
.Item(«TodaysDate»).Range.Text = Date .Item(«AddressLines»).Range.Text = AddyLineVar .Item(«Salutation»).Range.Text = SalutationVar End With
‘Letter is ready to print, so print it. ‘Wrd.ActiveDocument.PrintOut
‘All done. Close up (no need to save document) Wrd.ActiveDocument.Close wdDoNotSaveChanges Wrd.Quit
End Sub
Like all procedures, this one is just a series of small steps carried out in a specific order to achieve some goal. The first line tells you that this procedure will execute any time a user clicks the MergeBttn button.
Private Sub MergeBttn_Click()
The next two lines declare two string variables named AddyLineVar and SalutationVar. Each of those variables will become a string of text to be substituted into the document template in place of the AddressLines and Salutation bookmarks:
‘Declare variables for storing strings (text). Dim AddyLineVar, SalutationVar As String
In the Customers table I use for this example, the Addressl, City, State, and ZIP code fields are required, but the user can leave the FirstName, Company, and Address2 fields empty (Null). The code that follows builds the variable AddyLineVar as needed for whatever information is available in the current record. The first big If…End If block, shown next, starts out by saying, If the LastName field for this record is empty, make the first line of the AddyLineVar the company name and make SalutationVar into the general title, Sirs:.
‘Start building AddyLineVar, by dealing with blank ‘LastName and Company fields (allowed in this table). If IsNull([LastName]) Then AddyLineVar = [Company] ‘Just set SalutationVar to generic «Sirs». SalutationVar = «Sirs»
If the LastName field for this record is not null, the following code adds the customer’s first and last names to AddyLineVar. Note that vbCrLf is the Access VBA constant for a carriage return/linefeed. Each vbCrLf in AddyLineVar translates to the end of the line in the Word document. Note, too, that SalutationVar gets its value from the FirstName field in the following code:
Else
AddyLineVar = [FirstName] + » » + [LastName]
‘If the Company isn’t blank, tack that on after name. If Not IsNull([Company]) Then
AddyLineVar = AddyLineVar + vbCrLf + [Company] End If
‘Salutation will be customer’s first name. SalutationVar = [FirstName] End If
Because Addressl is a required field, you can assume that it is not null. The following code adds a vbCrLf and the contents of the Addressl field to AddyLineVar:
‘Add CRLF and Addressl
AddyLineVar = AddyLineVar + vbCrLf + [Addressl]
The next If…End If block adds a line break and the contents of the Address2 field to AddyLineVar but only if the Address2 field isn’t empty:
‘If Address2 isn’t null, add CRLF and Address2 If Not IsNull([Address2]) Then
AddyLineVar = AddyLineVar + vbCrLf + [Address2] End If
Because the City, State, and ZIP fields are required in the Customers table, the next lines of code just add another vbCrLf to AddyLineVar, followed by the City, a comma and blank space (, ), the State, two blank spaces, and then the ZIP:
‘Tack on line break then City, State Zip. AddyLineVar = AddyLineVar + vbCrLf + [City] + «, » AddyLineVar = AddyLineVar + [State] + » » + [ZIP]
At this point in the code, the AddyLineVar and SalutationVar variables both contain the data to be plugged into the form letter. Now you can start writing the code to open Word and replace its bookmarks with some actual data. First, use the standard syntax described earlier in this chapter to declare and open an instance of Microsoft Word:
The VBA editor won’t accept the statements that follow if you haven’t already selected the Microsoft Word Object Library in your References dialog box.
‘Declare an instance of Microsoft Word.
Dim Wrd As New Word.Application
Set Wrd = CreateObject(«Word.Application»)
From this point in the code, the object variable named Wrd refers to an open instance of Microsoft Word (and its entire Application object, which exposes all of Microsoft Word to VBA.)
The next step is to open the document template that contains the bookmarks and text. The syntax for opening a Word document from Access VBA
is objVar .Documents.Add path. The objVar must match the object variable used in the Dim and Set statements (Wrd in this example).
The path must be the complete path to the Word document. In my example, I place the Word document in the same folder as the database MDB file (which makes it easy to find). In Access, you can use Application. CurrentProject.Path to get the path to the currently open database. I name my Word document WordFormLetter.dot. The following statements create a string variable named MergeDoc that contains the full path and filename of that Word document template:
‘Specify the path and name to the Word document. Dim MergeDoc As String
MergeDoc = Application.CurrentProject.Path MergeDoc = MergeDoc + «WordFormLetter.dot»
If WordFormLetter.dot were in some other folder, I couldn’t use Application.CurrentProject.Path to get its path. I’d have to specify the path literally in the code. For example, in Windows XP, if your user account name is Bobo, and your form letter is named MyFormLetter. dot and is stored in your My Documents folder, the following statement will work just fine provided that you type it into the Code window as one long line.
Wrd.Documents.Add «C:Documents and SettingsBoboMy DocumentsMyFormLetter.dot»
Normally, when VBA opens an instance of Word, the program window is invisible, and all activity takes place behind the scenes. For testing and debugging purposes, though, you’ll probably want to make Word visible so you can see what’s happening. To make the window visible, set its Visible property to True, as shown here:
Wrd.Visible = True
When Word and a document are both open, VBA can refer to the document as objVar .ActiveDocument (where, once again, objVar matches the object variable name, which is Wrd in this example). The ActiveDocument object, in turn, contains a Bookmarks collection, which contains a list of all the bookmarks in the document.
The following statement begins a With…End With block that defines the current document’s Bookmarks collection (Wrd.ActiveDocument.Bookmarks) as the item to which all properties to follow (up to End With) will be applied:
‘Replace each bookmark with current data. With Wrd.ActiveDocument.Bookmarks
Within the With…End With block, you can refer to any bookmark by name by using the syntax .ItemibookmarkName) where bookmarkName is the name of the bookmark as defined in the Word document. Each bookmark has a .Range property, which refers to everything that’s contained within the bookmark. The .Range property in turn has a .Text property, which refers specifically to the text within the bookmark. Thus, the statement
.Item(«Addressl_ines»).Range.Text = AddyLineVar says, Change whatever text is currently in the bookmark named AddressLines to whatever is currently in the variable named AddyLineVar.
In the following code, I change the TodaysDate bookmark to the current date, the AddressLines bookmark to the contents of the AddyLineVar variable, and the Salutation bookmark to whatever is in the variable named
SalutationVar:
|
.Item( |
«TodaysDate») |
.Range.Text = |
Date |
|
.Item( |
«AddressLines |
«).Range.Text |
= AddyLineVar |
|
.Item( |
«Salutation») |
.Range.Text = |
SalutationVar |
|
End With |
Onscreen, the document template now contains the complete form letter with all the right information. This next statement prints the form letter:
‘Print the letter. Wrd.ActiveDocument.PrintOut
The following statement closes the letter without saving it. (There’s no need to save the letter after it’s printed because you’ll always have the document template to work with.)
‘All done. Close up (no need to save document) Wrd.ActiveDocument.Close wdDoNotSaveChanges
These two lines close Microsoft Word and end the procedure:
Wrd.Quit End Sub
Figure 14-9 shows an example of using the procedure. There I chose a customer named Tori Pines from the Access form and then clicked the Merge to Word Letter button. The form letter that you see in the background is the result, with the date, address lines, and salutation all in place. The code is written to actually print the letter, so you’d never actually see the form on top of the Word document. (I had to superimpose the form there.) However, you would get a printed copy of the letter shown in the figure.
Figure 14-9:
Record from the form merged into a form letter.
Figure 14-9 shows an example of using the procedure. There I chose a customer named Tori Pines from the Access form and then clicked the Merge to Word Letter button. The form letter that you see in the background is the result, with the date, address lines, and salutation all in place. The code is written to actually print the letter, so you’d never actually see the form on top of the Word document. (I had to superimpose the form there.) However, you would get a printed copy of the letter shown in the figure.

Continue reading here: Interacting with Microsoft Excel
Was this article helpful?
![]()
Can I fill in Word document from Access table and/or query?
I am trying to get a contract type of Word document to automatically fill in the name, address, case number etc. The source information lives in Access tables and or queries. I want a master document that will fill in from the opened case in Access. I’m not the sharpest toothpick in the box and am slightly (mostly) over my head. Can mail merge be used for this?

Access reports provide a flexible and easy-to-use tool for sharing data, but sometimes, it’s the wrong tool. For instance, you may find that you can’t exactly reproduce an existing paper form in Access, whereas you can in Word. Now, you might not care what the report (paper form) looks like, but perhaps management does. When this is the case, you may find it necessary to transfer Access data to Word forms. The good news is that Word and Access play well together.
Note:This information is also available as a download, which includes text files containing the VBA code from Listing A and Listing B.
The automated solution requires three pieces:
- A method of identifying the Access data you want to transfer
- A bit of VBA code to automate the process
- A Word document that represents the form you need to fill.
We’ll work with existing data in the Northwind database (the sample database that comes with Access). Specifically, the example will transfer data from the Customers table, via a form, to the Word document shown in Figure A.
Figure A: The highlighted areas are text fields.
Creating the Word form
The Word form isn’t as difficult to create as it might look. The example form consists of five simple tables that contain form fields. In this context, a form is a document that contains fill-in blanks or form fields, in which you enter information. A field is a predefined cell for entering and storing information.
The form in Figure A uses five two-row tables to simulate a form. You don’t need the tables, but they help organize and manage the data. To insert a table, choose Insert from the Table menu and then choose Table. In the resulting Insert Table dialog box, enter the appropriate number of columns and rows (see Figure B). To create this form, you’ll need five tables as follows:
| Columns | Rows |
| 2 | 2 |
| 2 | 2 |
| 1 | 2 |
| 4 | 2 |
| 2 | 2 |
Figure B: Identify the number of rows and columns in each table.
The example form also uses shading and text in the first row to distinguish between the heading and actual information. You can skip the formatting if you like; it isn’t critical to the technique. Alter the width of each cell column, using Figure A as a guide, if you like.
The example Word document contains a matching field for each column in the Northwind’s Customers table. You don’t have to accommodate each field; transfer just the data you need. However, you must associate a Word field with each underlying Access field that you want to copy to the Word form. To add the first field, complete the following steps in the Word form:
- Display the Forms toolbar by choosing Toolbars from the View menu and selecting Forms.
- In the document, click the table cell beneath the Customer Number heading.
- Click the Text Form Field button on the Forms toolbar.
- Double-click the field to display the Text Form Field Options dialog box.
- Rename the field fldCustomerID and click OK.
Repeat steps 2 through 5 to add a text field for each heading, using the following list to name each field:
| Word field heading | Field name | Corresponding field in Access table |
| Customer Number | fldCustomerID | CustomerID |
| Customer | fldCompanyName | CompanyName |
| Contact | fldContactName | ContactName |
| Title | fldContactTitle | ContactTitle |
| Street Address | fldAddress | Address |
| City | fldCity | City |
| Region | fldRegion | Region |
| ZIP Code | fldPostalCode | PostalCode |
| Country | fldCountry | Country |
| Phone Number | fldPhone | Phone |
| Fax Number | fldFax | Fax |
The field heading doesn’t have to match the field names. However, notice that the Word field names match the Access field names, with an additional fld prefix. It isn’t necessary to name the Word fields similarly to their corresponding Access fields, but doing so is self-documenting and simplifies your work.
After adding all the fields, click the Protect Form button. Doing so disables a number of features, which will keep casual users from altering your form. Then, save the form as CustomerSlip.doc and close it.
Identifying the Access data
The most common method you’ll probably use to identify a specific record is an Access form. To simply the example, use the existing Customers form in Northwind. If you’d rather not alter the actual object, use a copy or use the AutoForm wizard to generate a quick form based on the Customers table. When you have a form bound to the Customers table, add a command button to the form and name it cmdPrint, as shown in Figure C.
Figure C: The Print Customer Slip command button executes the VBA code that will pass Access data to the Word form.
With the form still in Design view, click the Code button to launch the form’s module. Add the code in Listing A to the module. The cmdPrint button’s Print event does all the work of copying data for the current customer in the Customers form to the Word document (CustomerSlip.doc).
Listing A
Private Sub cmdPrint_Click()
'Print customer slip for current customer.
Dim appWord As Word.Application
Dim doc As Word.Document
'Avoid error 429, when Word isn't open.
On Error Resume Next
Err.Clear
'Set appWord object variable to running instance of Word.
Set appWord = GetObject(, "Word.Application")
If Err.Number <> 0 Then
'If Word isn't open, create a new instance of Word.
Set appWord = New Word.Application
End If
Set doc = appWord.Documents.Open("C:WordFormsCustomerSlip.doc", , True)
With doc
.FormFields("fldCustomerID").Result = Me!CustomerID
.FormFields("fldCompanyName").Result = Me!CompanyName
.FormFields("fldContactName").Result = Me!ContactName
.FormFields("fldContactTitle").Result = Me!ContactTitle
.FormFields("fldAddress").Result = Me!Address
.FormFields("fldCity").Result = Me!City
.FormFields("fldRegion").Result = Me!Region
.FormFields("fldPostalCode").Result = Me!PostalCode
.FormFields("fldCountry").Result = Me!Country
.FormFields("fldPhone").Result = Me!Phone
.FormFields("fldFax").Result = Me!Fax
.Visible = True
.Activate
End With
Set doc = Nothing
Set appWord = Nothing
Exit Sub
errHandler:
MsgBox Err.Number & ": " & Err.Description
End Sub
How it works
First, the code creates an instance of Word. If Word is already open, it uses the currently running instance. The current code uses the expression Err.Number <> 0 because Microsoft is notorious for changing error numbers from version to version. You might want to be more specific by changing 0 to 429 (or the appropriate error number for your version if different).
Next, the Open method identifies the Word form (document). In this case, that’s CustomerSlip.doc in the WordForms folder on the C: drive. The optional True value opens the file as read-only. Update the path to accommodate your system. In fact, you might consider moving the filename and path to constants in the General Declarations section. That way, you can more easily update the code if you change the filename or move it.
The With block copies the data from each Access field to its corresponding Word field. After copying all the data, the Visible and Activate methods display and then select the filled in Word form, as shown in Figure D.
Figure D: The form will look like this after all the data is copied and filled.
The error handling is minimal. Be sure to thoroughly test your production solution and accommodate all possible errors. The most common errors you’ll run into are a missing Word file, an incorrect path, or mismatched field names.
Filling multiple Word forms
Currently, the example works with only one record, the form’s current record. Sometimes, you’ll want to pass multiple records. Fortunately, it isn’t difficult to enhance the existing code to handle multiple records and forms, as shown in Listing B.
Listing B
Private Sub cmdPrint_Click()
'Print customer slip for current customer.
Dim appWord As Word.Application
Dim doc As Word.Document
Dim rst As ADODB.Recordset
'Avoid error 429, when Word isn't open.
On Error Resume Next
Err.Clear
'Set appWord object variable to running instance of Word.
Set appWord = GetObject(, "Word.Application")
If Err.Number <> 0 Then
'If Word isn't open, create a new instance of Word.
Set appWord = New Word.Application
End If
'Populate recordset object.
Set rst = New ADODB.Recordset
rst.Open Me.RecordSource, CurrentProject.Connection
'Cycle through records to fill Word form fields.
Do While Not rst.EOF
Set doc = appWord.Documents.Open("C:WordFormsCustomerSlip.doc", , True)
With doc
.FormFields("fldCustomerID").Result = rst!CustomerID
.FormFields("fldCompanyName").Result = rst!CompanyName
.FormFields("fldContactName").Result = rst!ContactName
.FormFields("fldContactTitle").Result = rst!ContactTitle
.FormFields("fldAddress").Result = rst!Address
.FormFields("fldCity").Result = rst!City
.FormFields("fldRegion").Result = rst!Region
.FormFields("fldPostalCode").Result = rst!PostalCode
.FormFields("fldCountry").Result = rst!Country
.FormFields("fldPhone").Result = rst!Phone
.FormFields("fldFax").Result = rst!Fax
.Visible = True
.Activate
'.PrintOut
'.SaveAs "'" & rst!CustomerID & "'"
rst.MoveNext
End With
Loop
Set doc = Nothing
Set appWord = Nothing
Exit Sub
errHandler:
MsgBox Err.Number & ": " & Err.Description
End Sub
Instead of retrieving data from the actual form (using the Me identifier), this procedure uses a Recordset object to pass data from multiple records. Be sure to update the .FieldForm statements by referring to the recordset (rst!) instead of the Access form (Me!), as the previous procedure did.
Our example uses the form’s RecordSource property to retrieve data from the Access form’s underlying data source (the Customers table). Consequently, the form isn’t synchronized to the procedure, so the form’s current record never changes. We’re just using the form’s recordset and print button to keep the example simple. When applying this technique to your database, you can use any valid recordset source.
Notice that the code has two commented statements toward the end of the With block. Those are actions you might possibly want to take for each Word form. The first prints the completed form; the second saves the form to the current directory using the current record’s primary key value as the form’s name. You could use either or both. If you don’t save the current record, Word dumps it when the Do While loop processes the next record.
The downside is performance. If you’re working with thousands of records, this process will take a few minutes to complete.
Shortcut to Word forms
Filling a Word form with Access data can be a useful when your data is in Access and you must use Word’s formatting features to create just the right display. Fortunately, the process is simple, whether sharing one record or thousands.
-
#1
Sorry about the late Friday entry:
I have a form in Access that I use to create a word document (I created form fields in word and filled them from VBA code in Access). Everything works just fine. Now I am trying to create a table in Word that’s filled with my Access fields. I am having trouble figuring this out. The Access fields are from a continuous report, so I’m guessing it has to be some sort of loop as well.
can someone please help
Thanks so much

-
#3
Do you have any experience using this VBA? I have been at this all day and just can’t seem to get it to work. below is my code:
Set rs = CurrentDb.OpenRecordset(«tbl_PHOTO», dbOpenDynaset)
Selection.GoTo What:=wdGoToBookmark, Name:=»fldPhoto»
With rs
Do While Not .EOF
Selection.TypeText Text:=![Number]
Selection.MoveRight Unit:=wdCell
Selection.TypeText Text:=![Location]
Selection.MoveRight Unit:=wdCell
.MoveNext
Loop
.Close
End With
Selection.SelectRow
Selection.Rows.Delete
JHB
Have been here a while
-
#4
There must be more code as that!
And where do you’ve the code, in MS-Access or Word?
What problem do you’ve, some error message or …?
-
#5
the above code was put into my already existing code in access. Since that code works just find, and is lengthy, I just added the part of the code that included the loop. It does two things;
it will either do nothing, or (when I tweak it), it will output the first continuous record and wont stop. So it will give me the same record forever unless I close the word document. It seems to not be looping or stopping after the loop.

-
#6
This seems like you are dealing with extraneous issues.
Let’s get down to a few simple ideas. Here is the overview. You can look up the details online.
You open a Word.Application object using
Set {object-variable} = CreateObjects( «Word.Application» )
Open a document using
{object-variable}.Documents.Open {filename}
You can make that the active document, which means the ActiveDocument shortcut works for you.
You find Word tables in the Tables collection of the current document. Each table is a collection of Rows, which in turn is a collection of Columns. (OR you can do the collection of Columns as a collection of Rows — the interface works either way). To find a given cell in a table requires something like
Set {Word.Cell-object} = ActiveDocument.Tables.Row(j).Column(k)
From there, you have the cell pointer and can start playing with the properties of that cell. So the loop might at worst be one loop through the Documents collection to find the document you want (and make it active) followed by a loop through that document’s Tables
collection to find the right table. After that, your loop is a nested loop through the Rows(j).Columns(k) collection to see individual cells. The innermost part of that loop is where you would diddle with the cell’s attributes.
If your problem is that you always get the first record, your recordset needs tweaking. If you have a way to tell from your recordset where a given value should go, you could do the OTHER kind of loop — read through the recordset, extract the Row and Column number from data in the recordset, and randomly access the cells based on knowing the row and column number.
Your only REAL problem with this is that somewhere you must decide how to store the data in the recordset to define where it goes in the table, or must otherwise define a formula in your Word code that computes where the data goes. But somehow you have to decide your layout before you actually code that VBA segment.
-
#7
I figured it out!! Wow that took some work but here is the code for anyone interested. I was missing the first line in the code:
Dim db As DAO.Database
Dim rs As DAO.Recordset
Set db = CurrentDb
Set rs = db.OpenRecordset(«tbl_PHOTO»)
.FormFields(«fldPhoto»).Result = «****»
Selection.GoTo What:=wdGoToBookmark, Name:=»fldPhoto»
With rs
Do While Not rs.EOF
Selection.TypeText Text:=![Number]
Selection.MoveRight Unit:=wdCell
Selection.TypeText Text:=![Location]
Selection.MoveRight Unit:=wdCell
rs.MoveNext
Loop
rs.Close
End With
Selection.SelectRow
Selection.Rows.Delete
kaotix
-
#1
I am trying to find out how to auto fill a word document in specific
parts from an Access Database.
We have a program that does this already but it only has set templates
and set fields it retrieves the data from. There is no indication as to
any setup for the database it uses or anything.
I’ve read about mail merge but cannot see how this is what I want as
all that seems to do is select users to send the document I supply from
the database.
If anyone can link me to any information on how to do this or explain
in a bit more detail I would really apreciate it.
Thanks
Advertisements
Joseph Meehan
-
#2
There is more than one way of doing what you want. In addition I would
guess that different versions of Access and Word may have different versions
of how to do this.
I would guess you have a good knowledge of Word and a lesser knowledge
of Access. If I am right I suggest finding someone who knows Access well to
help you out. Access is very powerful, but not too friendly to the new user,
it has a steep learning curve since it works so different than must users
have experienced in other programs.
If you don’t know anyone with that kind of knowledge locally, then you
may end up spending a lot of time reading and working with Access, to get
familiar with it.
We can give it a try here, but first you will need to tell us some more
details.
What version of Access and Word do you have? What is your personal
knowledge level of each of those? What information do you want to get from
Access? How will you select what records in Access has that information?
What do you mean «There is no indication as to any setup for the
database it uses or anything.» Do you mean you don’t know what database is
supply the data?
It may make more sense to use an Access report than sending the
information to Word.
Please excuse the un-organized presentation I have made. It is just a
conversational stream of thoughts.
Bob I
-
#3
Try actually working your way through the mail merge wizard, it will
become a lot more obvious when you do the steps.
kaotix
-
#4
Thanks for your reply, the presentation was fine as I read it with th
same train of through in mind anyway
I have good knowledge of Word and good knowledge of Access but not
great deal of knowledge on this side of things with Access. Also, ca
you really have good knowledge of Word when its just a word processo
and doesn’t really do anything exceptional? Anyway
I understand your question regarding the reports in Access and do se
this as a possibility for my solution, but this is really more to as
‘how’ to do it in Word for future reference
I am currently using Office 2003
I want to, for now, just get example data from the database which wil
just be text fields in a simple table
Thank
kaotix
-
#5
Thanks Bob i’ll see what happens. I didn’t see your reply until I had
posted mine.
Bob I
Advertisements
Joseph Meehan
-
#7
Word is a rather complex program once you learn about it’s features.
The thing is 95% of the users only know and use about 20% of the program.
They lack knowledge of the other 80%. I would have to guess that it is
designed that way intentionally to make it less intimidating. I still am
haunted by my employees who repeatedly came to me because their files
disappeared. Of course what happened is they dropped off the recently used
list. They had no idea where the files were actually stored. (Oh yea, my
administrator had the same problem.
From the sounds of things, I think you will be able to work your way
through this one. IMO that is the best way to learn something new.
kaotix
-
#8
Well to be fair the mail merge does actually do a good job of this. But
to call it a mail merge is totally stupid and mis-leading.
With mail merge you can actually choose what ever fields you want to
put into the document and it doesn’t have to be a recipient.
The recipients are actually just rows in the table itself and you can
select what ever record from that table row to display within the
document.
I hope this helps anyone else out who is looking for a similar solution
to this problem as mail merge really does seem to be a good but
mis-leading option.
Thanks to everyone that gave me a response, its greatly appreciated.
Bob I
-
#9
It’s been Mail merge for over a decade. It was for that purpose that it
was designed. Just because you want to use it for another purpose, and
it works well for that, it’s hardly fair to call it misnamed or
mis-leading.
Bob I
-
#10
Hi Joe,
I think perhaps you meant to reply to OP, not me.
Advertisements
Joseph Meehan
-
#11
Yes, sorry
Bob I said:
Hi Joe,
I think perhaps you meant to reply to OP, not me.
Joseph Meehan wrote:
Advertisements
Asked
3 years, 3 months ago
Viewed
65 times
I will describe my problem as points:
- I have an Access database with functions & macros
- there is a function to fill data into Word document (it works well)
- I am using late binding
- the database should be available to users who don’t have Microsoft Application so I install Access runtime (it works well except the function of Word didn’t work)
- the code below works on a machine that has Access Application but doesn’t on other machines.
How can I get the code to run in the Access Runtime?
Private Sub Command96_Click()
Dim appWord As Object
Set appWord = CreateObject("Word.Application")

Dim doc As Object

'Set doc = CreateDocument("Word.Document")
'Avoid error 429, when Word isn't open.

On Error Resume Next

Err.Clear

'Set appWord object variable to running instance of Word.

Set appWord = GetObject(, "Word.Application")

If Err.Number <> 0 Then

'If Word isn't open, create a new instance of Word.

'Set appWord = New Word.Application
Set appWord = CreateObject("Word.Application")
End If

'Set doc = appWord.Documents.Open("\ubcdatacenterPublicUBCIEDatabaseDOCH_F.docx", , True)
Set doc = appWord.Documents.Open("\ubcdatacenterPublicUBCIEDatabaseDOCH_F.docx")
With doc

.FormFields("BookID").Result = Me!ID
.FormFields("Book_BC_date").Result = Me!date_BC
.FormFields("Book_AH_date").Result = Me!date_AH
.FormFields("Book_AH_date").Result = Me!date_AH
.FormFields("BookTopic").Result = Me!topic
.FormFields("BookProjectName").Result = Me!projectName
.FormFields("BookCompanyName").Result = Me!companyName
.FormFields("BookContent").Range.Text = Me!content

.Visible = True

.Activate

End With

Set doc = Nothing

Set appWord = Nothing

Exit Sub

errHandler:

MsgBox Err.Number & ": " & Err.Description

End Sub
![]()
asked Dec 19, 2019 at 12:21
![]()
3
Load 5 more related questions
Show fewer related questions