
This article describes the most common methods for creating ruling lines or blank lines in a Microsoft Word document. These are useful if you are creating a form that will be printed and filled out with pen or pencil.
The following six methods are described in this article:
-
Paragraph Border method
-
Table Border method
-
Blank Space method
-
Tab Leader method
-
Draw method
-
Compatibility Options method
Summary
To create lines in a Microsoft Word document, you may use any of the following methods:
Paragraph Border Method
To place a line (border) under each line that has a paragraph mark (¶), follow these steps.
NOTE: To show paragraph marks in your Word document, click Options on the Tools menu. On the View tab, click to select the Paragraph marks check box, and then click OK.
-
Select all the paragraphs to be underlined.
-
On the Format menu, click Borders and shading.
-
Click the Borders tab.
-
Under Style, click the line style you want to use for the border.
-
Under Preview, click on the diagram to select the center and bottom borders.
-
Click OK. Each line with a hard return will now have a border beneath it.
NOTE: Multiple blank paragraphs formatted in this way can be placed in text boxes and positioned underneath the normal text area to form lines that are not affected when you type text; lines created by using the Draw method are also not affected when you type text.
Table Border Method
To place a border on the bottom of the table cell, follow these steps. There will be a line under any text typed in the table cell. When text wraps to a second line, there will still be only a single border at the bottom of the cell.
-
Place the insertion point on a blank line where you want the underlined text to appear.
-
On the Table menu, point to Insert, and then click Table.
-
In the Number of columns box, type 1, in the Number of rows box, type 1, and then click OK.
NOTE: A one-column, one-row table now appears at the insertion point. You can specify the number of columns and rows you need.
-
On the Table menu, point to Select, and then click Table.
NOTE: You can also select just a particular cell, column, or row of your table to apply the bottom border to.
-
On the Format menu, click Borders and Shading, and then click the Borders tab.
-
On the Borders tab, under Setting, click None.
-
Under Style, click the line style you want to use for the border.
-
Under Preview, click on the diagram to select the bottom border, and then click OK.
Blank Space Method
To underline one space at a time, follow these steps. Word does not normally underline blank spaces. The following instructions explain how to create non-breaking spaces that Word will underline.
-
Place the insertion point where you want the ruling line (underlining).
-
On the Format menu, click Font. In the Underline style box, select the line style you want, and then click OK.
-
For every blank space you want to underline, press CTRL+SHIFT+SPACEBAR.
Tab Leader Method
-
Place the insertion point on the line where you want the underlining.
-
On the Format menu, click Tabs.
-
In the Tabs dialog box, click Clear All.
-
Under Tab stop position, type a number that corresponds to the number of inches you want the line to extend from the left margin. (For example, 6.0 inches goes from margin to margin in a document with 1.25-inch left and right margins.)
-
Under Alignment, click Right, and then under Leader, click 4 (the underline).
-
Click Set, and then click OK.
-
Press the TAB key. A line extends from the insertion point to the tab created in step 4.
-
Press ENTER to move to a blank line, and then press the TAB key again. Repeat this step as needed.
NOTE: Multiple blank paragraphs formatted in this way can be placed in text boxes and positioned underneath the normal text area to form lines that are not affected by typing text; lines created using the Draw method are also not affected by typing text.
Draw Method
-
Click the Drawing toolbar button on the Standard toolbar, or point to Toolbars on the View menu, and then click Drawing.
-
Click Line on the Drawing toolbar.
-
Place the pointer where you want the line to start. The mouse pointer is a crosshair (+).
-
Click and hold the mouse button, and drag the line to the length you want.
NOTES:
-
Holding down the SHIFT key while drawing a line produces straight horizontal or vertical lines.
-
Holding down the ALT key while drawing a line prevents the line from snapping to the grid and allows exact line placement. To turn off the snap-to-grid feature, click Draw on the Drawing toolbar, and then click Grid. Click to clear the Snap objects to grid check box, and then click OK.
-
-
Repeat steps 1 through 4 to add as many ruling lines as you want.
Compatibility Options Method
NOTE: Using this method will create an underlined character each time you press a key. Pressing the SPACEBAR will create an underlined space.
-
On the Tools menu, click Options.
-
Click the Compatibility tab.
-
Under Options, click to select the Draw underline on trailing spaces check box, and then click OK.
-
On the Format menu, click Font.
-
On the Font tab, click the underline style you want in the Underline style box, and then click OK.
More Information
For more information about using text boxes, click Microsoft Word Help on the Help menu, type text boxes in the Office Assistant or the Answer Wizard, and then click Search to view the topic.
References
Need more help?
- Remove From My Forums
-
Question
-
Hi,
I want to know if there is a macro which I can run to get a fill-in-the-blanks line.
I already know the usual ways, like keeping only the bottom border of a table, etc. They can be time-consuming, so I’d like to know the macro way to do the task.
Please help!
Regards,
VC
Answers
-
Hi Deepak,
I just figured it out myself.
Anyway, thank you very much.
Regards,
VC
-
Proposed as answer by
Wednesday, February 15, 2017 6:23 AM
-
Marked as answer by
CNL777
Wednesday, February 15, 2017 9:27 AM
-
Proposed as answer by
You would expect empty lines in a Microsoft Word document would be easy to create. And to be honest, they are! But the method to do so may not be so obvious.

Maybe you have to send someone a form to fill out by hand. You would expect empty lines in a Microsoft Word document would be easy to create. And to be honest, they are! But the method to do so may not be so obvious.
So before you rush ahead and ready your document for printing, check out this formatting trick that helps you to create neat blank lines in Microsoft Word forms.
Create Empty Lines in 1 Minute
The Tab Leader method is one of the speediest ways to create a blank line for a form. This method uses tab stops in a document to extend your blank line to the precise point you want it to end.
Write the first label for the text entry for your form. For example: Name. Separate it from the information that will go into the blank line with a colon, dash, or any other character. Then, hit the Spacebar to insert a gap before the blank line starts.
Go to the Ribbon > Home > Paragraph group on the toolbar. Click the downward pointing arrow to open the dialog box for the paragraph settings. Click the Tabs button at the bottom of the dialog box.
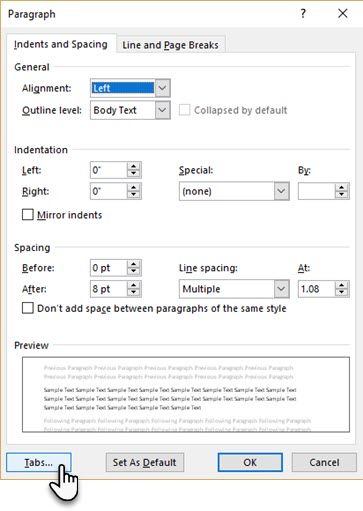
In the Tabs dialog box, click Clear All.
Under Tab stop position, type a number that corresponds to the number of inches you want the line to extend from the left margin. For example, if you want the line to extend 5 inches from the left margin, type 5″.
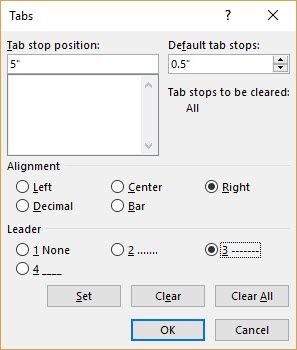
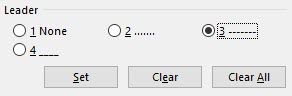
Also, select Right for the Tab Alignment, and choose 3 as the Leader to get a dashed line. What is a Leader? Microsoft Word uses either dots, dashes or solid lines as leaders. The leader style is denoted next to the numbers.
To finalize the settings, click Set and then OK to return to the document.
Place the cursor where you want to start the blank line. Press the Tab key on your keyboard, and a dotted line be drawn on the page the insertion point to the point where you had set the right tab.
![]()
Hit Enter and type the label for the second field entry (for e.g. Address:). Again, press Tab to insert the second dotted blank line. Repeat the process for all your fields you want displayed in your form. Thanks to the use of tabs, you can align all the blank lines neatly before you send the document to the printer.
For something more formal, check out how to use Microsoft Forms.
Microsoft Word 2010 is an optimal business choice for communications leaving your office, such as letters, invoices and marketing materials, but don’t rule out the software program for when you’re seeking to bring in information as well. Let Word help you design fill-in-the-blank forms, ideal for culling job applicants, preparing new hires for confidentiality agreements and anywhere else you want people to be able to give you input. Word’s fill-in forms can be a jumping off point for your electronic information gathering or they can be printed for manual completion.
-
Launch Word and type the form name at the top of the Word page. You can also type additional information such as the department using the form, the form creator’s name and any directions for using the form.
-
Press “Enter” to drop to a new line or “Enter” twice for a line of space below the top text. Type the first form question or command, such as “Name” or “Job Title Applied For.”
-
Click the “Insert” tab, then click the “Shapes” button. Click the basic Line shape. When the cursor changes to a plus sign, hold down the “Ctrl” key to give you a straight drawing line, and drag the cursor to the right of the text you just typed, giving your form recipients a place to write.
-
Press “Enter” and type the next question on the form. Right-click the line you drew above and press the “Ctrl-C” keys to copy the line. Press the “Ctrl-V” keys to paste in the copied line and drag it into place to the right of the new question you just typed. Adjust line size as needed.
-
Type the next question. Press “Ctrl-V” to paste another copy of the line. You do not have to keep clicking and copying the line, as it is still in memory. Adjust the line sizes for each question. For example, a fill-in line for someone’s birth date will be shorter than the line for a description of a past job.
-
Add any additional text and lines to the rest of the form page or pages as necessary. For questions in which you want recipients to have multiple lines, paste copies of the line and drag them directly underneath each other, with a small space in between each for recipients to write.
-
Save the form to your network or desktop in a location you’ll remember.
Please see the attached image. 
I would like to create a paragraph that will have a blank space like in the 8. Occupancy parapgraph of the attached image.
There are two blank spaces (with underline style) in between words. Suppose I will compose this page and will give to other users and they will fill up the blank spaces. Although here «3» are written by hands, but I want those two 3 will be typed by the keyboard on the pc.
Here the most interesting thing I want. Typing «3» on the blank spaces will not move or change the width of the «underlined» area. I can accomplish this by creating Tabs with ….. leader but that is not possible if there are multiple blank spaces in different lines of a same paragraph. So, let’s say the «underlined» area is 2 cm width, typing «3» over the underline will keep it as 2 cm unless the typed words are smaller than 2cm. Make sense?
Please let me know whether there is a way to accomplish that in an easy way in MS-Word?
Thanks
asked Jan 16, 2021 at 11:17
![]()
2
In Word, you can use either a Content Control or a MacroButton Prompt Field.
Here is my writing on the MacroButton Field Prompt. It’s biggest advantage is that it works in pre-ribbon versions of Word. Despite the name, no macros are involved in using this method. Here is a link to my free Add-In to easily insert these. You do not need the Add-In, though.
Content Controls are found under the Developer Tab in Word. Here is a page by Greg Maxey on Content Controls.
answered Jan 16, 2021 at 18:38
![]()
Charles KenyonCharles Kenyon
4,0202 gold badges8 silver badges19 bronze badges
Setup a Character style that is based on the Paragraph of where it is being used. Add a Font format of Underline.

Use a Listbox Content Control and set it so that it uses your unique underline character style. Based on your specification that the entry areas need to stay of fixed length, underlined, and the user will type in the number versus handwrite it, you will have to build the Listbox selections already formatted. Here’s an example:

You will need to include a text prompt as the first line of the list that is the same length as the actual number choices below them. It will take some experimenting to get them the same length … my example still isn’t quite perfect.
Note in my example that I had to include some underline characters before and after the numbers. This is to preserve the length of the entry field so the body next to this entry field does not shift.
When the user selects from this control, their choices look like the following:

answered Jan 16, 2021 at 19:00
![]()
Rich MichaelsRich Michaels
2,7962 gold badges10 silver badges20 bronze badges