
Show the Developer tab
If the developer tab isn’t already visible, see Show the Developer tab.
Make your list
-
Type the list.
-
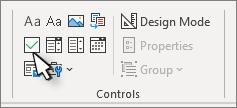
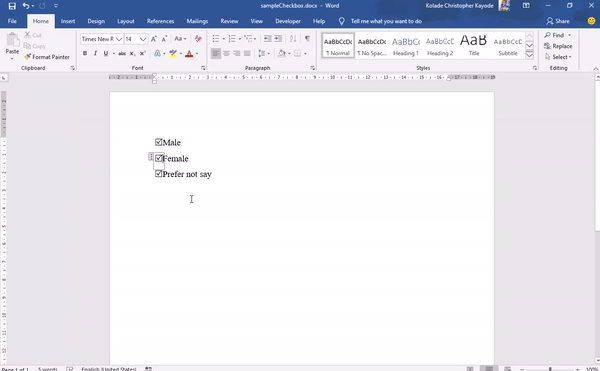
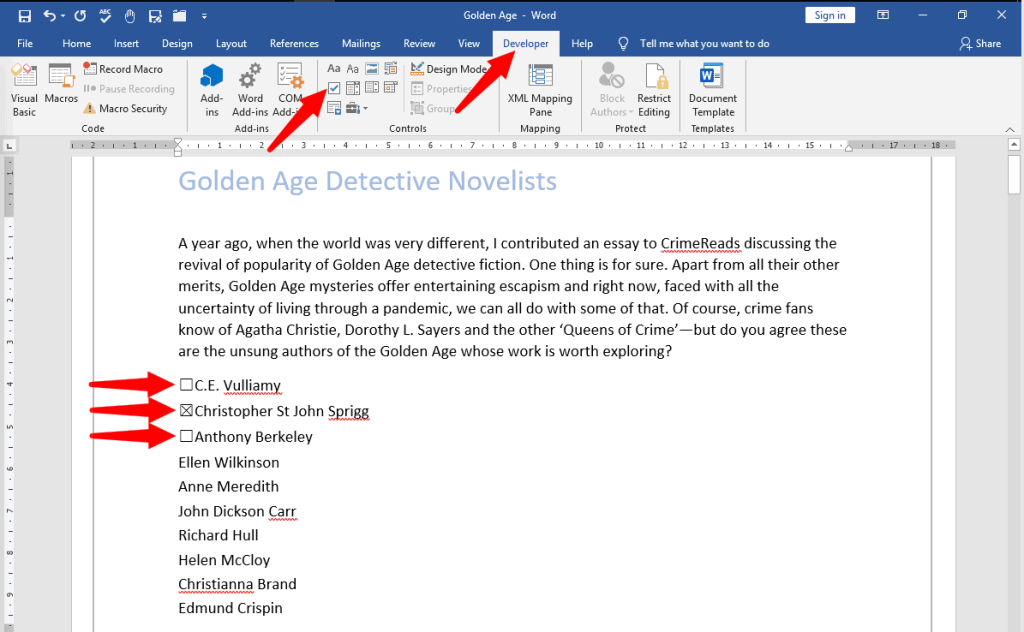
Go to Developer and select the Check Box Content Control at the beginning of the first line.

-
To change the default X to something else, see Make changes to checkboxes.
-
Copy and paste the check box control at the beginning of each line.
-
Select a checkbox to put an X (or other character) in the check box.
Add hanging indentation
If some list items are more than one line long, use hanging indents to align them.
-
Select the list. Bullets or numbers won’t look selected.
-
Go to Home and select the Paragraph dialog box launcher
. -
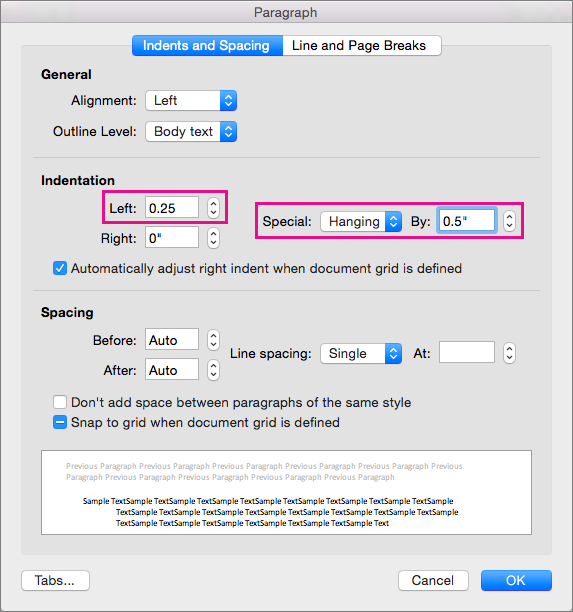
Under Indentation, in the Left box, type 0.25.
-
Under Special, choose Hanging.
-
For By, Word sets a default value of 0.5 inches. Change this if you want your additional lines indented differently.
-
Select OK when finished.
 .
.Lock the text and controls to prevent changes
-
Select the list and checkboxes.
-
Go to Developer >Group > Group.
To unlock the list, select the list and choose Group > Ungroup.
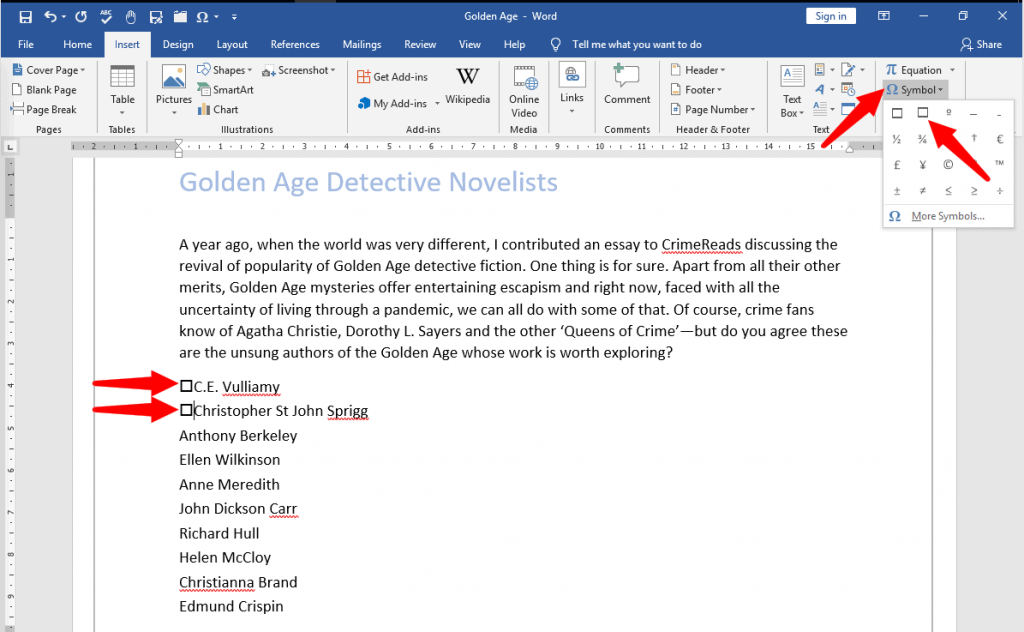
Create a print only list
-
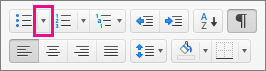
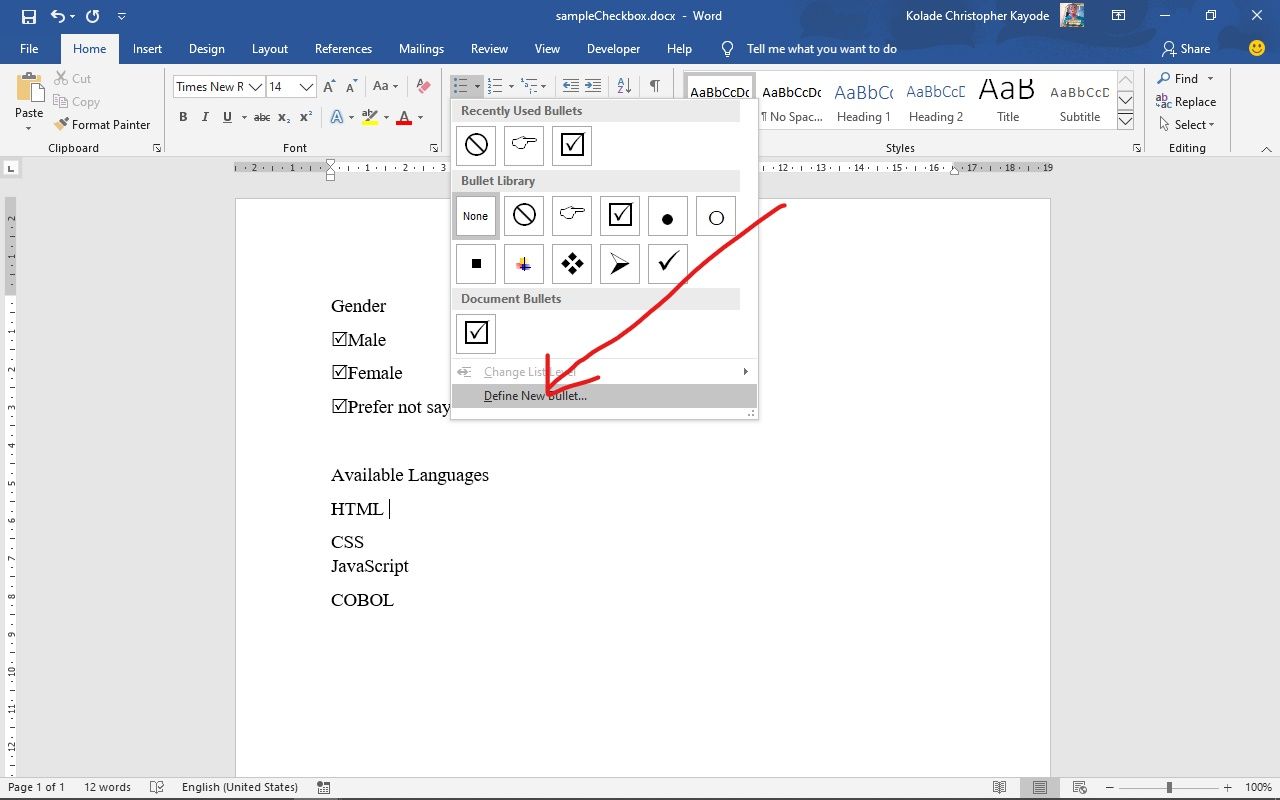
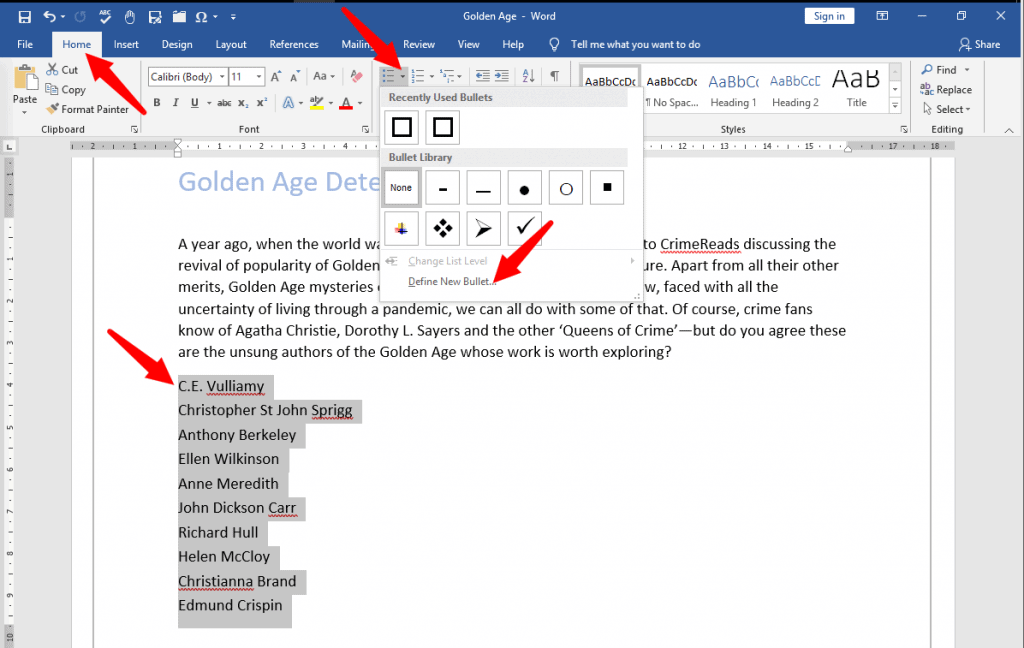
Go to Home and select the down arrow next to the Bullets button.
-
In the drop down menu, select Define New Bullet.
-
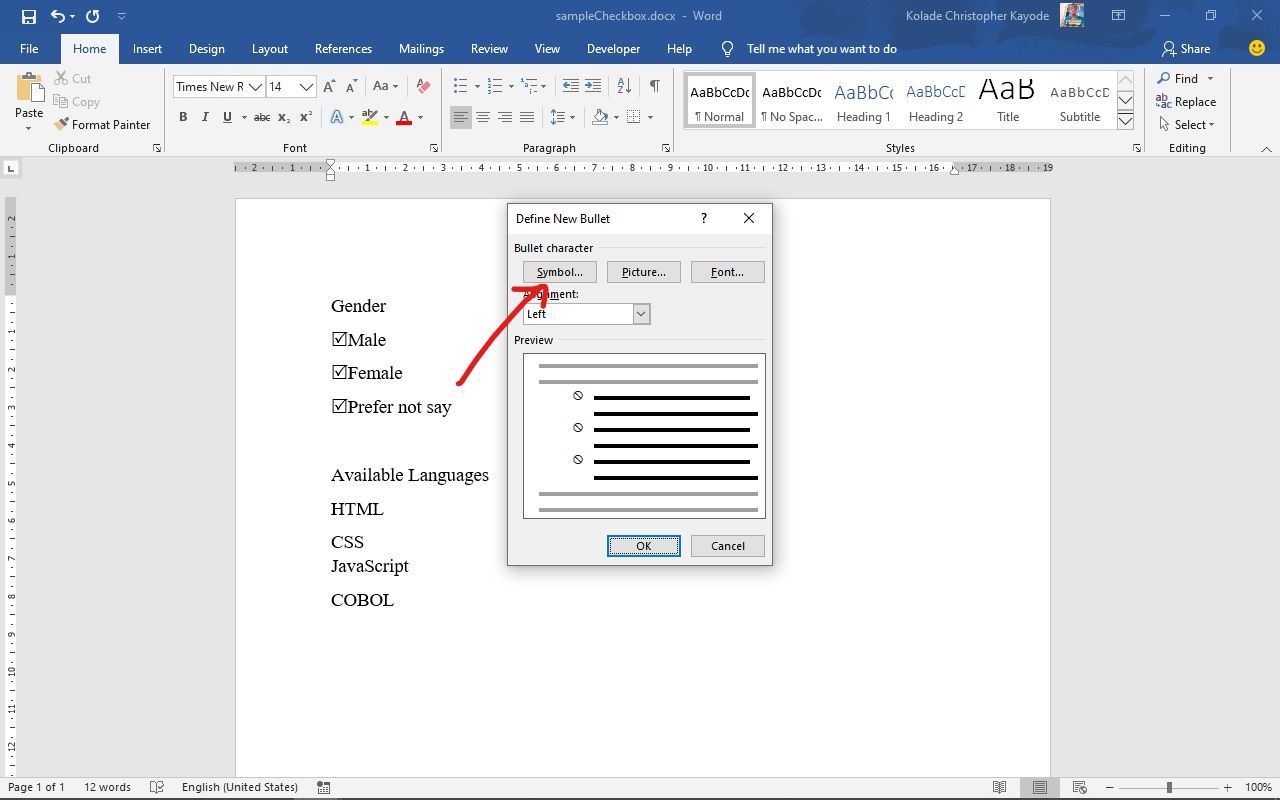
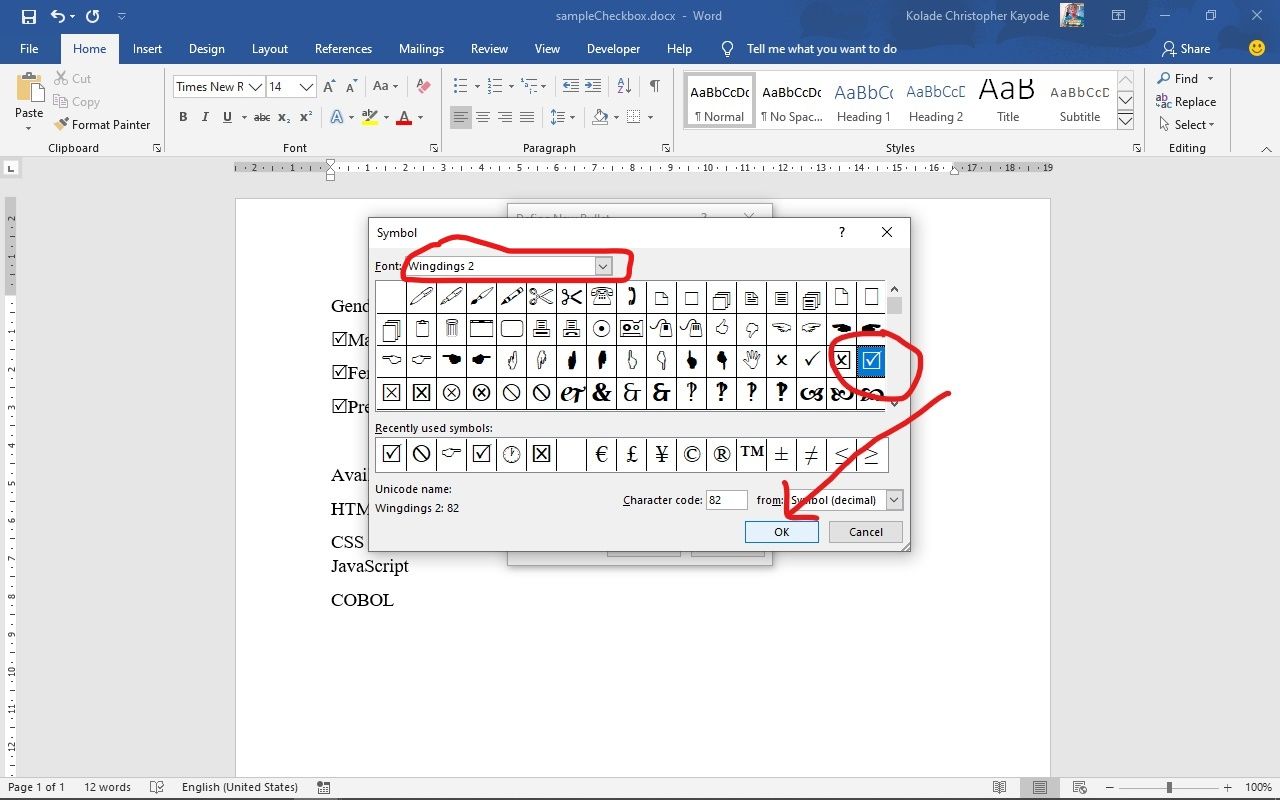
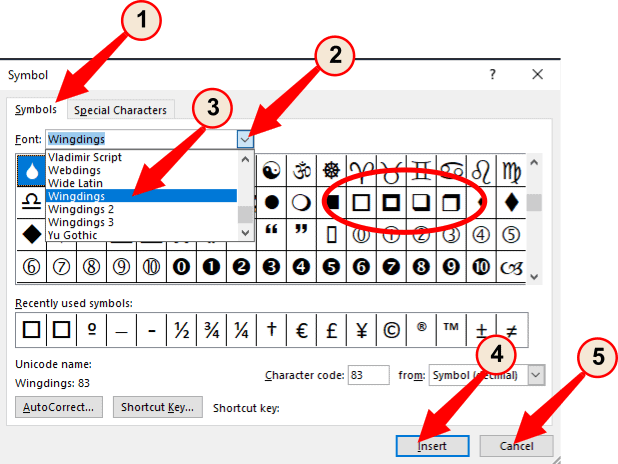
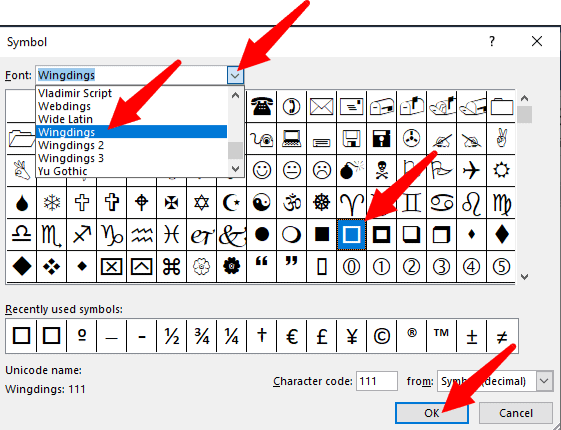
Select Symbol and find a box character. If you don’t initially see one, change Font to Wingdings or Segoe UI Symbol.
-
Select OK twice, and create your list.

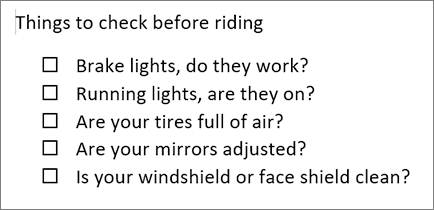
Make a checklist you can check off in Word
To create a list that you can check off in Word, add content controls for checkboxes to your document.
Show the Developer tab
For more info if the developer tab isn’t already visible in Word, see Show the Developer tab.
Make your list
-
Create your list.
-
Place you cursor at the start of the first line.
-
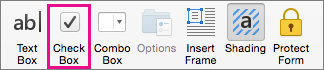
Go to the Developer tab, and then click Check Box.
-
If you want a space after the check box, press Tab or Spacebar.
Use a Tab character if you want to format the list item with hanging indentation, like Word applies to bulleted lists.
-
Select and copy (⌘ + C) the check box and any tabs or spaces.
-
Place the cursor at the start of the each list item, and paste (⌘ + V ) the copied check box and characters.
-
Paste the checkbox at the start of each line in your list.
Add hanging indentation
If some of the list items are longer than one line, use hanging indentation to align them.
-
Select the list.
-
Go to Format and select Paragraph.
-
Under Indentation, type 0.25 in the Left box.
-
In the Special list, choose Hanging.
For By, Word sets a default value of 0.5 inches. Change this if you want your additional lines indented differently.
Make a print only check list
You can replace the bullets or numbers in a list with another symbol, such as a box can be checked on a printed version of your document.
-
Select the entire list.
-
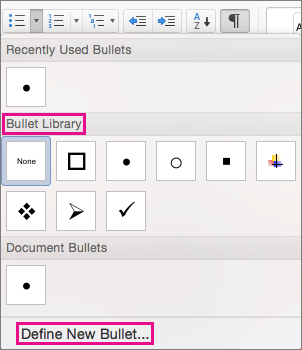
Select Home and select the arrow next to Bullets.
-
Select Define New Bullet.
-
Select Bullet, and choose a symbol from the table of symbols.
For more choices, in the Font box choose a symbol font, such as Wingdings.
-
Select a symbol to use, such as an open box (
) or a three-dimensional box (). -
Select OK, and then select OK again.
 ) or a three-dimensional box (
 ).
).Word for the web supports only the on-paper form of checklist.
-
Write your list, and then select it.
-
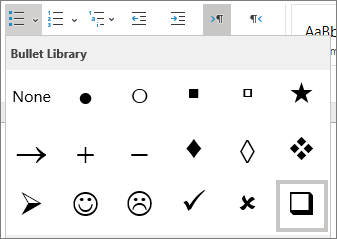
On the Home tab, choose the down-arrow next to the Bullets list to open the bullet library, and then choose the checkbox symbol.

First, you need to customize Word’s ribbon and enable the “Developer” tab to show the option to add check boxes. Then, select “Developer” and click the “Check Box Content Control” button to insert a check box into your document. You can also transform Word’s bullets into checkboxes.
When you create surveys or forms with Microsoft Word, check boxes make the options easier to read and answer. We’re covering two good options for doing just that. The first is ideal for documents that you want people to fill out digitally within the Word document itself. The second option is easier if you’re planning to print documents like to-do lists.
Option 1: Use Word’s Developer Tools to Add the Check Box Option for Forms
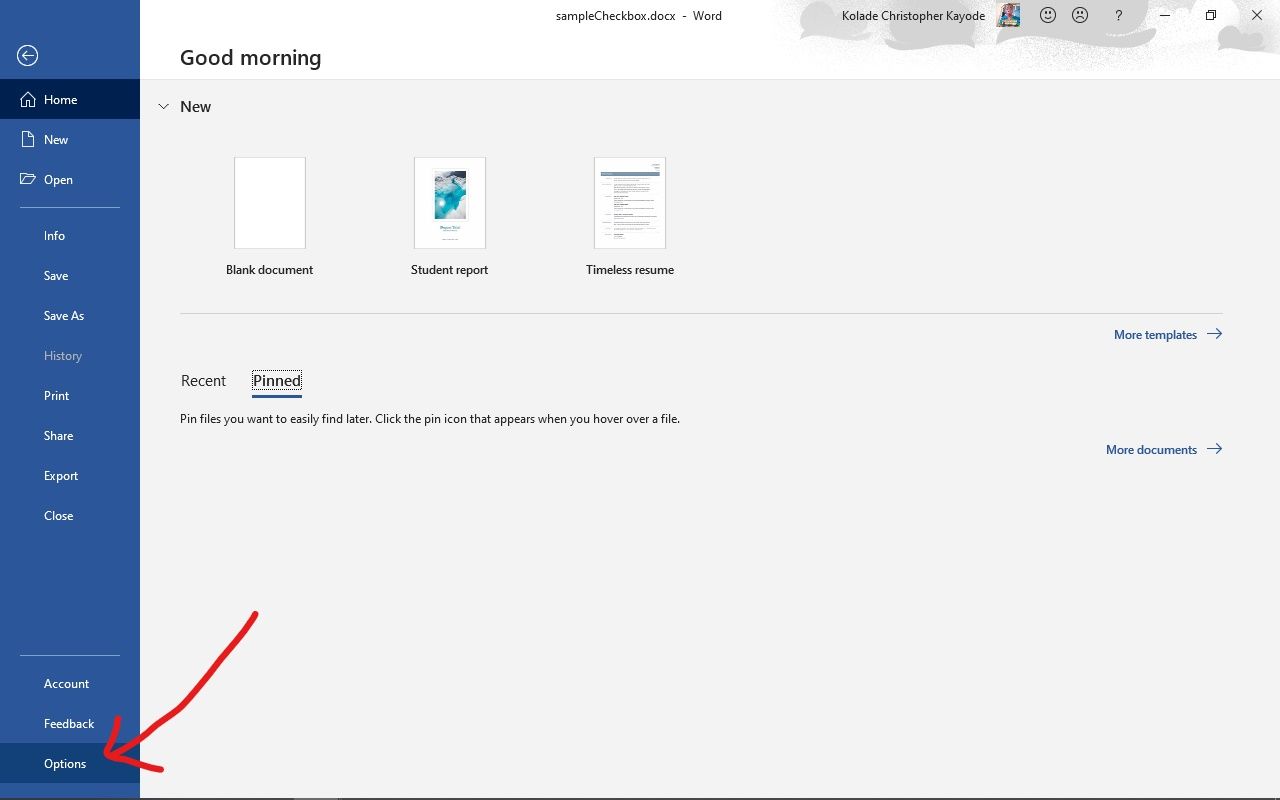
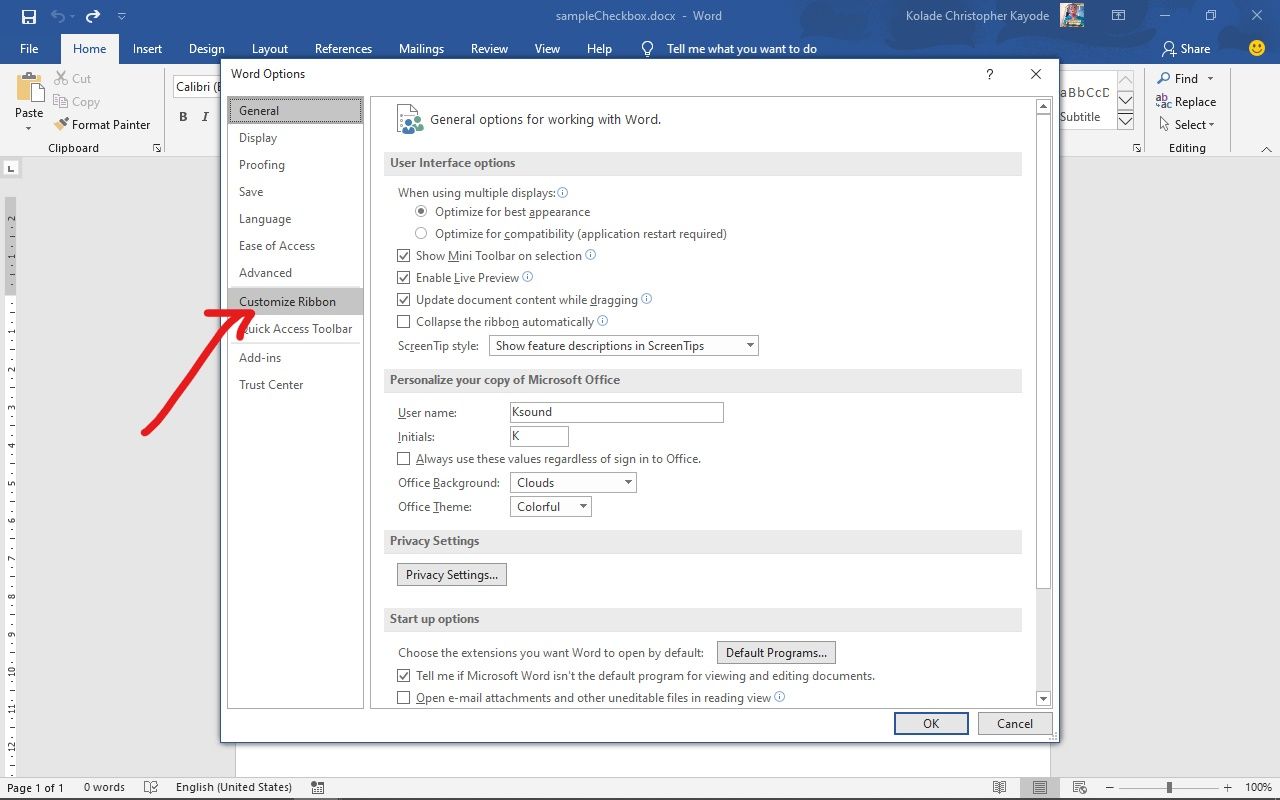
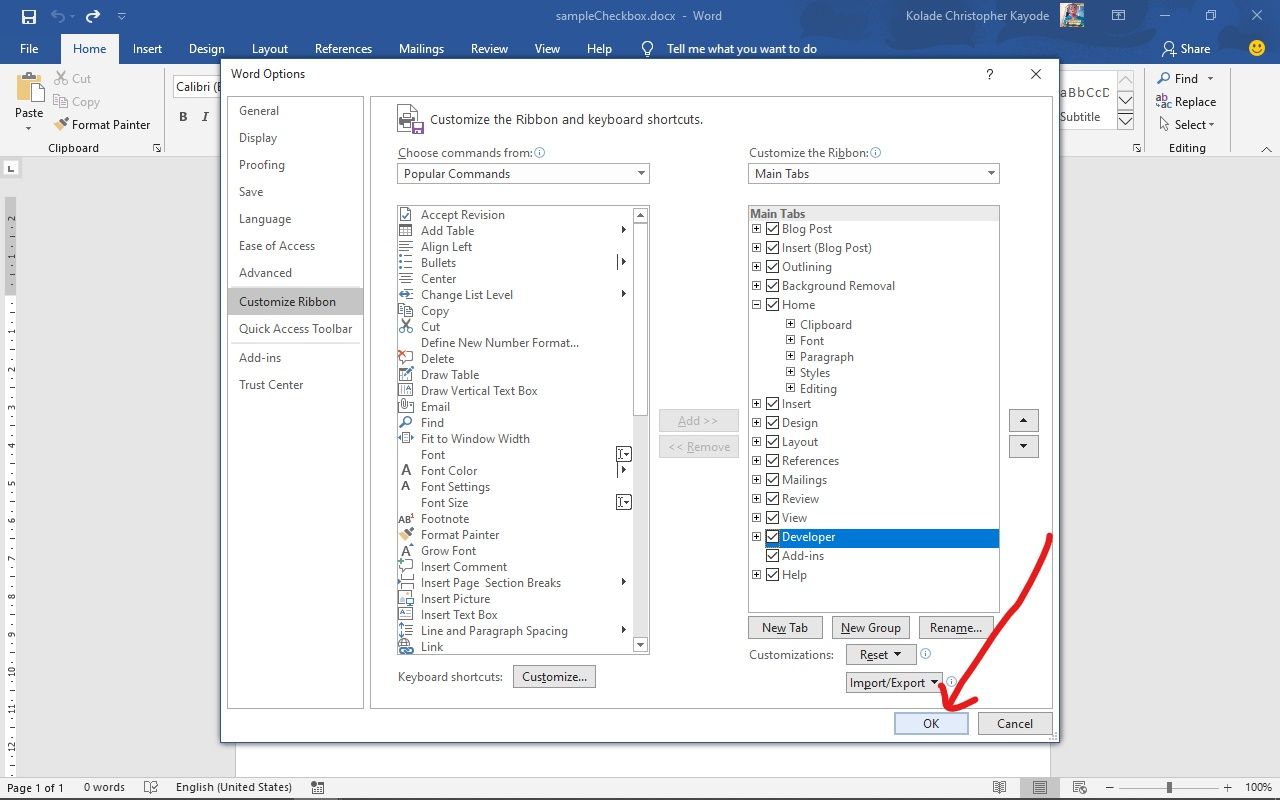
In order to create fillable forms that include checkboxes, you first need to enable the “Developer” tab on the Ribbon. With a Word document open, click the “File” drop-down menu and then choose the “Options” command. In the “Word Options” window, switch to the “Customize Ribbon” tab. On the right-hand “Customize the Ribbon” list, select “Main Tabs” on the dropdown menu.

On the list of available main tabs, select the “Developer” check box, and then click the “OK” button
Notice that the “Developer” tab is added to your Ribbon. Just position your cursor in the document where you want a check box, switch to the “Developer” tab, and then click the “Check Box Content Control” button.
You should see a check box appear wherever you placed your cursor. Here, we’ve gone ahead and placed a check box next to each answer and, as you can see, those check boxes are interactive. Click a box to mark it with an “X” (as we’ve done for answers 2, 3, and 4) or select the whole form box (as we’ve done for answer 4) to move the check box around, format it, and so on.
RELATED: How to Create a Fillable Form With Microsoft Word
Option 2: Change Bullets to Check Boxes for Printed Documents
If you’re creating a document to print out—like a to-do list or printed survey—and just want check boxes on it, you don’t have to mess around with adding Ribbon tabs and using forms. Instead, you can create a simple bullet list and then change the bullets from the default symbol to check boxes.
In your Word document, on the “Home” tab, click the small arrow to the right of the “Bullet List” button. On the dropdown menu, select the “Define new bullet” command.
In the “Define New Bullet” window, click the “Symbol” button.
In the “Symbol” window, click the “Font” dropdown and choose the “Wingdings 2” option.
You can scroll through the symbols to find the empty square symbol that looks like a check box, or you just type the number “163” into the “Character Code” box to automatically select it. Of course, if you see a symbol you like better—like the open circle (symbol 153)—feel free to choose that instead.
When you’ve selected your symbol, click the “OK” button to close the “Symbol” window, and then click the “OK” button to close the “Define New Bullet” window, too.
Back in your Word document, you can now type your bullet list. The check boxes appear instead of the regular bullet symbol.
And the next time you need the check box symbol, you don’t have to navigate through that whole set of windows. Just click that small arrow to the right of the “Bullet List” button again, and you’ll see the checkbox listed under the “Recently Used Bullets” section.
Again, this method is really only useful for documents you want to print out. The check box symbols are not interactive, so you can’t check them off inside a Word document.
If you’re also creating spreadsheets and presentations, you may want to learn how to insert checkboxes in Excel and add checkboxes to PowerPoint too.
RELATED: How to Add a Check Mark or Tick Mark in Word
READ NEXT
- › How to Add a Check Mark or Tick Mark in Word
- › How to Add a Drop-Down List to a Word Document
- › How to Create a Fillable Form With Microsoft Word
- › How to Create a Basic Survey in Microsoft Word
- › How to Count Checkboxes in Microsoft Excel
- › Get to Your Windows 11 Desktop: 7 Fastest Methods
- › Google+ Will Come to a Final End on July 5, 2023
- › Why the Right-Click Menu in Windows 11 Is Actually Good
![]()
Download Article
![]()
Download Article
Want to add a check box or tick box to a list or form in Microsoft Word? It’s easy to do, and you can even make it checkable so you can click the box with your mouse. We’ll show you an easy way to add a clickable checkbox using Developer Mode in Microsoft Word.
Steps
-
1
Open a new file in Microsoft Word. Do so by opening the app shaped like a blue W. Then click on File in the menu bar at the top of the screen, and click on New Blank Document.
-
2
Click on File in the menu bar and then Options in the menu.
- On Mac, click on Word in the menu bar and then Preferences… in the menu.
Advertisement
-
3
Click on Customize Ribbon and then Main Tabs in the «Customize the Ribbon:» drop-down menu.»[1]
- On Mac, click on Ribbon & Toolbar in the «Authoring and Proofing Tools» section of the dialog box, then click on the Ribbon tab at the top of the dialog box.
-
4
Check «Developer» in the «Main Tabs» pane.
-
5
Click on Ok.
-
6
Click on Developer. It’s a tab in the upper-right part of the window.
-
7
Position the cursor where you’d like to insert the check box.
-
8
Click on Check Box. It’s in the menu bar at the top of the window.
-
9
Add additional check boxes and text as needed.
-
10
Lock the form. To do so, select the entire list, to be found in the Controls section on the Developer tab, then click on Group and Group.
- On Mac, click Protect Form in the Developer tab toolbar.


Advertisement
Add New Question
-
Question
What should I do if the check box is grayed out in my ribbon?

It is grayed out for me too. However, if you click on the one icon that isn’t — Legacy Tools — then you will find the exact same checkbox, which you should be able to select.
-
Question
How can I enlarge the size of a text box without enlarging the text?
In Word, just dragging the corner of the text box should be sufficient. If the text changes size accidentally, you can always highlight it and change it back to the desired size.
-
Question
How do you make a drop box in word?
Download LibreOffice. Follow the manual on how to add a list or list/add or list/multiselect box (or just look under «insert» in the menu). You can add a data source for the dropdown menu items from a database, a spreadsheet or within the file structure itself.
See more answers
Ask a Question
200 characters left
Include your email address to get a message when this question is answered.
Submit
Advertisement
Thanks for submitting a tip for review!
About This Article
Article SummaryX
1. Open a document.
2. Click File.
3. Select Customize Ribbon and then click Main Tabs.
4. Check the «Developer» box.
5. Click Save.
6. Click Developer.
7. Click where you want to insert the check box.
8. Click Check Box.
9. Add additional boxes and text.
10. Lock the form.
Did this summary help you?
Thanks to all authors for creating a page that has been read 1,240,190 times.
Is this article up to date?
Last Updated: April 20, 2022 | Author: howto-Trust
Contents
- 1 How do I insert a fill in checkbox in Word?
- 2 How do I fill a checkbox with color in Word?
- 3 How do I make a check box editable in Word?
- 4 How do I check a box in Word 2010?
- 5 How do I add a check box in Pages?
- 6 Can you make a fillable form in Word?
- 7 How do I check a box in Word 2020?
- 8 How do I fill a checkbox in Word 2016?
- 9 How do I check a box in Word Mac?
- 10 How do you insert boxes in Word?
- 11 How do I create a check box in Word 2021?
- 12 How do you check and uncheck boxes in Word?
- 13 How do I insert a 2×2 box in Word?
- 14 How do I check a box in Word 365?
How do I insert a fill in checkbox in Word?
How do I fill a checkbox with color in Word?
To change size, color, or border style of the check box, select the Use a style to format text typed into the empty control box, and then click New Style. Under Formatting, select a font size for the check box. In the Color list, select a color. To select a different border, select Format > Border.
How do I make a check box editable in Word?
Just position your cursor in the document where you want a check box, switch to the “Developer” tab, and then click the “Check Box Content Control” button. You should see a check box appear wherever you placed your cursor.
How do I check a box in Word 2010?
Click in the document where you want the check box. Activate the Developer tab, then click on the check box in the Controls group. This will insert a check box that the user can tick and clear.
How do I add a check box in Pages?
Select Symbol from the options on your screen. You should see various symbols that you can use in place of regular bullets. Scroll down this list, find a checkbox icon, click it, and hit OK at the bottom. Click OK once again and you should see a checkbox in your document.
Can you make a fillable form in Word?
You can create the form with the desktop version of Word with the instructions in Create a fillable form. When you save the document and reopen it in Word for the web, you’ll see the changes you made.
How do I check a box in Word 2020?
How do I fill a checkbox in Word 2016?
How do I check a box in Word Mac?
How do you insert boxes in Word?
Add a text box
- Go to Insert > Text Box.
- Click in your file where you’d like to insert the text box, hold your mouse button down, then drag to draw the text box the size that you want.
- After you’ve drawn the text box click inside it to add text.
How do I create a check box in Word 2021?
How do you check and uncheck boxes in Word?
If you want to check or uncheck the checkbox with a simple click within the Word document, use a content control.
…
To display the Developer tab, if necessary, do the following:
- Right-click anywhere on the ribbon’s background and choose Customize the Ribbon.
- Check the Developer item in the list to the right.
- Click OK.
How do I insert a 2×2 box in Word?
Click the Insert tab and then click Pictures. Select the photo that you want to turn into a 2×2 picture. Click the Insert button to insert the picture into your Word document. You can also copy the picture (Ctrl + C) and paste it into your Word document (Ctrl + V).
How do I check a box in Word 365?

In Microsoft Word, you can create digital forms, surveys, to-do lists, and printable forms. And you might need to add a checkbox in these forms so your respondents can select certain options.
In this tutorial, I will show you how to insert an interactive checkbox in Microsoft Word for softcopy documents, and a non-interactive checkbox for hardcopy (printed) documents. Then you can start using them in your forms, surveys, and lists.
I will be using the Microsoft Word 2016 desktop app in this guide because it’s my personal preference. If you are using a different version, things may not be entirely the same, but you can still follow along.
How to Insert a Checkbox in Softcopy Documents like Digital Forms and Surveys
To insert a checkbox in a softcopy document (like forms and surveys that you want respondents to fill out digitally within the Word document), you’ll use the Developer tab in the menu bar.
Unlike other tabs such as File, Home, Insert, Design, and so on, the Developer tab doesn’t appear in the menu bar by default. So I will start this guide by walking you through how to show the Developer tab in the menu bar.
How to Show the Developer Tab
To show the Developer tab in the menu bar, first click on “File”:

Next, click “Options”:
Then select “Customize Ribbon” in the pop up that shows up:
Under “Main Tabs”, check the “Developer” option:

Finally, click “Ok”:
How to Insert the Checkbox in your Word Document
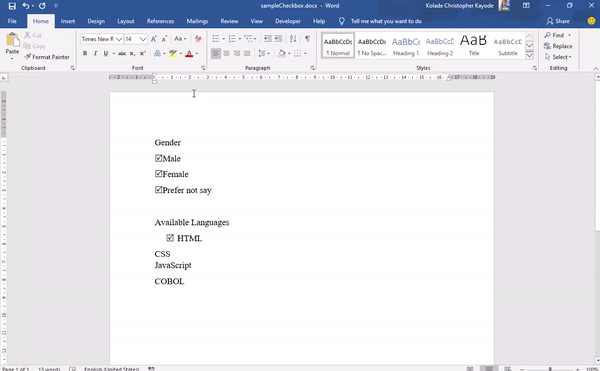
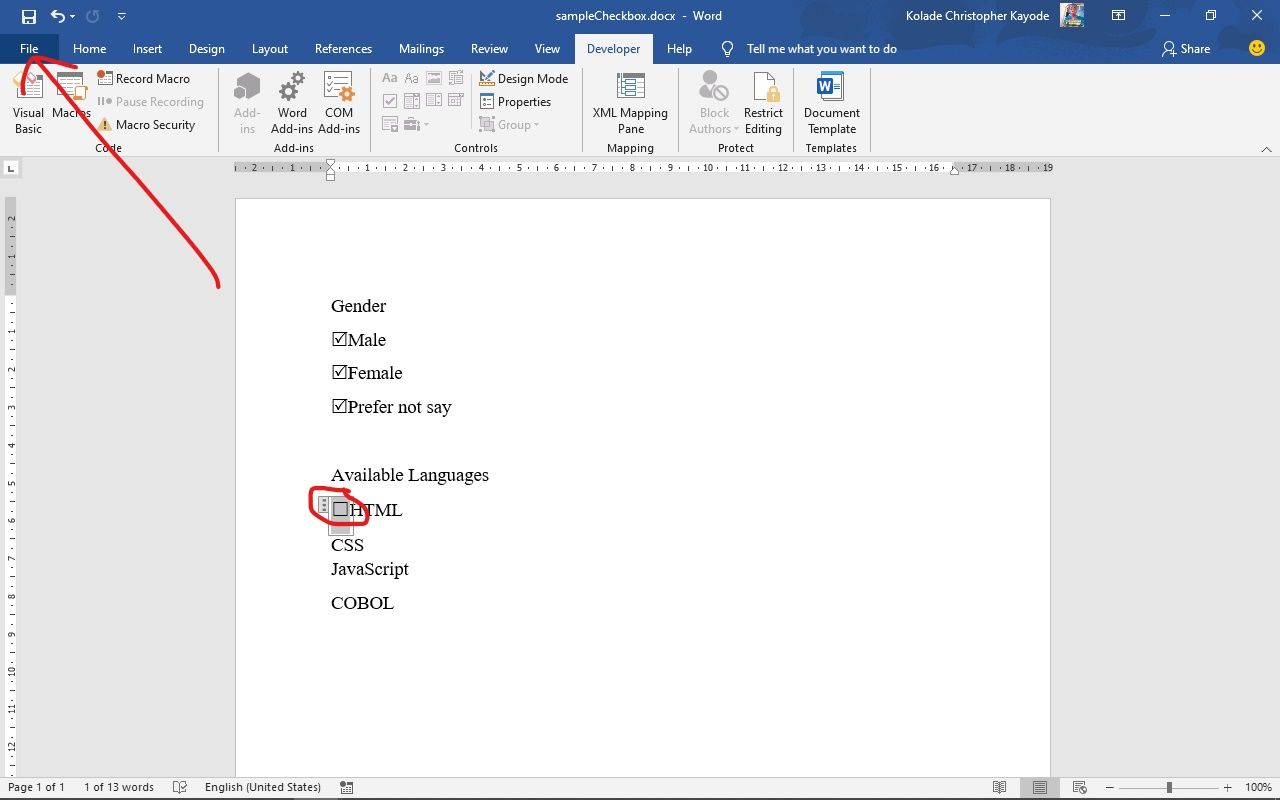
First, place the cursor where you want to insert the checkbox.
Next, click on the Developer tab in the menu bar. You will see options such as Add-ins, XML Mapping Pane, and some others (you will not see their names until you hover on them).
Hover on the one that has a checkmark and select it.
This will insert your checkbox.
How to Change the Icon of the Checked State of the Checkbox
The checkbox becomes interactive immediately after you insert it. The only problem is that an «X» appears by default in the checked state, and you might want a checkmark instead of this.
So now I’m going to show you how to change the X to a checkmark.
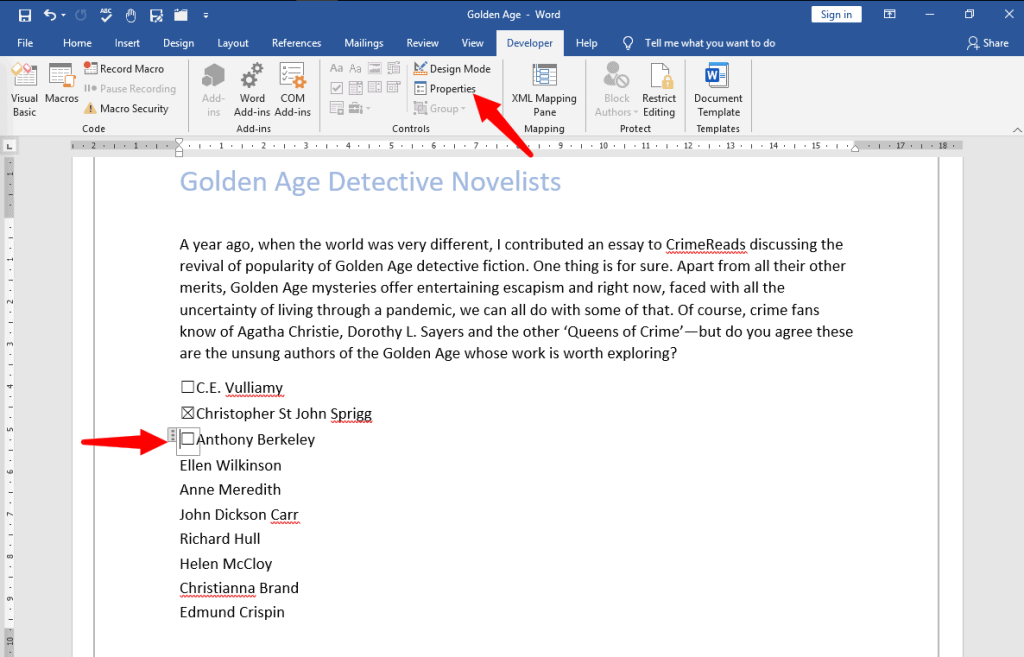
Step 1: Select the checkbox, or place the cursor right next to it:

Step 2: Click on the Developer tab and select “Properties”:

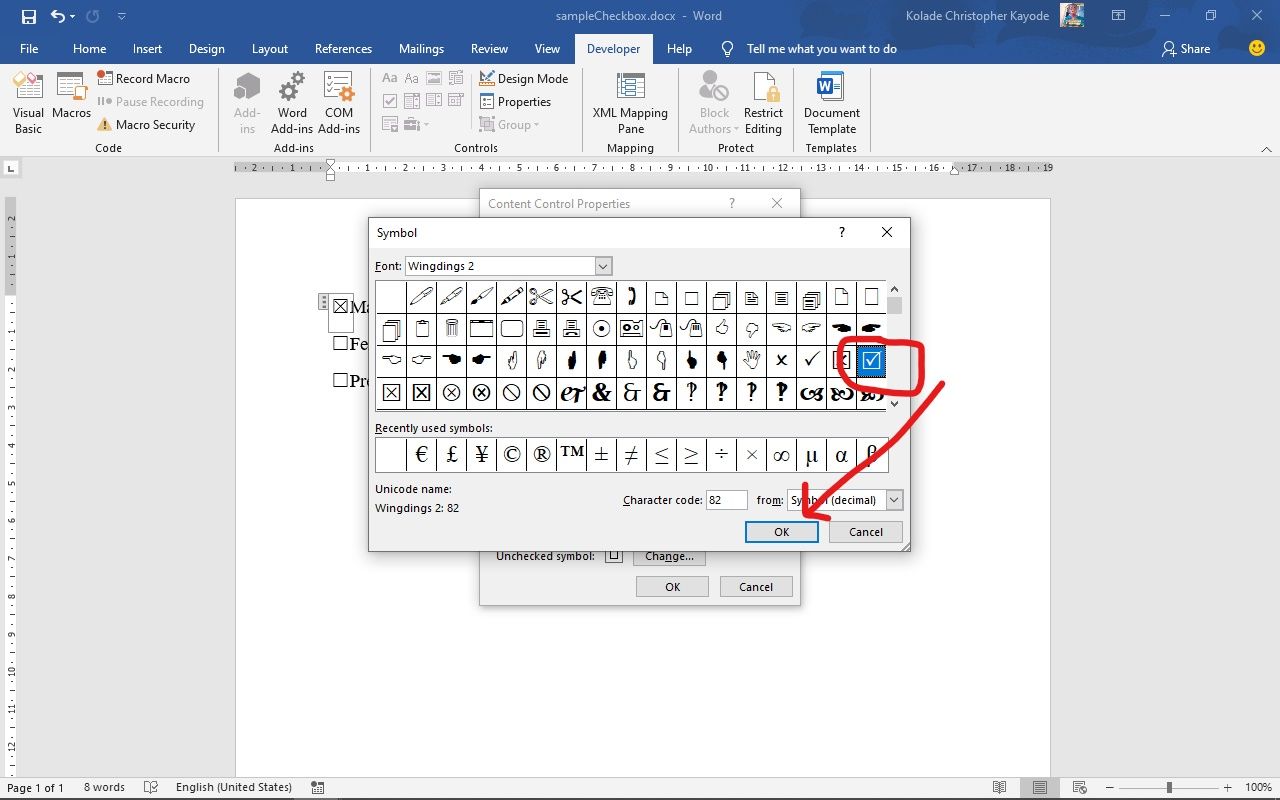
Step 3: You will see the default symbols for checked and unchecked symbols. Right next to the “Checked Symbol”, click “change”.
Step 4: In the popup that shows up, look for “winding2” under font and select it. You will see the common checkmark icons used for the checked state of checkboxes. Just select one of them and click “Ok”, then “Ok” again.
Below is a gif demonstrating how to change the checked icon:

You can follow the same process to change the unchecked state, as I’ve shown below:

How to Remove the Bounding Box of the Checkmark
Another way you can make the checkbox look better and make it user-friendly is to remove the bounding box that appears when it is checked or unchecked, and when the cursor is placed on it.
Step 1: Place the cursor on the checkbox.
Step 2: Select the Developer tab in the menu bar and click on “Properties”.
Step 3: Right next to “Show as”, click the dropdown and select “None”.
Thee 3 steps above are demonstrated in the animated gif below:
How to Insert a Checkbox in Hardcopy (Printed) Documents
If you are dealing with printed documents, you don’t need to dabble around with the Developer tab to insert a checkbox. Instead, you can define a custom bullet point for the purpose.
Step 1: Make sure you are on the Home tab of the menu bar.
Step 2: Click the Bullets dropdown icon:

Step 3: Click “Define new bullet”:
Step 4: Select «Symbol» in the popup that shows up:
Step 5: Select «Winding2» as the font.
Step 6: Choose the checkmark Icon and click “Ok”, then “Ok” again:
This is how its all done:
How to Create a Shortcut to Add an Interactive Checkbox in Word
If you want to continue inserting more interactive checkboxes, you don’t need to waste time by doing it from the Developer tab all the time. You can create a shortcut with the steps below.
Step 1: Make sure the checkbox is being shown as a bounding box.
Refer to the steps under the «Remove the Bounding Box” part of this tutorial to get a refresh on how to do this.
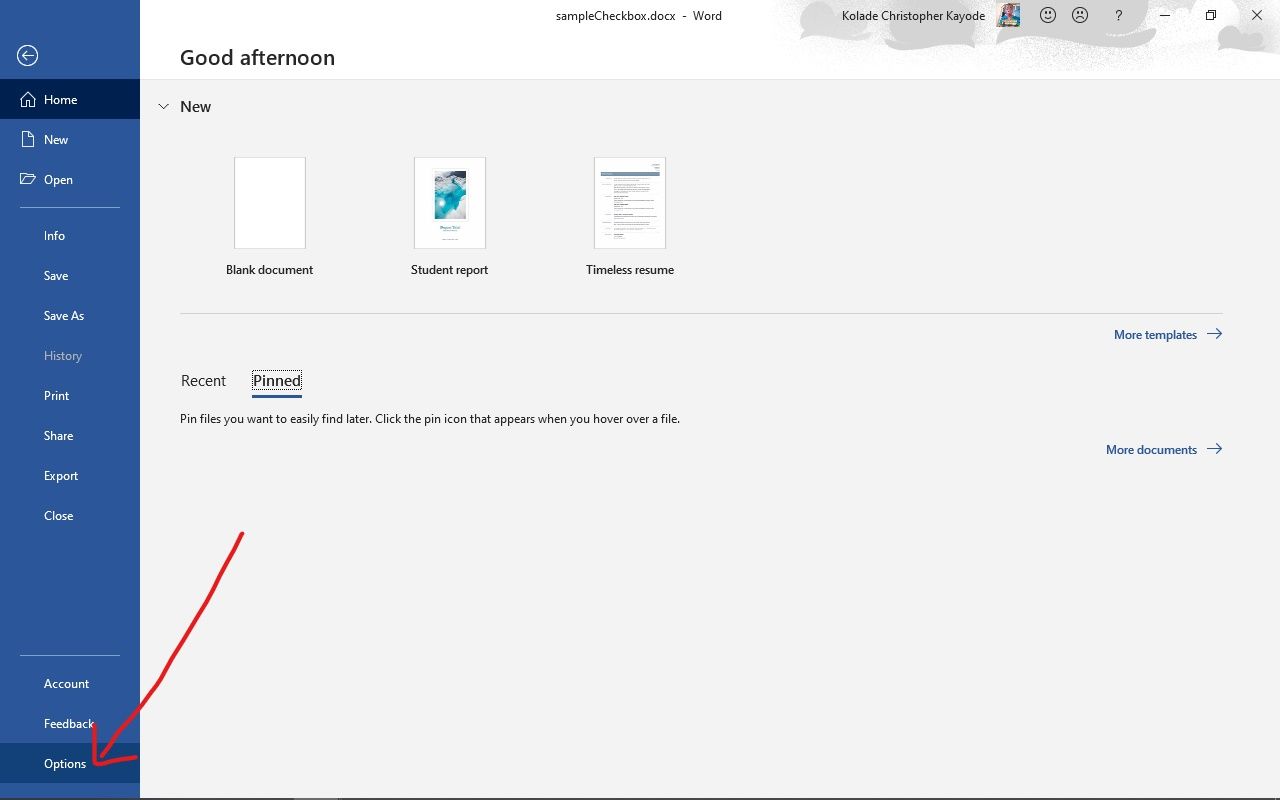
Step 2: Highlight the checkbox and click on the File tab of the menu bar:
Step 3: Click on “Options”:
Step 4: Select “Proofing” in the popup that comes up and click on “Autocorrect Options”:
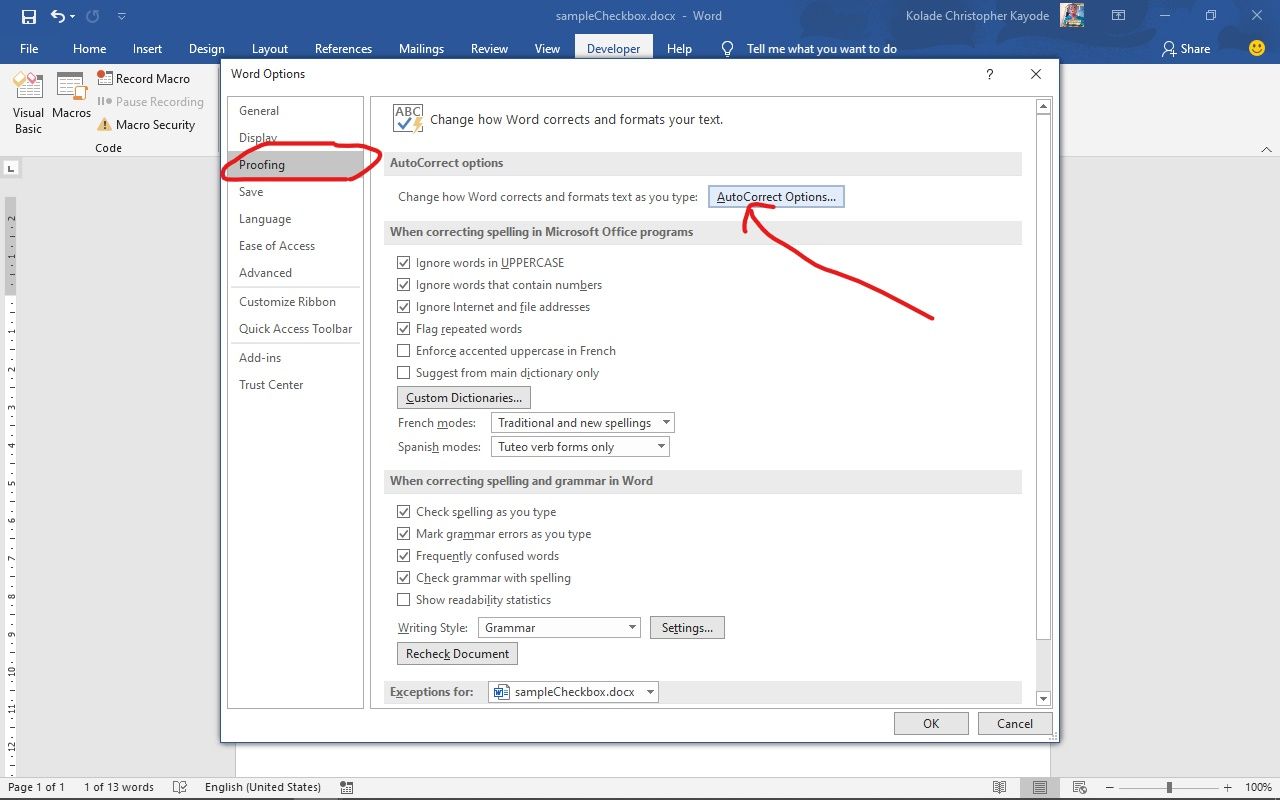
Step 5: You should see several options checked. Make sure “Replace text as you type” is checked too.
Step 6: In the editor under “Replace”, type in the shortcut you would like to use to insert checkboxes and click “Add”. Click “Ok” and “Ok” again.
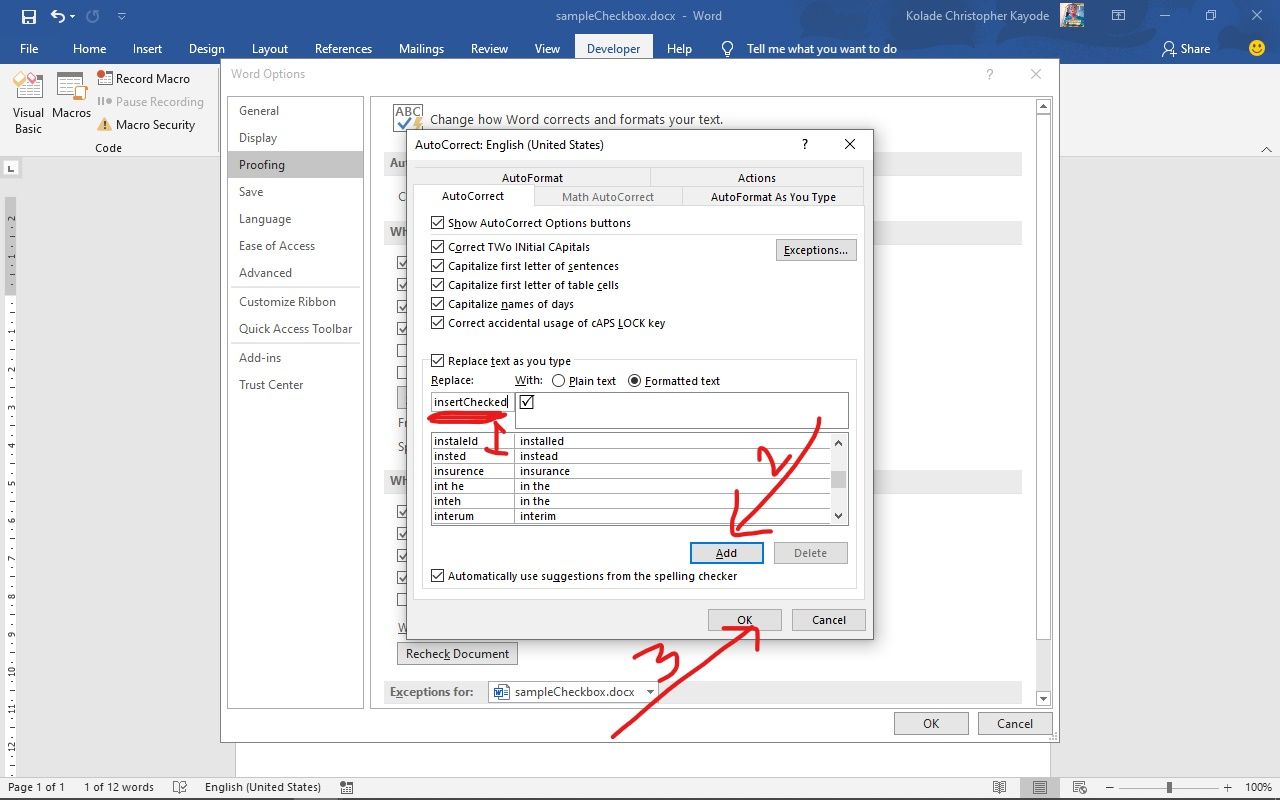
Now, to insert a checkbox, you can simply type the word you entered in step 6 and hit the space bar.
Conclusion
Checkboxes often play a crucial role in data collection using softcopy and printed documents. I hope this tutorial helped you understand how they work.
In this guide, you learned how to insert an interactive checkbox for fillable digital documents such as forms and surveys, and insert a non-interactive checkbox in printed documents.
Thank you for reading, and have a nice time.
Learn to code for free. freeCodeCamp’s open source curriculum has helped more than 40,000 people get jobs as developers. Get started
When you create forms or a survey with Microsoft Word, there are two ways you can get people to interact with it.
You can either print it and give it to them to read and fill in or you can ask them to read and answer it online.
In both cases, checkboxes are a great help to get feedback from your audience.
When used with a printout, your audience has the option of filling in the checkboxes with a pen or a pencil to add a cross or a tick mark to signify their disagreement or consent.
This type of checkbox is a visual symbol only, non-interactive and non-clickable, useful only when printed.
When online, you can present them with a digital document with functional or clickable checkboxes pre-filled with either a cross or a tick mark, and your audience has to click on the checkbox to toggle its contents to match their answer.
Microsoft Word allows you to insert both types of checkboxes in your document, and we will show you the two methods for inserting.
However, your document may have a long list making it tedious to insert checkboxes individually.
You may want to have a bulleted list with checkboxes acting as the bullets. However, Word allows you to have a bulleted list with only non-interactive checkboxes, but not with interactive checkboxes. Therefore, we will show you how to insert:
- A single non-interactive checkbox
- A bulleted list of non-interactive checkboxes
- Interactive checkbox
Let’s start.
Method #1: Insert a Single Non-Interactive Checkbox
Step #1: Open your Word Document
Open the Word document that contains the form or survey to which you wish to add non-interactive checkboxes.
Step #2: Open Symbol Dialog
Position the cursor where you want the first checkbox to appear. Click on the Insert tab in the top menu bar to change the ribbon. Click on Symbol to open a group of symbols and then on More Symbols to open the Symbol Dialog.
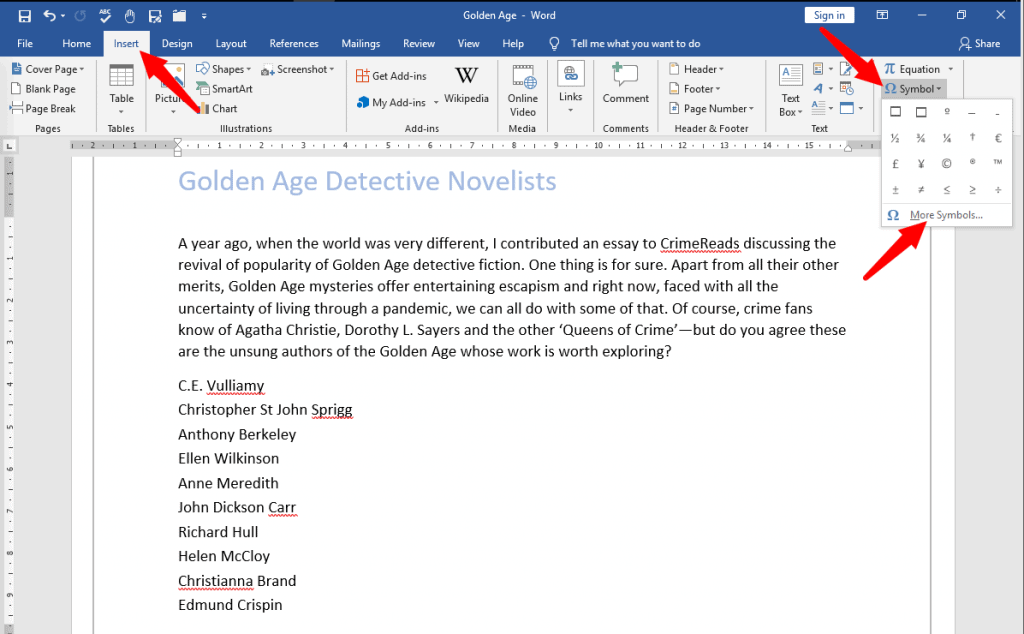
Step #3: Choose the Checkbox
Under the Symbol [1] tab, click on the down arrow on the right side of Font[2] and select Wingdings [3]. Word will display a large number of symbols, from which you can select the type of checkbox you prefer to use in your document. Click on Insert [4] to insert the checkbox symbol into your document. Click on Close [5] to close the Symbol Dialog. From now on, your chosen checkbox appears within the group of symbols under Symbol.
Step #4: Insert another Checkbox
Place the cursor where you want to insert the next checkbox. Click on Symbol under Insert tab (refer Step #2), and click on the checkbox symbol from within the group of symbols on display. This is how your document will now look like.
Method #2: Insert a Bulleted List of Non-Interactive Checkbox
Step #1: Open your Word Document
Open the Word document that contains the form or survey to which you wish to add non-interactive checkboxes. Select the list.
Step #2: Define a new bullet
Click on the Home tab on the top menu bar to change the ribbon. Within the section Paragraph, click on the small triangle beside Bullets to open the Bullet Library. Click on Define New Bullet at the bottom. This will open a Define New Bullet Dialog.

Step #3: Choose the checkbox
Click on the Symbol tab to open the Symbol dialog. Click on the down arrow on the right side of Font, and select Wingdings. Word will display a large number of symbols, from which you can select the type of checkbox you prefer to use in your document. Click on Ok, and you will return to the Define New Bullet dialog.
Step #4: Insert bulleted checkbox
Click on the down arrow under Alignment, and choose where you want to place the checkboxes in the gap preceding the list—on the left, centered, or on the right side. Click Ok to allow Word to place the checkboxes before the list.
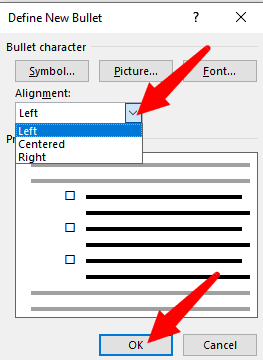
This is how your document will now look like. Word has inserted a non-interactive checkbox against all entries in the list.
Method #3: Insert Interactive checkbox
Step #1: Open your Word Document
Open the Word document that contains the form or survey to which you wish to add interactive checkboxes. Place the cursor at the location where you want the checkbox to appear.
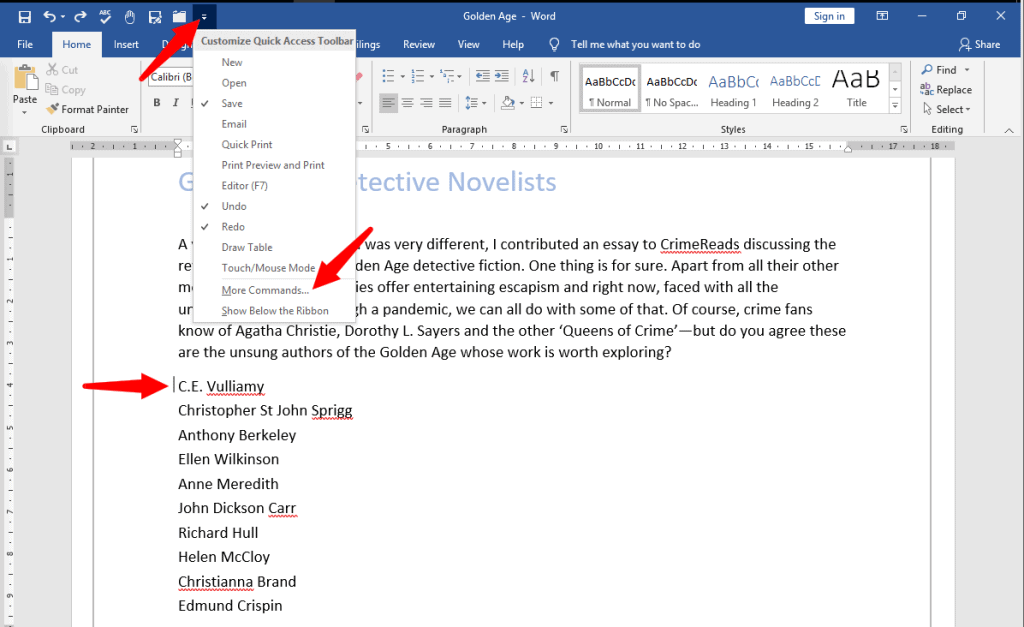
Step #2: Enable Developer Mode
Click on the small triangle in the Quick Access Toolbar to display a drop menu to Customize Quick Access Toolbar. Click on More Commands to open the Word Options dialog.
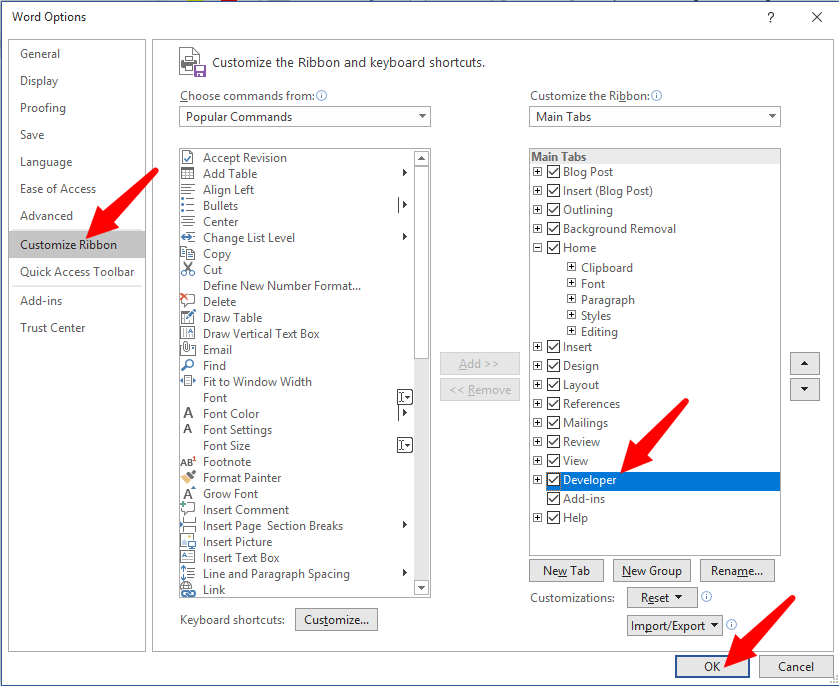
Click on Customize Ribbon. In the right column, under Customize the Ribbon, click on Developer, making sure a tick-mark appears on the checkbox immediately on the left. Click on Ok to close the dialog. Notice that Word has added a checkbox at the cursor position.

Notice that Word has also added a new tab Developer in its top menu bar.
Step #3: Insert the checkbox
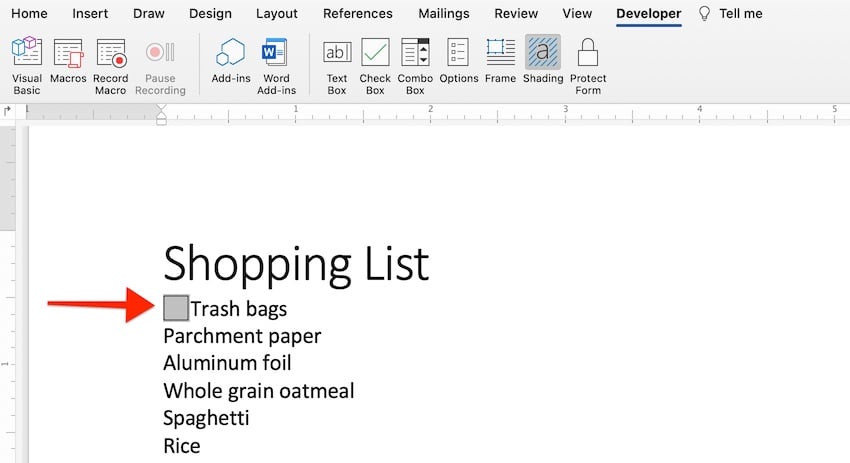
Click on the Developer tab in the top menu bar to change the ribbon. Within the Controls section, click on the Check Box Content Control. You can place additional checkboxes at positions of your choice by placing the cursor there, and clicking on Check Box Content Control for inserting each checkbox.

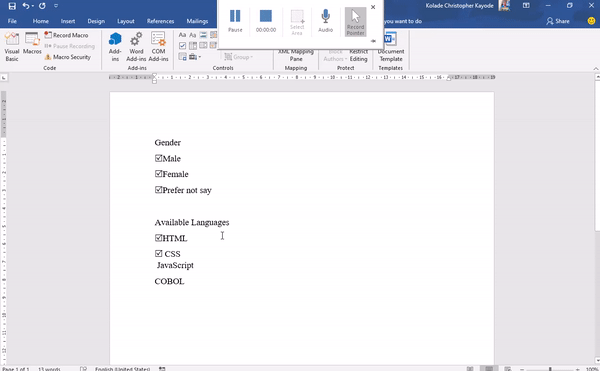
Finally, this is how your document may look like. If you click on any checkbox repeatedly, its contents will change from blank to a cross and back.
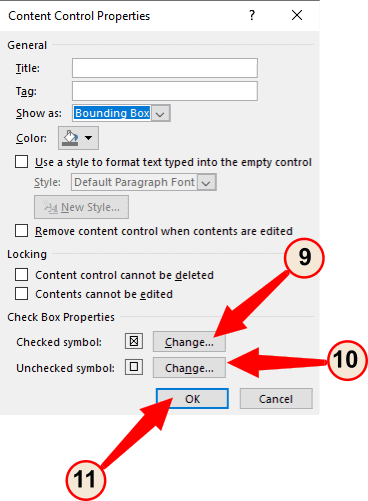
Step #4: Modify the checkbox content properties
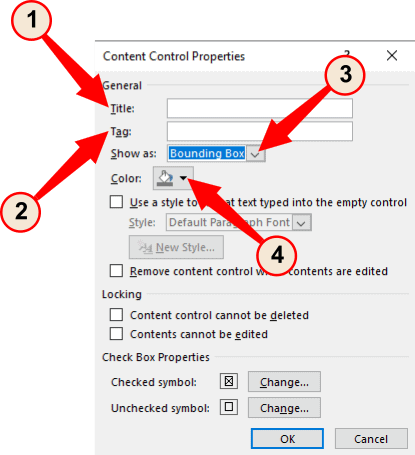
Word allows you to choose the default content of the interactive checkbox from blank, cross, and tick-mark. To modify a specific checkbox, click on it and then click on Properties within the Control section of Developer tab. This will open a Contents Control Properties dialog.
The Contents Control Properties dialog allows changing several properties of the selected checkbox. Under General, you may assign a Title [1] and a Tag [2] to the checkbox. You may also choose to Show as a Bounding Box, Start/End Tag, or as None [3]. You may also choose the color of the checkbox [4].
You may also choose to select your own text to appear within the checkbox [5] rather than a cross or tick-mark. You may also choose to make the checkbox contents blank when edited [6]. If necessary, under Locking, you can also choose to disallow deleting a checkbox [7] or prevent its contents from changing [8].
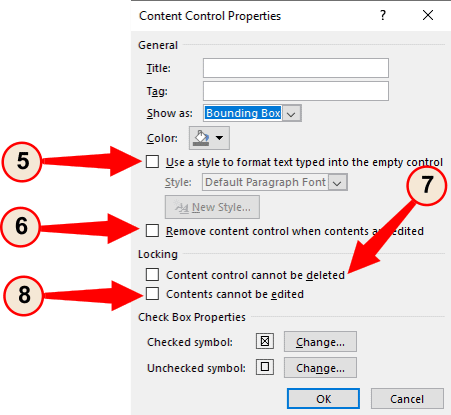
Under Check Box Properties, Word allows you to change the Checked Symbol [9] and the Unchecked Symbol [10]. Clicking on any of the Change tabs will take you to the Symbol Dialog, from where you can choose the Winding symbol of your preference (Refer Step #3 under Method #2). Click on Ok [11] to exit the dialog.
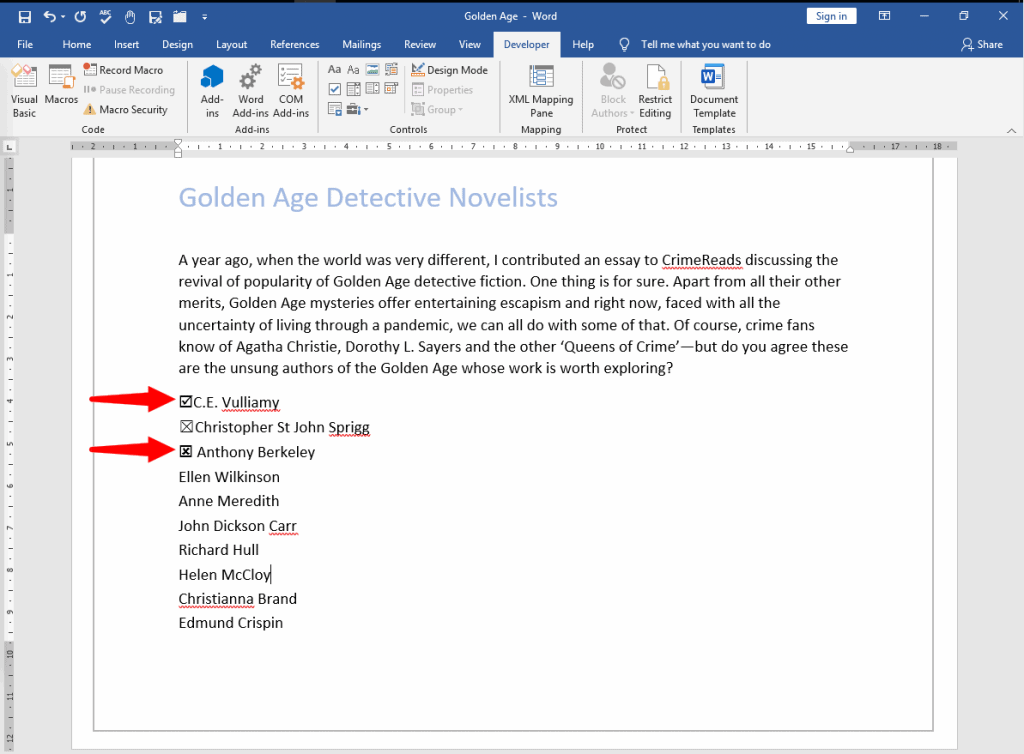
Finally, your document may look like this. Notice that items 1 and 3 have modified interactive checkboxes.
Conclusion
Obtaining feedback from your audience through forms or surveys is always easier when they have to check a few boxes, rather than express their answers. Word allows inserting checkboxes against a list of items, and allows the choice of presenting a printout or digital document to your audience for their feedback. We have shown you how to insert checkboxes in your document in a few simple steps.
You’ll find them on sticky notes and hospital clipboards. They’re used in commercial kitchens and classrooms. They can save you time and save lives. I’m talking about the humble checklist.
Do you need to insert a check box in Word? This tutorial shows you how to add a Microsoft Word checkbox.


If you’re interested in productivity and efficiency, you probably use checklists regularly. Checklists are essential to help you remember things and stay organized. They’re also useful for making complicated tasks more manageable.
In this article, you’ll learn how to add a check box in Word that can be used in two ways:
- printed out and marked on paper
- shared digitally and marked right inside Microsoft Word
You may also decide to use a Word template with a checklist built in. Premium templates for Word are created by professional designers. So the big design and layout decisions have already been made for you. In this case, the steps below will come in handy as well, if you want to change or customize a Microsoft Word checklist within a template.
How to Make Checklists With Check Boxes in Microsoft Word Quickly (Video)
In this video, we’ll show you how to use Microsoft Word to create a checklist with check boxes. You’ll start with a pre-designed template and learn how to customize it for your needs.

To learn even more about how to use checklists in Microsoft Word, or if you’re looking for the best templates to convert to checklists, keep reading.
3 Good Reasons to Use Checklists
If you’ve only ever used a to-list, it may come as a surprise that checklists have at least three different uses:
- To remember items. Your reliable to-do list falls under this category. A grocery list is another example of a checklist used to remember things.
- To remember items in the right order. Sometimes it’s not enough to remember a list of items. You need to remember them in a specific sequence as well, such as the steps for a procedure, recipe, or instructions. An example of this is a checklist of steps to assemble furniture.
- To make sure that specific requirements or criteria are met. Finally, checklists are used to ensure that a set of requirements are met. For example, if you were shortlisting a set of job candidates, you could use a checklist of the minimum requirements for the job to assess each candidate.
Checklists are so powerful that, according to Atul Gawande in The Checklist Manifesto, in complex lines of work like surgery or flying an airplane, good checklists
“…by remaining swift and usable and resolutely modest, they are are saving thousands upon thousands of lives.”
Whether you need to create a life-saving checklist or a mundane one, you’ll follow the same steps for creating checklists in Word.
Note: In the steps that follow, I’m using Microsoft Word for Mac version 16.47. If you’re using a different version, the interface and steps may be different.
How to Insert a Check Box in Word (for a Printed Form)
Let’s begin by creating a checklist in Word for a printed form. In other words, the items on the checklist will be marked on paper. To insert a check box in Word:
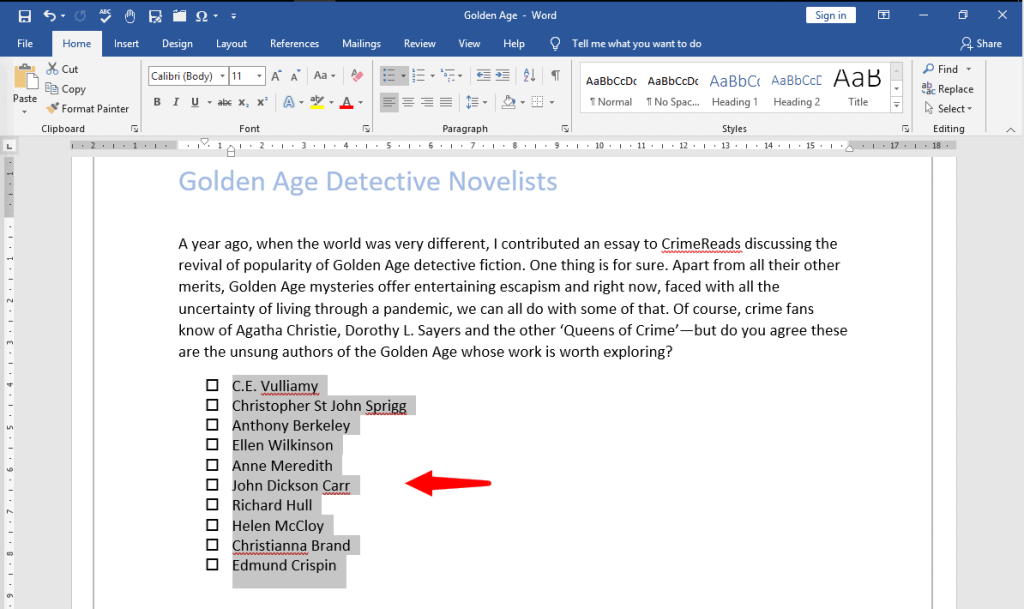
1. Select the Items
Click and drag the mouse to select the items you want to include in the checklist.


You can also create just one checklist item first. And then, to add new items, place the cursor at the end of the first checklist item. Hit Return, and the next line will automatically have a check box.
2. Insert Bullets
Under the Home tab, click on the arrow beside Bullets icon to open the Bullet Library. Choose the bullet you want to use in your checklist. If you want to use a different symbol, then click Define New Bullet….


The Customize Bulleted List menu pops up.
3. Customize the Check Box Symbol
Click on the Bullet… button.


The Symbol menu opens. Find the symbol you wish to use. In this example, I’m selecting the square outline from the Wingdings font. Click on the symbol, then click OK.


And just like that, you’ve created a checklist in Word that you can print out for marking.


You’ve just learned how to make a checklist in Word, specifically one that’ll be printed out and marked on paper.
You can also use Microsoft Word check boxes to create a form that’ll be marked digitally, right within Word itself. That’s what we’ll be doing in the next section, where you’ll learn how to create a check box in Word.
How to Insert a Check Box in Word (for Marking in Word)
You can also create a clickable check box in Word by using the Check Box Content feature. This creates a fillable form that you disseminate as a Microsoft Word document.
1. Insert a Check Box
Place the cursor in front of the first item on your checklist. Go to the Developer tab, then click Check Box Form Field.


A clickable check box is inserted where your cursor was. The check box behaves like a special character (much like a piece of text or graphic), not a bullet point.


For example, if you go to the end of the checklist item and press Return, the next line won’t automatically have its own check box. Keep reading to find out how to add check boxes to several items.
2. Modify the Check Box
By default, Microsoft Word automatically determines the size of the check box based on the font size. But you can change the default settings.
With the cursor either immediately before or after the check box you created, click on the Options button on the Developer tab. The Check Box Form Field Options menu opens.


Under Check Box Size, tick the radio button for Exactly, then select or type in the exact size you want for the check box. Then, click OK.


From the Check Box Form Field Options menu, you can also choose whether the check box should be checked or unchecked by default.
3. Copy the Check Box
When the check box looks just the way you like it, copy it to other items on your checklist. Highlight the check box you created. Press CTRL+C to copy the check box. Place the cursor in front of another checklist item, then press CTRL+V to paste it. Repeat for the other items on your list or form.


4. Protect the Form
When you’ve added all the check boxes you need and you’re happy with how they look, protect the form so that other users can’t edit it while they’re filling it out.
To do this, under the Developer tab, click Protect Form.


Now, the check boxes can’t be edited or formatted anymore.
5. Test the Form
After protecting the form, you can now test the check boxes. Click on a check box to check or uncheck it.


To change the settings on a check box, click Protect Form again to un-protect it. Remember to protect the form before sharing it with others, so they can’t inadvertently edit it!
6. Share the Form With Others
To share the form with others so they can fill it out in Microsoft Word, click on the Share button in the upper right-hand corner of Word. Then, click Send a Copy.


The Send a Copy menu opens. Leave the Send as format to its default setting, which is Word document. If you copy the file as a PDF, then it’ll no longer be clickable.
Click Email as Attachment.


This launches your default email application, with a copy of the Word checklist attached.


You can now send off the Word document. The protected form with check boxes within the document will be clickable. The recipients can check/uncheck the boxes and then send their copy of the document back to you.
Now you know how to create a check box in Word as a form, protect it, and share it for others to fill.
5 Tips for Creating a Good Checklist
Checklists can be incredibly useful and powerful, but only if they’re good checklists to begin with. Follow these tips for making a good checklist:
1. Make It Specific
Each item on the checklist should be about one thing and one thing only. If not, break item up into two or more separate items. Also make sure that each item is clear about what it’s referring to. If it can have many meanings or interpretations, think about how you can make it clearer.
2. Keep It Short
Keep the checklist manageable by limiting the number of items. If you must have a large number of items on your checklist, then follow the next tip.


3. Organize the Items
If you’ve got a long list, group similar items into categories or groups. Then, add a descriptive header for each group of items. This helps the user navigate the checklist more easily. This is especially useful if the checklist is about a multi-step, complicated process or procedure.
4. Test It With Users
Test the checklist with the people who’ll be using them. Observe them using the checklist in different scenarios. Take note of where they get confused and tripped up. Address anything they find confusing or unnecessary.
5. Keep It Updated
As your procedures and requirements change, revisit your checklists to make sure they’re still up-to-date.
Create Professional Checklists in Word With Premium Templates
If you need your checklist to be both functional and polished-looking, then use a checklist template for Word. Both free and paid checklist templates for Word are available. But usually, a premium checklist is better than a free editable checklist template for Word and offers more features.


For commercial use, you’re better off getting a premium MS Word checklist template. One great source for premium Word templates is Envato Elements because of its terrific offer. For one small monthly subscription, you get unlimited downloads of creative assets for creating print, digital, audio, and video materials. These include Word templates as well as fonts, photos, and graphics.
But, for one-off projects, another good source of templates for Word is GraphicRiver. In this marketplace, you pay only for each use of the material. It’s a great and budget-friendly option for those who create only a few communication materials.
Whether sourced from Elements or GraphicRiver, these premium templates for Word are designed by professionals. They’re made to be customizable and adaptable. And many come with after-sales support from the designer. This means, if you ever have any problems using the templates, you can reach out to them for help.
Optimize Your Productivity and Effectiveness with a Microsoft Word Checklist
Now you know how to add a checkbox in Word, whether it’s a printed checklist or one that’ll be marked digitally within Word. With a printed checklist, you first print out the form and then ask the users to mark off the checklist. With a clickable form, you share copies of the Word document. Each user then checks or unchecks the items on the checklist right in within Word.
You’ve also learned how to make a good checklist. By keeping it specific, short, organized, and updated, you can ensure that’ll be useful and not cause confusion.
You can further simplify your workflow by using a checklist template for Word. For unlimited downloads of templates and other creative assets, get your checklist template for Word from Envato Elements. You get unlimited downloads of everything in its creative library, all for one monthly subscription fee.
You can also get premium Word templates and other creative elements on an à la carte basis from GraphicRiver. Here you only pay for each use of each item.
While free editable checklist templates for Word are available, if you’re going to use it for business or commercial purposes, you’ll probably need a premium template. Check out the offerings from Elements or GraphicRiver.