
Excel for Microsoft 365 Word for Microsoft 365 Outlook for Microsoft 365 PowerPoint for Microsoft 365 Project Online Desktop Client Publisher for Microsoft 365 Excel 2021 Word 2021 Outlook 2021 PowerPoint 2021 Project Professional 2021 Project Standard 2021 Publisher 2021 Excel 2019 Word 2019 Outlook 2019 PowerPoint 2019 Project Professional 2019 Project Standard 2019 Publisher 2019 Excel 2016 Word 2016 Outlook 2016 PowerPoint 2016 Project Professional 2016 Project Standard 2016 Publisher 2016 Excel 2013 Word 2013 Outlook 2013 PowerPoint 2013 Project Professional 2013 Project Standard 2013 Publisher 2013 Word 2010 More…Less
In a text box or shape, you can quickly change the color of text, the inside (fill) color, or the color of the border.
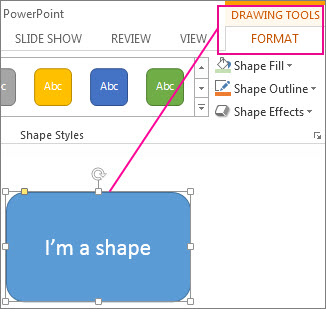
Let’s select the shape—the Drawing Tools appear in the ribbon, with the Format tab active.
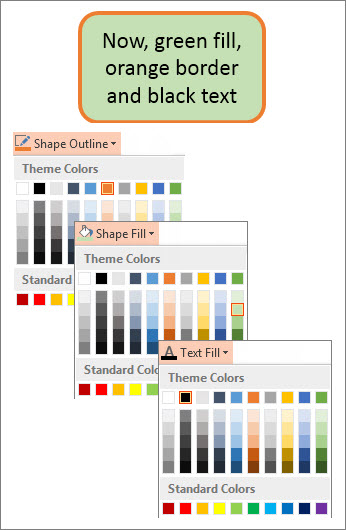
Here’s the same shape after we changed the border to orange, the fill to a light green, and the text to black. We used the Shape Outline, Shape Fill, and Text Fill commands, available on the Format tab under Drawing Tools.
Although the changes we’ll make below are shown in Microsoft PowerPoint, they work the same way in Excel, Word, Outlook, and Project.
Change the text color
-
Select the shape or text box border. When you do that, the Drawing Tools appear.
To change multiple shapes or text boxes, click the first shape or text box, and then press and hold Ctrl while you click the other shapes or text boxes.
-
On the Drawing Tools Format tab, click Text Fill and, under Theme Colors, pick the color you want.
Note: The Text Fill and Text Outline menus might not be active until you start typing in your shape.

To change the text to a color that isn’t in the theme colors
-
Select the shape or text box.
-
On the Drawing Tools Format tab, click Text Fill > More Fill Colors.
-
In the Colors box, either click the color you want on the Standard tab, or mix your own color on the Custom tab. Custom colors and colors on the Standard tab aren’t updated if you later change the document theme.
-
Change the inside (fill) color
-
Select the shape or text box to change. When you do that, the Drawing Tools appear.
To change multiple shapes or text boxes, click the first shape or text box, and then press and hold Ctrl while you click the other shapes or text boxes.
-
Click Shape Fill, and under Theme Colors, pick the color you want.
To change the fill color to a color that isn’t in the theme colors
-
Select the shape or text box.
-
On the Drawing Tools Format tab, click Shape Fill > More Fill Colors.
-
In the Colors box, either click the color you want on the Standard tab, or mix your own color on the Custom tab. Custom colors and colors on the Standard tab aren’t updated if you later change the document theme.
-

Change the border color
-
Select the shape or text box border. When you do that, the Drawing Tools appear.
If you want to change multiple shapes or text boxes, click the first shape or text box, and then press and hold Ctrl while you click the other shapes or text boxes.
-
On the Drawing Tools Format tab, click Shape Outline and, under Theme Colors, pick the color you want.
To change the border to a color that isn’t in the theme colors
-
Select the shape or text box.
-
On the Drawing Tools Format tab, click Shape Outline, and then click More Outline Colors.
-
In the Colors box, either click the color that you want on the Standard tab, or mix your own color on the Custom tab. Custom colors and colors on the Standard tab aren’t updated if you later change the document theme.
-

Tip: In PowerPoint, you can also change the border color by clicking Shape Outline (on the Home tab, in the Drawing group).
See Also
Remove or change the border on a text box or shape
Add a fill or effect to a shape
Change the font color (text color)
Change the background or color in Word
Change a message background in Outlook
Change the background color of your slides in PowerPoint
Insert WordArt
Add shapes
Need more help?
Содержание
- Вариант 1: Текст
- Способ 1: «Цвет выделения текста»
- Способ 2: «Заливка»
- Вариант 2: Рисунки, фигуры и надписи
- Вариант 3: Таблицы и диаграммы
- Вариант 4: Цвет страницы
- Вопросы и ответы

Вариант 1: Текст
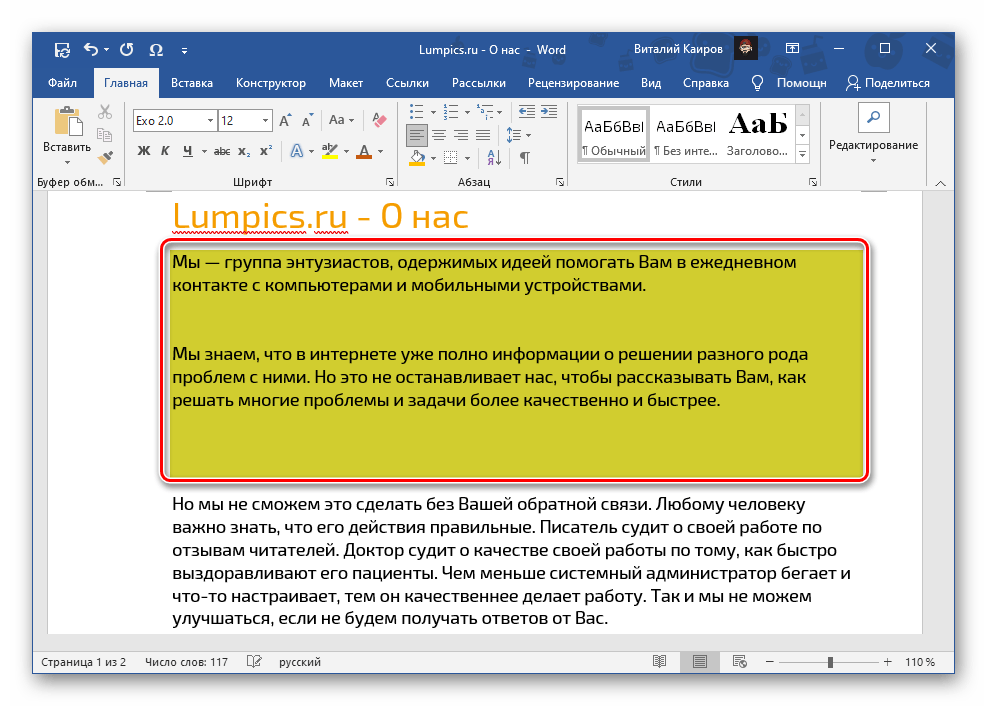
Наиболее часто заливку в Ворде требуется применять к тексту. Это может быть сделано одним из двух способов.
Способ 1: «Цвет выделения текста»
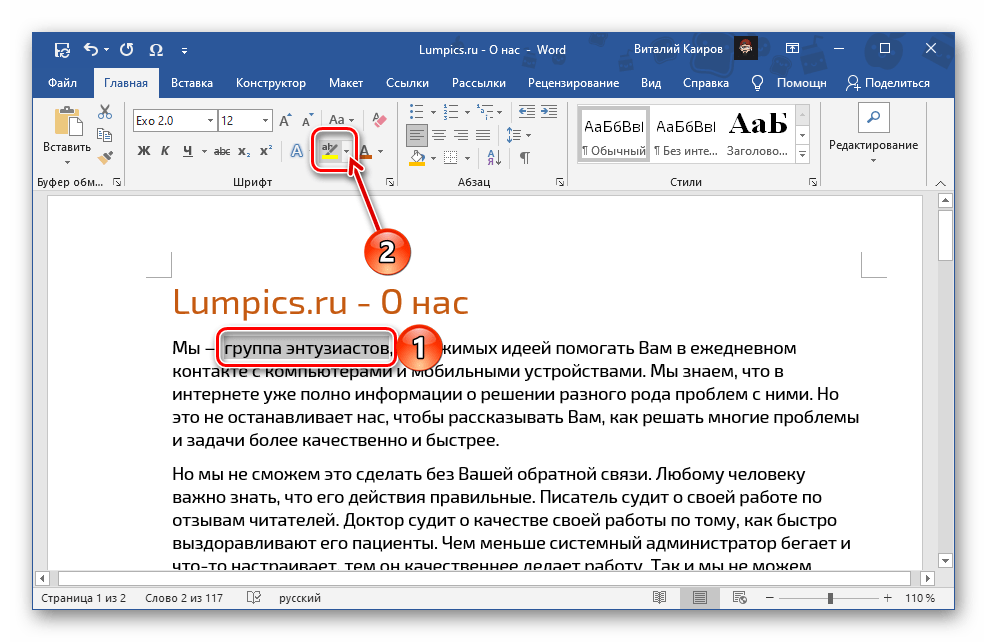
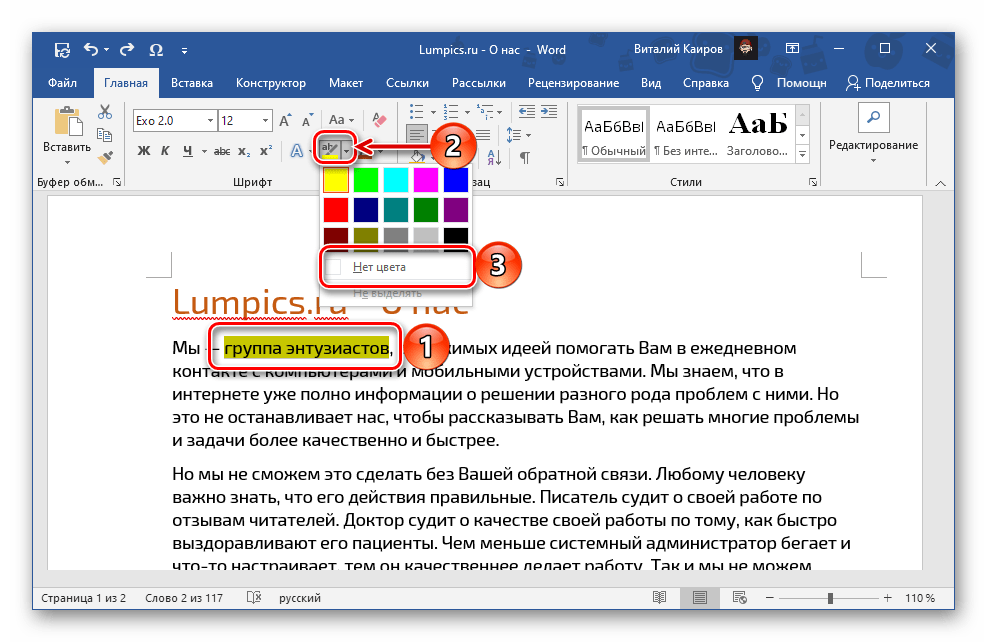
Если вы хотите залить произвольный фрагмент текста тем или иным цветом, проще всего это сделать с помощью специального инструмента из группы «Шрифт», показанного на изображении ниже. Просто выделите нужную запись и нажмите на кнопку «abc».
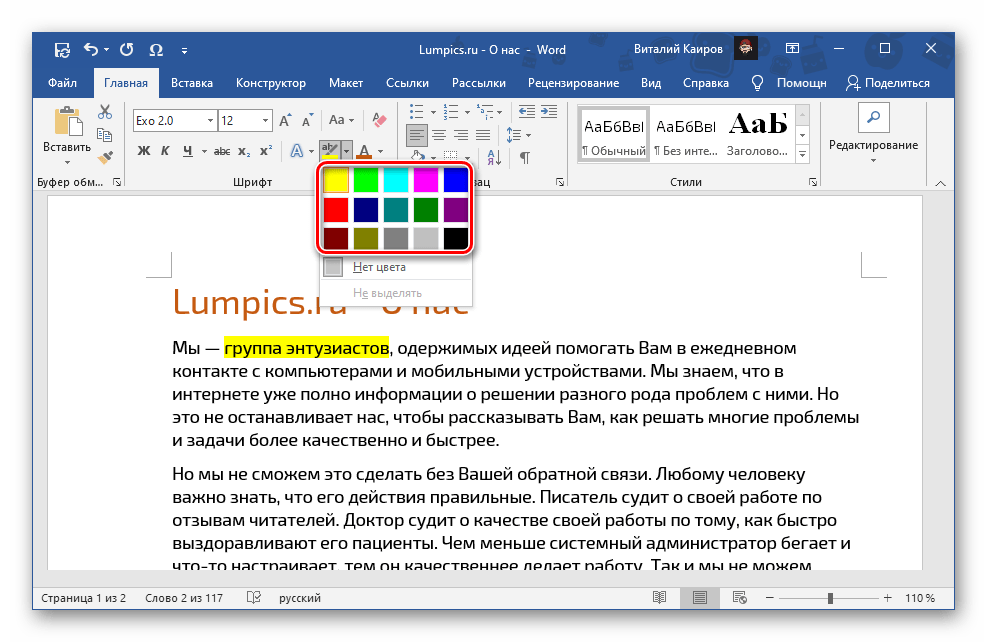
Для выбора цвета разверните меню этого инструмента и кликните по предпочтительному варианту на палитре.
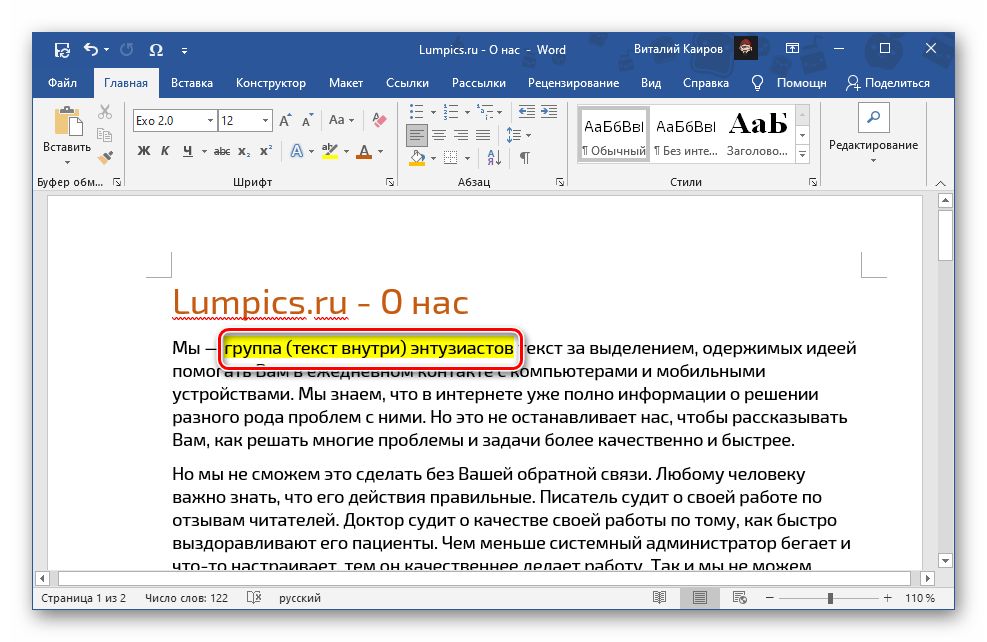
Примечание: Если вы продолжите вводить текст внутри выделенного блока или в самом его начале, он тоже будет залит выбранным цветом. Если делать это за последним «окрашенным» символом (буквой или знаком препинания), даже без отступа, заливка уже не будет применена.
Для того чтобы убрать цвет, выделите фрагмент и повторно нажмите на расположенный справа от кнопки «abc» указывающий вниз треугольник, чтобы развернуть ее меню, и выберите пункт «Нет цвета».
Обратите внимание! Использование инструмента «Цвет выделения текста» оставляет бесцветными междустрочные интервалы, если их размер превышает 1. Наглядный пример показан на изображении ниже.
Способ 2: «Заливка»
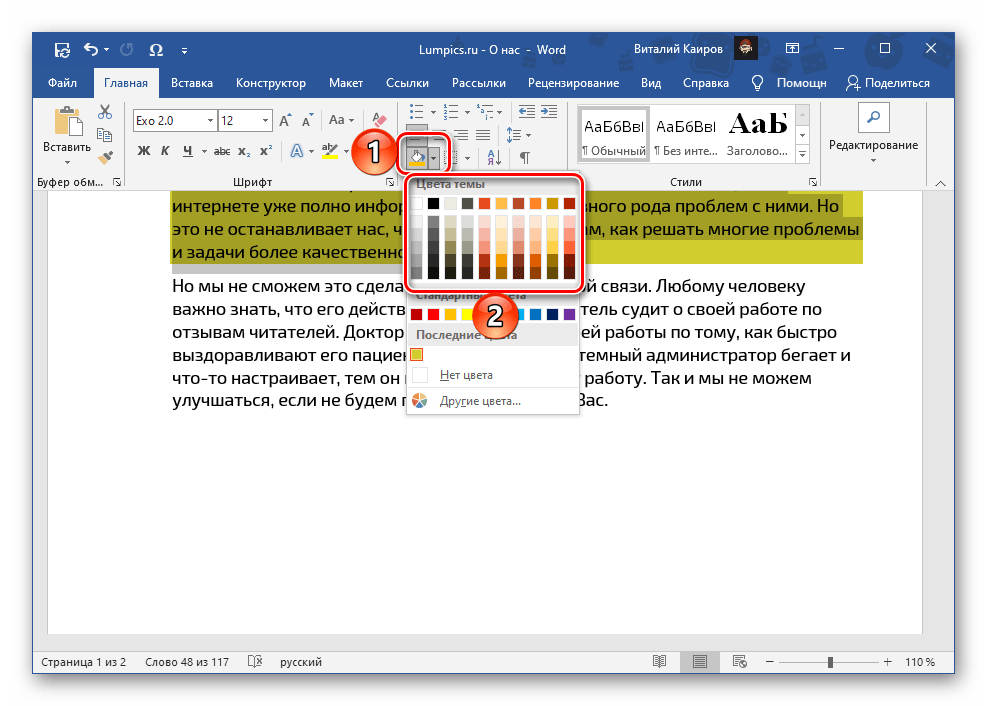
Если вам требуется залить текст сплошным цветом, независимо от того, какие установлены отступы между строками, следует воспользоваться другим инструментом Word – «Заливкой», входящей в группу «Абзац».
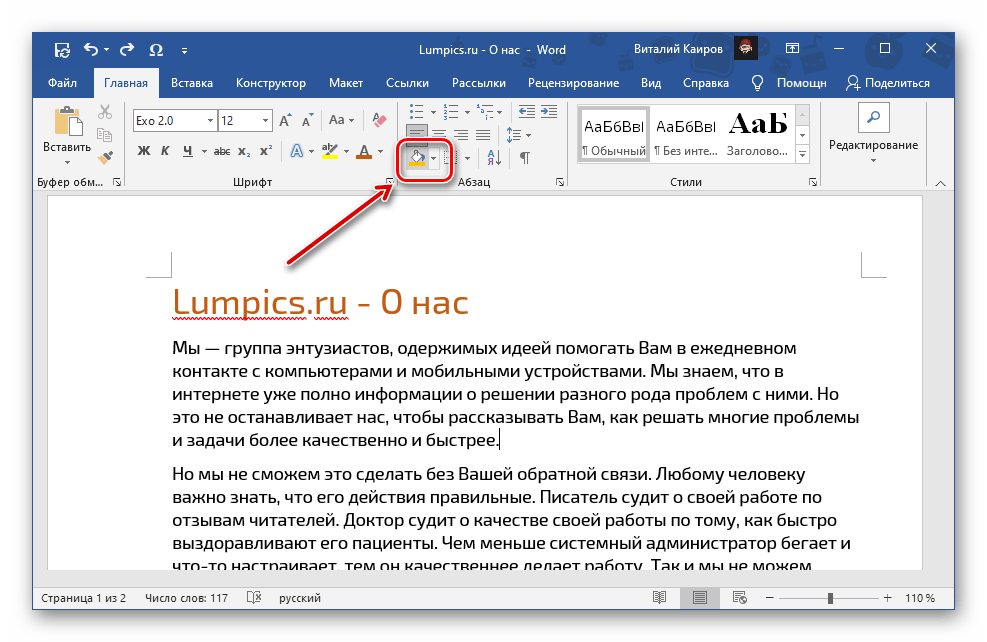
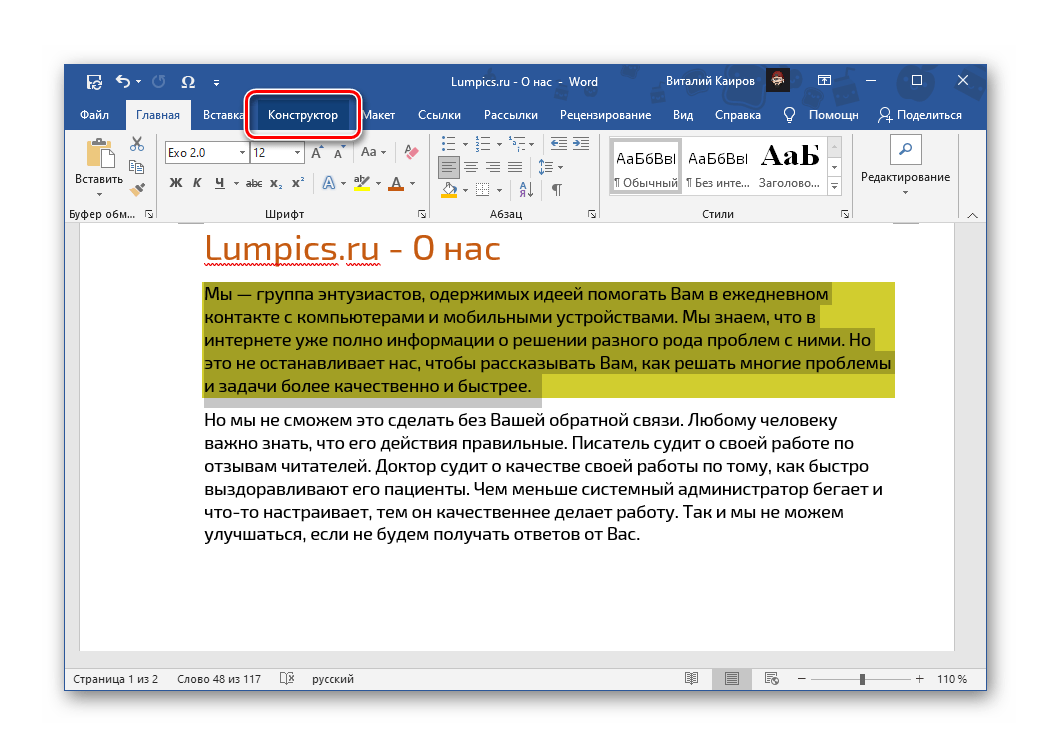
Если у вас уже есть текст, который требуется окрасить, выделите его, в противном случае установите указатель курсора в начале строки. Разверните меню кнопки «Заливка», нажав на расположенный справа от нее треугольник, и выберите подходящий цвет.
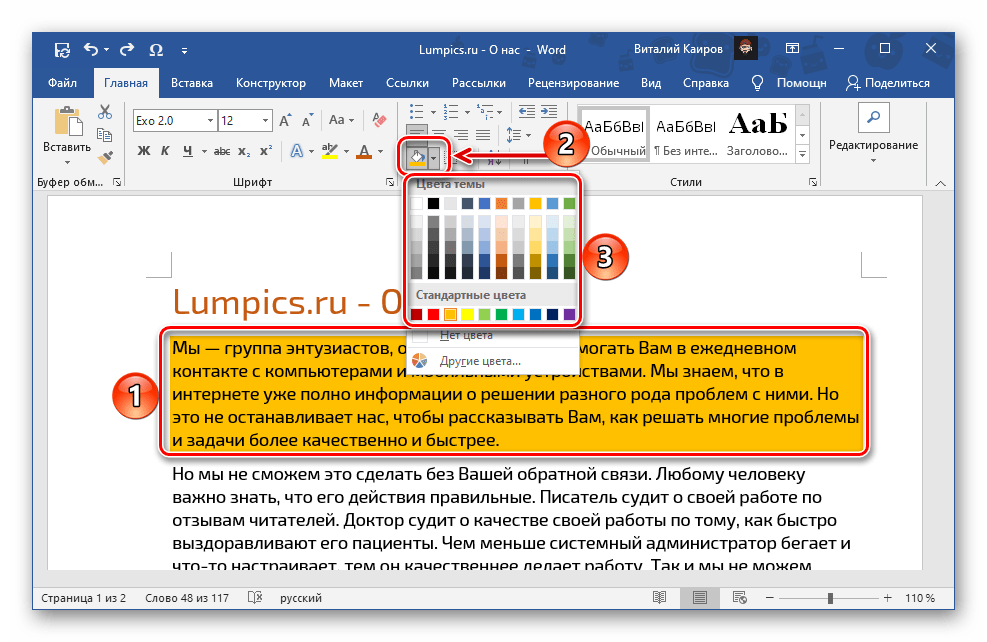
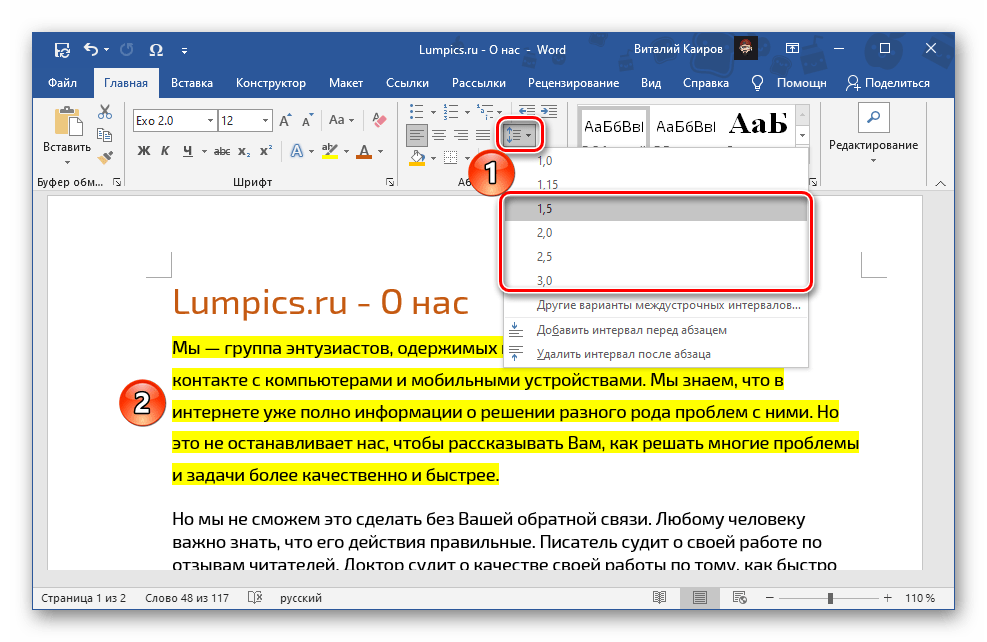
Обратите внимание! «Заливка», в отличие от рассмотренного в предыдущей части статьи инструмента, помимо непосредственно текста, применяется не только к отступам, но и к строкам в целом – от их начала и до конца, даже если они еще пустые, на всю ширину страницы. В свою очередь «Цвет выделения текста» распространяется только на текст. Различия показаны на изображении ниже: 1 — заливка, 2 — цвет выделения текста. При этом если выделять не целые строки и/или абзацы, а их части, эффект от заливки будет точно такой же, как и от выделения цветом.

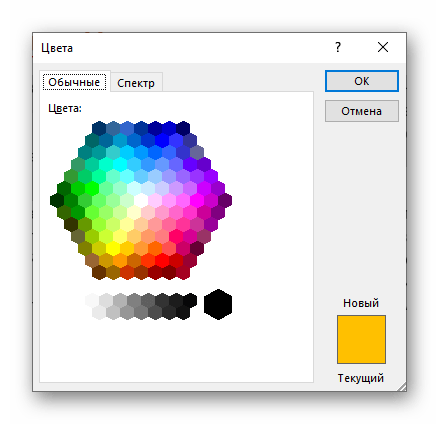
Помимо палитры с доступными по умолчанию цветами, можно выбрать «Другие цвета» заливки.
Это действие открывает диалоговое окно с двумя вкладками – «Обычные» и «Спектр». В первой представлена расширенная палитра шаблонных цветов.
Во второй вы можете выбрать его самостоятельно, воспользовавшись палитрой, указав код в «Шестнадцатеричном формате», самостоятельно задав значения «Красного», «Зеленого» и «Синего» на палитре «RGB»

либо, если была выбрана палитра «HSL», «Оттенок», «Насыщение» и «Яркость».
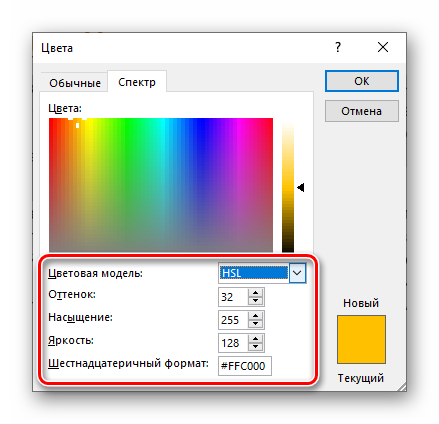
Определившись с выбором цвета, нажмите «ОК» для его применения.

Примечание: Варианты заливки, отличные от доступных на палитре по умолчанию, добавляются в список «Последние цвета».

Если набор, представленный в блоке «Цвета темы» меню «Заливка», по каким-то причинам вас не устраивает, необязательно каждый раз выбирать предпочтительный вариант оформления вручную.

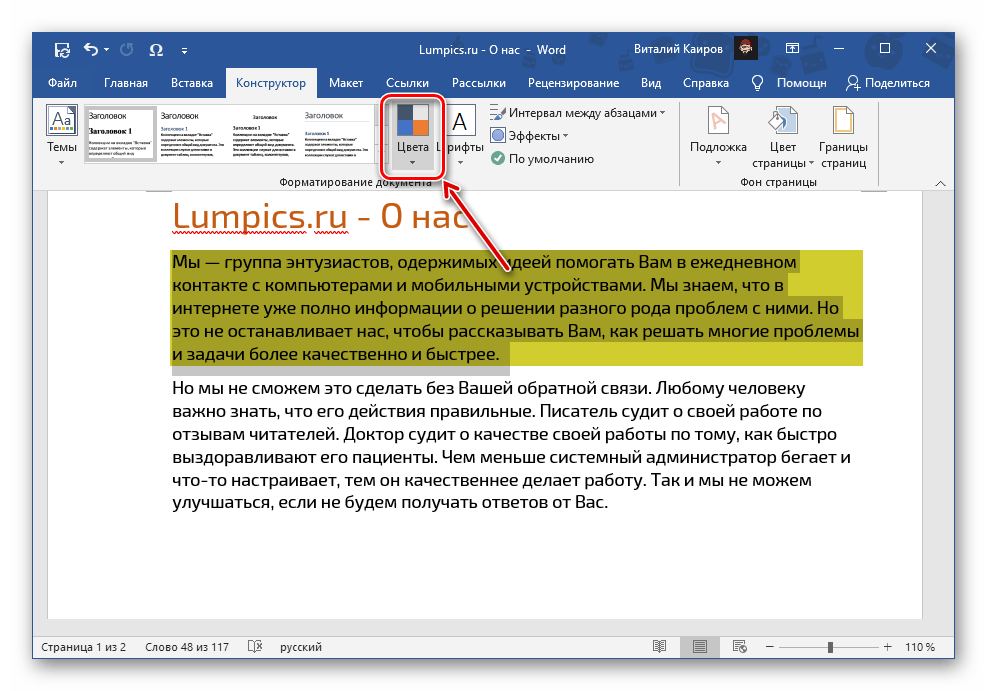
- Перейдите во вкладку «Конструктор».
- Разверните меню кнопки «Цвета».
- Выберите подходящий набор из списка доступных

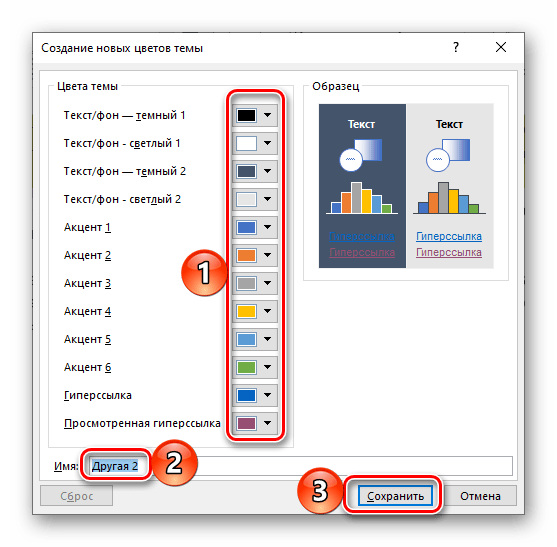
либо создайте собственный (пункт «Настроить цвета») и сохраните его.

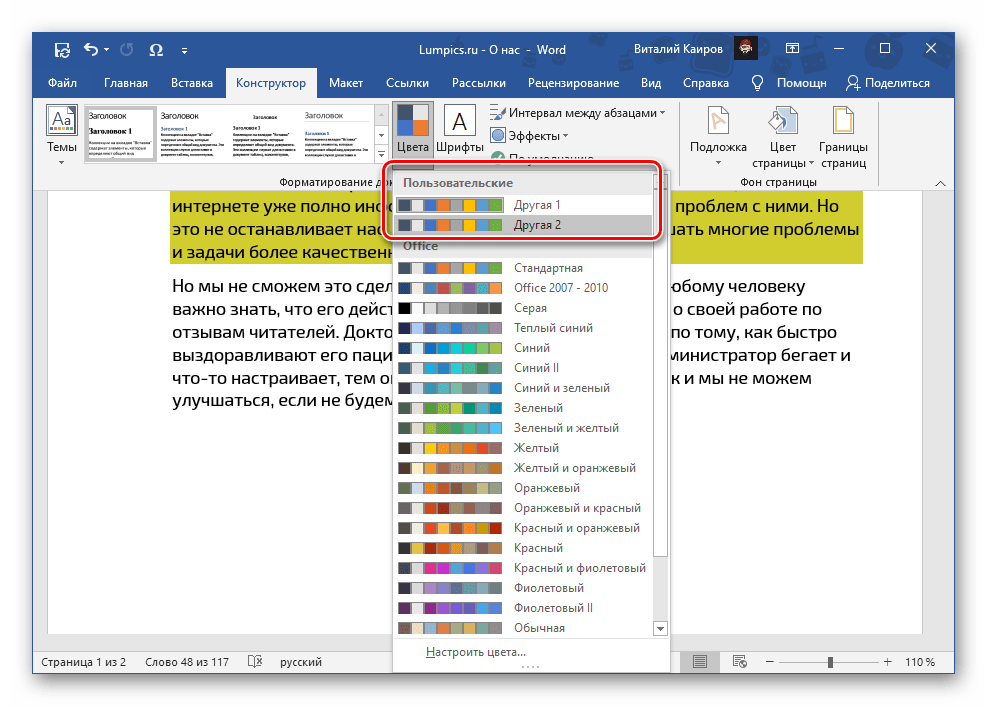
Ваша цветовая тема будет доступна для выбора в этом же разделе программы, в блоке «Пользовательские». - Какой бы из наборов вы не выбрали, он будет добавлен в качестве основного в меню кнопки «Заливка».

Обратите внимание! По необходимости любую выбранную тему или самостоятельно созданную можно назначить используемой по умолчанию и/или создать на ее основе шаблон документа.
Подробнее:
Как создать свой стиль текста в Ворде
Как создать шаблон документа в Ворде
Вне зависимости от того, к какому количеству строк была применена заливка, по нажатию клавиши «Enter» в конце любой из них, она будет переходить на следующую. Очевидно, что это работает и внутри абзацев, и в их начале, но лишь в тех случаях, если выделялись целые строки и/или абзацы, а не их отдельные части.
Для того чтобы отменить выделение текста, обратитесь к меню инструмента «Заливка» и выберите в нем пункт «Нет цвета».

Вариант 2: Рисунки, фигуры и надписи
Помимо текста, в Microsoft Word можно работать с рисунками, фигурами и надписями. К любому из этих объектов можно применить заливку.
Рисунки
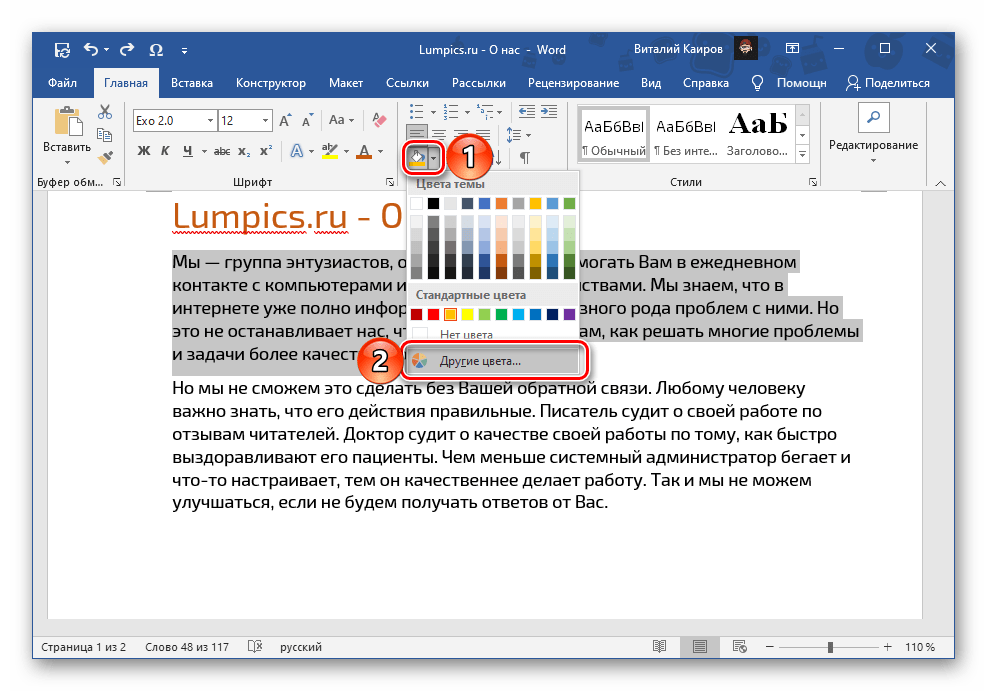
Выделите изображение и перейдите во вкладку «Формат», если этого не произойдет автоматически. Разверните меню кнопки «Цвет», расположенной в группе инструментов «Изменение», и выберите подходящее цветовое решение из списка доступных.

В этом же меню имеется возможность выбора «Других вариантов», а затем и «Других цветов», аналогичная таковой для рассмотренного выше инструмента «Заливка».

Кроме того, рисунок можно сделать прозрачным, самостоятельно определить параметры цвета и применить к нему художественные эффекты.

Читайте также:
Как вставить картинку в документ Ворд
Как изменить цвет рисунка в Ворде
Как рисовать в Ворде
Фигуры
Выделите фигуру, перейдите во вкладку «Формат» и разверните меню кнопки «Заливка фигуры», расположенной в группе инструментов «Стили фигур». Одним из доступных способов выберите подходящий цвет:


Читайте также:
Как вставить фигуру в документ Word
Как сделать прозрачной фигуру в Word
Надписи (WordArt)
Если надпись была добавлена посредством инструмента WordArt, сделать для нее заливку можно точно так же, как и для фигур, окрасив таким образом фон.

Если же требуется изменить цвет текста, предварительно его следует выделить. Далее воспользуйтесь элементами в группе инструментов «Стили WordArt», где доступна уже знакомая нам по предыдущим методам «Заливка» с палитрой в стилистике выбранной темы и «Другими цветами», а также «Градиент».

Также имеется возможность измерения цвета контура и применения эффектов.

Примечание: Если надпись была добавлена не в виде объекта WordArt, а как «Текстовое поле», для нее можно изменить фон и, очевидно, цвет текста. Алгоритм действий тот же, что и с фигурами, плюс доступны стандартные для программы средства форматирования.
Читайте также: Как добавить надпись в документ Ворд
Вариант 3: Таблицы и диаграммы
Для работы с таблицами, графиками и диаграммами в пакете Майкрософт Офис есть приложение Эксель, но и Ворд неплохо справляется с этой задачей. К объектам данного типа, созданным с его помощью, тоже можно применить заливку, причем доступно сразу несколько решений. Все они рассматривались нами ранее в отдельных материалах.
Подробнее: Как изменить цвет таблицы / диаграммы в Ворде

Отметим, что в Word также имеется возможность создания графических элементов SmartArt, используя которые, можно строить списки и схемы, а также более сложные объекты. Применить заливку к их содержимому можно так же, как и к рассмотренным выше фигурам и надписям.

Выбрать же цвет общей заливки можно во вкладке «Конструктор», которая появляется при выделении SmartArt. Для этого разверните меню кнопки «Изменить цвета» и выберите подходящий вариант. Шаблонные решения, как и уже неоднократно упомянутая нами выше «Заливка», могу быть изменены посредством цветовой темы.

Вариант 4: Цвет страницы
Последний из доступных вариантов заливки в Word заключается в изменении цвета всей страницы. В данном случае на выбор доступны как сплошные цвета из палитры и спектра, так и дополнительные способы: градиент, текстура, узор, рисунок. О том, как воспользоваться каждым из них, мы ранее писали в отдельной инструкции.
Подробнее: Как изменить цвет страницы в Ворде

To add a fill or effect, click your shape, click Format, click the arrow next to Shape Fill or Shape Effects, and select a color, gradient, texture, or effect. Click the shape that you want to fill.
Contents
- 1 How do you fill in color in Word?
- 2 Is there a fill tool in Word?
- 3 What is text fill?
- 4 How do you apply text effects in Word?
- 5 Where is shape fill in Word?
- 6 How do you draw and fill a shape in Word?
- 7 How do I insert text into an object in Word?
- 8 Can I use text-fill-color?
- 9 How do you write text in Word Art?
- 10 What are effects applied to text?
- 11 Which of the following is a text effect?
- 12 How do I apply for a filling?
- 13 How do I fill in a picture in Word?
- 14 What is Shape Fill tool?
- 15 How do you write freehand in Word?
- 16 How do I fill out an outline in Word?
- 17 How do I insert PDF into Word?
- 18 Where is the text group in Word?
- 19 How do I insert text without box in Word?
- 20 How do I fix indentations in Word?
How do you fill in color in Word?
Change the inside (fill) color
- Select the shape or text box.
- On the Drawing Tools Format tab, click Shape Fill > More Fill Colors.
- In the Colors box, either click the color you want on the Standard tab, or mix your own color on the Custom tab.
Is there a fill tool in Word?
Select the drawing object you want to fill. Click on the down-arrow next to the Fill Color tool on the Drawing toolbar. Word displays a color menu.If you do not see your desired color displayed, click your mouse on More Fill Colors to display a wider selection of choices.
What is text fill?
Fill refers to the interior of a WordArt or character. Notes: When you change options in this dialog box, the changes are immediately applied to your WordArt or text, making it easy to see the effects of the changes in your WordArt or text without closing the dialog box.
How do you apply text effects in Word?
Add an effect to text
- Select the text that you want to add an effect to.
- On the Home tab, in the Font group, click Text Effect.
- Click the effect that you want. For more choices, point to Outline, Shadow, Reflection, or Glow, and then click the effect that you want to add.
Where is shape fill in Word?
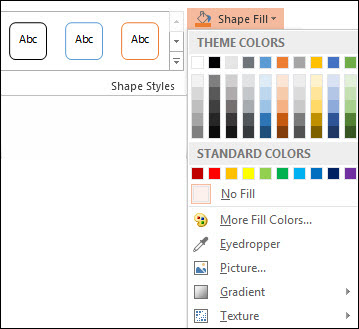
Click Insert > Illustrations > Shapes. Choose any shape you like and draw it on the page (click and drag). Here, I drew a basic rectangle. To change the shape’s fill, ensure that it is selected and then in the Drawing Tools contextual tab, click Shape Styles > Shape Fill.
How do you draw and fill a shape in Word?
To draw using the Scribble tool, click Insert > Shapes > Scribble.
Now the drawing can be edited by using the tools in the Shape Format ribbon.
- Change the Fill Color of Your Drawing.
- Change the Outline Color of Your Drawing in Word.
- Fill Your Drawing with a Picture.
How do I insert text into an object in Word?
To do so, click the “Insert” tab on the ribbon menu. Then, click the downward-facing arrow next to “Object” and select “Text from File.” Browse to the file you want and double-click it. Its text will appear in the Word document.
Can I use text-fill-color?
From the WebKit blog: text-fill-color – This property allows you to specify a fill color for text. If it is not set, then the color property will be used to do the fill. So yes, they are the same, but -webkit-text-fill-color will take precedence over color if the two have different values.
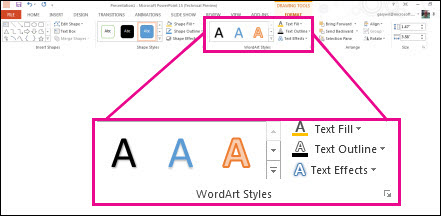
How do you write text in Word Art?
- On the Insert tab, in the Text group, click WordArt, and then click the WordArt style that you want.
- Type your text in the Text box. You can add a fill or effect to a shape or text boxas well as the text in the WordArt.
What are effects applied to text?
You can add shadows, bevels, reflections, and much more. The Text Effects button is in the Font group of the ribbon. The top options in the Text Effects menu have some pre-created styles to choose from. The Text Effects menu also has the options Outline, Shadow, Reflection, and Glow.
Which of the following is a text effect?
Adding additional features for text include background color, making text as blur, changing font color, outlining the text, changing font size, changing font style, and shadowing the text. Text effects can be added in word document as follows:Select the way the text needs to be changed.
How do I apply for a filling?
To add a fill or effect, click your shape, click Format, click the arrow next to Shape Fill or Shape Effects, and select a color, gradient, texture, or effect. Click the shape that you want to fill.
How do I fill in a picture in Word?
How to Fill the Page With a Picture on Microsoft Word
- Click the “Page Layout” tab. Click the “Page Color” button on the Ribbon at the top of the work area.
- Click the “Fill Effects” option.
- Browse to the picture you wish to use to fill the page and double-click it.
What is Shape Fill tool?
1. the shape fill tool is used for coluring a drawing objects true.
How do you write freehand in Word?
Draw a freeform shape
- On the Insert tab, in the Illustrations group, click Shapes.
- Under Lines, do one of the following: To draw a shape that has both curved and straight segments, click Freeform .
- Click anywhere in the document, and then drag to draw.
- To finish drawing the shape, do one of the following:
How do I fill out an outline in Word?
Add, change, or delete a fill
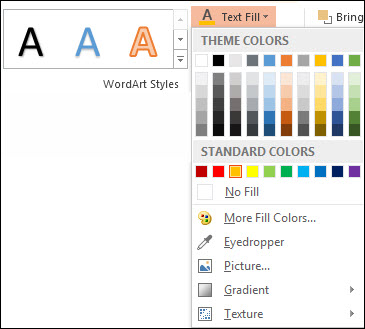
- Select the text in the WordArt.
- Go to Shape Format or Format and select the arrow next to Text Fill. Note: If you do not see Shape Format or Drawing Tools, make sure that you selected the text in the WordArt.
- Do one of the following: Select the color that you want.
How do I insert PDF into Word?
How To Insert PDF Into Word—From Microsoft Word
- Open the Word document you want to insert a PDF into.
- Click Insert > Object… > From File…
- Choose the PDF file from the pop-up window and press Insert.
- Ta-da! Your PDF should now be on the page.
Where is the text group in Word?
More videos on YouTube
- Select the Insert tab, then click the Text Box command in the Text group.
- A drop-down menu will appear.
- Click, hold, and drag to create the text box.
- The insertion point will appear inside the text box.
How do I insert text without box in Word?
Removing the Box from a Text Box
- Either click on the border of the text box or position the insertion point within the text box.
- Select the Text Box option from the Format menu.
- Click on the Colors and Lines tab, if necessary.
- In the Color drop-down list, select No Line.
- Click on OK.
How do I fix indentations in Word?
Adjust indents and spacing in Word
- Select one or more paragraphs that you want to adjust.
- Go to Home and then select the Paragraph dialog box launcher .
- Choose the Indents and Spacing tab.
- Choose your settings, and then select OK.
Click Shape Fill, and under Theme Colors, pick the color you want. Select the shape or text box. On the Drawing Tools Format tab, click Shape Fill > More Fill Colors. In the Colors box, either click the color you want on the Standard tab, or mix your own color on the Custom tab.
Just so, How do you add a fill in on word?
Creating Fillable Forms Using Microsoft Word
- Enable Developer Tab. Open Microsoft Word, then go to the File Tab > Options > Customize Ribbon > check the Developer Tab in the right column > Click OK.
- Insert a Control. …
- Edit Filler Text. …
- Design Mode button again to exit the mode.
- Customize Content Controls.
Besides, Can you fill in Word? Fill Forms in Word
Click the “File” menu’s “Open” command, then navigate to and click the document containing the form you need to fill in. Click the dialog’s “Open” button to load the form.
Does Word have a fill tool? Select the drawing object you want to fill. Click on the down-arrow next to the Fill Color tool on the Drawing toolbar. Word displays a color menu.
Subsequently, How do you apply text effects in Word?
Add an effect to text
- Select the text that you want to add an effect to.
- On the Home tab, in the Font group, click Text Effect.
- Click the effect that you want. For more choices, point to Outline, Shadow, Reflection, or Glow, and then click the effect that you want to add.
How do I fill a shape with text in Word?
Right-click the shape that contains the text that does not fit. On the shortcut menu, click Format AutoShape. In the Format AutoShape dialog, click the Text Box tab. Under Text autofitting, select the option you want.
What is text effect in Word?
In addition to formatting changes we previously discussed in Fonts, you can also apply effects to text with the Text Effects option. This was known as WordArt in previous versions of Word. You can add shadows, bevels, reflections, and much more. The Text Effects button is in the Font group of the ribbon.
What are text effects?
Text Effects and Typography in Microsoft word means applying special formats to the content such as an Outline, Shadow, Reflection or Glow is known as the Text Effects. Similarly, changing the Styles, Ligatures, and Stylistics Sets of the numbers is called Typography settings.
How do you engrave text in Word 2016?
To engrave text, follow these steps:
- Choose the text you want to engrave.
- Make sure the Home tab of the ribbon is displayed.
- Click the small icon at the bottom-right of the Font group. Word displays the Font dialog box. (See Figure 2.)
- Make sure the Engrave check box is selected.
- Click on OK.
Where is shape fill in Word?
Click Insert > Illustrations > Shapes. Choose any shape you like and draw it on the page (click and drag). Here, I drew a basic rectangle. To change the shape’s fill, ensure that it is selected and then in the Drawing Tools contextual tab, click Shape Styles > Shape Fill.
How do you create a text box in Word?
Add a text box
- Go to Insert > Text Box, and then select Draw Text Box.
- Click or tap in the document, and drag to draw the text box the size that you want.
- To add text to a text box, select inside the text box, and then type or paste text. Notes:
How do I insert picture into Word document?
How to Insert and Crop Pictures in Word
- Click in your document where you want to insert your picture.
- Click the Insert tab.
- Click Pictures button.
- Navigate to the picture you want to insert and select it.
- Click Insert button.
What is text fill?
Fill refers to the interior of a WordArt or character. Notes: When you change options in this dialog box, the changes are immediately applied to your WordArt or text, making it easy to see the effects of the changes in your WordArt or text without closing the dialog box.
How do you send a text with effects?
To manually add effects to your iMessage, open the Messages app and type your text. Then “long-press” (press and hold for a second or so) on the blue arrow that you usually tap to send a message. This brings up your special effect options. These are divided into two categories: bubble and screen effects.
What is Font command?
The FONT command is used to identify the fonts that are to be specified with the following commands: Traditional. PRINTLINE, FIELD, and TRCREF commands. Record Layout. LAYOUT and FIELD commands.
How is engraving done?
Engraving is an intaglio printmaking process in which lines are cut into a metal plate in order to hold the ink. In engraving, the plate can be made of copper or zinc. The metal plate is first polished to remove all scratches and imperfections from the surface so that only the intentional lines will be printed.
How do you emboss text in Word?
To emboss text, follow these steps:
- Choose the text you want to emboss.
- Choose Font from the Format menu. Word displays the Font dialog box. (See Figure 1.)
- Make sure the Emboss check box is selected.
- Click on OK.
What do you put on engraving?
If you want to engrave memorial jewelry to honor your loved one, then check out these engraving ideas.
- We Were Together. I Forgot the Rest.
- Remembered With Love.
- She Walked in Beauty.
- Forever In My Heart.
- We’ll Always Remember You.
- You’ll Always Be in Our Hearts.
How do I apply a fill?
- Right-click the shape that you want to add a pattern fill to and select Format Shape.
- In the Format Shape dialog box, click the Fill tab.
- In the Fill pane, select Pattern fill and then select a pattern, foreground color, and background color for your pattern fill.
How do I insert text in Word without the box?
Remove the border
- Select the text box or shape. If you want to change multiple text boxes or shapes, click the first text box or shape, and then press and hold Ctrl while you click the other text boxes or shapes.
- On the Format tab, click Shape Outline, and then click No Outline.
How do I insert a small box in a Word document?
Just position your cursor in the document where you want a check box, switch to the “Developer” tab, and then click the “Check Box Content Control” button. You should see a check box appear wherever you placed your cursor.
How do I insert a picture in Word without moving text?
To insert an image into Word without moving any text is to
set the image’s default wrapping to no wrapping before entering it into the document
.
…
- Insert the photo.
- Right click the photo.
- Format the picture to “WRAP” the text.
How do I put text and Pictures side by side in Word?
Choose “Behind Text” or “In Front of Text” if you aren’t concerned with images and text overlapping each other. Click the second image and repeat the process of changing the way text interacts with the image. Click and drag down the top-right corner of each image until both images will fit side by side on the page.
How do I fill a text with text?
- Reference 1
- Reference 2
- Reference 3
- Reference 4
- Reference 5
In this article, we plan to provide you 8 ways to set different background colors for header, footer, and main document in Word.
By default, to set a page color will make all parts of the document in the same background color, including the header, footer and main document. What if we want to set different background colors for these 3 parts?
To achieve so, we will have to deploy some workarounds, such as follows:
Method 1: Insert a Shape into Header or Footer
Let’s take the example of header first.
- Double click on header to enter its editing mode.
- Then click “Insert” and click “Shapes”.
- Next choose “Rectangle” on the drop-down menu.

- Wait until your cursor turns into a plus sign. Then drag it to draw a rectangle as large as the header area.
- Now right click on the shape. And choose “Format Shape” to open the same name box.
- Then click “Fill” and choose a fill color.
- Next click “Line Color” and select “No line”. Close the box.

- Right click on the shape again and choose “Wrap Text” this time.
- Click “Behind Text” on the submenu.

- Lastly, double click on main document to exit header.


The step to format footer is very much the same.
Here is the possible result:
Method 2: Insert a Text Box into Header or Footer
Similarly, we will describe how to do it in header as a demonstration.
- Firstly, double click on header to enter editing mode.
- Next click “Insert”, “Text Box” and “Draw Text Box” in consecutive.

- See your cursor turns into a plus sign. And click to draw a text box as large as the header area.
- Repeat step 5 to 10 in method 1 to format the text box and set background color for header.

Method 3: Insert a Picture into Header or Footer
- First of all, double click on header to enter editing mode.
- Then insert a picture into header by clicking “Insert” tab then the “Picture”.

- Choose a picture from your folder.
- Next right click on the picture and click “Wrap Text”.
- Choose “Behind Text”.
- Then adjust the picture size to fill the header area.

See the effect:
Method 4: Insert a Table into Footer
We can employ this method to just footer.
- Firstly double click on footer to enter the editing mode.
- Next click “Insert” and “Table” to insert a 1×1 table.
- Then select the table and right click.
- Choose “Table Properties”.
- In the box open, click “Table” tab then click the “Borders and Shading”.
- In the second box, click “Borders” and choose “None”.
- Then click “Shading” and choose a fill color.
- Click “OK” in the second box.
- Now back to the first box and click “Around” for text wrapping.
- Click “OK”.

- Finally, enlarge the table and fill the footer area.

Method 5: Insert a Shape into the Main Document
- To begin with, click “Page Layout”, then click “Page Color” and choose a color as the background color.

- Next enter header mode.
- Insert a shape following step 2 and 3 in method 1.
- Then enlarge the shape size to cover the main document area.
- Repeat step 5 to 9 in method.
- At last, click “Close Header and Footer”.


Method 6: Insert a Text Box into the Main Document
- Repeat step 1 in method 5 to format the background color for the entire document.
- Next enter header. And insert a text box as large as the main document part.
- Repeat step 5 to 9 in method 1.
- Exit header by clicking “Close Header and Footer”.
Method 7: Insert a Picture into the Main Document
- Similarly, repeat step 1 in method 5 to format the background color for the entire document.
- Next enter header and insert a picture to cover the main document.
- Then set the picture wrapping style as “Behind Text”.
- lastly exit the header.
Method 8: Insert a Table into the Main Document
If you decide to use this method, you have to format the document before enter any content.
- Likely, format the background color for the entire document.
- Insert a table to cover the main document part. And use step 3 to 10 in method 4 to set the table properties.
- Lastly, exit the header mode.
Solve Word Problems
We can realize many achievements in Word. But there is no guarantee for perfect performance all the time. Sooner or later, we are likely to run into some hard issues. If so, we need to utilize a doc fix tool to address such issues.
Author Introduction:
Vera Chen is a data recovery expert in DataNumen, Inc., which is the world leader in data recovery technologies, including fix Excel and pdf repair software products. For more information visit www.datanumen.com