
Fill data automatically in worksheet cells
Use the Auto Fill feature to fill cells with data that follows a pattern or are based on data in other cells.

Find more videos on Mike Girvin’s YouTube channel, excelisfun.
-
Select one or more cells you want to use as a basis for filling additional cells.
For a series like 1, 2, 3, 4, 5…, type 1 and 2 in the first two cells. For the series 2, 4, 6, 8…, type 2 and 4.
For the series 2, 2, 2, 2…, type 2 in first cell only.
-
Drag the fill handle
 .
. -
If needed, click Auto Fill Options
and choose the option you want.
 .
. and choose the option you want.
Need more help?
You can always ask an expert in the Excel Tech Community or get support in the Answers community.
Need more help?
Want more options?
Explore subscription benefits, browse training courses, learn how to secure your device, and more.
Communities help you ask and answer questions, give feedback, and hear from experts with rich knowledge.
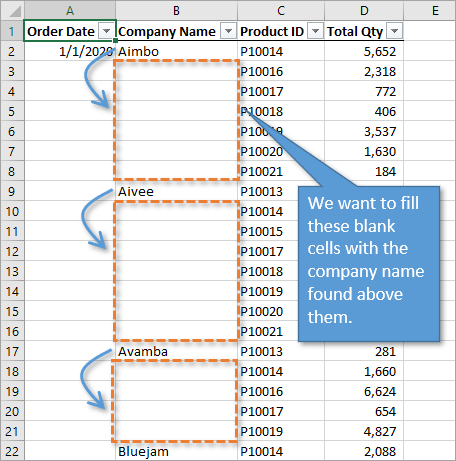
Bottom Line: In this post we look at 3 ways to copy down values in blank cells in a column. The techniques include using a formula, Power Query, and a VBA macro.
Skill Level: Intermediate
Watch the Tutorial
Download the Excel Files
You can download both the BEGIN and FINAL files if you want to follow along and practice.
Filling Down Blank Cells
Excel makes it easy to fill down, or copy down, a value into the cells below. You can simply double-click or drag down the fill handle for the cell that you want copied, to populate the cells below it with the same value.
But is there an easy way to replicate that process hundreds of times for reports that have large amounts of data?
In this post we’ll look at three ways to automate this process with: a simple formula, Power Query, and a VBA macro.
1. Filling Down Using a Formula
The first way to solve this problem is by using a very simple formula in all of the blank cells that references the cell above. Here are the steps.
Step 1: Select the Blank Cells
In order to select the blank cells in a column and fill them with a formula, we start by selecting all of the cells (including the populated cells). There are many ways to do this, including holding the Shift key down while you navigate to the bottom of your column, or if your data is in an Excel Table, using the keyboard shortcut Ctrl+Space.
Checkout my posts on 7 Keyboard Shortcuts for Selecting Cells and Ranges in Excel and 5 Keyboard Shortcuts for Rows and Columns in Excel to learn more.
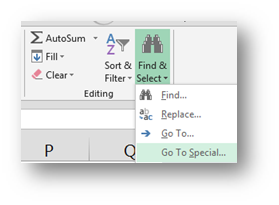
With all of those cells selected, we can pare down our selection to include only the blank cells. This is done by using the Go To Special window from the Find & Select menu on the Home tab of the ribbon.
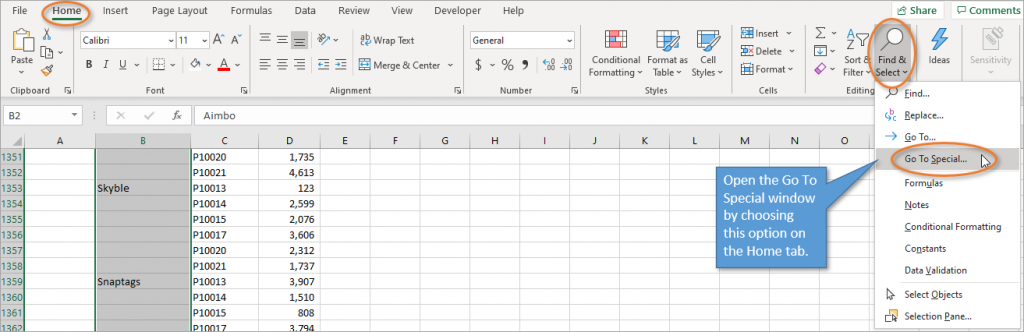
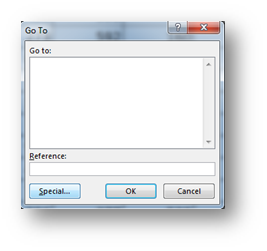
An alternative is to open the Go To window using F5 or Ctrl+G. Then press the Special button for the Go To Special window.
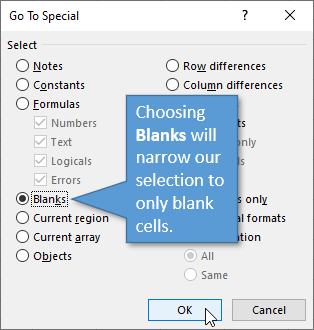
Once the Go To Special window is open, you can choose the option that says Blanks. This will select only the blank cells from the current selection.
When you hit OK, you’ll notice that the cells that have values in them are no longer selected.
Step 2: Write the Formula
From here you can start typing the formula, which is very simple. Type the equals sign (=) and then reference the cell above (in the case of our example, B2). That’s all you need for the formula!
Step 3: Ctrl+Enter the Formula
After writing the formula, don’t just hit Enter. Instead, use Ctrl+Enter to fill all of the selected cells with the same formula. Hold the Ctrl key, then hit Enter.
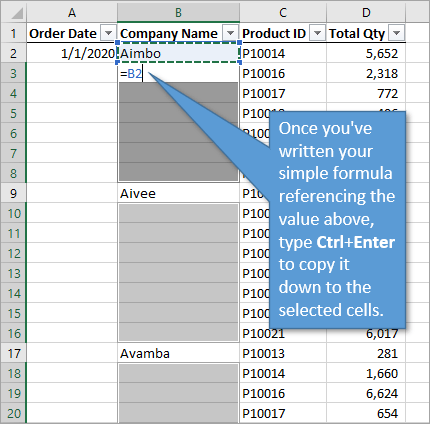
Because your formula reference is relative (B2), not absolute ($B$2), each cell will simply copy the value for the cell directly above it.
Step 4: Copy & Paste Values
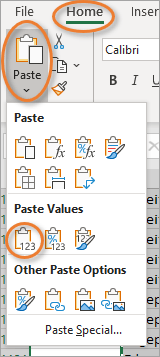
It is a good idea to now copy the entire data column and then paste over it using the Paste Values option so that the data is hard coded. Then, if you do any sorting, the data will not change. You can find the Paste Values option on the Home tab in the Paste drop-down menu:
There are other ways to paste values, including the right-click menu or using keyboard shortcuts. These posts explain those options:
Paste Values with the Right-click & Drag Mouse Shortcut
5 Keyboard Shortcuts to Paste Values in Excel
2. Filling Down Using Power Query
For this option, your data should be in Excel Table format. From anywhere inside the table, you can select the Data or Power Query tab, and then select From Table/Range. You can also create a query that connects to a different data source like a database or the web.
This opens up the Power Query Editor. In Power Query, the blank cells are labeled as null in each cell.
To fill down, just right-click on the column header and select Fill and then Down.
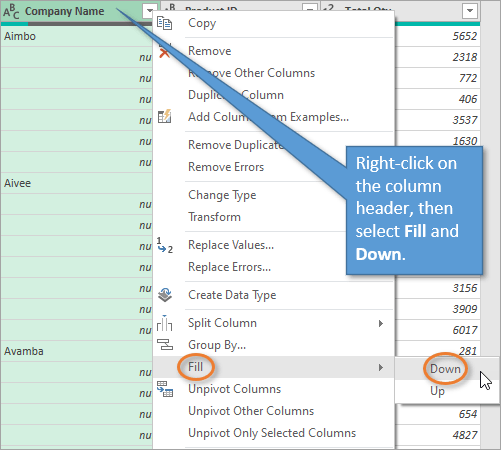
Power Query will fill down each section of blank cells in the column with the value from the cell above it.

When you click on Close & Load, a new sheet will be added to the workbook with these changes.
This process of filling down can be done for multiple columns simultaneously by first selecting multiple columns with Ctrl or Shift, then performing the Fill > Down operation.
If Power Query is somewhat new to you, I invite you to check out this post: Power Query Overview: An Introduction to Excel’s Most Powerful Data Tool.
Free Webinar on Power Query, VBA, & More
I also have a free webinar running right now that covers an introduction to Power Query and the other Excel tools like Power Pivot, Power BI, Macros & VBA, pivot tables, and more.

Click here to register for the webinar
3. Filling Down Using a Macro
To fill down using a macro, start by opening the VB Editor. You can do this by going to the Developer tab and clicking on the Visual Basic button or by using the keyboard shortcut Alt+F11. Insert a new code module, and then write your macro.
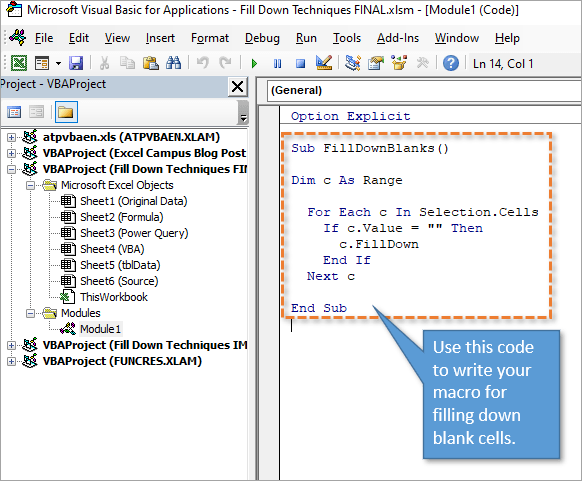
This macro loops through all of the cells in the selected range and performs the FillDown method if the cell is blank. The FillDown method copies the value from the cell above.
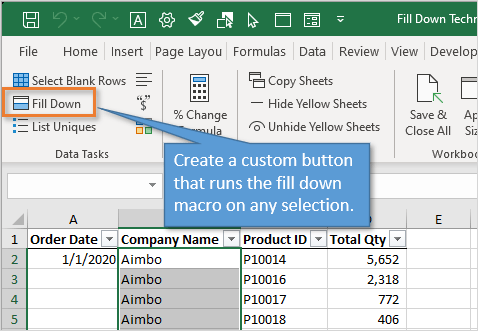
If this is a macro that you could use frequently, you might want to consider adding this macro to your personal Macro Workbook and creating a customized button for it. That’s what I’ve done and it looks like this on my Ribbon.
For instruction on how to create a Personal Macro Workbook and custom Ribbon buttons, check out this tutorial: How to Create a Personal Macro Workbook (Video Series).
Pros and Cons
So which of these three methods are right for you? Consider these things:
- The formula method is simple and easy to implement. It can be done without any knowledge of Power Query or VBA. However, it’s not as quick as a one-click button solution.
- Power Query requires source data that outputs into a separate worksheet, so it’s more of a process than simply filling down blank cells. If you are already data cleansing on a regular basis for other things, adding this to your existing process might make more sense.
- Once the initial macro is set up, VBA is a quick solution that’s easy to use—just click a button. However, there is a big disadvantage of this method. You aren’t able to undo your action once that button has been pushed, so you would have to be sure to save a backup copy beforehand if that is a concern for you.
Conclusion
There are three different methods for a very common Excel task. Did I miss any? Please leave a comment below if you have another way to go about it, or have any questions. Thanks! 🙂
Is it possible to select all the bank cells in an excel sheet and put the same value in all the cells?
I just want to populate them with «null»
I have Excel student 2010
asked Dec 22, 2011 at 8:33
![]()
4
To put the same text in a certain number of cells do the following:
- Highlight the cells you want to put text into
- Type into the cell you’re currently in the data you want to be repeated
- Hold Crtl and press ‘return’
You will find that all the highlighted cells now have the same data in them.
Have a nice day.
![]()
Sirko
71.8k19 gold badges147 silver badges181 bronze badges
answered May 3, 2013 at 14:50
![]()
PhoenixPhoenix
4,30410 gold badges39 silver badges53 bronze badges
2
OK, what you can try is
Cntrl+H (Find and Replace), leave Find What blank and change Replace With to NULL.
That should replace all blank cells in the USED range with NULL
answered Dec 22, 2011 at 11:12
![]()
Adriaan StanderAdriaan Stander
161k30 gold badges285 silver badges283 bronze badges
Here’s a tricky way to do this — select the cells that you want to replace and in Excel 2010 select F5 to bring up the «goto» box. Hit the «special» button. Select «blanks» — this should select all the cells that are blank. Enter NULL or whatever you want in the formula box and hit ctrl + enter to apply to all selected cells. Easy!
![]()
answered Jul 19, 2012 at 17:28
![]()
RobinRobin
1111 silver badge2 bronze badges
2
If all the cells are under one column, you could just filter the column and then select «(blank)» and then insert any value into the cells. But be careful, press «alt + 4» to make sure you are inserting value into the visible cells only.
answered Sep 30, 2014 at 15:26
![]()
user2722393user2722393
291 gold badge2 silver badges6 bronze badges
I don’t believe search and replace will do it for you (doesn’t work for me in Excel 2010 Home). Are you sure you want to put «null» in EVERY cell in the sheet? That is millions of cells, in which case there is no way a search and replace would be able to handle it memory-wise (correct me if I am wrong).
In the case I am right and you don’t want millions of «null» cells, then here is a macro. It asks you to select the range then put «null» inside every cell that was blank.
Sub FillWithNull()

Dim cell As range
Dim myRange As range

Set myRange = Application.InputBox("Select the range", Type:=8)
Application.ScreenUpdating = False

For Each cell In myRange
    If Len(cell) = 0 Then
        cell.Value = "Null"
    End If
Next

Application.ScreenUpdating = True

End Sub
answered Dec 22, 2011 at 10:33
![]()
GaijinhunterGaijinhunter
14.5k4 gold badges50 silver badges57 bronze badges
1
If you want to do this in VBA, then this is a shorter method:
Sub FillBlanksWithNull()

'This macro will fill all "blank" cells with the text "Null"

'When no range is selected, it starts at A1 until the last used row/column

'When a range is selected prior, only the blank cell in the range will be used.

On Error GoTo ErrHandler:

Selection.SpecialCells(xlCellTypeBlanks).FormulaR1C1 = "Null"

Exit Sub

ErrHandler:

MsgBox "No blank cells found", vbDefaultButton1, Error

Resume Next

End Sub
Regards,
Robert Ilbrink
![]()
brettdj
54.6k16 gold badges113 silver badges176 bronze badges
answered Dec 22, 2011 at 14:27
![]()
Robert IlbrinkRobert Ilbrink
7,6982 gold badges22 silver badges31 bronze badges
3
Sometimes, you may have a dataset where there are empty/blank cells in a dataset that should have been filled with the same value.
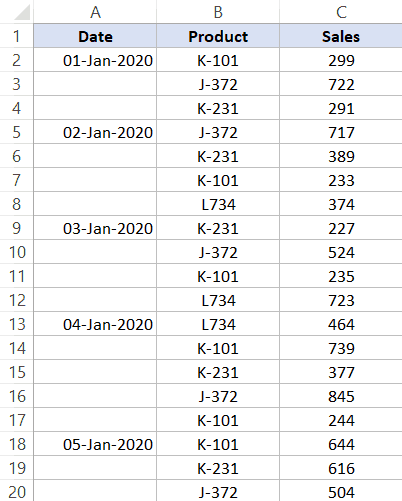
Below is a common example where the date is only mentioned one time and all the remaining records for that same date have the date cells blank.
While this type of data may look cleaner (especially when printed), it’s not great when you try to use this for calculations or create a Pivot Table using it.
In many cases, you would need to fill these blank cells with the value in the above cell.
In this Excel tutorial, I will show you three really easy ways to fill the blank cells with the value above in Excel.
- Using Go To Special with a formula
- Using Find and Replace with a formula
- Using VBA
The tricky part of this entire process is actually selecting the blank cells. Once you have the blank cells selected, there are multiple ways to copy cell values from above.
So let’s get started!
Fill Cells with Value Above Using ‘Go To Special’ + Formula
The first step in filling blank cells from the value above is to select these blank cells. And this can easily be done using the ‘Go To Special’ option in Excel.
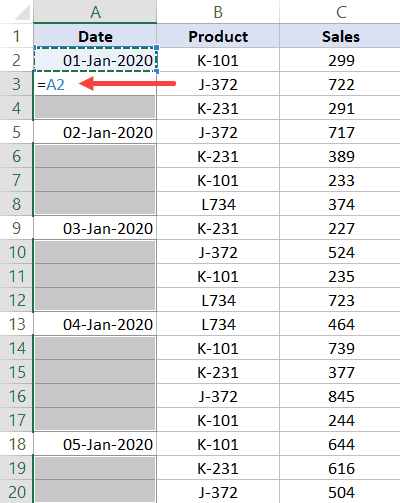
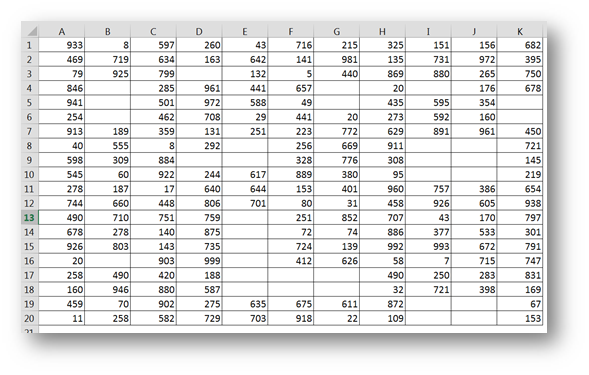
Suppose you have a dataset as shown below and you want to fill all the blank cells in column A with the date from the cell above.
Below are the steps to select all these blank cells at one go:
- Select the dataset in which you have these blank/empty cells
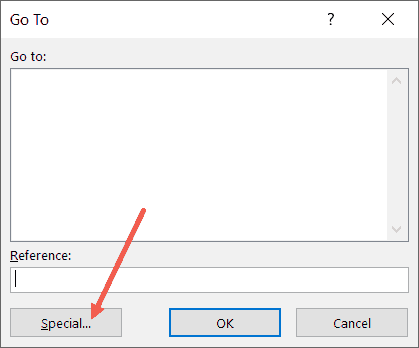
- Hit the F5 key on your keyboard (use ⌃ + G if you’re using a Mac). This will open the ‘Go To’ dialog box
- Click on the Special button.

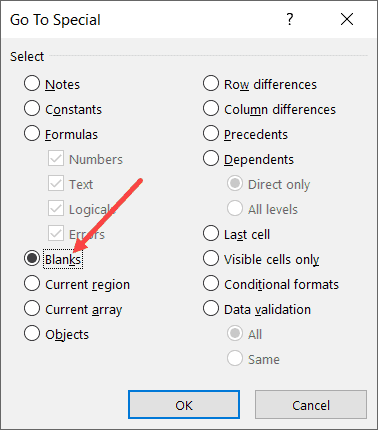
- In the ‘Go To Special’ dialog box, select the ‘Blanks’ option

- Click OK.
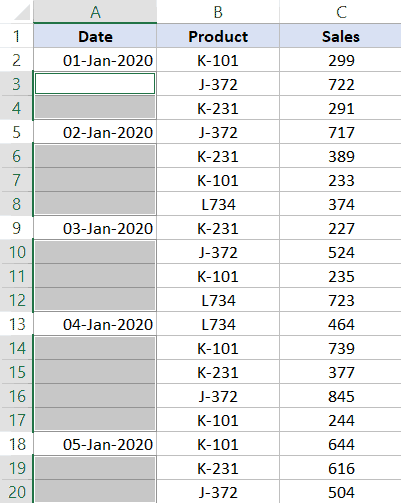
The above steps would select all the blank cells in this dataset.
Now that you have all the blank cells selected, the next step is to fill all these blank cells from the value above.
Follow the following steps to use a formula to copy the value from the cell above:
- Enter = (equal to sign). by default, this will enter the equal to sign in the active cell only
- Press the up-arrow key. This will select the cell right above the active cell

- Hold the Control key and press the enter key (Command + Enter if you’re using a Mac)
That’s it!
The above steps would apply the same formula (which is simply to refer to the cell above) to all the selected blank cells.
Once you have all these blank cells filled, remember to convert the formulas to values.
Note that for this method to work, the cells need to be completely empty. In case there are space characters, the ‘Go-To’ feature will not consider these as blank cells and these wouldn’t be selected.
Fill Cells with Value Above Using ‘Find and Replace’ + Formula
The above (Go To Special) method works well when you only have the blank cells that you want to fill-down.
But what if you get a dataset where the cells are not really blank (but may have a dash in it or some text such as NA).
In such a case, you can also use the Find and Replace method.
This method works similar to Go To Special, but with an added advantage of being able to select cells based on the value.
With this method, you can select blank cells or you can select cells that have any specific text/value in it.
Let me show you how this would work taking an example of blank cells only.
Suppose you have a dataset as shown below and you want to fill all the blank cells in column A with the date from the cell above.
Below are the steps to select all the blank cells using Find and Replace:
- Select the dataset in which you have these blank/empty cells
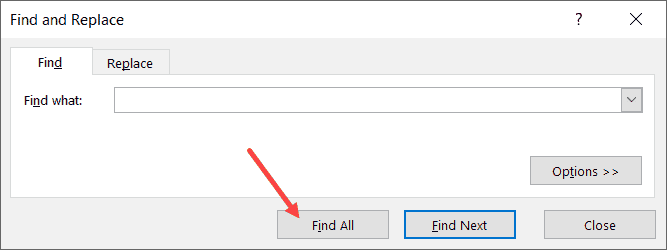
- Hold the Control key and press the F key (or Command + F if you’re using Mac)
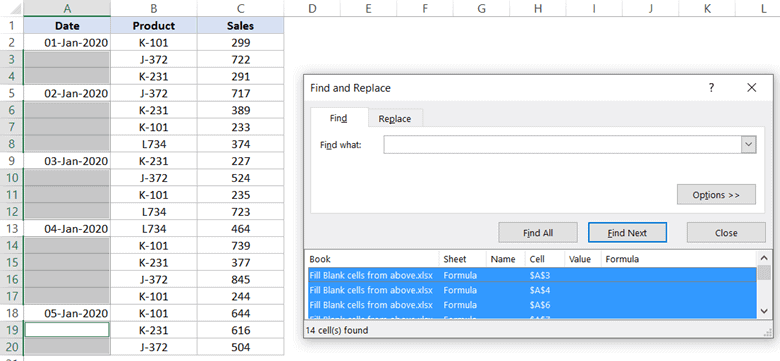
- In the Find and Replace dialog box that opens up, click on the ‘Find All’ button. This will find all the cells that are blank and you will also see a list of these cells addresses.

- Hold the Control key and press the A key (or Command + A if you’re using Mac). This will select all these blank cells

- Close the Find and Replace dialog box.
By the end of these steps, you will have all the empty cells selected.
Now, you can use the formula to get the value from the above cell and fill in the blank cells in Excel.
Follow the following steps to use a formula to copy the value from the cell above:
- Enter = (equal to sign). by default, this will enter the equal to sign in the active cell only
- Press the up-arrow key. This will select the cell right above the active cell
- Hold the Control key and press the enter key (Command + Enter if you’re using a Mac)
One of the benefits of using Find and Replace it works when you have blank cells that you want to fill, and you can also use it to find and select cells that have specific values.
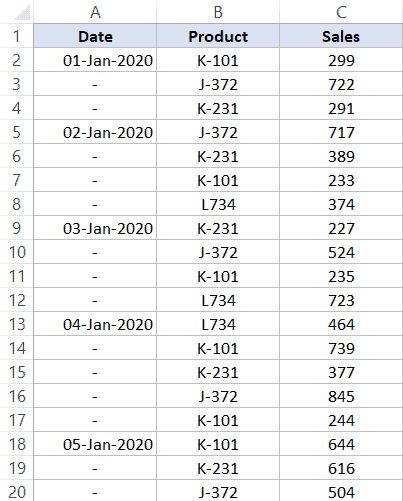
For example, suppose you have a dataset as shown below where instead of the blank cells, we have dashes instead.
To do this, follow the below steps:
- Select the dataset
- Hold the Control key and press the F key (or Command + F if you’re using Mac)
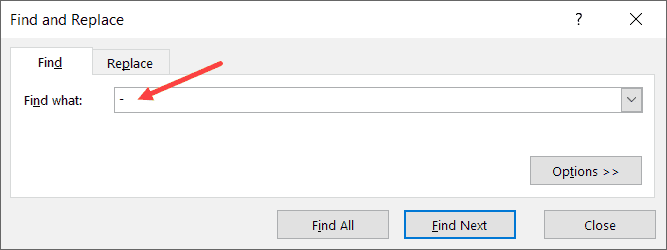
- In the Find and Replace dialog box that opens up, enter – (dash) in the ‘Find what’ field.
- Click on the Find All button. This will find all the cells that have the dash symbol and you will also see a list of these cells’ addresses.
- Hold the Control key and press the A key (or Command + A if you’re using Mac). This will select all these cells
- Close the Find and Replace dialog box.
Once you have these cells selected, you can use the formula steps shown above to fill values from cells above (or even full cell values from below/right/left).
Fill Cells with Value Above Using VBA
While these two above methods work perfectly fine, in case you have to do this quite often, you can also use a simple VBA code to get this done.
And if you want to be super-efficient and get this done with a single click, you can add the VBA macro to the Quick Access Toolbar (QAT) and simply click on it to fill the blank cells in the selection with the cell value from the above cell.
Below is the VBA code that will get this done:
Sub FillCellFromAbove()
For Each cell In Selection
    If cell.Value = "" Then
        cell.Value = cell.Offset(-1, 0).Value
    End If
Next cell
End Sub
To use this code, first, select the dataset where you want to copy the value from the above cell, and then run this code.
The above code uses the FOR EACH loop where it goes through each and every cell in the selection. As soon as it finds a cell that’s empty (checked using the IF statement), it copies the value from the cell above (done using OFFSET).
In this specific example, you may notice that
Note: In case you want to save a workbook that has the macro code, you need to save it in the .XLSM (macro enabled) format.
The best thing about using this VBA code is that it doesn’t require you to convert the formulas into values. With this method, you get static values only. This makes it a really efficient method (of all the three covered in this tutorial).
There are however two things you need to know when using VBA to get fill the blank cells with a value from the above cell:
- You can’t undo this once you have run the macro code. So make sure you create a backup copy before you run the VBA code
- If you have a huge dataset (thousands of rows with multiple columns), this is likely to slow down your system. Since the VBA code above goes through and analyzes each cell, it takes more time than the remaining two methods. When using with a few hundred (or even a few thousand data points), you’ll likely not notice any difference in speed.
To use this VBA macro code, you need to put it into a regular module.
So these are three ways you can use to fill the blank cells with data from the cell above it.
Hope you found this tutorial useful!
You may also like the following Excel tutorials:
- How to Compare Two Columns in Excel (using VLOOKUP & IF)
- How To Set Column Width in Inches (or Centimeters) in Excel?
- How to Find Merged Cells in Excel (2 Simple Ways)
- How to Make all Cells the Same Size in Excel (AutoFit Rows/Columns)
- How to Autofill Dates in Excel (Autofill Months/Years)
- How to Press Enter in Excel and Stay in the Same Cell?
- How to Highlight Blank Cells in Excel? 3 Easy Methods!
- Fill Blank Cells with Dash (-) in Excel (3 Easy Ways)
- How to Fill Blank Cells with 0 in Excel (3 Easy Ways)
How to fill blank cells in Excel with a desired value? In this tutorial we’ll be selecting all the blank cells and fill them in.
Part one will be selecting all the blank cells in a range or rather reducing a selection or a range to blank cells within that range. Part two will be how to enter a value or a formula(!) into multiple cells in Excel simultaneously.
Here’s our example in Excel
Let’s say we want to write a value of 0 (zero) into all the empty Cells. Now for those of you thinking this would be far easier by using the Ctrl+H (Find and Replace) I have only this to say. The method described here is much cooler and also, there are cases where Ctrl+H does not work, but this does 🙂
Ok so let’s get to it.
Reducing a Selection to blank cells only
Our final goal is to put a value into all blank cells, but to do this we must first select only those cells. This can be easily accomplished by selecting an entire range of data by using a Ctrl+A shortcut in Excel.

This is followed by either F5 or Ctrl+G or a Home/Find & Select/Go ToSpecial… command
Whereas the first two keyboard shortcuts (F5 or Ctrl+G) will take to the GoTo window where you have to select Special…
The Home/Find & Select/Go ToSpecial… will take you to the desired command directly.
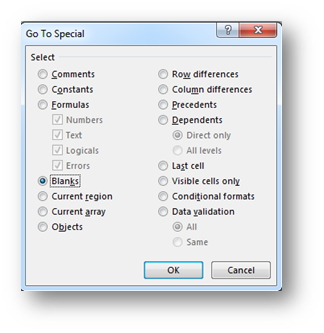
Now this is one of the best commands in Excel. In our case we will use the Blanks option. But take a look at some other options available in this window and let your imagination go wild!
Ok so we select Blanks and we get
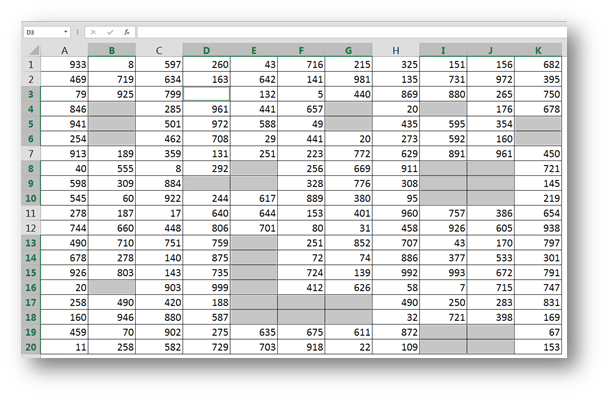
So our selection was reduced only to cells that are blank. This leads us to part two…
Enter a value or a formula into multiple cells in Excel simultaneously
There is only one trick here and that is the following key combination Ctrl+Enter. So without clicking (!!! If you click anywhere the whole selection is lost and you are back to square one), you type a value you would like to put in all of the selected cells and press Ctrl+Enter. And that value now resides in all selected cells.

This brings us ever so close to eternal happiness in Excel 🙂
Learn more
Check out our YouTube channel and subscribe for more amazing Excel tricks!
Follow us on LinkedIn.
Check out our brand new R Academy!